manuals.online logo
Brands
  1. Home
  2. •
  3. Brands
  4. •
  5. JVC
  6. •
  7. Headset
  8. •
  9. JVC HA-W700BT-G User manual

JVC HA-W700BT-G User manual

Information for Users on Disposal of Old Equipment and
Batteries
[European Union only]
These symbols indicate that equipment with these symbols should
not be disposed of as general household waste. If you want to
dispose of the product or battery, please consider the collection
systems or facilities for appropriate recycling.
This product’s performance would be degraded under a strong electro-static
environment. And the function would be self-recoverable after the above case.
This product’s performance would be degraded since the disturbance from the mains
cord. And the function would be self-recoverable after the above case.
Dear Customer,
This apparatus is in conformance with the valid European directives and
standards regarding electromagnetic compatibility and electrical safety.
European representative of Victor Company of Japan, Limited is:
JVC Technology Centre Europe GmbH
Company name changed in:
JVC Technical Services Europe GmbH
Postfach 10 05 52
61145 Friedberg
Germany
Thank you for purchasing this JVC product.
Before you begin operating this unit, please read the operating instructions carefully to be sure
you get the best possible performance.
If you have any questions, consult your JVC dealer.
Declaration of Conformity with regard to the R&TTE Directive 1999/5/EC
0678
Hereby, JVC, declares that this HA-W700BT is in compliance with the essential
requirements and other relevant provisions of Directive 1999/5/EC.
1. To reduce the risk of electrical shocks, fire, etc.:
●Do not remove screws, cover or cabinet.
●Do not expose this appliance to rain or moisture.
2. For your safety…
●
Never use the unit when driving a car, motorcycle, or bicycle. This could result in an accident.
●Pay special attention to traffic around you when using the headphones outside. Failure to do
so could result in an accident.
●Be careful not to turn up the sound volume too high. Your hearing can be damaged from
listening to sounds at excessive volume for long periods.
●Do not disassemble or modify the unit.
●Do not allow flammable, water or metallic objects to enter the unit.
●If you find skin problems where the headphones are in contact with the skin, stop using the
headphones; otherwise, it may cause inflammation or irritation to the skin.
●In dry air such as in winter, you may feel a static shock when using the headphones.
3. Avoid using the headphones…
●in places subject to excessive humidity or dust
●
in places subject to extremely high (over 40°C or 104°F) or low (under 0°C or 32°F) temperatures
4. DO NOT leave the unit…
●exposed to direct sunlight
●near a heater
5. To protect the unit, DO NOT…
●allow them to get wet
●shake them or drop them against hard objects
6. For using the headphones…
●Attach the ear pieces firmly when replacing them; otherwise, the ear pieces may be left in your
ears when taking the headphones off. If the ear piece is left in your ear, be careful not to push it
deep into the ear canal.
o
Be careful not to apply the power that exceeds the headphones’ input capacity. This may result in
sound distortion and could damage the oscillation board.
o
Grasp and pull the plug itself to disconnect the headphones. Do not pull on the cord.
o
When the ear pieces get dirty, detach the ear pieces and wash them in water-diluted detergent.
After washing, dry the ear pieces and attach to the headphones.
o
Replace the ear pieces when: they lose its elasticity; they are stained badly; they are broken or
deformed.
o
The ear pieces will deteriorate with age even in normal use and maintenance.
o
Store the ear pieces in a place where children cannot reach to avoid the risk of the accident such
as swallowing them.
●When using canal type headphones, you may hear the sound of cord rubbing together or the
sound of vibrations which travels through your body when walking.
7. For safe use of battery…
●Use only the supplied charging unit to charge the battery.
●Be sure to use the supplied AC adaptor.
●There are no serviceable parts inside. Consult your dealer to replace the built-in battery.
●When discarding batteries, environmental problems must be considered and the local rules
or laws governing the disposal of these batteries must be followed strictly.
Features
This unit is a wireless stereo headset using Bluetooth® wireless technology.
As Bluetooth Stereo Headset As Bluetooth Receiver
About Bluetooth
Bluetooth is a short-range wireless radio communication technology for the mobile device such as
cellular phones, portable PCs, and other devices. The Bluetooth devices can be connected without
cables and communicate each other.
About Bluetooth Profile
Bluetooth Profile designates the way of communication between Bluetooth devices. The system
supports the following Bluetooth Profiles.
A2DP: Advanced Audio Distribution Profile
The profile controls sending/receiving the high-quality audio contents.
AVRCP: Audio/Video Remote Control Profile
The profile controls the functions of audio/video devices such as playing, stopping, pausing and
volume control.
HSP: Headset Profile
The profile controlling the cell phone, and controlling the connection between the devices.
HFP: Hands-Free Profile
The profile controls the hands-free call with cell phone.
Parts name
1
8
2
345 6
7
9p
q
1(CALL) button
Controls the cellular phone calling through this unit.
2Strap hole
3Control switch (6button, +/– buttons)
• 6button: Controls the music player connected with this unit.
• +/– buttons: Adjusts the volume level. When you press + or – button with
the highest or lowest volume level, beep sound is heard.
4Red lamp
Indicates the battery status of this unit.
5Blue lamp
Indicates the communication status between this unit and Bluetooth device.
6Microphone
Picks up your voice when calling through this unit.
7Stereo mini jack
8Headphones
9Battery charge terminal
pClip
qPOWER switch
Slides to turn on or off this unit.
Battery charge
terminal
• Checking the battery charge
Press the 6button while holding the CALL button. (Press the 6button within two seconds
after pressing CALL button.) The red lamp lights or flashes to show the battery remains.
• The red lamp starts slow flashing automatically when the battery become nearly empty.
Battery charging
Charge the built-in lithium-ion rechargeable battery first to use this unit.
1 Connect the AC adaptor to the charging unit.
• Do not use any AC adaptor other than the supplied one.
2 Connect the AC adaptor to the AC outlet.
3 Put the unit on the charging stand.
The red lamp lights up when the charging starts.
The blue lamp will light up when the charging is finished (the red lamp will turn off).
• When the unit is turned off, it takes five hours to charge the battery to full when it is empty.
• Disconnect the AC adaptor from the AC outlet when you do not use the charging unit for a
extended period of time.
• Do not pull the cord when disconnecting the AC adaptor.
• Do not handle the power cord with wet hands!
• Do not bend the power cord sharply. Red lamp Battery level
●Full
●-●-●-●-●-●-●Halfway
●-●------------●-●Low
●---------------●Need to charge
About pairing
Pairing creates a unique and encrypted link between two Bluetooth devices and lets them
communicate with each other. Bluetooth devices will not work if the devices have not been paired.
Cautions on Bluetooth communication
• Microwaves emitted from Bluetooth devices may affect the operation of electronic medical
devices. Turn off this unit and other Bluetooth devices in hospitals, airplanes, trains, or crowding
places.
• Bluetooth devices use 2.4 GHz band, which is the same as that used by wireless LAN devices and
microwave oven. Interference may occur near these devices and cause noise, disconnectivity, or
a decrease of communication speed.
• Connection with all Bluetooth devices cannot be guaranteed. Connectivity, operation, display
indication or function may differ depending on the characteristics and specification of the
devices.
• Some Bluetooth devices take more time to establish connection.
• To use the Bluetooth functions, the Bluetooth devices are required to be compatible with the
same Bluetooth profiles as this unit is. However, the functions may not be available depending
on the specifications of the Bluetooth device even when it is compatible with the same profiles.
Music Call
Control Control
iPod with Bluetooth
Transmitter (AA-T100BT)
Bluetooth cell
phone
Bluetooth audio source
Music
Bluetooth cell phone
with music player
Music & Call
Control
AC adaptor Optional (not supplied)
Bluetooth Transmitter
(AA-T100BT)
Connection cord
(supplied) 0.7 m (2.3 ft)
Audio in
Products
Battery
INSTRUCTIONS
BLUETOOTH STEREO HEADSET
HA-W700BT -G
© 2007 Victor Company of Japan, Limited
Printed in China
LNT0095-001B
CAUTION
HA-W700BT_G4.indd 1HA-W700BT_G4.indd 1 07.11.30 1:36:17 PM07.11.30 1:36:17 PM
You can register up to 8 Bluetooth devices to the unit.
• The device that has the oldest connection date will be overwritten when you register a 9th Bluetooth device.
Before pairing...
• Make sure that the unit is turned off.
• Turn on the target Bluetooth device and place it within 1 m from the unit.
1 Turn on the unit with pressing and holding the CALL button to make it in the pairing mode.
The blue lamp and the red lamp will start flashing continuously as the unit finds the target Bluetooth device (pairing mode). Release
the CALL button after the flashing starts.
• Finish the steps below within about 3 minutes after the flashing starts (the pairing mode is automatically cancelled after the
period). Turn off the unit and start from step 1 again when you cannot finish the operation.
2 Execute pairing operation on the target Bluetooth device to find the unit.
The device shows the list of Bluetooth devices found. The unit is recognized as “JVC HA-W700BT”. Repeat from Step 1 again when
“JVC HA-W700BT” is not found.
• Refer also to the instruction manual supplied for the target device.
3 Select “JVC HA-W700BT” on the target Bluetooth device.
4 Enter “0000” when the Pass code* is requested on the target Bluetooth device.
Pairing is finished when the red lamp goes out and the blue lamp flashes three times repeatedly.
* also called as “pass key”, “PIN code”, “PIN number”, etc.
5 Execute Bluetooth connection to the unit on the target Bluetooth device.
The unit saves the target as the last connected Bluetooth device.
• Refer also to the instruction manual supplied for the target device.
• Some Bluetooth device will automatically connect with the unit after pairing is finished.
• When the connection is completed, the blue lamp flashes repeatedly.
To pair with devices which cannot show the Bluetooth device list...
On some Bluetooth devices, pairing may automatically be established by making both the unit and the target device in the pairing
mode. Refer also to the instruction manual supplied for the target device to make it in the pairing mode.
Registering a Bluetooth device – Pairing
Listening to Music
Preparation:
• Make sure that the Bluetooth device can transmit music through the Bluetooth connection (compatible with the A2DP profile of
Bluetooth)
• Finish pairing between the unit and the Bluetooth device.
• Turn on the Bluetooth device.
1 Turn on the unit.
2 Execute the Bluetooth (A2DP) connection on the Bluetooth device.
• When the connection is completed, the blue lamp flashes repeatedly.
• Refer also to the instruction manual supplied for the target device.
• If the connection is not completed within five minutes, the unit automatically turns off. In this case, turn the POWER switch to
OFF and turn it back to ON, and then repeat the procedure from step 1.
3 Start playback on the Bluetooth device.
• Refer also to the instruction manual supplied for the target device.
• Set the connected Bluetooth device so that the device emits the sound through the Bluetooth stereo headphones.
4 Adjust the volume by tilting the control switch up or down.
Basic controls available for the device:
Button Press Press and hold
6Play/pause Stop*
¢Skip (to the next)*Search (to forward)*
4Skip (to the previous)*Search (to backward)*
* Not available for some devices.
• You can perform some of the Bluetooth device operations with the control switch of the unit if the device is compatible with
the AVRCP profile. The operations you can do may vary depending on the device you use. Refer also to the instruction manual
supplied for the target device to see the available operations.
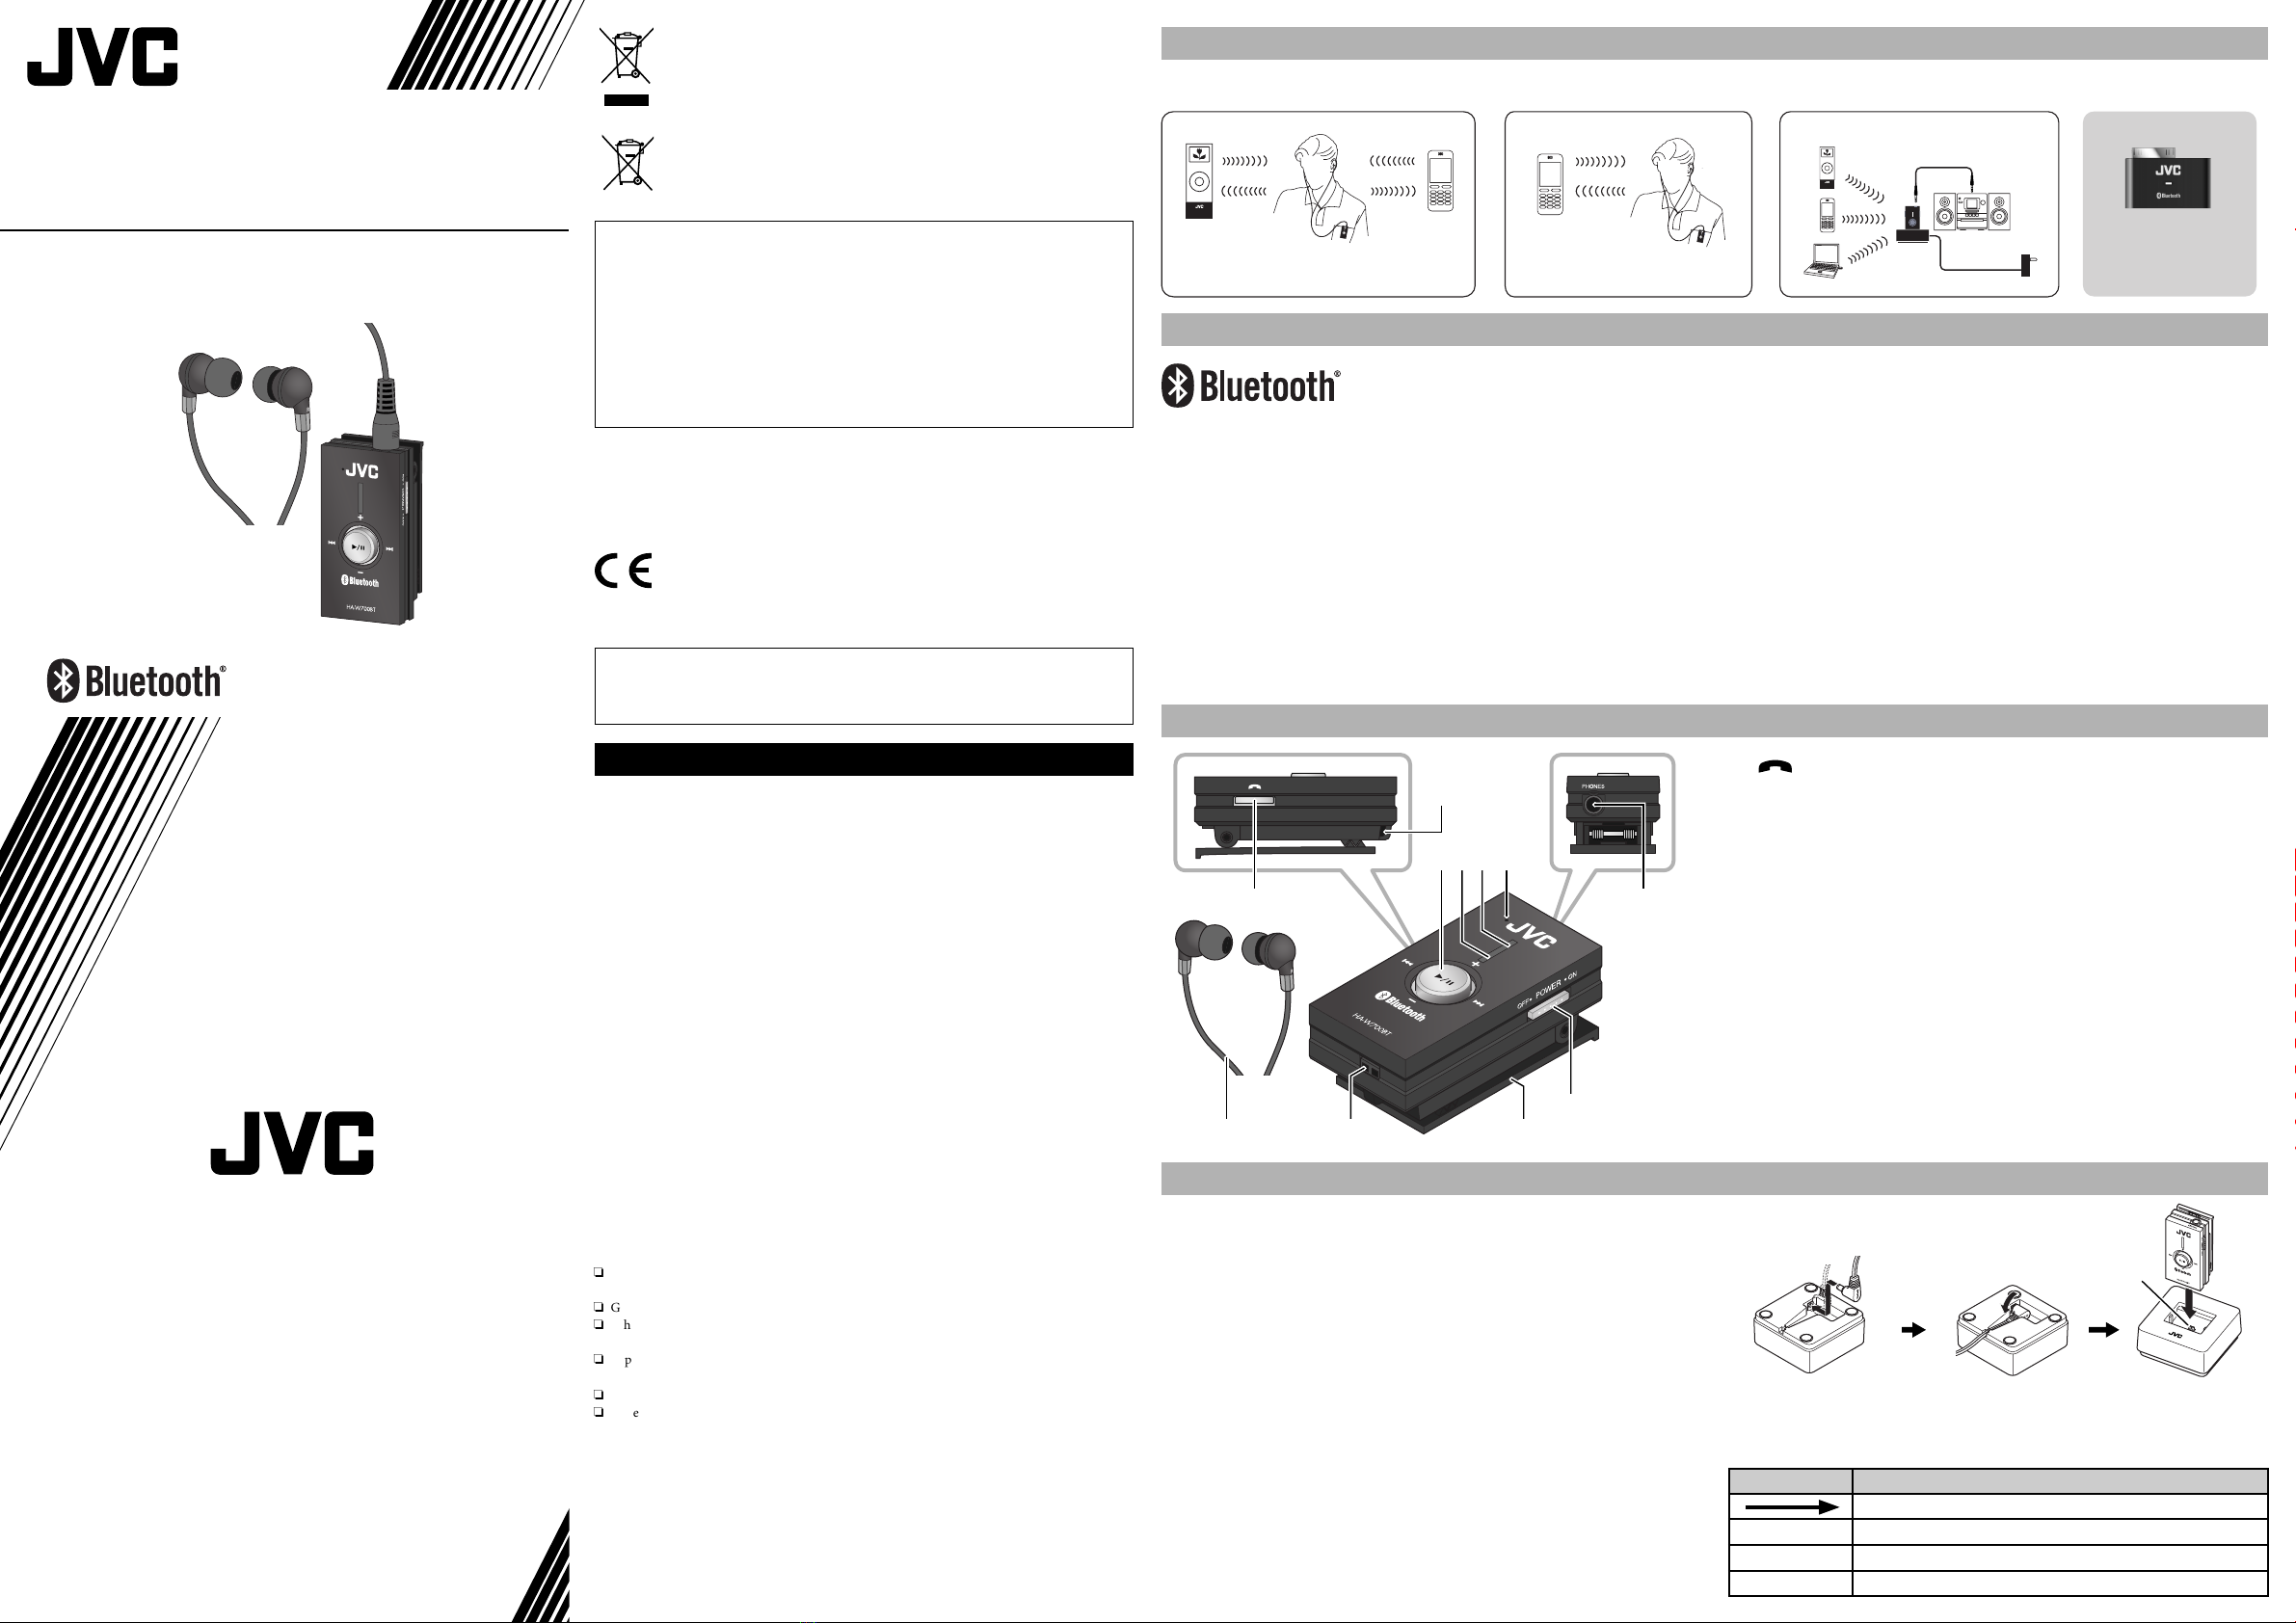
When using the unit as a Bluetooth receiver
The unit can be used as a Bluetooth receiver. Connect the PHONES terminal on the unit to the external input terminal (ϕ3.5 mm
stereo mini jack) on the audio equipment using the supplied connection cord.
• When connecting to an RCA pin plug, use a cord separately purchased.
• Before connection, turn off the unit and the audio equipment.
• Set the volume of the audio equipment to minimum before executing pairing or making connection between the unit and the
audio equipment.
To stop using the unit
Disconnect the Bluetooth connection on the Bluetooth device and turn off the unit.
For the better sound and comfort fit of the headphones
The medium-size ear pieces are attached to the supplied headphones when purchased.
You may not enjoy the bass sound fully if the ear pieces are not fit to your ears. To enjoy better sound while reducing sound
leakage and getting full noise canceling effect, choose the ear pieces from the supplied three sizes (Small, Medium, or Large) and
adjust their positions to fit them to your ears.
Calling through the unit
Preparation:
• Activate the Bluetooth communication function on your cellular phone.
• Finish pairing between the unit and your cellular phone.
1 Turn on the unit.
2 Execute the Bluetooth connection on the cellular phone.
• Refer also to the instruction manual supplied for the cellular phone.
• If the connection is not completed within five minutes, the unit automatically turns off. In this case, turn the POWER switch to
OFF and turn it back to ON, and then repeat the procedure from step 1.
• When using a cellular phone supports both HFP and HSP Bluetooth Profile, use HFP for this unit.
• When the connection is completed, the blue lamp flashes repeatedly.
Basic controls available for the cellular phone connected with HFP:
Status CALL button
Press Press and hold
Waiting Start voice dialing Redial
Dialing by voice dialing Cancel voice dialing —
Calling Cancel calling —
Incoming Answer the call Reject the call
Answering Finish the call Switch the device (between cellular phone and the unit)
Basic controls available for the cellular phone connected with HSP:
Status CALL button
Press Press and hold
Waiting — Redial
Calling Cancel calling Cancel calling or switch to the unit
Incoming Answer the call Reject the call
Answering Finish the call Switch the device (between cellular phone and the unit)
• These functions may not available for some cellular phones.
• When answering a call on cellular phone, these functions may not work.
To make a call while playing back music
When connecting the cellular phone by using HFP or HSP Bluetooth Profile, you can make a call by using the cellular phone.
To answer a call while playing back music
When a call comes in, the playback sound turns to ring tone. Press the CALL button to answer the call.
To finish the call
Press the CALL button. The playback sound comes back. (The playback sound may not come back in some cellular phone.)
LED flashing patterns
Status LED Flashing pattern
Pairing Blue ●-●-●-●-●-●-●-●-●-●-●-●-●-
Red ●-●-●-●-●-●-●-●-●-●-●-●-●-
Waiting connection Blue ●-●-●--------------●-●-●----------
Red ------------------------------------------
Communicating Blue ●---------------------●-----------------
Red ------------------------------------------
Troubleshooting
What appears to be trouble is not always serious. Check the following points before consult your JVC dealer.
Cannot pair the devices.
☞You cannot pair the Bluetooth device having receiving function only.
☞Bring the devices as closer as possible.
Cannot connect the devices.
☞Pairing is incomplete. Perform the pairing again.
☞Check that the Bluetooth communication function is activated in the Bluetooth device.
When you press the CALL button, the unit will search for the last connected Bluetooth device.
The sound is intermittent/The communication range is small.
☞Although Bluetooth®wireless technology can transmit the contents within the range of approx. 10 m, obstacles (human bodies,
metallic objects, wall, etc.) or radiowave condition may affect the sound and decrease its range.
☞The sound may be intermittent in the following cases. Avoid the following conditions when you use this unit.
– Places where the wireless local area network is applied.
– Near the microwave oven.
– Near the other Bluetooth devices.
– Places where the radiowave is used.
No sound.
☞The connection between the Bluetooth device and this unit is incomplete. Connect the devices again.
☞The setting of the Bluetooth device is incorrect. Set the connected Bluetooth device so that the device emits the sound through the
Bluetooth stereo headphones.
Battery disposal
When disposing the unit, take off the built-in lithium-ion rechargeable battery and dispose appropriately for environmental
protection.
1. Take off the screws with the Phillips-head screwdriver.
2. Open the case and use scissors to cut the cords one by one to take off the battery.
• Do not take off the battery from its case when you dispose of the battery.
• Do not cut two cords at the same time since it may cause a short-circuit.
Battery
Specifications
General
Bluetooth version: Bluetooth 2.0 certified
Output power: Bluetooth power class 2
Service area: max. 10 m (10.9 yd.)*
* Communication range may vary depending on the environmental conditions.
Frequency band: 2.4 GHz (2.4000 GHz – 2.4835 GHz)
Bluetooth profile:
A2DP (Advanced Audio Distribution Profile), AVRCP (Audio/Video Remote Control Profile), HFP (Hands-free Profile), HSP
(Headset Profile)
Supported Codec: SBC (Subband Codec)
Power supply: Built-in lithium-ion rechargeable battery (DC 3.7 V)
Battery life*: Music play time: up to 11 hours
Standby time: up to 100 hours
* Depends on use.
Mass: 35 g (1.23 oz.) (including headphones)
Headphones (J48139-001)
Frequency response: 10 Hz – 23,000 Hz
Sensitivity: 103 dB/1 mW
Accessories
AC adaptor x 1 (S004CV0500050), Ear pieces 3 pairs (Small, Medium, Large), Charging unit (J48140-001) x 1,
Connection cord (0.7 m (2.3 ft.) stereo mini plug - stereo mini plug)
Designs and specifications are subject to change without notice.
●iPod is a trademark of Apple Inc., registered in the U.S. and other countries.
●The Bluetooth® word mark and logos are registered trademarks owned by Bluetooth SIG, Inc. and any use of such marks by Victor
Company of Japan, Limited (JVC) is under license. Other trademarks and trade names are those of their respective owners.
HA-W700BT_G4.indd 2HA-W700BT_G4.indd 2 07.10.12 4:03:49 PM07.10.12 4:03:49 PM

Other JVC Headset manuals

JVC GG-01WB User guide

JVC

JVC GG-01WB User guide

JVC GG-01 User manual

JVC

JVC GG-01 User manual

JVC HA-W700BT-C User manual

JVC

JVC HA-W700BT-C User manual

JVC GG-01W User guide

JVC

JVC GG-01W User guide

JVC HA-C300 User guide

JVC

JVC HA-C300 User guide

JVC KS-HP1K User manual

JVC

JVC KS-HP1K User manual

Popular Headset manuals by other brands

Motorola Motostart H700 Start

Motorola

Motorola Motostart H700 Start

Jabra BT500 - Headset - Over-the-ear user manual

Jabra

Jabra BT500 - Headset - Over-the-ear user manual

Jabra EVOLVE 75 quick start guide

Jabra

Jabra EVOLVE 75 quick start guide

Sennheiser MB 40 datasheet

Sennheiser

Sennheiser MB 40 datasheet

Lioncast LX80 Wireless user manual

Lioncast

Lioncast LX80 Wireless user manual

GoerTek GBH808 user manual

GoerTek

GoerTek GBH808 user manual

Xact XG2500 instruction manual

Xact

Xact XG2500 instruction manual

Eastern Times Technology RAPOO H3070 quick start guide

Eastern Times Technology

Eastern Times Technology RAPOO H3070 quick start guide

MSI FREE TALK FT100 user guide

MSI

MSI FREE TALK FT100 user guide

Razer KRAKEN Pro user guide

Razer

Razer KRAKEN Pro user guide

Plantronics Blackwire C310-M Quick setup guide

Plantronics

Plantronics Blackwire C310-M Quick setup guide

AT&T TL 7610 Compatibility chart

AT&T

AT&T TL 7610 Compatibility chart

Phonak FreeCom 7100 user guide

Phonak

Phonak FreeCom 7100 user guide

Shenzhen Bluebird Hi-Tech Co. BTH-70 user manual

Shenzhen Bluebird Hi-Tech Co.

Shenzhen Bluebird Hi-Tech Co. BTH-70 user manual

Plantronics RIG 800 series user manual

Plantronics

Plantronics RIG 800 series user manual

Sennheiser CX 980I datasheet

Sennheiser

Sennheiser CX 980I datasheet

Kenwood WS-A1 Startup guide

Kenwood

Kenwood WS-A1 Startup guide

LG HBM-235 user manual

LG

LG HBM-235 user manual

manuals.online logo
manuals.online logoBrands
  • About & Mission
  • Contact us
  • Privacy Policy
  • Terms and Conditions

Copyright 2025 Manuals.Online. All Rights Reserved.