JVC TV 20240 User manual

Serial Number
IMPORTANT NOTE TO THE CUSTOMER:
Enter the serial number for your television
(located on the rear of the television cabinet) on the space below.
Staple your sales receipt or invoice to the inside cover of this guide.
Keep this user’s guide in a convenient place for future reference.
Keep the carton and original packaging for future use.
TV/VCR COMBO
USER’S GUIDE
FOR MODEL
TV-20240
(Illustration of TV-20240 and RM-C139)
(MONO)

IMPORTANT SAFEGUARDS
CAUTION:
Please read and retain for your safety.
Electrical energy can perform many useful functions. This TV
set has been engineered and manufactured to assure your
personal safety. But improper use can result in potential
electrical shock or fire hazards. In order not to defeat the
safeguards incorporated in this TV set, observe the following
basic rules for its installation, use and servicing.
And also follow all warnings and instructions marked on your
TV set.
INSTALLATION
1Your TV set is equipped with a polarized AC line plug (one
blade of the plug is wider than the other).
This safety feature allows the plug to fit into the power
outlet only one way. Should you be unable to insert the
plug fully into the outlet, try reversing the plug.
Should it still fail to fit, contact your electrician.
2Operate the TV set only from a power source as indicated
on the TV set or refer to the operating instructions for this
information. If you are not sure of the type of power supply
to your home, consult your TV set dealer or local power
company. For battery operation, refer to the operating
instructions.
3Overloaded AC outlets and extension cords are danger-
ous, and so are frayed power cords and broken plugs.
They may result in a shock or fire hazard. Call your service
technician for replacement.
4Do not allow anything to rest on or roll over the power
cord, and do not place the TV set where power cord is
subject to traffic or abuse. This may result in a shock or
fire hazard.
5Do not use this TV set near water — for example, near a
bathtub, washbowl, kitchen sink, or laundry tub, in a wet
basement, or near swimming pool, etc.
IMPORTANT SAFETY PRECAUTIONS
CAUTION
RISK OF ELECTRIC SHOCK
DO NOT OPEN
CAUTION:Toreduce therisk of electric shock.
Do notremove cover (or back).
No user serviceable parts inside.
Referservicingto qualified service personnel.
(POLARIZED-TYPE)
The lightning flash with arrowhead symbol,
within an equilateral triangle is intended to alert
the user to the presence of uninsulated
“dangerous voltage” within the product’s
enclosure that may be of sufficient magnitude
to constitute a risk of electric shock to persons.
The exclamation point within an equilateral
triangle is intended to alert the user to the
presence of important operating and mainte-
nance (servicing) instructions in the literature
accompanying the appliance.
WARNING: TO PREVENT FIRE OR SHOCK
HAZARDS, DO NOT EXPOSE THIS
TV SET TO RAIN OR MOISTURE.
CAUTION: TO INSURE PERSONAL SAFETY,
OBSERVE THE FOLLOWING RULES
REGARDING THE USE OF THIS
UNIT.
1. Operate only from the power source specified
on the unit.
2. Avoid damaging the ACplug and power cord.
3. Avoid Improper installation and never position
the unit where good ventilation is unattain-
able.
4. Do not allow objects or liquid into the cabinet
openings.
5. In the event of trouble, unplug the unit and
call a service technician. Do not attempt to
repair it yourself or remove the rear cover.
Changes or modifications not approved by JVC
could void the warranty.
* When you don’t use this TV set for a long
period of time, be sure to disconnect both the
power plug from the AC outlet and antenna for
your safety.
* To prevent electric shock do not use this
polarized plug with an extension cord, recepta-
cle or other outlet unless the blades can be fully
inserted to prevent blade exposure.

6If an outside antenna is connected to the TV set, be sure the
antenna system is grounded so as to provide some protection
against voltage surges and built-up static charges. Section 810
of the National Electrical Code provides information with respect
to proper grounding of the mast and supporting structure,
grounding of the lead-in wire to an antenna discharge unit, size
of grounding conductors, location of antenna discharge unit,
connection requirements for the grounding electrode.
7An outside antenna system should not be located in the
vicinity of overhead power lines or other electric light or
power circuits, or where it can fall into such power lines or
circuits. When installing an outside antenna system, extreme
care should be taken to keep from touching such power
lines or circuits as contact with them might be fatal.
8TV sets are provided with ventilation openings in the cabinet
to allow heat generated during operation to be released.
Therefore:
—Never block the bottom ventilation slots of a portable TV
set by placing it on a bed, sofa, rug, etc.
— Never place a TV set in a “built-in” enclosure unless
proper ventilation is provided.
— Never cover the openings with a cloth or other material.
— Never place the TV set near or overaradiator or heat register.
9To avoid personal injury:
—Do not place a TVseton asloping shelfunless properly secured.
— Use only a cart or stand recommended by the TV set
manufacturer.
—Do not try to roll a cart with small casters across thresh-
olds or deep pile carpets.
— Wall or shelf mounting should follow the manufacturer’s
instructions, and should use a mounting kit approved by
the manufacturer.
USE
10 Caution children about dropping orpushingobjects into the TV set
through cabinet openings. Some internal parts carryhazardous
voltagesand contact can result in a fire or electrical shock.
11 Unplug the TV set from the wall outlet before cleaning. Do
not use liquid or an aerosol cleaner.
12 Never add accessoriesto a TV set that has not been designed for
this purpose. Such additionsmayresultin ahazard.
13 For added protection of the TV set during a lightning storm or
when the TV set is to be left unattended for an extended period
of time, unplug it from the wall outlet and disconnect the
antenna. This will prevent damage to product due to lightning
storms or power line surges.
14 A TV set and cart combination should be moved with care.
Quick stops, excessive force, and uneven surfaces may cause
the TV set and cart combination to overturn.
SERVICE
15 Unplug this TV set from the wall outlet and refer servicing to
qualified service personnel under the followingconditions:
A. When the power cord or plug is damaged or frayed.
B. If liquid has been spilled into the TV set.
C. If the TV set has been exposed to rain or water.
D. If the TV set does not operate normally by following the
operating instructions. Adjust only those controls that are
covered in the operating instructions as improper adjust-
ment of other controls may result in damage and will often
require extensive work by a qualified technician to restore
the TV set to normal operation.
E. If the TVsethasbeendropped or damagedin any way.
F. When the TV set exhibits a distinct change in perfor-
mance — this indicates a need for service.
16 Do not attempt to service this TV set yourself as opening or
removing covers may expose you to dangerous voltage or
other hazards. Refer all servicing to qualified service personnel.
17 When replacement parts are required, have the service
technician verify in writing that the replacement parts he uses
have the same safety characteristics as the original parts.
Use of manufacturer’s specified replacement parts can
prevent fire, shock, or other hazards.
18 Upon completion of any service or repairs to this TV set,
please ask the service technician to perform the safety check
described in the manufacturer’s service literature.
19 When a TV set reaches the end of its useful life, improper
disposal could result in a picture tube implosion. Ask a
qualified service technician to dispose of the TV set.
20 Note to CATV system installer.
This reminder is provided to call the CATV system installer’s
attention to Article 820-40 of the NEC that provides
guidelines for proper grounding and, in particular, specifies
that the cable ground shall be connected to the grounding
system of the building, as close to the point of cable entry
as practical.
EXAMPLE OF ANTENNA GROUNDING
AS PER NATIONAL ELECTRICAL CODE

PRECAUTIONS ABOUT VIDEO
Before operating the video unit, please read the precautions on this page.
Precautions for Recording TV
Programs
About Copyright
The recordings you make from TV programs or pre-
recorded tapes cannot be used without permission
from the copyright holders, except when they are
used solely for personal enjoyment.
Trial Recording Before Making Important
Recordings
Make a trial recording before an important program
to be sure that you can record and playback audio
and video properly.
Disclaimer:
JVC assumes no liability for failure to record or
playback audio and video properly with this unit.
Precautions About Video Cassettes
Keep these points in mind while working with video
cassettes.
Recording
• If you record on a previously recorded tape, the
original content will be automatically erased.
• Video cassettes cannot be reversed or “flipped
over” like audio cassettes.
Handling Cassettes Properly
• To store cassettes, place them inside their cases.
The cases should then be stored vertically.
• Do not drop cassettes, or give them any other
hard shock.
• Rewind cassettes before storing.
• Do not repeatedly load and unload tapes without
running them in between.
Do Not Store in the Following Places
• Exposed to direct sunlight or near a heating
device.
• Exposed to excessive humidity, smoke, or dust.
• Near a strong magnet (including speakers).
Prevent Accidental Erasur e
Remove the small plastic tab at the rear of the
cassette. Without this tab, the cassette cannot be
used for recording. It is recommended that you
remove the tabs from important cassettes to prevent
accidental erasure. To record on a cassette whose
tabs have ben removed, cover the tab hole with two
layers of adhesive tape.
Precautions About Moistur e
Condensation
What is Moisture Condensation?
When you put cold water into a glass, water droplets
form on its surface. This phenomenon is called
moisture condensation.
If Moisture Condensation Occurs
The video unit may fail to operate, or may operate
erratically potentially damaging the unit and video
cassettes.
When Does Condensation Occur?
• When equipment is moved from a colder to a
warmer place.
• Immediately after a room heater is started.
• When the unit is exposed to a cold air flow (like
from an air conditioner)
• In high humidity or when steam is present.
To Prevent Condensation
• Wait about an hour before operating the unit so
that it can become accustomed to the room
conditions.
• Provide proper ventilation.
If the unit fails to operate or operates poorly and you
think condensation may be the cause, turn the unit’s
power off and wait a few hours before trying to
operate the unit again.
Enjoying Clear Video
Cleaning the Video Heads
After a long, or frequent use, the video heads inside
the unit may become dirty, possibly resulting in poor
picture quality. To prevent this from happening, it is
recommended you clean the unit frequently with a
head cleaning cassette (TCL-2 or 3, sold
separately).
If Video Quality is Still Poor After Cleaning
Try cleaning the unit two or three times instead of
just once. If the repeated cleaning still fails to
produce better picture quality, an internal
malfunction may be the cause. Call your local dealer
for servicing.
Video Heads beginning to get dirty Video Heads now fairly dirty Video Heads totally clogged
VCR Plus+ and PlusCode are registered trademarks
of Gemstar Development Corporation.
The VCR Plus+ system is manufactured under
license from Gemstar Development Corporation.

CONNECTIONS
Connections Checklist . . . . . . . . . . . . . . . . 5
Front Panel Diagram . . . . . . . . . . . . . . . . . 5
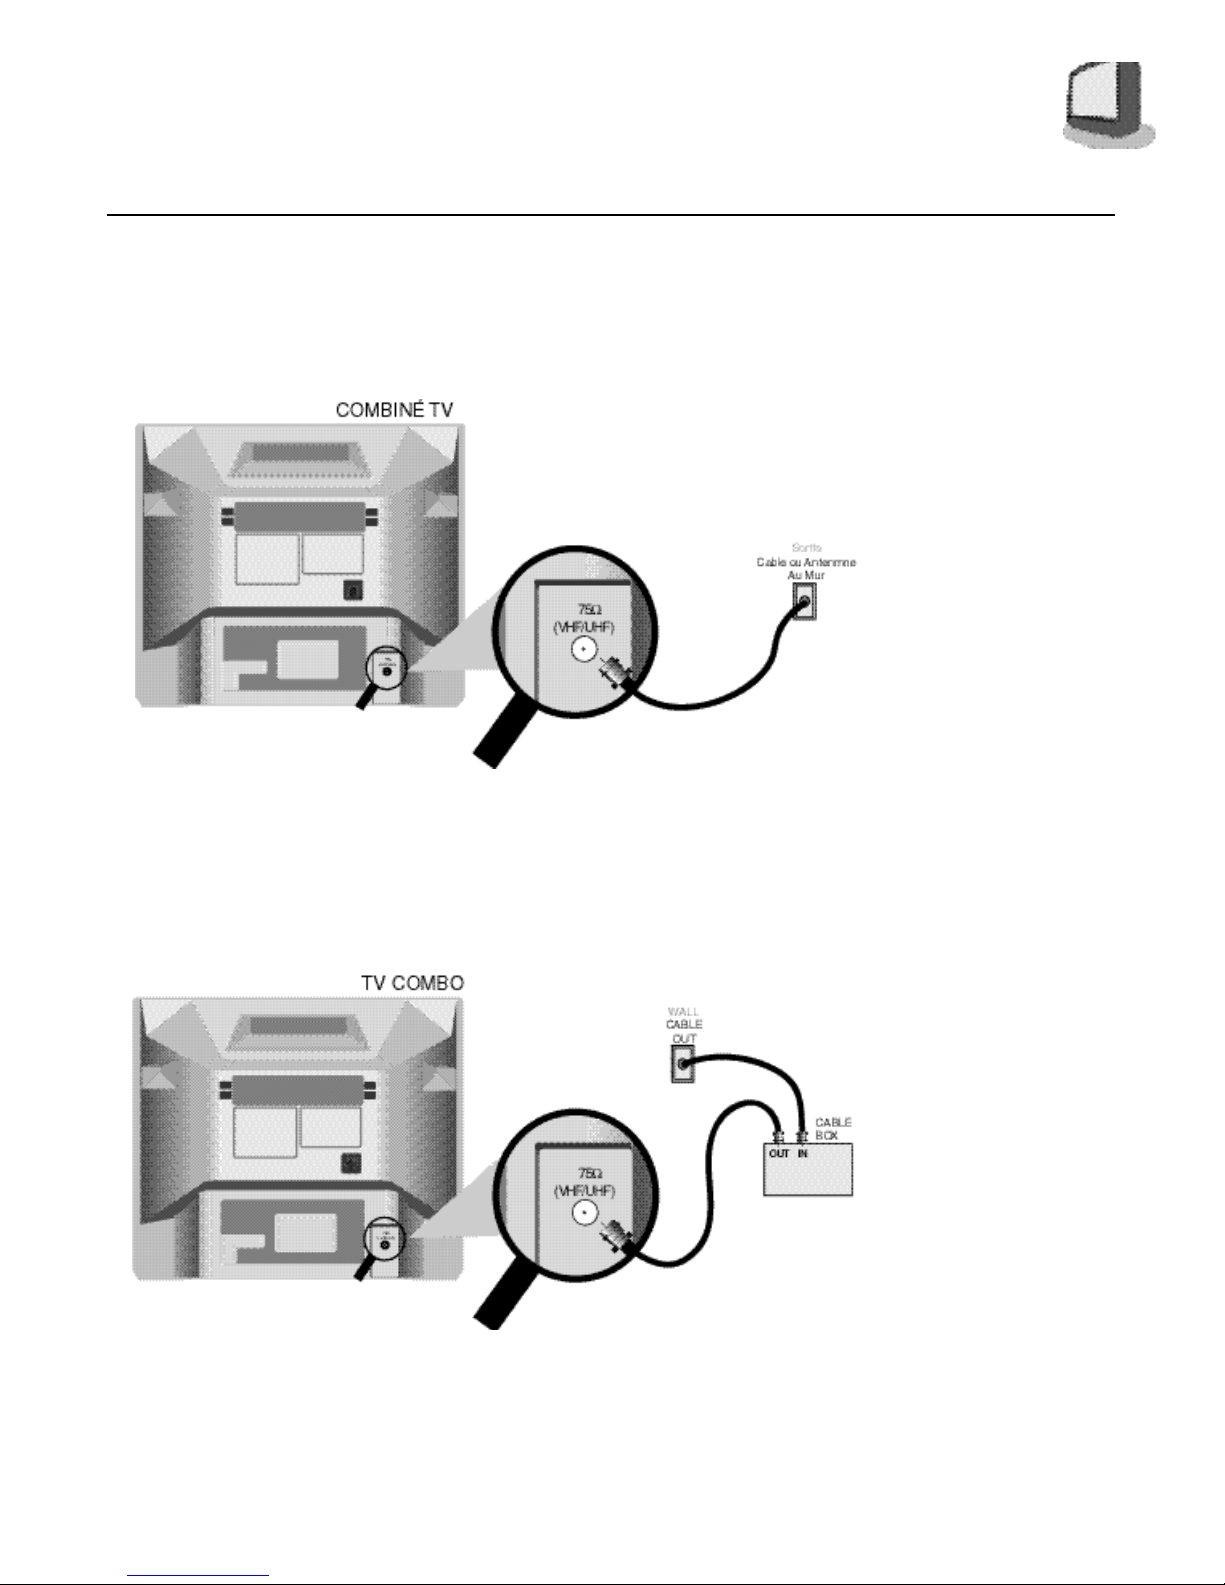
Cable Box Connection . . . . . . . . . . . . . . . . 6
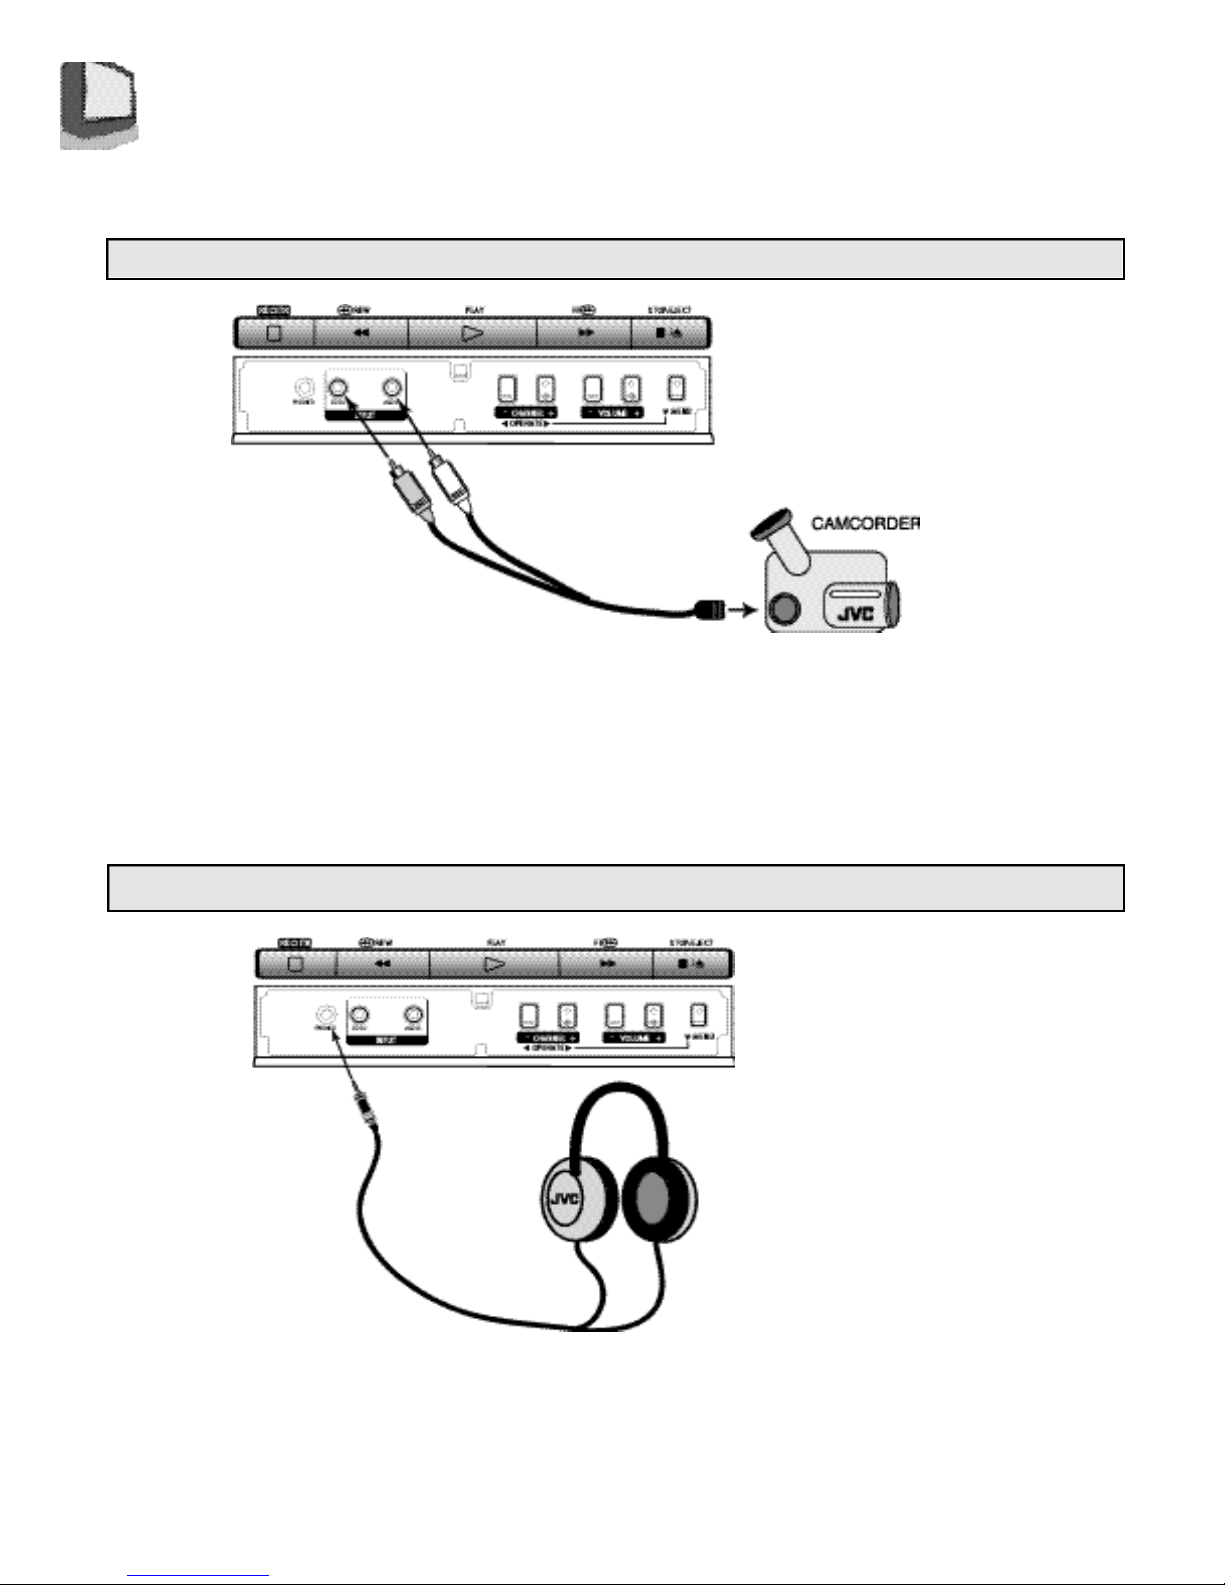
Connecting to a Camcorder . . . . . . . . . . . . . 7
Connecting to Headphones/Earphones . . . . . . . 7
GETTING STARTED
Remote Control . . . . . . . . . . . . . . . . . . . . 8
Power . . . . . . . . . . . . . . . . . . . . . . . . . 9
Adjusting Volume . . . . . . . . . . . . . . . . . . . 9
Changing Channels . . . . . . . . . . . . . . . . . . 9
Remote Programming . . . . . . . . . . . . . . . 10
CATV & Satellite Codes . . . . . . . . . . . . . . . 10
MENU FUNCTIONS
Using the Menu . . . . . . . . . . . . . . . . . . . 11
Initial Setup
Auto Tuner Setup. . . . . . . . . . . . . . 12
Channel Summary. . . . . . . . . . . . . 12
Set Lock Code . . . . . . . . . . . . . . . 13
VCR Plus+Guide Setup. . . . . . . . . . 14
Picture Settings
Tint . . . . . . . . . . . . . . . . . . . . . 15
Color . . . . . . . . . . . . . . . . . . . . 15
Picture . . . . . . . . . . . . . . . . . 15
Bright . . . . . . . . . . . . . . . . . . 15
Detail . . . . . . . . . . . . . . . . . . 15
Sound Settings
Bass . . . . . . . . . . . . . . . . . . . . . 16
Treble . . . . . . . . . . . . . . . . . . . . 16
Balance . . . . . . . . . . . . . . . . . . . 16
MTS (Multi-channel TV Sound) . . . . . 16
Some Sound Advice . . . . . . . . . . . . 16
Clocks/Timers
Set Clock (Semi-Auto). . . . . . . . . . . 17
Set Clock (Manual). . . . . . . . . . . . . 17
On/Off Timer. . . . . . . . . . . . . . . . . 18
General Items
Language . . . . . . . . . . . . . . . . . 18
Closed Caption. . . . . . . . . . . . . . . 18
Noise Muting . . . . . . . . . . . . . . . . 18
VCR FUNCTIONS
VCR Basics
Load Videocassette . . . . . . . . . . . . 19
Find the Start of the Program. . . . . . . . 19
Start Playback. . . . . . . . . . . . . . . . 19
Stop Playback. . . . . . . . . . . . . . . . 19
Simple Recording. . . . . . . . . . . . . . 19
Tape Counter. . . . . . . . . . . . . . . . 19
Ejecting the Cassette. . . . . . . . . . . . 19
TABLE OF CONTENTS
VCR Menu
Regular VCR Programming. . . . . . . . 20
Recording Speed. . . . . . . . . . . . . . 21
Auto SP→EP . . . . . . . . . . . . . . . . 21
Repeat Play. . . . . . . . . . . . . . . . . 21
V. Stabilizer. . . . . . . . . . . . . . . . . 21
VCR Plus+
Recording with VCR.Plus+. . . . . . . . . 22
Timer recording Troubleshooting. . . . . . . . . . 23
Instant Timer Recording
ITR. . . . . . . . . . . . . . . . . . . . . . 23
BUTTON FUNCTIONS - TV
Display . . . . . . . . . . . . . . . . . . . . . . . . 24
Video Status . . . . . . . . . . . . . . . . . . . . . 24
Sleep Timer . . . . . . . . . . . . . . . . . . . . . 24
Number Buttons (10 Key Pad) . . . . . . . . . . . 25
100+ . . . . . . . . . . . . . . . . . . . . . . . . . 25
Muting . . . . . . . . . . . . . . . . . . . . . . . . 25
Menu Button . . . . . . . . . . . . . . . . . . . . . 25
Input. . . . . . . . . . . . . . . . . . . . . . . 25
Return. . . . . . . . . . . . . . . . . . . . . . . . . 25
Exit. . . . . . . . . . . . . . . . . . . . . . . . . . 25
Closed Caption. . . . . . . . . . . . . . . . . . . . 25
Channel +/-. . . . . . . . . . . . . . . . . . . . . . 25
Volume +/-. . . . . . . . . . . . . . . . . . . . . . 25
TV/CATV Switch. . . . . . . . . . . . . . . . . . . 25
BUTTON FUNCTIONS - VCR
VCR Basics . . . . . . . . . . . . . . . . . . . . . 26
Index Search . . . . . . . . . . . . . . . . . . . . 26
Tracking Adjustment. . . . . . . . . . . . . . . . . 26
Skip Search . . . . . . . . . . . . . . . . . . . . . 27
Re-View . . . . . . . . . . . . . . . . . . . . . . . . 27
EZ Ject . . . . . . . . . . . . . . . . . . . . . . . . 27
Shuttle Plus +/- . . . . . . . . . . . . . . . . . . . 27
Timer. . . . . . . . . . . . . . . . . . . . . . . . . 27
VCR Plus+. . . . . . . . . . . . . . . . . . . . . . 27
Daily/Weekly. . . . . . . . . . . . . . . . . . . . . 27
REC/ITR . . . . . . . . . . . . . . . . . . . . . . . . 28
STOP/EJECT . . . . . . . . . . . . . . . . . . . . . . 28
Program Check . . . . . . . . . . . . . . . . . . . 28
APPENDICES
Troubleshooting . . . . . . . . . . . . . . . . . . . 29
Limited Warranty. . . . . . . . . . . . . . . . . . . 31
Authorized Service Centers . . . . . . . . . . . . . 32
Memo. . . . . . . . . . . . . . . . . . . . . . . . . 33
Specifications . . . . . . . . . . . . . . . Back Cover
T A B L E O F C O N T E N T S 4

5 C O N N E C T I O N S
The Connections Checklist — Read Me First! section of this guide is a list of ideas to keep in mind
when you set out to perform your connections. It is designed to help us not-so-technically-
advanced individuals. If you read this section, and can’t identify the plugs, connectors, and
components you have, do not be afraid to seek help.
RF Connectors
A/V input plug
CONNECTIONS CHECKLIST — READ ME FIRST!
FRONT PANEL DIAGRAM
TV-20240 Front Panel
4) Unplug the power cord between each connection.
1) Always refer to the connection instructions in the user’s
guide for your components first! The manufacturer will
provide the most detailed information about their products.
2) Know your jacks and plugs — most are color coded:
• Yellow plugs are Video connections
• Red plugs are Right Audio connections
•White or black plugs are Left Audio (Mono) connec-
tions (if your camcorder is a stereo model, use a
stereo-to-monaural conversion cable to connect to the
Combo unit. Conversion cables may be purchased
separately.)
3) Perform one hookup at a time.If you have many
accessories to connect, make sure each connection is
correct by checking to see that it works properly before
attempting the next connection.

CABLE BOX CONNECTION
There are two basic types of antenna/cable hook-ups. They are easy to distinguish.
Type 1:
If you use an antenna or have a cable television system that does not require the use of a
decoder box to receive signals, use the diagram below to connect your TV/VCR combo.
Type 2:
If you use an cable box to access any or all channels, use the diagram below.
1) Connect the cable or antenna wireout from the wall in to the TV VHF/UHF
input at the rear of the combo unit.
2) Plug the power cord into a nearby AC outlet.
1) Connect the cable wireout from the wall in to the cable box RF input.
2) Connect an RF cable out from the cable box in to the TV VHF/UHF input.
3) Plug the power cord into a nearby AC outlet.
CONNECTIONS 6

7 C O N N E C T I O N S
1) Press on the PUSH mark on the front panel door to open it.
2) Connect a yellow video cable from the cam-corder output into the TV’s Video input jack.
3) Connect a white (or Black) Mono audio cable from the camcorder output into the TV’s audio input jack.
❒Refer to the camcorder’s instructions for further information about the camcorder.
You can connect a camcorder right to your TV/VCR combo using the input jacks located at the front of the unit.
CONNECTING TO A CAMCORDER
1) Press on the PUSH mark on the front panel door to open it.
2) Insert the earphone/headphone plug into the phones input jack.
❒Refer to the headphones or earphones instructions for further information.
You can connect earphones or headphones to your TV/VCR combo using the input jack at the front of the unit.
CONNECTING TO HEADPHONES/EARPHONES

REMOTE CONTROL
CHANGING THE BATTERIES
RM-C139
GETTING STA R T E D 8
Be sure to use only size AA batteries.
Push down on the remote's back cover and slide
towards the bottom to remove it.
Insert the two supplied AA batteries, carefully noting the
“+” and “–” markings on the batteries and remote
control. To avoid a short circuit, insert “–” end first.
Snap the cover back into place.
❒If the remote control acts erratically, replace the batteries.
Typical battery life is usually about one year.
❒We recommend alkaline batteries for a longer battery life.
NOTE:
When you change the batteries, try to complete the task
within 3 minutes. If it takes longer than 3 minutes, the remote
control codes for your Cable box will have to be reset (page
10).
1
2
3
RM-C139RM-C139
TV-20240

9 GETTING STA R T E D
CHANGING CHANNELS
10 key direct access.
Press the numbers on the remote’s 10 key pad. For single-digit channel numbers press 0 then the
number. For channels above 100, press the 100+ button plus the 2-digit number.
CHANNEL –/+ button.
Press the CHANNEL –/+ button, to scan the channels in order.
❒After you operate the Auto Tuner Setup (page 12), all of the blank, or empty, channels will be removed
from scanning sothat there is no noise or channel snow when you scan, only active channels.
Return.
Press the RETURN button to return to the previous channel. First, select a channel
(game #1). Then, select another channel (game #2) with the 10 key pad and push the RETURN button
to flip directly back and forth.
1
2
3
❒Press the POWER button on the remote control or the TV/VCR combo front panel. The On Timer
lamp will glow red.
❒Make sure that the TV/CATV switch on the remote is set to TV. Switch to CATV only if you plan to
operate a cable box. If you switch to CATV you will not be able to operate the TV/VCR combo
functions with the remote, only the cable box functions!
❒To turn the power off, press the POWER button again. The On Timer lamp will go out.
❒The On Timer lamp will glow green when the On/Off Timer is set to yes, even when the TV power
is off.
POWER
Adjust the volume with the VOLUME –/+ buttons on the TV/VCR combo front panel or on the
remote control. Press the VOLUME –button to lower the volume. Press the VOLUME + button to
raise the volume.
Press the MUTING button to instantly turn the volume off to zero. To restore the volume to the
previous volume level, simply press the MUTING button again.
ADJUSTING VOLUME
VOLUME 13
|||||||
-------------------
1
2

CATV & Satellite Codes
CABLE BOX OR SATELLITE SETUP
The remote is programmed with the CATV and Satellite codes for power on and off, 10 key, and channel up
and down.
1) Determine the correct code from the “CATV & Satellite Codes” chart below.
2) Slide the 2-Way Mode Selector Switch to CATV.
3) Press and hold down the DISPLAY button.
4) Enter the 3-digit code with the 10 key pad while continuing to hold down the DISPLAY button.
5) Release the DISPLAY button.
6) Confirm the operation of the cable box.
SETTING THE CATV CODES
Many CATV brands have more than one code. If the first code in the list does not work, try the other codes
listed. If your CATVbox does not respond to any of the codes listed for the manufacturer, use the remote
control for theCATV box to operate it.
CABLE BOXES
ABC
Antronix
Archer
Belcor
Cable Star
Cabletenna
Cableview
Century
Citizen
Colour Voice
Comtronice
Contec
Curtis
Diamond
Drake
Eagle
Eastern
Focus
GC Electronics
Gemini
GeneralElectric
General
Instruments
Gerrard
Hamlin
Hitachi
Hytex
Jerrold
Macom
Magnavox
Matsusita
CODES
035 001 011 002 009 033 091
055
044
029 001 044 088 091 063 042
030 052 076
082
082
029 001 044 088 091 076
063 044 042 030 052 088
063 044 042 030 052 088
063 044 042 030 052 088
023
042 021
010
008 009 056 061 087 090
029 001 044 088 091 076
037 067 071
013 022 058 062 020 040 026
021
028 099
059
063 044 042 030 052 088 082
004 085 032 030
057
001 002 003 004 034 055 083
085 091 093 095
063 044 042 030 052 088
014 015 028 041 099
031 079 002 080
011
001 002 003 004 034 055 083
085 091 093 095
031 079 080
025 026 013
016 017
CABLE BOXES
Memorex
Movietime
NSC
Oak
Panasonic
Paragon
Philips
Pioneer
PopularMechanics
Pulsar
Quest
RCA
Realistic
Recoton
Regal
Regency
Rembrandt
Runco
Salora
Samsung
Scientific Atlanta
Sheritech
Signal
Signature
SL Marx
Sprucer
Standard
Components
Starcom
Stargate
CODES
007
032 039 029 042 044 088 040
038 060
038 040 032
011 046 010 012 047
016 017
007
013 020 023 024 096 030 084
005 006 078
059
063 044 042 030 052 088 007
001 002 003 004 034 055 083
085 091 093 095
016 017
051 044 088 053
059 063 044 042 030 052 088
014 041
028 099
032 039 029 042 044 088 002
060
007
068 072
016 017 006 032 040 042 078
094
008 009 056 061 087 090
027
013 022 058 062 020 040 026
004 042 032 078 094 021 038
002
032 040 042 078 094 063 044
030 052 088
016 017
032 039 029 042 044 088 018
060 063 052 030
001 004 055
032 040 042 078 094 004 063
044 030 052 088
CABLE BOXES
Starquest
Sylvania
Tandy
Teknika
Telecaption
Teleview
Texscan
Tocom
Toshiba
Tusa
TV86
Uniden Satellite
Unika
United Artists
United Cable
Universal
Videoway
Vid Tech
Vidter
Viewstar
Zenith
Zentek
SATELLITE
RCA
Sony
Gradiente
CODES
004
019 035
062
074 054
092 077
032 040 042 078 094
018 019 035
033 034 048 049 001 042
091 073
036 007 066 070
004
040
065 069
029 001 044 088 091 063
042 030 052 076
011
001
042 043 044 052 063 088
082
007 050 023 045
064
064
013 022 058 062 020 040
026 021
007 050 023 075
059
CODES
097
098
100
REMOTE PROGRAMMING 10

11USING THE MENU
USING THIS GUIDE:
Throughout this guide there are certain symbols we use
as shorthand to show you what to do. When you see
them, keep these factors in mind:
Up and down arrows mean press the MENU UPor
MENU DOWN buttons. Pressing the up or down
buttons allows you to:
• Move vertically in the main menu screen
• Move through a submenu, or
• Move to the next letter, number, or other
choice in a submenu, or
• Back up to correct an error
Left and right arrows mean press the MENU LEFT or
MENU RIGHT button to:
• Select the highlighted item, or
• Select the options in a submenu
The “Press Button” means you should press
that button on the remote control
The “Helping Hand” points to the highlighted or
selected item in a menu.
❒Important information, or a note, about a feature
follows a cube like this one.
SMALL CAPITAL LETTERS are used when we refer
to buttons … this is important because some
menu functions have the same name.
THE ONSCREEN MENUS:
To bring up the onscreen menu, press the MENU
button on the remote, and the menu will appear on the
screen. The "Helping Hand" will appear next to an item
that is selected.
When you first turn on the TV, the “Picture Settings”
menu will appear. However, “Initial Setup” is so
important, that this guide begins here.
INITIAL SETUP ITEMS
PICTURE SETTINGS
SOUND SETTINGS
TIMER SETUP ITEMS
GENERAL ITEMS
VCR SETUP SETTINGS

CHANNEL SUMMARY
You can add or delete channels from
channel scanning. You can also lock
out any “unauthorized” viewers from
one or up to all 181 channels.
Press any MENU Button
To CHANNELSUMMARY
To operate
Note: Noise Muting will not work while
you are in the Channel Summary menu
.
SCAN
You can manually set channels to scan
that were too weak to be picked up
during Auto Tuner Setup. Conversely, if a
channel was too weak to receive a good
picture but was picked up anyway, delete
it by removing the
√.
(If you have not
performed the Auto Tuner Setup
described in the previous column, please
do so now.)
CHANNEL -/+ to select the channel
To the SCAN column
To add or delete from scan
EXIT when finished
Note: Channels set to scan will be
marked with an
√.
Note: Some cable systems experience
interference from radio frequencies on
Cable Channel 95. If you like, you can
delete this channel from scanning by
removing the √
INITIAL SETUP 12
AUTO TUNER SETUP
During Auto Tuner Setup, the TV will
automatically scan through all available
channels and memorize the active ones
so that when you scan, you do not pick
up weak or noisy channels.
Press any MENU button
To AUTO TUNER SETUP
To operate
To choose CABLE or AIR
To move to START
To start Auto Tuner Setup
The Programming takes approximately
1 to 2 minutes
Note: Noise Muting will not work while
Auto Tuner Setup is working.
NOW
PROGRAMMING!
48
TUNER MODE : CABLE AIR
START
PROGRAMMING OVER!
Continued next page ...
NOTES:
During Initial Setup,
the TV will be
programmed to
only receive active
channels. Once the
channels are
activated by the
Auto Tuner Setup
they will be includ-
ed in Scan.
Some weak
channels may be
included or omitted
during this
procedure. You can
add or delete any
channels from
scanning in the
Channel Summary.
CHNO. SCAN CHNO. SCAN
01 06 √
02 √07
03 √08
04 √09 √
05 √10 √

CHANNEL GUARD - LOCK
To CHANNEL SUMMARY
To operate
CHANNEL +/- to select the channel
To the Lock column
The access code zero (0) to lock
or unlock that channel
EXIT when finished
Note: When viewing, once the Channel
Guard for a specific channel has been
unlocked, that channel will remain
unlocked until power to the television is
turned off. To reactivate Channel Guard,
turn the power off and then on again.
CHANNEL GUARD MESSAGE:
This message appears when a viewer
attempts to watch a guarded channel:
To watch a channel you have locked, enter
the lock code using the 10 key pad. An
explanation of how to set the lock code
appears in the next column on this page.
If the wrong lock code is entered, this
message will flash on the screen:
13INITIAL SETUP
INVALID LOCK CODE !
Continued …
PLEASE ENTER LOCK CODE BY
10 KEY PAD TO UNLOCK IT.
NO. ––––
SET LOCK CODE
The Lock Code locks and unlocks
Channel Guard settings. Write this four
digit number down and keep it safe
from potential viewers!
Press any MENU button
To SET LOCK CODE
To operate
The padlock icon appears
ZERO (the access code is zero)
To choose the number
To move to the next place
Continue to follow these directions for
all four numbers
To FINISH
To save settings and exit
EXIT when finished
Note: If you forget your Lock Code
you can check your code by going to
the setup screen of the Set Lock Code
function.
Note: After a power interruption of
more than 90 seconds you must reset
the lock code.
LOCK CODE 0000
FINISH
CHNO. SCAN CH NO. SCAN
01 06 √
02 √07
03 √08
04 √09 √
05 √10 √

INITIAL SETUP 14
VCR PLUS+GUIDE SETUP
You may simplify the recording of
television programs by using VCR
PLUS+codes to program your VCR.
Whenever you want to record a
program, all you need to do is find the
VCR PLUS+code for that program.
After entering the code, the TV/VCR
Combo. will automatically record the
program at the correct date, time, and
channel.
Before using VCR PLUS+for the first
time, you need to set local channels
for VCR Plus+. These guide numbers
may be found in your local TV
magazine or newspaper’s TV listings.
To Set Local Channels for VCR
PLUS+
Press any of the menu buttons
to display the Initial Setup
screen
To Select SET VCR PLUS+
GUIDE CHANNEL
To display the SET VCR PLUS+
GUIDE CHANNEL menu
screen
VCR PLUS+GUIDE SETUP
Continued...
Below is the VCR Plus+ Guide Setup
Menu
To move to a TV CH position
which corresponds to a
particular GUIDE CH number
To Select a receivable TV CH
Repeat the steps described above
until all receivable channels have
been set.
EXIT to save settings and exit.
Your TV/VCR Combo is now ready to
accept VCR Plus+codes.
NOTES:
VCR PLUS+codes
for individual televi-
sion programs can
be found in most
local newspaper
television listings
and TV magazines.

15PICTURE SETTINGS
NOTES:
If you do not move
to the next setting
with the up and
down arrows, in
approximately three
seconds the screen
will disappear and
your preferences
will be stored.
You can exit the
Picture Settings
menu at any time
by pressing the
EXIT button on the
remote control.
DETAIL
Detail allows you to adjust the level of
detail within the picture.
Press any MENU button
To DETAIL
To make the picture sharper
To make the picture smoother
To move to the previous
TINT
Tint allows you to adjust the levels of
red and green in the picture.
Press any MENU button
To TINT
To accentuate green
To accentuate red
To move to the next
COLOR
Color allows you to adjust both the
vividness and subtlety of the color.
Press any MENU button
To COLOR
To make colors more vivid
To subdue colors
To move to the next or previous
PICTURE
Picture allows you to adjust the range
between black and white in the
picture.
Press any MENU button
To PICTURE
To increase contrast
To decrease contrast
To move to the next or previous
BRIGHT
Adjust the degree of light and dark in
the picture.
Press any MENU button
To BRIGHT
To lighten the picture
To darken the picture
To move to the next or previous

MTS (Multi-Channel
Television Sound)
MTS technology gives you a choice
among stereo, mono, and Second
Audio Programs (SAP).
Press any MENU button
To MTS
Select the mode
(The ON AIR arrow tells you if
the current signal contains
Stereo or SAP)
Note: Keep the TV in STEREO mode
to get the fullest sound quality.
Note: SAP will allow you to hear an
alternative soundtrack, if available.
Note: Choose MONO to reduce
excess noise in a program or channel.
NOTES:
MTS has no effect
on normal sound
broadcasts.
You can exit the
Sound Settings
menu at any time
by pressing the
EXIT button.
BASS
The Bass level adjustment feature allows
you to raise or lower the level of lower
frequencies in the TV’s sound.
Press any MENU button
To BASS
To emphasize bass
To reduce bass
To move to next
TREBLE
The Treble level adjustment feature
allows you to raise or lower the level of
higher frequencies in the TV’s sound.
Press any MENU button
To TREBLE
To increase treble
To decrease treble
To move to next
BALANCE
The Balance adjustment feature
allows you to center the TV’s sound to
your needs.
Press any MENU button
To BALANCE
To shift the speaker balance to
the right
To shift the speaker balance to
the left
To move to next
Some Sound Advice
You can tell if a program is broadcast in stereo by the position of the ON AIR arrow in the MTS
menu. Unfortunately, it is common for some cable companies to squash the transmission of
stereo programs to mono because they only have mono equipment. If connected to a cable
system, the sound is at the mercy of that cable company — if they broadcast in mono, you
receive mono sound regardless of the original stereo programming.
Fortunately, most programs that are broadcast in stereo are aired on the major television
networks. If you connect your TV to an antenna instead of cable, and set the tuner mode in the
Auto Tuner Setup to “Air” instead of “Cable,” you will be able to pick up stereo broadcasts in
stereo.
SOUND SETTINGS 16

17C L O C K S / T I M E R S
SET CLOCK (M
ANUAL
)
If you are in an area that does not
receive the EDS or XDS signal needed
for the Set Clock (Semi-Auto) function,
or if you wish to set the clock to a
different time, use the manual function.
Press any MENU button
To SET CLOCK
To operate
To choose MANUAL
To move to hour
To set the hour (AM/PM)
To move to minutes
To set the minutes
To move to month
To set the month
To move to date
To set the date
To move to year
To set the year
To move to D.S.T.
To turn D.S.T. ON or OFF
To Move to START CLOCK
To start the clock
If you want to synchronize the TV
clock with another clock or time signal,
press LEFT or RIGHT MENU arrow at the
appropriate time, and the clockwill start
at that moment.
SET CLOCK (S
EMI
-AUTO)
The Clock is the heart of all timer
functions. You must set the clock before
any timer functions will work. Your clock
can be set automatically by using a
broadcast signal available in most areas.
Press Channel +/- to go to your
local PBS station (These stations
carry the EDS or XDS time signal)
Press any of the Menu .
To SET CLOCK
To operate
To choose SEMI-AUTO
To move to time zone
To set the time zone
To move to D.S.T. (Daylight
Savings Time)
To turn D.S.T. ON or OFF
To move to FINISH
To exit and save settings
CLOCK SET MESSAGE
If you do not set the clock but attempt to
use a timer function anyway, you will get
the following message:
THANK YOU !!
PLEASE SET CLOCK FIRST!!
MODE SEMI-AUTOMANUAL
TIME --:-- --
DATE/YEAR ---/--/--
D.S.T.ON OFF
START CLOCK
NOTES:
To use the Semi-
Auto function, first
tune the television
to your local PBS
station. PBS
stations transmit the
EDS or XDS signal
needed to set the
clock..
DAYLIGHT
SAVINGSTIME
This function
automatically
adjusts for Daylight
Savings time. At
2:00 am on the first
Sunday in April, the
clock moves
forward one hour.
At 2:00 am on the
last Sunday in
October the clock
moves back one
hour.
POWER OUTAGE
If the TV is
unplugged or you
experience a power
outage of more
than 90 seconds,
you must reset the
clock in order for
any of your timer
functions to work.
If power is interrupt -
ed for less than 90
seconds, the clock
will continue to run,
but will be delayed
the length of the
power interruption
(for example if the
power was
interrupted for 45
seconds, the clock
will be 45 seconds
slow). It is best to
check the clock
after any interrup -
tion in power.

ON/OFF TIMER
Use the On/Off Timer as an alarm to
wake up, as a program reminder, or as
a decoy when you’re out of the house.
Press any MENU button
To ON/OFF TIMER
To operate
To set the hour (AM/PM) you
want the TV to turn on
To move to minutes
To set the minutes
To accept ON TIME and to
move to OFF TIME (set time for
TV to turn off)
To move to CHANNEL
To select channel
To move to MODE
Choose ONCE or EVERYDAY
To YES NO
Choose YES for on, NO for off
To FINISH
To save settings
EXIT when finished
Note: In order for ON/OFF Timer to
work, the clock must be set. After a
power interruption of more than 90
seconds timer settings will be turned off
and will need to be reset.
Note: ON/OFF Timer cannot be set to
locked or guarded channels.
ON TIME 7 : 00 PM
OFF TIME 10 : 00 PM
CHANNEL 02
MODE ONCE EVERYDAY
ON/OFF TIMER YES NO
FINISH
NOTES:
Closed Caption
Notes: Captions
are usually found
on CC1 and text
on T1. The other
caption and text
channels are
workable but are
for future purpos-
es. If you want to
view captions or
text, most likely
you should
choose CC1 for
Captions and T1
for Text.
To access a
captioning option
or to turn one off,
allow the display
to remain on
screen until it
disappears. In a
few seconds, the
captions will start.
If a large black
box covers 80%
of the screen, the
Text Mode is
probably "On".
Press the CLOSED
CAPTION button to
turn it off.
General Note:You
can exit the menu
at any time by
pressing the EXIT
button.
CLOSED CAPTION
If they are included in a program, you can
view closed captions or text information.
Press any MENU button
To CLOSED CAPTION
To operate
TOCAPTION or TEXT
To select a caption or text channel
TOFINISH
To save settings and exit
Note: See page 25for details on accessing
closedcaptionswiththeCLOSED CAPTION button
on your remote control.
Note: Closed captioning may not correctly
operate when the signal received is weak
or when you are playing a video tape.
CAPTION: CC1 CC2 CC3 CC4
TEXT : T1 T2 T3 T4
FINISH
LANGUAGE
Choose from English, French, or Spanish
on-screen menus and displays.
Press any MENU button
To LANGUAGE
To choose a language
EXIT when finished
LANGUAGE ENG FRE SPA
TIMERS/GENERAL ITEMS18
NOISE MUTING
Eliminates noise from channels that are
not broadcasting or are too weak.
Press any MENU button
To NOISE MUTING
To turn ON/OFF
Note: Noise Muting will not work when
you operate Auto Tuner Setup or Channel
Summary.

19 BASIC VCR F U N C T I O N S
VCR BASICS
This section of the guide will explain
the many functions of the VCR
portion of your new TV/VCR Combo.
We will begin with a basic explana-
tion of how to load, view and eject a
video cassette.
LOAD A VIDEOCASSETTE
Make sure the “window” of the video
cassette is facing up, and the rear
label of the video cassette is facing
you. Insert the cassette into the slot
below the television screen by
pressing on the rear of the cassette.
Do not use too much pressure when
inserting. If the tab at the rear of the
cassette has been removed,
playback of the tape will begin
automatically:
FIND THE START OF THE
PROGRAM
If the tape is not set at the start of the
program, you can move backwards
on the tape by using the REW button
on the remote or TV/VCR combo front
panel. Press REW to rewind the tape
to the desired point. To advance
forward on the tape, press the FF
button.
START PLAYBACK
To begin viewing a video cassette,
press the PLAY button on the remote
or on the TV/VCR combo front panel.
A video picture will appear.
STOP PLAYBACK
To end playback of the video
cassette, press the STOP button on
the remote or the S
TOP
/E
JECT
button
on the TV/VCR combo front panel.
The video playback will stop and the
on screen display will automatically
switch to the television (or to LINE if
LINE INPUT is selected).
SIMPLE RECORDING
To record a television program, first
select the channel airing the program
you wish to record using the 10-digit
key pad or C
HANNEL
+/- buttons on
the remote control. Next, press the
SP/EP button to select the recording
speed (for more on recording speeds
see page 20). To begin recording,
press the P
LAY
button while holding
down the R
EC
button.The following
display will appear on screen over
the television picture for a few
seconds.
When the program is over, press S
TOP
to finish recording.
TAPE COUNTER
The Tape Counter appears on screen
when you fast forward or rewind as a
guide to show how much tape is left
on a cassette. It also appears when
you begin recording or playback. To
see the tape counter display at other
times, press D
ISPLAY
. For more on
D
ISPLAY
, see page 24. To reset the
counter, press C
ANCEL
on the remote.
EJECTING THE CASSETTE
To remove a cassette from the unit,
press the S
TOP
/E
JECT
button on the
TV/VCR combo front panel. The...
mark will begin to flash and the
cassette will be ejected from the unit.
CAUTION!
To avoid injury, do not place
your hand inside the video
cassette slot of the VCR or your
hand may be caught by the
unit’s internal mechanism. Take
special care to prevent children
from inserting their hands into
the VCR.
NOTES:
The TV/ VCR combo
can record and play
back video
cassettes in
monaural sound
only.
This TV/VCR combo
is equipped with
SQPB (S-VHS
QUASI PLAYBACK)
which lets you
watch tapes record-
ed in the S-VHS
format.
SQPB does not
deliver S-VHS
resolution.
S-VHS recording is
not possible with
this video recorder.
You can watch a
different program
than the one being
recorded by the
VCR. Press the
CHANNEL +/- button
or use the 10-key
pad to switch to a
different channel.
You may also return
to the recording
channel at any time.
REC 22
COUNT 0:00:30
Channel/Rec.
Display
Tape Counter
Other manuals for TV 20240
1
Table of contents
Other JVC TV VCR Combo manuals