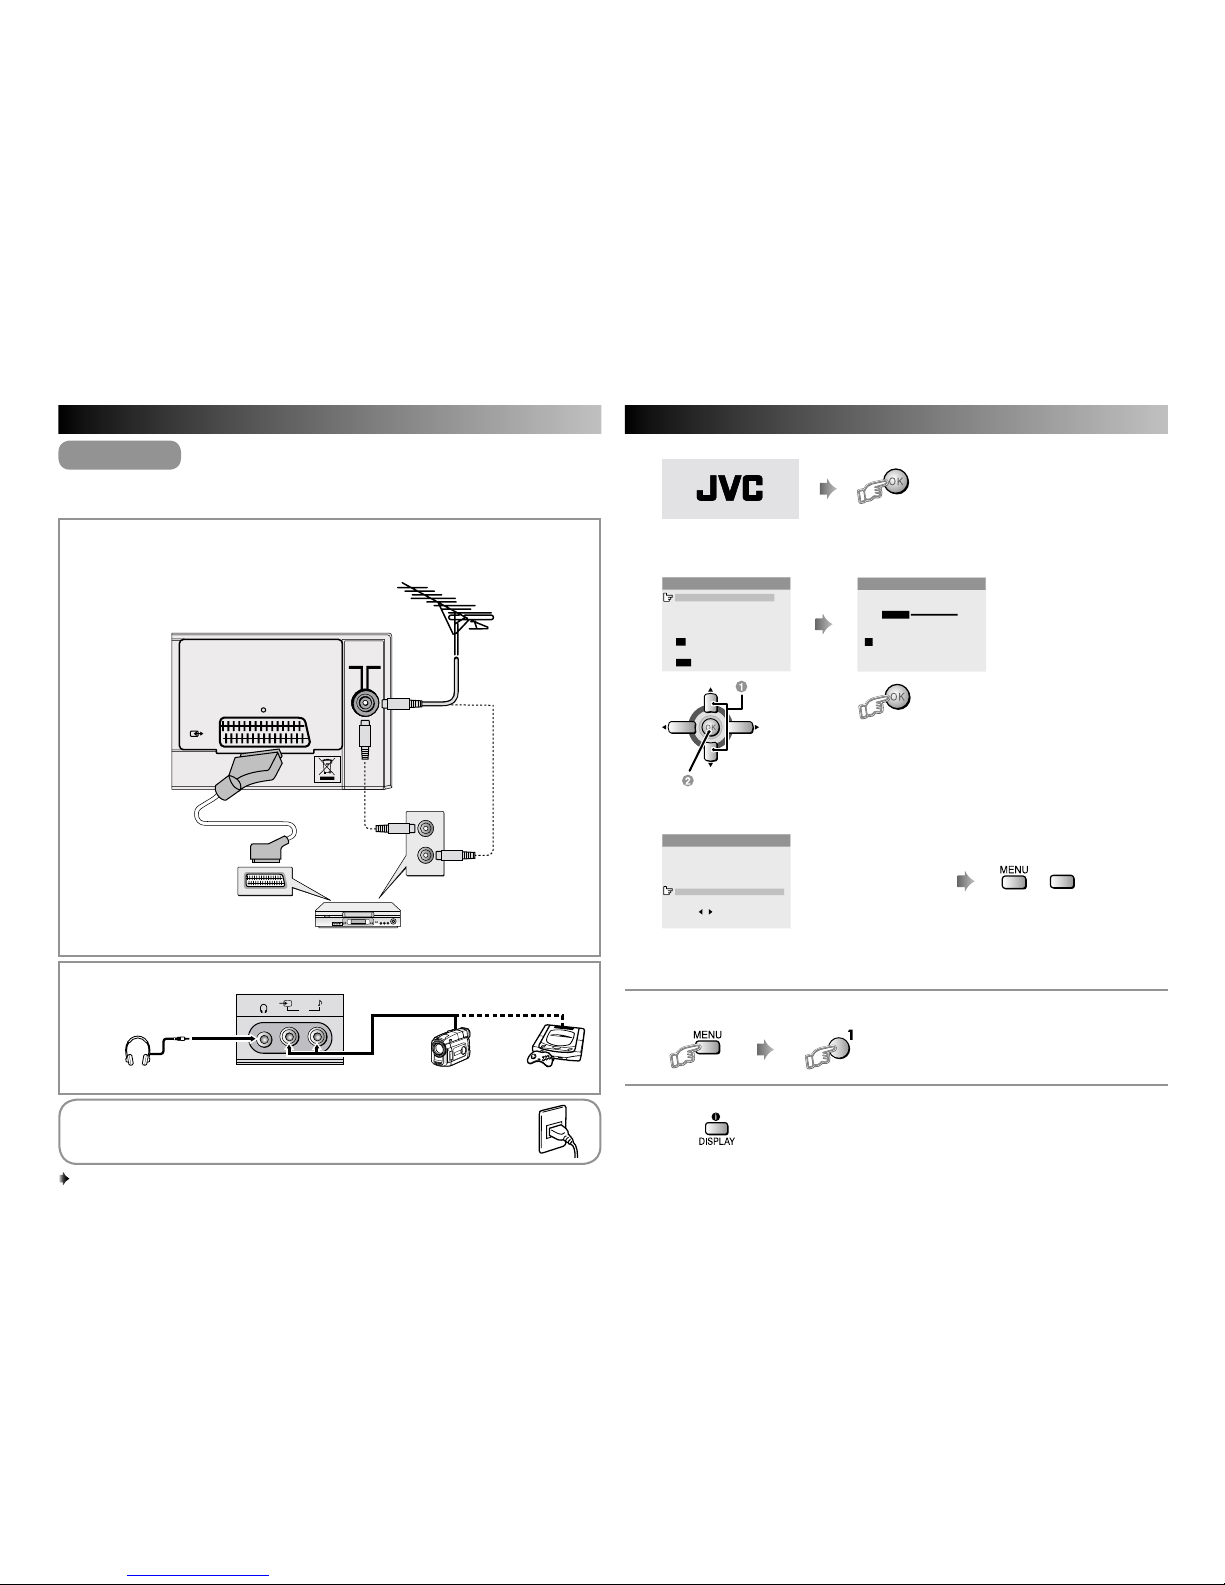
9
REFERENCE
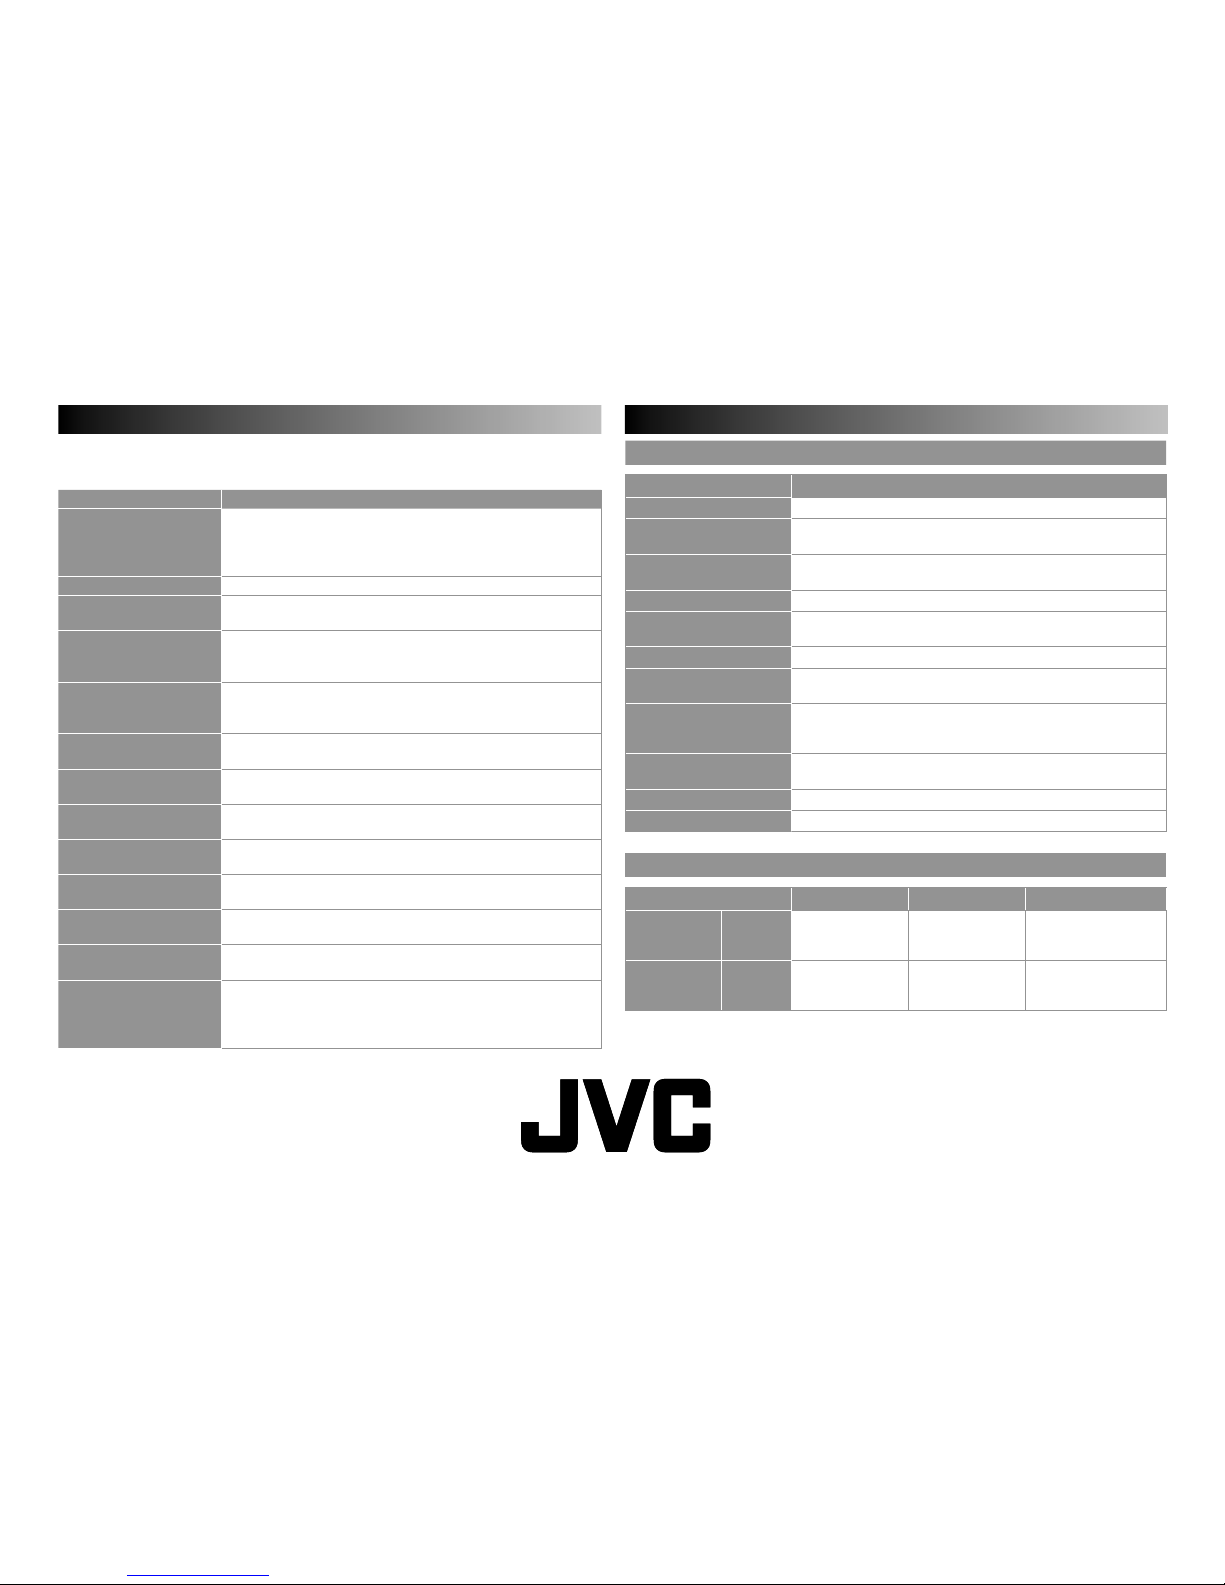
Sound and Colour system in your country or region
Area Country or Region Sound
System Colour
System
Europe
Germany, Holland, Belgium, etc. B/G
PAL
UK, etc. I
Czech Republic, Poland, etc. D/K
Russia, etc. SECAM
Asia,
Middle
East
Bahrain, Kuwait, Oman, Qatar, United Arab
Emirates, Yemen, etc.
Indonesia, Malaysia, Singapore, Thailand, India, etc
B/G
PAL
China, Vietnam, etc. D/K
Hong Kong, etc. I
Islamic Republic of Iran, Lebanon, Saudi Arabia, etc. B/G SECAM
Philippines, Taiwan, Myanmar, etc. M NTSC
Oceania Australia, New Zealand, etc. B/G PAL
Africa
Republic of South Africa, etc. IPAL
Nigeria, etc. B/G
Egypt, Morocco, etc. SECAM
“CH/CC” List
To use the INSERT function (P. 7), find the “CH/CC” number
corresponding to the TV’s Channel number from this table.
CH Channel CH Channel CC Channel CC Channel
CH 02/CH 202
E2, R1
CH 40/CH 240 E40, R40 CC 01/CC 201 S1 CC 31/CC 231 S31
CH 03/CH 203
E3, ITALY A
CH 41/CH 241 E41, R41 CC 02/CC 202 S2 CC 32/CC 232 S32
CH 04/CH 204
E4, ITALY B, R2
CH 42/CH 242 E42, R42 CC 03/CC 203 S3 CC 33/CC 233 S33
CH 05/CH 205
E5, ITALY D, R6
CH 43/CH 243 E43, R43 CC 04/CC 204 S4 CC 34/CC 234 S34
CH 06/CH 206
E6, ITALY E, R7
CH 44/CH 244 E44, R44 CC 05/CC 205 S5 CC 35/CC 235 S35
CH 07/CH 207
E7, ITALY F, R8
CH 45/CH 245 E45, R45 CC 06/CC 206 S6 CC 36/CC 236 S36
CH 08/CH 208
E8, R9
CH 46/CH 246 E46, R46 CC 07/CC 207 S7 CC 37/CC 237 S37
CH 09/CH 209
E9, ITALY G
CH 47/CH 247 E47, R47 CC 08/CC 208 S8 CC 38/CC 238 S38
CH 10/CH 210
E10, ITALY H, R10
CH 48/CH 248 E48, R48 CC 09/CC 209 S9 CC 39/CC 239 S39
CH 11/CH 211
E11, ITALY H+1, R11
CH 49/CH 249 E49, R49 CC 10/CC 210 S10 CC 40/CC 240 S40
CH 12/CH 212
E12, ITALY H+2, R12
CH 50/CH 250 E50, R50 CC 11/CC 211 S11 CC 41/CC 241 S41
CH 21/CH 221 E21, R21 CH 51/CH 251 E51, R51 CC 12/CC 212 S12 CC 75/CC 275 X
CH 22/CH 222 E22, R22 CH 52/CH 252 E52, R52 CC 13/CC 213 S13 CC 76/CC 276 Y, R3
CH 23/CH 223 E23, R23 CH 53/CH 253 E53, R53 CC 14/CC 214 S14 CC 77/CC 277 Z, ITALY C, R4
CH 24/CH 224 E24, R24 CH 54/CH 254 E54, R54 CC 15/CC 215 S15 CC 78/CC 278 Z+1, R5
CH 25/CH 225 E25, R25 CH 55/CH 255 E55, R55 CC 16/CC 216 S16 CC 79/CC 279 Z+2
CH 26/CH 226 E26, R26 CH 56/CH 256 E56, R56 CC 17/CC 217 S17
CH 27/CH 227 E27, R27 CH 57/CH 257 E57, R57 CC 18/CC 218 S18
CH 28/CH 228 E28, R28 CH 58/CH 258 E58, R58 CC 19/CC 219 S19
CH 29/CH 229 E29, R29 CH 59/CH 259 E59, R59 CC 20/CC 220 S20
CH 30/CH 230 E30, R30 CH 60/CH 260 E60, R60 CC 21/CC 221 S21
CH 31/CH 231 E31, R31 CH 61/CH 261 E61, R61 CC 22/CC 222 S22
CH 32/CH 232 E32, R32 CH 62/CH 262 E62, R62 CC 23/CC 223 S23
CH 33/CH 233 E33, R33 CH 63/CH 263 E63, R63 CC 24/CC 224 S24
CH 34/CH 234 E34, R34 CH 64/CH 264 E64, R64 CC 25/CC 225 S25
CH 35/CH 235 E35, R35 CH 65/CH 265 E65, R65 CC 26/CC 226 S26
CH 36/CH 236 E36, R36 CH 66/CH 266 E66, R66 CC 27/CC 227 S27
CH 37/CH 237 E37, R37 CH 67/CH 267 E67, R67 CC 28/CC 228 S28
CH 38/CH 238 E38, R38 CH 68/CH 268 E68, R68 CC 29/CC 229 S29
CH 39/CH 239 E39, R39 CH 69/CH 269 E69, R69 CC 30/CC 230 S30