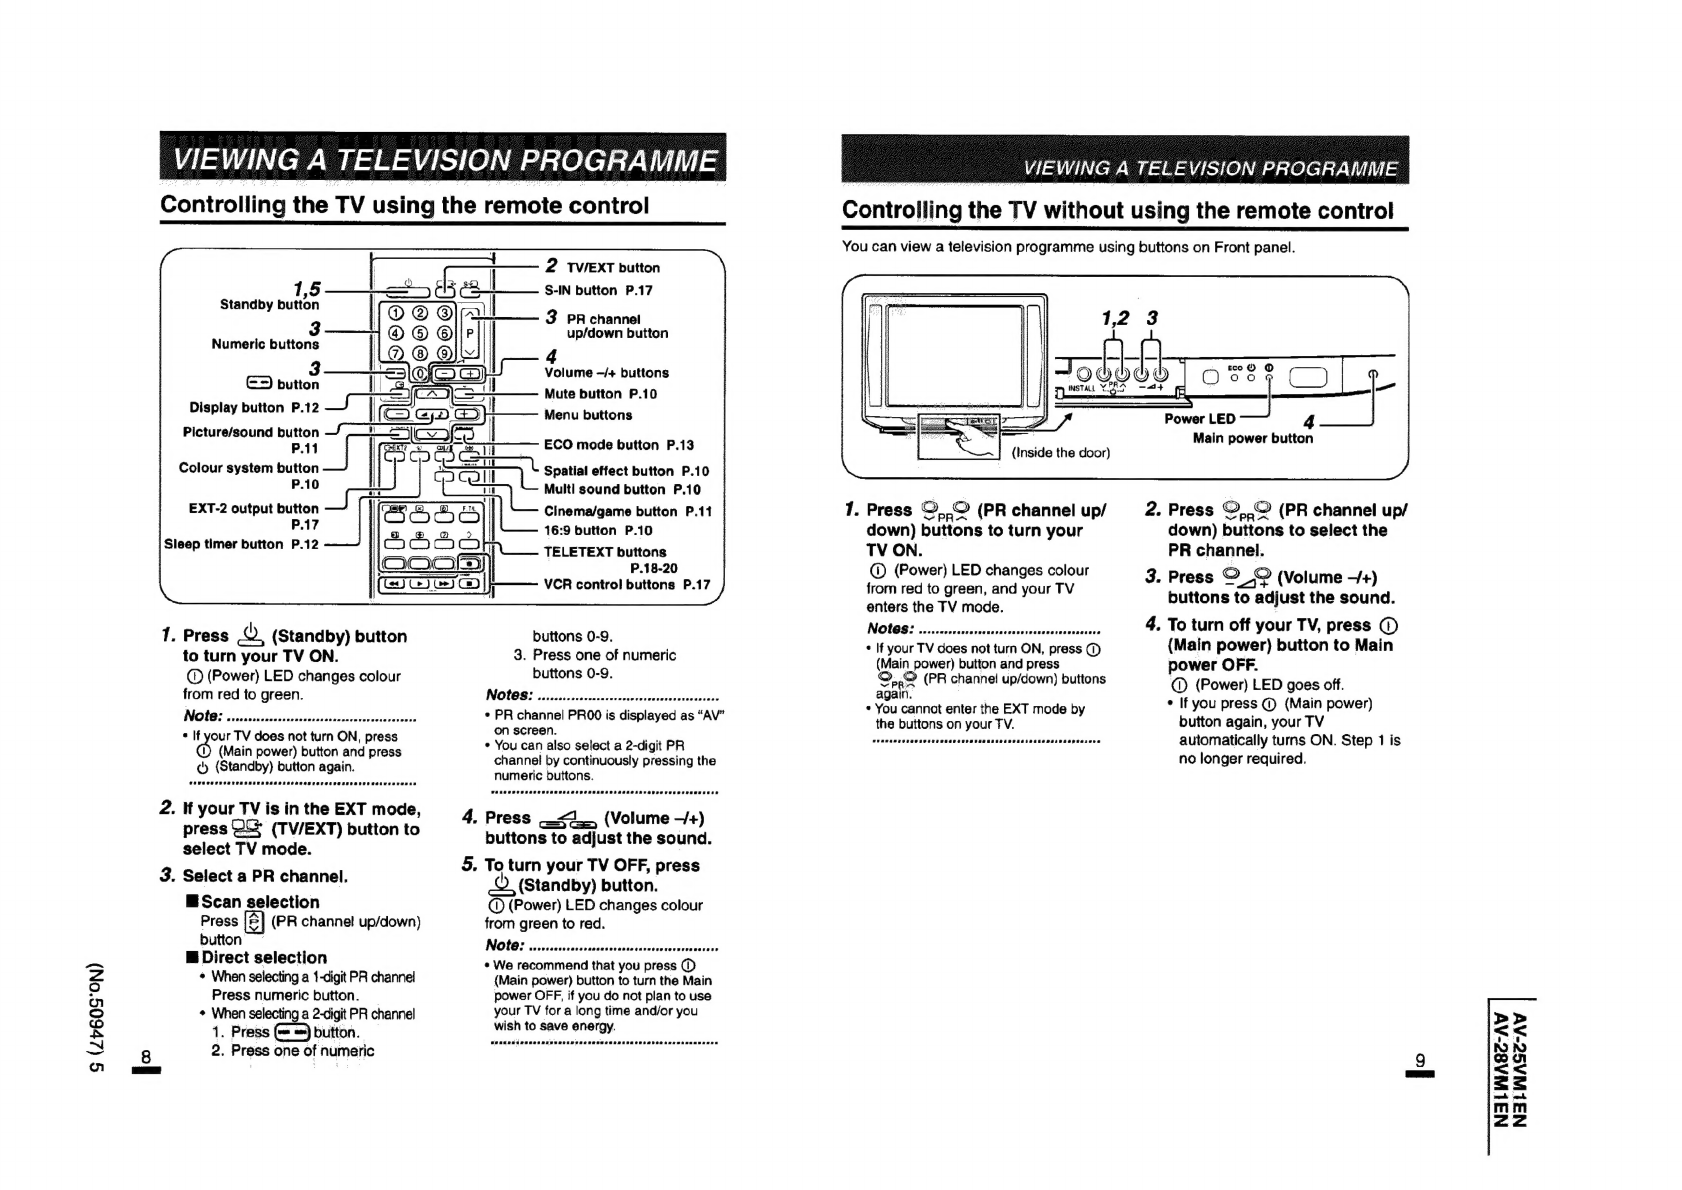
6
(ZP60S°ON)
EDITING
PR
CHANNELS
VIE
WING
FROM
AN
EX
TERNAL
DE
VICE
—
The
EDIT
menu
for
the
next
PR
6.
Repeat
steps
4.
and
5.
to
Voulcaivview
Tonia
eonnected
itera
device
by
ealecing
the
apprsorate
Input
channel
is
displayed,
and
the
change
the
settings
of
all
PR
mode.
broadcast
channel
set
for
that
PR
channels.
channel
is
selected.
When
you
have
finished
setting
all
7.
Press
@&
(TV/EXT)
button
repeatedly.
NOB
icin
teeniaisancanaaven
PR
channels,
return
to
the
EDIT
The
mode
changes
cyclically
in
the
following
order.
¢
To
change
the
setting
of
a
PR
channel
menu
of
PR
channel
PRO1.
as
TV
mode
—-»
EXT-1
mode
—»
EXT-2
mode
—»
EXT-3
mode
having
a
number
smaller
than
the
So
ee
|
currently
displayed
PR
channel
7.
Press
©
(Display)
button
;
number,
return
to
step
3.,
and
select
twice
to
delete
the
EDIT
2.
Press
$©)(S-IN)
button
if
you
wish
to
select
S-VIDEO
mode.
the
PR
channel
whose
setting
you
;
want
to
reset.
menu.
Note:
.......:200
seca
venenserencersesccsescevevserevescocsrencetoseses
sneer
encncaronanspvansersuavensersnassevacanioverece
sts
dots
taba
ahusasdsedses
cvauiceateal
ah
agseleaeande
Editing
of
PR
channels
is
complete.
*
You
cannot
select
S-VIDEO
mode
in
the
EXT-3 mode.
SRPSKA
REET
EOE
CAE
SESSLER
See
ws
SAAT
TORE
TEE
EU
TSE
ECE
SSIES
COST
FESS
CAS
CSL
RFAFISESS
ESTP
SSSR
ETA
SSSEISO
TH
SHA
SST
Sas
eee
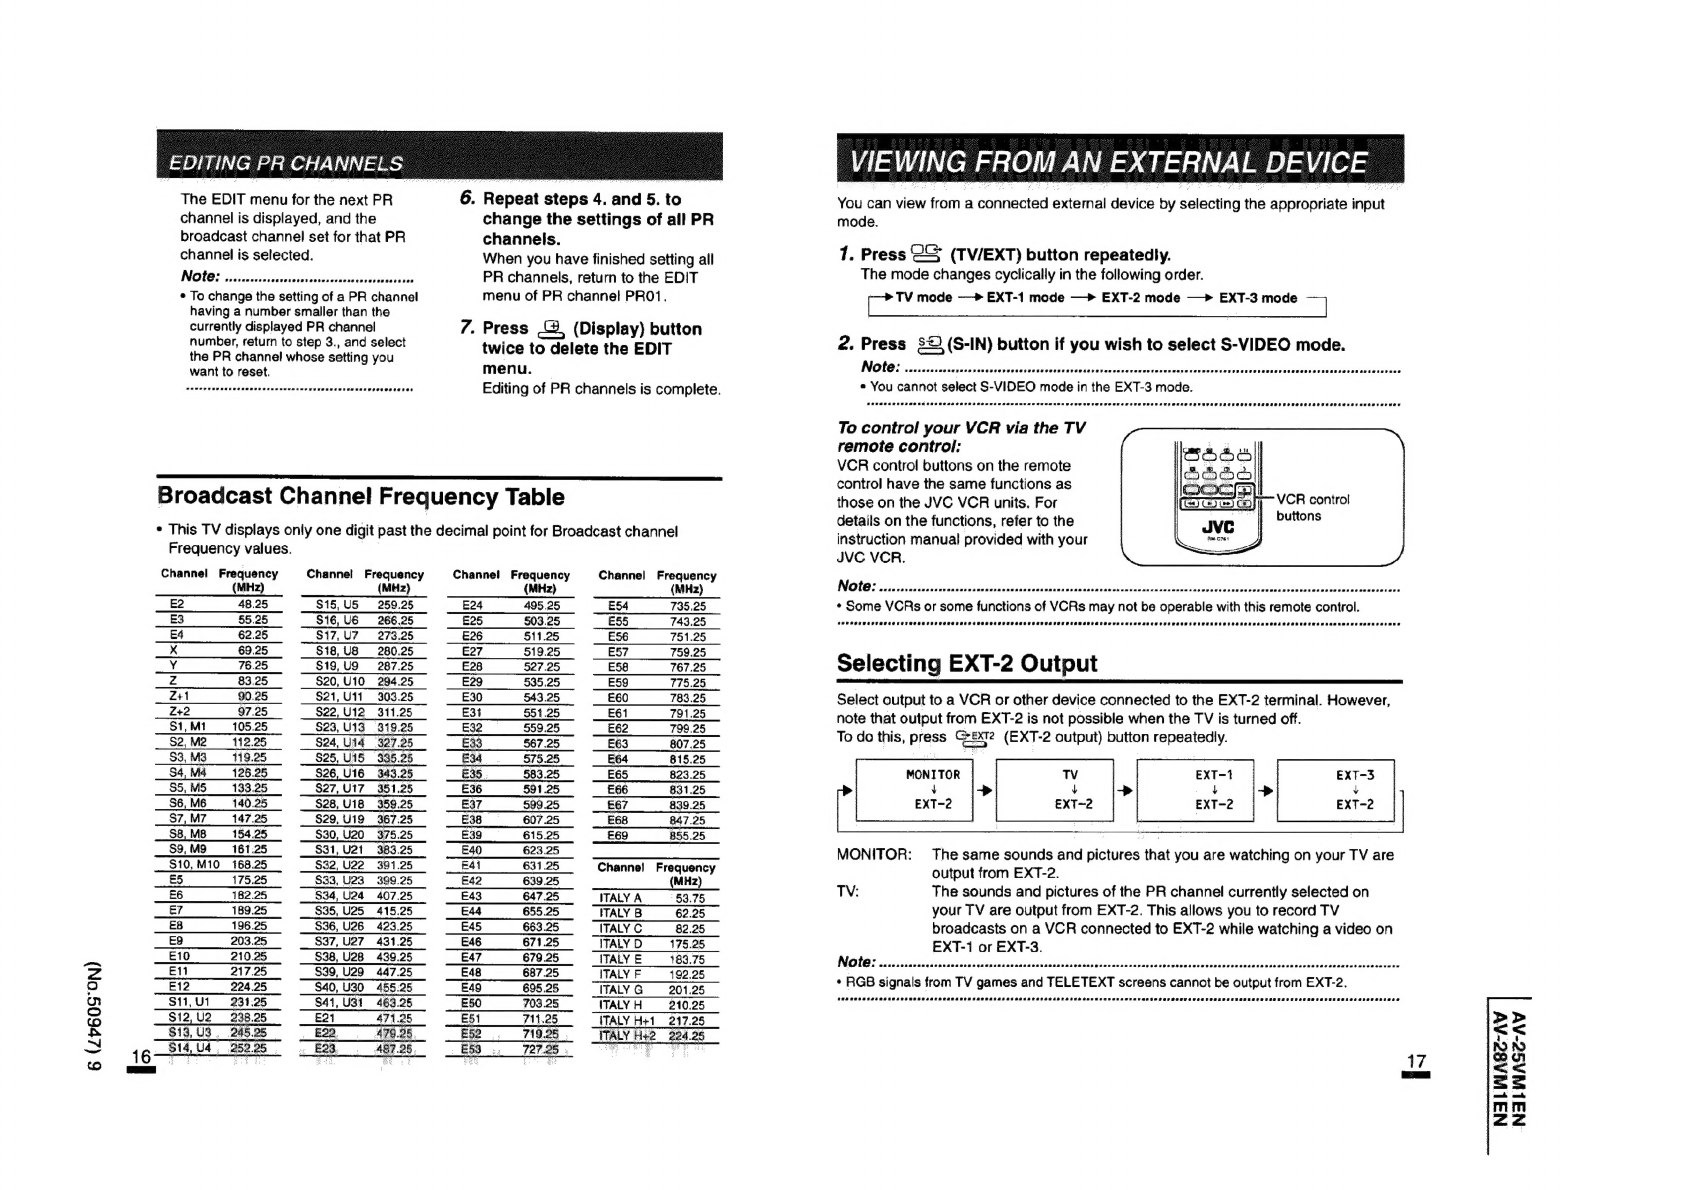
To
control
your
VCR
via
the
TV
remote
control:
VCR
control
buttons
on
the
remote
control
have
the
same
functions
as
Broadcast
Channel
Frequency
Table
those
on
the
JVC
VCR
units.
For
[CSTE
ESF
VCR
contro
aes
:
"tt
puttons
*
This
TV
displays
only
one
digit
past
the
decimal
point
for
Broadcast
channel
aed
oan
ie
hae
ssa
hae
|
Frequency
values.
JVC
VCR
Channel
Frequency
Channel
Frequency
Channel
Frequency
Channel
Frequency
(MHz)
(MHz)
(MHz)
(MHz)
IN
OUO
5
5
isssc
cai
sotdvta
sos
wiveatincubusey
ss
wentesdeautesad
base
it
eadacuseben
ti
icteuss
dessiusueasitewssescuctescassesiseseiaes
E2
48.25
$15,U5
259.25
E24
495.25
E54
735.25
*«
Some
VCRs
or
some
functions
of
VCRs
may
not
be
operable
with
this
remote
control.
E3
§5.25
$16,U6
266.25
E25
503.25
£55
743.25
ConeeerscracsacerensacescueseascsesaeseeEe
see
ee
eRe
snsOLeDSOnalDaanenenasneceseOEeOSENSEASSR
See
seceonvensesertetesasasuasecusencssane
E4
62.25
S17,
U7__
273.25
E26
511.25
E56
751.25
X
69.25
$18,
U8
280.25
E27
519.25
E57
759.25
|
.
Y
76.25
S19,
U9
287.25
E28
527.25
E58
767.25
Selecting
EXT-2
Output
Zz
83.25
$20,
U10
294.25
E29
535.25
E59
775.25
:
Z+1
90.25
$21,U11_
303.25
E30
543.25
E60
783.25
Select
output
to
a
VCR
or
other
device
connected
to
the
EXT-2
terminal.
However,
ee
wee
SCALE
ae
ae
,
EEE
St
Se
er
note
that
output
from
EXT-2
is
not
possible
when
the
TV
is
turned
off.
S2,
M2
112.25
$24,
Utd
927.25
E33
567.25
E63
807.25
To
cos
Piass:
Tees.
(EX)
Output)
ullon
nepeatany:
S3,M3___
119.25
$25,
Ui5
335.25
E34
575.25
E64
815.25
=
: :
S4,M4_
126.25
$26,U16
343.25
E35.
583.25
E65
823.25
MONITOR
S5,M5___
133.25
$27,
U17_
351.25
E36
591.25
E66
831.25
4
S6,M6___
140.25
$28,
U18
359.25
E37
599.25
E67
839.25
EXT-2
S7,M7___147.25
$29,
U19
367.25
E38
«607.25
E68
847.25
$8,M8
154.25
$30,
U20__
375.25
E39
615.25
E69
855.25
=
a
a
—S9.
M9
167.25
_
S31,
U2t_
383.25
0
E40
623825
MONITOR:
The
same
sounds
and
pictures
that
you
are
watching
on
your
TV
are
$10,M10
168.25
$32,
U22
391.25
E41
631.25
Channel
Frequency
output
from
EXT-2
5
175.25
$33,
U23
399.25
£42
639.25
(MHz)
:
E6
182.25
~~
§a4,U24
407.25
E43
64725.
“ITALYA.
53.75
TV:
The
sounds
and
pictures
of
the
PR
channel
currently
selected
on
E7
189.25
S35,
U25
415.25
E44
655.25
“TTALYB
62.25
your
TV
are
output
from
EXT-2.
This
allows
you
to
record
TV
E8
196.25
$36,
U26
423.25
E45
663.25
ITALY
C
82.25
broadcasts
on
a
VCR
connected
to
EXT-2
while
watching
a
video
on
EQ
203.25
S37,
U27
431.25
E46
671.25
ITALY
D
175.25
EXT-1
or
EXT-3.
—£10___—210.25___
$38,
U28_
439.25
E47
670.25
ITALY
180.75
Co
oes
mS
tS
RODE
ok
aranTE
eT
ICOE
ETE
A
nT
DUS
RTT
SPOTTER
y
tS
en
Se
ee
—s
eae
Ss
eS
——
ee
=
ET
*
RGB
signals
from
TV
games
and
TELETEXT
screens
cannot
be
output
from
EXT-2.
$11,
U1
231
25
~
841,
U3!
463.25
E50.
703.25
TTALYH
21025
TrIriririitfTiTiiTitiititrititiiiiiit
iit
itil
ti
tie
Cosereerrecseresizessezas
Foeemeseerersneaeesessacarerassase
$12,
U2_
298.25
E21
474.38
E51
714.25
TAD
+1
247.25
a
NSALWAS2-AV
NaAlWAS?-AV


 User manual")