JVC AV-21BX18 User manual

COLOUR TELEVISION
INSTRUCTIONS
AV-21BX18
AV-21BX18B
AV-21BX18S
AV-21QX18
AV-21QX28
AV-21SX18
AV-21SX28
AV-29BX18
AV-29BX18B
AV-29QX18
AV-29QX18B
AV-29QX28
GGT0222-001B-H
Safety precautions ............................... 2
Connections
......................................... 3
TV buttons and functions ..................... 3
Remote control buttons and
basic functions ..................................... 4
Initial settings ....................................... 5
Registering / Editing channels ............. 5
PREPARATION
Picture setting ...................................... 6
Sound setting ...................................... 6
Useful functions ................................... 7
Teletext operation ................................ 8
Watching Video or DVDs ..................... 9
Troubleshooting ................................. 10
Specification .......................................11
FUNCTIONS
REFERENCE
Contents
ENGLISH
The illustrations of AV-21QX28 is used in this instruction
manual for explanation purpose. Your TV may not look
exactly the same as illustrated.
This illustration shows AV-21QX28.

2
Thank you for buying this JVC colour television.
To make sure you understand how to use your new TV, please read this manual thoroughly before you begin.
CAUTION TO ENSURE PERSONAL SAFETY, OBSERVE THE
FOLLOWING RULES REGARDING THE USE OF
THIS TV.
• Operate only
from the
power source
indicated on
the rear of the
TV.
• Avoid damaging the power cord
and main plug. When unplugging
the TV, grasp the main plug. Do
not pull on the power cord.
• This TV can be
turned on/off power
by connecting/
disconnecting the
AC plug into AC
outlet. While this TV is being
installed, enough space should
be reserved for connection/
disconnecting the AC plug into
AC outlet by hand.
WARNING TO PREVENT FIRE OR SHOCK HAZARD, DO
NOT EXPOSE THIS APPLIANCE TO RAIN OR
MOISTURE.
• Never block or cover the ventilation openings.
• Never install the TV where good ventilation is unattainable.
• When installing this TV, leave spaces for ventilation around
the TV of more than the minimum distances as shown.
• The apparatus
shall not be
exposed to
dripping or
splashing and that no objects filled
with liquids, such as vases, shall be
placed on the apparatus.
• Do not allow
objects or liquid
into the cabinet
openings.
• The surface of the TV screen is easily
damaged. Be very careful with it when
handling the TV. Should the TV screen
become soiled, wipe it with a soft dry cloth.
Never rub it forcefully. Never use any
cleaner or detergent on it.
In the event of a
fault, unplug the unit and
call a service technician. Do
not attempt to repair it yourself
or remove the
rear cover.
• Never listen to headphones at high volume!
- It may damage your hearing.

3
CAUTION Ensure to turn off all equipments including the TV before
connecting the AC main plug to the AC outlet.
V L / MONO R
IN (VIDEO-3)
Connections TV buttons and functions
POWER
ON TIMER
Video and audio
input jacks for
VIDEO-3 mode
Remote control sensor TV’s main power on/off
Power lamp - Indicates the TV’s status.
No colour: TV’s main power is being turned off.
Red: TV’s main power is turned on.
Blink: While the TV is in standby mode, ON TIMER function is in used.
While the TV is in turn on mode, OFF TIMER function is in used.
VHF/UHF
outdoor
aerial
Rear of VCR
Connecting to the aerial cable and VCR
(Connect
directly if not
using a VCR)
RF output
(Connect via a VCR)
RF input
TV rear terminals
Connecting to the front video input terminal
Camcorder or TV game
Headphones
After all the
connections
have been
made, insert the
main plug to the
AC outlet.
• When connecting to
COMPONENT (VIDEO-2)
input, depending on the
connection, choose the
appropriate video input using
the menu (\ page 9).
DVD player (with component video signals input)
VCR (for playing)
DVD player
(composite signals)
VCR (for recording)
Connecting to the rear component/video input terminal and output terminal
Aerial cable
Video output
Audio
output
Channel selection,
To select menu function
MENU
EXIT
CHANNEL
-
+
VOLUME
-
+
V L / MONO R
IN (VIDEO-3)
Display the menu
and exit after finish
setting
Volume level adjustment,
To choose a Top menu and
adjust the desired menu function
Headphone jack
The illustration of AV-21QX28 is shown here for explanation purpose. Your
TV may not look exactly the same as illustrated.
The illustration of AV-21QX28 is shown here for explanation purpose. Your
TV may not look exactly the same as illustrated.
75-ohm
coaxial
cable
(not
supplied)

4
Remote control buttons and basic functions
COLOUR SOUND
SYSTEM
POWER
FAVORITE CHANNEL
MENU TV/VIDEO
DISPLAY MUTING
DVD MENU
ECO
BASS
CHANNEL VOLUME
-/--
TV
RM-C1171
PICTURE PICTURE
BOOSTER MODE
CINEMA
SURROUND
SOUND
MODE
123
456
789
0
OK
-
+ +
-
RETURN+
Turn the TV on from standby and vice versa
TV or video terminal input selection, Exit from the menu
Turn the volume Off / On
Programme number selection
For two digits :
Adjust the volume level, Turn off Muting
• Display the programme or video terminal number.
• To return to the previous menu
Channel selection
Select the desired channel number.
For Hyper Scan
Press and hold
PR changes without changing the
picture. Once you stop pressing
CHANNEL+ or CHANNEL– button,
picture will change to the desired PR.
• Insert two batteries by following the
and polarities and inserting the end
first.
• Use AA/R6/UM-3 dry cell batteries.
• If the remote control does not work
properly, fit new batteries. The supplied
batteries are for testing, not regular use.
• When Main Power off, Return plus program is clear.
If you want to change channel setting for Return plus
program, you can registered the new channel for Return
plus program without Main Power off.
RETURN function
If you have not set or have cancelled the RETURN PLUS
channel, this will return to the previously viewed channel.
Press and hold PROGRAMMED!
Choose the channel you want to programme
FAVORITE CHANNEL
Programme and recall 4 favourite channels
(colour buttons: red, green, yellow, blue)
Choose the TV channel you wish to programme
Press and hold
any button
PROGRAMMED! ■
Repeat to programme another favourite channel.
To recall the favourite channel,
press the corresponding colour button.
• When the TV is in Text function or MENU mode,
the favourite channel function is not available.
WARNING:
Batteries shall not be
exposed to excessive heat
such as direct sunshine,
fire or the like.
If this symbol
is shown, it is
only valid in the
European Union.
RETURN PLUS function
Return to the frequently viewed channel.

5
Initial Settings Registering / Editing channels
CH
LANGUAGE
TELETEXT LANGUAGE
AUTO PROGRAM
PR
FINE
03
067.25
ENGLISH
GROUP-1
SET UP
SKIP ON
50%
CH
LANGUAGE
TELETEXT LANGUAGE
AUTO PROGRAM
PR
FINE
03
067.25
ENGLISH
GROUP-1
SET UP
SKIP ON
MENU
CH
LANGUAGE
TELETEXT LANGUAGE
AUTO PROGRAM
PR
FINE
03
067.25
ENGLISH
GROUP-1
SET UP
SKIP ON
MENU TV/VIDEO
CH
LANGUAGE
TELETEXT LANGUAGE
AUTO PROGRAM
PR
FINE
03
067.25
ENGLISH
GROUP-1
SET UP
SKIP ON
CH
LANGUAGE
TELETEXT LANGUAGE
AUTO PROGRAM
PR
FINE
SKIP
03
067.25
ENGLISH
GROUP-1
SET UP
ON
CH
LANGUAGE
TELETEXT LANGUAGE
AUTO PROGRAM
PR
FINE
03
067.25
ENGLISH
GROUP-1
SET UP
SKIP ON
PR Display the programme number.
FINE
1. You can fine tunning press 1 / 2 button.
2. You can channel manual tunning by press
and hold 1 / 2 button on for 3 seconds.
SKIP SKIP the channel.
1. Select “TELETEXT LANGUAGE”
2. Select the teletext language
group.
3. Automatically register channels. (AUTO PROGRAM)
1. Turn on the TV.
4. Check what was registered.
2. Select the teletext language group.
1. Select “SET UP”
1. Select item.
2. Set or adjust.
You can edit the channel list or register new channel manually.
1. Display “SET UP” menu.
2. Select item.
1. Select the desired language by 1 / 2 button.
To complete
Setup Tour
or
• If you want to edit channel, read the next column.
2. Start to use
“SET UP” menu
SET UP menu appears.
OK
or
• You can set undesired channels to be skipped. (ON / OFF)

6
Picture Setting
1. Display “PICTURE” menu.
Sound Setting
1. Select “SOUND”
2. Start to use
“SOUND” menu
MENU
CH
SHARP
CONTRAST
BRIGHT
COLOUR
TINT
PICTURE MODE USER
NORMAL
WHITE BALANCE
OFF
VNR
PICTURE
MENU
CH
BASS
TREBLE
BALANCE
SOUND
ON
AI VOLUME
PICTURE MODE
You can choose the desired picture setting.
VIVID : Heightens contrast and sharpness.
SOFT : Softens contrast and sharpness.
USER :
You can change the picture setting as you like.
(
CONTRAST, BRIGHT, SHARP, COLOUR, TINT
)
SHARP : To sharpen the picture. (For DVD mode)
CLEAR : To softens the picture. (For DVD mode)
CONTRAST You can change the contrast of the picture.
Lower Higher
BRIGHT You can change the brightness of the picture.
Darker Brighter
SHARP You can change the sharpness of the picture.
Softer Sharper
COLOUR You can change the colour of the picture.
Lighter Deeper
TINT You can change tint of the picture.
Reddish Greenish
WHITE BALANCE
When DVD THEATER
STATUS set to ON,
WHITE BALANCE is not
available in VIDEO-2.
You can change the white balance of the picture to
better match the type of video being viewed.
NORMAL : Normal white balance.
COOL : Bluish white.
WARM : Reddish white.
VNR
Only available in RF,
VIDEO-1 and VIDEO-3.
Reduce the amount of noise in original picture.
OFF : VNR is turned off.
MIN : Effect of VNR becomes minimum level.
MAX : Effect of VNR becomes maximum level.
AUTO : Effect of VNR is automatically controlled.
AI VOLUME Prevent sudden increase or decrease of sound when
changing channels. (ON / OFF)
BASS You can change the low tones of sound.
(Weaker Stronger)
TREBLE You can change the high tones of sound.
(Weaker Stronger)
BALANCE You can change the speaker balance.
(Left Stronger Right Stronger)
1. Display “SOUND” menu.
2. Select item and setting or adjust.
1. Select item.
2. Set or adjust.
2. Select item and setting or adjust.
1. Select item.
2. Set or adjust.
1. Select “PICTURE”
2. Start to use
“PICTURE” menu
• To return the setting to
default, press the Blue
button.
• To return the setting to
default, press the Blue
button.

7
Useful Functions
MENU
CH
OFF TIMER
CHILD LOCK
BLUE BACK
VIDEO-2 SETTING
ON TIMER 00:00
VIDEO
ON
OFF
ON
FEATURES
PICTURE TILT 0
1. Display “FEATURES” menu.
ON TIMER
TV to turn on
automatically from
standby mode at a
set time.
You can set the ON TIMER to your desired period
of time.
When the ON TIMER is set to other than 00:00, the
ON TIMER is activated. You can set the period of
time to a maximum of 9 hours in 1 hour intervals.
Note : If TV is not in standby mode when ON
TIMER is reach the setting time, this case is
not available.
OFF TIMER
TV to turn off
automatically to
standby mode after
a set time.
You can set the period of time to a maximum of 90
minutes in 15 minutes intervals.
CHILD LOCK Disables the front control buttons of the TV.
(ON / OFF)
BLUE BACK Display a blue screen and mute the sound when the
signal is weak or absent. (ON / OFF)
PICTURE TILT
You can correct the picture tilt caused by the earth’s
magnetic force.
• Only available in 29B and 29Q series.
1. Select item.
2. Set or adjust.
Colour and Sound system in your country or region.
Area Country or Region Sound
system
Colour
system
Asia,
Middle East
Bahrain , Kuwait, Oman, Qatar, United Arab Emirates,
Yemen, Indonesia, Malaysia, Singapore, Thailand,
India, etc.
B/G
PAL
China, Vietnam, etc. D/K
Hong Kong, etc. I
Islamic Republic of Iran, Lebanon, Saudi Arabia, etc. B/G SECAM
Philippines, Taiwan, Myanmar, etc. M NTSC
Europe
Russia, etc. D/K SECAM
Czech Republic, Poland, etc.
PALGermany , Holland, Belgium , etc. B/G
UK, etc. I
Oceania Australia, New Zealand, etc. B/G PAL
Africa
Republic of South Africa, etc. I PAL
Nigeria, etc. B/G
Egypt, Morocco , etc. SECAM
1. Select “FEATURES”
2. Start to use
“FEATURES” menu
ECO
AI ECO SENSOR
You can automatically adjust TV screen contrast according
to the brightness of your room to suitable level for a better
eyecare. (OFF / MODE-1 / MODE-2 / DISPLAY)
• Only available in 21S series.
ECO MODE
You can adjust TV screen contrast according to the
brightness of your room to suitable level for a better
eyecare. (OFF / ECO-1 / ECO-2)
• Only available in 21B, 21Q, 29B and 29Q series.
COLOUR
COLOUR SYSTEM
You can select the appropriate colour system when the
picture is not clear or no colour appears.
(AUTO / PAL/ SECAM / NTSC3.58 / NTSC4.43)
SOUND
SOUND SYSTEM
You can select an appropriate sound system when
abnormal sound occurs even when the picture appears
normal. (B/G, I, D/K , M)

8
You can watch the Teletext broadcast channel with TEXT functions.
1. TV mode ➝ TEXT mode ➝ MIX mode
TEXT
2. Select other Teletext pages.
OR OR
3.
TEXT
OR
TV/VIDEO
to return to the TV mode.
You can also operate the teletext using the following buttons:
Teletext operation
(Hold) Hold a teletext page.
To Cancel, press the button again.
(Reveal) Display the hidden text (example: answers to a quiz).
To Cancel, press the button again.
(Size) Enlarge the teletext display.
(Index) Return to the index page instantly.
(Cancel)
Watch TV programme while waiting for a teletext page.
When the teletext page is found, a page number
appears at the upper left of the screen.
Press the button to view the teletext page.
(Sub-page)
Sub-page numbers are displayed at the left of the
screen.
To cancel sub-page function, press the button again.
GROUP-1 English, German, Swedish, Finnish, Danish, Hungarian,
Italian, French, Spanish, Portuguese, Turkish
GROUP-2 Polish, German, Estonian, Slovenian, Czech, Slovakian,
Rumanian
GROUP-3 Polish, German, Estonian, Lettish, Russian, Ukrainian
GROUP-4 English, French, Turkish, Arabic
GROUP-5 English, French, Turkish, Farsi
MENU
1. Display “SET UP” menu.
1. Select “SET UP”
2. Start to use
“SET UP” menu
2. Select item.
You can set the Teletext language group that corresponds to the programmes.
TELETEXT LANGUAGE
1. Select “TELETEXT LANGUAGE”.
2. Set Teletext language group.
CH
LANGUAGE
TELETEXT LANGUAGE
AUTO PROGRAM
PR
FINE
03
067.25
ENGLISH
GROUP-1
SET UP
SKIP ON
• Only available AV-21QX28, AV-21SX28 and AV-29QX28

9
VIDEO-2 SETTING
CH
OFF TIMER
CHILD LOCK
BLUE BACK
VIDEO-2 SETTING
ON TIMER 00:00
VIDEO
ON
OFF
ON
FEATURES
PICTURE TILT 0
Switch between video and component
signal (VIDEO / COMPONENT)
1. Select “FEATURES” menu.
1. Select “VIDEO-2 SETTING”
2. Set to VIDEO or COMPONENT
2. Select “VIDEO-2 SETTING”. Then set to VIDEO or COMPONENT.
MENU
1. Select “FEATURES”
2. Start to use
“FEATURES” menu
AUTO SIGNAL DETECT Automatically change the input mode to Video-2
when the DVD input signal is detected.
(ON / OFF)
DVD THEATER STATUS
Enjoy an enhanced picture quality for movie
playback in a dark room, like watching a movie in
the theater. (ON / OFF)
Function for watching DVDs
CH
OFF TIMER
CHILD LOCK
BLUE BACK
VIDEO-2 SETTING
ON TIMER 00:00
VIDEO
PICTURE TILT
0
ON
OFF
ON
DVD FEATURES
AUTO SIGNAL DETECT
ON
ON
DVD THEATER STATUS
Available for component signal only.
1. Select “FEATURES(DVD)” menu.
1. Select item.
2. Set or adjust.
2. Select item and setting.
MENU
1. Select
“FEATURES(DVD)”
2. Start to use
“FEATURES(DVD)”
menu
Watching Video or DVDs
• When you set DVD THEATER STATUS set to ON, AI ECO SENSOR /
ECO MODE and WHITE BALANCE adjustment become unavailable.
Only available in VIDEO-2 mode.
• You can operate the
DVD function by press
DVD MENU
button.

10
Troubleshooting
No picture, no sound Page
Deactivate the BLUE BACK function if it is turned on. P. 7
Choose the appropriate sound system. Refer to “SOUND SYSTEM”.
Snowy picture
Check the aerial cable and TV connections. P. 3
Stripes appear on the picture
Interference caused by devices such as an amplifier, personal computer,
or a hair drier. Move it away from your TV.
--
Double-pictures (ghosting) occur
Interference occurs caused by signal reflecting from mountains or
building. Try to adjust the aerial’s direction or use another antenna.
--
Poor picture
Choose the appropriate colour system. Refer to “COLOUR SYSTEM”. P. 7
Adjust the COLOUR or BRIGHT setting. Refer to “PICTURE MENU”. P. 6
White and bright still image look as if it was coloured
Inevitable phenomenon due to the nature of the picture tube.
This is not a malfunction.
--
Top of the image from software products or video tape is distorted
Due to the condition of the video signal, the image was not properly
recorded. This is not a malfunction.
--
Poor sound
Adjust the sound frequency properly. Refer to “SOUND SYSTEM”. P. 7
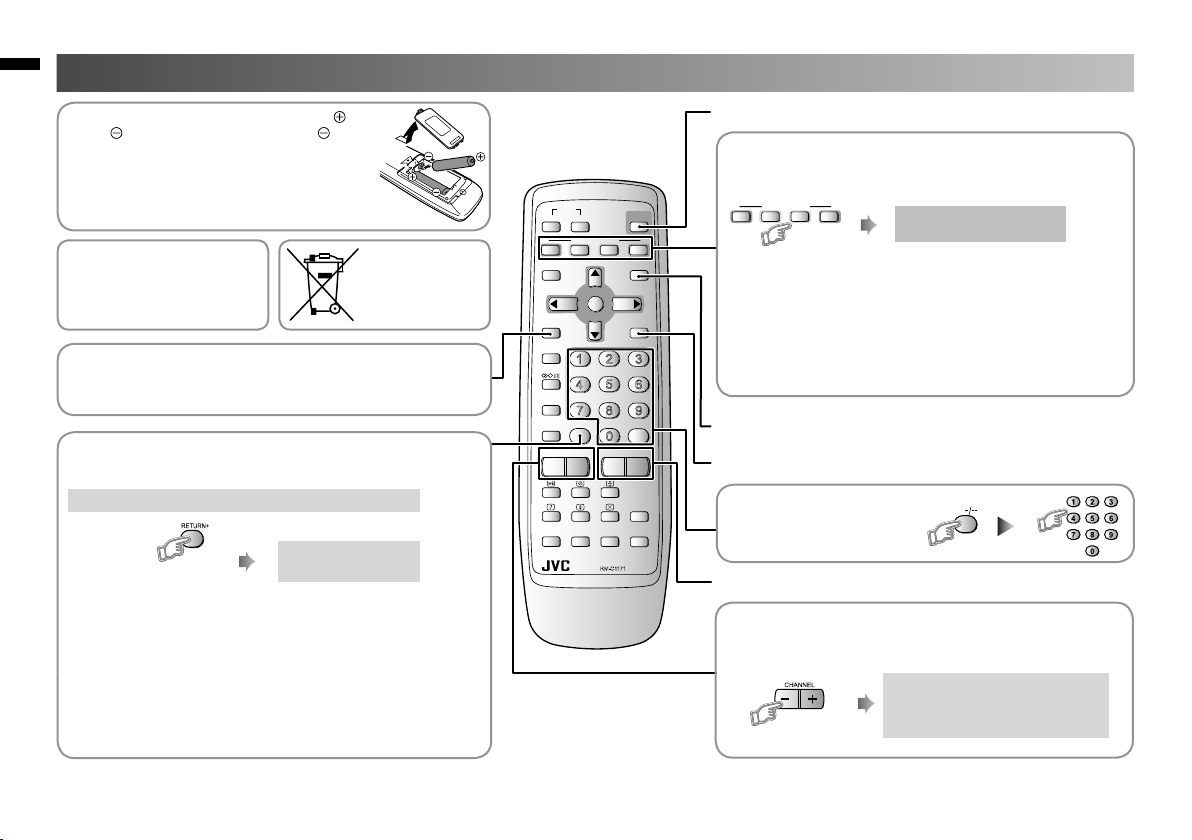
Cannot operate the remote control
The batteries may be exhausted. Replace with new batteries.
Ensure that you are operating the remote control at less than seven
meters from the front of your TV.
P. 4
Cannot operate the menus
Press TV/VIDEO button to return to TV mode and try operating the
menus.
--
Cannot operate the front control buttons
Deactivate the CHILD LOCK function if it is turned on. P. 7
If a problem occurs when you are using the TV, check the below troubleshooting guide before calling for repair.
Colour patches appear at the corner of the screen Page
This maybe due to magnetized device such as a speaker placed near to
your TV. Move it away from your TV. Alternatively, you can also use the
magnetic shielded speaker.
--
Picture is tilted
This maybe due to the earth magnetism. To “PICTURE TILT” to correct
the tilt.
P. 7
Image takes a short period to be displayed
Image required time to stabilize before display. This is not a malfunction. --
TV may emit crackling sound
This is due to a sudden change in temperature and it is not a
malfunction. If the crackling sound is too frequent, request your service
technician for inspection.
--
Feel a slight electric shock when touching the TV screen
This is due to the static electricity of the picture tube and it will not harm
the human body. This is not a malfunction.
--
AUTO SIGNAL DETECT does not work
Set the AUTO SIGNAL DETECT function to ON.
Turn the VCR or DVD Player off and on again.
Check that the video cable connection on VIDEO-2 is properly
connected.
P. 9
--
--
Suddenly, the TV input changes to VIDEO-2
Check whether the AUTO SIGNAL DETECT function is on or off.
AUTO SIGNAL DETECT function may work when you operate the VCR
or DVD player even if you do not make it to playback.
P. 9
--
AUTO SIGNAL DETECT does not work correctly
Check the video cable connection.
Some VCR or DVD player may output the video signal discontinuously.
If this happens, AUTO SIGNAL DETECT function cannot work correctly.
--

11
Specification
TV RF systems B, G, I, D, K, M
Colour systems PAL, SECAM, NTSC 3.58 MHz, NTSC 4.43 MHz
Receiving channels VHF low channel (VL), VHF high channel (VH), UHF channel (U)
Receives cable channels in mid band, super band and hyper band.
Power requirements AC 110 to 240 V, 50 Hz / 60 Hz
External input /
output
VIDEO-1 VIDEO input, AUDIO L/R input
VIDEO-2/COMPONENT VIDEO input, AUDIO L/R input, COMPONENT VIDEO (Y/CB/CR) input
VIDEO-3 VIDEO input, AUDIO L/R input
OUTPUT VIDEO output, AUDIO L/R output
Headphone jack Stereo mini jack (3.5 mm diameter)
Teletext system FLOF (Fastext), WST (World System Teletext)
Design and specifications subject to change without notice.

© 2008 Victor Company of Japan, Limited 0808SCT-NF-MT
This manual suits for next models
11
Table of contents
Other JVC TV manuals