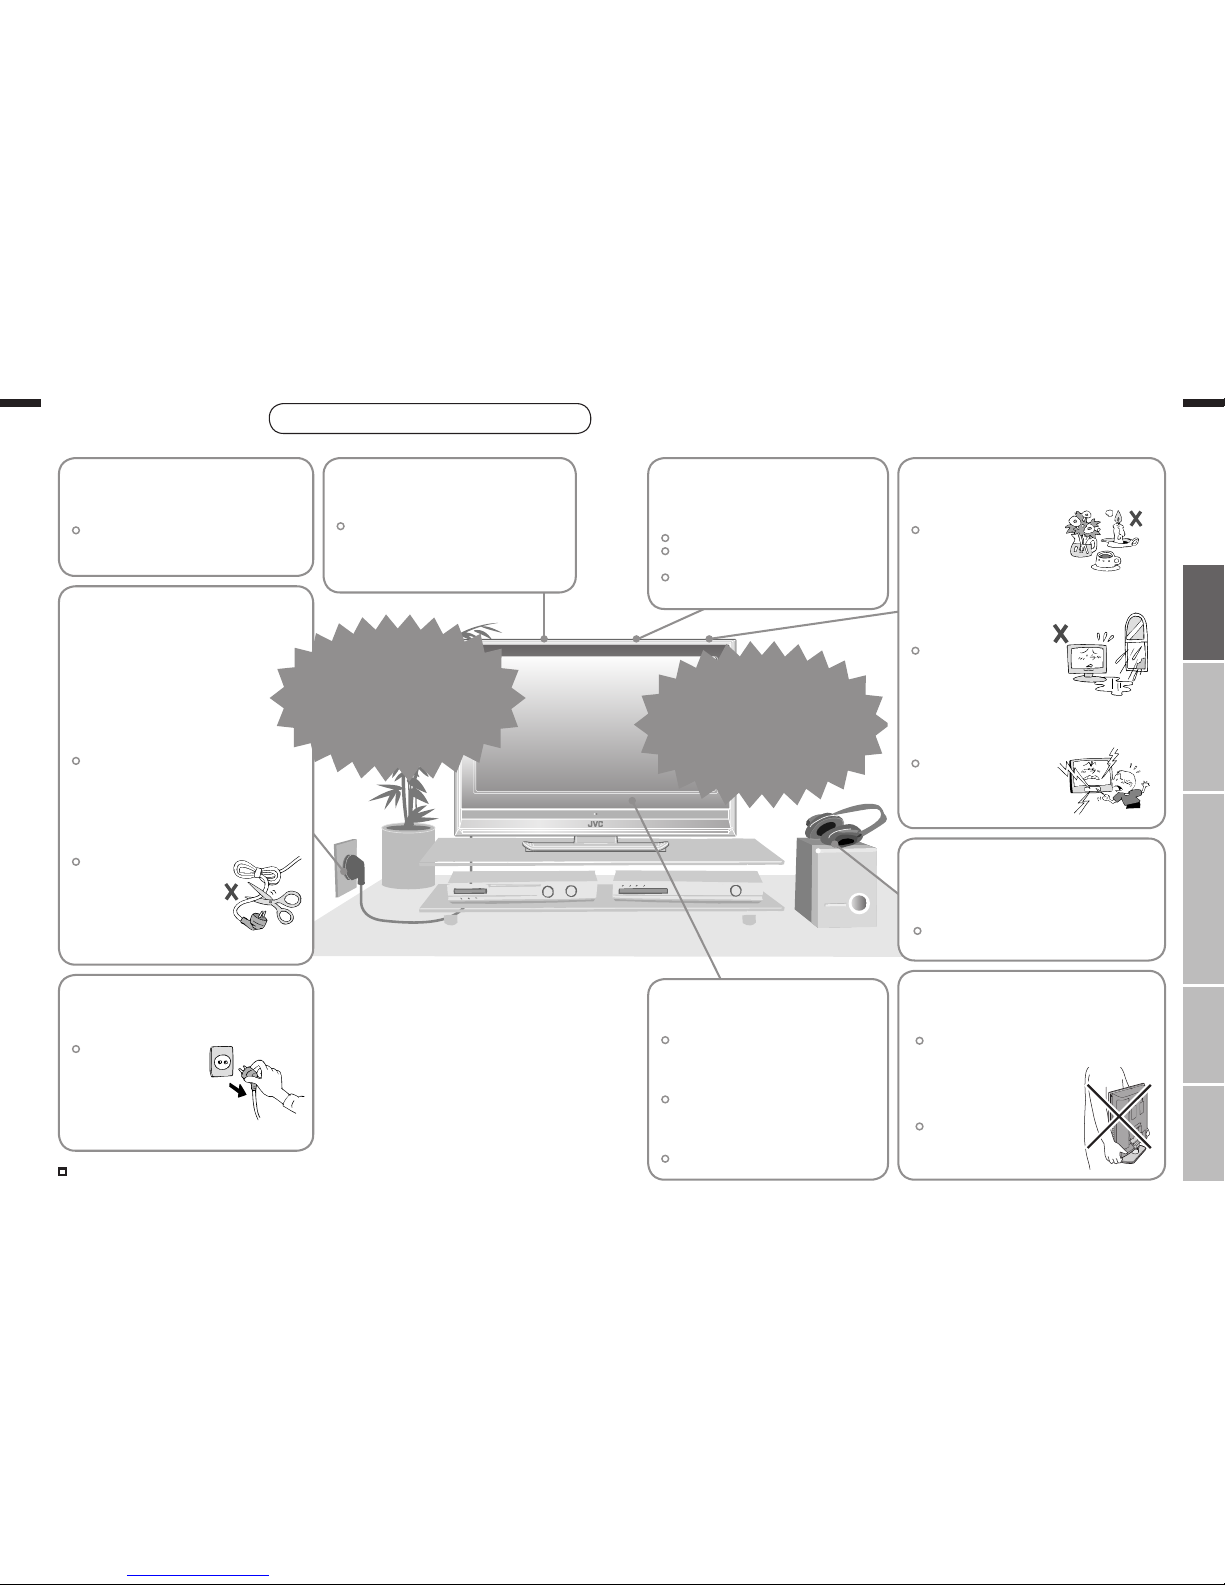
manuals.online logo
Brands
  1. Home
  2. •
  3. Brands
  4. •
  5. JVC
  6. •
  7. TV
  8. •
  9. JVC LT-Z32FX6 User manual

JVC LT-Z32FX6 User manual

Other manuals for LT-Z32FX6

3

This manual suits for next models

3

Other JVC TV manuals

JVC AV-21Y314 User manual

JVC

JVC AV-21Y314 User manual

JVC AV-2186ME Administrator Guide

JVC

JVC AV-2186ME Administrator Guide

JVC AV-1414F/E User manual

JVC

JVC AV-1414F/E User manual

JVC PD-35D30ES User manual

JVC

JVC PD-35D30ES User manual

JVC AV-20N83 User manual

JVC

JVC AV-20N83 User manual

JVC AV-21F3 User manual

JVC

JVC AV-21F3 User manual

JVC AV-20F475S User manual

JVC

JVC AV-20F475S User manual

JVC AV-21P8 User manual

JVC

JVC AV-21P8 User manual

JVC AV-28KT1BUF User manual

JVC

JVC AV-28KT1BUF User manual

JVC AV-36260 User manual

JVC

JVC AV-36260 User manual

JVC AV-32920 User manual

JVC

JVC AV-32920 User manual

JVC AV-2586ME User manual

JVC

JVC AV-2586ME User manual

JVC AV-28F3SJ User manual

JVC

JVC AV-28F3SJ User manual

JVC AV-28NH4SU Manual

JVC

JVC AV-28NH4SU Manual

JVC I'Art Palette PD-42V475 User manual

JVC

JVC I'Art Palette PD-42V475 User manual

JVC AV21BJ8EPS User manual

JVC

JVC AV21BJ8EPS User manual

JVC InteriArt AV-28E50SK User manual

JVC

JVC InteriArt AV-28E50SK User manual

JVC AV-14FT Use and maintenance manual

JVC

JVC AV-14FT Use and maintenance manual

JVC AV-21CS24 User manual

JVC

JVC AV-21CS24 User manual

JVC AV-21B217 User manual

JVC

JVC AV-21B217 User manual

JVC AV28BT7ENS User manual

JVC

JVC AV28BT7ENS User manual

JVC PD-50X575 User manual

JVC

JVC PD-50X575 User manual

JVC AV-14F7 User manual

JVC

JVC AV-14F7 User manual

JVC AV-21D73 User manual

JVC

JVC AV-21D73 User manual

Popular TV manuals by other brands

IKEA UPPLEVA user manual

IKEA

IKEA UPPLEVA user manual

Toshiba 19A20 Service manual

Toshiba

Toshiba 19A20 Service manual

Sony XBR-100Z9D reference guide

Sony

Sony XBR-100Z9D reference guide

Sony Trinitron KV-HR36M90 Service manual

Sony

Sony Trinitron KV-HR36M90 Service manual

Loewe Table Stand Reference 55 user guide

Loewe

Loewe Table Stand Reference 55 user guide

Panasonic Genus TX-G10 operating instructions

Panasonic

Panasonic Genus TX-G10 operating instructions

Samsung LN26C350D1D Service manual

Samsung

Samsung LN26C350D1D Service manual

BBK LT1516D Service manual

BBK

BBK LT1516D Service manual

Samsung 55S9 B Series Quick setup guide

Samsung

Samsung 55S9 B Series Quick setup guide

Sharp LC-40FI5012E user manual

Sharp

Sharp LC-40FI5012E user manual

Evervue BN185 Operation manual

Evervue

Evervue BN185 Operation manual

North State TV2GO user guide

North State

North State TV2GO user guide

Toshiba CX35F70 owner's manual

Toshiba

Toshiba CX35F70 owner's manual

Magnavox PS1980 owner's manual

Magnavox

Magnavox PS1980 owner's manual

Philips 20HF5335D manual

Philips

Philips 20HF5335D manual

Panasonic QuintrixF TX-29AS1D operating instructions

Panasonic

Panasonic QuintrixF TX-29AS1D operating instructions

Samsung 4 Series Quick setup guide

Samsung

Samsung 4 Series Quick setup guide

Panasonic TX-21FG20R Service manual

Panasonic

Panasonic TX-21FG20R Service manual

manuals.online logo
manuals.online logoBrands
  • About & Mission
  • Contact us
  • Privacy Policy
  • Terms and Conditions

Copyright 2025 Manuals.Online. All Rights Reserved.

ENGLISH
© 2006 Victor Company of Japan, Limited 0506TKH-CR-MU
LT-Z32FX6 LT-Z32FX60
LT-Z40SX6 LT-Z40SX60
LCT2028-001B-H
WIDE LCD PANEL TV INSTRUCTIONS
LT-Z32FX6
I II
3
1
2
4
LT-Z32FX6
LT-Z32FX60
3
1
2
4
LT-Z40SX6
LT-Z40SX60
1
ENGLISH
ENGLISH
2
IMPORTANT! PREPARE USE
SETTINGS
TROUBLE?
Expanding the world of
Enjoy rich multi-media with JVC
VHF/UHF
Digital camera
Video camera
Game console
Audio components
VCR DVD player
DVD recorder
Personal
Computer
beautiful images
First things first!
Warning ············································ 3
Getting started
Names of all the parts ······················ 5
Basic connections ···························· 7
Initial settings ··································· 9
Editing channels ····························· 11
· Registering channels
Connecting external devices ·········· 13
Let’s try it out
Enjoying your new TV! ··················· 15
· TV / Teletext / Video / etc.
Watching TV ··································· 17
Viewing teletext ······························ 19
Watching videos / DVDs ················ 21
Try the advanced features
Useful functions ······························ 23
· Take a snapshot
· View and search in multi-picture mode
· “Sleep Timer” / “Channel Guard”

Operate JVC recorders and other devices
··· 27
Just the way you like it
Customising your TV ······················ 29
Advanced picture adjustment ········· 31
·
Reduce noise / Watch a more natural picture
· Set the aspect ratio, etc.
When you have trouble
Troubleshooting ····························· 33
Technical information ····················· 37
“CH/CC” List ··································· 39
Specifications ································· 40
Contents
฀฀฀1-2 4/12/2006฀฀฀11:37:08฀AM
3
ENGLISH
ENGLISH
4
First things first!
IMPORTANT! PREPARE USE
SETTINGS
TROUBLE?
Never dismantle the
rear panel!
It may cause an electric shock.
Never obstruct the
ventilation holes!
It may cause overheating or a fire.
Handle LCD panel
with care!
Use a soft, dry cloth when cleaning.
Never try to repair
the TV yourself!
If the problem cannot be solved in
“Troubleshooting” (P. 33), unplug
the power cord and contact your
retailer.
If the TV is damaged
or behaving strangely,
stop using it at once!
Unplug the power cord and contact
your retailer.
Warning
For more details on installation, usage and safety Consult your retailer
Never expose to rain or
moisture!
To prevent fire or electric
shock, never allow
liquids to enter the unit.
Hold the TV so as not to
scratch the screen!
Do not touch the screen when carrying the
TV.
Do not carry the
TV on your own!
In order to prevent accidents,
ensure that the TV is carried
by two or more people.
Please follow all the guidelines below
Never listen to
headphones at high
volume!
It may damage your hearing.
Never place anything on
the TV!
Placing liquids, naked
flames, cloths, paper,
etc. on the TV may
cause a fire.
Never insert objects into
the cabinet openings!
It may cause a fatal
electric shock. Take care
when children are near.
Unplug the power cord
when going out!
The power buttons on
the remote control and
the TV unit cannot
completely turn off the
TV. (Make appropriate
arrangements for
bedridden people.)
For more details on installation, usage and safety Consult your retailer
Make enough room for
inserting and removing
the power plug!
Place the TV as
close to the outlet as
possible!
The main power supply for this TV is
controlled by inserting or removing the
power plug.
Never cut or damage
the power cord!
If the AC plug is not the
right shape, or the power
cord is not long enough,
use an appropriate plug
adapter or extension cable.
(Consult your retailer.)
Follow this manual
regarding setup!
Connect only to a 110-240V, 50/60Hz
AC outlet.
When attaching the TV to
the wall, use the optional
JVC wall mounting unit!
Consult a qualified technician.
See the included manual on mounting
procedures.
JVC assumes no responsibility for
damage due to improper mounting.
Do not allow the TV
to fall!
Do not rest your elbows on, or allow
children to hang from the TV.
There is a risk that the TV will fall and
cause injuries.
฀฀฀3-4 4/12/2006฀฀฀11:37:11฀AM
5
ENGLISH
ENGLISH
6
Getting started
TV/VIDEO
MENU
/OK
CHANNEL
VOLUME
IMPORTANT! PREPARE USE
SETTINGS
TROUBLE?
Change channel / page
Volume
Names of all the parts
Turn on “Cinema Surround” (P. 17)
Take a snapshot of the
screen (P. 23)
View in multi-picture
mode (P. 23)
Hold the current page
Bookmark pages
Reveal hidden pages
Enlarge the text
Switch briefly
between teletext and TV
To index page
Return to TV
/ Watch video, etc. (P. 21)
Power On / Off
Change channel / page
To teletext (P. 19)
Select and
confirm settings in menus
To previous screen
Change channel / page
Switch between
“TV / VCR / DVD / AUDIO” (P. 27)
When watching TV / Video
Change the aspect ratio (P. 17)
Mute
When viewing teletext (P. 19)
Insert the batteries
Use two “AAA/R03” dry cell batteries.
Insert the batteries from the - end, making
sure the + and - polarities are correct.
Return to channel
you want to view
Display on-screen menu (P. 29)
Power On / Off
Remote control sensor
Power lamp
ON: Lit (Blue)
OFF: Unlit
Power lamp lights while
the TV is on.
 “Power Lamp” (P. 30)
To headphones (P. 13)
Display on-screen
menu / set
Switch between
TV / AV devices
Illumination lamp
Illumination lamp lights
while the TV is on.
 “Illumination” (P. 30)
Press to
remove.
Cable cover
Remove the terminal cover
Change the direction of TV
Remote control
(RM-C1855)
“AAA/R03” Batteries
Check accessories
For confirming
the TV works
Colour buttons
Volume
Channel information
(P. 17)
If the cover cannot be closed due to the cables being in the way
 Do not force the cover to close (leave it open).
Connecting terminals on the back of the TV  Connecting External devices (P. 13)
The LT-Z40SX6, LT-Z40SX60 models differ from illustrations
on this page.
LT-Z32FX6, LT-Z32FX60
Press to
remove.
LT-Z40SX6, LT-Z40SX60
Cable cover
Body02_EN.indd฀฀฀5-65/10/2006฀฀฀10:34:23฀AM
7
ENGLISH
ENGLISH
8
IMPORTANT! PREPARE USE
SETTINGS
TROUBLE?
Connect the aerial
Basic connections
200mm
50mm150mm 150mm 50mm
VCR / DVD recorder
After all the connections have been made, insert the plug into an AC outlet.
If both composite and S-VIDEO cables are connected, S-VIDEO will be enable.
After all the connections have been made, insert the plug into an AC outlet.
AERIAL
Connect a VCR / DVD recorder
AERIAL
Power requirements
Connect the power cord only to a 110-240V,
50/60Hz AC outlet.
When attaching the TV to the wall, use the
optional JVC wall mounting unit
Consult a qualified technician.
See the included manual on mounting procedures.
JVC assumes no responsibility for damage due to
improper mounting.
200mm × 200mm mount which conforms to VESA
standards.
Installation requirements
To avoid overheating, ensure the unit has ample
room.
Please read the user manuals of each device carefully before setup.
It is necessary to connect an aerial to watch TV.
Connect with other devices  “Connecting external devices” (P. 13)
Care when setting Tidying the cables
VIDEO-1
To remove the cable cover, refer to back of the cover.
(R)
(L)
(Y)
(Pb)
(Pr)
LT-Z32FX6, LT-Z32FX60LT-Z40SX6, LT-Z40SX60
Body02_EN.indd฀฀฀7-85/10/2006฀฀฀10:34:24฀AM
9
ENGLISH
ENGLISH
10
>
Lan
g
ua
ge
>Group-1Group-2Group-3Group-4Group-5Teletext Language
01AVPR0203040506070809CH/CCCH
21
CH22CH23CH24CH25CC02CCCC04CC0503>EditID
CH>>14%Auto Program28
IMPORTANT! PREPARE USE
SETTINGS
TROUBLE?
Initial settings
Set the menu language, installation location and automatically register the TV channels.
These channels can be edited later in “Editing channels” (P. 11).
To the previous screen 
If the “JVC” logo does not appear or
if you wish to make changes later
 “Language”, “Teletext language” and
“Auto Program” (P. 30)
Exit 
MENU
BACK
TV
Begin
Select a language
Select the teletext language group
Check what was registered
1 select
Shown only when
powering on for the first time.
The power on the unit can also be used.
Edit channels
 ⁄ in “Editing channels” (P. 11)
1
2
6
2 set
Confirm
The remote control doesn’t
work
Confirm the mode is set to “TV”.
For the teletext language group

“Language group for teletext”
(P. 37)

If the characters are unreadable.

“Language group for teletext”
(P. 37)
5
Automatically register channels
select
3
4
฀฀฀9-10 4/12/2006฀฀฀11:37:26฀AM
11
ENGLISH
ENGLISH
12
· Registering channels
Set Up
Set UpAuto ProgramVideo-3 SettingAI VolumeHDMI SettingPC PositionVideoOffVideoTeletext LanguageEdit/ManualVideo-1 SettingLanguage
01AVPR0203040506070809CH/CCCH
21
CH22CH23CH24CH25CC02CCCC04CC0503>EditID
01AVPR0203040506070809CH/CCCH21CH22CH23CH24CH25CC02CC03CC04CC05>EditID
>Edit01AVPR0203040506070809CH/CCIDCH21CH22CH23CH24CH25CC03CC04CC05
01AVPR0203040506070809CH/CCCH21CH22CH23CH24CH25CC02CC03CC04CC05A>EditID
01AVPR0203040506070809CH/CCIDCH21CH22CH23CH24CH25CC02CC03CC04CC05JVC>Edit
01AVPR0203040506070809CH/CCCH21CH22CH23CH24CH25CC02CCCC03CC04>EditID
>Edit01AVPR0203040506070809CH/CCIDCH21CH22CH23CH24CH25CC02CCCC03CC04
12
>01AVPR0203040506070809CH/CCCH22CH23CH24CH25CC02CC03CC04CC05EditID
>1110PR1213141516171819CH/CCCH02 (B/G)CC06ManualID
>Manual1110PR1213141516171819CH/CCIDCH08 (B/G)CC06
>1110PR1213141516171819CH/CCCH08CC06EditID
>Manual1110PR1213141516171819CH/CCIDCH08 (I)CC06
IMPORTANT! PREPARE USE
SETTINGS
TROUBLE?
Display the menu bar
Select “Set Up”
Select “Edit / Manual”
Finish
When coming from “Initial settings” (P. 9), skip to ⁄.
Select a row
Edit
Move a
channel’s
position
MOVE
Editing channels
Edit the channels registered with “Auto Program” in “Initial settings” (P. 9).
To the previous
screen

Exit

1
2
3
4
5
6
Edit a
channel
name
ID
Insert a
channel
INSERT
Delete a
channel
DELETE
Register a
new channel
MANUAL
select
move out move in
select
1 enter the first
character
From high
frequencies
or
/
select a system
Receives the
broadcast
signal.
If you can not receive the
channel you want to view,
press 3 to change the sound
system.
 “Sound system in your
country or region” (P. 37)
Auto-search begins,
and the nearest
frequency is imported.
 Repeat the previous
steps until the
desired channel is
displayed
From low
frequencies
“CH/CC” List  (P. 39)
1 Begin 2 Select a destination 3 Finish
1 Begin 2 Enter a channel name
2 Select a “CH / CC” 3 Enter a number
2
Beginning channel search
1 Begin
3 Set
Adjust
Channel fine tuning 
If the picture or sound is unnatural 
1 select
2 next
1 select
2 next
set
1 Begin
select
1 Delete
(red)
(red)
2
next column
(green)
(yellow)
(blue) (green)
(blue)
(yellow)
฀฀฀11-12 4/12/2006฀฀฀11:37:31฀AM
13
ENGLISH
ENGLISH
14
IMPORTANT! PREPARE USE
SETTINGS
TROUBLE?
Connecting external devices
You can connect many different devices to the rear panel of the TV.
Please read the user manuals of each device before setting up.
(Connecting cables are not supplied with this TV.)
DVD player
(HDMI compatible)
Amplifier
(L) (R)
OUT
Set-top box / Digital
broadcast tuner
Game consoles
“Technical information” (P. 37)
VCR / DVD recorder
PC IN
PC
Video camera
VIDEO-1
VIDEO-2
VIDEO-3
: signal direction
Connect a “DVI” device to
“HDMI-1”  (P. 38)
To “VIDEO-3” R/L
Headphones
(R)
Headphone
VIDEO-1
Watching videos
Output Input 
·
Composite signal /
Component signal
/ S-VIDEO
· Sound L / R
Use Component signal
 “Switch between video and
component signal” (P. 22)
Use S-VIDEO
 “Using S-VIDEO” (P. 22)
VIDEO-2
Watching videos
Output Input 
·
Composite signal /
S-VIDEO
· Sound L / R
Use S-VIDEO
 “Using S-VIDEO” (P. 22)
VIDEO-3
Watching DVDs
Output Input 
·
Composite signal /
Component signal
· Sound L / R
Use Component signal
 “Switch between video and
component signal” (P. 22)
HDMI-1
HDMI-2
Connecting
HDMI devices
Output Input 
· HDMI signal
(P. 38)
“HDMI Setting”  (P. 30)
HDMI-2 input does not support
analogue sound.
OUT
Video and sound signal of a TV channel
you are viewing outputs from this
terminal
Output 
·
Composite signal /
S-VIDEO
· Sound L / R
“Using OUT terminal”.  (P. 22)
VCR / DVD / other devices
(L)
(Y)
(Pb)
(Pr)
(R)
(R)
(L)
(L)
HDMI-2 HDMI-1
DVD player
(HDMI compatible)
VCR / DVD recorder
IN HDMI-1
IN HDMI-1
(Y)
(Pb)
(Pr)
(R) (L)
(R) (L)
฀฀฀13-14 4/12/2006฀฀฀11:37:38฀AM
15
ENGLISH
ENGLISH
16
Let’s try it out
· TV / Teletext / Video / etc.
Picture
TV mode TV and Text mode
Text mode
IMPORTANT! PREPARE USE
SETTINGS
TROUBLE?
Watching TV
17
PAGE
Enjoying your new TV!
View channel information
Change the aspect ratio
Enjoy “Cinema Surround”
Register your favourite channels
29
PAGE
Personal preferences
Adjust the picture
Adjust the sound
Basic settings
(channel settings, etc.)
Advanced settings
(sleep-timer / channel guard, etc.)
Viewing teletext
19
PAGE Enlarge the text
To the index page
Hold the current page
Switch briefly between teletext and TV
Bookmark your favourite pages
Reveal hidden pages
21
PAGE Watching
videos / DVDs
Watch high quality video (S-VIDEO)
Switch between video and component signal
PC position adjustment
฀฀฀15-16 4/12/2006฀฀฀11:37:51฀AM