JVC HR-J261EU User manual

EN
LPT0321-001B
LPT0321-001BLPT0321-001B
LPT0321-001B
ENGLISH
CONTENTS
Filename [Cov1.fm]
VIDEO CASSETTE
RECORDER
SAFETY FIRST 2
Safety Precautions .................................2
INDEX 4
INSTALLING YOUR NEW RECORDER 7
Basic Connections ................................7
INITIAL SETTINGS 8
Auto Set Up ..........................................8
Preset Download ................................10
Language ............................................12
T-V LINK 13
T-V Link Functions ..............................13
PLAYBACK 14
Basic Playback ....................................14
Playback Features ...............................15
RECORDING 18
Basic Recording ..................................18
Recording Features .............................19
B.E.S.T. Picture System .......................21
TIMER RECORDING 22
Express Timer Programming ................22
EDITING 26
Edit From A Camcorder ......................26
Edit To Or From Another Video
Recorder .............................................27
SUBSIDIARY SETTINGS 28
Mode Set ............................................28
Clock Set ............................................31
Tuner Set ............................................32
Video Channel Set ..............................38
TROUBLESHOOTING 39
QUESTIONS AND ANSWERS 42
LIST OF TERMS 43
SPECIFICATIONS Back Cover
Cov1.fm Page 1 Wednesday, February 9, 2000 12:52 PM

Filename [HRJ261EU1.fm]
Masterpage:Left
2EN SAFETY FIRST
Safety Precautions
The rating plate and the safety caution are on the rear of the unit.
WARNING: DANGEROUS VOLTAGE INSIDE
WARNING: TO PREVENT FIRE OR SHOCK HAZARD, DO NOT EXPOSE THIS UNIT
TO RAIN OR MOISTURE.
CAUTION
8When you are not using the recorder for a long period of time, it is recommended that you disconnect
the power cord from the mains outlet.
8Dangerous voltage inside. Refer internal servicing to qualified service personnel. To prevent electric
shock or fire hazard, remove the power cord from the mains outlet prior to connecting or
disconnecting any signal lead or aerial.
WARNING
There are two different types of SECAM colour systems: SECAM-L, used in FRANCE (also called SECAM-
West), and SECAM-B, used in Eastern European countries (also called SECAM-East).
1. This recorder can also receive SECAM-B colour television signals for recording and playback.
2. Recordings made of SECAM-B television signals produce monochrome pictures if played back on a
video recorder of SECAM-L standard, or do not produce normal colour pictures if played back on a
PAL video recorder with SECAM-B system incorporated (even if the TV set is SECAM-compatible).
3. SECAM-L prerecorded cassettes or recordings made with a SECAM-L video recorder produce
monochrome pictures when played back with this recorder.
4. This recorder cannot be used for the SECAM-L standard. Use a SECAM-L recorder to record SECAM-L
signals.
IMPORTANT
8Please read the various precautions on page 2 and 3 before installing or operating the recorder.
8It should be noted that it may be unlawful to re-record pre-recorded tapes, records, or discs without
the consent of the owner of copyright in the sound or video recording, broadcast or cable programme
and in any literary, dramatic, musical, or artistic work embodied therein.
●Cassettes marked “VHS” (or “S-VHS”) can be used with this video cassette recorder, however, only VHS signals can be played back
and recorded.
●HQ VHS is compatible with existing VHS equipment.
PAL
HRJ261EU1.fm Page 2 Friday, December 10, 1999 5:40 PM

Filename [HRJ261EU1.fm]
Masterpage:Right
EN 3
Failure to heed the following precautions may result in damage to the recorder, remote control or video
cassette.
1. DO NOT place the recorder . . .
...in an environment prone to extreme temperatures or humidity.
...in direct sunlight.
...in a dusty environment.
...in an environment where strong magnetic fields are generated.
...on a surface that is unstable or subject to vibration.
2. DO NOT block the recorder’s ventilation openings.
3. DO NOT place heavy objects on the recorder or remote control.
4. DO NOT place anything which might spill on top of the recorder or remote control.
5. AVOID violent shocks to the recorder during transport.
MOISTURE CONDENSATION
Moisture in the air will condense on the recorder when you move it from a cold place to a warm place, or
under extremely humid conditions-just as water droplets form in the surface of a glass filled with cold
liquid. Moisture condensation on the head drum will cause damage to the tape. In conditions where
condensation may occur, keep the recorder turned on for a few hours to let the moisture dry.
For Italy:
“It is declared that this product, brand JVC, conforms to the Ministry Decree n. 548 of 28 Aug.’95
published in the Official Gazette of the Italian Republic n. 301 of 28 Dec.’95”
The STANDBY/ON 1button does not completely shut off mains power from the unit, but switches
operating current on and off. “`“ shows electrical power standby and “!“ shows ON.
Video tapes recorded with another recorder in the LP (Long Play) mode cannot be played back on this
video recorder.
HRJ261EU1.fm Page 3 Friday, December 10, 1999 5:40 PM

Filename [HRJ261EU1.fm]
Masterpage:Left
4EN INDEX
FRONT VIEW
ASTANDBY/ON 1Button 墌pg. 8
BCassette Loading Slot
CREVIEW Button 墌pg. 16
DRewind 3Button 墌pg. 14, 15
EPlay 4Button 墌pg. 14
FFast Forward 5Button 墌pg. 14, 15
GCounter Reset 0000 Button 墌pg. 20
HTimer#Button 墌pg. 23
IFront Display Panel 墌pg. 5
JInfrared Beam Receiving Window
KPR +/– Buttons 墌pg. 18
LDisplay – – : – – Button 墌pg. 20
MRecord 7Button 墌pg. 18
NStop/Eject 0Button 墌pg. 14
OPause 9Button 墌pg. 15
REAR VIEW
AMains Power Cord 墌pg. 7
BANT. IN Connector 墌pg. 7
CAV1 (L-1) IN/OUT Connector
墌pg. 7, 26, 27
DRF OUT Connector 墌pg. 7
HRJ261EU1.fm Page 4 Friday, December 10, 1999 5:40 PM

Filename [HRJ261EU1.fm]
Masterpage:Right
EN 5
FRONT DISPLAY PANEL
AB.E.S.T. Picture System Display 墌pg. 21
BSymbolic Mode Indicators
CProgramme Time Indicators 墌pg. 22
D“Timer” Indicator 墌pg. 23
ETape Remaining Time Indicator 墌pg. 20
FChannel/Clock Display
GInstant REVIEW Indicator 墌pg. 16
HVCR Indicator 墌pg. 19
I“Cassette Loaded” Mark
JCounter/Remain Display
KMode Display (L-1)
PLAY:
FF/REW VARIABLE
SEARCH:
u
STILL:
SLOW: ui
RECORD: o
RECORD
PAUSE: oi
ON-SCREEN DISPLAY
When “O.S.D.” is set to “ON” (墌pg. 29), various
operational indicators appear on the TV screen.
AOperation mode indicators
BTape direction
CCounter display
DTape remaining time indicator 墌pg. 20
ETape position indicator
The tape position indicator
appears on the TV screen
when you press 3or
5from the Stop mode
or perform an Index Search
(墌pg. 17). The position of
“q” in relation to “0”
(beginning) or “+” (end)
shows you where you are
on the tape.
NOTE:
Depending on the type of tape used, the tape position
indicator may not appear correctly.
FCurrent day/month/year
GClock display
HChannel position number and station name/
Auxiliary input indicator (L-1)
ITimer warning display
A warning appears on the TV screen to tell you that the timer-
recording is to start in 5 minutes if you’re not in the Timer
mode at that time.The warning blinks for the entire 5 minutes
leading up to the start of timer recording. To clear the display,
press &.
JCassette loaded mark
Beginning End
HRJ261EU1.fm Page 5 Friday, December 10, 1999 5:40 PM

Filename [HRJ261EU1.fm]
Masterpage:Left
6EN INDEX (cont.)
REMOTE CONTROL ATV Button 墌“Operating JVC TVs” below
BTV/VCR Button 墌pg. 19 and “Operating JVC
TVs” below
CREVIEW Button 墌pg. 16
DNUMBER Keys 墌pg. 18
EVPS/PDC Button (Not functions with this
recorder.)
FCancel &Button 墌pg. 24
0000 Button 墌pg. 20
GSTOP +/– Button 墌pg. 22
HSTART +/– Button 墌pg. 22
IPROG Button 墌pg. 22
JProgramme Check "Button 墌pg. 24
KRewind 3Button 墌pg. 14, 15
LRecord 7Button 墌pg. 18
MStop 8Button 墌pg. 14, 18
NMENU Button 墌pg. 12
OrtButton 墌pg. 8
TV PR +/– Button 墌“Operating JVC TVs” below
PSTANDBY/ON 1Button 墌pg. 8
Q^(TV Muting) Button 墌“Operating JVC
TVs” below
RDisplay – – : – – Button 墌pg. 20
SDAILY Button 墌pg. 23
TWEEKLY Button 墌pg. 23
UAUX Button 墌pg. 26
V#(Timer) Button 墌pg. 23
WDATE +/– Button 墌pg. 22
XPR +/– Button 墌pg. 18
YAuto Tracking pButton 墌pg. 16
Z30 SEC Button 墌pg. 17
aPlay 4Button 墌pg. 14
bFast Forward 5Button 墌pg. 14, 15
cPause 9Button 墌pg. 15
dOK Button 墌pg. 9
eweButton 墌pg. 15
TV %+/– Button 墌“Operating JVC TVs” below
Buttons with a small dot on the left side of the name can also
be used to operate your JVC TV while holding down the TV
button. (墌“Operating JVC TVs” in the right column )
This remote control transmits A code signals only; it is not
applicable to B code signals.
How To Use
The remote control can operate most of your video recorder’s
functions, as well as basic functions of JVC TV sets.
(墌“Operating JVC TVs” below.)
●Point the remote control toward the receiving window.
●The maximum operating distance of the remote control is
about 8 m.
Operating JVC TVs
To operate your TV, while holding down the TV button, press
the corresponding button: STANDBY/ON 1, TV/VCR,
TV PR +/–, TV %+/–, ^(TV Muting).
NOTES:
●When inserting the batteries, be sure to insert in the correct
directions as indicated under the battery cover.
●Depending on the type of JVC TV, some or all functions
may not be operated using the remote control.
●If the remote control doesn’t work properly, remove its
batteries, wait a short time, replace the batteries and then
try again.
HRJ261EU1.fm Page 6 Friday, December 10, 1999 5:40 PM

Filename [HRJ261EU1.fm]
Masterpage:Right
EN 7
INSTALLING YOUR NEW RECORDER
Basic Connections It’s essential that your video recorder be properly
connected.
ACheck the contents.
Make sure the package contains all of the accessories
listed in “SPECIFICATIONS” on the back cover.
BSituate the recorder.
Place the recorder on a stable, horizontal surface.
CConnect the recorder to TV.
The connection method you use depends on the type of
TV you have.
RF Connection
●To connect to a TV with NO AV input connectors . . .
ADisconnect the TV aerial cable from the TV.
BConnect the TV aerial cable to the ANT. IN connector on the
rear panel of the recorder.
CConnect the provided RF cable between the RF OUT
connector on the rear panel of the recorder and the TV’s
aerial connector.
AV Connection
●To connect to a TV with AV input connectors . . .
AConnect the aerial, recorder and TV as per “RF Connection”.
BConnect an optional 21-pin SCART cable between the AV1
(L-1) IN/OUT connector on the rear panel of the recorder and
the TV’s 21-pin SCART connector.
DConnect the recorder to mains.
Plug the end of the mains power cord into a mains outlet.
Make AV connection if your TV has a 21-pin AV input
connector (SCART) in order to reduce the possibility of
interference. And if you are using a stereo TV, you will
need an optional 21-pin SCART cable in order to
enjoy stereo playback of video tapes.
Aerial connector
Back of TV
21-pin SCART
connector
TV aerial
cable
RF cable
(provided)
21-pin SCART
cable
(not provided)
Mains power cord
Mains outlet
Back of
recorder AV1 (L-1) IN/OUT
THESE STEPS MUST BE COMPLETED BEFORE ANY
VIDEO OPERATION CAN BE PERFORMED.
After the connection is completed, perform “Auto Set
Up” on page 8.
HRJ261EU1.fm Page 7 Friday, January 21, 2000 10:52 AM

Filename [HRJ261EU1.fm]
Masterpage:Left
8EN INITIAL SETTINGS
Auto Set Up
ATurn on the recorder.
Press 1on the recorder or remote control. The Country
Set display appears on the front display panel and/or on
the TV screen.
BSelect your country.
On the front display panel
Press rt to select your international telephone country
code of your country referring to the chart in the left
column.
(Example) DEUTSCHLAND is selected.
NOTES:
●If you have selected BELGIUM (32) or SUISSE (41), go to step
3.
●If you have selected any other country name (code), go to step
4.
After the 1button on the recorder or remote control is
pressed for the first time to power on the recorder, by simply
selecting your country*, the Auto Set Up function sets the
tuner channels automatically.
* If you live in Belgium (BELGIUM) or Switzerland (SUISSE), you also
need to select your language.
International Telephone Country Code
BELGIUM
CESKÁ REPUBLIKA
DANMARK
DEUTSCHLAND
ESPAÑA
GREECE
ITALIA
MAGYARORSZÁG
NEDERLAND
:
:
:
:
:
:
:
:
:
32
42
45
49
34
30
39
36
31
NORGE
ÖSTERREICH
POLSKA
PORTUGAL
SUISSE
SUOMI
SVERIGE
OTHER WESTERN EUROPE
OTHER EASTERN EUROPE
:
:
:
:
:
:
:
:
:
47
43
48
351
41
358
46
– –
EE
Before starting, make sure of the following:
●The TV aerial cable should be connected to the recorder.
●The recorder’s mains power cord should be connected to a
mains outlet.
●If you want to use the on-screen display, the TV should be
set to its AV mode (with AV connection 墌pg. 7) or UHF
channel 36 (with RF connection 墌pg. 7).
NOTE:
If you have connected your TV to
the recorder with RF connection
and the on-screen display
appearing on UHF channel 36
looks distorted, perform “Video
Channel Set” on page 38.
On the on-screen display
Press rt to move the
highlight bar (pointer) to your
country’s name.
HRJ261EU1.fm Page 8 Friday, December 10, 1999 5:40 PM

Filename [HRJ261EU1.fm]
Masterpage:Right
EN 9
CSelect the language.
Press OK. The Language Set display appears on the front
display panel and/or on the TV screen.
On the front display panel
Press rt to select your language code.
(Example) DEUTSCH is selected for SUISSE.
DSet the date and time.
●When you set the time, press and hold rt to change the time
by 30 minutes.
●When you set the date, press and hold rt to change the date
by 15 days.
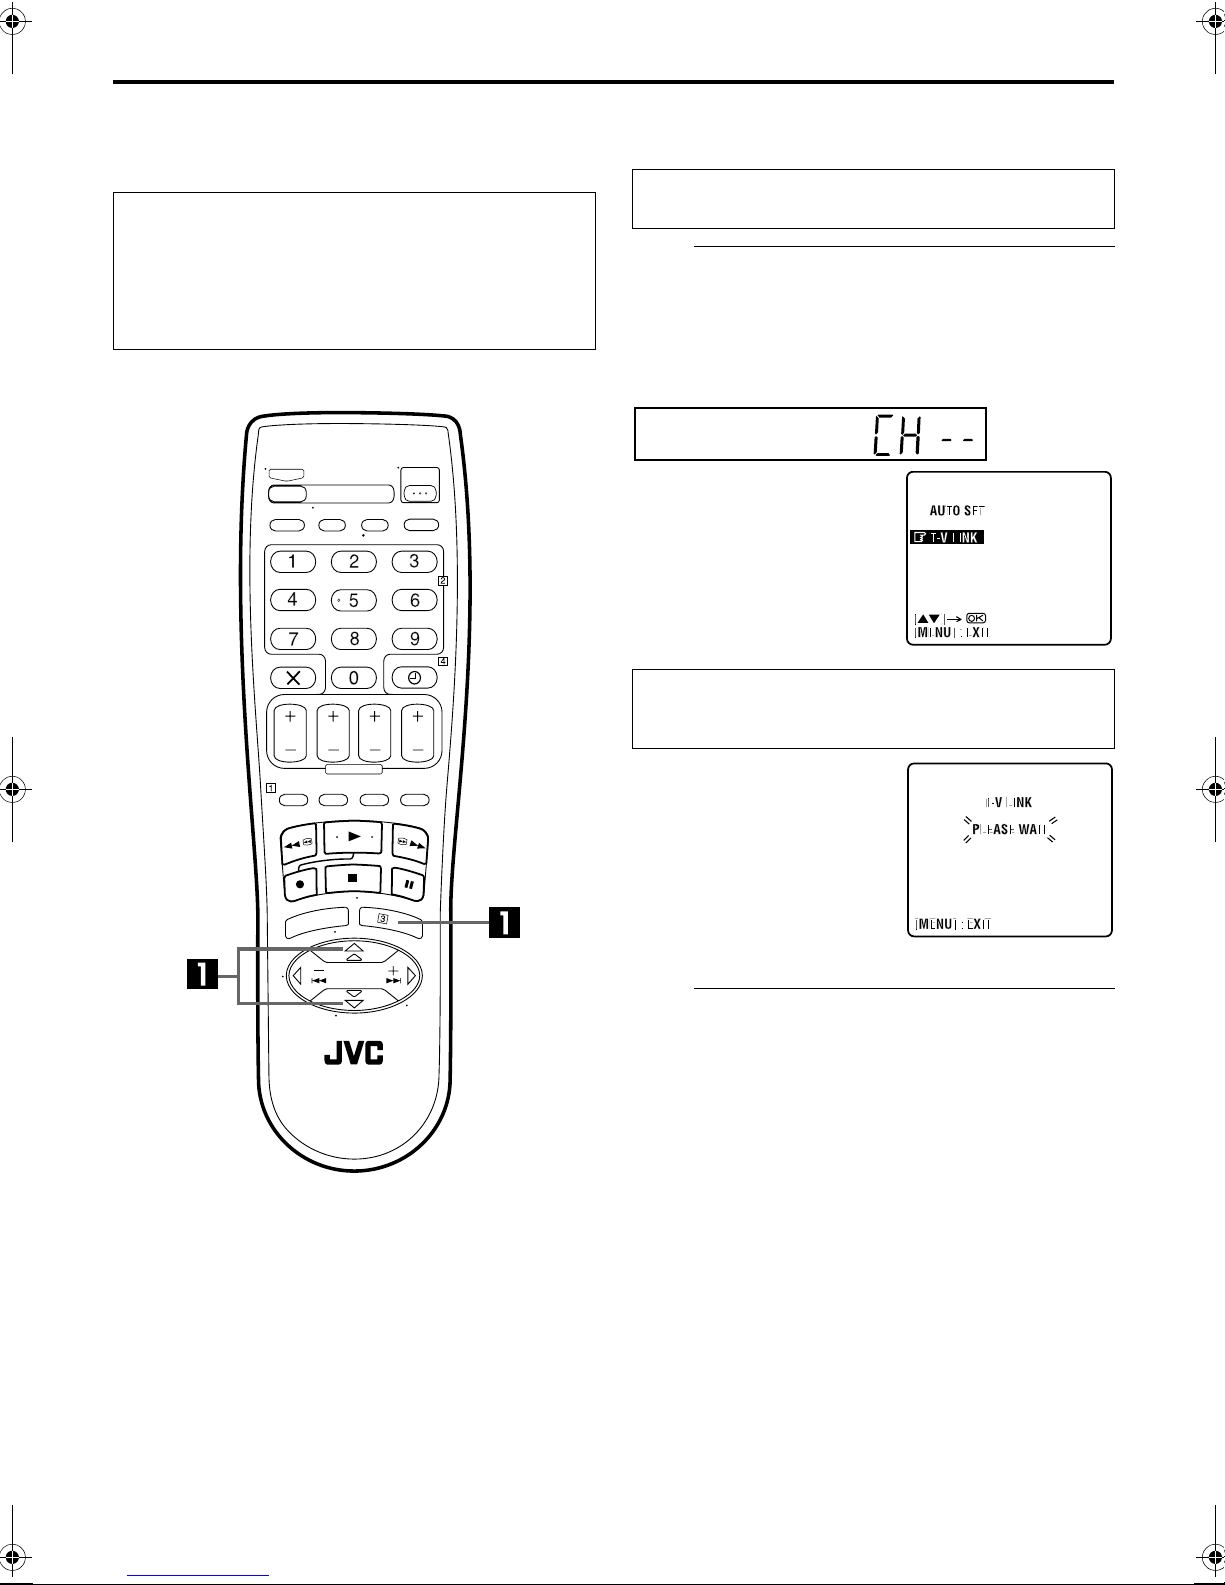
EPerform Auto Set Up.
Press MENU. The AUTO SET/T-V LINK display appears on
the front display panel and/or on the TV screen.
On the front display panel
Press rt to select “Auto” and press OK or e.
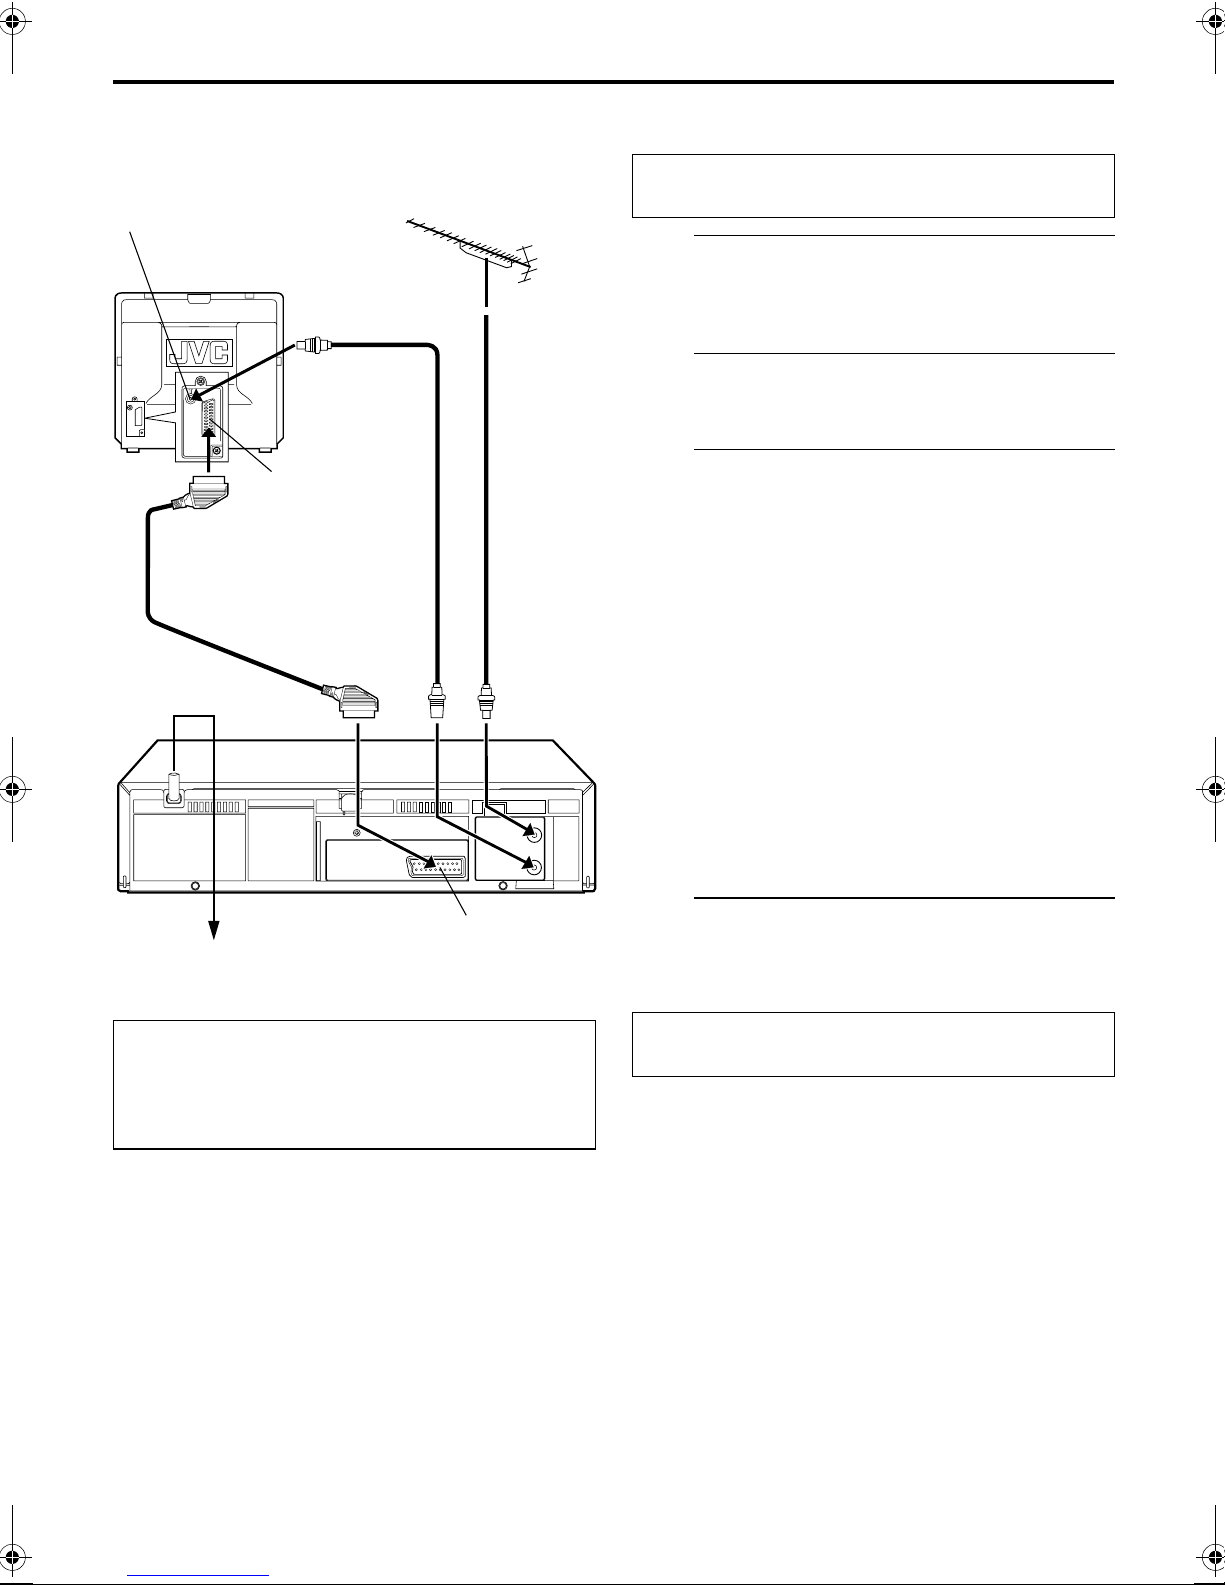
●If you have connected the recorder to your TV via the AV
connection (墌pg. 7), the recorder will automatically perform
Preset Download (墌pg. 10).
NOTES:
●If there is a power cut, or if you press 1or MENU while Auto
Set Up is in progress, Auto Set Up will be interrupted; be sure
to turn off the recorder power once and try again from step 1.
●If no sound accompanies the picture or the audio sounds
unnatural on some channels that have been stored by Auto Set
Up, the TV system setting for those channels may be incorrect.
Select the appropriate TV system for those channels
(墌pg. 35, “INFORMATION”).
Language Code
ENGLISH
DEUTSCH
FRANCAIS
ITALIANO
CASTELLANO
NEDERLANDS
SVENSKA
:
:
:
:
:
:
:
01
02
03
04
05
06
07
NORSK
SUOMI
DANSK
POLSKI
CEcTINA
MAGYAR
:
:
:
:
:
:
08
09
10
11
12
13
On the on-screen display
Press rt to move the
highlight bar (pointer) to the
language of your choice.
Press OK. The Clock Set
screen appears. Press rt to
set the time, then press OK or
e. The “date” display begins
blinking. Repeat the same
procedure to set the date and
year.
International telephone
country code Language code
On the on-screen display
Press rt to move the
highlight bar (pointer) to
“AUTO SET” and press OK or
e.
“Auto” blinks on the front display panel; do NOT press
any button on the recorder or remote control.
●If you are using the on-screen
display, the AUTO SET
screen will appear. As Auto
Set Up progresses, the “q“
mark on the TV screen
moves from left to right.
When the Auto Set Up is
completed, “SCAN
COMPLETED” appears for
about 5 seconds, then the
normal screen appears.
ATTENTION
Once you have performed Auto Set Up, even if the recorder’s
memory backup has expired, all the stored stations remain in
the recorder’s memory and the recorder will not perform
Auto Set Up again. You only need to set the clock.
(墌pg. 31)
If you have moved to a different area, perform each setting as
required.
●Video channel setting (for RF connection users) 墌pg. 38
●Tuner setting 墌pg. 32
●Clock setting 墌pg. 31
If a new station starts broadcasting in your area, perform
tuner setting (墌pg. 32) and, if necessary, video channel
setting (墌pg. 38).
Beginning End
HRJ261EU1.fm Page 9 Friday, January 21, 2000 10:18 AM

Filename [HRJ261EU1.fm]
Masterpage:Left
10 EN INITIAL SETTINGS (cont.)
Preset Download
NOTES:
●For details, refer to the instruction manual of your TV.
●If there is a power cut, or if you press 1or MENU while
downloading or set up is in progress, it will be interrupted; be
sure to turn off the recorder power once and try again from the
beginning.
●On this recorder, the characters available for station names
(ID) are A–Z, 0–9, –, f, + and I(space). Some names of
downloaded stations may differ from those of your TV
(墌pg. 36).
If you have connected the recorder to your TV via the AV
connection (墌pg. 7), the recorder will automatically perform
Preset Download instead of the Auto Set Up in step 5on page 9.
APerform Preset Download.
Press MENU. The AUTO SET/T-V LINK display appears on
the front display panel and/or on the TV screen.
On the front display panel
Press rt to select “CH – –” and press OK or e.
BSet the video channel.
Set the video channel to off manually. (墌pg. 38)
ATTENTION
You can use this function only with a TV offering T-V Link,
etc.* Be sure to use a fully-wired 21-pin SCART cable.
* Compatible with TVs offering T-V Link, EasyLink, Megalogic,
SMARTLINK, Q-Link, DATA LOGIC or NexTViewLink via fully-
wired 21-pin SCART cable. The degree of compatibility and
available functions may differ by system.
Perform steps 1to 4of “Auto Set Up” on page 8 before
continuing.
On the on-screen display
Press rt to move the
highlight bar (pointer) to “T-V
LINK” and press OK or e.
Preset positions on the front display panel increase from
“CH1”; do NOT press any button on the recorder or remote
control.
●If you are using the on-screen
display, the T-V LINK screen
will appear. When Preset
Download is completed,
“COMPLETED” appears for
about 5 seconds, then the
normal screen appears.
●If you press any button on the
recorder or remote control
while downloading is in
progress, it will be interrupted.
HRJ261EU1.fm Page 10 Friday, December 10, 1999 5:40 PM

Filename [HRJ261EU1.fm]
Masterpage:Right
EN 11
IMPORTANT
Your video recorder memorizes all detected stations even if reception of some of them is poor. You can delete those stations with an
unacceptable picture (墌pg. 35, “Delete A Channel”).
INFORMATION
Language for the on-screen display
Auto Set Up also selects the language automatically for the on-screen display depending on the Country setting you have made in
step 2on page 8 (unless you have selected BELGIUM or SUISSE), as shown below.
If you want to change the language setting manually, see “Language” on page 12.
SUOMI ]SUOMI DANMARK ]DANSK NEDERLAND ]NEDERLANDS
PORTUGAL ]ENGLISH ÖSTERREICH ]DEUTSCH GREECE ]ENGLISH
DEUTSCHLAND ]DEUTSCH CESKÁ REPUBLIKA ]CEcTINA OTHER WESTERN EUROPE]ENGLISH
POLSKA ]POLSKI ITALIA ]ITALIANO OTHER EASTERN EUROPE ]ENGLISH
NORGE ]NORSK MAGYARORSZÁG ]MAGYAR
SVERIGE ]SVENSKA ESPAÑA ]CASTELLANO
HRJ261EU1.fm Page 11 Friday, December 10, 1999 5:40 PM

Filename [HRJ261EU1.fm]
Masterpage:Left
12 EN INITIAL SETTINGS (cont.)
Language This recorder offers you the choice to view on-screen
messages in 13 different languages. Though Auto Set Up
selects the language automatically (墌pg. 11), you can
change the language setting manually as required.
AAccess the Main Menu screen.
Press MENU.
BAccess the Country Set screen.
CSelect your country.
Press rt to move the highlight bar (pointer) to your
country’s name, then press OK or e.
DSelect the language.
EReturn to the normal screen.
Press MENU.
Turn on the TV and select the video channel (or
AV mode).
Press rt to move the
highlight bar (pointer) to
“AUTO CH SET”, then press
OK or e.
Press rt to move the
highlight bar (pointer) to the
language of your choice.
●You do not have to press OK;
pressing OK enters AUTO SET/
T-V LINK screen.
HRJ261EU1.fm Page 12 Friday, December 10, 1999 5:40 PM

Filename [HRJ261EU1.fm]
Masterpage:Right
EN 13
T- V L I N K
T-V Link Functions
When you connect the recorder to your TV via a fully-wired 21-pin SCART cable (墌pg. 7), the following functions are available. You
can use these functions only with a TV offering T-V Link, etc.*
For details, refer to the instruction manual of your TV.
* Compatible with TVs offering T-V Link, EasyLink, Megalogic, SMARTLINK, Q-Link, DATA LOGIC or NexTView Link via fully-wired 21-pin SCART
cable. The degree of compatibility and available functions may differ by system.
NexTView Link
You can download the EPG (Electronic Programme Guide) information from your TV for timer-programming on the recorder.
For details, refer to the instruction manual of your TV.
TV Auto Power On
The TV will turn on and be set to its AV mode automatically whenever you play a tape.
For details, refer to the instruction manual of your TV.
VCR Auto Standby
You can use your TV’s remote control to turn off the recorder.
For details, refer to the instruction manual of your TV.
Direct Rec
You can easily start recording the programme that you are watching on your TV. When you use this function, set “DIRECT REC” to
“ON” (墌pg. 29).
HRJ261EU1.fm Page 13 Friday, December 10, 1999 5:40 PM

Filename [HRJ261EU1.fm]
Masterpage:Left
14 EN PLAYBACK
Basic Playback ALoad a cassette.
Make sure the window side is up, the rear label side is
facing you and the arrow on the front of the cassette is
pointed toward the recorder.
●Don’t apply too much pressure when inserting.
●The recorder’s power comes on automatically and the counter
is reset to 0:00:00.
●If the record safety tab has been removed, playback begins
automatically.
BFind the programme start point.
If the tape is advanced past the start point, press 3. To
go forward, press 5.
CStart playback.
Press 4. “BEST” appears blinking in the recorder’s front
display panel during automatic tracking. (墌pg. 21)
DStop playback.
Press 8on the remote control or 0on the recorder’s
front panel. Then press 0to remove the cassette.
Turn on the TV and select the video channel (or
AV mode).
Clean the video heads using a dry cleaning
cassette — TCL-2UX — when:
●Rough, poor picture appears while a tape is played back.
●The picture is unclear or no picture appears.
●“USE CLEANING CASSETTE” appears on the screen (only
with “O.S.D.” set to “ON” (墌pg. 29).
Usable cassettes
●Compact VHS camcorder recordings can be played on this
video recorder. Simply place the recorded cassette into a
VHS Cassette Adapter and it can be used just like any full-
sized VHS cassette.
●This video recorder can record on regular VHS and Super
VHS cassettes. However, it will record and play back
regular VHS signals only. It is not possible to play back a
recorded Super VHS tape.
HRJ261EU1.fm Page 14 Friday, December 10, 1999 5:40 PM

Filename [HRJ261EU1.fm]
Masterpage:Right
EN 15
Playback Features Still Picture/Frame-By-Frame
Playback
1Pause during playback.
Press 9.
●If there is vertical jitter, use the PR buttons to correct the
picture.
2Activate Frame-by-frame playback.
Press 9.
OR
Press wor e.
Slow Motion
During still picture, press and hold 9for 2 seconds, then
release. Press and release again to return to still picture.
OR
During still picture, press and hold wor e. Release to
return to still picture.
High-Speed Search
During playback or still, press 5for forward high-
speed search, or 3for reverse high-speed search.
NOTE:
For short searches, press and hold 5or 3for over 2
seconds during playback or still picture. When released, normal
playback resumes.
Variable Speed Search
During still picture, press wor e.
●The more times you press, the faster the playback picture
moves.
●To decrease speed, press the button for the opposite direction.
ATTENTION
In the high-speed search, still, slow motion or frame by frame
playback mode, the picture will be distorted, and there will
be a loss of colour.
To resume normal playback, press 4.
HRJ261EU1.fm Page 15 Friday, December 10, 1999 5:40 PM

Filename [HRJ261EU1.fm]
Masterpage:Left
16 EN PLAYBACK (cont.)
Manual Tracking
Your video recorder is equipped with automatic tracking control.
During playback, you can override this and adjust the tracking
manually by pressing the PR buttons.
1Override automatic tracking.
Press pon the remote control.
2Adjust the tracking manually.
Press PR +or –.
3Return to automatic tracking.
Press pon the remote control.
NOTE:
When a new tape is inserted, the recorder enters the automatic
tracking mode automatically.
Instant ReView
Simply by pressing a single button, the recorder power comes
on, rewinds, and begins playback of the last timer-recorded
programme. If you have several programmes recorded, you can
easily access any of them.
NOTE:
Before starting, make sure that the recorder is off and that the
Timer mode is disengaged.
Activate Instant ReView.
Press REVIEW. The recorder power comes on and the
recorder searches for the index code indicating the start
of the last timer-recorded programme. Once it’s found,
playback begins automatically.
●The front display panel tells you how many programmes have
been timer-recorded. If you have, for example, 3 programmes,
“REVIEW” and “3” appear and blink. To watch the first of the 3
programmes, press REVIEW three times. The recorder searches
and begins playback automatically. You can access a
programme as far as 9 index codes away from the current tape
position.
HRJ261EU1.fm Page 16 Friday, December 10, 1999 5:40 PM

Filename [HRJ261EU1.fm]
Masterpage:Right
EN 17
Index Search
Your recorder automatically marks
index codes at the beginning of
each recording. This function gives
you quick access to any one of 9
index codes in either direction.
NOTE:
Before starting, make sure the
recorder is in the Stop mode.
Activate Index Search.
Press wor e(2or 6). “21” or “61” is
displayed on the TV screen and search begins in the
corresponding direction.
●To access index codes 2 through 9, press wor erepeatedly
until the correct index number is displayed.
Example:
To locate the beginning of B from the current position, press w
twice.
To locate the beginning of D from the current position, press e
once.
●When the specified index code is located, playback begins
automatically.
Skip Search
During playback, press 30 SEC 1 to 4 times to skip over
unwanted sections. To resume normal playback, press 4.
●Each press initiates a 30-second period of fast-motion
playback. Normal playback resumes automatically.
Next Function Memory
The Next Function Memory “tells” the recorder what to do after
rewinding. Before continuing, make sure the recorder is in the
Stop mode.
a- For Automatic Start Of Playback
Press 3, then press 4within 2 seconds.
b- For Automatic Power Off
Press 3, then press 1within 2 seconds.
c- For Automatic Timer Standby
Press 3, then press #(TIMER) within 2 seconds.
Repeat Playback
Your recorder can automatically play back the whole tape 100
times repeatedly.
1Start playback.
Press 4.
2Activate Repeat Playback.
Press 4and hold for over 5 seconds, then release.
●The Play indicator ( u) on the front display panel blinks
slowly.
●After playing back a tape 100 times, the recorder stops
automatically.
3Stop Repeat Playback.
Press 8at any time.
●Pressing 4, 3, 5or 9also stops Repeat Playback.
Current position
Index number
HRJ261EU1.fm Page 17 Friday, December 10, 1999 5:40 PM

Filename [HRJ261EU1.fm]
Masterpage:Left
18 EN RECORDING
Basic Recording ALoad a cassette.
Insert a cassette with the record safety tab intact.
●The recorder’s power comes on automatically and the counter
is reset to 0:00:00.
BChoose a programme.
Press PR +/– or the NUMBER keys to select the channel
you wish to record.
CStart recording.
Press and hold 7and press 4on the remote control, or
press 7on the recorder.
DPause/Resume recording.
Press 9. Press 4to resume recording.
EStop recording.
Press 8on the remote control or 0on the recorder.
Then press 0to remove the cassette.
Turn on the TV and select the video channel (or
AV mode).
Recording Resume Function
If there is a power outage during recording, Instant Timer
Recording (墌pg. 19) or timer recording (墌pg. 22), the
recording will resume automatically when power is restored
to the recorder unless the recorder’s memory backup has
expired.
B.E.S.T. takes place at the beginning of the first recording
after inserting the cassette. (墌pg. 21)
If “DIRECT REC” is set to “ON”, the programme that appears
on the TV screen will be recorded (墌pg. 29).
Accidental erasure prevention
To prevent accidental recording on a recorded cassette,
remove its safety tab. To record on it later, cover the hole
with adhesive tape.
Record safety tab
HRJ261EU1.fm Page 18 Friday, December 10, 1999 5:40 PM

Filename [HRJ261EU1.fm]
Masterpage:Right
EN 19
Recording Features Instant Timer Recording (ITR)
This easy method lets you record for from 30 minutes to 6 hours
(selectable in 30-min. increments), and shuts the recorder off
after recording is finished.
1Start recording.
Press 7on the recorder.
2Engage the ITR mode.
Press 7again. “o“ blinks and 0:30 appears on the front
display panel.
3Set the recording duration.
If you want to record for more than 30 minutes, press 7
to extend the time. Each press extends recording time by
30 minutes.
NOTE:
You can only perform ITR using the 7button on the recorder’s
front panel.
Record One Programme While
Watching Another
If your recorder is connected to the TV via the AV
connection, press TV/VCR. The recorder’s VCR indicator
and the TV broadcast being recorded disappear. Once
recording is in progress, all you need to do is to set the
channel controls on the TV for the station you wish to
view.
●The programme selected with the TV’s channel controls
appears on the TV screen, while the one selected with the
recorder’s PR buttons is recorded on the tape.
HRJ261EU1.fm Page 19 Friday, January 21, 2000 10:52 AM

Filename [HRJ261EU1.fm]
Masterpage:Left
20 EN RECORDING (cont.)
Elapsed Recording Time Indication
1Set the counter display.
Press – –:– – until a counter reading appears on the front
display panel.
2Reset the counter.
Press 0000 before starting recording or playback.
●The counter is reset to “0:00:00” and shows the exact elapsed
time as the tape runs. You can check the exact time of a
recording or playback.
Tape Remaining Time
Press – –:– – until the time remaining on the tape appears.
●The front display panel shows the tape remaining time with
“y“ displayed.
●By pressing the – –:– – button, you can change the display to
show the counter reading, channel position*, clock time or
tape remaining time.
* Channel position is not displayed during playback.
NOTE:
Depending on the type of tape used, the tape remaining time
reading may not appear right away, or is not correct. “– –:– –”
may sometimes appear, or the display may blink on occasion.
HRJ261EU1.fm Page 20 Friday, December 10, 1999 5:40 PM
Table of contents
Other JVC VCR System manuals

JVC
JVC HR-S9911U - S-VHS Hi-Fi Stereo VCR User manual

JVC
JVC HR-J4009UM User manual

JVC
JVC HR-S7700EU User manual

JVC
JVC HR-J713EU User manual

JVC
JVC HR-J795EK User manual

JVC
JVC HR-S6965EK User manual

JVC
JVC HR-S7500E Quick start guide

JVC
JVC HR-S6850EU User manual

JVC
JVC HR-S6950EU User manual

JVC
JVC HR-DVS3EU Quick start guide