jWIN JX-CD 540J User manual

1
Avoid installing the unit in locations described below.
&Places exposed to direct sunlight or close to heat radiating appliances such as electric heaters.
&On top of other stereo equipment that radiates too much heat.
&Places lacking ventilation or dusty places.
&Places subject to constant vibration.
&Humid or moist places.
This product utilizes a laser.
Danger - Invisible laser radiation is present when unit is opened and interlock failed or defeated.
Caution - Use of controls or adjustments of procedures other than those specified herein may result
in hazardous radiation.
THIS LASER COMPACT DISC PLAYER FUNCTIONS BY HELP OF INVISIBLE LASER LIGHT
AND IS EQUIPPED WITH SAFETY SWITCHES TO AVOID EXPOSURE WHEN DOOR IS OPEN
AND SAFETY INTERLOCKS ARE DEFEATED. IT IS DANGEROUS TO DEFEAT OR BYPASS
SAFETY SWITCHES.
IMPORTANT NOTES
CD/CD-R/CD-RW Compactible Super Anti
Shock Anti Roll System
JOGGABLE
MODEL # JX-CD 650J (without Car Kit)
JX-CD 540J (with Car Kit)
OPERATING INSTRUCTIONS
Please read this manual thoroughly before operating your new CD player
DANGER INVISIBLE LASER RADIATION
WHEN OPEN AND INTERLOCKFAILED OR
DEFEATED AVOID DIRECT EXPOSURE TO
BEAM
CAUTION HAZARDOUS LASER RADIATION
WHEN OPEN AND INTERLOCKDEFEATED
ATTENTION RAYONMENT LASER
DANGEREUX SI OUVERTAVEC
L'ENCLENCHEMENT DE SECURITEANNLE
CAUTION TO REDUCE THE RISKOF ELECTRIC
SHOCK, DO NOTREMOVE COVER (OR BACK). NO
USER-SERVICEABLE PARTS INSIDE. REFER
SERVICING TO QUALIFIED SERVICE PERSONNEL.
CAUTION
RISK OF ELECTRICSHOCK
DO NOT OPEN
DANGEROUS VOLTAGE
Uninsulated Dangerous Voltage, that may be of
sufficient magnitude toconstitute a risk of electric
shock to personsis present withinthis product's
enclosure.
ATTENTION
The Owner's Manualcontains important operating
and maintenance instructions.
For your safety, it is necessary to refer to the
manual.
WARNING: TOPREVENT FIRE OR SHOCK HAZARD. DO NOT
EXPOSE THIS UNITTO RAIN OR MOISTURE.

32
LOCATION OF CONTROLS
LISTENINGLISTENING
Me
Hant you
Me
Hant you
For A LifetimeFor A Lifetime
EIAEIA
N
D
U
I
S
C
T
I
R
N
I
O
E
R
S
T
C
E
L
E
EST. 1924
A
N
S
O
S
I
O
T
C
A
I
1 2 3 4 5 6 7
8
91011121314
1. SEARCH/SKIP- 8.
2. SEARCH/SKIP+ 9. DC 6VINPUT SOCKET
3. PROG. BUTTON 10.
4. DISPLAY LENS 11.
5. 12. VOLUME CONTROL
. PLAY/PAUSE BUTTON 13. DBBS SWITCH
7. STOP BUTTON 14. DOOR OPENSWITCH
RECHARGE SWITCH
LINE OUT SOCKET
HEADPHONE SOCKET
MODE BUTTON
6
Dear Customer:
Selecting fine audioequipment such as the unit you've just purchased is only the start of your
musical enjoyment. Now it's time toconsider how you can maximize thefun and excitement your
equipment offers. This manufacturer andthe Electronic IndustriesAssociation's Consumer
Electronics Group wantyou to get the most out of your equipment by playing it at a safelevel.
One that letsthe sound come through loud and clear without annoying blaring or distortion and,
most importantly, without affecting your sensitive hearing.
Sound can bedeceiving. Over time your hearing "comfort level" adapts to higher volumes of
sound. So thatsounds "normal" can actually be loud and harmful to your hearing. Guard against
this by settingyour equipment at a safe level BEFORE your hearing adapts.
To establish a safelevel:
&Start your volumecontrol at a low setting.
&Slowly increase thesound until you can hear it comfortably and clearly, and without distortion.
Once you haveestablished a comfortablesound level:
&Set the dialand leave it there.
Takinga minute to do this now will help to prevent hearing damage or loss inthe future. After all,
we want youlistening for a lifetime.
We WantYou Listening For ALifetime
Used wisely, your new sound equipment willprovide a lifetimeof fun and enjoyment. Since
hearing damage fromloud noise is often undetectable until it is too late, this manufacturer and
the Electronic IndustriesAssociation's Consumer ElectronicsGroup recommend you avoid
prolonged exposure toexposure to excessive noise. This list of sound levels is included for your
protection.
Decibel
Level Example
30 Quiet Library, soft whispers
40 Living room, refrigerator, bedroom awayfrom traffic
50 Light traffic, normal conversation, quietoffice
60 Air conditioner at20 feet, sewing machine
70 Vacuum cleaner, hairdryer, noisy restaurant
80 Average city traffic, garbage disposals, alarm clockat
two feet
THE FOLLOWING NOISESCAN BE DANGEROUSUNDER CONSTANT EXPOSURE:
90 Subway, motorcycle, truck traffic, lawn mower
100 Garbage truck, chainsaw, pneumaticdrill
120 Rock band concertin front ofspeakers, thunderclap
140 Gunshot blast, jetengine
180 Rocket launching pad
Information courtesy ofthe Deafness ResearchFoundation.
INDUSTRY CANADA NOTICE
Operation is subjectto the following two conditions: (1) this device may not cause interference,
and (2) thisdevice must accept any interference, including interference that may cause
undesired operation ofthe device.

54
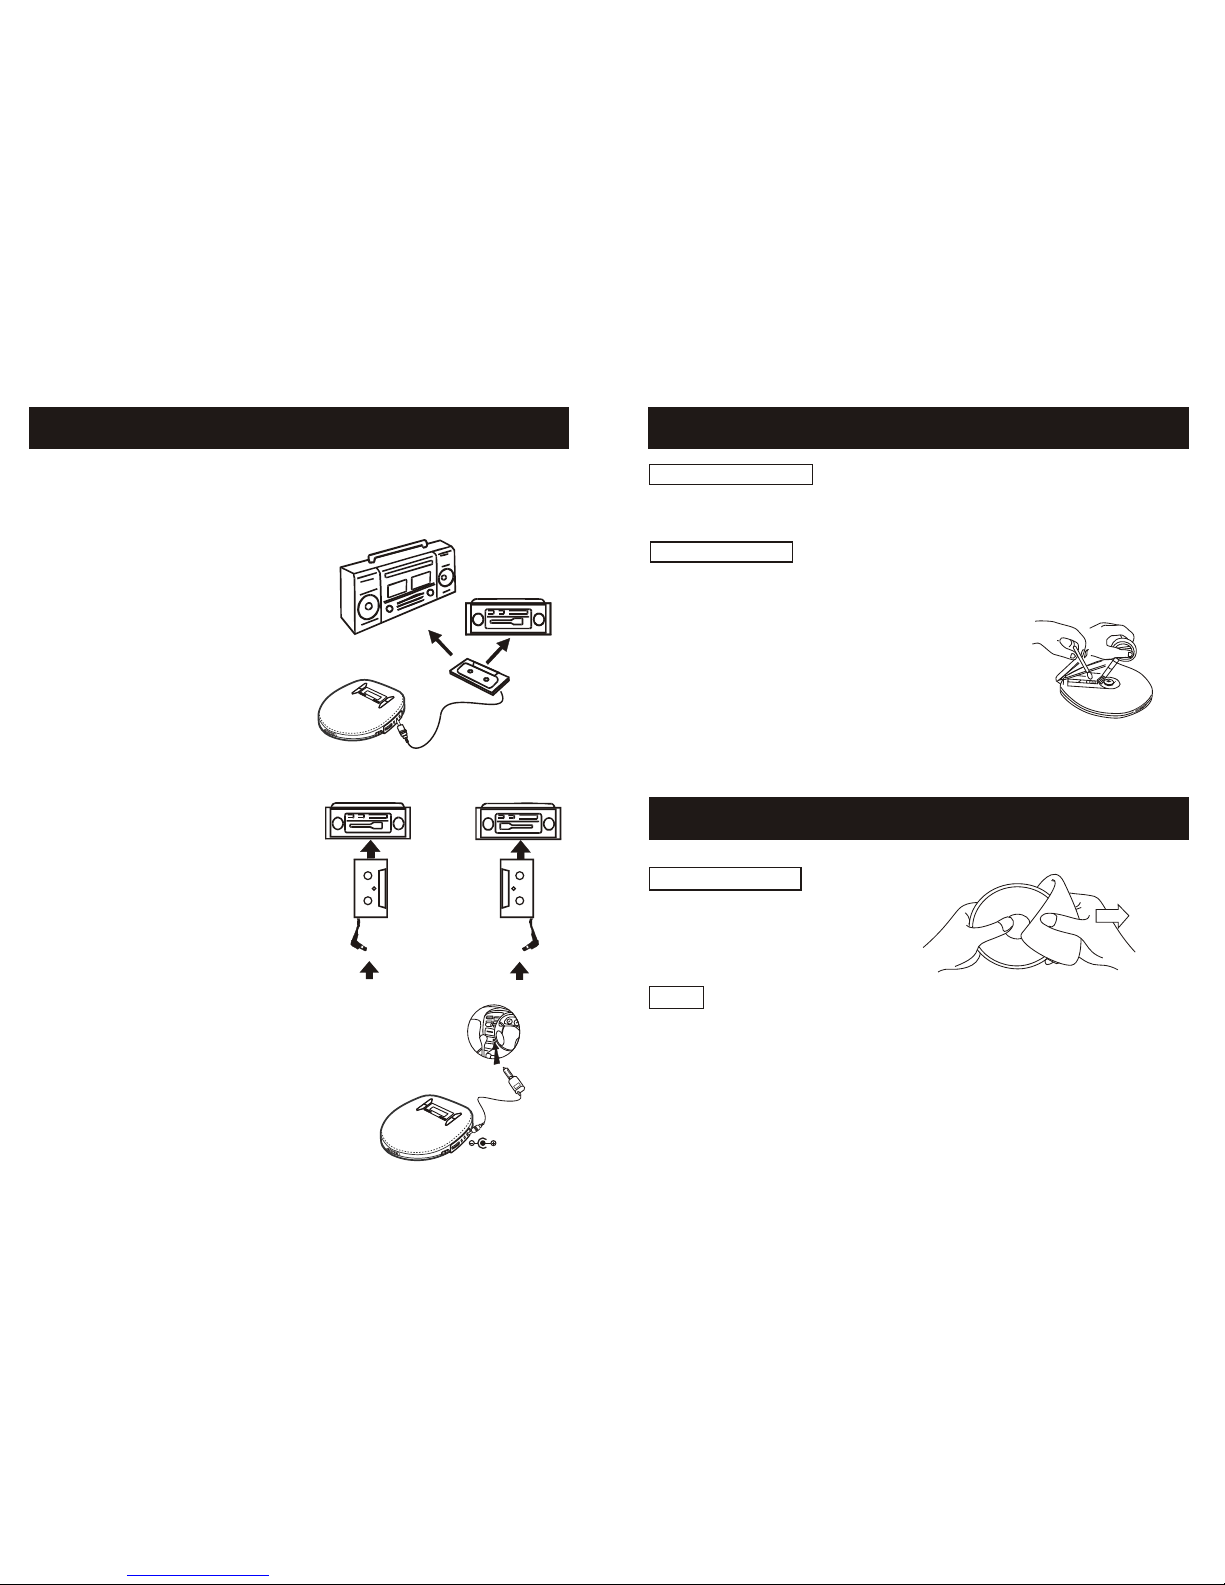
Listening with the Hearphones Connecting to component audio
systems
Connect the plug of the stereo
earphones (not included) or
headphones (included) into
the PHONES (Green) socket.
Connect the stereo connection cable
(not included) into the LINE OUT
(BLACK) socket of the unit and the
CD/AUX inputs of an audio system.
Caution: Avoid excessive
volume levels and listening to
sound for a long period of time
when using headphones.
Note: Always switch the power off
before making any connections
between the player and another unit.
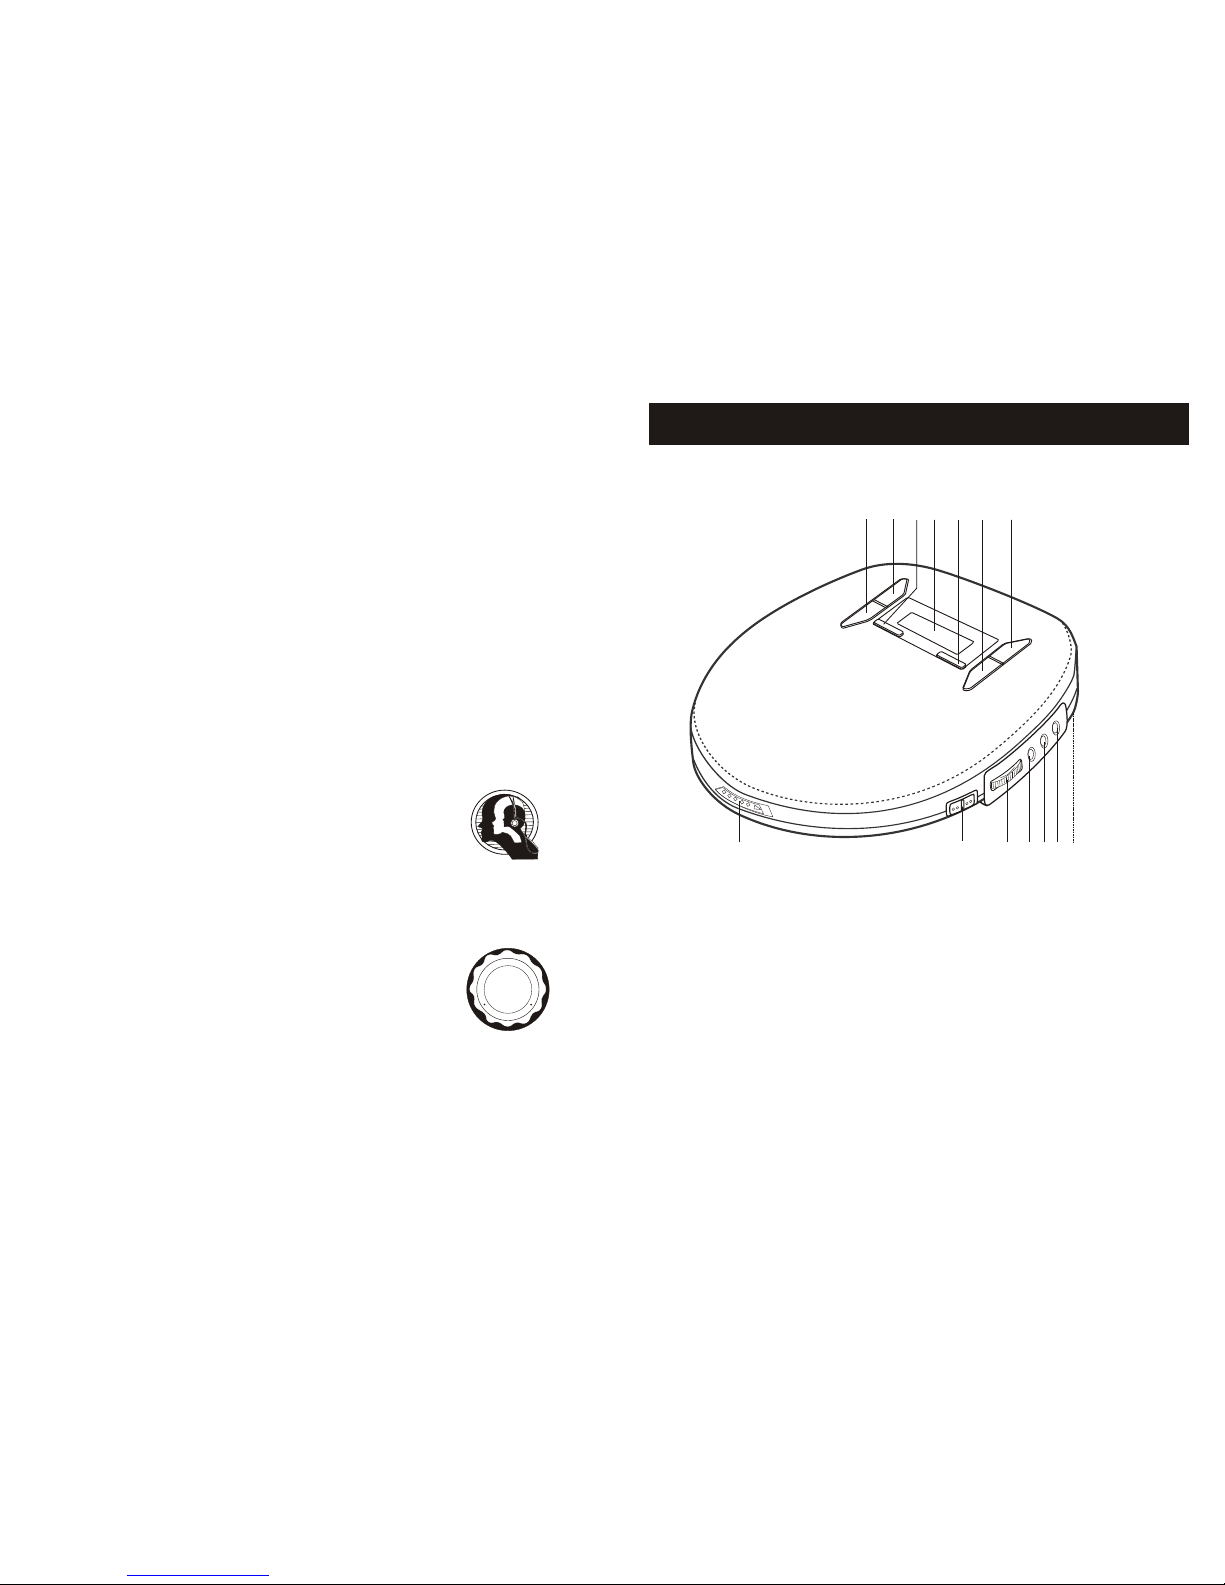
HEADPHONE AND HI-FI CONNECTION
Battery Power Operation AC Operation (optional)
1. Open the battery compartment
cover and insert two 'AA' alkaline
batteries inside the battery
compartment. Follow the polarity
as indicated on the bottom of the
cabinet.
2. Close the battery compartment
cover.
1. Insert the DC plug, at the end of the
AC adaptor cord into the DC input
socket, at the side of the unit.
2. Plug the AC adaptor(not included)
into a 120V
Note If the AC plug does not fit in
your AC outlet, a plug adaptor
(not included) should be used.
Consult your local dealer on the type
of plug adaptor required.
AC power outlet socket.
Battery Type
(using 2 batteries)
Average Playing
Time (Normal
Play Mode)
Ni-CAD
rechargeable
(min. Specification
recommended
1.2V-650mA)
Alkaline
MN 1500, LR 6
or Equivalent
Note: Zinc/Carbon, or Zinc/Chloride type
batteries are not recommended for this unit
as their use will result in extremely short
playing times. Wherever possible and for
economy it is recommended that the AC
adaptor supplied with this unit is used.
13 Hours
Anti Shock Mode
Only
5 Hours
(not supplied)
To remove the disc
Hold the edge and gently press
the center pivot as illustrated,
then pick up the disc.
CAUTION:
Wait for the disc to stop rotating before
sliding the OPEN switch.
1. Connect the headphones to the
PHONES (GREEN) socket.
2. Slide the OPEN switch to open the
CD compartment lid.
3. Adjust the VOLUME to minimum.
4. Insert the disc with the label side
Facing up. Push down in the center
until disc is locked in place.
5. Close the lid securely until a click is
heard.
6. Press the PLAY button to start playing.
Note: FSP function will automatically
engage (Pg11)
BASIC DISC PLAY
NOTE:
Only compact disc marked with the
are guaranteed to work on this player.
Home recorded disc's (CDR) recorded
on home PC's may not play or operate
correctly. CDRW disc cannot be played.
This unit can play 3" (8cm) single CD's
without an adaptor. Do not use a CD
single adaptor for these discs.
Turning Power on and off
This unit has no ON/OFF switch.
To turn on: Press PLAY/PAUSE
(playback Starts)
To turn off: Press STOP button
once to enter standby mode.
Press STOP button
twice, to turn off the
power immediately.
Auto power - off function
When the unit is stopped (standby
mode) for approximately 1 minute,
the power is automatically turned
off.
4
5
POWER SOURCES BATTERIES/AC ADAPTOR
1
23
6

76
Note: The JOGGA buffer will fill automatically. If JOGGA function is not required, press
FSP button to switch if off.
During PLAY mode
The track number and the elapsed playing
Time are displayed.
During PAUSE mode
The track playback is paused, the elapsed
time flashes.
Note
When the lid is opened during play mode " ---- " shows in the display indicating that
the door still open.
Note
A flashing indication appears on the display when the batteries need to be
changed.
The display will briefly show as diagram
then proceed to start playback.
To review the total number of tracks on
the disc and total disc time, press the
STOP button once.
When the is pressed at initial start up
LCD DISPLAY INFORMATION
Every time the CD MODE button is pressed.
The corresponding mode appears in the display window.
NORMALNORMAL REPEAT 1REPEAT 1 REPEAT ALLREPEAT ALL
RANDRAND
INTROINTRO
ALLALL
When shown on the
LCD display; the
current track on the
disc will be repeated.
When shown on the
LCD display; all
tracks on the disc will
be repeated.
Press once to playPress once to play
PLAY/PAUSE
x1x1
NOTE: In normal mode none of the above symbols show in the display.
NORMAL PLAYBACK
Plays the whole disc.
¡£¡£
REPEAT / PLAY MODES
During playbackDuring playback
MODEMODE
x1x1
MODEMODE
x2x2
MODEMODE MODEMODE MODEMODE MODEMODE
1
RAND
INTRO
1ALL
This sixth track has elapsed
2 min 30sec.
Track no.
Elapsed time

98
x3x3
Plays the first 10 seconds of each track on the disc.
INTRO
When in the STOP mode, press the MODE button three times and then
press the PLAY/PAUSE button to start INTRO playback.
During disc playback press the MODE button three times and then press
the back skip button to start INTRO playback . Alternatively
INTRO will start at the end of the current playing track.
This allows selected tracks on the disc to be played in any desired order.
Program can only be set in the STOP
mode.
1. Press the PROG button when the
unit is in the stop mode.
The track number and indicator
appear in the display.
2. Press or to select the desired
track.
3. Press the PROG button to enter the track
into memory.
4. Repeat step 2 and 3 to program
up to 24 tracks into memory.
5. Press to start the programmed play.
6. To erase the program, simply press the
STOP button twice.
PROGRAM
To program tracks
PROG
INTRO SCAN AND PROGRAMMED TRACK PLAY
PROG
x1x1
During playbackDuring playback
MODEMODE
SKIP AND SEARCH FUNCTIONS
Locating a Particular track
To skip back to the beginning of the
current or a previous track
To skip to the beginning of following
tracks
Press lightly and repeatedly.
Locating a Particular Point in a track
To search back at a high speed
To search forward at a high speed
Keep depressed
Keep depressed
Enables all the tracks on a disc to be played in a Random ( Shuffle ) sequence.
For example : If "RAND is selected while playing track 8, the random function
will commence once track 8 has ended.
When all tracks on a disc have been played the player will automatically stop
and power down in approx. 1 minutes to preserve battery life.
"
RAND
Low level audio will be heard during the search process to assist in
locating correct point in the track.
RANDOM PLAY
Press MODE button again to return to the NORMAL play mode.
During playbackDuring playback
MODEMODE
x4x4
Track no. of the first
desired selection
The second selection
INTRO
PROG
PROG
PROG
RAND

11
10
This player incorporates the latest digital anti shock circuit, which prevents
interruption of the sound output if the unit is subjected to shock or vibration
during disc playback. The anti shock system will automatically start when a
disc is played, is shown in the display during start up then is flashes
slowly when the data buffer is full and the JOGGABLE system is most
effective.
Notes:
1. While the FULL SHOCK function provides continuous sound output when the
unit is subjected to shock or vibration; it will not correct errors arising from the
use of defective scratched or dirty discs.
FULL SHOCK PROTECTION
PRODUCT SPECIFICATIONS
AUDIO
Power requirements
Power consumption 0.8W (DC 3V) UNDER NORMAL CONDITION
Approx.200g not including batteries (Main Unit)
Weight
- 2 x LR6 " AA " size alkaline battery
- DC in 4.5V jack accepts AC power adaptor
(center positive)
GENERAL
PICK-UP
System
Laser diode
Properties
Error correction
Wavelength : = 780nm
Emission duration : continuous
Laser output : <44.6 W
Material: GaAlAs
Cross-interleave Reed-solomon code
Compact disc digital audio system
1-bit DAC 8 times oversampling
20-20, 000Hz ( +1/-3 dB )
Below measurable limits
2 channels ( stereo )
Line output : 0.6 Vrms ( 47K )
Heaphone: 15 mW ( 32 )
D/A conversion
Frequency response
Wow and flutter
No. of channels
Output level
CHARGING AND USE OF RECHARGEABLE BATTERIES
Note
Rechargeable Battery Operation
You may play DISC'S whilst charging the batteries.
4. If the operating time decreases drastically even when the rechargeable
nickel-cadmium batteries are properly recharged, purchase a new set
of rechargeable nickel-cadmium batteries.
5. When charging for the first time or after a long time, playing time may
be reduced. In this case, charge and discharge the batteries several
times.
This unit can fully recharge the specified rechargeable battery, in
approximately 15 hours. The rechargeable batteries (NOT supplied)
should be recharged before they are used form the first time because
they are low in power or if they have not been used for a long period
(over 60 days)
1. Open the battery compartment cover and insert two of the recommended
rechargeable batteries, matching polarity. (1.2V 650mA)
BOTH BATTERIES MUST BE OF RECHARGEABLE NICKEL-CADMIUM
TYPE, OTHERWISE THE BATTERIES MAY EXPLODE OR LEAK.
2. Plug in the AC adaptor and set the Recharge switch to ON position to
start charging.
3. After 15 hours. Please unplug the AC adaptor and switch the Recharge
switch to the OFF position.
DO NOT CHARGE CONTINUOUSLY FOR 24 HOURS OR MORE.
DOING SO CAN CAUSE THE PERFORMANCE OF THE
RECHARGEABLE BATTERIES TO DETERIORATE.

1312
Cleaning the Cabinet
Cleaning the Lens
Wipe with a soft cloth. If the cabinet is very dirty, dampen the cloth with a weak
solution of neutral detergent and water, and then wipe clean.
A dirty lens will cause sound skipping and, if the lens is very dirty, the CD may
not work. Open the disc cover and clean the lens as follows:
Dust or Dry Particles
Using a camera lens brush/blower, blow on the lens
a couple of times, then wipe it lightly with he brush
to remove dust. Then, blow on the lens once more.
Finger prints
If the lens cannot be cleaned by using a brush / blower,
use a dry cotton swab starting in the middle and working to the outside edge.
PLAYER MAINTENANCE
DISC CLEANING AND TROUBLESHOOTING GUIDE
Cleaning the Disc
When a disc becomes dirty,
clean it with a cleaning cloth.
Wipe the disc from the center
out.
Note
Do not use solvents such as benzine petrol, thinner, commercially
available cleaners or anti-static spray intended for analogue discs.
Should you experience difficulties in the use of this player please refer to
the following chart before contacting your dealer or the place of
purchase.
ACCESSORIES AND ADDITIONAL FEATURES
(ONLY FOR JXCD 540J)
Compact Disc Cassette Adaptor
The cassette adaptor allows you to use your portable CD player with your car stereo cassette
system or portable audio cassette system.
1. Insert the cassette adaptor in the same
direction as you would insert an audio
cassette tape.
2. Position the cord so that it feeds through
the front of the cassette deck.
3. Insert the cassette adaptor stereo plug
into the HEADPHONE JACK on the left
side of the CD player.
4. Turn on the cassette player. Press PLAY
on the cassette player.
5. Press PLAY on the CD player.
6. Set the volume of the CD player to a mid-
level. Adjust the volume of the cassette
player.
Note:
&The cassette adaptor had the
play head onone side only. If
you insert the cassette and no
sound is heard, try turning the
cassette over or pressing the
reverse button ofthe cassette
player to change direction.
&The car cassette adaptor may
not be compatible with all
makes and modelsof cassette
players.
DC Cigarette LighterPower Adaptor
Use the DCcigarette Lighter Adaptor to conserve
battery life when using the CD player in a car.
1. Plug the adaptor into the car cigarette lighter.
2. Plug thepin into the 4.5V DC Jackon the left
Side of theunit.
To DC4.5V Jack
To
Cigarette
Lighter

14
Troubleshooting Guide
Problem
Player fails to function
No sound from
Headphones
Intermittent sound
Dirty or defective disc
Dirty pick up lens
Player is subject to excessive vibration or shock
Low battery power
Poor Headphone connection
No sound when played
through an external amplifier
Connection is incorrect
Power to external amplifier not switched on
Headphone plug is not firmly inserted into the Green Phones
socket.
Headphone have been inserted into the Black line output
socket.
Points to Check
Disc may be inserted upside down
Disc not mounted correctly on chuck
Dirty or defective disc
Dirty pick up lens
Player lid not closed
Moisture/Condensation, allow player to warm up to room
temperature for 60 minutes
AC power to adaptor switched off
Weak batteries
Auto switch off has occurred
TROUBLE SHOOTING GUIDE
This manual suits for next models
3
Table of contents
Other jWIN CD Player manuals

jWIN
jWIN JX-CD492 User manual

jWIN
jWIN JX-CD290 User manual

jWIN
jWIN JX-CD404 User manual

jWIN
jWIN JL-CD815 User manual

jWIN
jWIN JX JX-CD530 JX-CD530 User manual

jWIN
jWIN JX-CD7100 User manual

jWIN
jWIN JX-CD680 User manual

jWIN
jWIN JX-CD477 User manual

jWIN
jWIN JL-K755 User manual

jWIN
jWIN JX-CD790 User manual
Popular CD Player manuals by other brands

Sony
Sony CFD-S250 - Cd Radio Cassette-corder operating instructions

Sony
Sony CDX-656 - Compact Disc Changer System Service manual

Philips
Philips AZ1123B Specifications

Harman Kardon
Harman Kardon FL 8400 operating instructions

Tascam
Tascam CD-302 owner's manual

Philips
Philips AZ6880/17 Instructions for use