König Electronic SEC-IPCAM100B User manual

ENGLISH
IP camera
FULL MANUAL
Table of contents:
• Introduction (p. 2)
• Safety precautions (p. 2)
• Packaging
content (p. 2)
• System
requirements (p. 2)
• Technical specifications (p. 2)
• Product
description (p. 3)
• User
instructions(p. 5)
• Warranty (p. 22)
• Disclaimer (p. 22)
• Disposal (p. 22)
Introduction:
Watch over your property with this genuine Plug & Play IP camera without the need for any IP setting or router
configuration. Easy and simple installation in just a few minutes, the free uCare Cam App allows you to watch
on your Smartphone, anytime and anywhere. Advanced features provide you with an email or App notification
when motion is detected. Photo and/or video footage can be play backed at any time you require.
• We recommend that you read this manual before installing/using this product.
• Keep this manual in a safe place for future reference.
Safety precautions:
This product should ONLY be opened by an authorised technician when service is required. Disconnect the
product from the mains and other equipment if a problem should occur. Do not expose the product to water or
moisture.
Packaging content:
1x IP camera
1x Camera mount
1x AC/DC adapter
1x Quick start guide
1x CD with complete manual
System requirements:
• Device running on iOS 5.0 or above
• Device running on Android 4.0 or above
• WiFi Router
Technical specifications:
Specifications: SEC-IPCAM100B/W SEC-IPCAM105B/W
Video codec: MJPEG
Resolution: VGA 640x480 / QVGA 320x240 / QQVGA 160x120
Frame rate: 1~25fps
Image sensor: CMOS
Lens: 3.6mm 3.0mm
Night vision: 1 Lux, 10 meter 1 Lux, 5 meter
Flash memory: 8 MB
Card storage: up to 32 GB SDHC (not included)
Audio: 2-way
(integrated microphone + loudspeaker)
1-way
(integrated microphone)
Networking Protocol: IPV4, ARP, TCP, UDP, ICMP, DHCP Client, NTP Client, DNS Client, SMTP
Client, P2P Transmission
Built-in network interfaces: 802.11b/g/n WLAN
2

Specifications: SEC-IPCAM100B/W SEC-IPCAM105B/W
Wireless security: Wireless security: WEP/WPA/WPA2 wireless encryption
Wireless transmit output
power:
Wireless transmit output power: 16.5 dBm for 11b, 13.5 dBm for 11g,
13.5 dBm for 11n (+/- 1.5dBm)
Video features: Adjustable image size and quality, Time stamp and text overlay, Flip
View Angle: H:39.3°, V:26.8°, D:46.5° H:46.4°, V:31.9°, D:54.5°
Digital zoom: Up to 4x
3A Control: AGC (Auto Gain Control), AWB (Auto White Balance),
AES (Auto Electronic Shutter)
Power: External AC-to-DC switching power adapter, 100 to 240 V AC, 50/60 Hz, Dc
Plug Output: 5 V DC/1 A
Dimensions (W x D x H): 88mm*46mm*116mm (excluded
camera mount)
74mm*74mm*65mm (excluded
camera mount)
Weight: 119 g (without mount) 72 g (without mount)
Max. power consumption: 2.3W 1.9W
Operating Temperature: 0 to 40 °C (32 to 104 ˚F)
Storage Temperature: -20 to 70 °C (-4 to 158 ˚F)
Humidity: Humidity: 20% to 80% RH non-condensing
Product description:
SEC-IPCAM100B/W
Front
LED indicator for status
of IP camera
WPS/Reset button for
set-up and reset
Microphone
No function
IR LED for 10 metre
night view
Light intensity sensor
for IR LED
Wifi antenna
Slot for Micro SD card
3

Back
5V DC input
Loudspeaker For
2-way Audio
communication
Connection for
camera mount
SEC-IPCAM105B/W
Front
LED indicator for status
of IP camera
Microphone
IR LED for 5 metre
night view
Light intensity sensor
for IR LED
4

Back
WPS/Reset button for
set-up and reset 5V DC input
Slot for Micro SD card
User instructions:
A. Hardware Installation
1. Please find a location to install the uCare Cam that is within good WiFi signal reach of your home router.
2. If you plan to hang the uCare Cam, you can use the mounting kit included.
3. If the power cable included is not long enough to reach a power outlet, please purchase an extender
cable from your local electronics store.
4. Connect the camera power adapter.
Warning:
Please use the power adapter included with your camera to avoid damage to the camera.
When the camera powers up, the status LED will be green for about 15 seconds before flashing red. If
there is no red LED flashing, please unplug the power cord, wait 5 seconds, then re-connect the power. It
will take about 60 seconds for the uCare Cam to finish starting up. The status LED should alternate
between red and green. If the status LED does not flash red and green, please press and hold the
WPS/REST button at the back of the uCare Cam for 10 seconds.
B. Hardware Installation
1. Download the Smartphone App “uCare Cam” from the App store (iOS) or Play
Store (Android).
2. Search for the App named “uCare Cam”, then download and install it on your
smartphone.
3. After the software installation is complete, this icon will appear . Click on
this to run the App.
5

C. uCare Cam APP Overview
Default camera password: 0000
Default manager name: admin
Default manager password: 0000
There are 4 major function tabs at the bottom of the App main screen.
Camera List Tab
This is the main App screen. In this tab, all of the cameras which have been added
will be listed.
WiFi Setting or WiFi Connect Tab
Please go to this tab to configure the uCare Cam WiFi settings.
There are two methods to install a new uCare Cam and connect it to a WiFi
Router.
1. Router Mode
2. WPS (WiFi Protect Setup) Mode
(Requires a Router with WPS function using WPA/WPA2 encryption -
WEP encryption will not work)
Play List Tab
Go to this tab to view all pictures taken by the user via smartphone. The pictures will be listed by camera.
Settings Tab
Configure uCare Cam settings and remote microSD Card video playback.
User will need to input a management ID and password to enter this tab.
Default management ID: admin Default password: 0000
If you forget your password, you can reset the uCare Cam by pressing the WPS/REST button on the back of
the camera for 10 seconds. This will restore the uCare Cam to factory settings. You will need to set up the
WiFi connection again after you reset the camera.
D. iOS – Setup uCare Cam WiFi
Method 1: Use WPS (WiFi Protected Setup)
Available if your WiFi router supports WPS and it is set to use WPA or WPA2 security encryption. WEP
security encryption is not supported in WPS mode. An easy way to check if your router supports WPS is to
look for a button that says “WPS” on the router. It may also be called “AOSS” or “QSS”.
1. Press and hold the WPS/REST button for 10 seconds at the back of the camera. It will reset and restart
the uCare Cam. After about 60 seconds, the LED colour should flash green and red.
2. Press “WPS” button on the WiFi router
3. Press the WPS/REST button on the back of the uCare Cam for 2 seconds.
•If the uCare Cam has entered the WPS connection mode, the status LED colour will turn a fast
blinking green.
4. The uCare Cam will try for up to 2 minutes to connect to the WiFi router using WPS.
5. If the LED colour changes to orange, your uCare Cam has successfully connected to your router. If the
LED does not change to orange, the setup has failed. Please make sure the uCare Cam is within WiFi
distance of your router, press the WPS/REST button for 10 seconds to reset the uCare Cam, and try the
setup again.
6. Use the smartphone App to add the uCare Cam into the Camera List. See instruction manual – “iOS - Add
uCare Cam (already connected to router) to App”.
6

Method 2: Use Router Mode
You will first need to connect to the router that is available inside the uCare Cam, configure the WiFi settings
for your home router, then the uCare Cam will restart and connect to your home router.
Write down, or have handy, the SSID of your WiFi router and your WiFi password. For example, the
SSID may be something like “TP-Link-XXXXX” or “NETGEAR”. You will need both the SSID and the
password during this process.
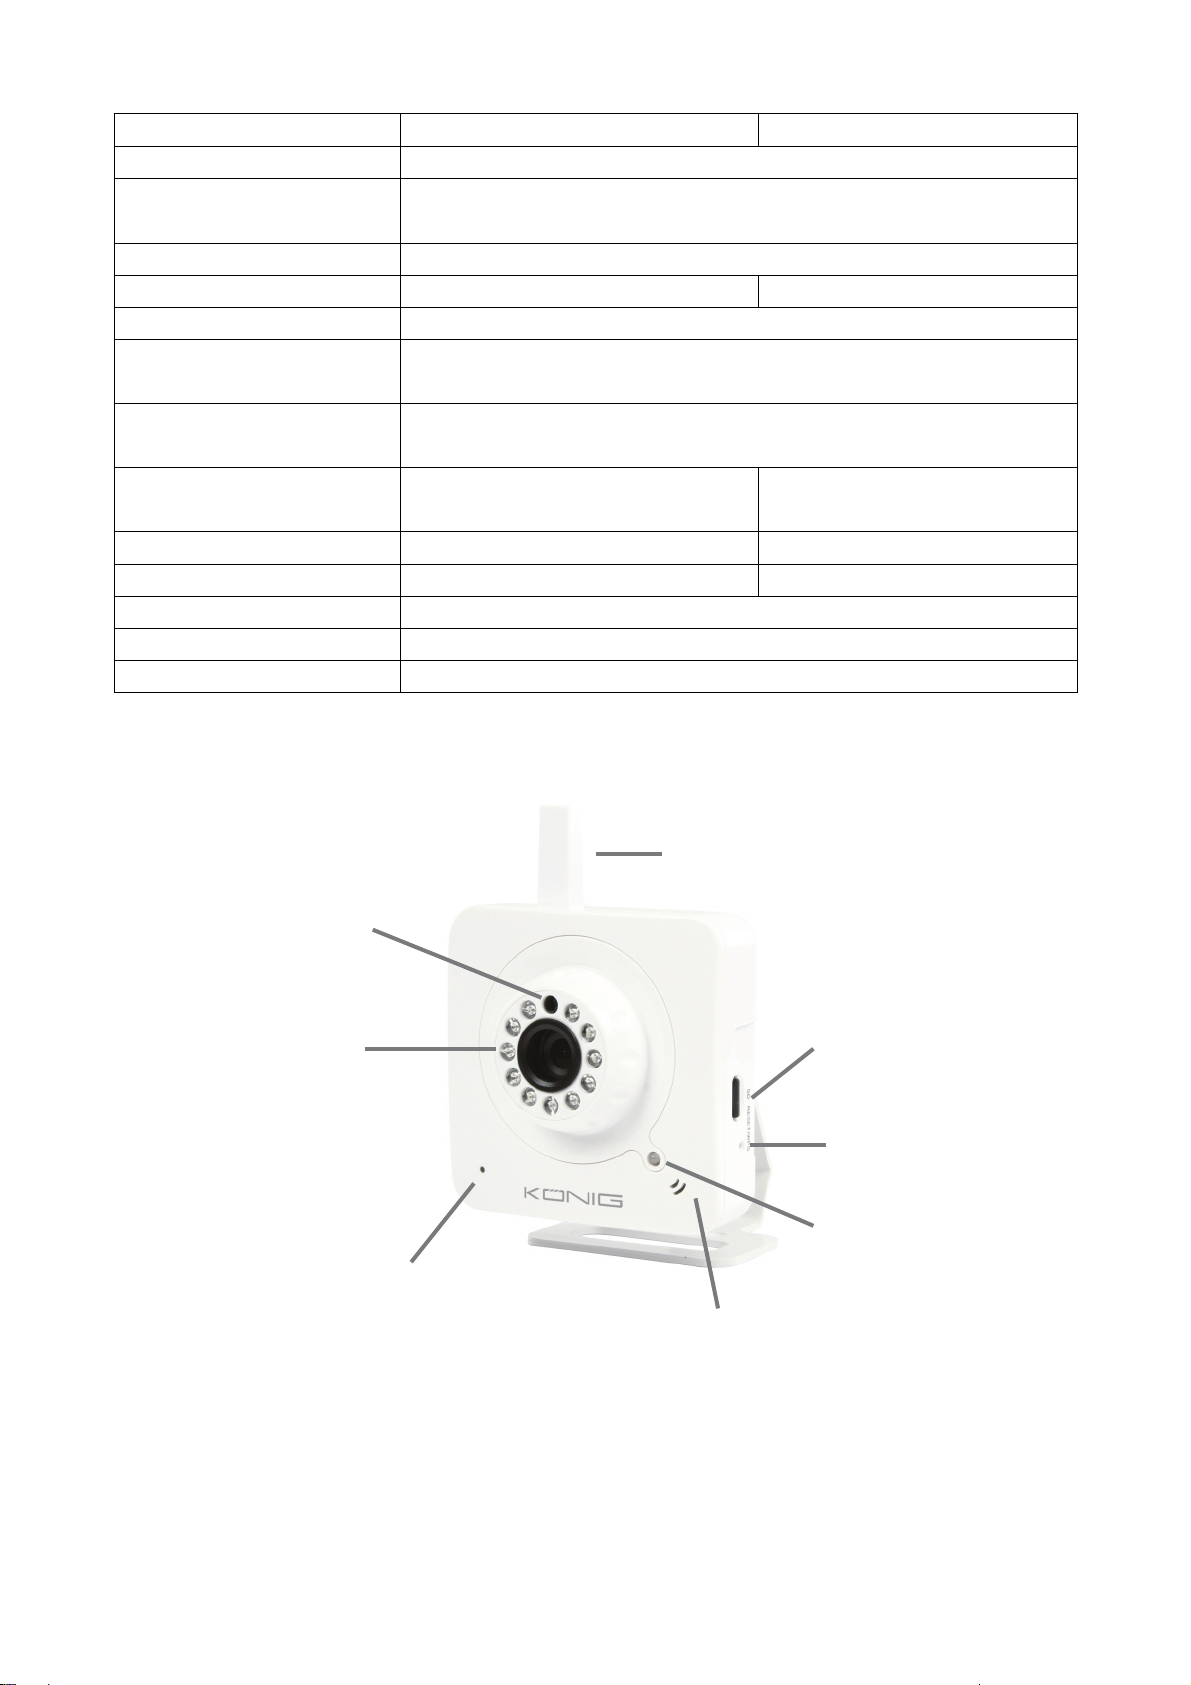
1. Make sure the status LED on the uCare Cam is blinking red and
green. If the status LED is not blinking red and green, please
press and hold the WPS/REST button for 10 seconds to reset the
uCare Cam. Wait for 1-2 minutes for it to restart and the LED
should turn red and green.
2. Connect your iOS device to the router inside the uCare Cam. To
connect to the uCare Cam router, open up “Settings” , then
“Wi-Fi” and let it search for a network. The network will be
“wifi-cam-p2p”. Click on “wifi-cam-p2p” to connect.
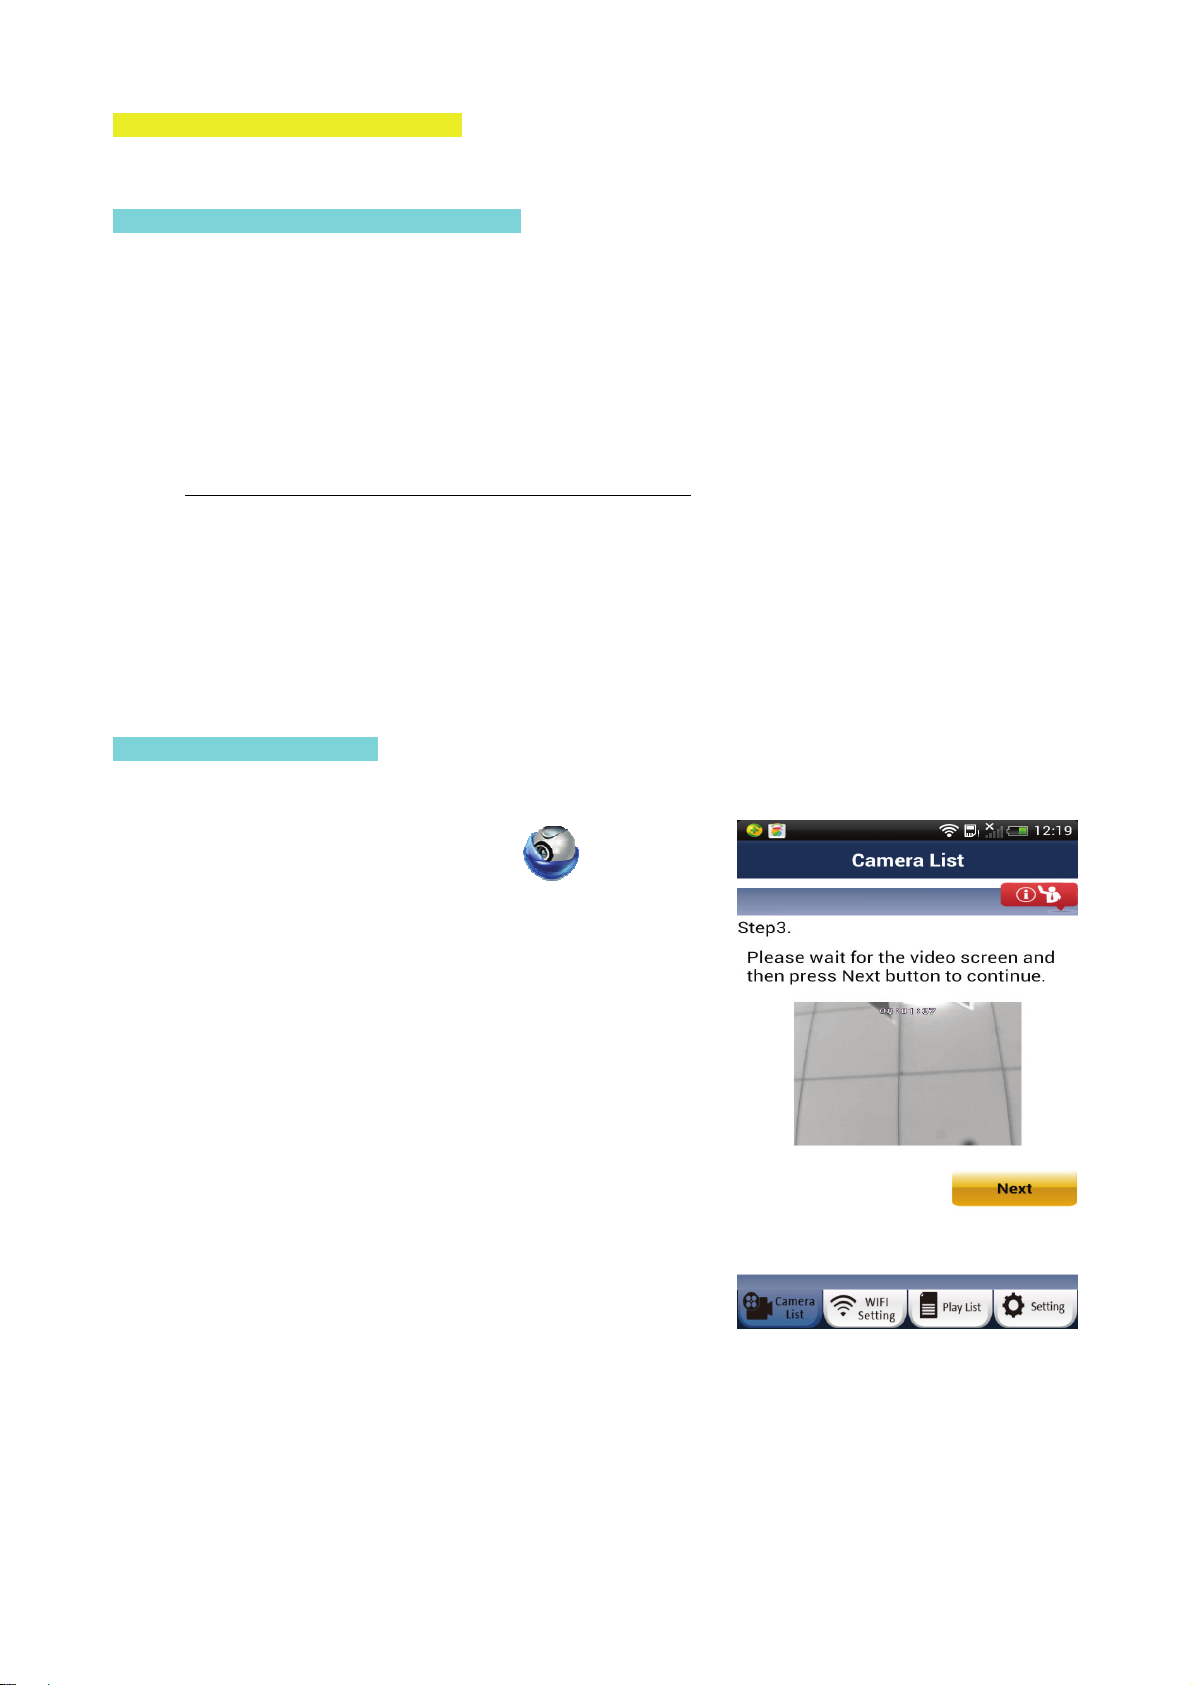
3. Now, open the smartphone App “uCare Cam” and click on
the tab at the bottom of the screen that says “WiFi Connect”.
Click on “Router mode”, then “Next”. You will see live video.
4. Enter the WiFi router SSID and password for your home router.
Click on the “Next” button and again, on the next screen, the
“Next” button.
5. Please enter a Camera name (2 to 20 characters) and the default
password “0000”. You are encouraged to change the default
password after setup for security purposes. Then click “Finish”.
6. After the uCare Cam receives this information, it will restart.
Please wait for it to start up and connect to your home router.
When it successfully connects, the status LED colour will turn
orange. It may take up to 10 minutes. If the status LED colour
does not turn orange, please check your router and make sure the
uCare Cam is within the signal area of your WiFi router. Then try
setup again, starting from Step 2.
7. Your iOS device should have disconnected from “wifi-cam-p2p” and reconnected to your home router.
Please check that your iOS device has connected to your home router now, via “Settings” -> “Wi-Fi”. If
it has not, please connect your smartphone to your home router WiFi.
8. Open the “uCare Cam” smartphone App, and you can click on the camera name in the Camera List view
to connect.
7

E. Android – Setup uCare Cam WiFi
There are two methods to set up the uCare Cam to connect to a new WiFi Router.
Method 1: Use WPS (WiFi Protected Setup)
Available if your WiFi router supports WPS and it is set to use WPA or WPA2 security encryption. WEP
security encryption is not supported for WPS mode. An easy way to check if your router supports WPS is to
look for a button that says “WPS” on the router. It may also be called “AOSS” or “QSS”.
1. Press and hold the WPS/REST button for 10 seconds at the back of the camera. It will reset and restart
the uCare Cam. After about 60 seconds, the LED colour should flash green and red.
2. Press “WPS” button on WiFi router
3. Press the WPS/REST button on the back of the uCare Cam for 2 seconds.
•If the uCare Cam has entered the WPS connection mode, the status LED colour will turn a fast
blinking green.
4. The uCare Cam will try for up to 2 minutes to connect to the WiFi Router using WPS.
5. If the LED colour changes to orange, your uCare Cam has successfully connected to your router. If the
LED does not change to orange, the setup has failed. Please make sure the uCare Cam is within WiFi
distance of your Router, press the WPS/REST button for 10 seconds to reset the uCare Cam, and try the
setup again.
6. Use the smartphone App to add the uCare Cam into Camera list. See instruction manual – “Android - Add
uCare Cam (already connected to router) to App”.
Method 2: Use Router Mode
Please have your WiFi password readily available as you will need it in this process.
1. Open the Smartphone APP “uCare Cam” and click on
the tab at the bottom of the screen that says “WiFi Setting”.
2. Click on “Router mode”.
3. Make sure the status LED on the uCare Cam is blinking red and
green. If the status LED is not blinking red and green, please
press and hold the WPS/REST button for 10 seconds to reset
the uCare Cam. Wait for 1-2 minutes for it to restart and the LED
should turn red and green.
4. Click “Next”. Your smartphone will start to search for the uCare
Cam. Once it finds it, you will see live video. Click on “Next”
button.
5. Your smartphone will search for nearby WiFi signals. Once they
are found, you will see a list of routers.
6. Click on your router name and enter your WiFi password in the
pop-up screen.
8

7. Please enter a Camera name (2 to 20 characters) and the
default password “0000”. You are encouraged to change the
default password after setup for security purposes. Then click
“OK” in the top right corner.
8. The camera will restart and the Smartphone App will
automatically connect to the camera in Live View.
9. When the uCare Cam successfully connects to your router, the
status LED colour will turn orange. It may take up to 10 minutes.
If the status LED colour does not turn orange, please check your
router and make sure the uCare Cam is within the signal area of
your WiFi Router. Then try the setup again.
10. If the setup is successful, the uCare Cam will be automatically
added to your Camera List window and you can click on the
camera name to view Live Video.
F. iOS – Add the uCare Cam (already connected to Router) to App
There are three ways to add a uCare Cam to the Camera List view if the uCare Cam is already connected to
the internet. You can:
•Scan for the uCare Cam in local intranet
•Scan QR code at the back of the uCare Cam
•Type in 20 digit code
Method 1: Scan for the uCare Cam in local intranet
1. Make sure your smartphone is connected to the same router
as your uCare Cam. Open up the Smartphone App “uCare
Cam” and click on the “+” at the top right of the
screen.
2. Click on “Scan Camera’s UID in intranet”.
3. You will see a list of UIDs that were found on your local
intranet.
4. Click on the UID you would like to add.
5. Please enter a Camera name (2 to 20 characters) and the camera password. The default password is
0000. Click “Done” on the top right of window.
9

6. You will see the Camera name now in Camera List view. It should indicate that the Camera is “Online”.
To connect to the Camera, please click on the Camera name. If the Camera is not “Online”, you may
need to force reconnect. To force reconnect, click on the right arrow and click on “Reconnect”. Click on
the Camera name once it shows “Online”.
Method 2: Scan QR Code at back of the uCare Cam
1. Make sure your smartphone is connected to the internet. Open up the Smartphone App “uCare Cam”
and click on the “+” at the top right of the screen.
2. Click on “Scan camera QR code”.
3. You will see your smartphone camera live view. Face your smartphone camera towards the QR code
found on the back of the uCare Cam. Please make sure the QR code is clear and fully viewable in the
screen. Once the QR code has been detected, the App will display the UID in the App window.
4. Please enter a Camera name (2 to 20 characters) and the camera password. The default password is
0000. Click “Done” on the upper right of the screen.
5. You will see the Camera name now in Camera List view. It should indicate that the Camera is “Online”.
To connect to the Camera, please click on the Camera name. If the Camera is not “Online”, you may
need to force reconnect. To force reconnect, click on the right arrow and click on “Reconnect”. Click on
the Camera name once it shows “Online”.
Method 3: Type in the 20 digit QR code
1. Make sure your smartphone is connected to the internet. Open up the Smartphone App “uCare Cam”
and click on the “+” at the top right of the screen.
2. Click in the “UID” field to enter typing mode.
3. Type in the 20 digit code exactly as printed underneath the QR code on the back of the uCare Cam.
4. Please enter a Camera name (2 to 20 characters) and the camera password. The default password is
0000. Click “Done” on the upper right of the screen.
5. You will see the Camera name now in the Camera List view. It should indicate that the Camera is
“Online”. To connect to the Camera, please click on Camera name. If the Camera is not “Online”, you
may need to force reconnect. To force reconnect, click on the right arrow and click on “Reconnect”. Click
on the Camera name once it shows “Online”.
G. Android – Add uCare Cam (already connected to router) to App
There are three ways to add a uCare Cam to the Camera List view if the uCare Cam is already connected to
the internet. You can:
•Scan for uCare Cam in local intranet
•Scan the QR code at back of uCare Cam
•Type in 20 digit code
10

Method 1: Scan for the uCare Cam in local intranet
1. Make sure your smartphone is connected to the same router as
your uCare Cam. Open up the Smartphone App “uCare Cam”
and click on the “Click here to import installed WiFiCam”
at the top of the screen.
2. Click on “Search”.
3. You will see a list of UID’s that were found in your local intranet
(Figure XX).
4. Click on the UID you would like to add.
5. Please enter a Camera name (2 to 20 characters) and the
camera password. The default password is 0000. Click “OK” at
the bottom of the screen.
6. You will see the Camera name now in Camera List view. It should
indicate that the Camera is “Online”. To connect to the Camera,
please click on Camera name. If the Camera is not “Online”, you
may need to force reconnect. To force reconnect, click and hold
on the Camera name. A pop-up window will give you options to
Reconnect, Edit, and Remove Camera. Click on “Reconnect”
then click on the Camera name once it shows “Online”.
Method 2: Scan QR Code on the back of uCare Cam
1. Make sure your smartphone is connected to the internet. Open up the Smartphone App “uCare Cam”
and click on the “Click here to import installed WiFiCam” at the top of the screen.
2. Click on “QRCode”. You are required to have a QR code reader installed on your Android phone. A
popular QR code reader might be “QR Droid”.
3. You will see your smartphone camera live view. Face your smartphone camera towards the QR code
found on the back of the uCare Cam. Please make sure the QR code is clear and fully viewable in the
screen. Once the QR code has been detected, the App will display the UID in the App window.
4. Please enter a Camera name (2 to 20 characters) and the camera password. The default password is
0000. Click “OK” at the bottom of the screen.
5. You will see the Camera name now in the Camera List view. It should indicate that the Camera is
“Online”. To connect to the Camera, please click on the Camera name. If the Camera is not “Online”,
you may need to force reconnect. To force reconnect, click and hold on the Camera name. A pop-up
window will give you options to Reconnect, Edit, and Remove Camera. Click on “Reconnect” then click
on Camera name once it shows “Online”.
Method 3: Type in 20 digit QR code
1. Make sure your smartphone is connected to the internet. Open up the Smartphone App “uCare Cam”
and click on the “Click here to import installed WiFiCam” at the top of the screen.
2. Click in the “UID” field to enter typing mode.
3. Type in the 20 digit code exactly as printed underneath the QR code in back of the uCare Cam.
11

6. Please enter a Camera name (2 to 20 characters) and the camera password. The default password is
0000. Click “OK” on the bottom of the screen.
7. You will see the Camera name now in Camera List view. It should indicate that the Camera is “Online”.
To connect to the Camera, please click on the Camera name. If the Camera is not “Online”, you may
need to force reconnect. To force reconnect, click and hold on Camera name. A pop-up window will give
you options to Reconnect, Edit, and Remove Camera. Click on “Reconnect” then click on Camera name
once it shows “Online”.
H. Live Video Window & Network Connection Type
When you connect to your uCare Cam, you will see the below Live Video screen. At the top of the screen,
there will be some information listed to help you understand the performance of your internet connection.
Online / P2P: Connection type - there are three types, LAN, P2P, and Relay. Connection type shown is
P2P
640x480 is the video resolution. uCare Cam supports VGA 640x480, QVGA 320x240, and
QQVGA 160x120
FPS is current frames per second
OnLine Nm: number of users currently connected to this uCare Cam
Frame Ratio 0 / 499 : first number is packet loss number, second number is packet receive number. If
the first number is too high compared to the second number, it means that your internet connection speed
is slow or unsteady.
Connection Types
There are three types of network connection types possible between uCare Cam and your Smartphone App.
1) Local Area Network (LAN) Mode
Both uCare Cam and your smartphone are connected to the same WiFi Router.
Typical frame rate will be around VGA 640x480 15~20fps.
2) Point to Point (P2P) Mode
uCare Cam will establish a point to point network connection directly with the smartphone.
The typical scenario will be that the uCare Cam is installed at home or in the office and the smartphone
has a 3G/3.5G/4G internet connection. Typical frame rate will be around VGA 640x480 10~15fps.
3) Relay Mode
The uCare Cam and smartphone cannot establish a point to point network connection link. The uCare
Cam must send Audio/Video data to a relay server and the smartphone will retrieve data from the relay
server. In relay mode, there will be a limit on the video download frame rate.
The typical scenario will be that the uCare Cam is installed at home or in the office and the smartphone is
using a WiFi connection.
Remark:
12

•When using 3G/3.5G/4G to connect to uCare Cam, the App will use P2P mode.
If the smartphone download speed is too slow, the App will switch to relay mode. The user can force
the App to reconnect to the uCare Cam and it will try P2P mode again. To force reconnect, press and hold the
camera name on the Camera list. A pop-up menu will appear with the option to “Reconnect”. Please click
“Reconnect”.
I. Using the uCare Cam App
The uCare Cam has a lot of functions possible through the Smartphone App. Please see below for some of
the key functions.
Camera List
Camera On-Line
Add Camera that
has alread
y
been
Edit Camera Info
Take Photo
Connection Status
Information
13

Playlist
User can view, delete, and copy picture files.
File list per
camera
Camera file folde
r
File delete
Photo view
Settings
Manage uCare Cam (Default manager name: admin, Default Password: 0000)
Only one user can manage a camera that is online and connected to the smartphone App at any one
time.
14

Here, the user can:
• Check Camera Info
• Change WiFi Router
• Change Alarm Settings – “Warning &
Notify Setting”
• Set Real-time video
• Check SD Card Recording
• Play SD Card Video
• Set Password
• Change Date & Time
1) Change WiFi Router
User can remotely switch the camera to connect to a different WiFi router.
2) Alert & Notify Setting / Warning & Notify Setting
The camera has a number of hardware alarm detection possibilities.
User can set the desired trigger and notification. When a new event is generated, the App will notify the
user either through email or through a push notification on the smartphone.
15

Set Email Alerts
To setup your email to receive motion/sound/etc. alerts, please login to the “Settings” page with Manager
name and password (default: admin / 0000).
1) Click on “Alert & Notify Setting” or “Warning & Notify Setting”.
2) Click on “Email snapshot alert”
3) You will see a variety of options. You can touch and scroll down the page to see more options.
16

• Email snapshot alert – Turn email on/off
• Motion detection enabled – Turn motion detection on/off
• Sensitivity – Motion detection sensitivity (High, Medium, Low)
• Sound detection enabled – Turn sound detection on/off
• SD card remove detection – Send alert if SD card is removed
• SD card out of space alert – Send alert if SD card is full
• Notification subject – Note to be added to email alert (less than 10 characters)
• Receiver Email – email address to send alert to
• SMTP Mail Settings – only either SMTP or Gmail mail settings can be set. Please enter your email
provider’s SMTP server settings. You may need to contact your email provider for the server settings.
Please enter your email address and email password. This account will be used as the “Sender” or
“From” for the email alerts.
• Gmail Mail Settings – only either SMTP or Gmail mail settings can be set. For convenience, we have
already entered Gmail’s SMTP server settings. Please enter your Gmail account email and Gmail
password. This account will be used as the “Sender” or “From” for the email alerts.
3) Real-time video setting
User can adjust the video quality settings based on the status of the network connection. If the user does
not have adequate video performance, please turn off motion detection and reduce the resolution.
(1) Frames: The default is motion image detection
(2) Resolution: The default is 640x480
17

4) SD Card Recording Setting
User can insert a microSD card into the camera to enable the
recording function.
Trigger Recording:
The camera will automatically start recording when a trigger event
(motion, sound, and other events) have occurred. The camera will
record for 60 seconds. If another trigger event occurs, the camera
will record for another 60 seconds; otherwise it will stop recording.
Continuous Recording: User can setup uCare Cam to
constantly record. A video file will be saved every two minutes.
When the microSD card is full, if “SDCard Overwrite” is checked, the
programme will remove the oldest video files and continue to record.
Otherwise, it will stop recording. “HQ” means high quality recording.
“LQ” means low quality recording.
18

5) Play SD Card Video
Click on the Video file to play.
6) Password Setting
The two-level password management system allows the user to
safely and effectively manage the camera.
First layer: Camera password – able to view the camera.
Default value is 0000
Second layer: Manager’s Name and Password – able to view
and set uCare Cam settings.
Default value is: admin / 0000
19

7) Date & Time
User can only adjust the Time Zone. The Date and Time will be
factory set and the user cannot change it.
App Info
In the App info page, the user can see options related to the App, not specific to a camera. To go to the App
info page, please click on the top right hand corner of screen. Inside the App info page, the user can:
• Switch the App user interface skin to a different colour template.
• See the Quick Installation Guide
• See this Detailed Instruction Manual
• See the App version number
• See the memory usage of the uCare Cam App on your smartphone.
J. Update your uCare Cam firmware
1. Download firmware and un-compress the file.
2. Copy “update.bin” to microSD Card top folder, for example H:\
20
This manual suits for next models
3
Table of contents
Other König Electronic IP Camera manuals