Könner & Söhnen KS JS-1000 User manual
Owner’s Manual
Please, read this manual
carefully before use!
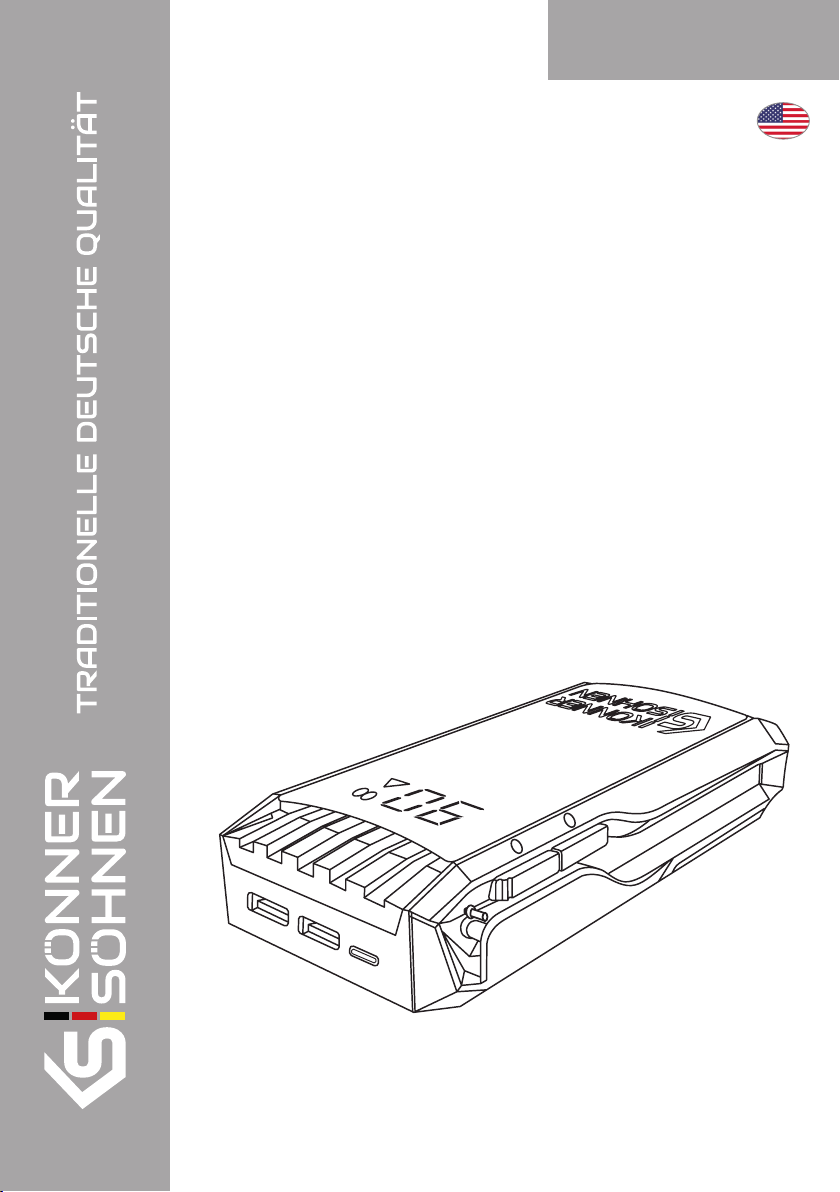
Jump starter
KS JS-1000
KS JS-1400
USA
INTRODUCTION
Thank you for your purchase of Könner & Söhnen®products. This manual contains a brief description of
safety, use and debugging. More information can be found on the ocial manufacturer’s website in the
support section: konner-sohnen.com/manuals
You can also go to the support section and download the manual by scanning the QR code, or on the
website of the ocial importer of Könner & Söhnen®products: www.konner-sohnen.com/en-us
Manufacturer reserves the right to make alterations into the generators, which may not be reected in this
manual. Pictures and photos of the product may vary from its actual appearance. At the end of this manual,
You may nd contact information which you are free to use in case of any issues occurrence.
All data, specied in this operation manual is the most up to date for the moment of its publishing. The current
list of service centers you can nd at the website of ocial importer: www.konner-sohnen.com/en-us
Jump starter has following functions
Please, read this manualPlease, read this manual
carefully before use!carefully before use!
Failure to follow the recommendations marked with this
sign may lead to serious injury of the operator or third
parties.
Useful information while operating the machine.
ATTENTION – DANGER!
No charging the product in unattended places!
ATTENTION – DANGER!
IMPORTANT!
JUMP STARTER 1
SAFETY WARNINGS 2
To keep away from re, electric shock or any damage to
your car, please follow the warnings below:
WARNING!
konner-sohnen.com |1
Jump starter Device charging function Flashlight function
Jump starter KS JS-1000 can instantly start 12V vehicles up to 1.6 gal. (6L) gasoline or
0.8 gal. (3L) diesel engines.
Jump starter KS JS-1400 can instantly start 12V vehicles up to 2.6 gal. (10L) gasoline or
1.6 gal. (6L) diesel engines.
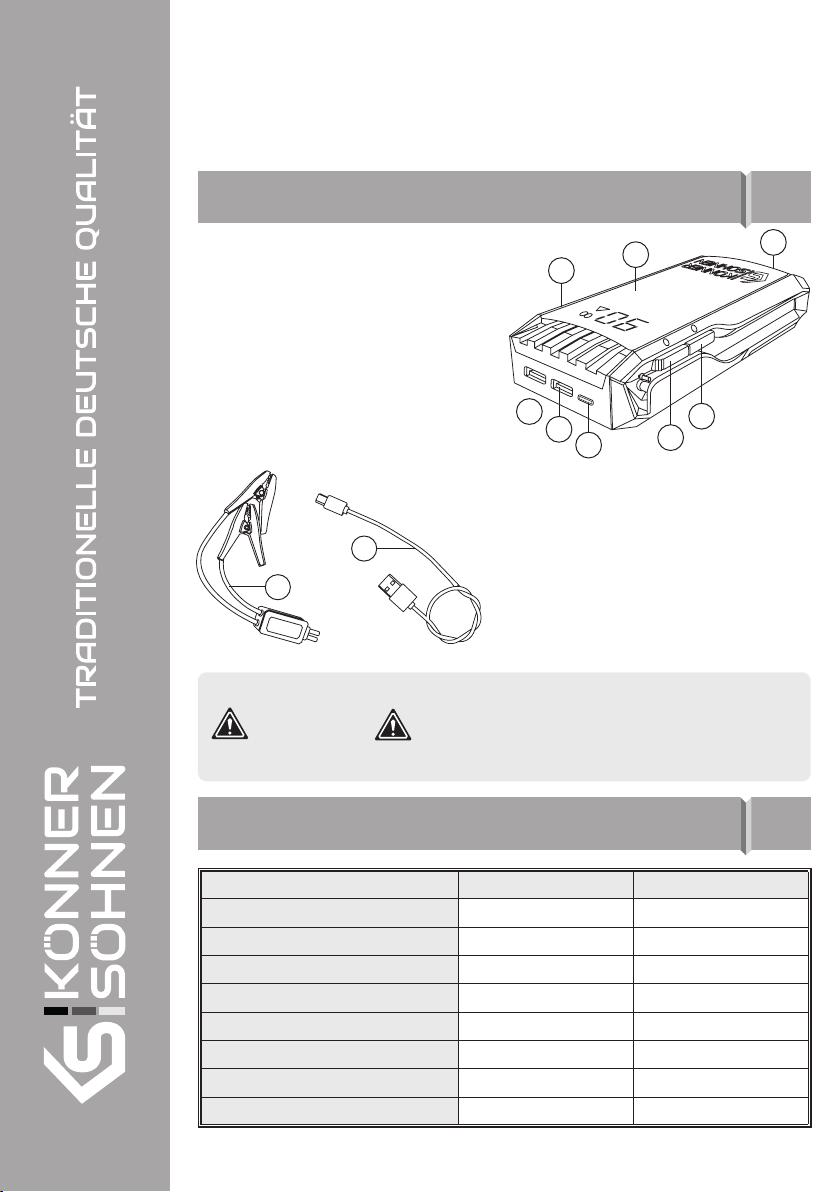
MAIN OVERVIEW 3
Manufacturer reserves the right to make changes and/or
improvements in design, components set and technical
attributes without notice and without incurring obliga-
tion. The pictures in this manual are schematical and may
not match the parameters of original product.
IMPORTANT!
TECHNICAL SPECIFICATION 3
• Do not throw or hit hard. Do not disassemble or reinvent. Do not place in liquid or re. Do not expose to
high temperature. If the product is damaged, please stop using it.
• Do not allow children to touch the product , this is not a toy. People without safety awareness and normal
behavior should use this product under the supervision and guidance of a legal guardian.
• Do not clamp both battery terminals together or clamp on the same piece of metal. Otherwise, it may
cause safety accidents.
1010
99
11
77
88
22
33
445566
1. Charge port
2. USB output port
3. Quick charge inlet
4. DC anti-reverse insertion car start entrance
5. Smart digital display
6. LED Lighting
7. Main switch
8. LED light switch
THE PACKAGE INCLUDES:THE PACKAGE INCLUDES:
• Jump starter
• Packaging
• Operating instruction
• Accessories storage bag
9. Smart clamp
10. USB charging cable
Model parameters KS JS-1000 KS JS-1400
Battery 12000 mAh 18000 mAh
USB output 5V/3A, 5V/2A 5V/3A, 5V/2A
USB input 5V/3A 5V/3A
Rated starting current 500 A 700 A
Peak current 1000 A 1400 A
Charging time 4-5 hours 4-5 hours
Dimensions (LхWхH) 7.7’’*3.9’’*1.5’’ 7.7’’*3.9’’*1.5’’
Working temperature (-4 °F) – (+140 °F) (-4 °F) – (+140 °F)
konner-sohnen.com |2

The device is suitable only for 12V batteries!
WARNING!
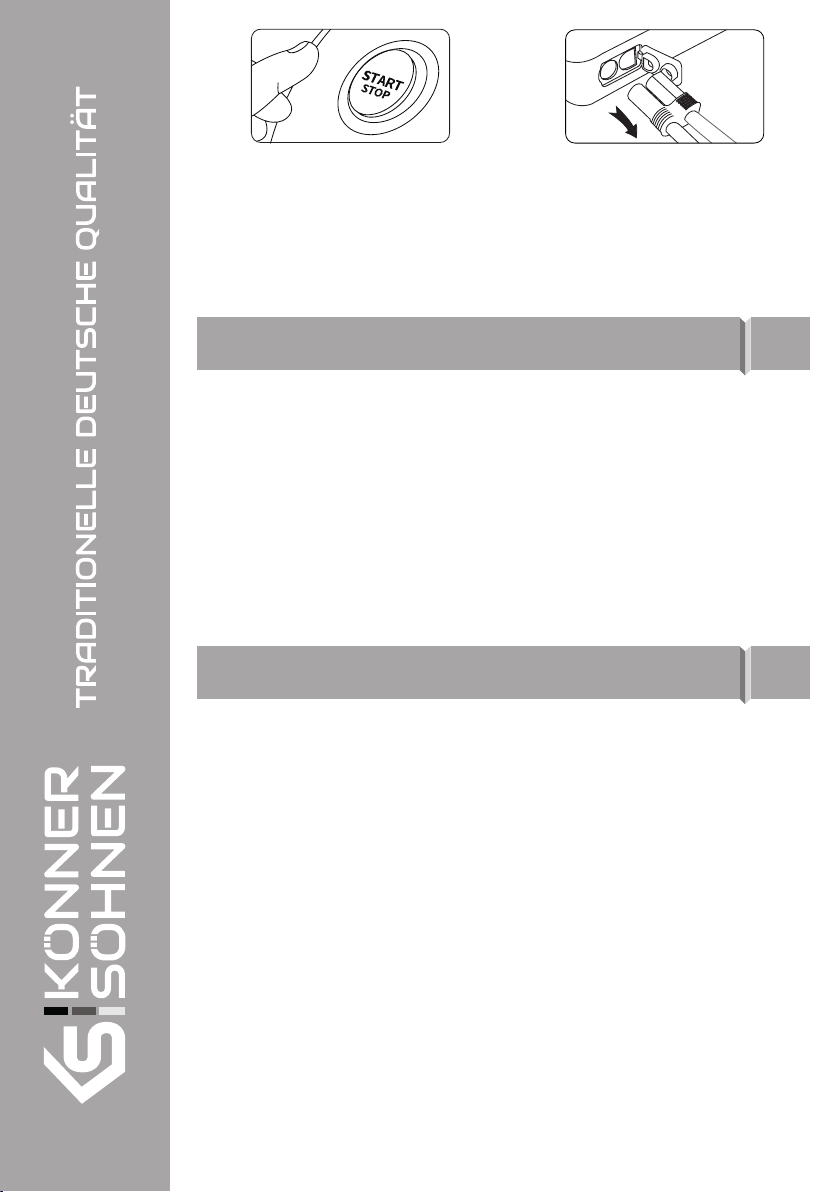
HOW TO START A CAR WITH A FLAT BATTERY:HOW TO START A CAR WITH A FLAT BATTERY:
When starting the car, please conrm that the power of the product is more than 20%.
STEP 2:STEP 2: Сonnect the battery clamp to the positive
and negative poles of the car battery (Red for the
positive terminal and black for the negative terminal).
STEPSTEP 1:1: Open the silicone stopper of the
product and insert the battery clamp into
the corresponding hole of the product.
FUNCTIONS/OPERATION 5
Press and hold the key for 3 seconds to turn on the ashlight,
then the light button function changes from solid light to ashing,
SOS distress signal light.
HOW TO USE LED EMERGENCY LIGHTINGHOW TO USE LED EMERGENCY LIGHTING
Press and hold again for three seconds to turn o the ashlight.
HOW TO CHARGE THE PRODUCT?HOW TO CHARGE THE PRODUCT?
Connect the charging head/charging cable to the charging inter-
face, and connect the other end to 220V household electricity or
12V car charging. When the charging process starts, the display
shows ashing “IN” letters. This means that charging is in pro-
cess. When “IN” stops ashing - the battery is full.
DESCRIPTION OF THE DISPLAY SCREEN OF THE CAR EMERGENCY STARTER:DESCRIPTION OF THE DISPLAY SCREEN OF THE CAR EMERGENCY STARTER:
1. Turn on the main switch on the side of the car’s emergency start power supply, and lightly press the
display switch to display the power.
2. There is a virtual power when you use it for the rst time.
HOW TO CHARGE THE PHONE OR LAPTOP?HOW TO CHARGE THE PHONE OR LAPTOP?
Plug in the charging cable, and then short press the power button to charge the phone or laptop.
JUMP STARTER CHARGING INSTRUCTIONS:JUMP STARTER CHARGING INSTRUCTIONS:
To charge your phone or other device from the power bank, you need to connect the charging cable to the
USB port. When connected to the standard port, it will display “OUT 5V/2A,” and when connected to the
fast charging port, it will display “OUT 5V/3A.”
USB charging slot 5V/2A
USB QC slot 5V/3A for phone
konner-sohnen.com |3
STEPSTEP 3:3: Start the engine. Do not cycle the jump
starter for more than 3 seconds, pause for 1 minute
between jump start attempts. This is necessary to
let the jump starter battery cool down.
STEPSTEP 4:4: The plug is withdrawn from the
jump starter rst, and then the battery clips
are removed from the positive and negative
terminals.
When the connection is successful, the indicator lights up green.
The red light indicates that the supply voltage is too low or that the positive and negative electrode terminals
have been swapped.
1. Read the operating instructions carefully before using the device.
2. The device must never be used as a substitute for a car battery.
3. Keep children and animals away from the working area of the device.
4. Only use the jump starter for 12 V batteries.
5. Keep the clips and their connection points clean and tidy. Never connect the clips together.
6. Avoid using the device near explosive substances, flammable gases, or in dusty environments.
7. Avoid overheating the device, smoking near the device, and exposing the device to extreme moisture;
keep the device away from open flames and never immerse it in water.
8. The device must not be stored at temperatures exceeding 140 °F.
9. After successfully jump-starting the vehicle, disconnect the jump starter from the battery within 30
seconds to prevent equipment damage.
10. Do not use the jump starter cable to charge other devices.
11. Keep it supervised while charging.
12. Using the device at current and voltage ranges other than those specified on the device nameplate may
cause charging and discharging problems and deterioration of battery capacity and performance. This
is also dangerous and may cause the device to malfunction.
13. When the battery is stored for more than three months, the product needs to be charged to ensure the
normal performance of the product.
WARNING 7
TROUBLESHOOTING 6
HOW TO USE THE INTELLIGENT BATTERY CLAMPS?HOW TO USE THE INTELLIGENT BATTERY CLAMPS?
When the intelligent battery clamps are connected to the jump starter and car battery, the light indicator
stays on green and the buzzer does not sound, which is the on state and can start the car normally.
AUTOMATIC SHUTDOWNAUTOMATIC SHUTDOWN
The product has an intelligent detection function. Once there is no load, or the electronic devices are fully
charged, it will be automatically powered o to save power.
HOW LONG WILL IT TAKE TO CHARGE THE PRODUCT?HOW LONG WILL IT TAKE TO CHARGE THE PRODUCT?
4 – 5 hours.
To extend the device’s service life, we recommend keeping the device charged to at least 50% and checking
the charge level every month.
konner-sohnen.com |4

14. Never do anything that may cause mechanical damage to the device.
15. Do not disassemble or transform the product without authorization.
16. Ifthedevicecasing is bulged,leaking,or giving offanunpleasantodor, stop usingthedevice immediately.
17. If you notice battery acid leaking from the battery, do not touch it with bare hands. If battery acid
contacts the skin or eyes, rinse immediately with plenty of running cold water and soap. Flush eyes for
at least 10 minutes. Seek medical advice if necessary.
18. The device features a lithium rechargeable battery that must be disposed of under the applicable laws
in your country.
19. Please connect the starting cable correctly according to the manual.
20. Never attempt to jump-start the vehicle in continuous mode! With standard power, the start cycle
should take no more than 3 seconds, and the interval between cycles should be at least 1 minute. Do
not exceed 3 consecutive start attempts.
21. After starting the car with the starting power, the temperature of the starting power supply itself will rise,
please do not charge the starting power at this time, at least 8-10 minutes before charging.
22. Only use the jump starter cable supplied with the jump starter.
23. Do not charge the device immediately after jump-starting the vehicle’s battery.
24. Never use the device to start the vehicle’s battery and charge the device’s internal battery simultaneously.
konner-sohnen.com |5

CONTACTS
The United States:The United States:
KS Energy Solutions, Inc.
Balcones Drive STE 100 Austin,
TX 78731, USA
Authorized Warranty ServiceAuthorized Warranty Service
www.konner-sohnen.com/us
This manual suits for next models
1
Table of contents
Other Könner & Söhnen Remote Starter manuals

Popular Remote Starter manuals by other brands


Jaycar Electronics
Jaycar Electronics MB3752 instruction manual

Ultra Start
Ultra Start 72 Series owner's manual

ADS
ADS FLASHLOGIC FLRSVW1 Product guide

Black Widow Security
Black Widow Security BW RAS 400 installation manual

Vector
Vector Power City DK080706 Owner's manual & warranty

Code Alarm
Code Alarm CA-535 owner's manual

EINHELL
EINHELL EGS 3600 Directions for use

Schumacher
Schumacher INSTANT POWER IP-75C owner's manual

EINHELL
EINHELL BT-PS 1000 Directions for use

Mazda
Mazda 0000-8F-H28 installation instructions

DEI
DEI 450ESP owner's guide

Directed Electronics
Directed Electronics AutoCommand 28624TN Owner's installation guide