K Source VS50001 User manual

Wi-Fi Bicycle/Motorcycle Camera
Wi-Fi Appareil Photo de Bicyclette-Motocyclette
Cámara Para Bicicleta/Motocicleta con Wi-Fi
Wi-Fi
CYCLE CAMERA
INSTALLATION GUIDE
GUIDE D’INSTALLATION
GUÍA DE INSTALACIÓN

2
INSTALLATION GUIDE
PARTS and FEATURES
A1 Camera
A2 Thumb screw
A3 Clamping mount
A4 Mounting bolt
B1 Handlebar mount bolt
B2 Handlebar end
B3 Medium rubber insert (for 7/8" handlebar)
B3-1
Large rubber insert (for 1" handlebar)
B3-2
Small rubber insert (for 5/8” handlebar)
B4 Flanged hex nut
(match with medium & large rubber
insert)
B4-1Hex nut
(match with small rubber insert)
W Gasket
(for 7/8"outer diameter handlebar)
T Hex wrench
U USB charger cable
A1
A2
A3
A4
B1 T
W
B3-1
B3-2
B4-1
B2
B3
B4
U

3
INSTALLATION STEPS (on handlebar)
Step 1
For 7/8"handlebars, use the supplied gasket (W) before
mounting. Do not use for 1"
Step 2
Loosen clamping mount (A3) by hex wrench (T)
Step 3
Attach clamping mount to handlebar.
Step 4
Fasten bolt (A4) with hex wrench
Step 5
Fasten Power Sports Camera (A1) to clamping mount.
Step 6
Tighten camera with thumb screw (A2).

4
INSTALLATION STEPS (in handlebar end)
Step 1
Before installation, use a blade to carefully slice off
the rubber endcap of your handlebar grip to expose
the opening. Measure and choose the proper rubber insert
(B3/B3-1/B3-2) for your handlebar.
Step 2
Assemble the bolt(B1) with rubber insert and hex nut
(B4 or B4-1).
Step 3
Jam assembly into your handlebar opening and tighten
with hex wrench (T).
Step 4
Place gasket (W) onto recessed area of the bar-end
assembly.
Step 5
Attach clamping mount of the Power Sports Camera over
the gasket.
Step 6
Tighten camera with thumb screw. (A4)

5
HOW TO REPLACE RECHARGEABLE BATTERY
Step 1
Lay camera, lens (A1) side up, on a soft cloth to prevent
damage to the mirror side.
Step 2
Remove 3 housing screws.
Step 3
Turn camera over and pry mirror face open with a coin.
Step 4
Note position of battery and metal contacts when removing.
Replace with a BL-5C rechargeable battery.
Step 5
Replace mirror face by pressing into place.
Step 6
Flip camera over and tighten 3 housing screws.
Please do not replace rechargeable battery unless battery is confirmed to be malfunctioned,
once device is disassembled, it becomes out of warranty.

6
CYCLE CAMERA OWNER’S MANUAL
WARNING!
FOR YOUR SAFETY, DO NOT OPERATE THIS CAMERA WHILE RIDING!
FRONT
SIDE
SIDE
BACK
No. LED indicators
1Green/Red light
2Green light
3Blue light
No. Access
DMicro USB/Power
EMicro SD card
No. Description
FCamera Module
GReset Button
No. Control buttons
APower on/off, Snapshots
BVideo recording on/off
CWi-Fi on/off
1 A
2
E
D F
G
B
3 C

7
Step 1 Step 2 Step 3
CONTROL BUTTON FUNCTIONS AND LED LIGHT INDICATIONS
(Refer to diagrams)
1. Wi-Fi Connection
Power charge: Connect power cable to slot D. Green light (2) will come on and shut off when
fully charged. (Full battery charge will take approximately 2 hours. Operating
time will also last about 2 hours.)
SD card: Insert SD card into slot E.
Power on: Push and hold button A for 2 seconds – green light (1) will come on. If SD card
is not installed, green light (1) will start blinking.
Snapshot: Short press button A. You will hear shutter sound and red light (1) flashes when
the snapshot is taken
Video on: Short press button B – green light (1) will start blinking when the video is on.
Video off: Short press button B – green light (1) stops blinking
Wi-Fi on: Short press button C – blue light (3) will start blinking when it is on
Wi-Fi off: Short press button C – blue light (3) will shut off
Power off: Push and hold button A for 2 seconds – green light (1) will shut off
Reset: If the system crashes or malfunctions,
remove the rubber cap (G) and reset
by pushing the button with a sharp
object or pencil point.
Replace rubber cap after reset.
Cycle camera videos and snapshots can be viewed and edited via smart device. The camera
also can be controlled by smart device.
(1) Download App "STKCamViewer"via Apple App Store, Google Play or Windows marketplace
to your smart device.
Important: For Android devices, please download MX player in order to activate sound.
(2) Press POWER button A to turn on cycle camera system. (Green light [1] will come on.)
(3) Press W-Fi button C on the camera (Blue light [3] will come on.)
(4) Turn on Wi-Fi setup on your smart device or desktop, choose Wi-Fi file named
"Wi-Fi-DV_xxxx", default password is "12345678". Once the blue light [3] starts blinking,
your camera is connected to your smart device.
(5) Format SD card through App "STKCamViewer".
File system: FAT32
Allocation unit size: 64kilobytes

8
CAUTION
•ApplicableSDcard-MicroSDcard.Grade-CLASS10 , 8GB~64GB
•Whenusingforthefirsttimeusage,connectwithyoursmartdeviceAPPtoset
correct time.
•ForAndroiddevices-YouwillneedtoturnOFFandONinordertoviewsaved
videosandsnapshotsoninternalmemory.ThisisnotnecessaryforiOS.
3. Function Introduction
• High resolution recording: Full HD 1080P (1920*1080P, 2 million pixels). 30 images per
second, clearer and perfect picture
• Automatic loop recording & segmentation Archive: Proceed loop recording automatically
and archive by segmentation, can also set segmentation storage time as required.
• Automatic time correction: No complicated settings, system can simply correct time
automatically via connecting with APP in smart device.
• Support Wi-Fi wireless transmission: Can connect with smart device via wireless Wi-Fi
transmission, user can preview photos, download videos, etc.
• Wide angle 130˚ Recording: Wide-angle video shoot with no dead ends
• F1.8 Large aperture: F1.8 Large aperture, larger amount of light, good night vision performance.
• Scratch-proof glass lens, good temperature resistance: Apply 6G+IR glass lens, anti-aging,
anti-scratch, good heat resistance and good light transmittance.
• Easy operation: Easy button operation, ON/OFF, REC/Snapshot (switching) and Wi-Fi ON/OFF,
a key to setting mode, user-friendly.
• Rotating screen monitoring: Cycle Camera can be mounted upside down. If mounting this
way, do not turn the system on until mounted in position. Otherwise your smart phone monitor
will pick up an upside down image.
2. Video playing
Videos and photos can be browsed or played via these devices
(1) App "STKCamViewer"(2) Desktop, laptop, or tablet

9
4. Spec. Description
1. Before first use, format memory card using your smart device App.
2. Must stop recording before removing micro SD card.
3. Leaving memory card in the system at all times may wear it down. Remove it when
not in use.
4. For safety, do not operate while driving.
5. Do not disassemble – damage to the product may result.
6. The first time you use the product, be sure to do so with the phone APP link time
correction in the system.
7. Your files can be locked with the APP – this will prevent accidental erasure or deletion.
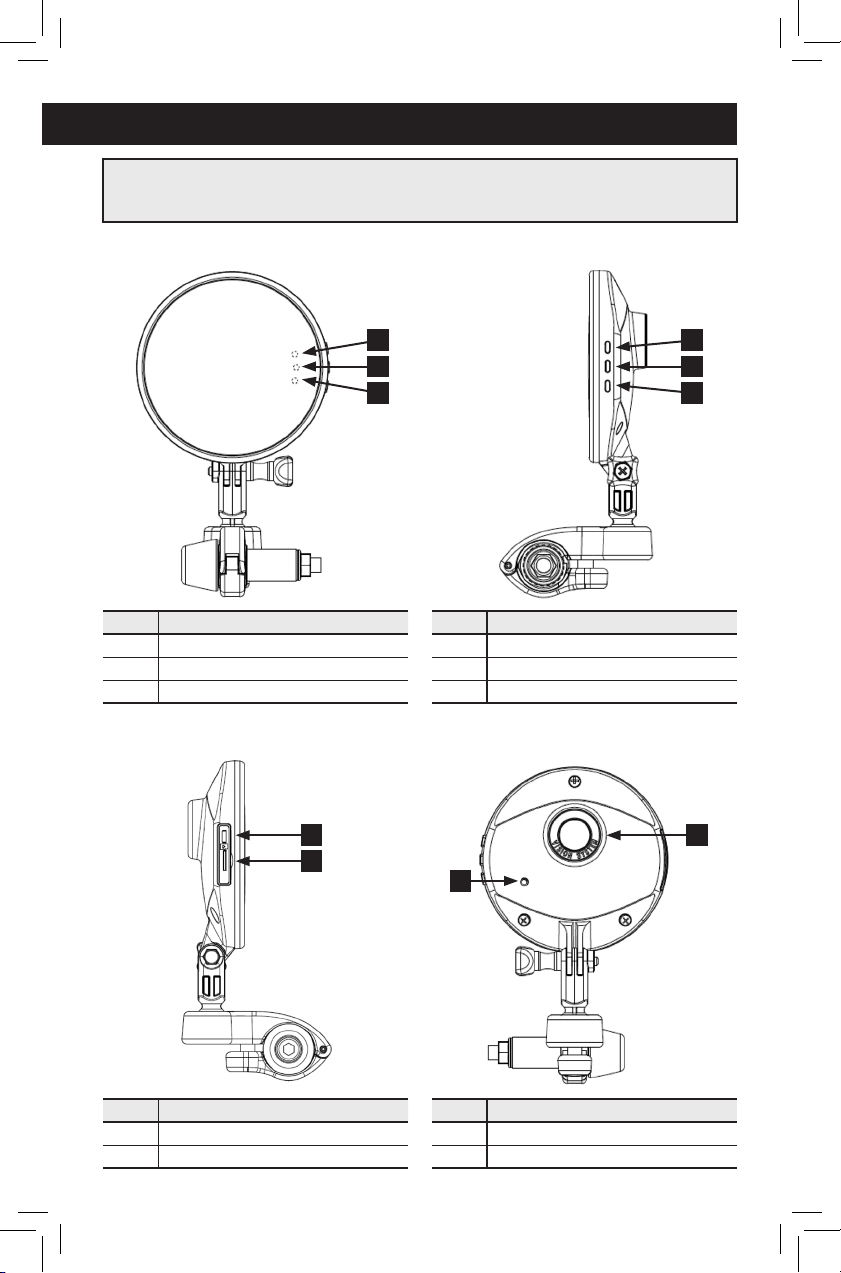
8 . Low battery status can be monitored by smart device APP or by flashing green light (2)
on the mirror.
9. After viewing the video through the APP, to turn off the function, please turn off
the phone APP and then turn off the system wireless function.
10.Use of an unapproved battery or charger may present a risk of fire, explosion, leakage,
or other hazard.
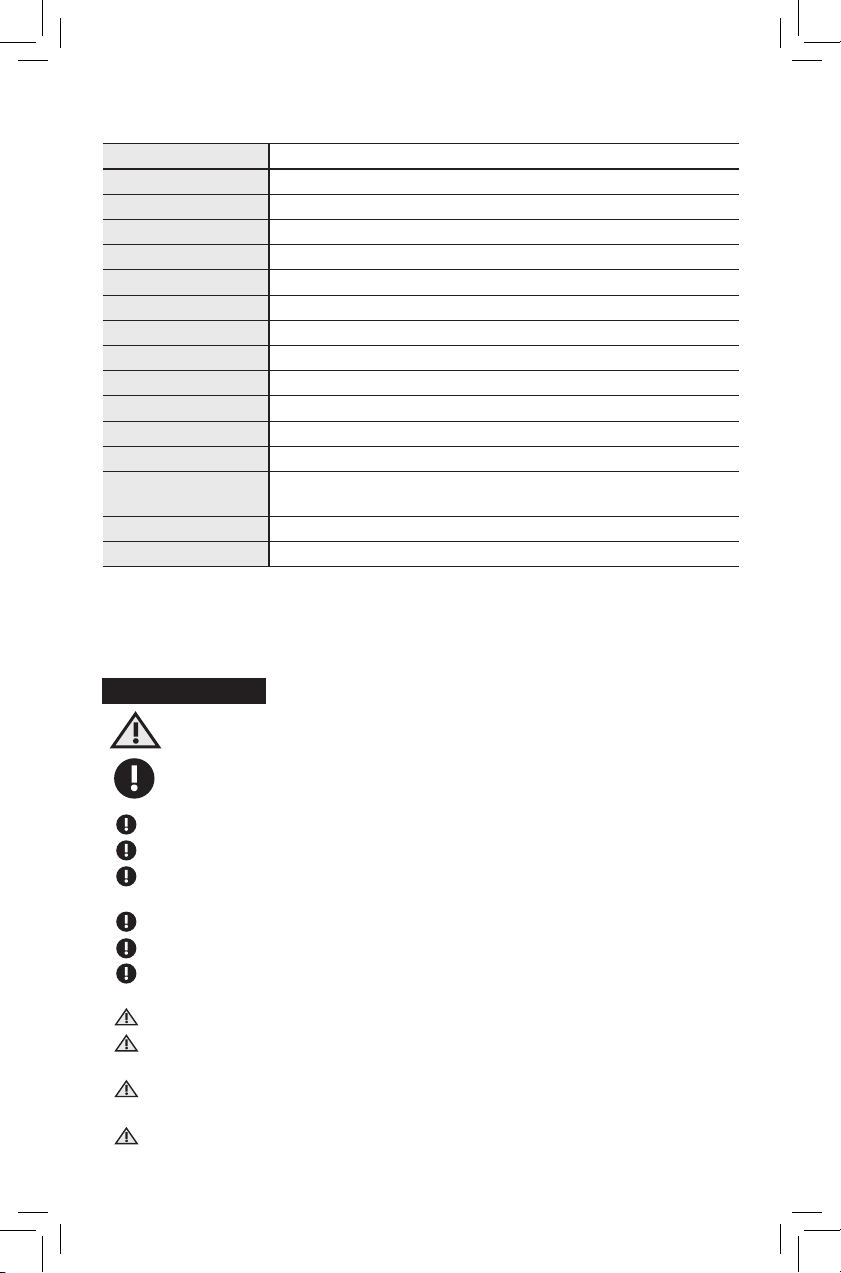
MODEL NAME VS50001/VS50002/VS50003
Sensor Aptina 1/3 Inch AR0330 CSP
Wi-Fi 2.4GHz IEEE 802.11 b/g/n
SDRAM 32MB DDR SDRAM
Audio Supports recording
RTC Built-in system clock
SPI NOR Flash 2MB SPI Flash Memory
Video Size 1920×1080 30fps (1080P), 1280×720 30fps (720P), 640×480 30fps (VGA)
Video Size 5M, 3M, 2M,1.3M,VGA
Camera Resolution Supports iOS and Android
APP Interface This product supports Micro SD Card
Memory Card (8GB ~ 64GB, CLASS 10 above)
TV OUT Supports NTSC/PAL
Micro USB • Charger
• 2.0 high speed transceiver, supports USB Mass Storage
Battery Capacity BL-5C 1100 mAh (about 100 minutes)
Operating Temperature 32°F~113°F / 0~45°C
Paying attention to caution and warning symbols will help to prevent damage to your
device and loss of data during operation.
Caution!
Warning! (required procedure)
5. Caution
ICON EXAMPLE

10
6.1.2 Automatic White Balance
(View of the screen and Icon position may vary depending on your smart device.)
6.1 Video Recording Mode
6.1.1 Resolution Setting
6. APP Operation Instruction
1
5
2
3
4
8
10
6
9
7

11
6.1.3 Setting
6.1.3.1 Recording Time Setting
6.1.3.2 EV Setting
Adjust Exposure Compensation value based on environmental difference.

12
6.1.3.3 Audio Setting
6.1.3.4 Frequency Time Setting
6.1.3.5 Wi-Fi Setting
6.1.3.6 Format SD card
Formatting SD card will clear all data in memory card
Cycle cam name and password can be changed via Wi-Fi setting (This option is not
applicable to some APP.)

13
6.1.3.7 Default Setting
6.1.4 System Version Information
6.1.5 Rec. icon
Default setting can be restored at any time.
Recording in progress.

14
6.1.6 Data File
6.1.7 / Rec/Stop icon
6.1.9 Recording Mode
6.1.8 Volume Adjustment
Adjust the above bar.
Click icon to display all data in SD card. All data are editable.
Click on icon when you want to switch to snapshot mode.
Download files first before playing on smart phone.
6.1.10 Battery Capacity Display
This shows battery life.
This icon indicates that the camera is charging.

15
6.2 Snapshot Mode
6.2.1 Snapshot Mode
6.2.3 Shutter Button
6.2.2 Snapshot Resolution Setting
(View of the screen and Icon position may vary depending on your smart device.)
You are in snapshot mode when you see icon
Click this icon to take snapshot
2
4
1
3

16
6.2.4.2 Other Setting
7. Maintenance
8. Service
Please refer to 6.1.3.1~6.1.3.7 for Format Memory Card, Default Reset and Audio
Sampling Rate.
•Wipeoffyourdevicewithacleanclothperiodicallytopreventdustanddirtbuildup.
Damp cloth can also be used-never used gasoline, paint thinner or alcohol solvents as it
may damage the device.
•Adirtylenswillaffectpicturequality.Wiperegularlywithasoftclothtokeepclean.
•Troubleshootanyproblembyreadingthismanualrst.
•Iftheproblempersists,DONOTattempttoxthedeviceyourselfasitmayvoidthewarranty.
•Ifthedeviceisstillunderwarranty,contactusat[email protected].
6.2.4 Settings
6.2.4.1 Snapshot Mode
GUIDE D’INSTALLATION

17
GUIDE D’INSTALLATION
PIÈCES et CARACTÉRISTIQUES
A1 Appareil photo
A2 Vis de serrage
A3 Dispositif de fixation
A4 Boulon de montage
B1 Boulon de montage du guidon
B2 Extrémité du guidon
B3 Pièce en caoutchouc moyenne
(pour guidon de 22 mm ou 7/8 po)
B3-1
Grande pièce en caoutchouc
(pour guidon de 25 mm ou 1 po)
B3-2
Petite pièce en caoutchouc
(pour guidon de 16 mm ou 5/8 po)
B4 Écrou hexagonal à bride
(concordez avec un insert en caoutchouc
moyen et large )
B4-1Écrou hexagonal
(concorder avec la petite pièce en caoutchouc)
W Joint d’étanchéité
(pour guidon à dia. ext. de 22 mm ou 7/8 po)
T Clé hexagonale
U Câble de chargement USB
A1
A2
A3
A4
B1 T
W
B3-1
B3-2
B4-1
B2
B3
B4
U

18
ÉTAPES D’INSTALLATION (sur le guidon)
Étape 1
Pour des guidons de 22 mm (7/8 po), utilisez le joint
d’étanchéité fourni (W) avant le montage. Ne l’utilisez pas
pour les guidons de 25 mm (1 po)
Étape 2
Desserrez le dispositif de fixation (A3) au moyen de la clé
hexagonale
Étape 3
Fixez le dispositif de fixation sur le guidon.
Étape 4
Serrez le boulon (A4) au moyen de la clé hexagonale
Étape 5
Fixez l’appareil photo de véhicules sports motorisés (A1) sur
le dispositif de fixation.
Étape 6
Serrez l’appareil photo au moyen de la vis du boîtier(A2).

19
ÉTAPES D’INSTALLATION (dans l’extrémité du guidon)
Étape 1
Avant l’installation, utilisez une lame pour couper et enlever
soigneusement le capuchon d’extrémité en caoutchouc
de la poignée du guidon en vue de mettre à découvert
l’ouverture. Mesurez et choisissez la pièce en caoutchouc
qui convient (B3/B3-1/B3-2) à votre guidon.
Étape 2
Assemblez le boulon (B1) au moyen de la pièce en
caoutchouc et de l’écrou hexagonal (B4 ou B4-1).
Étape 3
Poussez l’assemblage dans l’ouverture de votre guidon et
serrez au moyen de la clé hexagonale (T).
Étape 4
Placez le joint d’étanchéité (W) sur la zone en retrait de
l’assemblage de l’extrémité.
Étape 5
Fixez le dispositif de fixation de l’appareil photo de
véhicules sports motorisés par-dessus le joint d’étanchéité.
Étape 6
Serrez l’appareil photo au moyen de la vis de serrage (A4).

20
COMMENT REMPLACER LA PILE RECHARGEABLE
Étape 1
Déposez l’appareil photo, objectif (A1) vers le haut, sur un
linge doux afin d’éviter d’endommager le côté miroir.
Étape 2
Retirez les 3 vis du boîtier.
Étape 3
Retournez l’appareil et ouvrez doucement la face du miroir
au moyen d’une pièce de monnaie.
Étape 4
Notez la position de la pile et des contacts métalliques
en les retirant. Remplacez-les par une pile rechargeable
BL-5C.
Étape 5
Remettez la face du miroir en place en poussant dessus.
Étape 6
Retournez l’appareil et serrez les 3 vis du boîtier.
Veuillez ne pas remplacer sauf si la pile est défectueuse. Le démontage de cet appareil
annulera la garantie.
*Si l’appareil ne fonctionne pas bien à l’intérieur de la période de garantie, veuillez communiquer avec
MANUEL D´UTILISATEUR – APPAREIL PHOTO
DE BICYCLETTE-MOTOCYCLETTE
This manual suits for next models
2
Table of contents
Languages:
Other K Source Bicycle Accessories manuals