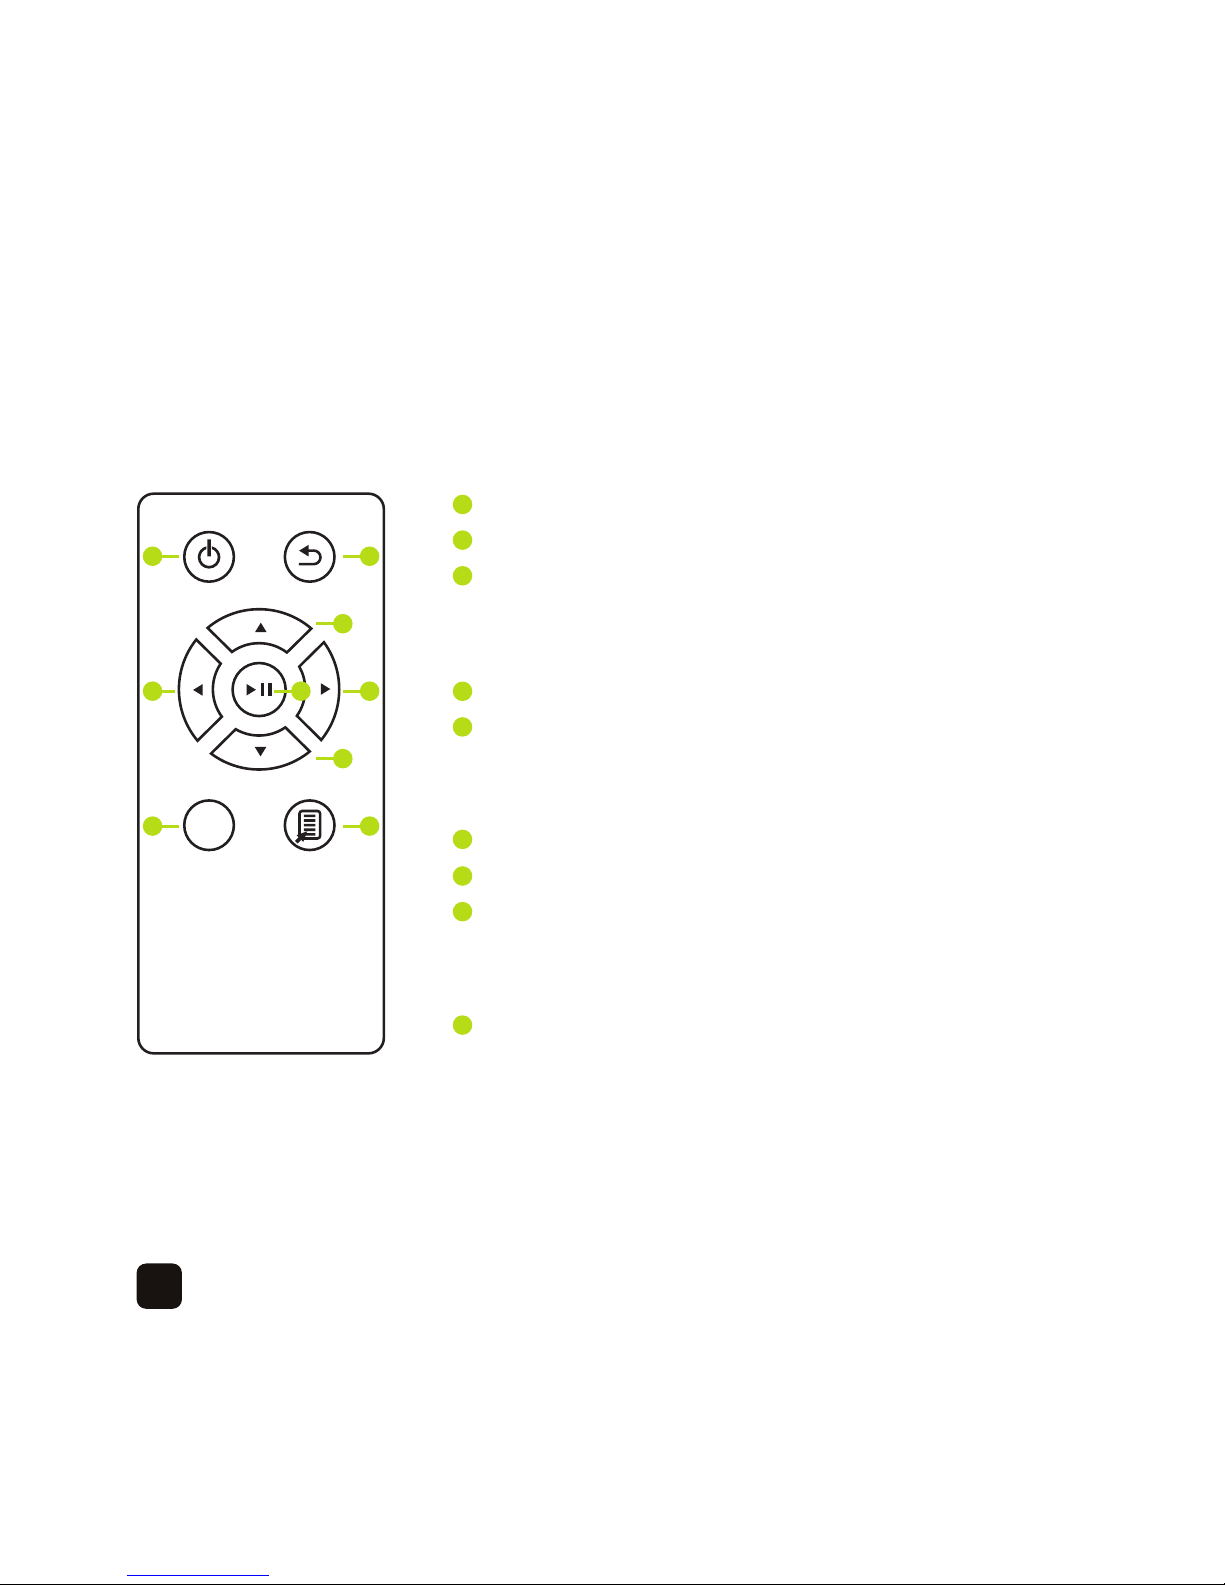
Kaiser Baas KBA04041 User manual

let’s get started.

Contents
1 Introduction
1 Features
2 Safety notice
3 What’s in the box
4 Product description
7 Getting started
13 Transferring your media files
15 Windows
16 Mac
17 Playing a slideshow
19 Playing video files
21 Playing music files
23 Playing Ebook files
24 Explorer mode
25 Clock and Calendar
26 Contact us
27 Frequently asked questions
29 Product specifications
30 Warranty Information

1
Introduction
Congratulations on the purchase of your 8.0” Digital Photo Frame. This user guide
will help you with the setup and playback of your photo, music and video collection.
Features
• 8.0inchdisplaywith4:3aspectratio
• 2GBinternalmemory,copyfilesfromyourcomputer,memorycardorUSB
memory stick directly to the internal memory
• Playphotos,videosandmusicfromtheinternalmemory,memorycard
orUSBmemorystick
• Playaphotoslideshowwithtransitionsandbackgroundmusic
• Built-inclockandcalendarfunction
• Includesaminiremotecontrol–selectadifferentphoto,pause
a slideshow, zoom, rotate and other available functions
• Includesaschedulefunctiontoturntheframeonandoffatdesignatedtimes

2
Safety notice
DonotplaceyourKaiserBaas8.0”DigitalPhotoFrameinplacesthatareexposedtooil,
water or dust.
KeepyourKaiserBaas8.0”DigitalPhotoFrameawayfromheatedsourcessuchasheaters.
DonottryanddisassembleorremodelyourKaiserBaas8.0”DigitalPhotoFrame.
Doing so my cause the unit to malfunction and may void the warranty.
Do not touch the power cable with wet hands or use defective power cables as it may
cause electric shocks or fire.
DonotdropyourKaiserBaas8.0”DigitalPhotoFrameasitmaycauseseriousdamageand
may void the warranty.
PlaceallmagnetiseditemssuchasspeakersawayfromyourKaiserBaas8.0”DigitalPhoto
Frameasitmayeraseorcausedamagetotheon-boardmemory.

3
What’s in the box
MODE
MODE
MODE
MODE
MODE
MODE
8.0” Digital Photo Frame USBcable Power adaptor
Userguide Bracket Remote control

4
Product description
Right side
Memory card slot
USBinput
DC input

5
Backside
MENU
Power button
Play / pause
Left / volume + Right/volume-
Up/previousphoto/previous
music track / previous video
Down / next photo / next
music track / next video Menu / return
Kensington Slot Speaker

Remote control
Power: Turn the device on or off
Return: Exit
Up: Directional button, press to display a
previous photo, play a previous music
track or rewind a video file
Left: Directional button, press to decrease volume
Down: Directional button, press to display the next
photo, play the next music track or
forward a video file
Right: Directional button, press to increase volume
Play/pause: Play and pause your media files
Mode: Change display ratio, change background
colour when playing music, change font
colourwhenreadinganE-book
On-screen menu: Accesson-screenmenufunctions
MODE
1 2
1
2
3
8 9
4 6
3
5
74
5
6
7
8
9
6

7
Getting started
To prevent scratches on the display when transporting, there is a protective plastic sheet
covering the screen. Please remove this before use.
ConnectthepoweradaptortotheDCinputlocatedontheright-handsideoftheframe–
MENU

Connecttheotherendintothemainspowerpoint–
Connectthebracketintothebackoftheframeclockwise–
8

9
Removetheplastictabfromtheremotecontrolbeforeuse–
MODE

When power is connected, the frame will turn on automatically.
You will see the ‘Kaiser Baas’ logo and a slideshow will start playing.
Thereareanumberofpicturefilesontheon-boardmemoryfordemonstration
purposes that are accessible when selecting the ‘Favourite’option.Thedemon-
stration files cannot be deleted.
Press the ‘Return’ button to exit the slideshow and go to the main menu. You will now
seethefollowingscreen-
10

Press the directional button to select ‘Setup’, press the directional button to select
‘Common’ then press the ‘Play/Pause’ button to select.
Youwillnowseethefollowingscreen–
11

Thereareanumberofoptionsthatyoucanchange–
Language: Changetheon-screenlanguage
Background: Choose a different background colour
USB mode: IfyouwanttoconnectaUSBmemorysticktotheUSBport,selectUDISK.
Ifyouwanttoconnecttheframetoyourcomputertoaccesstheon-board
memory, select PC
Product info: Display firmware information and how much space is available on
theon-boardmemory
Update: Updatefirmwarewhenavailable
Factory default: Select default settings
Boot mode: Allows you to select which mode the frame will run when it is turned on
Press the ‘Return’ button to return to the main menu.
To set the correct time and date press the directional button to select ‘Time’ then press the
‘Play/Pause’ button to select.
Usetheanddirectionalbuttonstoselect,presstheanddirectionalbuttonstochange and
press the ‘Play/Pause’ button to confirm.
Press the ‘Return’ button to return to the main menu.
12

13
Transferring your media files
The8.0”DigitalPhotoFramehas2GBofon-boardmemory.Toplayyourphoto,musicand
videofilesfromtheon-boardmemory,youneedtoconnectthedevicetoyourcomputer
to copy over your files.
ConnecttheUSBcableintotheUSBinputonthedevice–
ConnecttheotherendofthecableintoaspareUSBportonthecomputer–
MENU

Go to ‘Setup’, select ‘Common’, for PC connection change ‘USB Mode’ to ‘PC’ then press
the ‘Play/Pause’ button to confirm.
You will see a ‘Connecting with the PC’ message on the frame and the computer will
detect the frame as a removable device.
14

15
Windows
Click ‘Start’ > ‘Computer’, you will see a ‘Removable Disk’iconwith1.72GBfree.
Doubleclickthistoaccesstheon-boardmemory.
It is recommended to create folders as it will be easier to organise your files.
Click ‘New folder’ and create a ‘Photos’ folder for your picture files, a ‘Music’ folder for your music
files and a ‘Videos’folderforyourvideofiles.Youcanalsocreatesub-folderswithinthosefolders,
for example, ‘Photos’ > ‘Birthdays’.
Copy your various media files into the relevant folders.
Whenareyouarefinished,disconnecttheUSBcablefromtheframe.

Mac
Onthedesktopyouwillseethisicon–
It is recommended to create folders as it will be easier to organise your files.
Click ‘File’ > ‘New Folder’ and create a ‘Photos’ folder for your picture files, a ‘Music’ folder for
your music files and a ‘Videos’folderforyourvideofiles.Youcanalsocreatesub-folderswithin
those folders, for example, ‘Photos’ > ‘Birthdays’.
Whenareyouarefinished,disconnecttheUSBcablefromtheframe.
16

17
Playing a slideshow
To play a slideshow, press the or directional buttons to select ‘Photo’, then select the
location of your photo files.
Fortheon-boardmemoryselect‘MEMORY’.
For the SD card select ‘SD’.
FortheUSBmemorystickselect‘USB’.
Press the ‘Play/Pause’ button to confirm.
Theslideshowwillautomaticallystartplaying.Ifyouhavephotosinmultiplesub-folders,
thesub-folderthatwascreatedfirstwillplay.
Press the or directional buttons to select a different photo to display.
Press the ‘Play/Pause’ button to pause a slideshow and press again to continue playing. When a
slideshow is paused, information about the photo such as file name, file type, file size and
resolutionwillappearbrieflyon-screen.
Press or buttons to adjust the volume if you have background music enabled.
Press the ‘MODE’ button to change the aspect ratio.
SD
USB
SD
USB
SD
USB

Press the ‘On-screen menu’ button to adjust settings for playback, enable background music,
zoom, rotate, brightness, transition type and slideshow duration.
If you would like to display a thumbnail of your photos press the ‘Return’button–
Usethedirectionalbuttonstoselectadifferentphototodisplay.
Ifyouwouldliketoplayaslideshowfromadifferentsub-folder,pressthe‘Return’ button again to
select a different location.
To exit ‘Photo’ mode press the ‘Return’ button until you see the main menu.
18
Table of contents
Other Kaiser Baas Digital Photo Frame manuals