Kanaan KN40543 User manual

User's Manual
4x2 Matrix Switch for HDMI 4K*2K
Product number KN40543

Thank you for purchasing the HDMI Matrix Switch from KanaaN.
We hold several brands to produce and distribute our products: LEICKE (power
adapters, batteries), KanaaN (adapters/converters, charging cables etc.), Sharon (iPad
cases with keyboard, fans etc.), Hebron (protective cases, docking stations, screen
protectors etc.), MANNA (cases for tablets and smartphones).
We continuously work on the development of our products, our customer support and
innovations. ur products have a long service life, are eco-friendly and high performing.
Furthermore, every day we do our very best to satisfy you as our customer. That is why
you, no matter if private or business customer, are in the focus of our company’s efforts.
We take your reviews and proposals seriously and evaluate them continuously. That way,
we get to know you and your demands on our products and services better and thus
allow for positive enhancements.
To discover more about LEICKE products, or if you have any questions about this
product, visit our website www.leicke.com.
Dear customer,
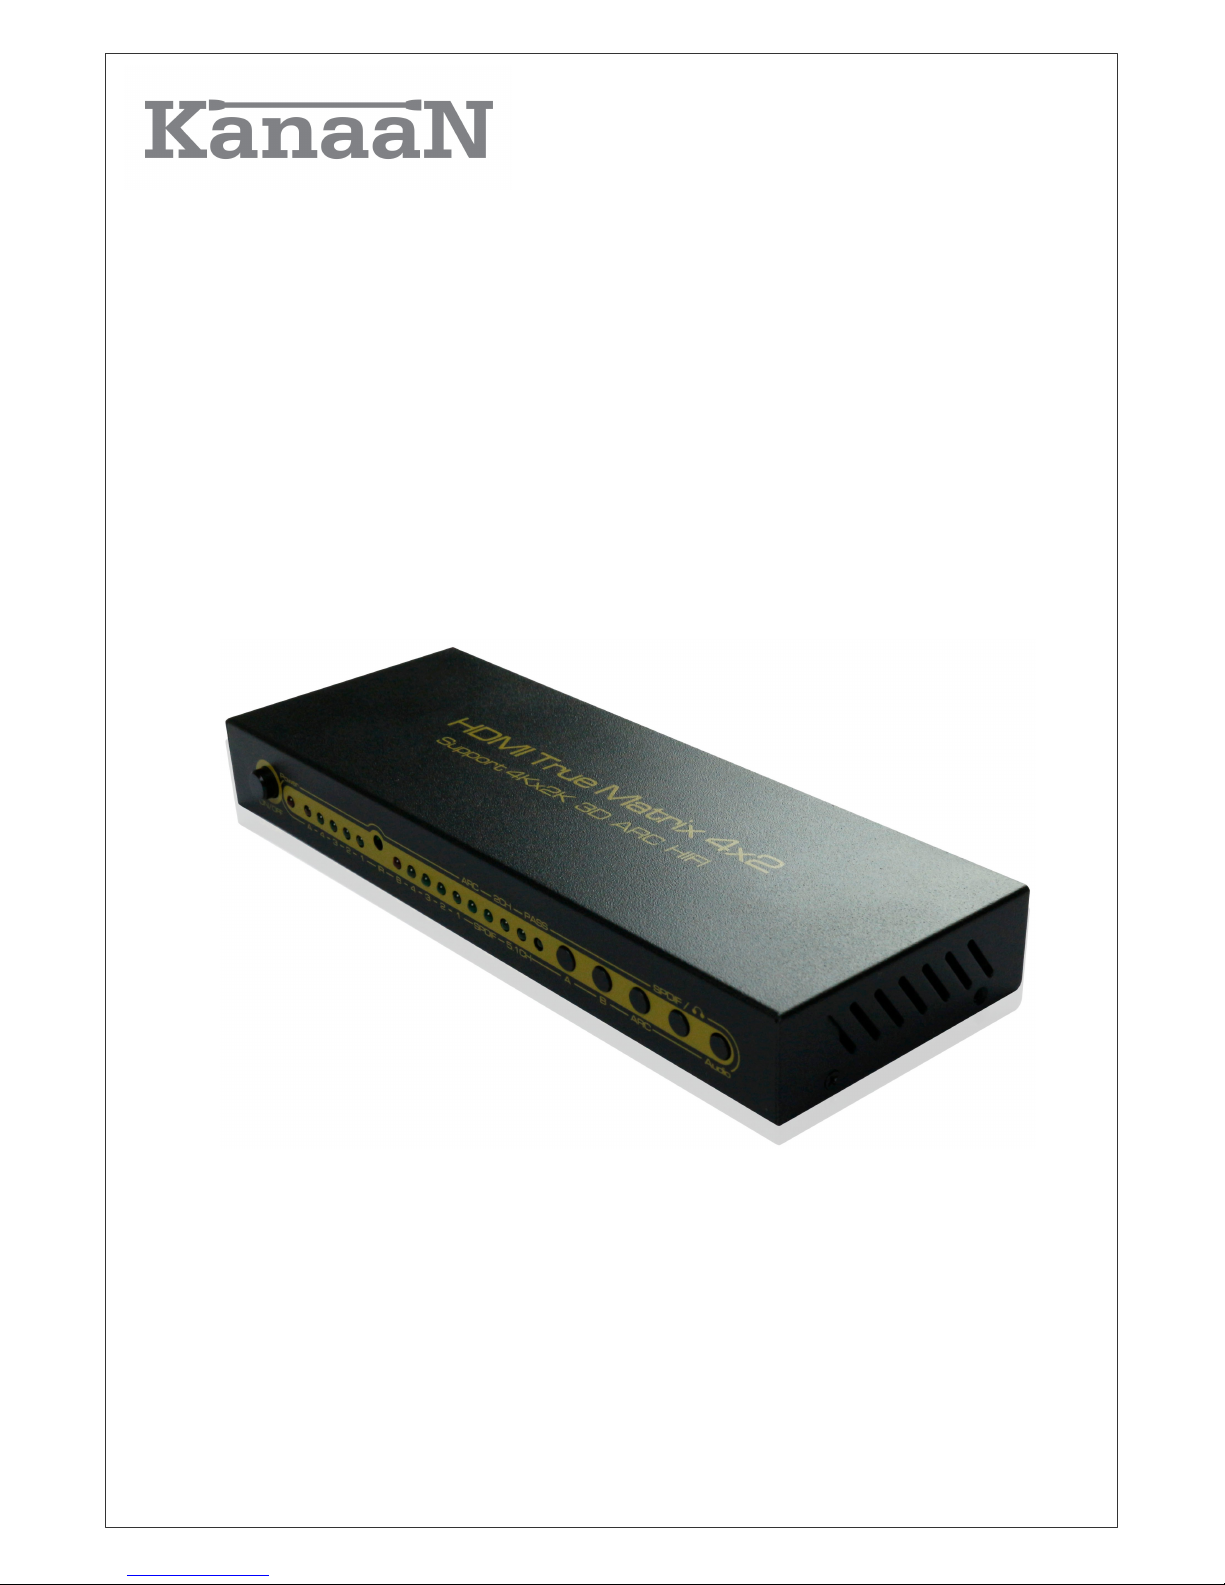
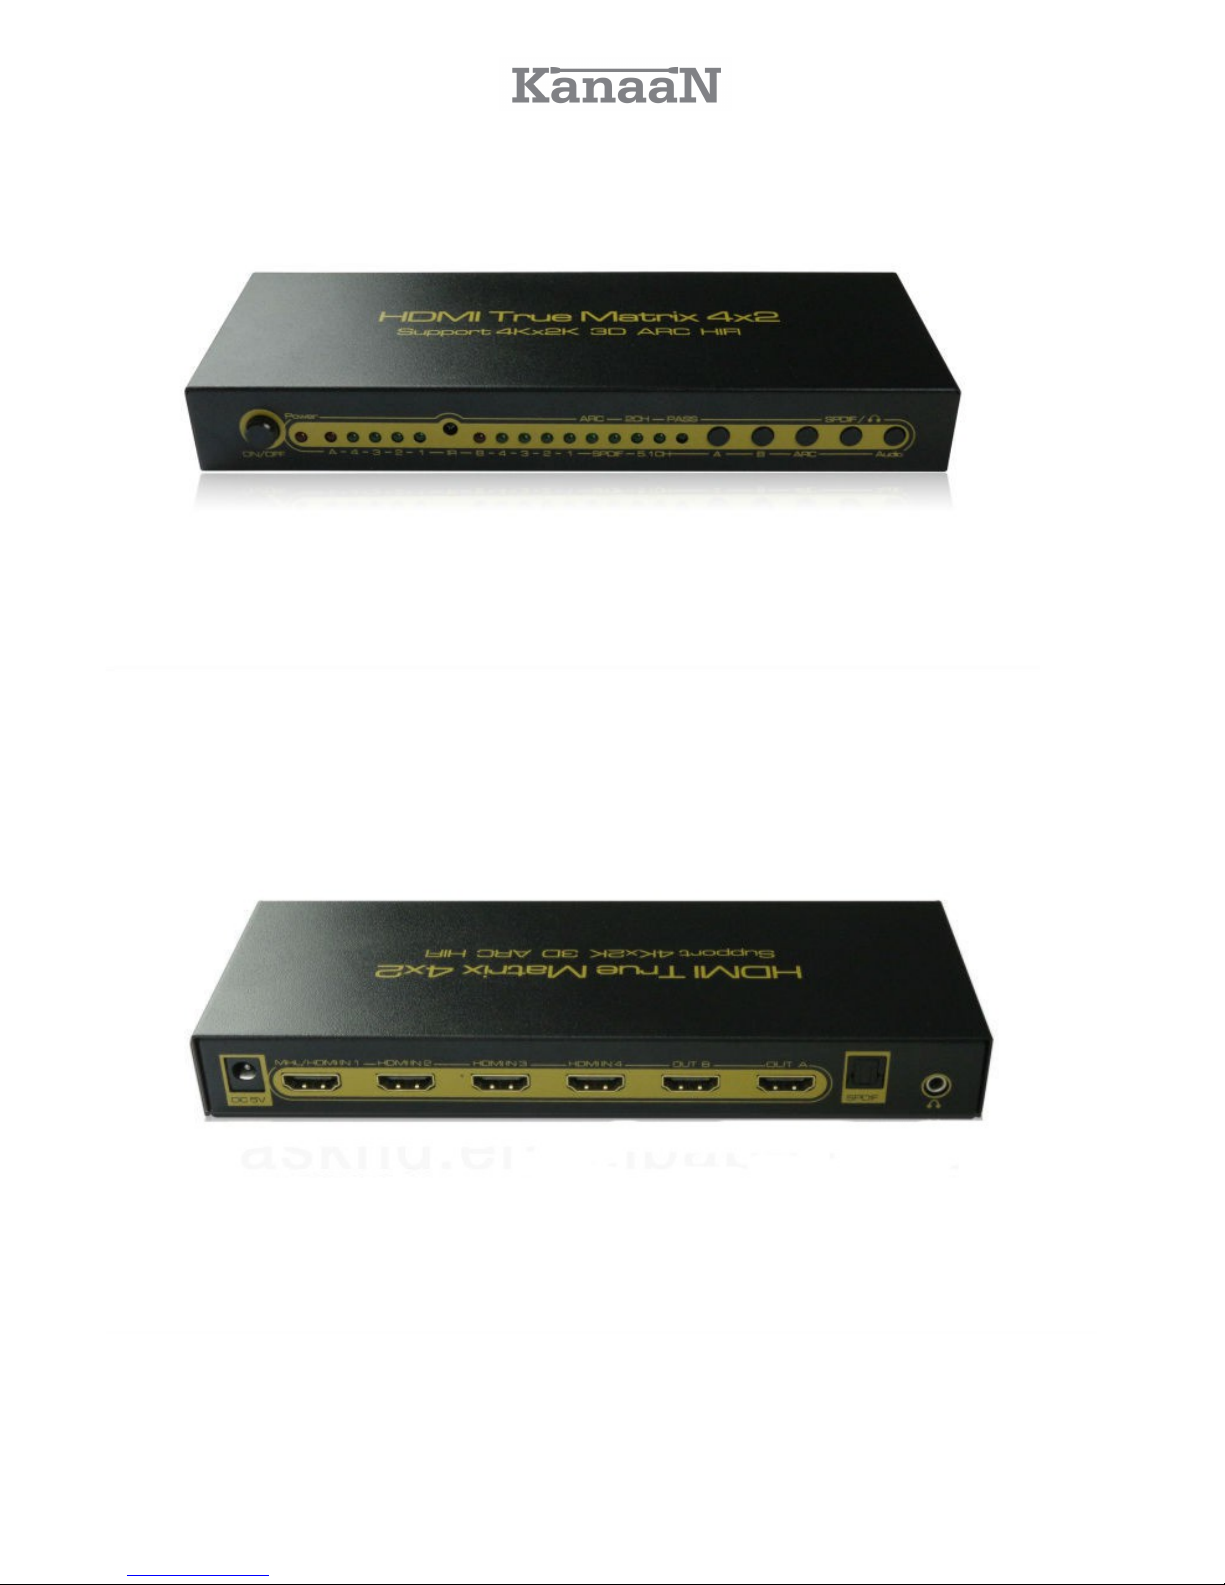
This 4x2 HDMI Matrix Switch from our brand KanaaN is speciall designed for either
home or professional application. It enables ou to connect multiple HDMI devices to two
displa devices without having to change an cables for usage. One input signal can
even be displa ed on two displa s at the same time.
The included remote control enables ou to switch easil . The matrix switch supports the
new resolutions UHD and 4K*2K. However, older formats as 720p or 1080p are
supported as well.
Additionall , a separate audio output allows for a sound output analogue stereo via a
3.5mm jack plug or digital up to Dolb 5.1.
The Switch is CEC compatible and can transfer remote signals. Like this, ou can con-
trol devices like BluRa pla er and amplifiers of the same producer with just one remote
control if CEC is supported. Please check our devices for the following:
T-Link, Eas Link, EZ-S nc, Simplink, Digital Link HD, NetCommand for HDMI, RIHD, Vi-
era Link, Kuro Link, An net+, Aquos Link, BRAVIA S nc, Regza-Link, TechniLink, CST-
Link, FUN-Link, Digi-Link
2

The Switch amplifies the output signals and if the protection is high enough, up to 25m
AWG24-Kabel can be connected.
For optimum performance, please read these instructions carefull before connecting,
operating or adjusting this product. Please keep this manual for further reference.
Pictures in this manual may differ from the original product!
Your LEICKE Team!
PACKAGE CONTENTS
Before attempting to use this device, please check the packaging and make sure the
following items are contained in the package:
Number of
Pieces
Name Note
1KanaaN 4x2 HDMI 4K*2K
Matrix Switch -
1 Power Adapter DC 5V/1A, plug type depending on
target country
1 Remote control battery included
1 MHL/MHL cable -
1 User's Manual -
TECHNICAL DETAILS
HDMI version HDMI 1.4a, ARC, 3D supported
Supported Resolutions 4K*2K, 2K, 1080p, 1080i, 720p, 576p, 576i,
480p, 480i
Supported colour depth 30bit / 36bit / 48bit
Supported audio formats DTS-HD, Dolby-true HD, LPCM 5.1, DTS,
Dolby-AC3, DSD
Audio outputs SPDIF/optical, 3.5mm jack plug
3

Maximum band width up to 340MHz
Maximum data throughput 10.2 Gbps
Input/ utput voltage TMDS 0.5~1V p-p
Input/ utput voltage DDC 5V p-p (TTL)
Maximum cable length input 15m (AWG 24)
Maximum cable length output 25m (AWG 24)
Maximum current consumption 1300 mA
Weight 380 g
CONNECTION AND OPERATION
Step 1 Connect your devices and displays to the KanaaN Matrix Switch. Please note,
that the separate audio out will only transmit audio from HDMI out A. HDMI input 1 is the
only one to process MHL signals from smartphones etc.
Step 2 Switch all devices on, including the matrix switch.
Step 3 Choose the right combination of inputs and outputs with the remote control (pull
plastic flap out first) or directly at the switch. As soon as the connection is established,
the LEDs of the inputs and outputs will glow.
Step 4 If you have connected an amplifier to the matrix switch, you can adjust the audio
output according to your wishes via the "audio" button. Please note, the the analogue
output can only do stereo. If 5.1CH is adjusted sound will be put out incompletely. Via the
ARC key you can activate the audio back channel, to e.g. provide amplifiers with a HDMI
input with audio signals. You can choose the required output (digital / analogue /
advanced audio) with the SPDIF key.
Note: For the protection of the switch and other devices, please make sure, that the
switch is switched off before connecting the other devices. Please insert and extract all
cables gentl .
4

PANEL AND LABELS
Front
N/ FF: Switch to turn on and off
P WER: Status LED
A: HDMI out A status LED
A (1-4): Status of inputs allocated to output A
IR: Infrared receiver
B: HDMI out B status LED
B (1-4): Status of inputs allocated to output B
ARC: Audio back channel status LED
SPDIF: Status LED for digital SPDIF out
2CH: Status LED for analogue 3.5mm stereo out
5.1CH: Status LED for digital 5.1 signal
ADV: Status LED for Advance Audio, HDMI amplifier
can tell playing device, which formats are supported
Back
DC5V: Input power supply 5V/2A
MHL/HDMI-IN: Input 1, supports MHL/HDMI
HDMI-IN 1-4: HDMI inputs
UT-B: HDMI out B
UT-A: HDMI out A (parallel to audio output)
SPDIF: optical SPDIF out, digital
3.5mm stereo out, analogue
5

6

TROUBLE SHOOTING
Please check the connection carefully before turning on the device. Please make sure,
that all cables are connected properly and the channels are switched on according to the
connected cables.
Problem Possible Cause/Possible Solution
No image Is the power LED on? (check power supply)
Are the channels correctly adjusted? (check
configuration)
Do both devices support the output format? (choose the
lower one if not)
Is the cable quality sufficient? (use shorter/better
protected cables)
No audio Audio out correctly adjusted? (change with SPDIF key
until correct output is found)
Is the audio format supported? (if necessary, check your
audio device for the format); analogue: stereo PCM,
digital: PCM, Dolby 5.1
Audio can just be put out separately at output A.If
necessary, change output.
Audio and image
troubles
Are the used cables of poor quality or maybe too long?
Are input device and output device compatible with each
other?
Are the plugs correctly connected?
If you choose to use two output devices (splitting)
problems may occur if the resolutions are different.
Check power supply. If necessary, choose another wall
outlet.
7

Problem Possible Cause/Possible Solution
Unplug HDM cables and plug again.
Remote control is not
working
Has the plastic strap been removed?
Is the remote controls battery low?
If the problems cannot be solved, please don't hesitate to contact us.
SAFETY NOTES
Please use device as described in the manual.
Keep away from damp, high temperature, dusty, erosive and oxidative
environment.
Keep safe from being hit or falling down.
Do not touch with wet hands.
Do not pull on power cord when taking off the wall socket.
Turn off power when device is not in use for a longer time.
Do not open cover and do not touch inner parts.
Use original factory power adapter.
Warning: Use appropriate power supplies onl . The usage of power supplies with the
wrong specifications ma lead to irreparable damages to the matrix switch and our
equipment.
8

FCC Interference Statement
This equipment has been tested and found to comply with the limits for a Class B digital device, pursuant
to Part 15 of the FCC Rules.
These limits are designed to provide reasonable protection against harmful interference in a residential
installation. This equipment generates, uses and can radiate radio frequency energy and, if not installed
and used in accordance with the instructions, may cause harmful interference to radio communications.
However, there is no guarantee that interference will not occur in a particular installation. If this equipment
does cause harmful interference to radio or television reception, which can be determined by turning the
equipment off and on, the user is encouraged to try to correct the interference by one of the following
measures: - Reorient or relocate the receiving antenna. - Increase the separation between the equipment
and receiver. - Connect the equipment into an outlet on a circuit different from that to which the receiver is
connected. - Consult the dealer or an experienced radio/TV technician for help.
This device complies with Part 15 of the FCC Rules. peration is subject to the following conditions:
1. This device may not cause harmful interference, and
2. this device must accept any interference received, including interference that
may cause undesired operation.
FCC-Caution: FCC Caution: Any changes or modifications not expressly approved by the party
responsible for compliance could void the user's authority to operate this equipment.
IMP RTANT N TE:
Radiation Exposure Statement:
1. This equipment complies with FCC radiation exposure limits set forth for an uncontrolled
environment. End users should follow the specific instructions in the user's manual to comply with
the FCC rules.
2. This transmitter must not be co-located or operating in conjunction with any other antenna or
transmitter.
DISPOSAL
This device contains materials that must not be disposed of as household waste. Please check local laws
concerning the applicable disposal regulations. Protect the environment by participating in recycling
programs!
9

CONTACT
If you have any questions, please feel free to contact us.
PRODUCTION & WHOLESALE
LEICKE GmbH
Dohnanyistr. 28
04103 Leipzig
Germany
Web www.leicke.com
Mail [email protected]
10
Table of contents