K&K Sound pure classic User manual

92798 Cape Arago Hwy
Coos Bay, OR 97420
Phone (541) 888- 517
Fax (541) 888-4846
www.kksound.com
Pure Classic
Pure Classic
Thank you for buying the Pure Classic Transducer System for your guitar!
This system includes the four head piezo-ceramic transducer with endpin jack.
The Pure Classic Guitar System has significant advantages over saddle transducers:
•Warmer sound quality
•Less fret and finger noise
•Well balanced individual strings
•Less percussive, important for hard pickers
Don’t worry about the length of this manual; it is written great detail to help you install the Pure System for best
possible performance. In the end the installation of the system may be easier than a saddle transducer
installation. We want to make sure that the installation is done right the first time, so please take the time and
follow this manual precisely.
Please familiarize yourself with the handling instructions of the supplied superglue and the supplied double side
tape and with the disclaimer at the end of this manual. Please read through the entire manual before installation.
List of tools needed:
•Electric drill (for endpin jack mount)
•Drill bits /8" (10mm) and 1/2" (12mm for endpin jack mount))
•Pliers or wrench for endpinjack installation
•4 latex gloves (if superglue is used)
•Acetone
•Fine sandpaper or razorblade
•Some double side adhesive carpet tape or similar
•Some duct tape or fabric tape
Your Pure Classic includes the following hardware parts:
•4 transducers with cable-harness and endpin jack
•Super glue
•Double side tape for removable installation
About removable vs. permanent installation of the Pure Classic and the difference in tone quality:
The pickups can be installed either permanently -- which refers to super-gluing them directly to the wood inside
your guitar -- or removable, by using the supplied double side adhesive tape. Of course, there is a difference in
tone between these installation methods.
Pickups that are superglued directly to the wood will put out about 25% - 0% more volume, more bass and more
midrange. The overall tone quality using the direct installation is probably best described as providing
“authoritative midrange” and very fundamental bass response. Fingerstylists will like that. It is absolutely great for
flat-picked solos, too. This way, one single tone will sound very warm and “thick”.
On the other hand, removable installation using the double-sided adhesive tape provides a somewhat finer tone
with more definition. It sounds slightly brighter with less midrange and less bass response. The output will still be
sufficient and higher than most competitors’ passive pickups. Volume and bass can easily be boosted with one of
our preamps if desired. The pickups are virtually noiseless; pre-amplification usually does not introduce noticeable
noise.
1

Please follow the handling instructions, which are supplied with the double side adhesive tape.
We recommend using the tape mount at first. There is a very good chance that you will like it just fine this way. If
you would like to get a “fatter” and louder tone than tape-mounted, you can carefully remove and re-glue the
pickups directly with superglue.
Installation Preparation:
You are going to install the system according to the diagrams in this manual.
•Place the guitar on a table. Use a blanket to prevent damage to the instrument body.
•Loosen the strings. TIP: Spread the strings apart by using a thin cord. Knot one end of the cord to the
low strings at the sound hole. Lead the cord around the back of the guitar and tie it around the high
strings on the opposite side of the sound hole. Spread strings apart and tighten another knot.
•Place the guitar so you can comfortably put your hand into the sound hole and feel the inside structures
underneath the bridge with your fingers.
•Locate the bracing and check if your guitar has a bridge reinforcement plate. This is a thin wood plate
usually about /4" (about 20mm) wide and about as long as the bridge. It is located underneath the
bridge. You can feel it with your fingers. If there is no reinforcement plate at all, please follow the
paragraph: "If your guitar does not have a bridge reinforcement plate" below.
If your guitar does not have a bridge reinforcement plate:
To make it easier for you to install the transducers without being able to see what you are doing, we advise you to
use one of the 2 following procedures. Procedure 1 requires the help of a friend; procedure 2 is the more precise
method:
Procedure 1:
•Use the pickup cables as a guide to copy the pickup position from the outside to the inside of the
instrument. You define this on the top of your guitar. For this procedure it is recommended to have a
second person around for help. Note: We are not working inside the guitar yet!
•Hold one transducer over the bridge in the desired position between D and A string (center position) and
lead the cable across the soundhole towards the neck.
•Wrap a piece of tape around this cable as a marker, which lines up with the edge of the sound hole that
faces the bridge (see fig B). Make sure that the cable is straight and gently taut.
•Do the same procedure with the second center pickup (G and B string) and with the two outer
transducers.
•This gives you a fairly precise definition of where the pickups will be located inside your guitar when the
tape-marks line up with the edge of the soundhole. During installation the second person should help
keep the cables on continuous gentle tension.
Tape
markers
2

Procedure 2:
•Here you have to drill two 1/16” reference holes in each end of the saddle-slot a little bit past the e strings
(see diagram). If the guitar already has a hole in the saddle-slot for an undersaddle pickup you can use
this hole.
•Please inspect the bridge area inside the guitar with a mirror and a flashlight to make sure that there is
enough room for all 4 pickups and also check on the outside over the saddle that 2 pickups will fit
between center brace and reference hole.
brac ing
REFRERENCE
HOLES
•Stick 2 pieces of an old low e-string or two small nails through the reference holes so that they extend
about ½” or so inside the guitar.
•Use them as a side-stop for your 2 outer pickups (see diagram). In other words, glue the pickups with
their outer edges touching the string pieces or nails that extend inside the guitar through the reference
holes.
•Remove the string pieces or nails and install the 2 inner pickups right next each outer pickup and against
the center brace (see diagram).
•This method is slightly more invasive than the “procedure 1” but it makes easier and more reliable to find
the correct spots.
Installation Preparation, continued:
The Pure Classic’s 4 pickups are identical. It does not matter in which position you install any of the pickups.
•Clean the bridgeplate or the bridge area inside the guitar. We recommend you either use fine sandpaper
or scrape the surface with a razor blade to smooth it. Then clean it with acetone.
•If you use superglue, find out which hand you are going to use for the installation and put on a latex glove.
•If you have some double-sided adhesive carpet tape on hand, stick a small piece to the tip of your index
or middle finger (whichever you use, see photo) and stick the pickup to it. The golden side of the pickup is
facing up. This makes holding on to the pickup and positioning it a lot easier.
3

Practice Procedure for Guitars with Bridgeplate:
•Before you actually install the pickups inside your guitar, you should perform a series of practice-runs
without using the glue. This is important for learning the correct movements and getting the feel.
•Just place the pickups centered on that bridgeplate plate, these are the correct positions.
•Start with the pickup for the D and A string right beside the middle brace. Place one pickup inside the
guitar.
•Position it as shown in diagram above with the metal side facing the wood by using the reinforcement
plate and the middle brace as your guides.
•One edge of the pickup should touch the brace.
•Press the transducer against the desired location with your finger to practice the glue attachment (do not
use glue yet!).
•Now try out the installation of the second center pickup for the G and B strings. Place one transducer
inside the guitar and again, position it on the reinforcement plate and the brace.
•This practice run will make sure you will actually find the correct locations for the center transducers. The
other 2 pickups for the high E and the low E strings have to be attached right beside the two center
pickups. Here you cannot perform a realistic practice before you actually installed the 2 center pickups.
•Please perform a practice run for these pickups as soon as you mounted the 2 center pickups.
•Make sure to perform all practice tests thoroughly.
Practice Procedure for Guitars without Bridgeplate:
•Before you actually install the pickups inside your guitar, you should perform a series of practice-runs
without using the glue. This is important for learning the correct movements and getting the feel.
If procedure 1 was used:
•Start with the pickup for the D and A string right beside the middle brace. Place one pickup inside the
guitar.
•Position it as shown in diagram above with the metal side facing the wood by using the tape marks and
the middle brace as your guides.
•One edge of the pickup should touch the brace.
•Press the transducer to the desired location with your finger to practice the glue attachment (do not use
glue yet!).
•Now try out the installation of the second center pickup for the G and B strings. Place one transducer
inside the guitar and again, position it on the bridge reinforcement plate and against the brace.
•This practice run will make sure you will actually find the correct locations for the center transducers.
•The other 2 pickups for the high E and the low E strings have to be attached right beside the two center
pickups. Here you cannot perform a realistic practice before you actually installed the 2 center pickups.
•Please perform a practice run for these pickups as soon as you mounted the 2 center pickups.
4

•Make sure to perform all practice tests thoroughly.
•You are going to follow these identical procedures with superglue or tape for final installation!
•In case you are going to use the superglue installation, make sure not to get superglue on your fingers or
on your guitar! Please read and follow the safety instruction for the superglue!
•It is a good idea to cover the entire guitar top with cloth or paper, just leaving an opening for the sound-
hole. Practice until you feel confident to do it right the first time.
If procedure 2 was used:
•Start with the low e string outer pickup and set it right next to the inserted guide piece as shown in the
according diagram above.
•The outer edge of the pickup should touch the guide piece.
•Press the transducer against the desired location with your finger to practice the glue attachment (do not
use glue yet!).
•Now try out the installation of the second outer pickup on the high e string side. Place one transducer
inside the guitar and again, position it right next to the inserted guide piece as shown in the according
diagrams
•This practice run will make sure you will actually find the correct locations for the 2 outer transducers. The
inner 2 pickups have to be attached right beside the two outer pickups and against the center brace. Here
you cannot perform a realistic practice before you actually installed the 2 outer pickups.
•Please perform a practice run for these pickups as soon as you mounted the 2 outer pickups.
•Make sure to perform all practice tests thoroughly.
•You are going to follow these identical procedures with superglue or tape for final installation!
•In case you are going to use the superglue installation, make sure not to get superglue on your fingers or
on your guitar! Please read and follow the safety instruction for the superglue!
•It is a good idea to cover the entire guitar top with cloth or paper, just leaving an opening for the sound-
hole. Practice until you feel confident to do it right the first time.
Installation of the Transducers with Double sided Tape:
•Apply the tape as described in the supplied tape handling instructions.
•Whenever you're ready mount the first transducer as practiced, stick it to the desired location into the
guitar. Press it on firmly.
•Repeat the above step with the next transducer and attach it to the corresponding position at the as
practiced.
•Now its time to practice the installation of the 2 remaining pickups as mentioned above.
•Whenever you're ready go ahead and install them as well.
•Use 2 fitting strips of duct tape (fabric tape) to secure the wires of the 2 left and the 2 right pickups
according to picture below. This is important for (mechanical) noise free operation.
Installation of the Transducers with Superglue:
Note: The entire golden surface of the pickups should be covered with glue! Spread a THIN layer over the golden
side. Do not use just a drop in the center, as this will not distribute evenly.
5

Please do not worry; the glue we supply will not dry immediately after it is applied to the pickup. You will have
sufficient time without rushing things.
The superglue gel allows for about 15 seconds repositioning time after the pickup is pressed to the bridgeplate
surface. Excess glue will ooze out at the edges and eventually dry - that’s fine.
After the final position is reached hold and press the pickup firmly in place for at least another 0 seconds.
•Whenever you're ready, apply a THIN layer of superglue on the metal surface of the first transducer.
•Now mount the transducer as practiced, glue it to the desired location into the guitar. Press it on and hold
it in position for approx. 0 seconds.
•Repeat the above 2 steps with the next transducer and attach it to the corresponding position at the as
practiced.
•Now its time to practice the installation of the 2 remaining pickups without the superglue as mentioned
above.
•Whenever you're ready go ahead and install them as well.
•Use 2 fitting strips of duct tape (fabric tape) to secure the wires of the 2 left and right pickups according to
picture below. This is important for (mechanical) noise free operation.
Drilling the Hole for the Endpin Jack:
•Remove existing endpin if any.
•If there is no endpin hole in your classic guitar (standard), mark an according point on your guitar.
•To get the cleanest possible result, start with a small (1/8”) drill bit and work your way up to a ½” hole in 5
or 6 individual drill steps using a little bit bigger drill every time.
•Use protective tape (duct tape or similar) to cover the drill hole. This helps protecting your finish.
•Drill or widen the endpin hole to 1/2".
Installation of the Endpin Jack:
•Unscrew the endpin jack's strap mount knob
•Take off the washer.
•Find out the thickness of your end-block and set the nut on the jack accordingly (see picture below).
•Insert the jack from the inside.
•TIP: A chopstick or something similar helps to grab the jack and to pull it through the hole.
6

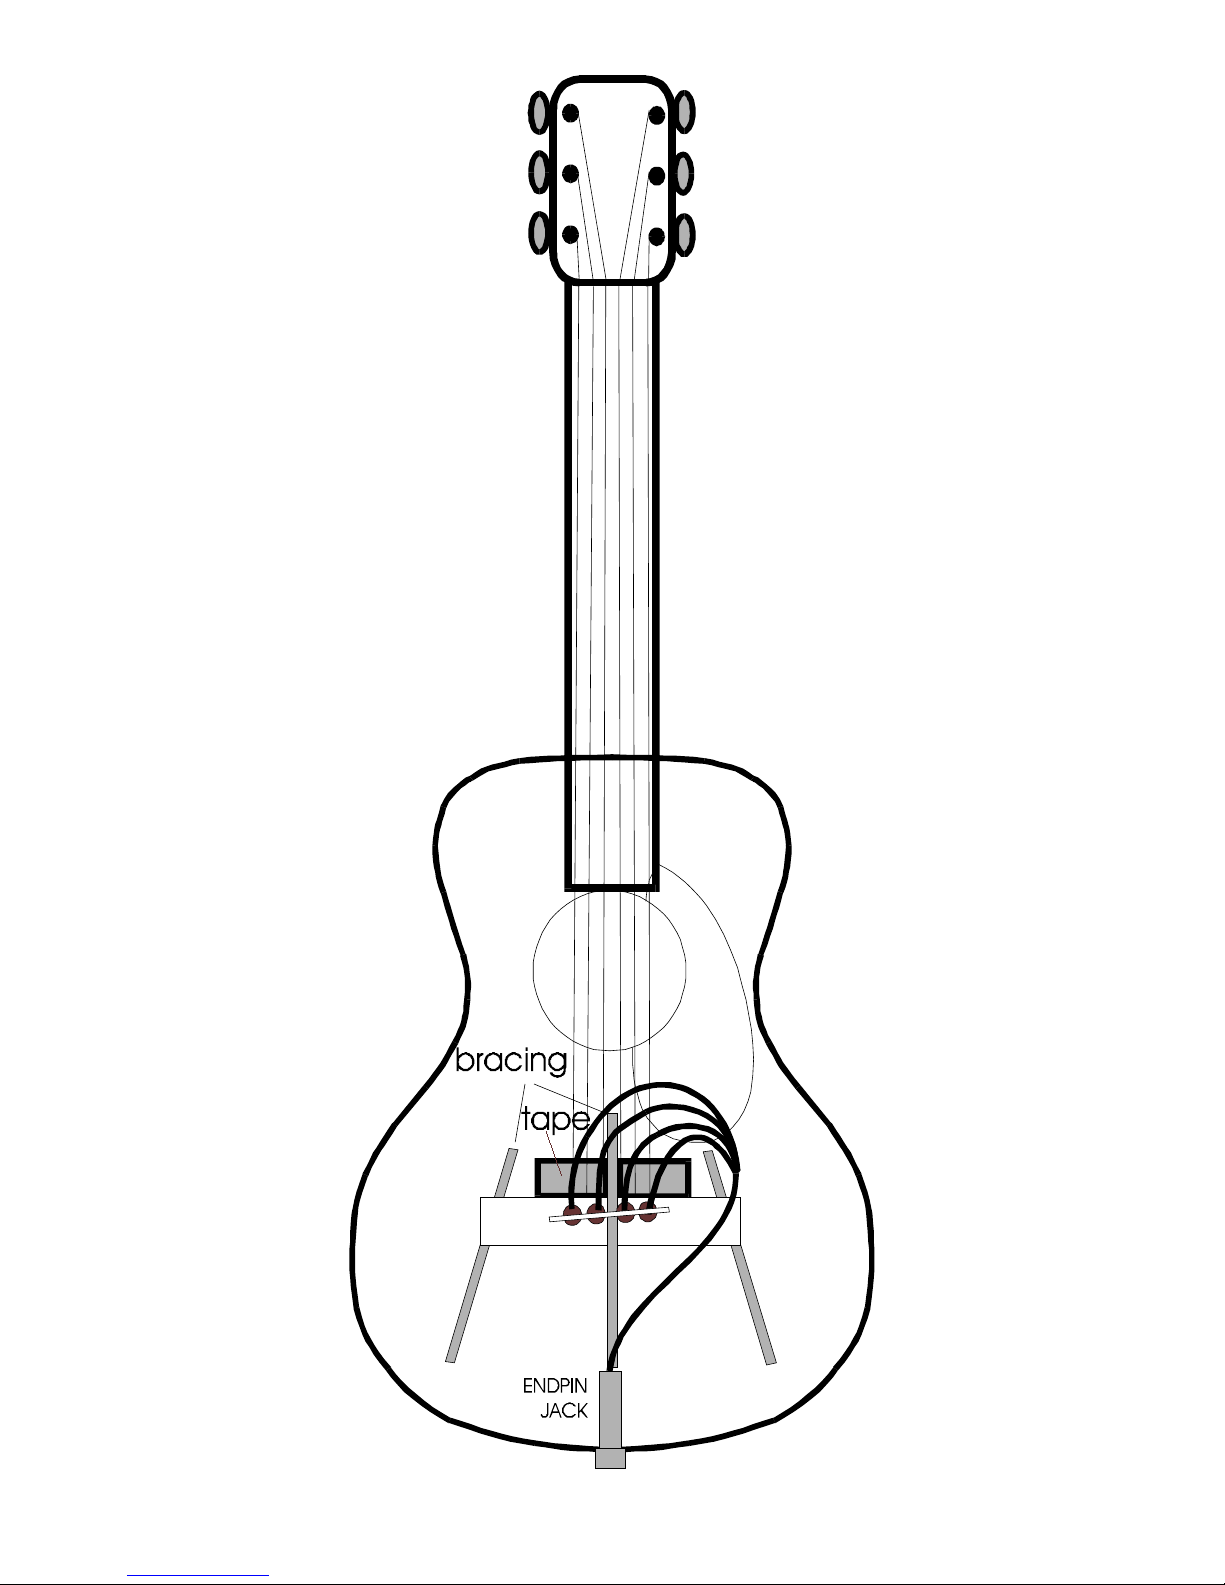
•Attach washer and strap mount knob and tighten it. The flat head screwdriver slots on the jack end allow
holding it tight with a screwdriver or a knife.
Endblock thickness
adjustment nut
•Note: Make sure that the strap knob screws in ALL THE WAY over the outer threaded part of the jack, so
that a tiny portion of the thread is exposed when the strap-knob is tightened.
###
Removal of Pickups (please read and understand the disclaimer below):
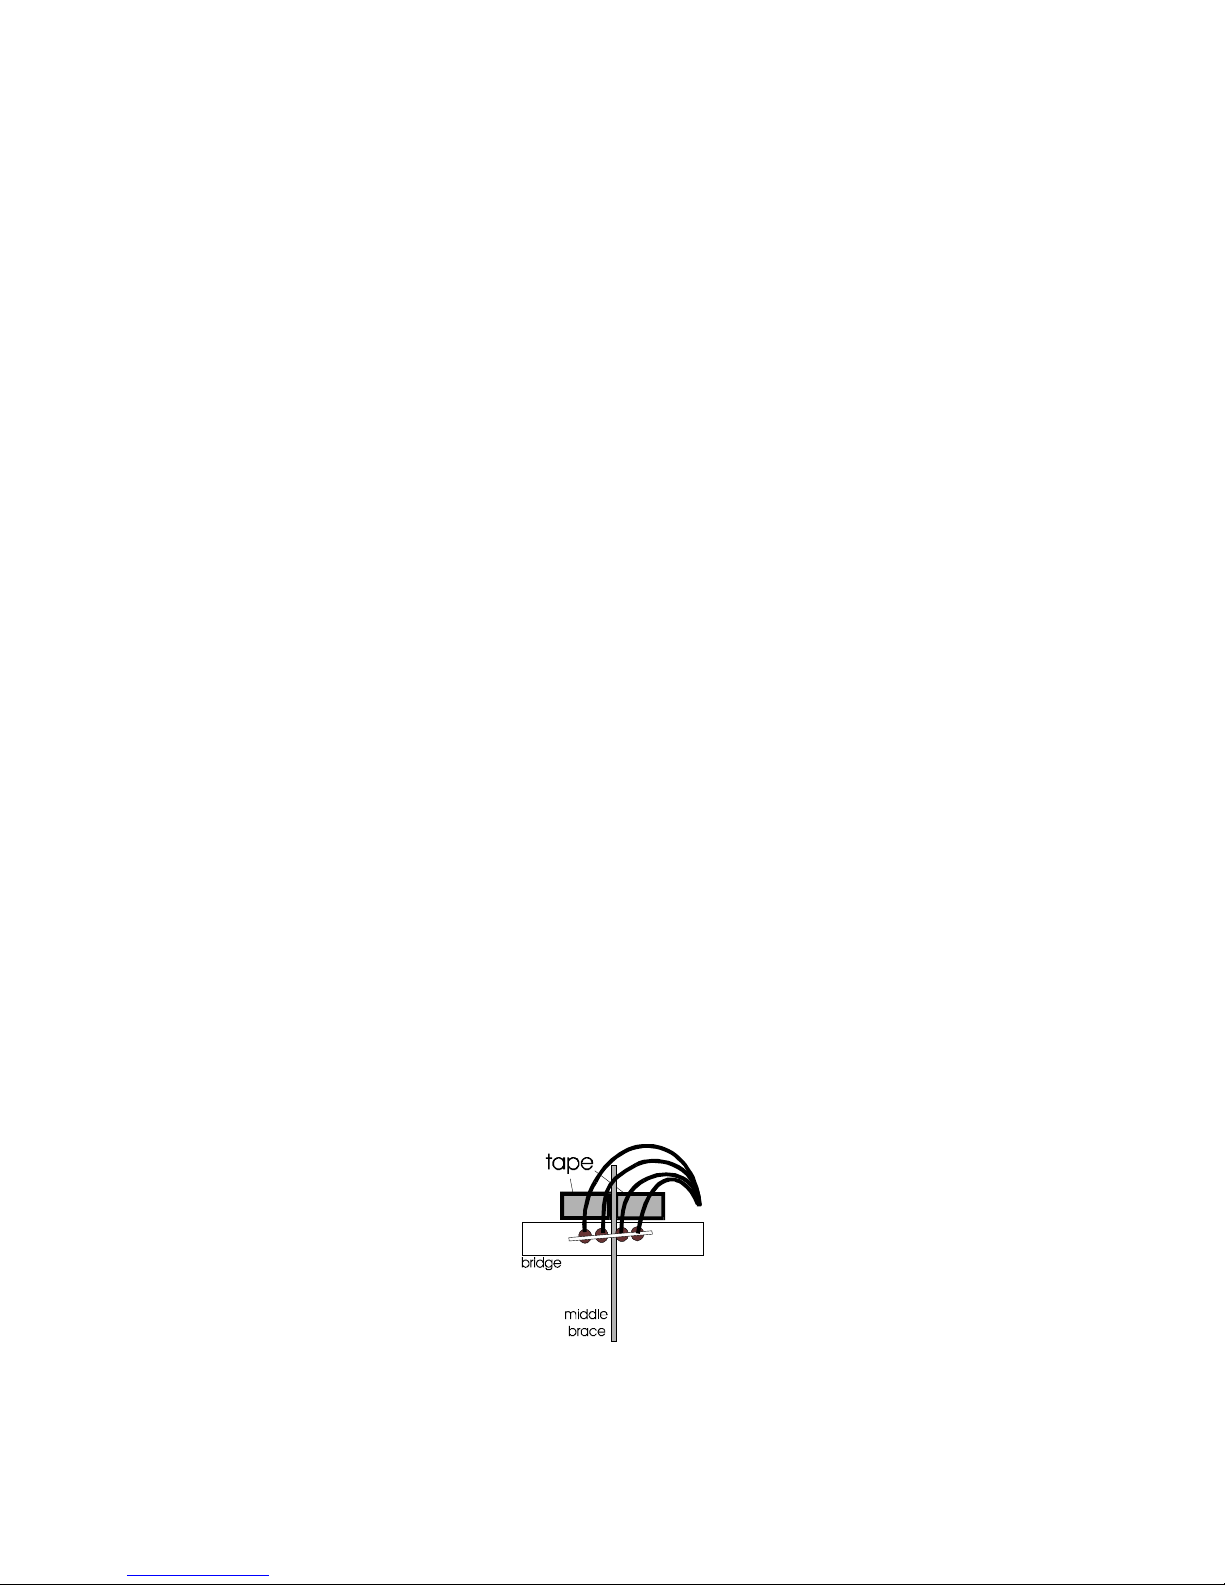
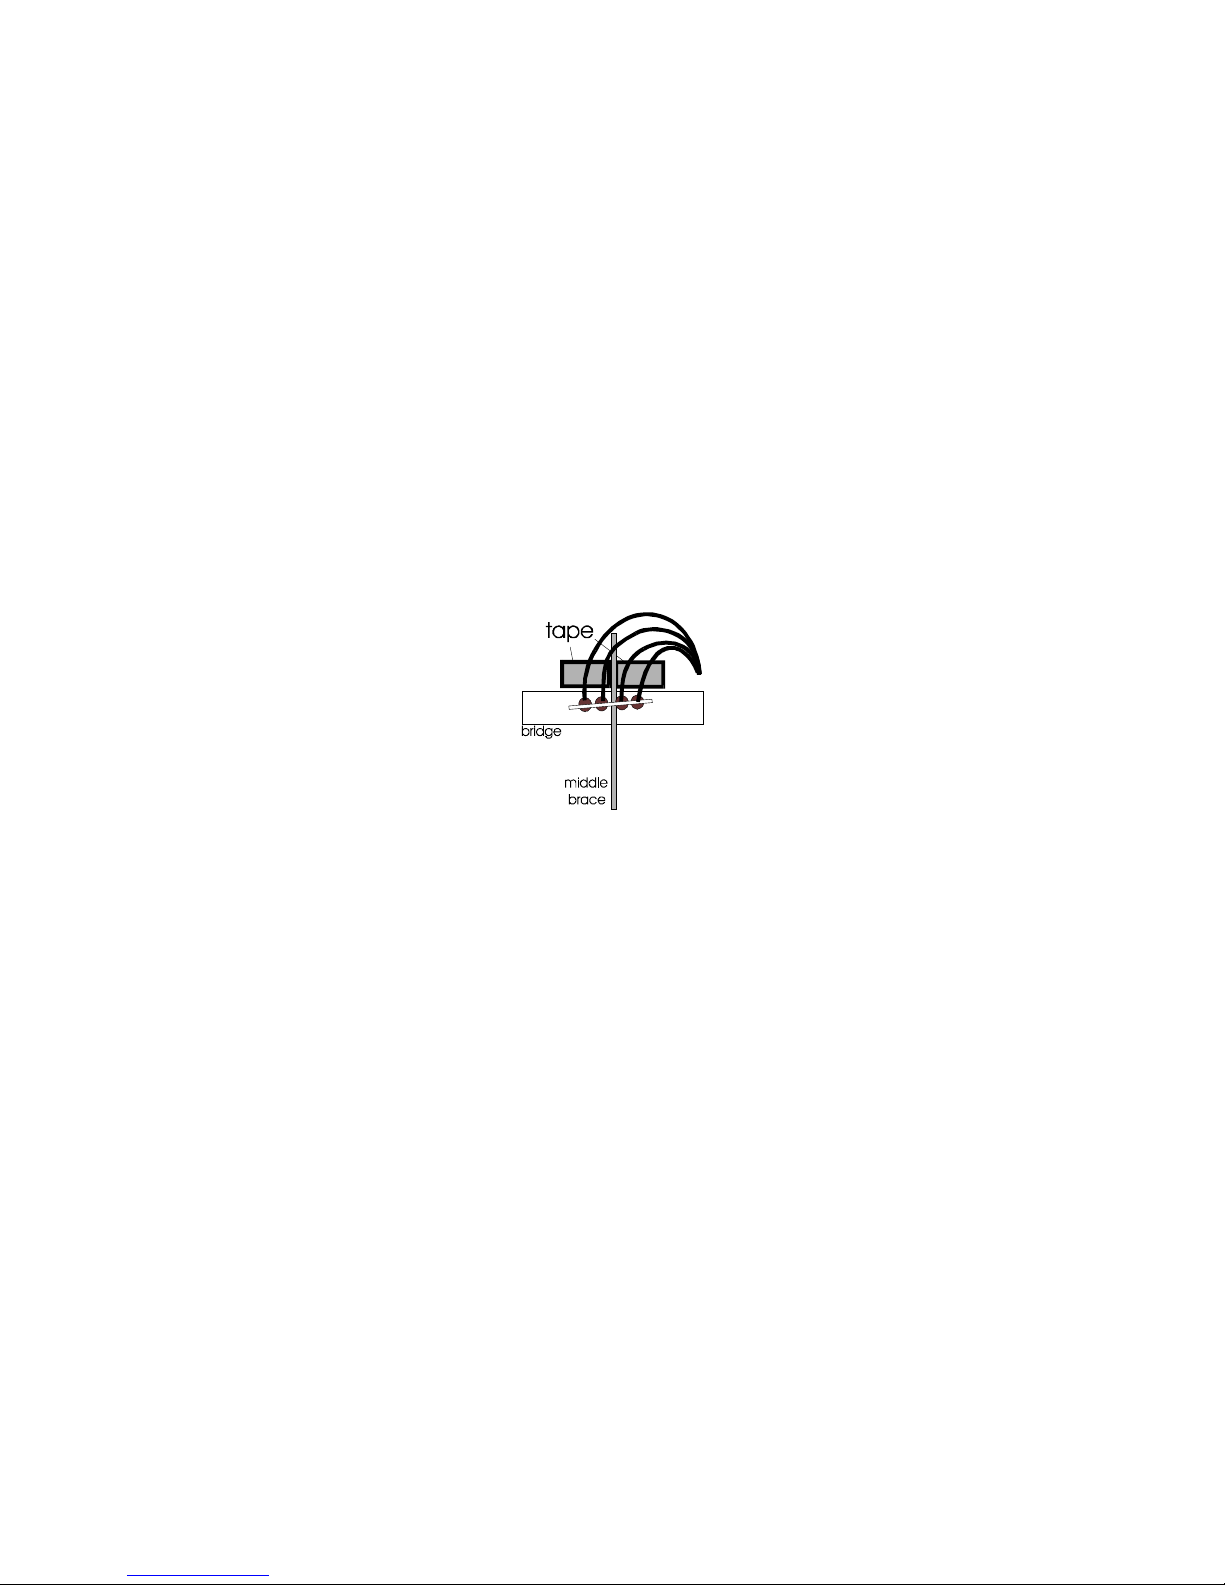
Double-sided Tape Installation:
•Please do not pull the pickups off by the wire!
•Use an old, dull razorblade to loosen the pickups. Please be very careful when handling the razor
blade. If you don’t have a dull one, scrape the blade of a new one over some sandpaper.
•Carefully remove the duct tape over the pickup cables.
•Slide the dull razor blade under the pickup on the cable entry side. Make sure the blade gets in between
the pickup and the wood. Avoid to accidentally cut the pickup apart. Be very careful not to bend the
pickups. Keep the blade almost parallel to the guitar top.
•This removal procedure requires some skill ! If you do not feel up to this task please contact a luthier or
your music stores guitar-tech.
There will be some glue residue on the base plates of the pickups.
You can clean it by rubbing it off with your thumb. If you like to use a solvent, “Naphta” is working best. Please
check at your hardware store.
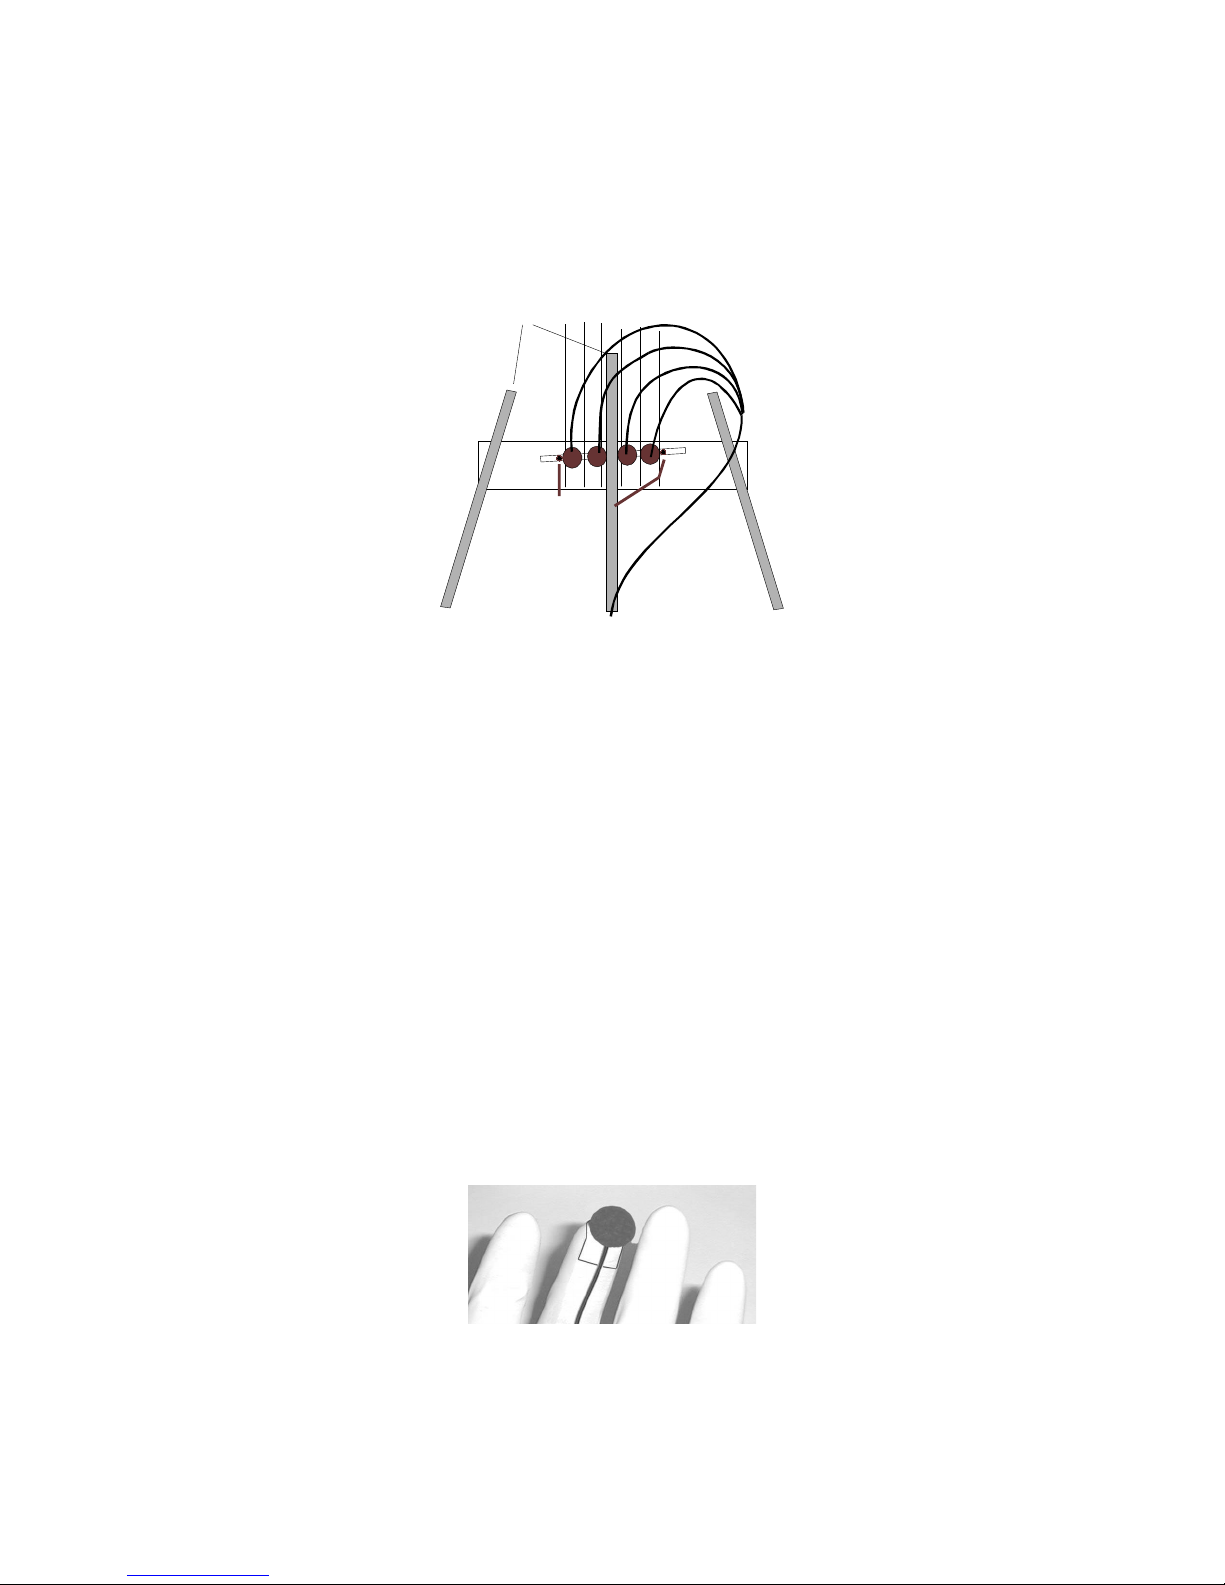
After the pickups are cleaned, plug them into your amp and tap on the golden surface of each pickup with a finger
to make sure that all pickups work.
The tapping sound should be clearly amplified. All pickups should perform with the same sensitivity and loudness
level. Now the pickups are ready for re-installation.
Superglue Installation:
If the pickups were glued directly to the bridgeplate removal is not recommended.
However, experienced luthiers should be able to remove the pickups by using a razor blade. Be aware that this
will very likely damage the piezo transducers.
It also is dangerous to work with a razor blade inside your guitar where you can’t see what you are doing.
###
Please make sure you read, understand and agree to the disclaimer below before you proceed with the
installation. Please call our help line if you ha e any questions: (541) 888-3517
If you ha e doubts please do not install this product.
DISCLAIMER regarding the installation or removal of the Pure Western, Pure Classic, Mini Pure and any
product which contains any of these transducers:
Installation or removal of the above listed products is at your own risk. In no event will K & K Sound Systems Inc.
be liable to you for any damages arising from your use of, or, the inability to use these products. This includes any
possible health hazards, accidents, injuries, any lost profits, or other incidental or consequential damages, even if
K & K Sound Systems Inc. has been advised of the possibility of such damages, or for any claim by another party.
Exact following of mounting instructions and handling instructions for supplied superglue is mandatory.
7

8
Table of contents
Other K&K Sound Musical Instrument manuals