KaVo EWL 5831 User manual

Operating Instructions
Model Trimmer EWL 5831
1.001.3277 ●RB ●05/02 GB 15.07
KaVo Elektrotechnisches Werk GmbH
Wangener Straße 78
D-88299 Leutkirch
Tel.: 0 75 61 / 86-0 • Fax: 0 75 61 / 86-22 2
1.000.8422 DE
1.000.9674 GB
1.000.9679 US


EWL 5831 1
GB
TABLE OF CONTENTS
A 1 For your safety ............................................................................................................................................2
A 1.1 Proper use of the product ....................................................................................................................2
A.1.2 Explanation of the safety symbols in these instructions ......................................................................2
A 1.3 Safety considerations ..........................................................................................................................2
A 1.4 Sources of danger ................................................................................................................................2
A 1.5 Observance of the Operating Instructions ............................................................................................2
A 1.6 Liability for function and damage ........................................................................................................3
A 1.7 Authorized Users ..................................................................................................................................3
A 2 Maintenance and Cleaning ........................................................................................................................4
A 2.1 Maintenance ........................................................................................................................................4
A 2.2 Cleaning ..............................................................................................................................................4
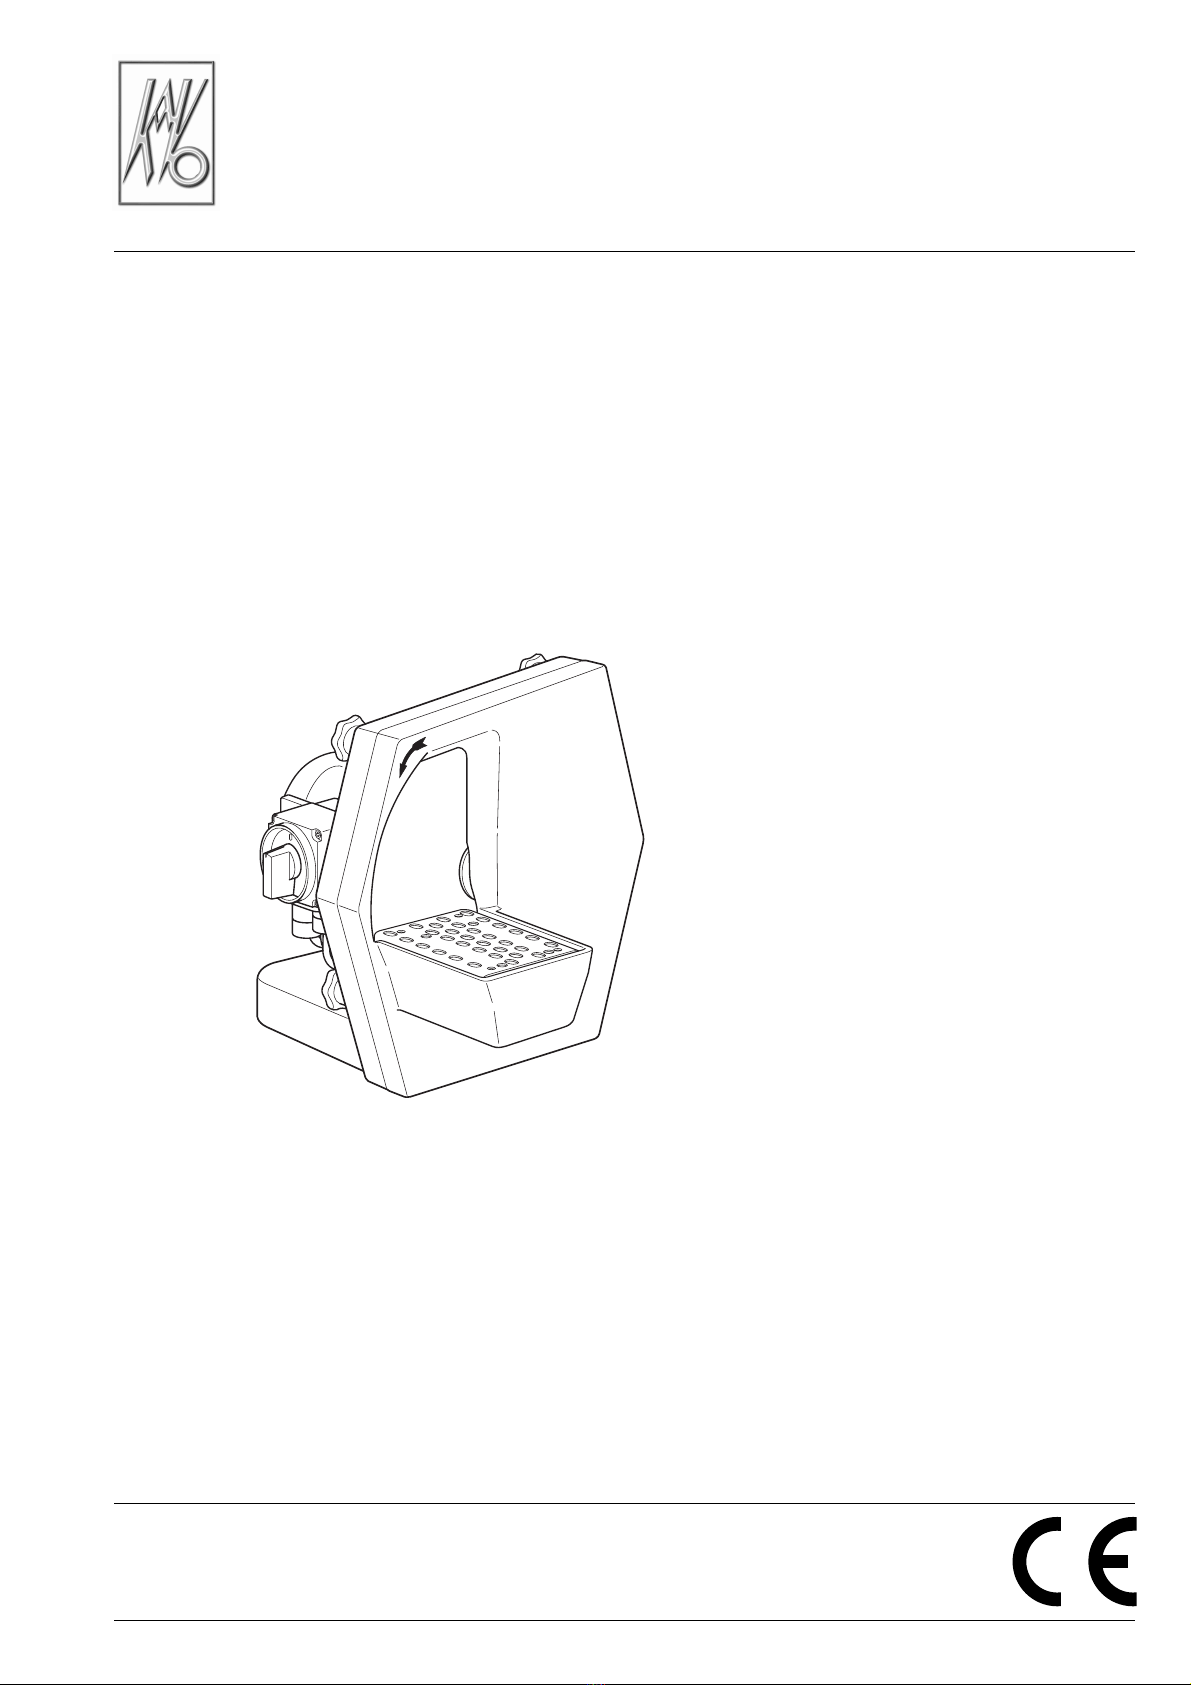
A 3 Applications ................................................................................................................................................4
A 4 Preparing for installation ............................................................................................................................4
A 4.1 Unpacking/Transport ............................................................................................................................4
A 4.2 Included accessories ............................................................................................................................4
A 4.3 Setting up and location ........................................................................................................................4
A 5 Handling ........................................................................................................................................................5
A 5.1 Technical data ......................................................................................................................................5
A 5.2 Water control ........................................................................................................................................5
A 6 Installation ....................................................................................................................................................6
A 6.1 Location ................................................................................................................................................6
A 6.2 Water connection ..................................................................................................................................6
A 6.3 Drainage hose ......................................................................................................................................6
A 7 Fittings ..........................................................................................................................................................7
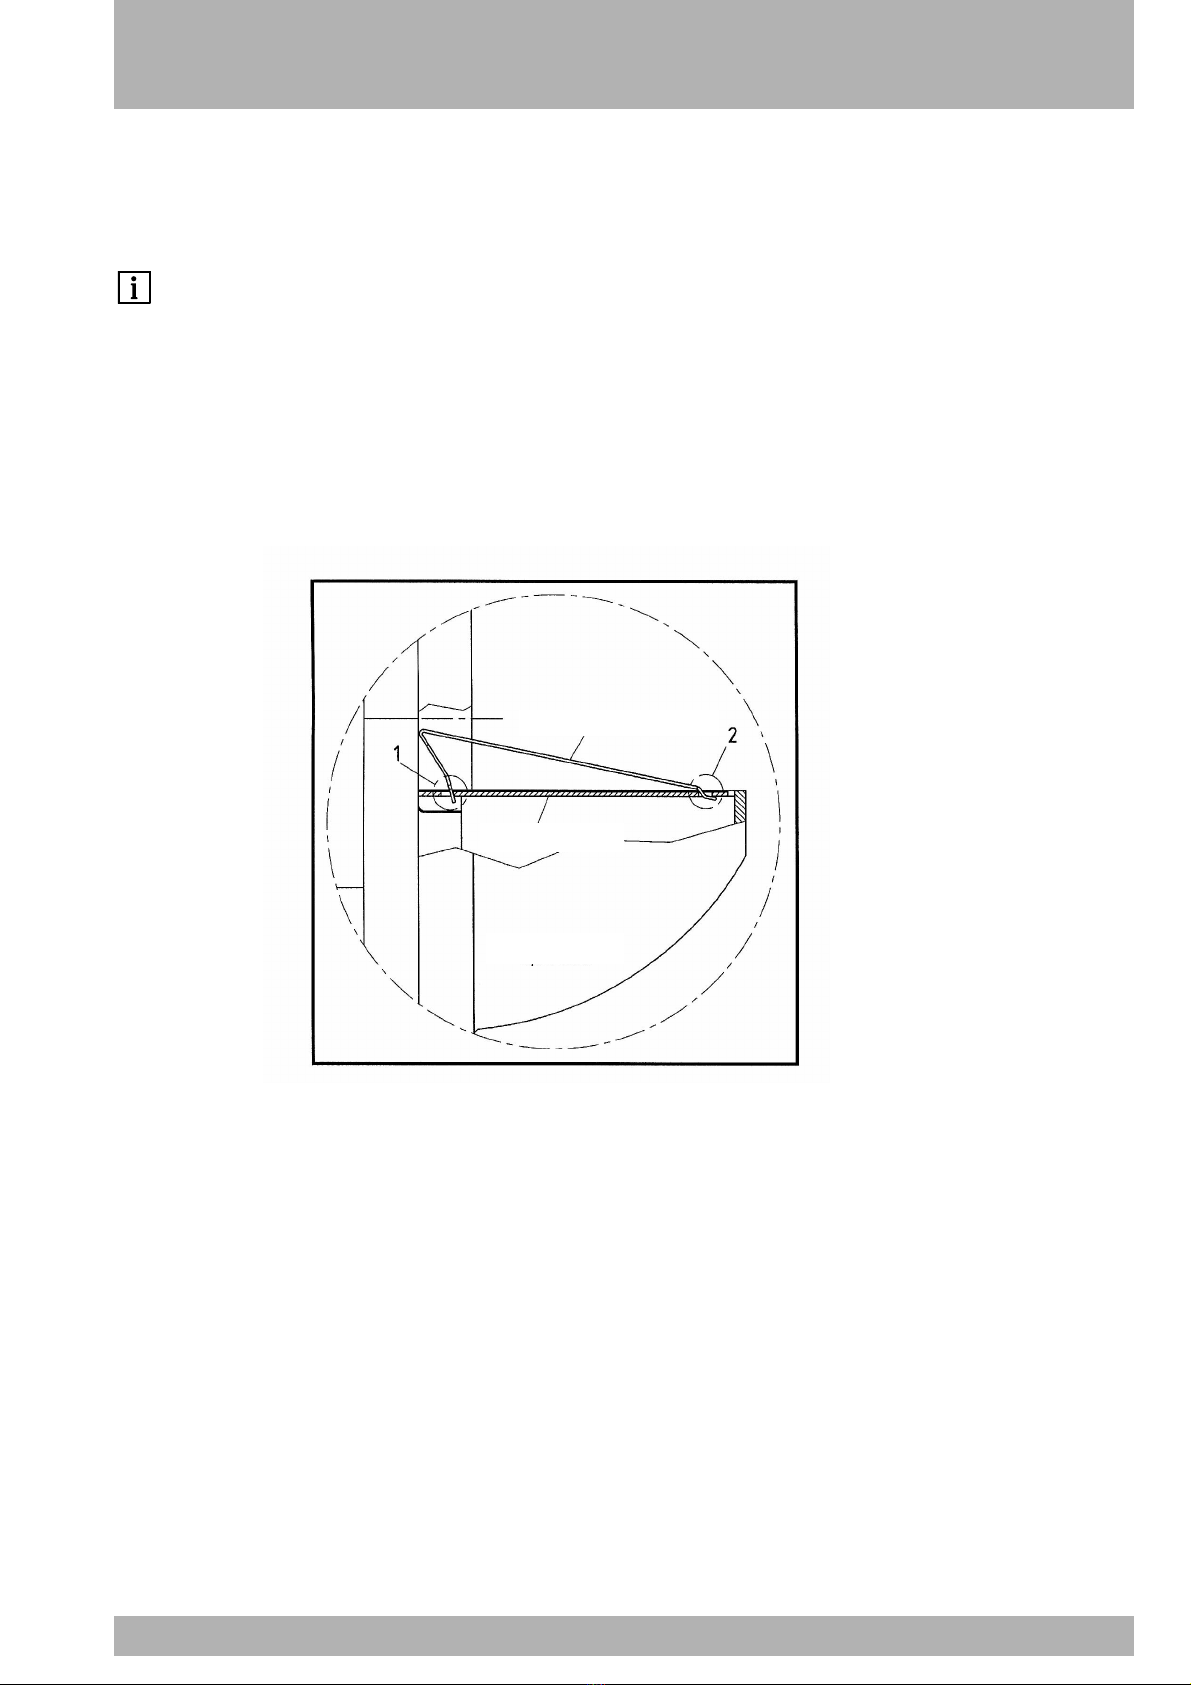
A 7.1 Fitting the diagonal support ..................................................................................................................7
A 7.2 Assembly ..............................................................................................................................................7
A 8 Taking care of the unit ................................................................................................................................8
A 8.1 Maintenance ........................................................................................................................................8
A 8.2 Troubleshooting ....................................................................................................................................8
A 8.3 Reconditioning the trimming disc ........................................................................................................8
A 8.4 Replacement trimming discs ................................................................................................................8
Warranty information ......................................................................................................................................9
Spare parts ..................................................................................................................................................10

2EWL 5831
A 1 For your safety
A 1.1 Proper use of the product
The Model Trimmer is for use in dental laboratories, solely for the grinding (trimming) of plaster models.
In order to prevent damage to the unit and/or the grinding disc, only the above materials may be trimmed. Otherwise, the disc could
shatter.
A.1.2 Explanation of the safety symbols in these instructions
arning! This is a warning relating to risky and dangerous situations. Non-compliance with this warning can lead to life-
threatening situations. These warnings must be strictly observed.
Information! This is information relating to specific characteristics to be observed.
A 1.3 Safety considerations
• All service and repair work must be carried out by authorized, trained personnel.
• Before carrying out any cleaning or maintenance, disconnect the electrical supply and ensure that the motor cannot be restarted.
• hen working with the trimming disc, safety glasses must be worn.
• Electric motors operate with dangerous, electrically-charged rotating parts. By incorrect operation, improper use or insufficient
maintenance they can, therefore, cause damage to health and materials.
• All work on the motor must be carried out by qualified specialists.
• Condensers must be discharged before opening the unit.
• hen using the unit, tight-fitting clothing should be worn, and sleeves must be rolled up inwards. Do not wear gloves.
• Long hair should be protected with, for example, a hairnet.
• hen working, the wearing of rings, chains, wrist-watches and similar jewellery is prohibited.
• Overnight and at weekends, the water faucet must be completely closed.
A 1.4 Sources of danger
Danger of injury from rotating parts and the trimming disc.
A 1.5 Observance of the Operating Instructions
Each user of the unit is assumed to have a thorough knowledge and observance of these operating instructions. The unit is designed only
for the applications described.

GB
OPERATING INSTRUCTIONS
EWL 5831 3
A 1.6 Liability for function and damage
If the unit is improperly maintained, repaired, or altered by an unqualified person; or is used for purposes for which it was not designed,
then the responsibility for proper function is solely carried by the owner or operator of the unit.
The unit must be maintained and operated in accordance with these operating instructions.
KaVo E L is not liable for damage arising as a result of non-compliance with the above information.
Guarantee and liability conditions as described in the Sales and Delivery Conditions from KaVo E L are not extended through the above
information.
Modifications by others, and use of unauthorized parts, invalidates the Product Liability. Use only original KaVo E L spare parts.
After initial installation, if damage occurs due to the use of an unapproved disc, liability lies with the person who installed it.
Using diamond discs for the trimming of investment materials and metals leads to extreme wear and tear of the disc. In such cases,
KaVo E L undertakes no liability.
A 1.7 Authorized Users
The owner of the unit must make these Operating Instructions readily available to all potential users, and ensure that they have read and
understood them. Only then may the user be allowed to operate the unit.
Ensure that these operating instructions are available at all times, are read, and understood.

4EWL 5831
A 2 Maintenance and Cleaning
A 2.1 Maintenance
Before carrying out any cleaning or maintenance, disconnect the electrical supply and ensure that the motor cannot be restarted. During maintenance
work, the water supply should also be disconnected. Do not open the unit until the trimming disc has come to a complete stop.
The Model Trimmer requires little maintenance. However, when the disc compartment is opened for cleaning purposes or to change discs, please ensure
that the sealing surfaces are also cleaned and further sealed with an insoluble grease.
For safety reasons, regularly check that the clips holding the water hose are tight.
A 2.2 Cleaning
Occasionally, it is recommended to remove any surface contaminants such as plaster slurry with a damp cloth. Otherwise the unit requires no special
cleaning.
A 3 Applications
A model trimmer is designed for the grinding (trimming) of plaster models.
Use the unit solely for this application!
A 4 Preparing for installation
A 4.1 Unpacking/Transport
Open the shipping carton, remove the packing materials and carefully take out the unit and accessories. Check the included accessories.
hen shipping the unit, pack it in a suitable container to prevent transport damage.
Remove the operating instructions and read thoroughly.
hen unpacking, it is important that any transport damage be immediately
recorded.
A 4.2 Included accessories
The following accessories are included in the delivery:
Unit with solenoid valve
Trimming disc
Diagonal support
1 metre each: water-supply and drainage hose
A 4.3 Setting up and location
The unit should be set up close to a sink, but ensuring easy access to the trimming disc.
For the water supply , the 1/2“ (13 mm) reinforced hose is required – and the 1“ (25 mm) plastic hose is used for drainage.
The location, even if temporary, plays an important role in the safety and function of the unit. The area should be dry, ventilated and vibration-free –
constant temperature and a wooden underlay are advantageous.
• Do not store or set up the unit outside.
• The unit must have reached room temperature before operating.

GB
OPERATING INSTRUCTIONS
EWL 5831 5
A 5 Handling
A 5.1 Technical data
Model Trimmer E L 5831 1.000.8422 DE (electrical supply line 0.223.4118)
Model Trimmer E L 5831 1.000.9674 GB (electrical supply line 0.691.3601)
Model Trimmer E L 5831 1.000.9679 US (electrical supply line 0.223.4144)
Model Trimmer E L 5831 AU (electrical supply line 0.223.4145)
Motor consumption: 900 watts
Voltage: 230 volts / 50 Hz
Revolutions: 3,000 rpm
eight: 22.2 Kg
Dimensions
idth: 325 mm
Height: 340 mm
Depth: 385 mm
Hand rest: 120 mm protruding
Technical modifications reserved
Noise emissions from the unit were measured within a radius of 1 metre, and at a height of 1.60 metres. In a time-related average of 50%
free-running, 30% medium load and 20% full load, these amounted to 69 db(A). The noise-recordings were carried out in accordance with
DIN 45635 Part 1.
• ait a few seconds after switching on until the motor has reached full speed, so that the full torque can be used.
• Do not press the models too hard on the disc, so that the motor stalls.
• This can lead to a possible overload, and damage the motor.
.
A 5.2 Water control
The water supply is regulated by a faucet.
The volume of water is sufficient when, during trimming, the disc roughly retains its natural colour.
Trimming of the model is best achieved by applying only light pressure and using small left/right movements.
Naturally, only fully-hardened plaster models should be trimmed, as soft plaster can lead to blockages in the drainage system.

6EWL 5831
A 6 Installation
A 6.1 Location
As the unit uses primarily water, installation is recommended close to a water tap, preferably at a sink, or wall-mounted on a bracket above
the sink.
A 6.2 Water connection
Connect the reinforced pressure hose between the faucet and the unit connector, located at the rear under the motor. Firmly secure the hose
using the pre-installed clips.
The faucet should be closed when the unit is not in operation, in order to prevent the hose standing permanently under pressure.
• Re-tighten the hose clips about 2 days after installation.
• The water supply must be shut off overnight and at weekends.
A 6.3 Drainage hose
The drainage hose must be so placed that, under no circumstances, a back-up of water occurs at the unit (spraying water). Lay the hose in a
smooth curve (not kinked), with a constant drop of at least 1 cm per metre (1%).
The end of the drainage hose must remain above the water level of the plaster trap, and never be submerged in water.
As standard, the hose connector is set diagonally to the right However, this can be converted to a straight connector, which is
recommended under difficult drainage conditions.
In this case, simply exchange the sealing cap for the connector.

EWL 5831 7
GB
OPERATING INSTRUCTIONS
A 7 Fittings
A 7.1 Fitting the diagonal support
The diagonal support is clipped into the support plate, as required. Please note the following:
hen working with the diagonal support, ensure that it is correctly located according to the sketch below.
hen fitting the diagonal support, make sure that positions 1 and 2 are correctly seated.
A 7.2 Assembly
Apart from the item described in section A 7.1, no assembling is required.
diagonal support
front plate
correctly seated

8EWL 5831
A 8 Taking care of the unit
A 8.1 Maintenance
No special maintenance is necessary, apart from the procedures described in section 2.1
A 8.2 Troubleshooting
Problem Possible cause Possible remedy
ater spraying out of the cut-out ater volume is set too high Reduce the pressure at the faucet
(see section A 5.2 ater control)
Drainage hose has been extended Ensure that the hose diameter is 1“ (25.4 mm)
with a thinner hose
Drainage hose is kinked Make sure there are no kinks in the hose
End of the drainage hose submerged Ensure that the end of the hose is above the
under water in plaster trap surface of the water
The gradient of the drainage hose is Check that the drop is at least 1 cm per metre
too shallow
The drainage hose curve is too sharp Make sure the hose lies as straight as possible
The hose is fitted with a pipe elbow Curve of the elbow must be at least 40 mm
A 8.3 Reconditioning the trimming disc
After a period of time, if the trimming-disc surface becomes smooth or ridges appear, it is possible to smooth out the ridges or roughen up
the surface by means of a dressing tool.
hen using a dressing tool, the Instructions for Use and Safety Information must be strictly adhered to.
A 8.4 Replacement trimming discs
• Replacement discs from KaVo E L are supplied with a tool for removing the old disc, and a tube of grease for sealing the disc
compartment.
• Never fit replacement discs on an already-installed disc, irrespective of origin or type.
• Using diamond trimming discs for trimming of investment materials and metals leads to extreme wear and tear of the disc.
• In such cases, KaVo E L undertakes no liability.
• hen replacing a disc, the supplied instructions for changing must be followed.

GB
OPERATING INSTRUCTIONS
EWL 5831 9
Warranty information
ithin the scope of the current Delivery and Payment Conditions, KaVo E L warrants the unit to be free from malfunctions, defects in
both materials and workmanship for a period of 6 months from the date of purchase. At the end of this warranty period, KaVo provides a
further 6-months guarantee for faults arising, which can be traced back to deficiencies in materials or the manufacturing process.
For established complaints, the guarantee covers only the supply or repair of replacements, free of charge. KaVo E L is not liable for
defects, and their consequences, caused by or which could be caused by normal wear; misuse; improper cleaning or maintenance; failure to
follow the operating, maintenance or electrical regulations; corrosion; air pollution; chemical or electrical influences which are unusual, or
not in accordance with factory regulations.
The guarantee does not apply if defects, or consequential damage, are the result of unauthorized modifications, and alterations to the
product. Entitlement to the guarantee can only be validated if claims are submitted without delay, in writing.
Return of the product must be accompanied by a copy of the invoice or delivery note, on which the serial number is clearly indicated.

Mat. No. Description
1.001.3473 Simmer ring
1.000.8872 Replacement corundum disc, normal, dia. 260, grain size 24
1.000.8873 Replacement diamond disc
1.001.2202 Tool for c anging discs
1.001.2203 Sealing grease
SPARE PARTS EWL 5831
10 EWL 5831
Spare parts
1/2
1.001.3426
1.001.3427
1.001.3428 1.001.3429
1.001.3426
1.001.3472
1.001.3430
1.001.3471
1.001.3474
1.001.3475

GB
OPERATING INSTRUCTIONS
EWL 5831 11

This manual suits for next models
3
Table of contents