Kawai ES100 User manual

English
Deutsch
Français
Español
Italiano
ES100/ES110
F-350 Assembly Instructions
F-350 Aufbauanleitung
Instructions d’assemblage du F-350
Instrucciones de montaje del F-350
Istruzioni di assemblaggio F-350

1. Do not use this F-350 for any purpose other than its intended use as a piano pedal unit.
2. At the final stage of assembly, ensure that all screws are firmly tightened.
3. Do not drag the product along the floor. Take care not to drop the product.
4. Do not stand on the pedal unit or apply undue force on it.
5. If any screws are found to be loose, tighten them immediately.
6. Ensure that the adjuster bolt firmly touches the floor, supporting the pedal unit and preventing instability or
damage.
7. When moving the piano, raise the Adjuster Bolt and readjust after moving.
Included parts
Before attempting to assemble the ES100/ES110 digital piano stand, please ensure that all parts below are included. A Phillips-
head screwdriver (not included) will also be required in order to assemble the stand.
Pedal board
(including adjustor bolt)
aScrew (5x25mm) x 4
A
1. Pull out the pedal cable
Unfasten and extend the pedal connection cable attached
to the bottom of the pedal board A.
2.
Attach the pedal board
A
to the stands (HML-1)
Fix the pedal board Ato the stand using four screws a.
* When it is dicult to engage the pedal board with the
stand, slightly loosen the screws xing the back board B
of the stand.
* Remove if any hole patches have been stuck to hide holes
in the stand.
A
B
aa
aa
F-350 Assembly Instructions
English
2

3
English
3. Mounting the ES100/ES110 digital piano
onto the stand
Carefully lift the ES100/ES110 digital piano onto the
assembled stand.
4. Attaching the ES100/ES110 digital piano
to the stand
Ensure that all four screws provided with HML-1 are rmly
tightened.
5. Connecting the pedal cable
5- 1
Pass the pedal cable (extending from the rear of the
pedal board) through the aperture to the front of the
main body, and connect to the PEDAL terminal.
5- 2
Pass the cable through the hook provided at the back of
the main unit.
5- 3
Ax the cable using the cable clamp provided with
HML-1.
6. Adjusting the pedal support bolt
Turn the pedal support bolt anti-clockwise, extending
the bolt until it makes contact with the oor and
supports the pedals rmly.
2
1
3

4
Deutsch
F-350 Aufbauanleitung
1. Benutzen Sie das F-350 ausschließlich als Pedaleinheit für das Digitalpiano.
2. Nach dem Zusammenbau aller Teile prüfen Sie bitte erneut, ob alle Schrauben und Verbindungen fest sind.
3. Ziehen Sie den Ständer nicht über den Boden und lassen Sie ihn nicht fallen.
4. Stellen Sie sich nicht auf die Pedalstütze und wenden Sie keine übermäßige Kraft auf sie an.
5. Falls einige Schrauben locker sind, ziehen Sie diese sofort wieder fest.
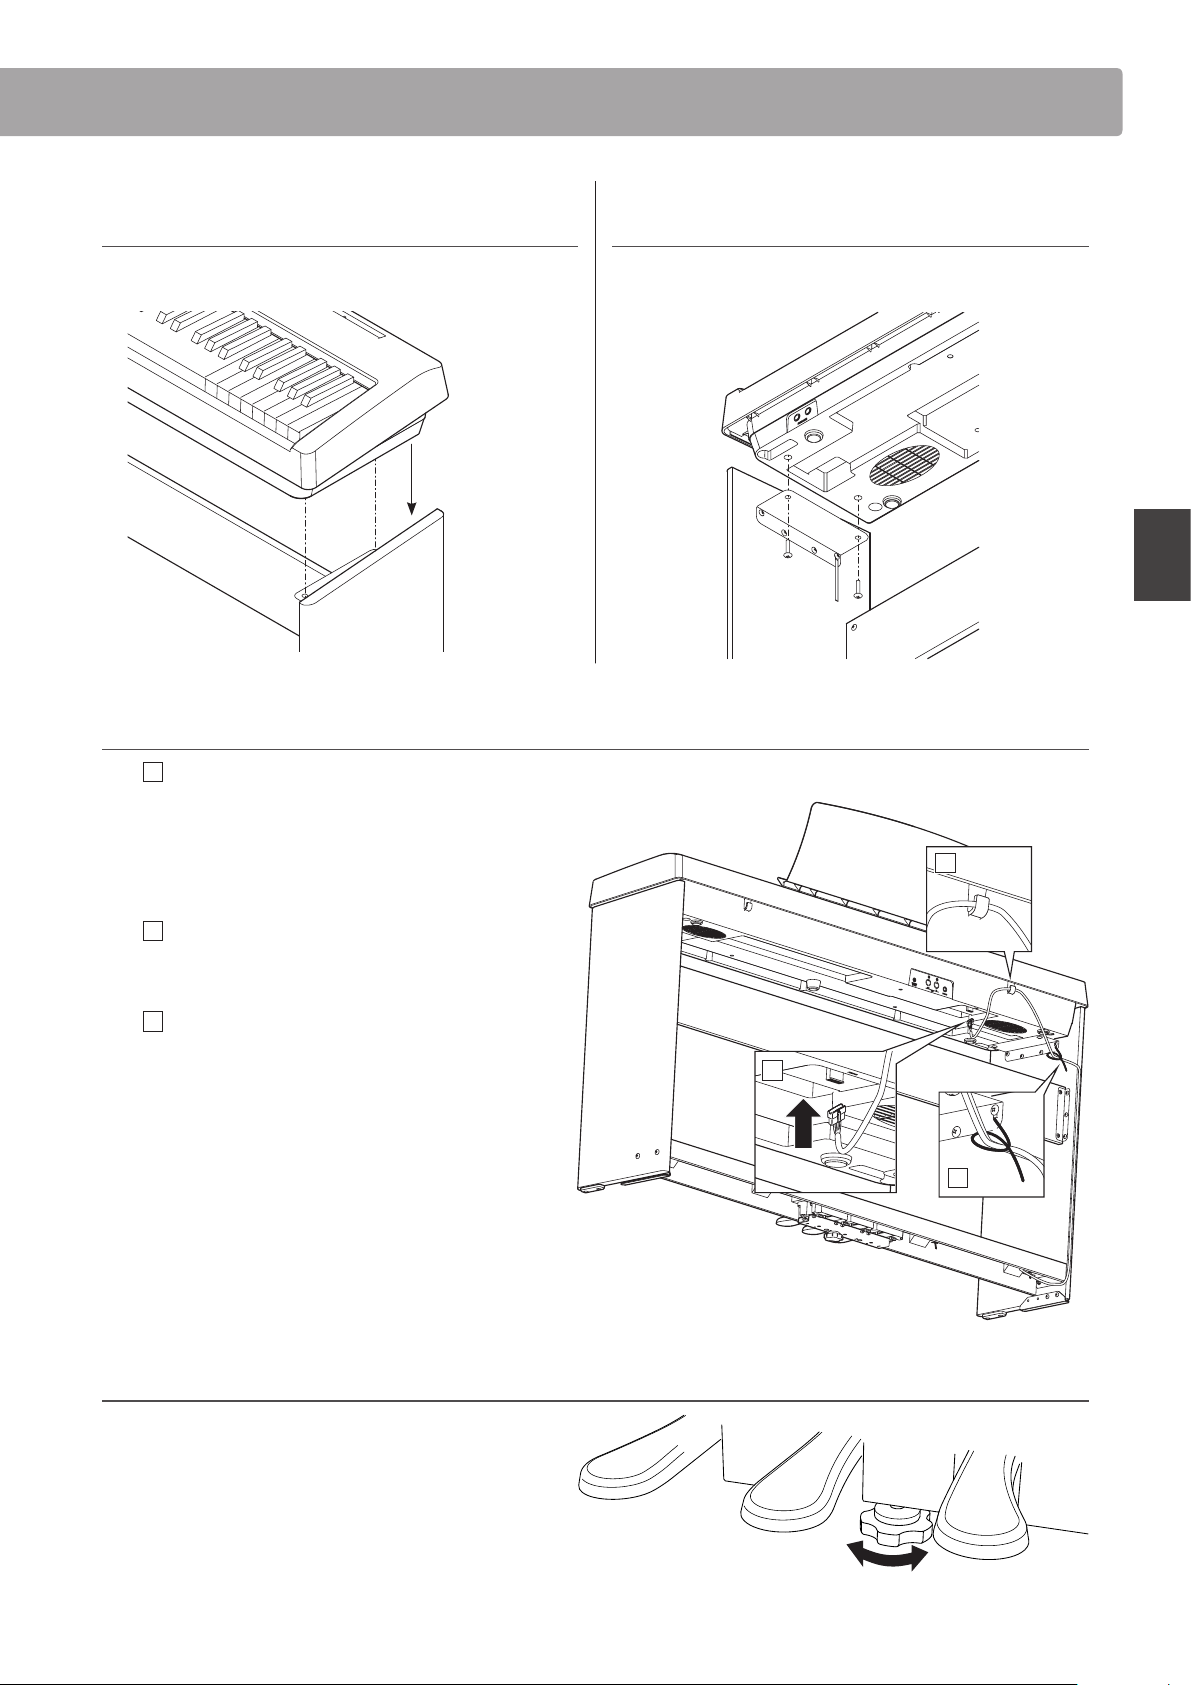
6. Stellen Sie sicher, dass die Pedalstütze den Boden berührt, um Instabilität zu vermeiden.
7. Wenn Sie das Instrument bewegen, stellen Sie vorher die Pedalstütze etwas höher ein (ohne Bodenkontakt).
Beiliegende Teiles
Vergewissern Sie sich vor dem Aufbau des ES100/ES110, dass alle nachfolgend aufgelisteten Teile vollständig vorhanden sind.
Für den Aufbau benötigen Sie einen Kreuzschraubendreher, welcher nicht im Lieferumfang enthalten ist.
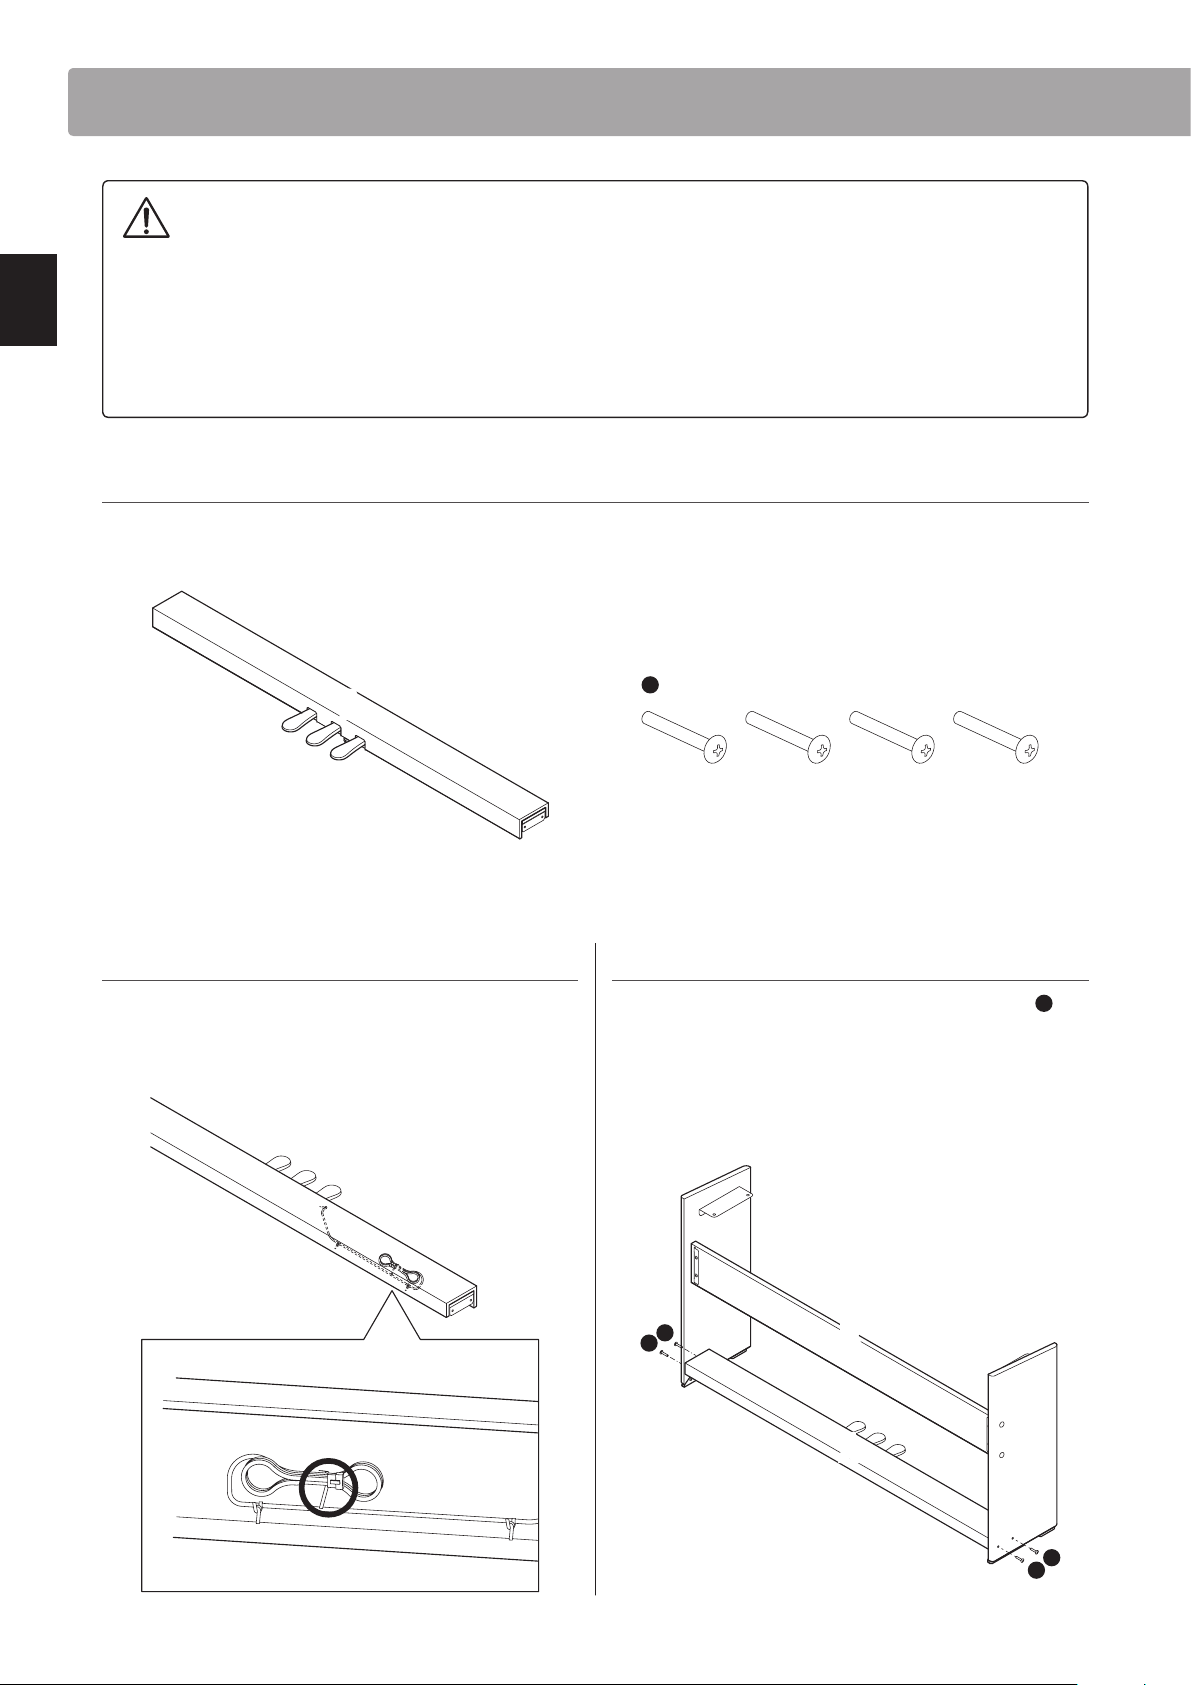
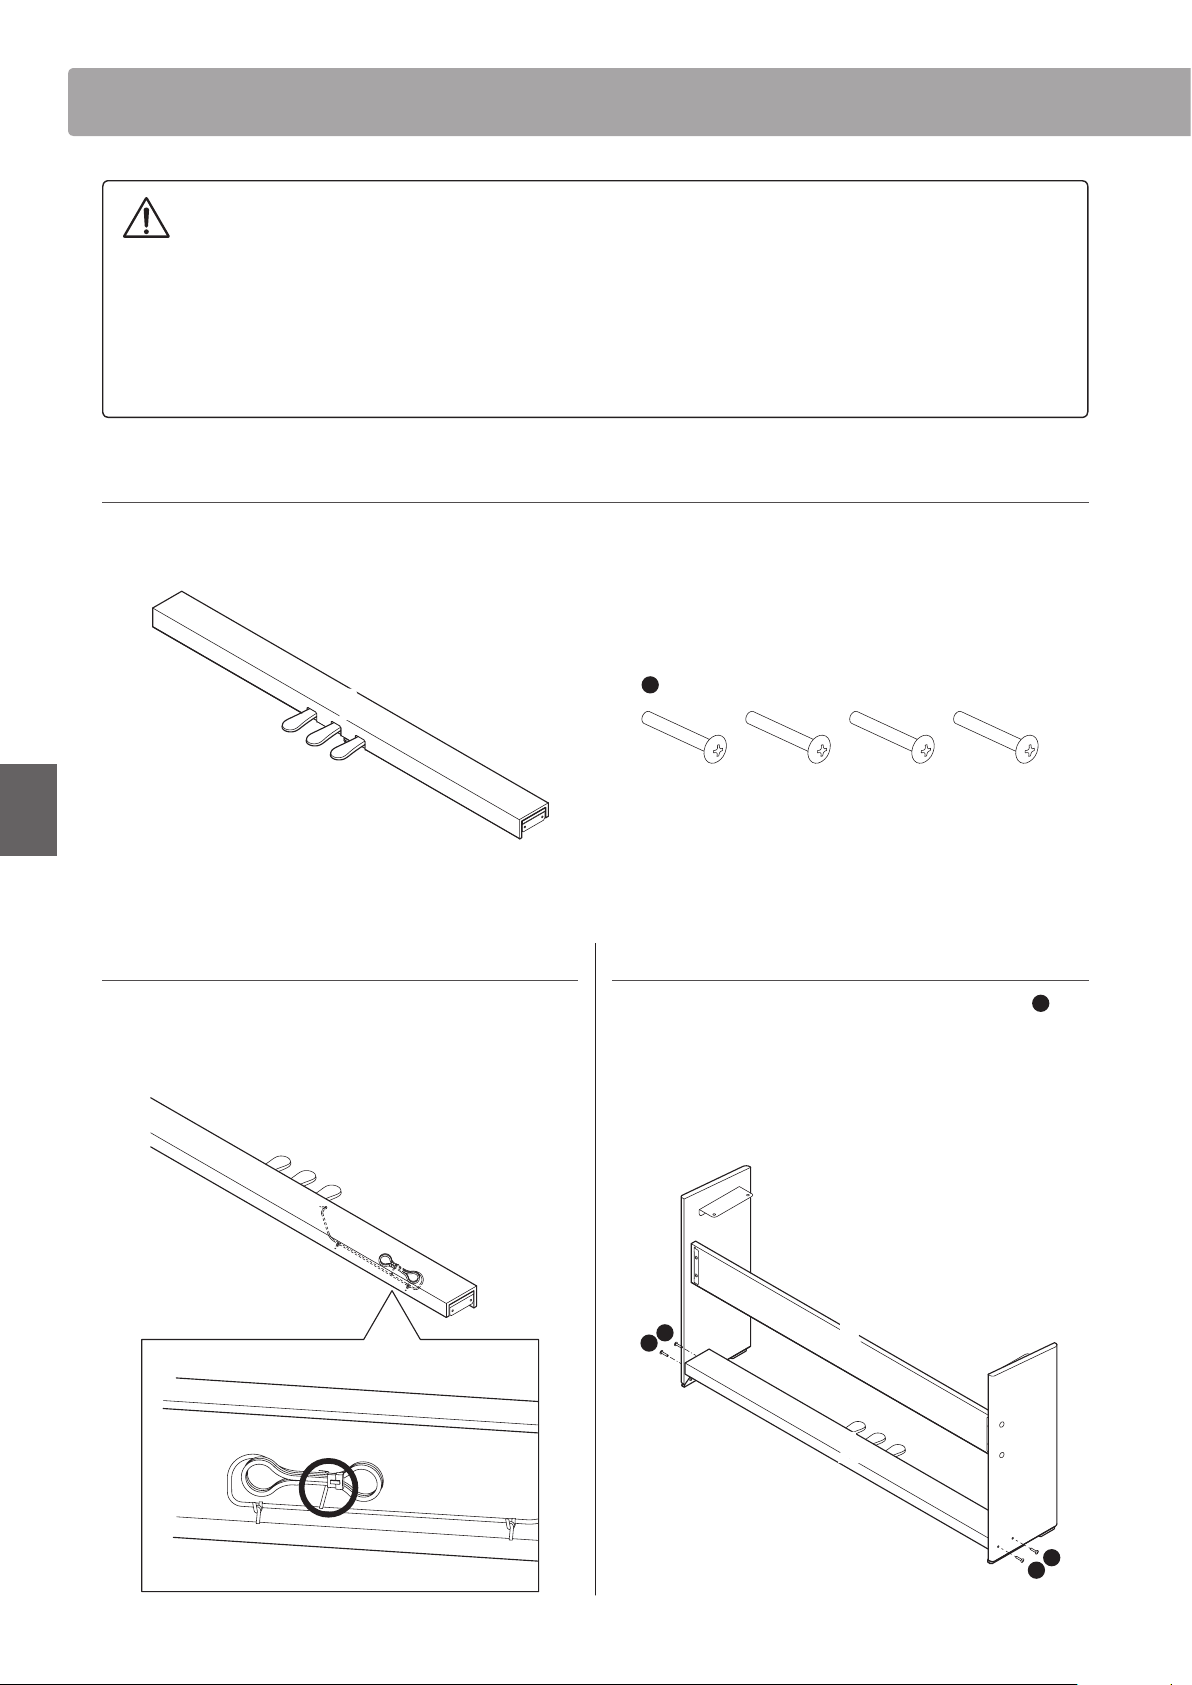
Pedal einheit
(inkl. Einstellschraube)
aSchraube (5x25mm) x 4
A
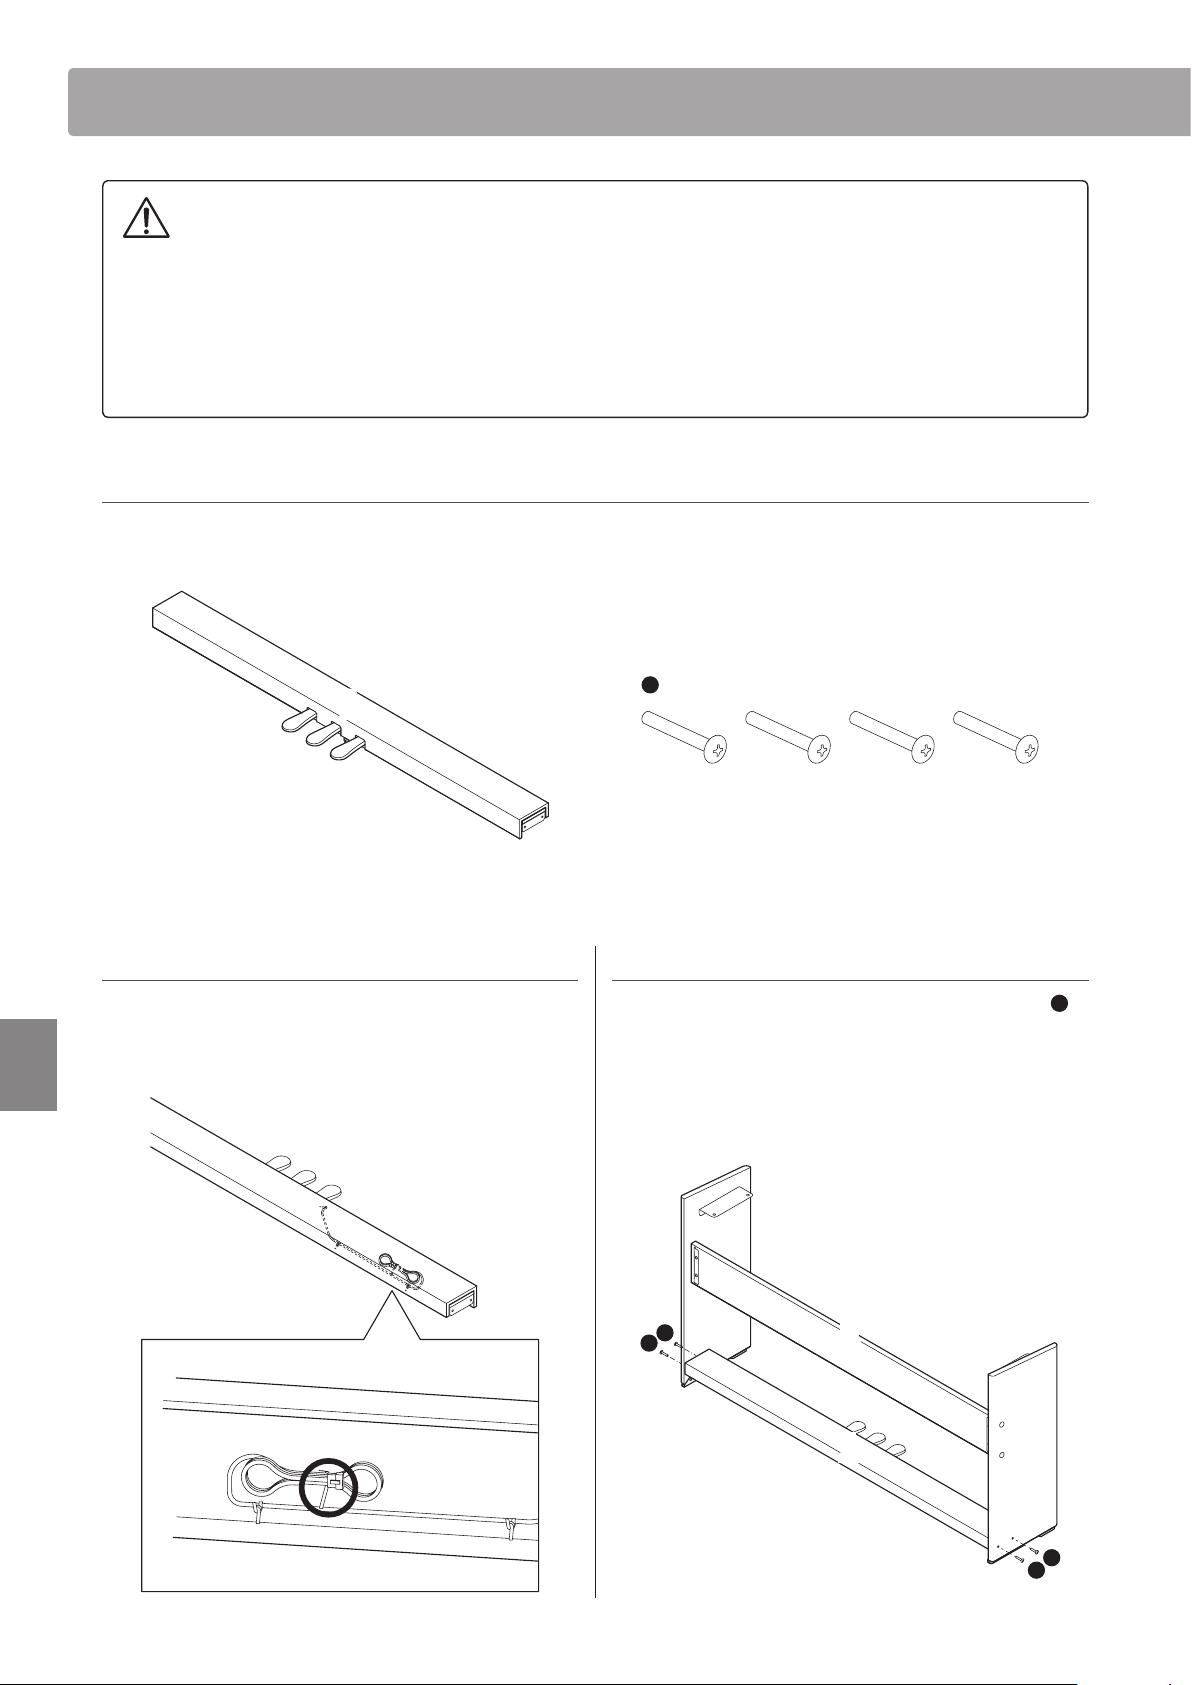
1. Ziehen Sie das Pedalkabel heraus
Lösen Sie das Pedalkabel unter der Pedaleinheit Aund
ziehen Sie es heraus.
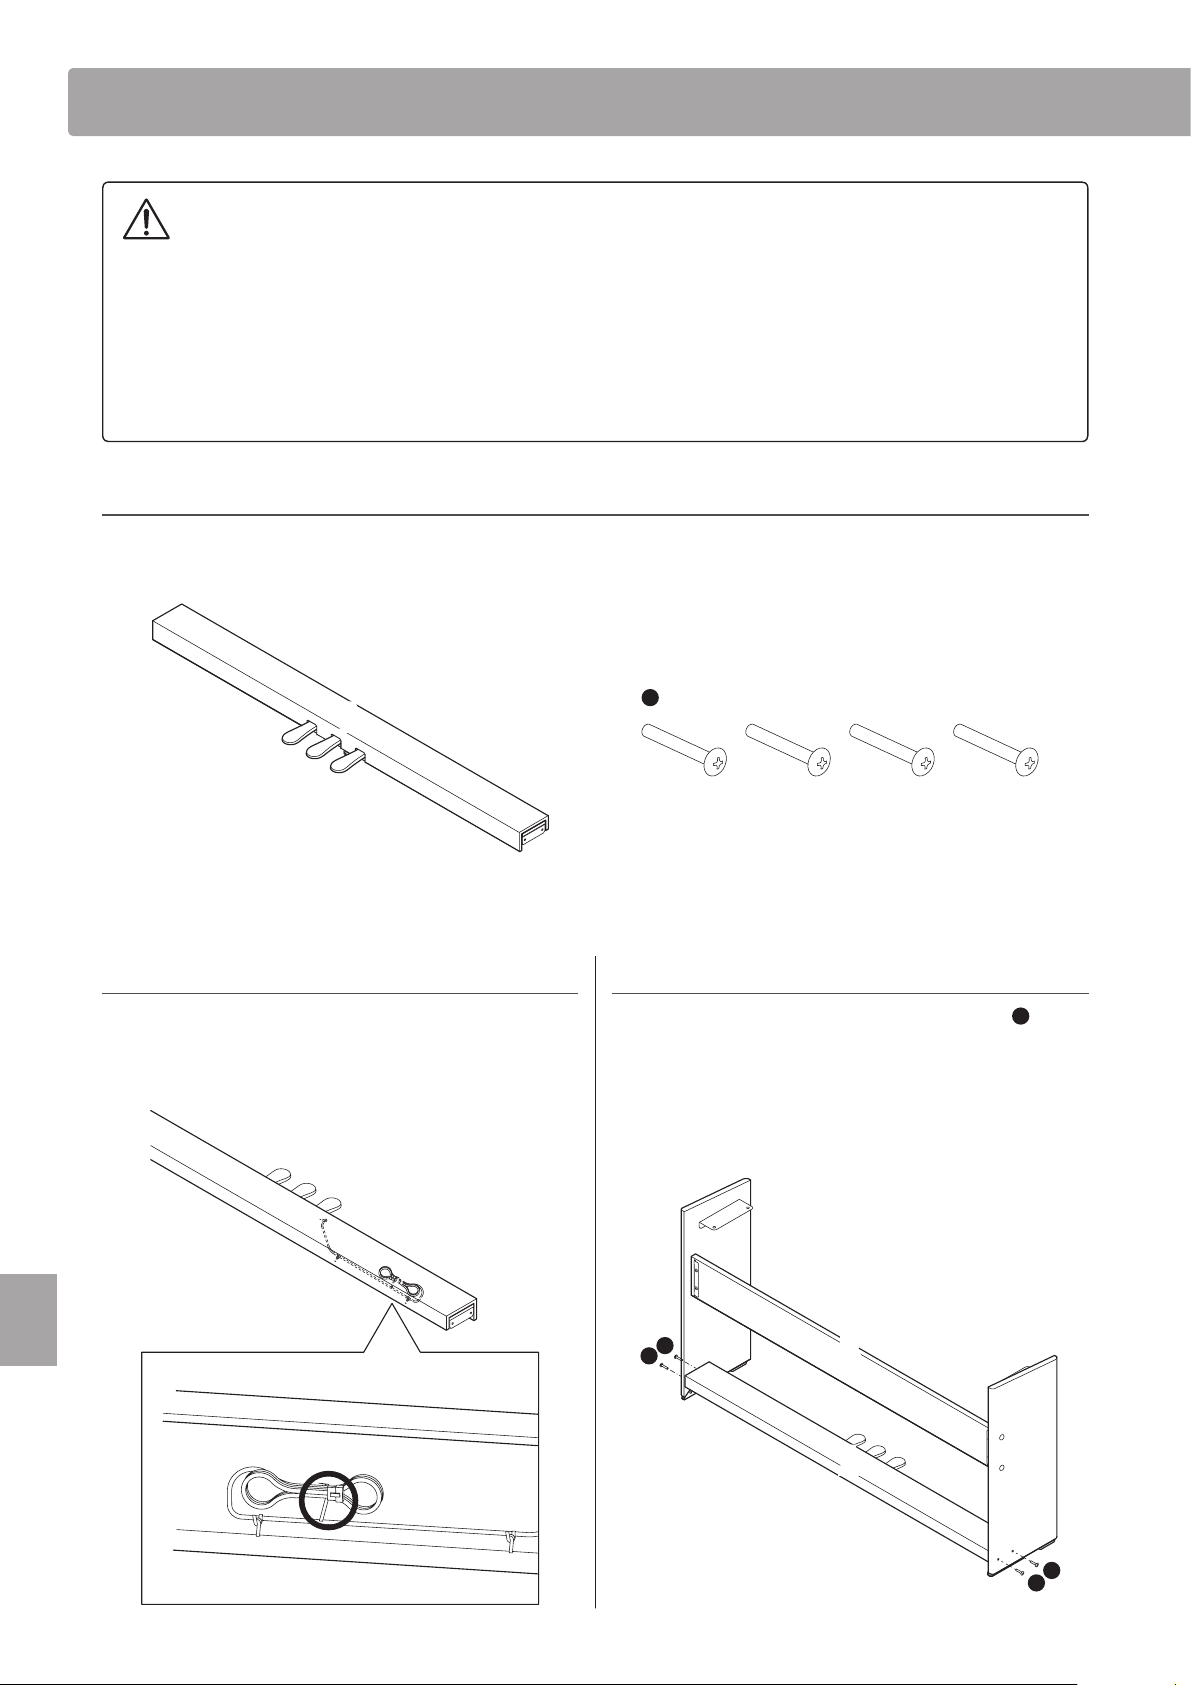
2. Bringen Sie die Pedaleinheit Aan den
Ständern (HML-1) an.
Befestigen Sie die Pedaleinheit Amit den vier Schrauben a
an dem Ständer an.
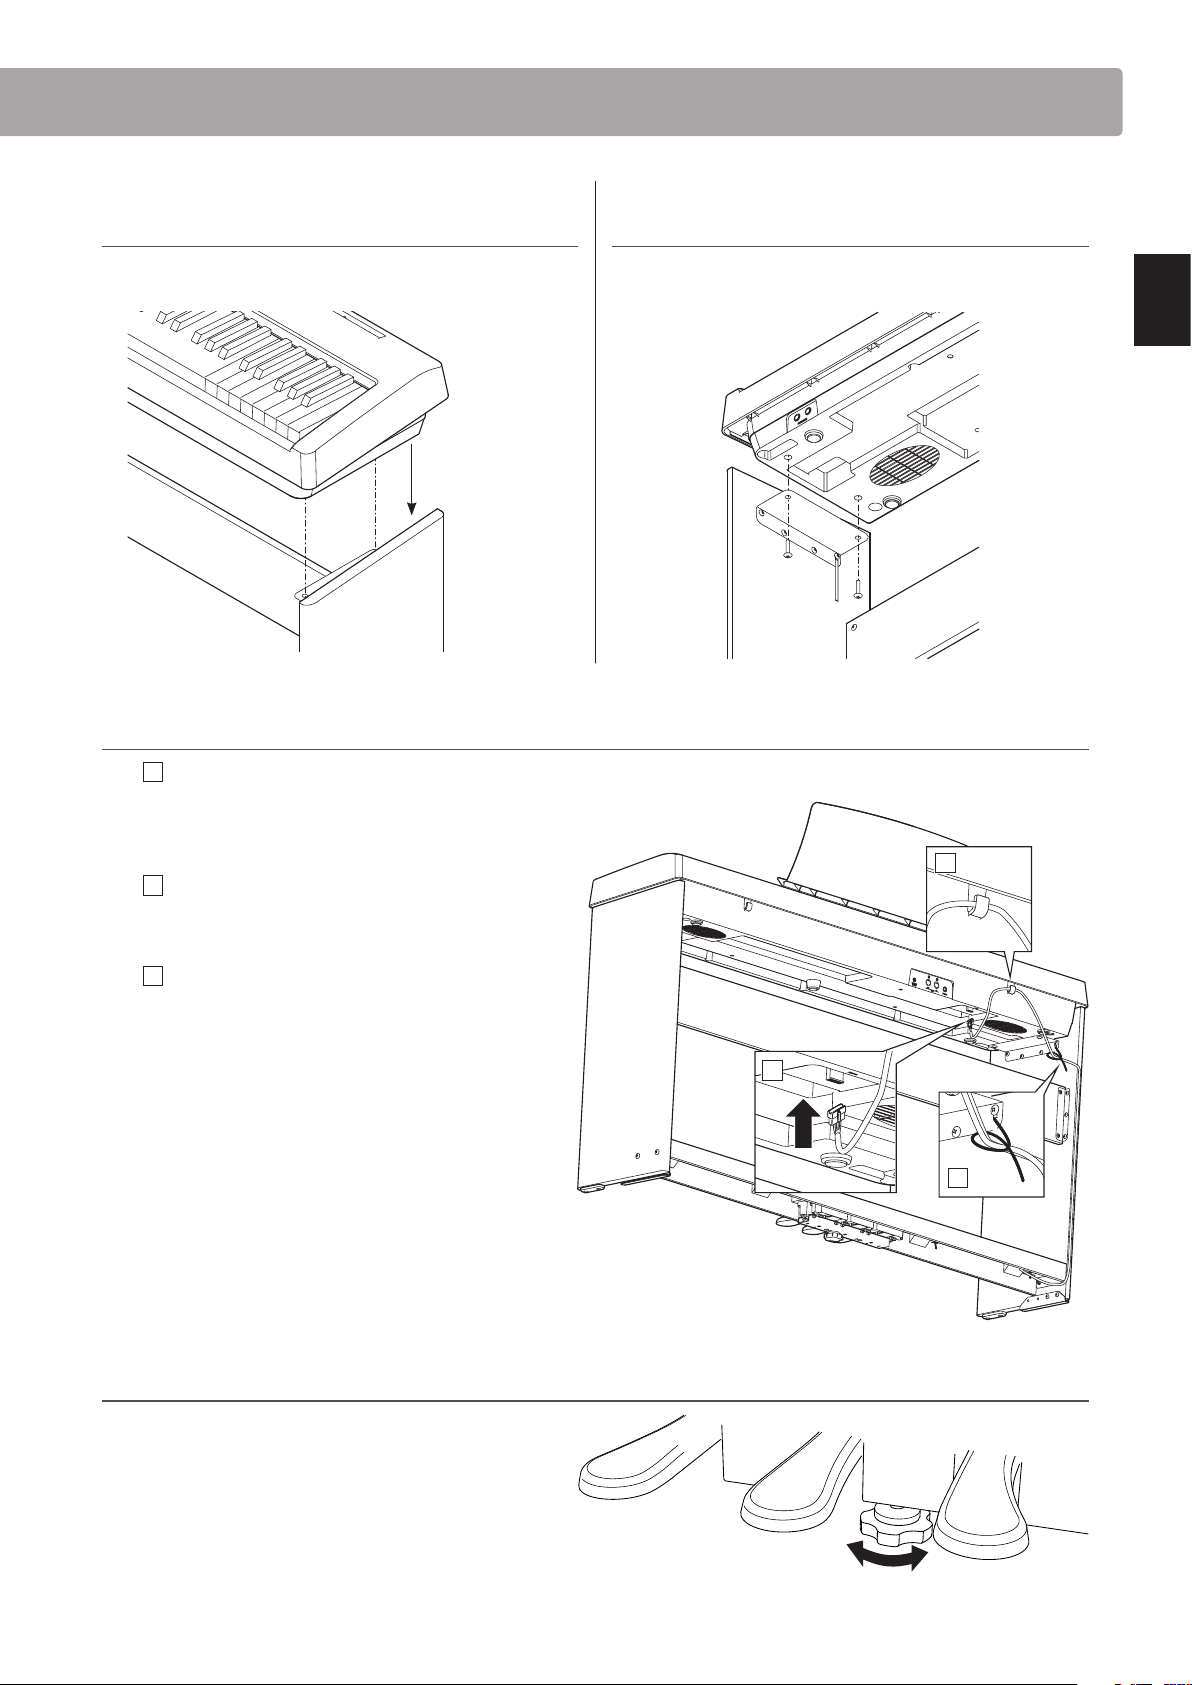
* Wenn es schwierig ist, die Pedaleinheit an dem Ständer
anzubringen, lösen Sie leicht die Schrauben, die die
Rückwand Ban dem Ständer befestigen.
* Falls Aufkleber aufgeklebt wurden, um Löcher in dem
Ständer zu verdecken, entfernen Sie diese.
A
B
aa
aa

5
Deutsch
F-350 Aufbauanleitung
3. Positionierung des ES100/ES110 auf dem
Ständer
Heben Sie das ES100/ES110 vorsichtig auf den aufgebauten
Ständer.
4. Befestigung des ES100/ES110 auf dem
Ständer
Stellen Sie sicher, dass alle vier mit dem HML-1 gelieferten
Schrauben fest angezogen sind.
5. Verbinden des Pedalkabels
5- 1
Verlegen Sie das Pedalkabel hinter der Rückwand
nach oben und stecken Sie es durch die schmale Ö
nung zwischen der Oberkante der Rückwand und der
Unterkante des Spieltisches und verbinden Sie den
Stecker mit der PEDAL Buchse.
5- 2
Führen Sie das Kabel durch den auf der Rückseite der
Haupteinheit vorhandenen Haken.
5- 3
Bringen Sie das Kabel mit der Kabelklemme des HML-1
an.
6. Justieren der Einstellschraube
Drehen Sie die Einstellschraube, bis sie den Bodenbelag
berührt und der Pedaleinheit eine gute Stabilität
verleiht.
2
1
3

6
Français
Instructions d’assemblage du F-350
1. N’utilisez pas le pédalier F-350 à toute autre fin que celle spécifiée pour les pédaliers de piano.
2. À la fin du montage, veillez à ce que toutes les vis soient fermement serrées.
3. Ne traînez pas le produit sur le sol. Faites attention à ne pas laisser tomber le produit.
4. Ne vous tenez pas debout sur le pédalier et n’exercez pas de force excessive.
5. Si des vis se desserrent, resserrez-les immédiatement.
6. Veillez à ce que le boulon régulateur touche le sol, en soutenant le pédalier et évitant ainsi la mobilité et d’éventuels
dommages.
7. Lorsque vous déplacez le piano, montez le boulon régulateur puis réajustez-le une fois le piano en place.
Pièces
Avant de commencer le montage du le ES100/ES110 stand de piano numérique, assurez-vous que toutes les pièces ci-dessous
sont présentes. Prévoyez également un tournevis cruciforme (non inclus) pour le montage de le stand.
Pédalier
(avec boulon de réglage vertical)
aVis (5x25mm) x 4
A
1. Sortez le câble du pédalier
Détachez et tendez le câble de connexion de pédales sous
le pédalier A.
2. Fixez le pédalier Asur les socles (HML-1)
Fixez le pédalier Asur le socle à l’aide des quatre vis a.
* Si le pédalier s’engage dicilement dans le socle,
desserrez légèrement les vis qui xent le panneau arrière
Bdu socle.
* Retirez si l’une des protections de dissimulation d’orice
est restée coincée dans le socle.
A
B
aa
aa

7
Français
Instructions d’assemblage du F-350
3. Montage du piano numérique ES100/
ES110 sur le stand
Posez avec précaution le piano sur le dessus du socle
monté.
4. Fixation du piano numérique ES100/ES110
au stand
Veillez à ce que les quatre vis fournies avec le HML-1 soient
fermement serrées.
5. Connexion du câble du pédalier
5- 1
Passez le câble du pédalier (sort à l’arrière du pédalier)
dans l’ouverture vers l’avant de l’unité principale, et
connectez-le à la borne PEDAL.
5- 2
Passez le câble par le crochet fourni à l’arrière de l’unité
principale.
5- 3
Fixez le câble à l’aide du serre-câble fourni avec le
HML-1.
6. Réglage du boulon de réglage vertical de pédalier
Tournez le boulon de réglage vertical dans le sens
contraire des aiguilles d’une montre jusqu’à ce qu’il
touche le sol et soutienne fermement le pédalier.
2
1
3

8
Español
Instrucciones de montaje del F-350
1. No utilizar de ninguna otra forma excepto la indicada de unidad de pedales del piano.
2. En la etapa final de montaje, asegúrese de que todos los tornillos estén bien apretados.
3. No arrastre el producto por el suelo. Tenga cuidado de no dejar caer el producto.
4. No se ponga encima de la unidad de pedales ni ejerza una presión excesiva sobre esta.
5. Si algún tornillo se afloja, apriételo inmediatamente.
6. Asegúrese que el tornillo de ajuste toque firmemente el suelo, apoyando la unidad de pedales y previniendo
inestabilidad o daño.
7. Al mover el piano, levante el tornillo de ajuste y reajústelo después de moverlo.
Piezas incluidas
Antes de montar el soporte de piano digital ES100/ES110, asegúrese de que todas las piezas mostradas más abajo vienen
incluidas. Un destornillador Phillips (no incluido) también será necesario para montar el soporte.
Pedalera
(incluido ajuste de tornillo)
aTornillo (5x25mm) x 4
A
1. Extraiga el cable del pedal
Desatar y extender el cable de conexión del pedal conectado
a la parte inferior del tablero del pedal A.
2. Fije la pedalera Aa los soportes (HML-1)
Fije la pedalera Aal soporte utilizando cuatro tornillos a.
* Cuando resulte difícil acoplar la pedalera al soporte,
aoje un poco los tornillos que jan la tabla trasera Bdel
soporte.
* Retire cualquier tapón de agujero si se han atascado para
ocultar los agujeros del soporte.
A
B
aa
aa

9
Español
Instrucciones de montaje del F-350
3. Colocación del piano digital ES100/ES110
en el soporte
Coloque con cuidado el piano digital ES100/ES110 en el
soporte ya montado.
4. Conexión del piano digital ES100/ES110 a
la base
Asegúrese de que los cuatro tornillos suministrados con el
HML-1 estén bien apretados.
5. Conexión del cable del pedal
5- 1
Pasar el cable del pedal (que se extiende desde la parte
trasera del tablero de pedales) a través de la abertura en
la parte delantera del cuerpo principal, y conectarlo al
terminal de PEDAL.
5- 2
Pase el cable por el gancho provisto situado en la parte
trasera de la unidad principal.
5- 3
Coloque el cable utilizando la abrazadera de cables
suministrada con el HML-1.
6. Ajuste el perno del soporte del pedal
Girar el perno de soporte del pedal en sentido contrario
a las agujas del reloj, hasta que haga contacto con el
suelo y soportan rmemente los pedales.
2
1
3

10
Italiano
Istruzioni di assemblaggio F-350
1. F-350 deve essere utilizzato unicamente come pedale per pianoforte.
2. Alla fine dell’assemblaggio assicurarsi che tutte le viti siano ben fissate.
3. Non trascinare il supporto sul pavimento. Attenzione a non far cadere il prodotto.
4. Non appoggiarsi sull’unità pedali né applicarvi eccessiva forza.
5. Se qualche vite non è fissata bene, stringerla immediatamente.
6. Assicurarsi che la manopola regolatrice tocchi bene il pavimento , in modo che sostenga l’unità pedali evitando
instabilità o danni.
7. In caso di spostamento dello strumento, alzare la manopola regolatrice e regolarla nuovamente dopo aver
riposizionato il pianoforte.
Parti
Prima di procedere con l’assemblaggio del supporto ES100/ES110 assicurarsi che tutte le parti siano presenti. Per montare il
supporto è necessario anche un avvitatore Phillips.
Pedaliera
(inclusa manopola regolatrice)
aViti (5x25mm) x 4
A
1. Estrarre il cavo del pedale
Sciogliere ed estendere il cavo di connessione dei pedali
ssato all’estremità inferiore della pedaliera A.
2. Attaccare la pedaliera Aal supporto (HML-1)
Fissare la pedaliera Aal supporto con quattro viti a.
* Se risulta dicile montare la pedaliera sul supporto,
allentare leggermente le viti sistemando il pannello
posteriore Bdel supporto.
* Se sono stati attaccati chiudi fori per nascondere dei fori,
rimuoverli.
A
B
aa
aa

F-350 Assembly Instructions
11
Italiano
3. Montare il pianoforte digitale ES100/
ES110 sul supporto
Appoggiare con delicatezza il pianoforte digitale ES100/
ES110 sul supporto assemblato.
4. Fissare il pianoforte digitale ES100/ES110
al supporto
Vericare che tutte e quattro le viti fornite in dotazione con
HML-1 siano ssate saldamente.
5. Collegamento del cavo del pedale
5- 1
Far passare il cavo del pedale (estendendolo dalla parte
posteriore della pedaliera) attraverso l’apertura verso
la parte frontale dell’unità principale e collegarlo al
terminale PEDAL.
5- 2
Far passare il cavo attraverso il gancio apposto sul retro
dell’unità principale.
5- 3
Attaccare il cavo usando il morsetto del cavo fornito in
dotazione con HML-1.
6. Regolare la manopola dei pedali
Ruotare la manopola in senso anti orario, sino a
quando entra in contatto con il pavimento sostenendo
saldamente i pedali.
2
1
3

Copyright © 2016 Kawai Musical Instruments Mfg. Co.,Ltd. All Rights Reserved.
F-350 Assembly Instructions
817877
KPSZ-0660 R101
OW1100EGFSI-S1607
Printed in China
Other manuals for ES100
2
This manual suits for next models
2
Table of contents
Languages:
Other Kawai Music Pedal manuals