KBS Gastrotechnik K 331 User manual

REFRIGERATOR
INSTRUCTION MANUAL
KÜHLSCHRANK
BETRIEBSANLEITUNG
KOELKAST
GEBRUIKSAANWIJZING
GB
DE
NL


1
IMPORTANT USE AND SAFETY INSTRUCTIONS
CAREFULLY READ THE INSTRUCTION MANUAL. If instructi ns are n t
f ll wed, there is a risk f injury, damage f the appliance and l ss f the
right t free warranty service. We recommend to keep the In truction manual the
whole time you have the appliance. When you ell the appliance pa the In truction
manual to the new owner of the appliance.
WARNING!
–Do not cover the ventilation holes at the top and on the sides of the
appliance.
–Do not use any mechanical means or electrical devices to hasten the thawing
process when cleaning the freezer compartment.
–Do not use electrical appliances inside the food storage compartments of the
appliance, unless they are of the type recommended by the manufacturer.
–If the supply cord is damaged it must be replaced by the manufacturer,
manufacturer service agent or a similarly qualified person, in order to avoid a
hazard.
–Disposal of the appliance should be according to national rules.
–Do not damage the appliance refrigeration system. It contains the refrigerant
gas R600a. If the refrigeration system is damaged:
•Do not use any open flame.
•Avoid sparks ―do not turn on any electrical appliances or lighting
fixtures.
•Immediately ventilate the room.
–Do not allow children to play with the appliance or to plug it in or unplug from
the electricity supply socket. Do not allow children to play with the packaging
material from the appliance.
–This appliance can be used by children aged from 8 years and above and
persons with reduced physical, sensory or mental capabilities or lack of
experience and knowledge if they have been given supervision or instruction
concerning use of the appliance in a safe way and understand the hazards
involved.
–Cleaning and user maintenance shall not be made by children without
supervision.
–The appliance should be used only for storing foodstuffs.
G
B

2
–This appliance is not designed for the storage of explosive substances such
as aerosol cans with a flammable propellant.
–It is prohibited to store petrol and other flammable liquids near the appliance.
CONNECTION TO THE MAINS
–The appliance must be plugged into an earthed electricity supply socket. The
earthed electrical socket by which the appliance is connected to the mains
should be in an accessible place.
–IF THE APPLIANCE IS PRODUCED WITH THE SPECIAL SUPPLY CORD
IT CAN BE EXCHANGED ONLY BY THE SAME SPECIAL SUPPLY CORD
PROVIDED BY THE MANUFACTURER.
–TO AVOID HAZARDS, DAMAGED POWER SUPPLY CORDS SHOULD BE
REPLACED ONLY BY THE MANUFACTURER, A MAINTENANCE
TECHNICIAN, OR A PERSON WITH AN EQUIVALENT QUALIFICATION.
–DO NOT USE extension cords or connectors (adapters) or couplers.
–The frequency and power of the electricity supply in your house must
conform to the general data parameters of the appliance as it is shown in the
product label.
–When positioning the appliance, be careful that the electrical cord isn’t
squeezed in order to avoid its damage. Do not store heavy objects such as
cooling devices, furniture or other domestic devices next the appliance in
such a way that they could squeeze and damage the electrical cord. This can
cause a short circuit and a fire.
–Make sure that the plug of the electrical cord is not squeezed by the back
wall of the appliance or otherwise damaged. A damaged plug can be the
cause of a fire!
–ATTENTION! DO NOT REMOVE THE COVER OF THE LIGHT
EMITTING DIODE (LED) LUMINAIRE! If the cooling appliance is
equipped with light emitting diode (LED) luminaire and the lighting is not
functioning, please contact a maintenance technician to have it replaced.
THE LUMINAIRE CAN BE REPLACED ONLY BY A MAINTENANCE
TECHNICIAN!
•IF THE APPLIANCE IS UNPLUGGED (FOR CLEANING, MOVING TO ANOTHER PLACE,
ETC.), IT MAY BE REPEATEDLY SWITCHED ON AFTER 15 MIN.
•It i forbidden to u e a technically damaged appliance.
•Do not place any witched on electrical device ( uch a microwave oven , hair
dryer , iron , electric kettle or other electrical device ) on top of the appliance
becau e thi may cau e ignition of pla tic part .

3
•Do not place any di he with liquid on top of the appliance and do not keep flower
in va e or other liquid-filled ve el on the appliance.
•Do not climb on or it on the appliance, do not lean on or hang on the appliance door and
do not allow children to do thi .
IF THE APPLIANCE IS OUT OF ORDER AND IT IS NOT POSSIBLE TO REPAIR IT BY
MEANS OF GIVEN RECOMMENDATIONS, UNPLUG IT, OPEN THE DOORS AND CALL
THE SERVICE EXPERT. ONLY A SERVICE REPRESENTATIVE CAN REMEDY ALL
TECHNICAL OR CONSTRUCTION FAULTS
.
ENVIRONMENTAL PROTECTION INFORMATION
Thi ymbol indicate that once the appliance i no longer needed, it cannot be
di po ed together with other mi cellaneou municipal wa te. It hould be collected and
eliminated eparately, i.e. in container pecially marked with thi ymbol in large-
dimen ion rubbi h collection area . Full information on where to ubmit the old
appliance afety can be obtained from local government authoritie , the hop where
you bought the appliance or the manufacturer’ repre entative .
•The appliance can’t be di po ed of by burning!
If you decided to crap the appliance, make it impo ible to u e in order to prevent po ible
mi adventure. Pull out the electric plug from the electricity upply ocket and then cut off the cord.
Tear off the ga ket. Break the door lock if any.
WARNING! D n t dismantle the appliance y urself. Pass it n t recycling
c mpanies.
GENERAL INFORMATION
The appliance i a refrigerator made a a cabinet and de igned for a hort-term torage of chilled
product .
THE APPLIANCE IS ECOLOGICALLY CLEAN, CONTAINING NO MATERIALS HARMFUL TO THE
OZONE LAYER: the refrigerant u ed i R600a, the foaming agent u ed for the appliance in ulation
i cyclopentane C
5
H
10
.
THE MANUFACTURER GUARANTEES RELIABLE OPERATION OF THE REFRIGERATOR WHEN THE
RELATIVE AIR HUMIDITY NOT GREATER THAN 70 PER CENT AND THE AMBIENT TEMPERATURE
IS: +16 TO +32 DEGREES CELSIUS (Climate cla N);
+16 TO +43 DEGREES CELSIUS (Climate cla T).
Appliance Refrigerat r
Total gro volume, L 270
Net volume, L 267
Actual c nsumpti n will depend n h w the appliance is used and where it is l cated
Energy efficiency cla A+ A++
Energy con umption: kWh/24h
kWh/year
0,363
133
0,285
104
Climate cla N - T
Noi e level, dB(A) re 1pw 41
Overall dimen ion , cm 145 x 60 x 62 145 x 60 x 65
Electrical Data ee in the product label
NOTE. The manufacturer re erve the right to make future change to technical parameter and
pecification .

4
DESCRIPTION OF THE APPLIANCE, BASIC PARTS (see fig.)
PREPARING THE APPLIANCE FOR OPERATION
It i recommended to prepare the appliance for operation with a helper !
•Remove package.
•Remove the eparate poly tyrene part (tran port protection) between the rear of the device and
conden er – metal grid (if available).
•Lift the appliance away from foamed poly tyrene ba e. Tear off adhe ive tape .
•When po itioning the appliance in cho en location, it will move more ea ily into po ition if you lift
the front a little and incline it backward, allowing it to roll on it ca ter .
Y ur appliance is fit with screwed handles t n t rise r push it taking by
handles. Handles may break.
•Remove all red-coloured part ( ee fig. 2) from the helve .
Tear away the red-coloured adhe ive tape – they are intended
only for the tran port of the appliance.
Take two upport 1 from
the bag ( ee fig.) and in ert them into the guide 2 at the top back
part of the appliance.
•Suitably di po e the packaging material.
•If the appliance i brought in from the cold (temperature i not higher than +12 °C), you hould
wait for two hour before connecting it to the main .
The appliance hould not be connected to the main until all packing and tran port material
aren’t removed.
1 Thermo tat - temperature regulator 5 Conden er
2 On / off switch for interior light 6 Thaw water drip tray
3 Adju table height helve 7 Compre or
4 Shelf

5
POSITIONING
•Place the appliance in a dry, well ventilated room.
WARNING! The appliance should not be operated in an unheated
room or porch. Place the appliance away from heat sources such as
kitchen stove/oven, radiators, or direct sunlight.
WARNING! The appliance must not touch any pipes for
heating, gas or water supply, or any other electrical
devices.
Do not cover the ventilation hole at the top of the appliance – it mu t be
a good air circulation around the appliance. There hould be a gap of at
lea t 10 cm between the top of the appliance body and any furniture that
may be above it. If thi requirement i not
followed, the appliance con ume more
electrical energy and it compre or may
overheat.
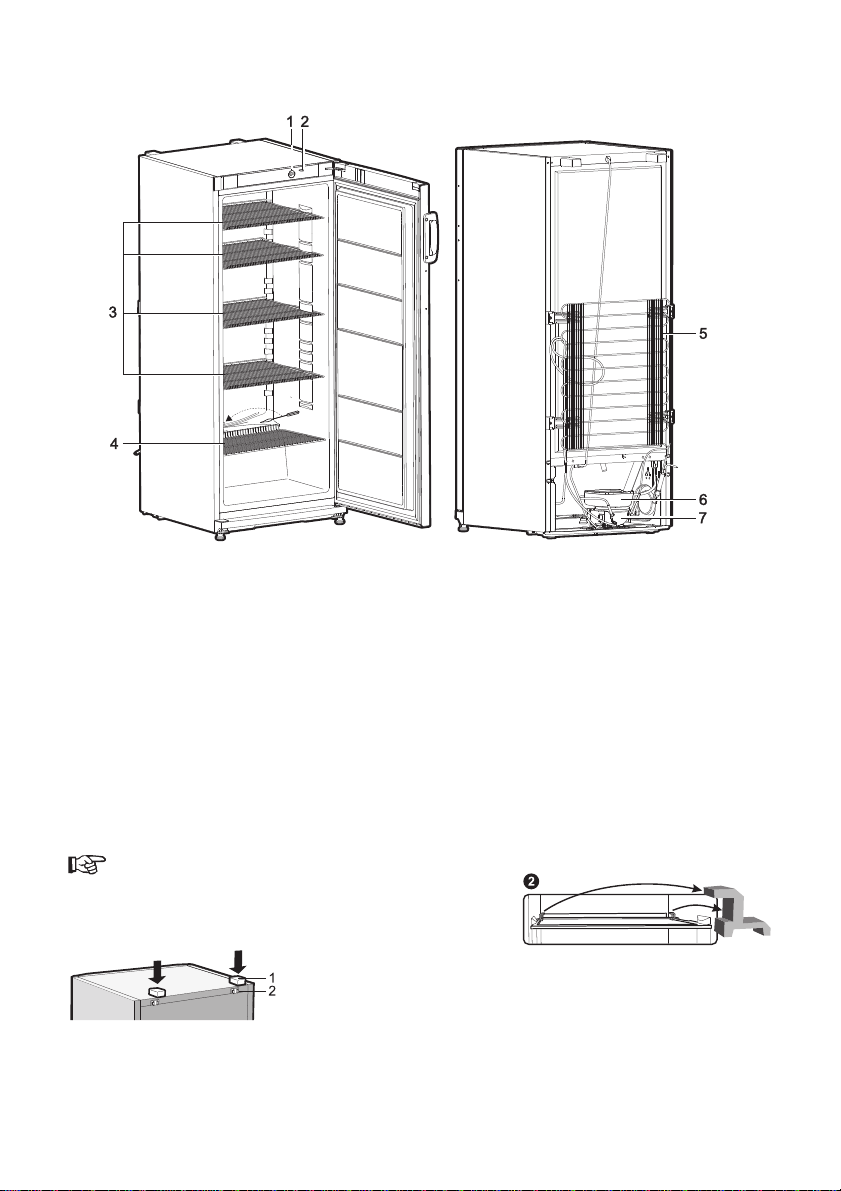
•If the appliance i placed in a corner, a gap
of at lea t 60 mm mu t be left between the
appliance body and the wall ( ee fig.)
•The appliance mu t tand on a level
urface and mu t not touch the wall. If
nece ary, regulate the height of the
appliance by adju ting the levelling feet: by
turning them clockwi e – the front of the
appliance ri e , by turning them counter
clockwi e – it come down. If the appliance i tilted lightly
backward – the door will clo e by them elve .
TEMPERATURE REGULATION
The temperature in the refrigerator compartment i controlled u ing the thermo tat knob 1 (fig. 1)
by turning it to one ide or the other. The temperature indication in digit i hown be ide the
thermo tat knob. The temperature i regulated on the cale:
0 = Compre or i witched off. WARNING! Electric current is n t switched ff.
1 = highe t temperature (lowe t cooling)
7 = lowe t temperature (highe t cooling)
If food product in the refrigerator compartment are too cold, et the thermo tat knob to 1, 2 or
3. If food product in the refrigerator compartment are not being chilled ufficiently, et the
thermo tat knob to 4 or 5 - 7.
Plea e et the de ired temperature in the appliance according to your own requirement !
THE TEMPERATURE IN THE REFRIGERATOR COMPARTMENT MAY VARY DEPENDING ON
AMBIENT TEMPERATURE, THE AMOUNT OF FOODSTUFFS, THE TEMPERATURE OF THE
FOODSTUFFS, AND HOW OFTEN THE APPLIANCE DOOR IS OPENED AND CLOSED.
Therefore we recommend:
•locate the appliance away from heat ource ,
•food placed in the appliance hould not be warmer than the room temperature,
•appliance door mu t not to be left open,
•the appliance door hould not be open longer than it i nece ary to take out or put in food tuff .
IF THE ROOM IS COOL, THE APPLIANCE COOLS LESS. THE TEMPERATURE IN THE APPLIANCE
MAY THEREFORE RISE. U e the thermo tat wheel to et a lower temperature.

6
STORAGE OF FOODSTUFFS IN THE REFRIGERATOR COMPARTMENT
The refrigerator compartment i intended for the hort-term torage of fre h food tuff .
•Do not put hot food tuff in the refrigerator compartment – they mu t be cooled down to room
temperature.
•Strictly ob erve the food tuff validity time indicated by the manufacturer on the product
packaging.
•If on one of the helve you have placed a lot of liquid filled di he , a moi ture may conden e
and form drop , which may drip onto the helf below. To avoid thi , move ome liquid filled
object to the other helve .
DEFROS TING OF THE REFRIGERATOR COMPARTMENT
The refrigerator compartment defro t automatically. Drop of ice that form on the back wall of the
refrigeration compartment thaw during the time the compre or i not working and the thaw water run
down the thaw water runoff channel to the tray on top of the compre or, where it evaporate .
CLEANING AND CARE
REGULARLY CLEAN THE APPLIANCE.
Remember that bef re cleaning the appliance b dy y u must disc nnect the
appliance fr m the electrical energy supply s cket by pulling the plug ut f the
electricity utlet.
•Clean the appliance inner urface with warm oapy water. Di hwa hing detergent may al o be
u ed. Wipe dry inner and outer urface .
•Regularly clean the hermetic ga ket of the door . Wipe dry.
REGULARLY CLEAN THE THAW WATER CHANNEL SPACE WITH A SPECIAL
CLEANER FOR THAT PURPOSE.
•At lea t once a year clean du t away from the back
part of the appliance body and the compre or. A
oft bru h, electro tatic cloth or vacuum cleaner may
be u ed for cleaning.
•DO NOT u e detergent containing abra ive
particle , acid, alcohol or benzene for cleaning the
appliance inner and outer urface .
•DO NOT u e for cleaning cloth or ponge that have coar e urface
intended for crubbing.
PRACTICAL TIPS AND OBSERVATIONS
•Do not keep banana in the refrigerator – the e fruit are en itive to cold.
•Do not keep prepared food and ready-to-cook (“heat and eat”) food in the ame container.
•Store in an airtight container in the appliance any food tuff that have a trong odour (e.g. fre h
fi h, pâté de foie gra goo e liver pâté, and chee e).
•IF THE APPLI A NCE IS TO BE LEFT SWIT CHED OFF F OR AN EX TENDE D
PER I OD, LEA V E I TS DO O R S OP E N.
Remarks n the app lian ce perating n ise. A the appliance operate and
goe through the freezing cycle, variou noi e will be emitted. Thi i normal and i not a
ign of any malfunction.
•A the refrigerant circulate around the refrigeration y tem, it cau e ound like murmuring,
bubbling, or ru tling.
•Louder ound like popping or clicking may be heard for a hort time a the refrigerator’
compre or witche on.

7
CHANGING THE OPENING DIRECTION OF THE DOORS
It i recommended that changing the opening direction of the door hould be done with a helper.
You will need two panner No. 8 and No. 10 and a Philip head crewdriver.
When changing the opening direction of the door , YOU CAN NOT lay the refrigerator horizontally!
Do the action below in the order they are li ted.
WARNING! Turn ff the appliance and pull the plug ut f the electricity supply s cket.
1. Remove the cover c from the body of the refrigerator and of the inner ide of the door. Al o
remove the upper bracket 6 together with the nut and wa her and the pacer under the
bracket.
2. Remove the door of the refrigerator compartment.
3. Remove the bottom cover 1.
4. Un crew the axle 2 from the bottom bracket 7 and put it together with all wa her on the
other cabinet ide by crewing to the bracket 7 on the oppo ite ide ymmetrically to former
po ition.
5. Hang the door on the axle 2 of bracket 7.
6. Turn bracket 4 around 180° together with the wa her on the axle and the pla tic pacer,
tran ferring the wa her to the axle on the other ide of the bracket. Once the bracket i
attached to the freezer compartment door, fix it in place on the other ide of the refrigerator.
7. Turn the bracket 6 around 180° together with the wa her on the axle and the pla tic pacer.
Remove the axle and the wa her and reattach them on the other ide of the bracket. Once
the bracket 6 i attached to the refrigerator compartment door, fix it in place on the other ide
of the refrigerator in the uppermo t aperture . U e the cover c to cover the bracket and the
remaining pace.
8. Remove the bolt cover a and the topper b. Remove the crew that hold the handle in
place. Move the handle to the other ide and crew them in place. Place the topper into the
remaining aperture in the door, and put the crew cap in place.
9. Remove the cover 10 from the bottom cover 1 and in ert it to the guide on the other ide of
the bottom cover ( ymmetrically to former po ition). In ert left and right leg of the bottom
cover 1 ( ee pic.) and pu h it until cover fixing.

8
OPERATION PROBLEMS AND THEIR SOLUTIONS (TROUBLESHOOTING)
What if …
•The appliance is plugged in t the mains but it d es n t w rk. Check that your hou e
electricity upply in tallation are in order. Check that the plug i correctly in erted into the
electricity upply ocket.
•The n ise has bec me l uder. Check that the appliance i tanding table, on a level place.
To make it level, regulate the front feet. Check if the appliance i not touching any furniture, and
that no part of the refrigeration y tem at the back part of the appliance body i touching the
wall. Pull the appliance away from any furniture or wall . Check that the cau e of increa ed
noi e i n’t due to bottle , can or di he in the appliance that might be touching each other.
•Water has appeared at the b tt m f the refrigerat r c mpartment. Check whether a
thaw water channel pace i n’t blocked. Clean the thaw water channel pace with a cleaner
intended for that purpo e.
•Water has appeared under the appliance. The thaw water collection tray ha lipped off the
compre or. Place the tray on top of the compre or.
•When the appliance d r is pened, the rubber sealing gasket pulls ut. The ga ket i
meared with ticky food tuff (fat, yrup). Clean the ealing ga ket and the groove for it with
warm water containing oap or di hwa hing detergent and wipe dry. Put the rubber ealing
ga ket back into the place.
•High temperature in appliance, the c mpress r perati n pauses are sh rt. A certain
whether the appliance door i hutting tightly, whether the door wa n’t kept open longer than
nece ary when taking out or putting in food tuff , or whether a large amount of warm food wa
placed in the appliance.
•The t p f the appliance has c ndensati n n it. The ambient relative air humidity i above 70
%. Ventilate the room where the appliance tand , and if po ible remove the cau e of the humidity.
TRANSPORT
THE MANUFACTURER WILL NOT BE RESPONSIBLE FOR ANY DAMAGE TO THE APPLIANCE
THAT RESULTS FROM NON-COMPLIANCE WITH THE INSTRUCTIONS FOR
TRANSPORTATION.
•The appliance hould be tran ported in the vertical po ition.
•When being tran ported, the appliance hould be protected from atmo pheric condition (rain,
now, dampne ).
•The appliance hould be firmly ecured in place while being tran ported, to avoid lippage or any
hock in the tran port vehicle.
•If the appliance wa tran ported not vertically, it may be connected to the main after 4 hour at
lea t. If thi i not done, the appliance compre or may fail.
WARRANTY SERVICE
IF YOUR APPLIANCE IS NOT WORKING
PROPERLY, ASCERTAIN WHETHER YOU CAN
REMEDY THE CAUSE OF THE FAULTY
FUNCTIONING OF THE APPLIANCE
YOURSELF. If you cannot olve the problem
your elf, contact the neare t refrigerator
ervice repre entative by telephone or in
writing. When making contact, nece arily
indicate the refrigerator model 1 and number
2. You will find thi data on the product
label, which i glued to the left wall of the
refrigerator compartment.

9
WICHTIGE GEBRAUCHS UND SICHERHEITSHINWEISE
LESEN SIE BITTE DIE GEBRAUCHSANWEISUNG SORGFÄLTIG DURCH ! Bei
Nichtbeachtung der in der Gebrauchsanweisung genannten Anweisungen
besteht die Gefahr der Beschädigung des Geräts und des damit verbundenen
Verlusts des Rechts auf Garantieleistungen. Wir empfehlen ihnen, die
Gebrauch anwei ung bi zum Ende der Betrieb zeit aufzubewahren und ie im Falle
eine Verkauf de Gerät an den neuen Eigentümer weiterzugeben
.
ACHTUNG!
−Halten Sie die Lüftungsöffnungen im Gerategehäuse oder in möglichen
Seitenwändenvon umgebenden Einbauwänden frei von Hindemissen.
−Benutzen Sie keine mechanichen Gegenstände order andere Mittel, um den
Abtauprozess zu beschleunigen, ausser den vom Hersteller empfohlenen.
−Das Kühlsystem des Geräts nicht beschädigen. Verwendetes Kühlmittel
R 600a. Falls das Kühlsystem beschädigt ist:
•Kein offenes Feuer verwenden.
•Funkenschlag vermeiden, keine elektrischen sowie
Beleuchtungsgeräte einschalten.
•Den Raum sofort durchlüften.
−Kinder nicht mit dem Kühlschrank spielen oder ihn ans Netz anschließen
oder den Stecker ziehen lassen. Kinder nicht mit der Verpackung spielen
lassen.
−Das Gerät kann von Kindern ab 8 Jahren sowie von Personen mit reduzierter
physischen, sensorischen oder mentalen Fähigkeiten oder Mangel an Erfahrung
und/oder Wissen benutzt werden, wenn siebeaufsichtigt oder bezüglich des
sicheren Gebrauchs des Gerätes unterwiesen wurden und die daraus
resultierenden Gefahren verstanden haben.
−Reinigung und Benutzer-Wartung dürfen nicht durch Kinder ohne
Beaufsichtigung durchgeführt werden.
−Das Kühlgerät nur zur Kühlung und Aufbewahrung von Esswaren
verwenden.
−In diesem Gerät keine explosionsfähigen Stoffe, wie zum Beispiel
Aerosolbehälter mit brennbarem Treibgas, lagern.
DE

10
NETZANSCHLUSS
−Das Kühlgerät unbedingt an eine geerdete Steckdose anschließen. Die
geerdete Steckdose für den Netzanschluss des Geräts sollte sich an gut
zugänglicher Stelle befinden.
−VOR DEM AUFSTELLEN EIN DEFEKTES KABEL UNBEDINGT DURCH
EIN NEUES VOM SELBEN TYP WIE DAS VOM HERSTELLER DES
KÜHLGERÄTS VERWENDETE ERSETZEN, UM SCHADEN AN
GESUNDHEIT UND EIGENTUM ZU VERMEIDEN.
−UM JEGLICHES RISIKO AUSZUSCHLIESSEN, DARF EIN SCHADHAFTES
NETZKABEL NUR VOM HERSTELLER, DESSEN WARTUNGSMEISTER
ODER EINER ENTSPRECHEND AUSGEBILDETEN PERSON
AUSGEWECHSELT WERDEN.
−Das Verwenden von Verlängerungskabeln, Adaptern oder
Mehrfachsteckdosen ist NICHT ZULÄSSIG.
−Netzspannung und -frequenz müssen mit den in Angaben in der Tabelle über
die allgemeinen Eigenschaften des Kühlschranks übereinstimmen.
−Beachten Sie bitte beim Aufstellen des Kühlgeräts, dass dieser das
Netzkabel nicht beschädigt. Nichts Schweres wie Kühlgeräte, Möbel oder
andere Haushaltgeräte auf das Stromkabel stellen, um dieses nicht zu
beschädigen. Andernfalls könnte dies zu einem Kurzschluss und zu einem
Brand führen.
−Achten Sie darauf, dass die Rückwand des Kühlgeräts den Netzstecker nicht
berührt oder letzterer in irgendeiner Weise beschädigt ist. Ein defekter
Netzstecker kann zu einem Brand führen!
−ZUR BEACHTUNG! DIE LED-HAUBE DARF NICHT ENTFERNT WERDEN!
Wenn Ihr Kühlgerät über eine eingebaute Innenbeleuchtung mit
Leuchtdioden (LED) verfügt und diese nicht funktioniert, wenden Sie sich
bitte an den Wartungsservice, um sie auswechseln zu lassen. DIE
BELEUCHTUNG DARF NUR VON FACHLEUTEN DES
WARTUNGSSERVICE AUSGWECHSELT WERDEN!
•
NACH DEM AUSSCHALTEN DES GERÄTS (ZUR REINIGUNG, ZUM AUFSTELLEN AN
EINEM ANDEREN PLATZ USW.) DIESES ERST NACH MINDESTENS 15 MINUTEN
WIEDER ANS NETZ ANSCHLIEßEN.
•Die Benutzung eine techni ch nicht einwandfreien Gerät i t zu unterla en.
•Vor der Reinigung da Gerät au chalten und den Netz tecker au der Steckdo e ziehen.
•Schützen Sie die Innenwände und alle Kun t toffteile de Kühlgerät vor Kontakt mit Fett,
Säuren und Soßen.
•Bitte keine elektri chen Geräte wie Mikrowellengeräte, Haartrockner, Bügelei en, Wa erkocher
und ähnliche auf den Kühl chrank tellen: Kun t toffteile könnten ich entzünden.

11
NUR DER SERVICE-FACHMANN IST IMSTANDE, TECHNISCHE MÄNGEL ZU
BEHEBEN
.
UMWELTHINWEISE
Die e Symbol bedeutet, da der Kühl chrank nach Ablauf der Betrieb zeit
nicht über den normalen Hau halt abfall ent orgt werden darf, ondern
getrennt, in peziellen, mit die em Zeichen ver ehenen Containern, über eine
pezielle Sammel telle ent orgt werden mu .
•Da Gerät darf nicht verbrannt werden!
Genauere Informationen, wo alte Kühl chränke zur Ent orgung abgegeben werden
können, erhalten ie von den örtlichen Behörden, dem Ge chäft, in dem Sie den
Kühl chrank gekauft haben, oder vom Her teller.
Vor der Ent orgung de Gerät machen Sie die e bitte unbrauchbar, damit mögliche
Unfälle verhindert werden können. Ziehen Sie den Netz tecker au der Steckdo e,
zer chneiden ie da Kabel. Reißen Sie dann den Dichtung gummi vom Kühlgerät. Fall
vorhanden, machen Sie da Tür chlo unbrauchbar.
ACHTUNG! Zerlegen Sie das Kühlgerät auf keinen Fall selbst. Bringen Sie es
zu einem Abfallents rgungsunternehmen
.
ALLGEMEINE DATEN
Bei Ihrem Kühlgerät handelt e ich um einen Kühl chrank. Im der Kühlfach werden Fri chprodukte
aufbewahrt.
DER KÜHLSCHRANK IST UMWELTFREUNDLICH, ER BEINHALTET KEINE DIE OZONSCHICHT
SCHÄDIGENDEN MATERIALIEN: al Kühlmittel wird R 600a verwendet, die I olierung Ihre Gerät
be teht au Zyklopentan C
5
H
10
.
DER HERSTELLER GARANTIERT EINE ZUVERLÄSSIGE FUNKTION DES KÜHLSCHRANKS EINER
VERHÄLTNISMÄSSIGEN LUFTFEUCHTIGKEIT VON BIS ZU 70 PROZENT UND BEI EINER
UMGEBUNGSTEMPERATUR:
VON +16 BIS +32 GRAD CELSIUS. Der Kühl chrank gehört der Klimakla e N an.
VON +16 BIS +43 GRAD CELSIUS. Der Kühl chrank gehört der Klimakla e T an.
Kühlgerät Kühlschrank
Ge amtbruttovolumen, L 270
Nutzinhalt Gefrierteil, L 267
Der tat ächliche Verbrauch hängt von der Nutzung und vom Standort de Geräte ab
Energieeffizien kla e A+ A++
Energieverbrauch: kWh/24 h
kWh/Jahr
0,363
133
0,285
104
Klimakla e N - T
Geräu chemi ion dB(A) 1 pW 41
Abme ungen, cm 145 x 60 x 62 145 x 60 x 65
Elektri che Daten iehe Typen child
ANMERKUNG. Der Her teller behält ich da Recht vor, die in der Gebrauch anwei ung genannten
techni chen Eigen chaften de Gerät owie de en Au tattung zu ändern.

12
BESCHREIBUNG DES GERÄTS, HAUPTBESTANDTEILE
VORBEREITUNG DES GERÄTS
Wir empfehlen, für die Vorbereitung arbeiten eine weitere Per on heranzuziehen.
•Die Verpackung entfernen. ACHTUNG Entnehmen Sie da eparate Styroporteil (Tran port chutz)
zwi chen Geräterückwand und Konden ator -Metallgitter (fall vorhanden).
•Den Kühl chrank von der Schaum toffunterlage nehmen. Klebebänder entfernen.
•Neigen Sie beim Auf tellen den Vorderteil de Kühl chrank ein wenig nach hinten, dann können
Sie ihn auf den Rädchen leicht an den gewün chten Platz rollen.
Ist Ihr Kühlschrank mit angeschraubten Handgriffen ausgestattet, s beim
Anheben und Verschieben des Kühlschranks bitte nicht auf Handgriffe zu
nehmen, um ihren Abbruch zu vermeiden.
•Entfernen Sie alle roten Teile von den Ablageflächen (Abb.
2). Entfernen Sie die roten Klebebänder von den
Türablagen, die e ind nur für den Tran port erforderlich.
ANME RKUNG . Beim Öffnen der Gefrier chranktür fällt ein
rote Kleinteil herau – DIESES WIRD NUR FÜR DEN TRANSPORT BENÖTIGT.
•Nehmen Sie die zwei Streben 1 und etzen Sie die e in die
Führungen 2 im oberen Teil der Rückwand ein.
•Ent orgen Sie die Verpackungen fachgerecht.
•Fall der Kühl chrank ich in kühler Umgebung befunden hat
(Außentemperatur weniger al +12
o
C), die en er t nach Ablauf von zwei Stunden an
Netz an chließen.
•Da Gerät nicht an Netz an chließen ohne vorher alle Verpackung - und Tran portelemente
entfernt zu haben.
1 Temperaturregler 5 Konden ator
2 Ein-/Au chaltknopf für die Innenbeleuchtung 6 Tauwa erverdun tung gefäß
3 - 4
Ablageflächen 7 Kompre or

13
AUFSTELLUNG
•Stellen Sie den Kühl chrank in einem trockenen, gut gelüfteten Raum auf.
ACHTUNG! Der Kühlschrank darf nicht in ungeheizten Räumen oder
auf dem Balkon betrieben werden. Das Gerät nicht in unmittelbarer Nähe
einer Heizquelle (Kochherd, Heizkörper, direkte Sonneneinstrahlung)
aufstellen.
ACHTUNG! Der Kühlgerät darf nicht in Kontakt mit
Heizungs- Gas- und Abwasserrohre geraten sowie
elektrische Geräte nicht berühren.
Die Lüftung öffnung an der Ober eite de Kühl chrank darf nicht abgedeckt
werden, eine ungehinderte Lufzirkulation mu gewährlei tet ein. Der
Zwi chenraum zwi chen der Ober eite de Kühl chrank und einem darüber
befindlichen Möbel ollte minde ten 10 cm betragen.
Andernfall teigt der Stromverbrauch de Kühl chrank
an oder der Kompre or kann ich überhitzen.
•Fall der Kühl chrank in einer Ecke aufge tellt werden
oll, bela en Sie einen eitlichen Ab tand von
minde ten 6 mm
•Der Kühl chrank i t unbedingt auf einer ebenen
Oberfläche aufzu tellen, er darf nicht an die Wand
angelehnt werden. Regulieren Sie, fall nötig, die
Höhe durch Drehen der Stützfüße: durch Drehen im
Uhrzeiger inn hebt ich der Vorderteil de Gerät , durch Drehen im
Gegenuhrzeiger inn enkt er ich. Wenn der Kühl chrank ganz leicht nach
hinten geneigt teht, gehen die Türen von elb t zu.
TEMPERATURREGULIERUNG
Die Temperatur im Kühl chrank wird durch Drehen de Temperaturdrehregler einge tellt 1
(Abb. 1.). Die Zahlen auf dem Temperaturdrehregler zeigen die Temperatur an.
Die Temperatur kann auf einer iebenteiligen Skala reguliert werden:
0 = der Kompre or wird abge chaltet. ACHTUNG! Das Gerät ist n ch am Str mnetz
angeschl ssen.
1 = höch te Temperatur (gering te Kühlung)
7 = niedrig te Temperatur ( tärk te Kühlung)
Fall die Produkte im Kühlfach zu kalt ein ollten, o tellen Sie bitte den Temperaturdrehregler
auf Stufe 1, 2 oder 3 ein. Werden die Produkte im Kühlfach nicht genügend gekühlt, tellen Sie
bitte den Temperaturdrehregler auf Stufe 4, 5 oder 6 ein.
Bitte tellen Sie die Temperatur im Kühl chrank ganz nach Ihren Wün chen ein!
DIE TEMPERATUR IM KÜHLFACH KANN ABHÄNGIG VON UMGEBUNGSTEMPERATUR,
MENGE UND TEMPERATUR DER NAHRUNGSMITTEL, HÄUFIGKEIT DER TÜRÖFFNUNG
SCHWANKEN. De halb empfehlen wir Folgende :
•Stellen Sie den Kühl chrank möglich t nicht in der Nähe von Wärmequellen auf;
•Stellen Sie keine E waren in den Kühl chrank, die wärmer al die Umgebung temperatur ind;
•La en Sie die Kühl chranktüren nicht offen tehen. Halten Sie die Kühl chranktüren nicht länger
offen, al e für da Herau nehmen oder Hinein tellen der Produkte erforderlich i t.
BEI NIEDRIGER RAUMTEMPERATUR KÜHLT DER KÜHLSCHRANK WENIGER STARK, DESHALB
KANN DIE TEMPERATUR IM KÜHLSCHRANK ANSTEIGEN. Stellen Sie in die em Fall die Temperatur
mithilfe de Temperaturregler niedriger.

14
AUFBEWAHRUNG VON NAHRUNGSMITTELN IM KÜHLFACH
Da Kühlfach i t zur kurzzeitigen Aufbewahrung von Fri chprodukten be timmt.
•Stellen Sie keine heißen E waren in den Kühl chrank, la en Sie die e bi zu Zimmertemperatur
abkühlen.
•Halten Sie ich an da vom Her teller angegebene Haltbarkeit datum der Waren.
ABTAUEN DER KÜHLKAMMER
Die Kühlkammer taut automati ch ab. Die ich hinten in der Kühlkammer bildenden Ei tropfen
chmelzen während der Betrieb pau en de Kompre or , da Schmelzwa er fließt durch die
Tauwa erauffangrinne in Tauwa erverdun tung gefäß auf dem Kompre or und verdun tet
dort.
REINIGUNG UND PFLEGE
REINIGEN SIE DEN KÜHLSCHRANK REGELMÄSSIG.
Vergessen Sie nicht v r dem Abtauen der dem Reinigen des hinteren Teils des
Gehäuses das Gerät v m Netz zu nehmen.
•Bewahren Sie die Innenoberflächen de Gerät und alle Kun t toffteile vor Fett, Säure, Soßen.
Fall Sie unab ichtlich davon au gießen, reinigen Sie die betroffenen Flächen ofort mit warmem
Seifenwa er oder Spülmittel. Reiben Sie ie an chließend trocken.
•Reinigen Sie die Innenflächen de Kühl chrank mit warmem Seifenwa er. E kann auch
Ge chirr pülmittel verwendet werden.
•Reiben Sie die Innen- und Außenflächen trocken.
•Reinigen Sie die Türdichtung regelmäßig. Reiben Sie ie trocken.
REINIGEN SIE REGELMÄßIG DIE ABFLUSSÖFFNUNG DER
TAUWASSERAUFFANGRINNE MIT DEM DAFÜR VORGESEHENEN
REINIGUNGSINSTRUMENT.
•Wi chen Sie minde ten einmal im Jahr den Staub ab,
der ich an der Kühl chrankrückwand und auf dem
Kompre or ange ammelt hat. Zur Reinigung eine weiche
Bür te, elektro tati che Tücher oder den Staub auger
benutzen.
•Für die Innen- und Außenreinigung KEINE, körnigen, äure-, alkohol-, oder
benzinhaltigen Putzmittel verwenden.
•Bei der Reinigung KEINE Scheuerlappen oder Schwämme mit rauer Oberfläche verwenden.
PRAKTISCHE RATSCHLÄGE UND BEMERKUNGEN
•Bewahren Sie im Kühl chrank keine Bananen auf, denn die e Früchte ind kälteempfindlich.
•Bewahren Sie E waren mit einem pezifi chen Geruch wie fri chen Fi ch, Gän eleberpa tete,
Kä e in einem gut ver chlo enen Behältni auf.
•WENN SIE DAS KÜHLGERÄT FÜR LÄNGERE ZEIT AUSSCHALTEN, LASSEN SIE DIE TÜR OFFEN.
Anmerkungen zum Betriebsgeräusch des Geräts. Die vom Kühl chrank während de
Betrieb verbreiteten ver chiedenen Betrieb geräu che ind normal und deuten nicht auf
einen Defekt hin.
•Da Plät chern, Gurgeln und Rau chen kommt vom Kühlmittel, da durch da Kühl y tem de
Gerät zirkuliert.
•Ein kurze , lautere Aufheulen oder ein Klicken hört man, wenn der Kompre or de Gerät ich
ein chaltet.

15
WECHSEL DES TÜRANSCHLAGS
Zum Wech el der Öffnung richtung der Kühl chranktür empfehlen wir eine weitere Per on
heranzuziehen. Sie brauchen: Schrauben chlü el Nummer 8 und 10, Kreuz chraubenzieher.
Der Kühl chrank darf zum Wech eln der Kühl chranktür NICHT horizontal abgelegt werden!
Gehen Sie wie folgt vor:
ACHTUNG! Schalten Sie das Gerät ab, ziehen Sie dazu das Netzkabel aus der Steckd se.
1. Entfernen Sie Abdecklei ten c von Gehäu e und Türinnen eite, nehmen Sie die obere
Halterung 6 amt Unterleg cheiben mit aufge tülpten Unterleg cheiben und Kun t toffdichtung
unter der Halterung ab.
2. Nehmen Sie die Kühlfachtür ab.
3. Nehmen Sie die die untere Abdecklei te 1 ab.
4. Lö en die Ach e 2 von unteren Halterung 7. Schrauben Sie e zu ammen mit allen Scheiben
zu an der anderen (gegenüberliegenden) Seite liegenden Halterung 7, ymmetri ch der
ehemaligen Stellung ( iehe Abb.).
5. Setzen Sie die Gefrierfachtür auf den Trag tift von Halterung 7.
6. Drehen Sie Halterung 6 amt Trag tift, aufge tülpten Unterleg cheiben und Kun t toffdichtung
um 180º. Drehen Sie den Trag tift amt Unterleg cheiben herau und chrauben Sie ihn auf
der anderen Seite der Halterung wieder fe t. Setzen Sie Halterung 6 in der Kühl chranktür ein
und chrauben Sie die e in die Öffnungen auf der Gegen eite de Kühl chrank fe t.
7. Decken Sie die Halterung und die freien Öffnung mit den Abdeckkappen c ab.
8. Entfernen Sie die Schraubenabdeckkappen a und die Ver chlu topfen b. Drehen Sie die
Schrauben der Türgriffe herau . Schrauben Sie die Griffe auf der Gegen eite wieder fe t. Die
Ver chlu topfen drücken Sie in die verbliebenen Öffnungen in der Tür, die Abdeckkappen auf
die Schrauben.
9. Entfernen Sie den Deckel 10 der unteren Abdeckung 1 und legen Sie e in die Leit chaufeln
auf der anderen Seite der unteren Abdeckung ( ymmetri che Stellung de ehemaligen). Setzen
Sie den linken und rechten Bein unterer Abdeckung 1 in die Löcher ( iehe Bild.), und chieben
Sie bi der Deckel einra tet.

16
STÖRUNGEN UND DEREN BEHEBUNG
Was, wenn...
•Der ans Str mnetz angeschl ssene Kühlschrank nicht funkti niert. Überprüfen Sie, ob
die Elektroin tallation bei Ihnen zu Hau e in Ordnung i t. Überprüfen Sie, ob der Stecker richtig
in die Steckdo e ge teckt wurde.
•Der Lärmpegel des Geräts ansteigt. Überprüfen Sie, ob da Gerät tabil und waagrecht
teht. Zur Regulierung bedienen Sie ich der vorderen Stützfüße de Gerät . Überprüfen Sie, ob
zwi chen dem Kühl chrank und anderen Möbeln oder den Teilen an der Hinter eite de Gerät
und der Wand ein Zwi chenraum i t. Ziehen Sie den Kühl chrank weg von den Möbeln oder der
Wand. Überprüfen Sie, ob die lauteren Geräu che nicht von Fla chen, Do en, Ge chirr im
Kühl chrank tammen, die ich gegen eitig berühren.
•Wasser auf dem B den des Kühlfachs. Überprüfen Sie, ob die Abflu öffnung der
Tauwa erauffangrinne nicht ver topft i t. Reinigen Sie die Abflu öffnung der
Tauwa erauffangrinne mit dem dafür vorge ehenen Reinigung in trument.
•Wasser unter dem Kühlgerät. Da Tauwa erverdun tung gefäß i t vom Kompre or
gerut cht. Stellen Sie da Becken auf den Kompre or zurück.
•Beim Öffnen der Kühlschranktüren quillt das Gummidichtungsband herv r. Die
Dichtung i t mit klebrigen Nahrung mitteln (Fett, Sirup) ver chmutzt. Reinigen Sie die Dichtung
und die Vertiefung für die Dichtung mit warmem Seifenwa er oder Spülmittel, reiben ie beide
trocken. Setzen Sie die Gummidichtung wieder in die Vertiefung ein.
•H he Temperatur im Kühlschrank, Betriebspausen des K mpress rs kurz. Achten Sie
darauf, ob die Kühl chranktüren ich gut dicht chließen la en, ob nicht die Türen beim
Herau nehmen oder Hinein tellen von Produkten länger al erforderlich offen gela en wurden,
ob nicht zu viele und zu warme E waren in den Kühl chrank ge tellt wurden.
•Die Oberfläche des Kühlschranks beschlägt sich. Die Luftfeuchtigkeit in der Umgebung
beträgt mehr al 70 Prozent. Lüften Sie den Raum, in dem da Kühlgerät teht, be eitigen ie
fall möglich die Ur ache für die Feuchtigkeit.
TRANSPORT
BEI NICHTBEACHTUNG DER TANSPORTVORSCHRIFTEN KANN DER HERSTELLER NICHT
FÜR ENTSTEHENDE SCHÄDEN HAFTBAR GEMACHT WERDEN.
•Da Kühlgerät nur in vertikaler Lage tran portieren.
•Während de Tran port mu da Kühlgerät vor atmo phäri chen Einwirkungen (Regen,
Schnee, Feuchtigkeit) ge chützt ein.
•Da Kühlgerät mu gut befe tigt ein, um Verrut chen und Beulen durch Schläge während de
Tran port zu vermeiden.
•Fall da Gerät nicht in vertikaler Lage tran portiert wurde, darf e er t nach minde ten vier
Stunden an Netz ange chlo en werden. Bei Nichtbeachtung die er Vor chrift droht der Au fall
de Kompre or .
GARANTIELEISTUNGEN
FALLS IHR KÜHLSCHRANK NICHT MEHR RICHTIG
FUNKTIONIERT, ÜBERZEUGEN SIE SICH, OB SIE DIE
URSACHE DES NICHT ZUFRIEDENSTELLENDEN
BETRIEBS DES GERÄTS NICHT SELBST BEHEBEN
KÖNNEN. Können Sie da Problem nicht elb t lö en,
wenden Sie ich telefoni ch oder chriftlich an einen
Serviceverteter in Ihrer Nähe. Geben Sie dabei
unbedingt Modell (1) und Gerätenummer (2) an.
Die e Angaben finden Sie auf der Geräteetikette an
der linken Außenwand de Kühlfach .

17
VEILIGHEIDSINSTRUCTIES
Lees de veiligheidsinstructies aandachtig d r. Indien de instructies niet
z rgvuldig w rden t egepast, kunnen er risic ’s nstaan f kan er schade
w rden aangericht met als gev lg het vervallen van de v lledige garantie. Het
i aanbevolen om de veiligheid in tructie te bewaren gedurende de gehele leven duur
van de koelka t. Indien de koelka t wordt verkocht, dient men teven de
veiligheid ini tructie aan de nieuwe eigenaar te geven.
WAARSCHUWING!
–Let erop dat de ventilatieopeningen aan de bovenkant en zijkanten niet
afgedekt worden.
–Tijdens het reinigen van het vriesgedeelte geen gebruik maken van mechanische
of elektrische hulpmiddelen om het ontdooingsproces te versnellen.
–Indien de voedingskabel beschadigd is, dient deze door de fabrikant, zijn
onderhoudspersoneel of door een gespecialiseerd vakman te worden
vervangen om schade te voorkomen.
–Wanneer de koelkast wordt afgedankt, dient dit volgens de landelijke
wetgeving plaats te vinden.
–Zorg dat het koelsysteem van de koelkast niet wordt beschadigd. Indien het
koelsysteem wordt beschadigd:
•Geen vuur gebruiken.
•Vermijd vonken ―gebruik geen elektrische apparaten of
verlichtingen.
•Ventileer onmiddelijk de ruimte waar de koelkast zich bevindt.
–Laat kinderen niet met de koelkast spelen of de stekker uit het stopcontact
halen of deze in het stopcontact steken-. Laat kinderen niet met het
verpakkingsmateriaal van de koelkast spelen.
–Dit apparaat mag gebruikt worden door kinderen (tenminste 8 jaar oud) en
door personen met verminderde fysische, zintuiglijke of mentale
bekwaamheden, of gebrek van ervaring en kennis, wanneer deze onder
begeleiding zijn of instructies ontvangen hebben over het gebruik van dit
apparaat en volledig de gevaren en veiligheidsvoorschriften begrijpen.
–Kinderen mogen niet worden toegestaan om schoonmaak of onderhoud werk
aan deze apparaten te doen tenzij onder begeleiding.
–De koelkast dient uitsluitend voor het koelen van levensmiddelen gebruikt te worden.
–Dit apparaat is niet geschikt voor de opslag van explosieve stoffen zoals
aerosols met ontvlambaar drijfgas.
NL
Table of contents
Languages:
Other KBS Gastrotechnik Refrigerator manuals