KEEWAY versilia 125 User manual


EN
PREFACE
Thank you for purchasing the motorcycle and sincerely welcome you to be our user. In order to
enjoy a safe and pleasant driving, please make sure to get familiar with the manual first before
driving. Your safety depends not only on the vigilance and experienced operation skill, but also
whether you know well about the technical specifications. Periodical check-up and maintenance
are basically essential. If maintenance service is needed, please go to our after-sale service
center.
The manual explains detailed operation and maintenance knowledge, with sincere
expectation for your long-time use. Modification of specifications may cause some figures and
content discrepancy in the manual, we feel sorry for that and keep the final right of
interpretation.
Enjoy your riding and thanks again for your support.

EN
ImportantAttention Points
Driver and passenger:
This motorcycle is limited to one driver and one passenger. Never exceed the max load capacity.
Safety: avoid driving the motorcycle in extreme weather and cold weather below -12℃.
Road condition
Not drive too high speed when road is not in good condition.
Please read the user’s manual carefully
You must pay attention on the warning sentence or paragraph.
WARNING
Not following the operation instruction in this manual may cause injury to you and the vehicle.
ATTENTION
Keep this manual as a permanent part, whenever transfer the scooter to a new owner, remember to hand
over the manual to him together.

EN
Contents
Ⅰ. Notice for safe driving
Rules for safe driving .........................................1
Load capacity ……….........................................2
Ⅱ. Various parts name and instruction
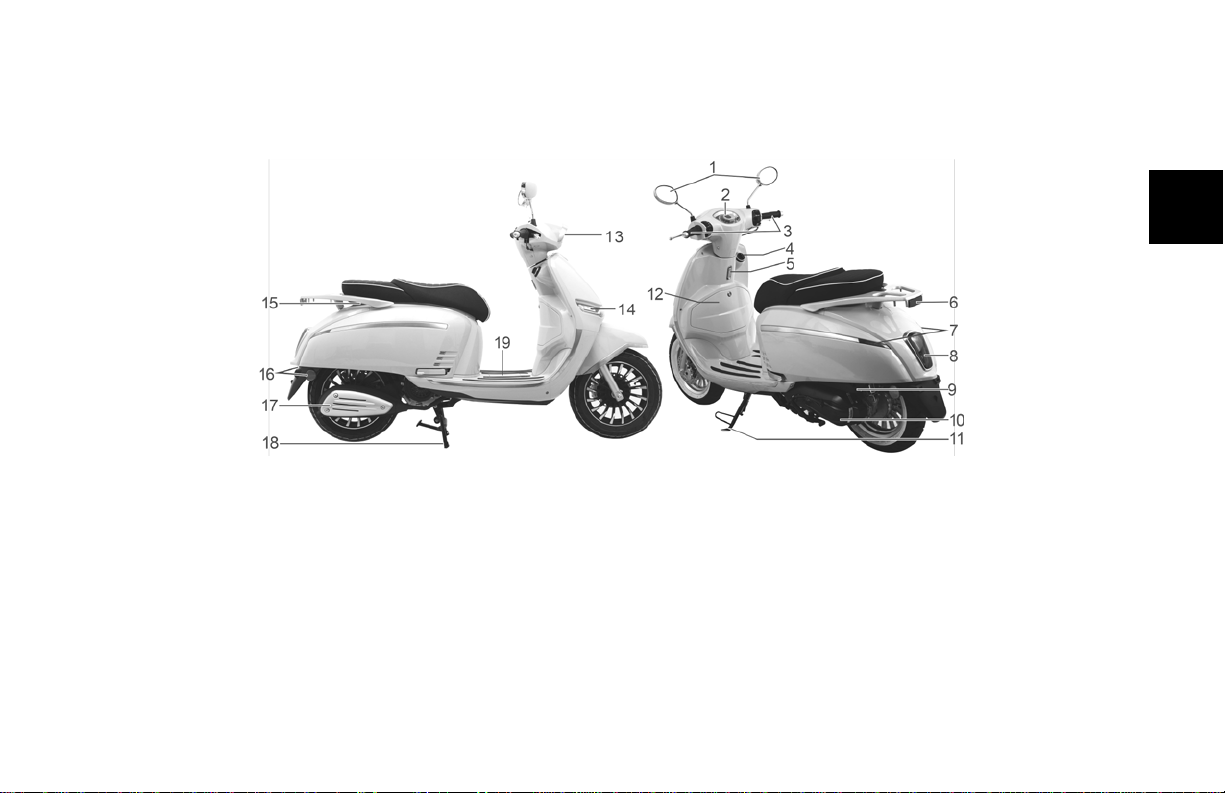
Parts & Sub assemblies…...................................3
Meter and indicator…….....................................4
Fuel gauge
……...................................................4
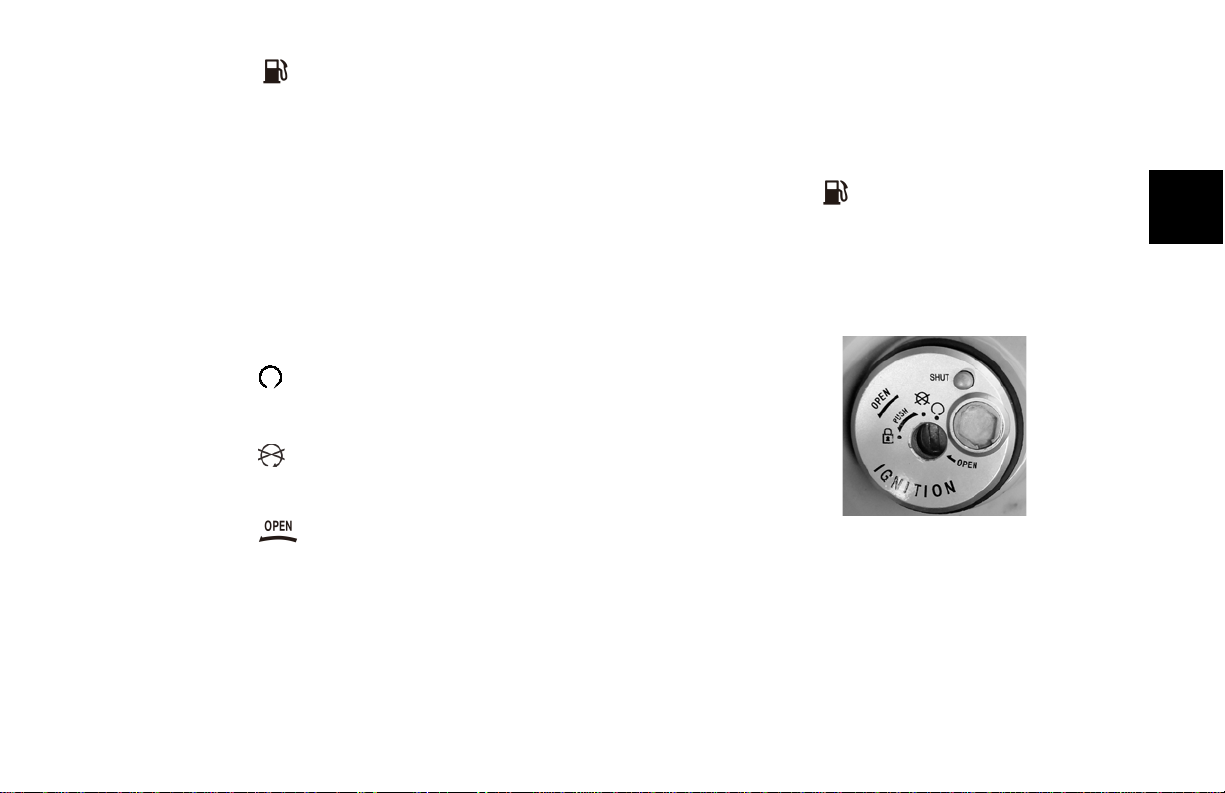
Ignition switch………........................................5
Steering lock………….......................................6
Keyless ignition switch.......................................6
Lift the seat.........................................................7
Lock the handlebar..............................................7
Warning light Switch ….....................................8
Flameout switch..................................................8
Electric Starting button.......................................8
Headlight dimmer switch 1.................................8
Turning signal light switch 2...............................8
Horn switch 3 .....................................................8
Ⅲ. Operation instruction
Check up before driving.....................................9
Gasoline ............................................................10
Inspect the engine oil level................................10
Brake system inspection....................................11
Front hydraulic disk brake.................................11
Inspect the brake fluid level...............................11
Inspect the brake disk........................................12
Rear drum brake....................................................13
Abrasion mark of the brake...................................13
Tire........................................................................14
Start engine...........................................................15
First running of the scooter...................................15
Drive motorcycle Warning....................................16
Driving operation..................................................16
Brake operation.....................................................17
Power off the engine.............................................18
Parking operation..................................................18
Ⅳ. Maintenance and service
Maintenance periodic form..............................19-21
Clean the air filter..................................................21
Battery maintenance..............................................22
Replace engine oil.................................................23
Change gear oil.....................................................24
Inspection of clutch and CVT belt........................24
Spark plug.............................................................25
Fuse replacement..................................................25
Ⅴ. Vehicle storage................................................26
Ⅵ. Vehicle identification....................................27
Ⅶ. Tool kit..........................................................27
Ⅷ. Main Technical specifications..............28-29
Ⅸ
.EFI system owner’s manual.....................30-34

1
EN
Ⅰ Notice for safe driving
Rules for safe driving
1. Many traffic accidents are caused by the inability of car driver to notice the motorcyclist, so the
motorcyclist should try his best to be noticed by other drivers.
※Put on the specialized coat in bright color or warning mark.
※Drive with great caution in the place with dazzling light or in blind spot.
2. Particular care should be exercised at the level crossing of roads, entrance and exit of parking lot or on
the automobile lane.
3. Never over speed,otherwise accident may occur.
4. You must get the driving license and be familiar with the vehicle. Never lend the vehicle to the man
without driving license or who is unfamiliar with motorcycle.
5. Avoid driving on the rough road. This can easily result in operation failure and structural damage to the
vehicle frame.
6. Check up before driving. (See page 9)
7. When driving, hold the handle bar and put feet on the footrest.
8. Don’t drive too close to other vehicles. Never contend for lane, and strictly observe the local traffic.

2
EN
Load capacity
Warning:
Only put lightweight goods in luggage box or on the carrier.
The load should not exceed the limit which is stipulated in Table 1:
Table 1
Deposited position Stated Weight (kg)
Carrier 5kg
Luggage Box 5kg
The max payload of this motorcycle is 150kg, including the weight of the driver, passenger and
goods.
If the motorcycle is over loaded, it will affect the stability and operation of the motorcycle.
Tie all the goods needed to be carried on the motorcycle.
On the rear shelf seats no child allowed.

3
EN
Ⅱ. Various Parts Name and Instruction
Parts & sub assemblies
(
Fig1
)
Fig1
1. Rear view mirror
2.Speedometer
3. Front and rear brake
4. Ignition switch
5. Helmet hook
6. Rear reflector
7. Rear L. & R. turn light
8. Tail light
9. Air cleaner
10. Kick starter
11. Side stand
12. Tool box
13. Headlight
14. Front L&R. turn light
15. Fuel tank cap
16. Side reflector
17. Muffler
18. Center stand
19. Battery location

4
EN
Meter and indicator
(
Fig2
)
(1)Fuel gauge: Indicate the fuel volume in the fuel tank.
(2)Speedometer: Show the actual running speed
(3)Left turning signal : Sparking when the button turns left.
(4)High beam indicator : When the button is on position“ ”,
the high beam indicator works.
(5)Clock: shows the current time.
(6)Odometer: Records the total mileage which this scooter has
driven.
(7)Right turning signal : Sparking when the button turns right.
(8)Fault indicating lamp: When EFI system has functional problem, the lamp will flash. The flashing
frequency and times will help to judge the actual EFI malfunction type.
(9)Speedometer function adjusting button: press the button and input password ‘326’ to get into the
adjusting mode, 1-time adjusting, 2-km/mile shifting 3-speed adjusting
Fuel gauge
(
Fig2
)
When the tank is full:
•All of the fuel level indicator segments are lit.
Fig2

5
EN
•The " " symbol is displayed.
•The min. and max. levels are indicated by the letters E and F.
•The fuel reserve gauge is shown by the last segment flashing (r):1st level: the first(1.1L)segments flash.
When the tank is empty, all the segments on the fuel gauge are off and the " " symbol flashes.
Ignition switch (Fig3)
The ignition switch is equipped with security lock. After lock the handlebar, remember to press the
“SHUT” button, the key hole will be covered. Insert the other end of key into security lock and turn it
clockwise, the key hole will be uncovered.
(1)—Power to the electrical circuit is on. The engine can be
started. The key cannot be pulled out.
(2)—The engine is off. Power to the electrical circuit is off. The
key can be pulled out.
(3)“”Insert the key and turn it counter-clockwise to lift the seat. Put
down the seat, and press the rear end of it until a clear metal-meshing sound
can be heard. Pull up the seat rear end to make sure it is locked securely, then pull the key out.
Fig3

6
EN
Steering lock
Power to the electrical circuit is off. turn the handlebar to the left limit position ,turn the key to lock()
position, the handlebar can be locked, key can be pulled out.
Keyless ignition switch (Fig4-1)
The operation of smart key is illustrated as follows:
Anti-theft setting 1 ( )
Short press once to get into anti-theft alarming mode, long press
for 3 seconds to get into anti-theft alarming silent mode, and long
press for 3 seconds again to quit anti-theft alarming silent mode.
Detecting the scooter 2 ( )
Short press once, it sounds drip- drip- drip, meanwhile turning
lights flash, to tell the location of the scooter. Long press for 3
seconds to get into the adjustment of sensitivity. It ranges 1 to 5
from the low to the high sensitivity. Press unlock button to quit
adjustment.
Fig4-1
1
2
3

7
EN
Unlock operation 3 ( )
Short press once to unlock the main switch, lighting will be on
simultaneously, the main electrical circuit can be through.
Notice (Fig4-2):
When switch position is on “ ” or “LOCK” position, the smart key will
lock the scooter automatically.
Lift the seat ( )
When the ignition switch is on the unlocked position, turn the handle lever
counter-clockwise to lift the seat.
Lock the handlebar (Fig4-3)
When the ignition switch is on the unlocked position, turn the handlebar to the
left limit, then press the handle lever of switch and turn it counter-clockwise to
the limit, the handlebar can be locked.
Fig4-2
Fig4-3

8
EN
Warning light Switch 1 (Fig 5)
When turning the switch to “ ”,the left and right turning lights will be
flashing at the same time;
When turning the switch to “ ”,the double flashing lights will be off.
Flameout switch (2) (Fig 5)
When the switch is on “ ”, the electric starting can be operable;
When the switch is on “ ”, the electric starting cannot be operable.
Electric starting switch
(
3
)
(Fig 5)
Press this button, the engine starts.
Headlight beam switch 1
(
Fig6
)
After start the engine, the headlight will keep a constant lighting condition.
Press“”button,to get high beam;Press“ ”button,to get low beam.
Turning light switch 2
(
Fig6
)
When the switch is on“”, left turning light will flash, When the switch is on
“”, right turning light will flash. Press the turning light switch, the light will
turn off.
Horn switch 3
(
Fig6
)
Press “ ”this switch, the horn will sound.
Fig5
Fig6

9
EN
Ⅲ. Operation Instruction
Check up before driving
The user must personally ensure that his vehicle is in good condition. Certain safety elements may
show signs of damage even when the vehicle is not used. E.g. long-time exposure to bad weather can lead
to oxidation in the braking system or a pressure drop in the tires which can have serious consequences. In
addition to a simple visual inspection, it is extremely important to check before use.
Read the below table carefully and make all the inspections before each riding.
Inspection item
Methods/Standards
Inspection item
Methods/Standards
Handlebar 1-Turn smoothly
2-Not loose ,no excessive clearance
Brake cables Make a visual check ,add lubricant if
necessary
Lighting system
Operate all lights, make sure all of
them can function well.
Brake lever
pivots
Make a visual check ,add lubricant if
necessary
Engine oil level
Make sure engine oil is within the
standard level
Main and side
stand shafts
Make a visual check ,add lubricant if
necessary
Brake system 1-Front and rear brake lever free path
2-No brake fluid leakage
Horn Press the horn button ,make sure it sounds
normally
Throttle cable 1-Suitable free path
2-
Turn the throttle grip, make sure the
throttle reset is normal
Fuel and fuel
hose
1-Check the fuel level ,make sure the left
fuel is sufficient for completing the trip
2-Check the fuse hose and vacuum hose
Tire pressure Check tire pressure within the rated
Check the tire thread depth ,tire
surface no cut or damage
Bolts/nuts
tightening Check the fastening of crucial
components, retighten it if necessary
Table 1

10
EN
Gasoline
When symbol and the last segment flashes, please refill fuel tank.
And check whether the tank and the carburetor are in good condition.
•Gasoline tank contains max. 5.0L
•Turn the tank cap anti-clockwise to open the fuel tank .(Fig7
)
•Recommended gasoline, octane number is above 90.
•Do not refill fuel doped with water, dust or other impurities.
NOTICE:
•Gasoline is inflammable, it possibly causes fire even exploding under certain condition, refilling
is always carried out at well ventilated area after the engine is shut off and cooled down. Keep
away from fire when refilling the fuel tank.
•Do not overfill, and prevent fuel from overflowing out of the fuel tank. Lock the fuel cap
securely after refilling.
•Gasoline is poisonous, keep children away when refill the fuel tank.
Inspect the engine oil level
(
Fig8
)
1. Place the vehicle on its central stand on flat ground.
2. Remove the cap/oil gauge (01).
3. The oil level shall be between the minimum (2) and maximum (3) level
4. Add oil if necessary
Fig 7
Fig8
01

11
EN
Brake system inspection
The scooter is assembled with front hydraulic disk brake and rear drum brake. For safety concerns, it is
necessary to inspect the abrasion of brake pads regularly.
Front hydraulic disk brake
Replace brake pads(Fig9)
○1E Aabrasion marks
A○2E Abrake disk
A○3E Abrake pads
Observe the abrasion marks on brake pads, in case the abrasion marks touch the brake disk, it is necessary
to replace brake pads immediately.
Inspect the brake fluid level
(
Fig10)
Insufficient brake fluid will draw air into the brake system and cause brake
failure, so it is necessary to inspect the brake fluid level before each ride.
Fig9
Fig10

12
EN
Obey the following instructions to inspect and refill the brake fluid.
1. Swing the handlebar and make sure the main cylinder is at the horizontal position.
2. Check the fluid level observation window, if brake fluid is not visible, refill it immediately.
Non-standard brake fluid will corrode and deform the oil seal, and bring oil leakage. The recommended
brake fluid grade is DOT3.
A○1E ABrake fluid level observation window(Fig11)
3. When refill brake fluid, prevent water from getting into the main
cylinder. Mixed water into brake fluid will drop down the boiling point and
cause air resistance in the brake system.
4. Brake fluid has corrosion. In case brake fluid spill or touch the parts surface,
wipe it off immediately.
Inspect the front and rear brake disk(Fig12、Fig13)
When the front disc gets worn to the limit (see the notice on the
disc: MIN.TH.3mm), the old disc must be changed in order to
avoid negative impact to the brake performance.
Fig11
Fig12
Fig13

13
EN
Rear drum brake
The free stroke of rear brake handle(Fig 14)
Measure the free stroke of rear brake lever before braking function, the free path should around 14 mm,
take the tail of brake handle as standard.
Replace brake pads(Fig15)
1、abrasion marks
2、brake disk
3、brake pads
Observe the abrasion marks on brake pads, in case the abrasion marks touch the brake disk, it is necessary
to replace brake pads immediately.
Fig 14
Fig 15

14
EN
Tire:
Check the tire pressure regularly and adjust if necessary.
Front tire pressure: 225kPa Rear tire pressure: 225kPa
•Tire pressure should be cold-checked regularly.
•Check if the motorcycle has a flat tire, mend it immediately when it has.
•Check if any metal trash or gravel in the groove of tires.
•Change the tire when the thread wear limit.
ADMONITION
:
•Incorrect pressure causes abnormal wear and affects road behaviour, thus making driving
dangerous.
•When replacing tires, you are advised to mount tires of the same brand and equivalent quality.
In case of puncture, it is forbidden to mount an inner tube in a tubeless tire.

15
EN
Start engine (Fig 16)
•Put the key into the key hole and turn to “ON” (Fig 16).
•Electric starter: press start button to start engine, don’t keep
the start button pressed more than 5 seconds each time (Fig 17).
NOTICE
:
•Electric starting is based on grasping the brake handle.
•If electric starting doesn’t work, there must be a break for 30
seconds before you start the engine with it again.
•When start the engine in cold condition, please warm up engine for 3 minutes
before running.
•The engine will be over heated if it works for a long time at idle speed in an
extremely hot day, you need to power off the engine immediately.
First running of the scooter
For end users, please pay great attention to the break-in period of a new scooter.
Start the new scooter, and keep it rotate at the idle speed for 10 minutes. The initial 500km is deemed
as the break-in period, referring to mileage readings on the odometer. The break-in quality has a great
impact on the service life of a scooter. Keep in mind to limit the driving speed under 60km/h during the
break-in period.
After the break-in period is finished, it is highly recommended to carry out the 1st time maintenance ,
Fig16
Fig17

16
EN
the major objective is to make up the slight abrasion and prolong the engine’s life, and provide the best
driving performance.
Drive motorcycle
WARNING:
•The temperature of exhaust pipe is pretty high during driving, you will be scalded if touch it
carelessly, even within short period of time after engine is shut off, the high temperature can
also cause injury, so wear trousers to protect your legs against injury.
•Wear helmet, glasses, and gloves when driving.
•Loose or unsuitable clothes may cause an accident during driving.
•All device must be installed according to requirement of the traffic rule. Take the license with
you when driving, each equipment of the motorcycle should accord with the local traffic law.
Driving operation
•Release Main-Stand and sit on the saddle, step on the ground by left foot to make motorcycle plumb
with floor.
•Squeeze the brake lever with your left hand, grip the grab handle with your right hand and push the
vehicle forwards to fold up the central stand. Sit on the vehicle. Release the left brake and turn the
throttle slowly with your right hand to start moving.
This manual suits for next models
1
Table of contents
Other KEEWAY Scooter manuals