DirectBikes DB125T-13 User manual


Introduction
DirectBikes thanks you for purchasing your new
DB125T-13 motorcycle. We produce our
motorcycles using some of the most advanced
production techniques in the world.
We want you to enjoy your new machine and have
compiled a basic manual for you that covers the
assembly out of the crate and the basic
maintenance. Please read carefully. If in any doubt
consult a suitably qualified person or our technical
department.
Proper assembly and maintenance will ensure your
safety and the long service life of the machine.
Identification
The VIN or chassis number is located on the frame
of the motorcycle and is either under the seat or
under the clip in cover in the front of the footwell.
The engine number is located on the left side on the
bottom of engine.
Tools
Please have a selection of good quality tools ready
which include; Cutters, knife, hammer, 8, 10, 12, 13,
14, 17mm sockets and spanners, ratchet, extension
bar, flat screwdriver’s, Philip screwdriver’s, pliers,
magnetic tray, lube, multi-purpose grease and
cleaning cloths.
The Crate
Before starting check the model details against the
invoice details and any signs of damage to the box.

Please ensure you have adequate space. Using
scissors cut the nylon bands that surround the box
and discard. Cut the cardboard to reveal the steel
frame supporting the motorcycle. You will now need
a 13mm socket on a bar or ratchet and a 13mm
spanner. Undo the front wheel from the frame.
Undo all the lower nuts and bolts securing the upper
portion of the frame. Undo the bolts securing the
handlebars and the rear carry rack.
Wearing gloves and using two people, lift the upper
part of the frame off the motorcycle. Be careful not
to scratch the paintwork. The motorcycle is now
held in by only the front spindle. Stood at the rear of
the motorcycle, lift it out of the frame to the right and
put the centre stand down. One person holds the
back down whilst the other person undoes the
spindle and releases the motorcycle from the frame
completely. Discard the metal frame. Remove all
the protective packaging and the ancillaries from
the footwell.

(Illustration only)
Assembly
Front wheel
With the back of the motorcycle still being held
down it is now possible to insert the front wheel.
Firstly remove the plastic wedge from the brake
calliper. Offer the wheel up in-between the forks so
the brake disc sits correctly in the calliper. It is
vitally important that the brake pads sit on either
side of the disc.
Next insert the front wheel spindle through the fork
leg to which the calliper is attached, through the
spacer into the wheel and through the speedo drive
into the opposite fork leg. Put the nut onto the
spindle finger tight. Now check that the speedo
drive is correctly located, double check that the disc
is correctly located and tighten up. Pump the front
brake lever till it goes hard. Lastly put the chrome
covers on the lower fork, left and right.

Front Mudguard
The front mudguard is in two halves, front and rear
and is held on by five screws and one clip.

Top box
The top box is supplied with a universal fitting kit.
The two long slotted bars go on the inside of the
box. Put the long M6 screws (4 of) through the slots
and line the box on the rack so that it is central. Use
the 4 smaller slotted bars underneath. Fix in place
with the nuts and washers provided. Cover with the
protective foam mat A maximum weight of 10 kilos
is recommended. The weight may also alter the
handling of the motorcycle.
Mirrors
The mirrors come ‘handed’, i.e. a left and right one.
They screw into either the left and right switch gear
or into the front and back brake lever assemblies.
There is a lock nut on the threaded part of the
mirror to ensure the mirror does not come loose.
Wind this lock nut up as far as it will go and
carefully screw the mirror into the mount.

It is important you do not ‘cross thread’ the mirror as
it will damage the mount. When the mirror is in as
far as it will go sit on the motorcycle and make sure
you can see behind you. Once done move the lock
nut down and tighten being careful not to over
tighten. Finish by sliding the rubber boot down over
the lock nut.
Filling the battery
The battery supplied is a SEALED lead acid type.
Please wear protective clothing at all times when
assembling the battery. If spilled rinse the area
immediately with water.
Place battery on level ground out side. Using blister
pack of acid supplied, turn upside down and put
onto the top of the battery. The six foil seals should
locate accordingly with the 6 cells of the battery.
Push the blister pack down so that the seals are
broken. Leave the acid to drain into the battery.
Once all of the acid has drained into the battery,
remove the blister pack and discard appropriately.
Remember there may still be small amounts of acid
inside it. Let the battery stand for 20 minutes. Make
sure that the acid is covering the plates. If needed
top up with distilled water. Place the sealing cap
onto the battery and push down evenly till the cap is
flush. Now wash any spillages off the battery.
Charging of the Battery
The battery should be charged at 1/10 of its
capacity for 10 hours. For example if it is a 12 volt 7
amp hour (12v7ah) battery it should be charged at
0.7 amps for 10 hours. Do not use a car charger as
they often have 4 to 10 amps output and will

damage the battery. No naked flames. No smoking.
Charge in a well ventilated area.
Fitting the Battery
Whether the battery is located under the seat or in
the foot well of the motorcycle it is vitally important
that you ensure the correct fitment and pay
attention to the polarity. Red and + are the positive
side. Black and – are the negative side. Failure to
observe this will damage the electrics of the
motorcycle. Use the M6 nut and bolt supplied to fix
the electric leads to. Ensure they are tightened.
Important Checks
The scooter is nearly ready to go, but before you
put any petrol or oil in to the scooter, there are a
few final things that need checking.......
Speedometer
Please make sure that the speedometer is fully
operational and is reading in both MPH and KPH
before registering the scooter. If not, please do not
register the scooter and contact us for a
replacement speedometer to be dispatched.
Brakes
Test both the front and bake brakes are fully
operational.
Make sure that there is some ‘freeplay’ in the
levers, 5mm to 8mm; this must be checked with the
steering at left, right and centre.

Exhaust
Please make sure that that the nuts and bolts
holding on the exhaust are tight before road use.
Throttle
Test that the throttle is fully operational. Make sure
there is about an eighth of a turn (1/8) freeplay in
the throttle. Check with the steering at left, right and
centre.
Steering
Test that the steering is fully operational. The
steering should be free and have little resistance to
turning. If it has, check the cables are routed
correctly.
Fuel / Vacuum Pipes
Please check before usage that all fuel / vacuum
pipes are connected correctly. If you have any
questions regarding this please contact us for
assistance.
Tyres
The tyre pressure is 1.75 bar for the front tyre and
2.0 bar for the rear. If you are carrying passengers
or luggage please increase the rear tyre to 2.25 bar.
If you are a light person or heavy person these
pressures may need adjusting to compensate.
Electrics
Please go through the controls and make sure that
the following systems are working correctly;
Indicators: left and right, front and rear.

Lights: sidelights, front and rear. High and low beam
for the front light.
Rear brake light, working from both the front and
rear brake independently. The horn: It should be a
sharp loud noise. The main fuse is located next to
the battery and is rated at 15 amps. Do not use a
larger fuse.
Suspension
The suspension should be nice and free and should
return to its normal position when bounced up and
down. There should be no leaks.
Engine oil
The engine oil dipstick and cap are combined and is
located on the right side of the engine. With the bike
on its centre stand and on level ground remove the
dipstick and clean it. Re-insert it and remove it
again. The oil level should be visible on the hatched
marking between the lower and upper level. Add or
remove as appropriate.
General ‘walk around’
Before use please go around the scooter and check
that all nuts and bolts are tight and secure and that
there are no loose parts.
Starting the motorcycle
Before starting you need to put petrol in. The petrol
cap is either located under the seat or at the rear of
the foot well under a locked flap. These motorcycles
use normal unleaded (90> octane). You must not
over fill with petrol as any spillages will damage the

paint and may spill onto a hot engine creating a
hazard. Make sure the motorcycle is on the main
centre stand.
Put the key in the ignition and turn clockwise until
the ignition lights come on. Hold the rear brake and
press the ignition button on the right hand
switchgear. Keep the button pressed in until the
motorcycle starts but for no longer than 5 seconds if
it does not. Wait 10 seconds before trying again.
You should not need to touch the throttle as the
carburettor has an auto choke. These motorcycles
are also fitted with a manual kick start on the left
side of the engine. To operate this you still need to
have the rear brake applied. Push the kick-start
pedal down slowly until there is resistance in the
engine then release until the pedal returns to the
top. Push the pedal all the way down briskly and
release. Repeat as necessary until the motorcycle
has started.
DO NOT REV THE MOTORCYCLE WHILST IT IS
ON THE STAND.
They are fitted with an auto clutch and could go
forward if they were to come off the stand causing
injury and damage!
Riding the Motorcycle
Please always wear a HELMET and PROTECTIVE
CLOTHING!
Familiarise yourself with the controls BEFORE you
go out on a public road. Take the appropriate
training if you do not all ready know how to ride a
motorcycle. Failure to do so could put yourself or
others at risk of injury!

The controls are fairly basic. The right hand controls
the throttle front brake and the switch for the lights
and starter. The left hand controls the rear brake
and the switch for the high low beam, indicator (left
and right) and the horn switch.
Start the motorcycle. Sit astride the motorcycle with
one or both feet on the floor and you’re hands on
the handle bars with the brakes on. Let the brakes
off as you gently twist the throttle and
simultaneously lift you’re feet into the footwell.
When you want to slow or come to stop release the
throttle and gently apply the brakes.
For safety do not ride your scooter in freezing
weather conditions; in cold weather conditions it is
advisable to lubricate throttle cable with wd40 or
silicon greece.
Running in
Your new motorcycle requires a ‘running in’ period.
This is very important because it allows the
mechanical parts to bed in and will increase the
serviceable life of the machine.
It is recommended that for the first 100 miles of use
the no more than two thirds of throttle is used and
try not to go above 40mph. Vary the speed. After
100 miles have been achieved please go through all
the ‘Checks’ as mentioned previously. In addition
change the engine oil, the rear drive oil, check and
clean the air filter, check and clean the spark plug,
check the level of the front brake fluid, the play in
the rear brake, check the pressure in the tyres.

The engine oil required is a good quality Sae10w-40
suitable for motorcycles using a wet clutch. The
approximate capacity is 1000ml.
The final drive should use 200ml of a Sae90w gear
oil, again suitable for motorcycles. The front brake
fluid required should be of at least DOT4 or higher.
The gap in the spark plug should be 0.7mm
Servicing
The life of your motorcycle will greatly depend on
how you look after it. Regular serving with an
authorised dealer will greatly increase its service life
and increase its second hand value not to mention
keeping you safe!
It is suggested that you service it according to the
table. It will not harm the machine if you choose to
service it more regularly than suggested. A smear
of grease on spindles and nut and bolts will aid in
assembly, removal and seized parts.
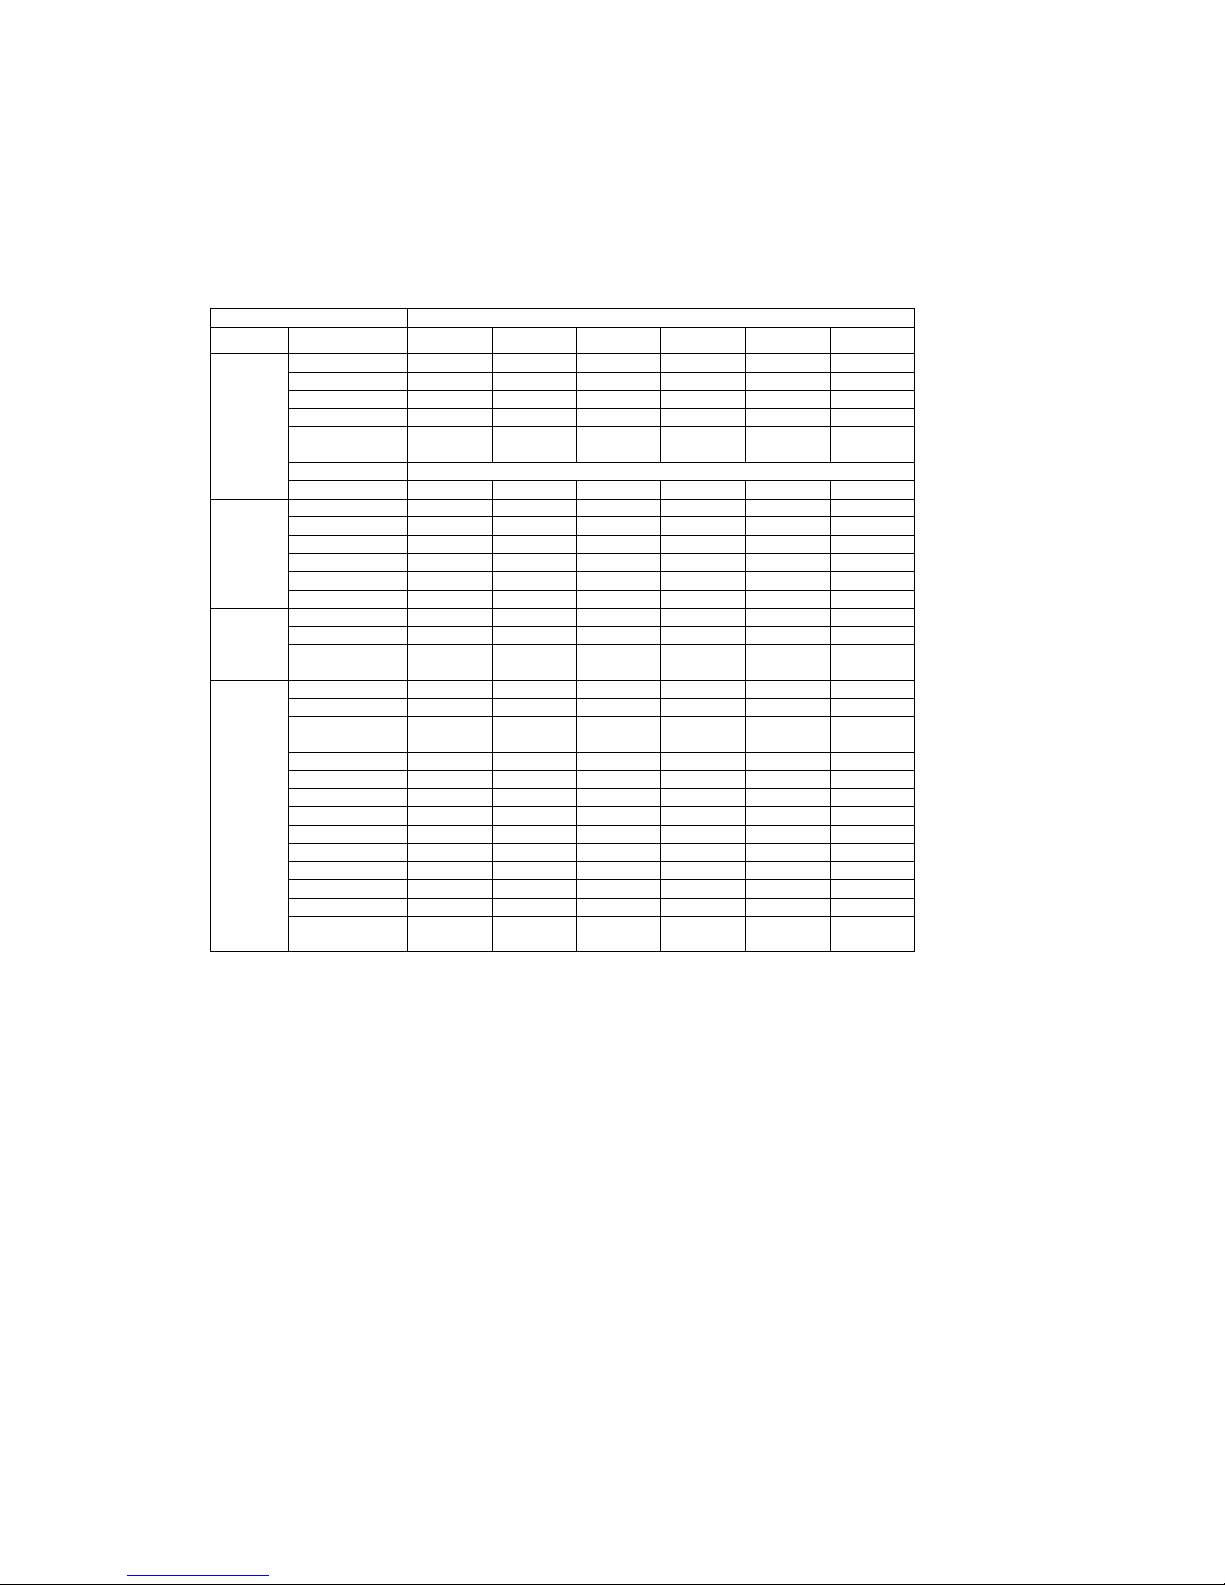
Key:
I: inspect, clean, adjust, lubricate or change
A: adjust
C: clean
R: change
T: tighten
item Distance km (months)
300 kms /
6 months
1000kms /
12 months
4000kms /
18 months
7000kms /
24 months
10000kms /
30 months
13000kms /
36 months
Engine
Drive strap
Drive chain
I
I
Chain cam A A
Span Valve
A
A
A
Hose & Bolton
cyclinder-head
I I I
Air cleaner
Clean every 100km, change when needed
Oil engine R R R R R R
Fuel
system
Filter fuel
R
Choke I I
Joint fuel hose I I I
Carburetor A A A
Gear R R
Fil
ter oil
C
C
Ignition
Timing ignition I I I
Spark plug I I
Circuit ignition
system
I I
Other
Electrics
I
I
I
I
I
I
Grave bolt T T
Span clutch
lever
A A
Brakes I I I I I I
Nuts and Bolts
T
T
T
T
T
T
Exhaust I I I I I I
Fuel Tank I I I I I I
Wheels I I I I I I
Tires I I I I I I
Throttle
I
I
I
I
I
I
Speedometer I I I I I I
Fairings
I
I
I
I
I
I
Headrace
Bearings
I I I I I I

Key:
I: inspect, clean, adjust, lubricate or change
A: adjust
C: clean
R: change
T: tighten
item Distance km (months)
16000kms /
42 months
19000kms /
48 months
22000kms /
54 months
25000kms /
60 months
28000kms /
66 months
31000kms /
72 months
Engine
Drive strap I
Drive chain I I I I
Chain cam A
Span Valve A
Hose & Bolton
cyclinder-head
Air cleaner Clean every 100km, change when needed
Oil engine R R R R R R
Fuel
system
Filter fuel
Choke
Joint fuel hose
Carburetor
A
A
Gear R
Filter oil C C
Ignition
Timing ignition
Spark plug I I I I
Circuit ignition
system
Other
Electrics I I I I I I
Grave bolt
Span clutch
lever
Brakes I I I I I I
Nuts and Bolts T T T T T T
Exhaust
I
I
I
I
I
I
Fuel Tank I I I I I I
Wheels
I
I
I
I
I
I
Tires I I I I I I
Throttle I I I I I I
Speedometer I I I I I I
Fairings I I I I I I
Headrace
Bearings
I I I I I I
Repeat same service intervals when exceeding 31,000km+ from table above.

Cleaning
Your new machine should be cleaned on a regular
basis. This stops the ingress of corrosion, maintains
its lustrous finish and gives you a chance to
observe anything that may be broken or damaged.
The bike should be washed off in warm soapy water
using a sponge or soft cloth. Please use a detergent
designed for motorcycles as washing-up liquids and
wash’n’wax style soaps are not fit for the purpose.
Do not use a pressure washer. A hosepipe with a
spay attachment is ok. A good quality wax for the
bodywork, a quality spray such as WD-40 for the
engine and ancillaries is ok. DO NOT GET EITHER
ONTO THE BRAKES. If you do, use brake cleaner
to remove.
Storage
When not using your scooter a cover should be
used to protect the scooter from the elements. If
storing the scooter for periods in excess of six
weeks it is advisable that a few further things are
done. Drain the fuel. You will find the drain cock at
the lowest point of the carburettor. Disconnect the
battery and leave it on a ‘trickle’ charger such as an
‘optimate’. Raise the wheels off the floor. Take the
spark plug out and put 15ml of oil into the cylinder
and turn the engine over. Leave the spark plug out
and put a clean cloth over the hole to stop
dust/debris getting into the engine. Spay scooter
with lube, e.g. ‘WD40’.

On re-commission of the machine go through all of
the ‘CHECKS’ and change the oil in the engine and
the final drive.
Troubleshooting
Engine won’t
start
Check fuel Check battery
Check main
fuse
Check brake
lockout switch
Lights don’t
work
Check main
fuse
Check battery
Check
switches
Check
electrical
connections
Brakes
ineffective
Check fluid
levels and
rear brake
rod free play
Check pads in
front and
shoes in rear
Check brake
disk and
drum lining
thickness
Check brake
hose on front
and cable to
the rear
Bad handling Check front
and rear tyre
pressures
Check front
and rear tyres
for excessive
wear
Check front
and rear
suspension for
stiction and
play
Check front
and rear
wheel
bearings
Carburettor
In the unlikely event that your scooter fails to start
please check the air pilot screw on the side of the
carburettor. It should be 2.5 turns out. Screw all the
way in and count the number of turns out.
If you have mechanical queries please contact us
on: 0845 6520 680

Table of contents
Other DirectBikes Scooter manuals


