Keiser TrekMill MM5050 User manual

TrekMill
MM5050
CONTENTS
USER'S MANUAL
Serial Number:
Date Purchased:
Find the serial number in
the location shown below.
Serial
Number
Read the safety and comfort guide
in this manual before using this equipment.
Keiser Corporation
2470 S. Cherry Avenue
Fresno, CA 93706 USA
Tel : 559-256-8000 Fax : 559-256-8100
www.keiser.com [email protected]
Safety & Comfort Guide
Before You Begin
Assembly
Operation and Adjustment
Operation
Maintenance
Limited Warranty

Safety & Comfort Guide
Warning : To reduce the risk of burns, fire, electric shock,or injury to persons, read the
following safety and comfort guide before operating the TrekMill.
2
1. It is the responsibility of the owner to
ensure that all users of the TrekMill are
adequately informed of all warnings and
precautions.
2. Position the TrekMill on a clear, level
surface. Do not place the TrekMill on thick
carpet as it may interfere with proper
ventilation. Also, do not place the TrekMill
near water or outdoors.
3. Do not operate the TrekMill until it is fully
assembled.
4. Keep children under the age of 12 and
pets away from the TrekMill at all times.
5. The TrekMill should not be used by
persons weighing more than 300 pounds
(120 kg).
6. Never allow more than one person on
the TrekMill at a time.
7. Wear appropriate exercise clothing when
using the TrekMill. Do not wear loose
clothing that could become caught in the
TrekMill. Always wear athletic shoes.
8. Keep the power cord away from heated
surfaces.
9. Do not operate the TrekMill if the power
is off, if the power cord or electrical plug is
damaged, or if the treadmill is not working
properly.
10. Never start the TrekMill while standing
on the walking belt. Place feet outside of
belt on the frame, start the TrekMill at the
lowest speed and then step onto the belt.
Always hold the handrails while using the
TrekMill.
11. The TrekMill is capable of high speeds.
Adjust the speed in small increments to
avoid sudden jumps in speed.
12. Never leave the TrekMill unattended
while it is running. Remove the key, move
the on/off switch to the off position and
unplug the power cord when the TrekMill is
not in use.
13. Do not change the grade of the TrekMill
by placing objects under the TrekMill!
14. Never insert or drop any object into any
opening.
15. Inspect and tighten all parts of the
TrekMill regularly.
16. Danger: Always unplug the power cord
immediately after use, before cleaning the
TrekMill, and before performing the
maintenance and adjustment procedures
described in this manual. Never remove the
motor cover unless instructed to do so by an
authorized service representative. Servicing
other than the procedures in this manual
should be performed by an authorized
service representative only.
Warning : Before beginning this or any exercise program, consult your physician. This is
especially important for persons over the age of 35, expectant and nursing mothers, or
persons with pre-existing health conditions. Read all instructions before using. Keiser
assumes no responsibility for personal injury or property damage sustained by or through
the use of this product.

Console
Handrail
Key/Clip
Walking Belt
Roller
Adjustment Bolts
Power Cord
Cushioned
Walking platform
Foot Rail
Before You Begin
Read this manual carefully before using this product.
3
If you have questions after reading this manual, please call our Customer Service Department
at 1-800-888-7009 or 559-256-8000. The serial number can be found on a decal next to the
motor.
Before reading further, please familiarize yourself with the parts that are labeled in the drawing
below.

Assembly requires two people. Set the TrekMill in a clear area and remove all packing materials.
Do not dispose of the packing materials until assembly is complete. Assembly requires the Allen
wrenches provided, a Phillips screwdriver
and a 13mm open-ended wrench.
4
1.Identify the right upright [1]. Insert upright
harness [2] into upright and pull the excess upright
wire harness out of the top of the right upright. Slide
the right upright onto the base. Be careful not to pinch
the wire harness.
Finger tighten six bolts [3] (four on outside of upright
and two on the inside) with washer and star washer
into the upright [1].
Note: It may be necessary to move the upright slightly
to align the holes.
Attach the left upright (not shown) in the same way.
Note: There is no wire harness in the left upright. Do
not tighten the upright bolts [3] yet.
2.Place the console [4] on each upright [1]. Make
sure the console is turned as shown in the drawing.
Connect the console wire harness [5] to the upright
wire harness [2] and insert both wire harnesses into the
right upright [1].
Tighten two console side bolts [6] into the top of the
upright and console. Repeat this procedure on the
other side. Use 13mm wrench to tight these bolts.
Assembly

5
Assembly
3.Place a handrail [7] on each pipe [8] of the console
[4]. Have a second person hold the handrail [7] in the
position shown. Insert two long handrail bolts [9] into
handrail through the upright. Next, insert four short
handrail bolts [10] down the handrail [7] as shown.
Tighten all of the bolts used in steps 1, 2 and 3. Insert
the large rubber caps [11] into the uprights [1].
4.Place the channel [12] under the upright [1] and
tighten the screws [13].
Note: Make sure that all parts are tight before you use
the TrekMill. Keep the included Allen wrenches in a
secure place. The second Allen wrench is also used to
adjust the walking belt.
Packing List
1. Long Handrail Bolts - 2
2. Short Handrail Bolts - 4
3. Console Bolts - 4
4. Upright Bolts - 12
(with star and plate washer)
5. Upright Channel Screws - 8
6. Large Rubber Cap - 2
7. Allen Wrench - 2
8. Safety Key - 1

Operation and Adjustment
6
Improper connection of the equipment-grounding conductor can result in an increased risk
of electric shock. Do not modify the power cord provided with the product. Use a transformer
when the voltages between the TrekMill and your facility do not match.
When the manual mode of the console is selected, the grade and speed of the TrekMill can
be changed with a touch of a button. As you exercise, the console will display continuous
exercise feedback.
The console also offers twenty preset programs. Each preset program automatically controls
the grade and speed of the TrekMill to simulate a hiking trail as it guides you through an
effective workout. Choose from five low courses, nine middle courses, and six high courses.
HOW TO PLUG IN THE POWER CORD
FEATURES OF THE CONSOLE

Operation and Adjustment
7
1. Attach the clip to the waistband of your clothing.
Stand on the foot rails of the TrekMill. Find the clip attached to the key and slide the clip onto
the waistband of your clothing. Next, insert the key into the console. Test the clip by carefully
taking a few steps backward until the key is pulled from the console, adjust the position of
the clip as needed. Then, remove the key from the console.
2. Plug in the power cord.
3. Move the on/off switch to the on position.
4. Insert the key fully into the console.
Stand on the foot rails of the TrekMill. Attach the clip securely to the waistband of your
clothing. Next, insert the key into the console.
Before operating the console, read the following precautions.
- Do not stand on the walking belt when turning on the power.
- Always wear the clip while operating the TrekMill.
- Adjust the speed in small increments to avoid sudden jumps in speed.
- To reduce the possibility of electric shock, keep the console dry.
Avoid spilling liquids on the console.
GETTING STARTED.

Operation
1.Select the manual mode.
When the key is inserted, the
manual mode will automatically
be selected, as shown by the
manual indicator. If a preset
program has been selected,
press the Select Program button
repeatedly until the Manual indicator lights.
2.Press the Start button.
A moment after the button is pressed, the walking
belt will begin to move at .3 m/h (.5 km/h). Hold the
handrails and begin walking.
3. To stop the walking belt.
Press the Stop button. To restart the walking belt,
press the Start button.
Note: It will take a moment for the walking belt to
reach the selected speed setting.
4. Change the grade of the TrekMill as
desired.
To change the grade of the
TrekMill, press and buttons.
Each time a button is pressed,
the grade will change by 1%.
The grade range is -5% to 50%.
Note: It will take a moment for the TrekMill to reach
the selected grade setting.
5. Change the speed of the TrekMill as
desired.
As you exercise, change the
speed of the walking belt as
desired by pressing the Speed
and buttons. Each time a
button is pressed, the speed
setting will change by .06 m/h (0.1 km/h). If a button
is held down, the speed setting will change quickly.
To change the speed setting quickly, press the exact
desired speed button.
Note: It will take a moment for the walking belt to reach
the selected speed setting.
6.
Follow your progress with the console displays.
- The Matrix
When the manual mode is selected,
the matrix will display a logo in the
manual mode.
- The Speed Display
This display shows the speed of the
walking belt. This display also shows
the maximum speed in the automatic
mode.
- The Grade Display
This display shows the grade of the
TrekMill. This display also shows the
maximum grade in the automatic
mode.
- The Distance/Vertical Distance Display
This display shows the distance you have trekked and
the vertical distance automatically. The automatic mode
is identical.
- The Calories/Time Display
This display shows the the approximate number of cal-
ories you burned and the elapsed time. This display
shows preset segment time of the program in the
automatic mode.
7. Finishing exercise.
Step onto the foot rails and press the Stop button.
Next, remove the key from the console and put it in a
secure place.
Note: If you press the Stop button in the manual mode,
the grade will be changed to the lowest level. If the key
is removed, the display and indicators on the console
remain lit when the power is on.
HOW TO USE THE MANUAL MODE
You can adjust the speed and grade as desired in the manual mode.
When you are finished using the TrekMill, move the on/off switch to the off position
and unplug the power cord.
8

Operation
9
1. Getting into the present program.
After inserting the key and the LED is lit, you can
select the program desired.
2.Select the desired preset program.
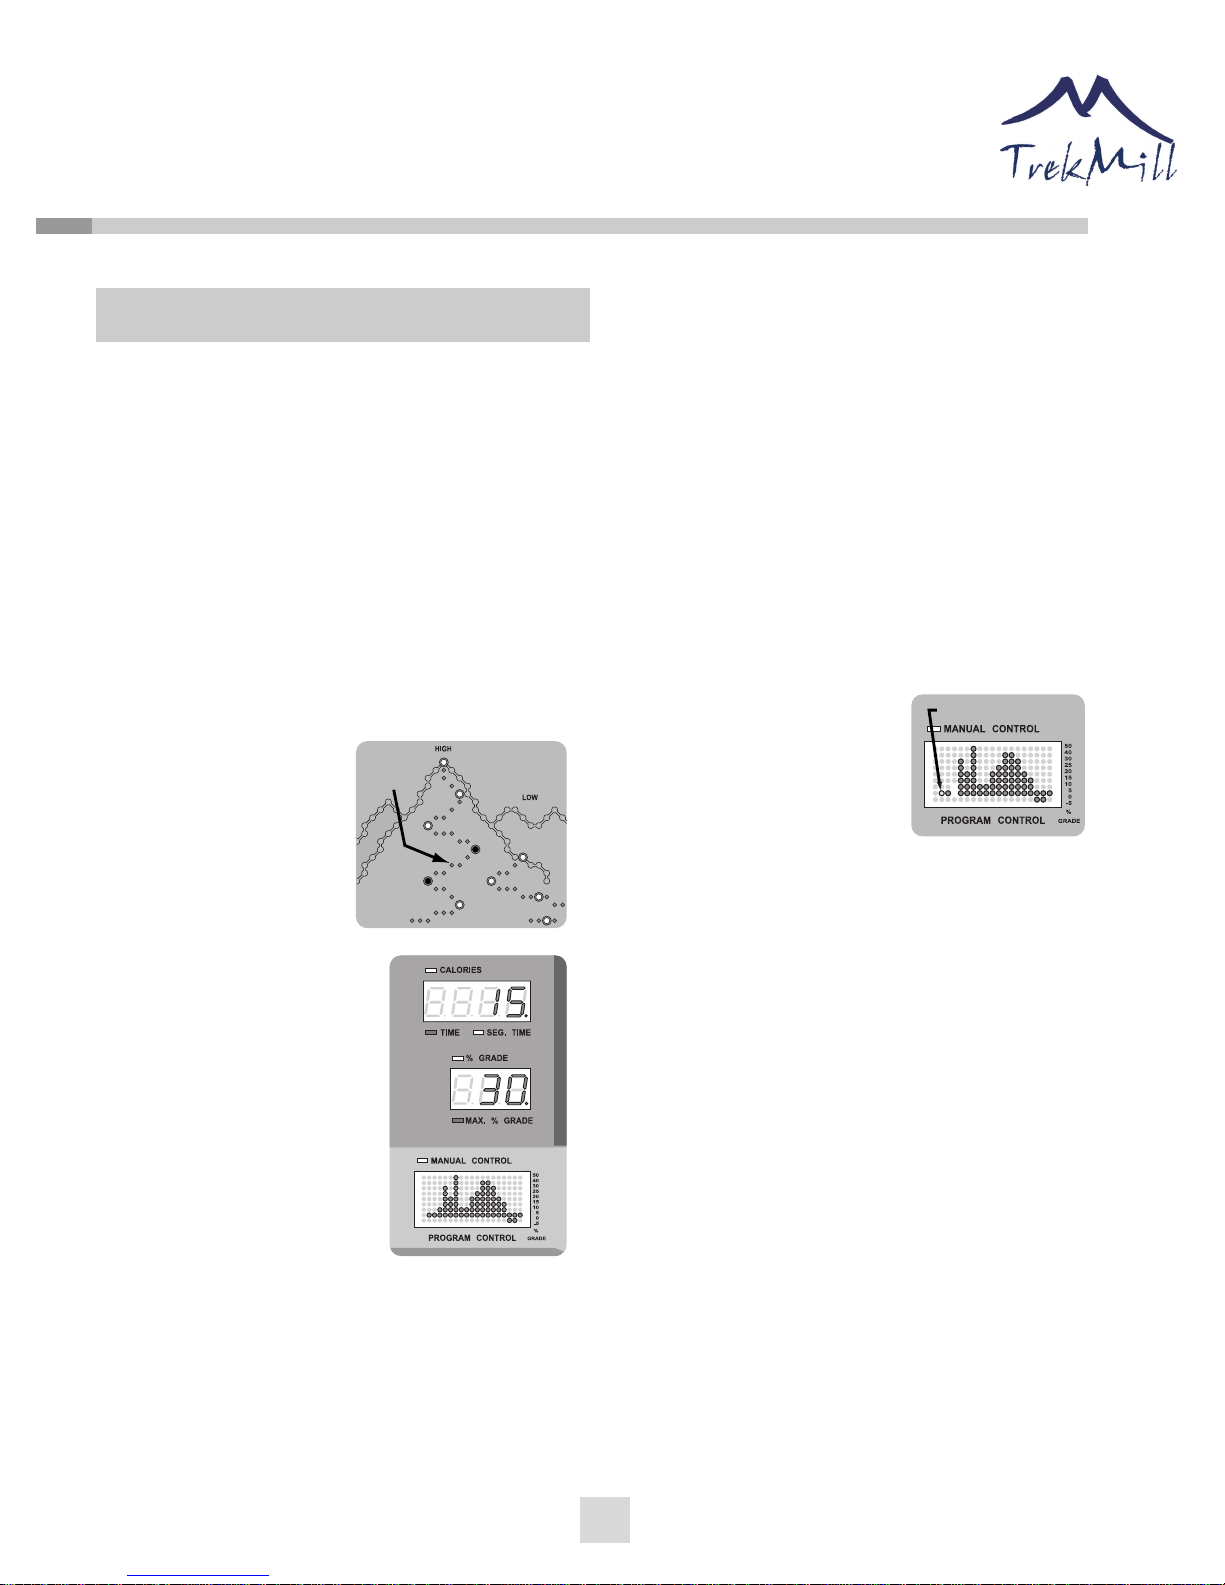
The twenty trails shown in
the trail display represent
the twenty preset programs.
As you press the Select
Program button repeatedly,
indicators will light in the
trail display to show which
trail you have selected.
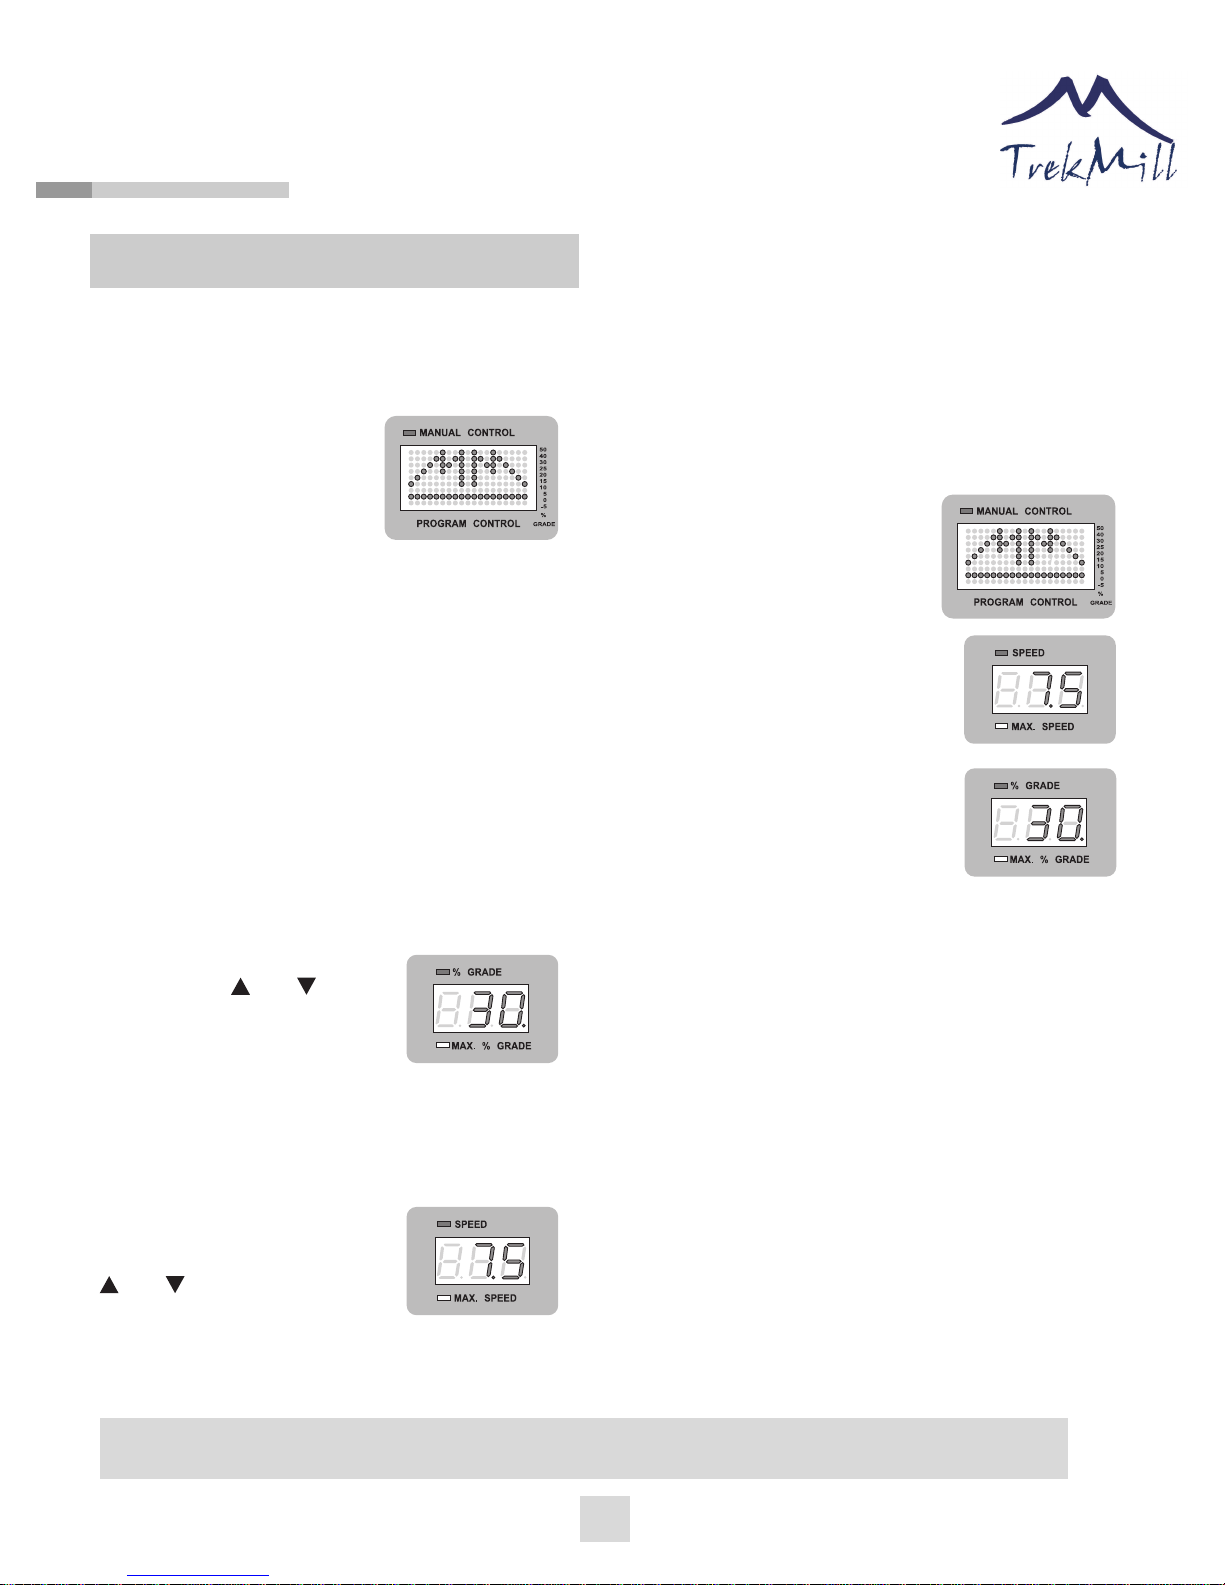
When a preset program is
selected, the matrix will show
the grade settings for the
program. In addition, the Speed
display will show the maximum
speed setting for the program
and the time.
Grade display will show the
maximum grade setting for the
program. The numbers shown
at first are maximum numbers,
the numbers will be changed
automatically during your trek.
3. Press the Start button.
A moment after the button is pressed, the TrekMill
will automatically adjust to the first grade and speed
settings for the program. Hold the handrails and
begin walking. Each program is divided into several
time segments of different lengths.
The Calories/Time display shows both the last time
in the program and the time remaining in the current
segment of the program. One grade setting and one
speed setting are programmed for each segment. The
grade setting for the first segment
is shown in the flashing Current
Segment column of the matrix.
The grade settings for upcoming
segments are shown in the
columns to the right.
When only three seconds remain in a segment of the
program, a series of tones will sound. In addition, the
Speed display will flash three times if the speed is
about to change. And the Vertical Distance/Calories/
Grade display will flash if the grade is about to change.
When the segment is completed, all grade settings in
the matrix will move one column to the left. The grade
setting for the second segment will then be shown in
the flashing Current Segment column and the TrekMill
will automatically adjust to the grade and speed
settings for the second segment.
The program will continue until the grade setting for
the last segment is show in the Current Segment
column of the matrix and no time remains in the
program. The walking belt will then slow to a stop.
4.Adjusting Exercise
If the grade or speed for the current segment is too
high or too low, you can manually override the setting
by pressing the Incline or Speed buttons on the
console. Every few times one of the Incline buttons is
pressed, an additional indicator will lighten or darken
in the Current Segment column of the matrix.
HOW TO USE PRESET PROGRAMS
The console offers twenty preset programs. Each preset program automatically controls the
grade and speed of the TrekMill to simulate a hiking trail as it guides you through an effective
workout. You can choose from five low courses, nine middle courses, and six high courses.
Follow the steps below to use a preset program.
Selected
Course
Current Segment

Operation
10
Note: If you manually override either the grade or
speed setting for the current segment, when that
segment ends, the TrekMill will automatically adjust
to the grade and speed settings for the next
segment. Because each program is based on a
preset distance, if you manually increase the speed,
the time remaining in the current segment and the
time remaining in the program will decrease; if you
manually decrease the speed, the time remaining in
the current segment and the time remaining in the
program will increase.
5.Temporarily stopping the program.
To stop the program temporarily, press the Stop
button once. When the stop button is pressed and
the grade is less than 10%, the grade remains
constant in the stopped position. When the stop
button is pressed and the grade is greater than 10%,
the grade will automatically adjust to 0%. If you
press the start button after you have paused the
program will continue from the point where you
paused. If you press the stop button a second time
the preset program will end and you will have to
start your program over.
6.Continuing exercise.
If you complete a course, the next course will flash.
Press the start button to begin the next program.
7. Switching to the manual mode.
Press the stop button twice if you want to switch to the
manual mode.
8.Completing exercise.
When the program is completed step onto the foot rails
and remove the key from the console. Make sure to
keep the key in a secure place.
Note: The displays and indicators on the console will
remain lit when the power is on even if the key is
removed.
HOW TO USE ADMINISTRATOR MODE
When you are finished using the TrekMill, move the on/off switch to the off position and unplug the
power cord.
1. Display the Cumulative Distance.
1. Stop the machine.
2. Take the key from the console.
3. Press the middle button and the stop button
at the same time.
4. You can see the cumulative distance in the
distance window.
2. Setting the limit of incline and speed.
1. Stop the machine.
2. Take the key from the machine.
3. Press the middle button pressing the stop button at
the same time.
4. Press the middle button once more.
(Entering the setting mode, max. incline
an max. speed will display).
5. Using the buttons related to the incline
and speed, you can set the limits of incline
and speed.
6. Operate the TrekMill once, prior to powering
off to enable the set values.
7. If you want to cancel this operation turn
the power off without running machine.
To finish this mode press the stop key. To finish this mode press the stop key.

Maintenance
11
Note: There is no need to adjust this product upon delivery.
When using this product commercially, periodically lubricate the inside of walking belt with
silicon oil. Most problems can be solved by following the steps below. Find the symptom that
applies, and follow the steps listed. If further assistance is needed, please let us know.
HOW TO MOVE THE TREKMILL
Before moving the TrekMill, change the grade of the TrekMillto the lowest level and
unplug the power cord.
Tilt the TrekMill back until it rolls freely on the wheels. The help of a second person may be needed when
tipping the TrekMill. Carefully move the TrekMill to the desired location. Place one foot on the walking belt,
and carefully lower the TrekMill until it is resting on the floor. Never move the TrekMill without tipping it back.
To reduce the risk of injury, use extreme caution while moving the TrekMill. Do not attempt to move the
TrekMill over an uneven surface.
TROUBLE SHOOTING
The power does not turn on.
1. Make sure the power cord is plugged in.
2. Make sure the power supply is the correct voltage.
3. Make sure the on/off switch is in the "on" position.
The power turns off during use.
1. Check the circuit breaker located on the TrekMill near the power cord. If the circuit breaker has tripped, wait
for five minutes and then press the switch back in.
2. Make sure the power cord is plugged in.
3. Remove the key from the console. Reinsert the key back into the console.
4. Make sure the on/off switch is in the "on" position.
The walking belt slows when walked on.
If the belt is over tightened, the TrekMill performance may decrease and
walking belt may become damaged. Remove the key, and UNPLUGTHE
POWER CORD. Using the supplied Allen wrench, turn both rear roller
adjustment bolts counterclockwise 1/4 turn. When the walking belt is
correctly tightened, you should be able to lift each side of the walking belt
2 to 2.75 in (5 to 7 cm) off the walking platform. Be careful to keep the
walking belt centered. Plug in the power cord, inset the key and carefully
walk on the TrekMill for a few minutes. Repeat until the walking belt is
properly tightened.

Maintenance
The walking belt is off-center
1. If the walking belt has shifted to the right, first remove the key and
UNPLUG THE POWER CORD. Using the Allen wrench, turn the left front
roller adjustment bolt clockwise, and the right bolt counterclockwise, 1/4
of a turn each. Be careful not to over tighten the walking belt. Plug in the
power cord, insert the key and run the TrekMill for a few minutes. Repeat
until the walking belt is centered.
2. If the walking belt has shifted to the left, first remove the key and
UNPLUG THE POWER CORD. Using the Allen wrench, turn the left front
roller adjustment bolt counterclockwise, and the right bolt clockwise, 1/4
of a turn each. Be careful not to over tighten the walking belt. Plug in the
power cord, insert the key and run the TrekMill for a minutes. Repeat until
the walking belt is centered.
The walking belt slips when walked on
If the walking belt slips when walked on, first remove the key and
UNPLUG THE POWER CORD. Using the Allen wrench, turn both roller
adjustment bolts clockwise, 1/4 of a turn. When the walking belt is
correctly tightened, you should be able to lift each side of the walking belt
2 to 2.75 in. (5-7cm) off the walking platform. Be careful to keep the
walking belt centered. Plug in the power cord, insert the key and carefully
walk on the TrekMill for a few minutes. Repeat until the walking belt is
properly tightened.
12

Limited Warranty
1. Keiser warrants this product to be free from defects in workmanship and material, under normal use and
service conditions, for a period of one year from the date of purchase (Running Belt and Motor Belt for six
months from the date of purchase). This warranty extends only to the original purchaser. Keiser's obligation
under this warranty is limited to replacing or repairing, at Keiser's option, the product at one of its authorized
service centers. All products for which warranty claim is made must be received by Keiser at one of its
authorized service centers with all freight and other transportation charges prepaid, accompanied by sufficient
proof of purchase. All returns must be pre-authorized by Keiser. This warranty does not extend to any product or
damage to a product caused by or attributable to freight damages, abuse, misuse, improper or abnormal usage
or repairs not provided by an Keiser authorized service center, to products used for commercial or rental
purposes, or to products used as store display models. No other warranty beyond that specifically set forth
above is authorized by Keiser.
2. Keiser is not responsible or liable for indirect, special or consequential damages arising out of or in
connection with the use or performance of the product or damages with respect to any economic loss, loss of
property, loss of revenues or profits, loss of enjoyment or use, costs of removal, installation or other
consequential damages of any nature.
3. The warranty extended hereunder is in lieu of any and all other warranties and any implied warranties of
merchantability or fitness for a particular purpose and is limited in its scope and duration to the terms set forth
herein.
Product Name
Model Name
Serial No.
Warranty Period
Purchase Date
TrekMill
1 year from purchase
(6 months for Running Belt and Motor Belt)
13

Keiser Corporation
2470 S. Cherry Avenue Fresno, CA 93706 USA
1-800-888-7009
Tel: (559)256-8000 Fax: (559)256-8100
www.keiser.com
Table of contents
Popular Treadmill manuals by other brands

NordicTrack
NordicTrack Incln Train X11i Intera Treadmill manual

Zipro
Zipro Notus user manual

Weslo
Weslo Easy compact 2 treadmill Manual de utilizare

Trojan
Trojan CARDIO COACH 460 Assembly, care and instructions manual

Reebok
Reebok RX 820 RBTL69920 user manual

SPARTAN sport
SPARTAN sport 1271 owner's manual

Sunny Health & Fitness
Sunny Health & Fitness SF-T7705 user manual

NordicTrack
NordicTrack Pro 3000 Treadmill Gebruikershandleiding

ICON Health & Fitness
ICON Health & Fitness NordicTrack 2500 R user manual

NordicTrack
NordicTrack C2155 NTL07707.0 user manual

Gymstick
Gymstick PRO20.0 user manual

Costway
Costway SuperFit SP37747US user manual