Kellfri 35-VKMATV120H User manual

Carefully read the operating instructions
before using the product!
Operating instructions translated from Swedish
35-VKMATV120H
35-VKMATV150H
35-VKMATV150H2
FLAIL MOWER ATV WITH FLAP

Kellfri designs and supplies ecient, aordable machinery and components for forestry,
agriculture, construction and gardening in Sweden, the rest of the Nordic region and Europe.
We recommend that you always read and follow the safety instructions and the instructions in
the machine's operating manual.
Kellfri is not liable for any errors in this document.
TABLE OF CONTENTS
Introduction 3
Product information 3
Machine's function 3
Safety instructions 4
Instructions for emergency situations 4
Personal protection 4
Surroundings 5
Before use 5
Environment 5
Use 6
After use 6
Maintenance and service 7
Transportation and set-up 7
Recycling 7
Motorised machines 8
Relling with engine oil 9
Fire prevention 9
Machines/tools connected to hydraulics 10
Chemicals 11
Risks and hazards associated with the use of garden machinery 12 - 13
Warning labels 14
Before use of ail mower 15
Adjustment of tow bar 15
Starting the engine 16
Operation and speed 16
Adjustment of cutting height 17
Transport mode 18
Lever height adjustment 18
Support roller and side skids 19
Tyre pressure 19
Inspection of rotor bearings 19
Inspection of oil level in engine 19
Inspection of belts 20
Inspection of wheel bearings 20
Maintenance of blades 20
Service and interval 21
Grease points 22
Choke - idling 23
Exploded diagrams and materials list 24 - 28
Notes 29 - 30
Deviation form 31
Warranty terms and conditions 32

Table of Contents
INTRODUCTION
Thank you for choosing a product from Kellfri AB. Compliance with the safety instructions,
operating manual and sound common sense will guarantee many years of enjoyment using
the product. Kellfri's equipment and products are aimed at self-employed farmers, horse
enthusiasts and other country-dwellers who have stringent performance demands.
PRODUCT INFORMATION
These ail mowers are designed to be towed behind an ATV or 4-wheeler, but can be towed
by any vehicle with a 50 mm hitch ball. The swivelling tow bar hitch means that it follows
the ground regardless of the angle to the towing vehicle. The ail mower is operated using a
separate 13 hp engine. The tow bar hitch can be adjusted laterally to 3 positions. Simple and
stable structure made from robust steel plating.
The perfect tool for you if you have large areas of grass.
The ail mower is equipped with an easy to start petrol engine and is designed to withstand
many dierent conditions. The ail mower is easily height adjustable. It also has a full-width
support roller to avoid damage to the machine, rotor and blades.
The ail mower has a steel construction to give it strength. All parts are of a high quality,
guaranteeing many years of problem-free use.
MACHINE'S FUNCTION
The equipment is intended solely for cutting and topping grass and grasslands.
Remove any harmful objects such as stones, branches, etc. from the cutting area before
starting work.
Important! The machine is supplied without oil. Fill before use!
TECHNICAL DATA 35-VKMATV120H 35-VKMATV150H 35-VKMATV150H2
Length 1800 mm 1720 mm 1720 mm
Width 1850 mm 2060 mm 2060 mm
Height 830 mm 900 mm 900 mm
Working width 1200 mm 1500 mm 1500 mm
Cutting height Max: 300 mm
Min: 20 mm
Max: 300 mm
Min: 20 mm
Max: 300 mm
Min: 20 mm
Wheel designation 16 x 6.5-8 16 x 6.5-8 16 x 6.5-8
Number of ails 28 34 34
Engine, hp 15 15 18 (electric start-up)
Operating speed, km/h 6 - 12 6 - 12 6 - 12
Engine oil, type L SAE 15W-40 SAE 15W-40 SAE 15W-40
Oil quantity, L 1.1 1.1 1.1
Fuel quantity, L 6 (unleaded 95
octane petrol)
6 (unleaded 95
octane petrol)
6 (unleaded 95
octane petrol)
Weight 243 kg 275 kg 275 kg
Spark plug NHSP LD F6RTC NHSP LD F6RTC NHSP LD F6RTC
Kellfri's 35-VKMATV120H & 35-VKMATV150H are patent pending

Table of Contents
SAFETY INSTRUCTIONS
Before using the equipment or product, and for the safety of yourself and others, you must
read the safety instructions and instruction manual and understand their contents. Always
keep the safety instructions and operating manual handy for users of the equipment or
product. For the safety of both yourself and others, it may be a good idea to read through
the safety instructions every now and then. If the safety instructions or the operating manual
are damaged, or become unusable for any other reason, new copies may be ordered from:
Kellfri AB, Munkatorpsgatan 6, SE-532 37 SKARA, Sweden. Tel.: +46 511 242 50
The safety instructions can also be downloaded from Kellfri's website: www.kellfri.co.uk
Do not use the equipment or product if you feel ill, tired or are under the inuence of alcohol.
Do not use the equipment or product if you are taking prescribed medication or drugs, or
suering from severe depression or mental illness. Always comply with general rules of the
road and applicable rules stipulated by animal welfare legislation. People under the age of 15
are not allowed to use the equipment.
INSTRUCTIONS FOR EMERGENCY SITUATIONS
In case of emergency, call 112.
Always have a mobile phone or emergency phone available when working alone. A rst-aid
kit and re extinguisher must be kept in an easily accessible location when carrying out any
work, maintenance or service.
Warning!
The original design of the machine must not, under any circumstances, be modied
withouttheapprovalofthemanufacturer. Unauthorised modications and/or accessories
may cause life-threatening injuries or death to users and others.
PERSONAL PROTECTION
Always use suitable protection equipment. Do not wear loose clothing or jewellery while
working with the equipment. Long hair should be tied up when working with equipment
that has moving parts. Use protective gloves to avoid the risk of burns if hot surfaces such
as exhaust pipes are touched, and to avoid oil and petrol getting in contact with the skin. Ear
defenders must be worn whilst the engine is running.
Kellfri is not liable for any modications, changes or rebuilds carried out by customers.
Where the machine is used professionally, employers are responsible for ensuring that users of the
machine have theoretical and practical knowledge of the machine and that work is performed in
a safe manner. Stay informed by complying with work environment legislation; contact your local
work environment authority.

Table of Contents
SURROUNDINGS
Check that the work area is free from bystanders and objects before hitching or using the
equipment. Otherwise, there is a risk of serious injury. Be extra careful if there are children in
the vicinity of the area where the equipment or product is used or stored. Check that there
are no low-hanging electrical cables within the work area. Exercise caution when working on
slopes and close to ditches.
Always work alone with equipment or products that are made for working alone. Never leave
rubbish in the work area, and keep work areas clean. Always respect the equipment's risk zone.
BEFORE USE
Carefully read the safety instructions and the operating manual. Make sure that you
understand the safety instructions, the operating manual and warning labels. Use common
sense and suitable personal protective equipment when using the product. Always check the
performance of the machine combination to be used. It is important that these are compatible
and work satisfactorily together. This is to ensure that the equipment or product works as
expected, and to guarantee the safety of yourself and others. Carry out a visual inspection
of the equipment or product before use. Repair or replace damaged or worn parts to reduce
the risk of injury. Grease moving parts and check that all nuts and bolts are tightened. Correct
if necessary. Learn and remember the correct working method. Beginners must work slowly
until they have learned how the machine or product works.
Users/customers are responsible for ensuring users can handle the situation. If a user feels
that the machine is dangerous to use, they should not use it until they have received thorough
training.
WARNING!
Never use equipment or products with defective safety components.
Children must not be left unsupervised in the area!
Warning!
ENVIRONMENT
• Disposal of oil and other waste
• Improper disposal of oil or other waste may be hazardous to the
environment.
• When oil is emptied from the machine, it must be poured into a
leak-proof container suitable for oil. It is not permissible to store
oil in a container used for food or drink, in order to avoid the oil
being consumed by mistake and causing serious injury.
• It is prohibited to spill oil on the ground, or pour it into a drain or
anywhere leading to a water source.
• Discarded oil, fuel, coolant, brake uid, lters and batteries may
not be thrown away or emptied in just any way. Contact your
local authority for further information.

Table of Contents
USE
Only those who understand the safety instructions and the operating manual may use the
equipment or product. Exercise caution and care when working with the equipment or
product and only use them in the way described in the instruction manual.
There is a risk of crushing when working with equipment that has moving parts. Exercise
caution when working with equipment with hydraulic hoses, as oil under pressure can
penetrate the skin. Immediately seek medical attention if this should occur. Always work alone
with equipment that is made for working alone.
Respect the equipment's risk zone.
For further information about your machine, read the machine's operating manual.
DANGER!
CAUTION!
NOTE:
Warning symbols identify important safety aspects in this manual in order to help you and others avoid dangers
and accidents. When using the machine: Be extremely careful!
Warning!
This symbol indicates that a serious accident will occur if the directions in the operating manual are not
followed. The accident will lead to serious injury, possibly death, or serious damage.
This symbol indicates that an accident will occur if the directions in the manual are not followed. The
accident will lead to serious injury or damage.
This symbol indicates that an accident may occur if the directions are not followed.
The accident will lead to injury or damage.
NOTE indicates the risk of a breakdown if the directions are not followed.
Where the machine is used professionally, employers are responsible for ensuring that users of the
machine have theoretical and practical knowledge of the machine and that work is performed in
a safe manner. Stay informed by complying with work environment legislation; contact your local
work environment authority.
AFTER USE
• Ensure that the equipment/product is standing on level ground when it is disconnected.
Use stabilisers, if these are included with the product/tool.
• Wash, rinse with water and dry if necessary.
• Re-lubricate if necessary.

Table of Contents
MAINTENANCE AND SERVICE
• Make sure that the equipment is stable and cannot tip over when carrying out mainte-
nance and service work.
• Replace damaged or worn parts to reduce the risk of injuries.
• Carry out maintenance, service and checks in line with recommendations.
• Only use spare parts with equal performance to reduce the risk of injuries and breakdowns.
• All electrical repairs and electrical connections must be carried out by a qualied person.
Check that all nuts and bolts are tightened after maintenance and service work.
Always test the machine before starting work.
IMPORTANT! Check the oil level (engine oil) and lubricate grease points regularly!
IMPORTANT! Avoid over-lubricating. Dirt collects easily on exposed grease and causes
increased wear. After lubrication, wipe o excess grease.
DANGER!
WARNING: Pressurised oil and fuel leaks can penetrate skin and cause serious
injuries. Do not use your hands to locate leaks. Use a piece of paper or cardboard
to look for leaks.
Kellfri AB has a policy of continuous product development and therefore reserves the right to
make modications, e.g. to the design and appearance of the product, without prior notice.
TRANSPORTATION AND SETUP
• Check that the work area is free from bystanders, children and objects before driving o.
• Always observe additional caution during transport and moving.
• Ensure that the equipment or product is well anchored and that available transport
lashings are tted.
• Always position the load as low as possible. All protruding loads should be well anchored.
• Respect the risk zones even during transport and moving.
• Do not permit anyone to walk under suspended loads when carrying out lifts.
• Trailers used for transport should have brakes that work.
• An SMV sign must be attached when travelling on public roads.
• Check tyre pressure - see information on tyre pages. Do not exceed the maximum pressure!
• Always store the equipment or product in a dry place, preferably under a roof, when not
in use.
• Ensure that the equipment or product is stable and cannot tip over.
• Never permit children to play at the storage site.
• Be aware of the tipping risk!
RECYCLING
For scrapping, the equipment/product must be dismantled and transported
to a recycling station designated by your local authority. Any liquids should
be collected and transported to a recycling station designated by your local
authority. Contact your local authority for further information.

Table of Contents
MOTORISED MACHINES
Important to bear in mind when using motorised machines:
• Fumes contain toxic substances, so never use the machine in poorly ventilated spaces. Do
not run the engine in an enclosed space, as the exhaust fumes contain carbon monoxide,
which is lethal if inhaled. The motorised machine must not be used indoors.
• Risk of burns from touching hot surfaces such as exhaust pipes.
• Operate a new machine at low speed for the rst 20 hours, not at high speed and with
a full load.
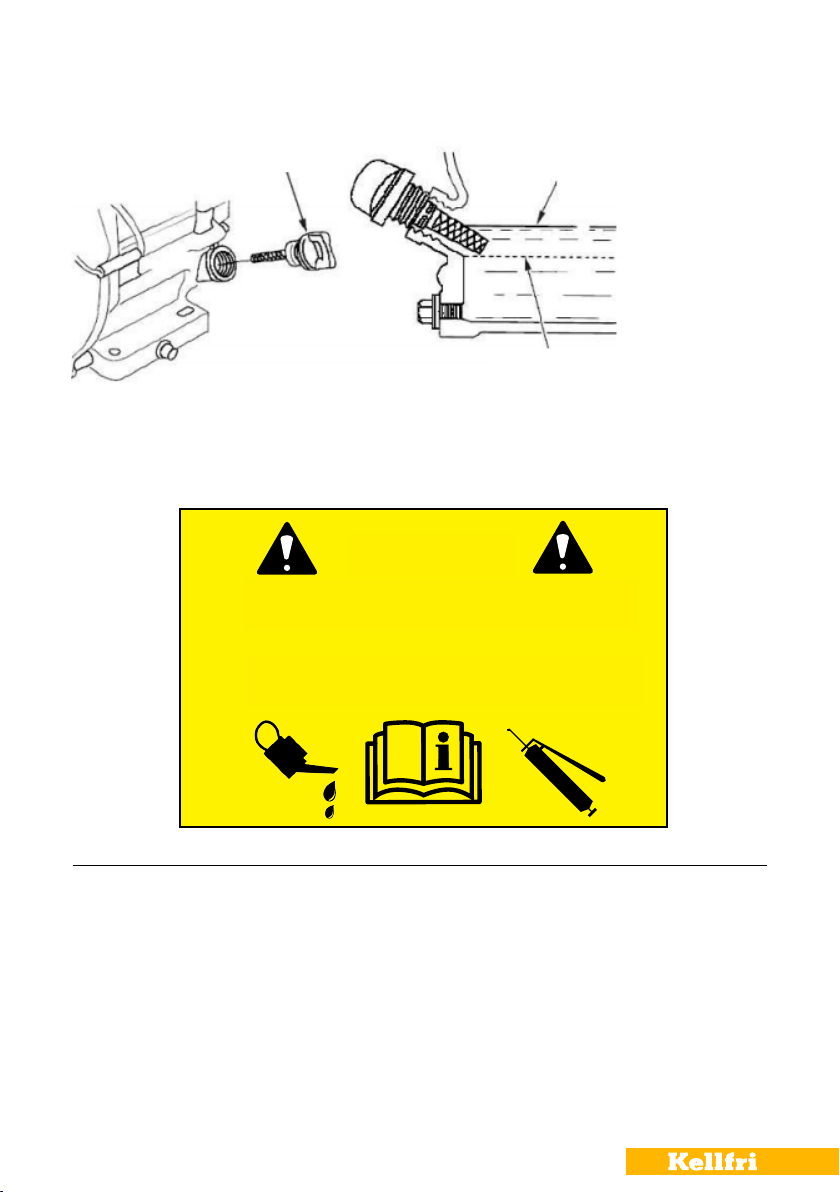
• Avoid getting petrol/oil on your skin. If this happens, rinse thoroughly with water.
• Avoid breathing in petrol fumes while refuelling. Screw the tank cap on securely.
• Do not keep fuel or other explosive substances near the work zone when using
the machine.
• Only store fuel in containers intended for this purpose.
• Refuelling is not permitted indoors or when the engine is running.
• Never use dirty oil or fuel. This can cause serious damage to the engine.
• Never leave the machine with the engine running.Turn o the engine when you leave the
equipment, even for a short period.
• Only the operator may be present in the vicinity of the machine while it is in operation.
Take care if there are children in the area where the product is stored or used.
• Check that the work area is free from bystanders and objects before starting.
• Do not use the machine without having all guards correctly mounted.
• Do not operate the machine if it is vibrating substantially; stop the machine immediately
and check the maintenance schedule. Check that all nuts and bolts are tightened.
• Do not alter the engine settings unless specied by the engine manufacturer.The engine's
rpm must never exceed the value indicated on the sign.
• Never exceed the maximum driving speed.
• The SMV sign must be clearly visible during work.
• Lights must be used for driving on public roads, both in daylight and in darkness.
• Do not spray water directly on the sound damper, exhaust system or lter. Water may
creep into the engine and cause serious damage.
• Carry out maintenance, service and checks in line with recommendations. Replace
damaged and worn parts. Before beginning servicing work: stop the engine, remove the
key, put the gear into neutral, apply the handbrake and ensure that all parts have stopped
and cooled down.
• The exhaust pipe becomes hot and there is a risk of re if grass and dry material collect
around the exhaust pipe. Check and clean if necessary.
• A type ABE2 or 3 re extinguisher should always be easily accessible during work. Contact
your insurance provider.
Avoid hearing damage
Long-term exposure to noise can cause permanent hearing damage.
Use ear defenders.
Prevent inhalation of toxic gases
Fumes contain toxic substances, so never use the machine in poorly ventilated
spaces. Not for indoor use.
Avoid burns
Never touch the silencer or other part of the exhaust system while the generator
is running or when the parts are still hot.

Table of Contents
PREVENT FIRE
• Use the correct fuel specied for your machine. Unsuitable fuel, such as kerosene, must not be used.
• Wipe o spilt fuel with a clean cloth.
• Smoking and open ames are prohibited in the vicinity of the machine. Petrol can ignite easily.
• Keep explosive and ammable materials away from a machine with a combustion engine, as
the exhaust system generates high temperatures during operation and can cause re or explosion.
• In order to prevent re and to keep the generator/engine well ventilated, the machine should
be placed at least 1.5 m away from buildings or other equipment during operation.
• Always place the machine on a level surface. There is a risk of fuel spillage if the machine is placed
on an incline.
Relling/measuring stick max. level
min. level
Rell with engine oil 15W-40, 1 L
Check the level by withdrawing the measuring stick. The oil level should be between min. and
max.
REFILLING WITH ENGINE OIL
CAUTION!
This machine is delivered without oil!
Fill up the tank BEFORE USE!
IMPORTANT! Check and lubricate
all grease points before use!
VARNING!
Maskinen levereras utan olja!
Fyll på olja INNAN ANVÄNDNING!
VIKTIGT! Kontrollera och smörj
alla smörjpunkter innan körning!
The machine is supplied without oil!
Rell with oil BEFORE USE!
IMPORTANT! Check and lubricate
all grease points before operation!
WARNING!

Table of Contents
MACHINERY/EQUIPMENT CONNECTED TO HYDRAULICS
Be careful when you connect your machine or equipment to a hydraulic hose.
DANGER!
Pressurised oil and fuel leaks can penetrate skin and cause serious injuries. Do not use your
hands to locate leaks. Use a piece of paper or cardboard to search for leaks.
• Warning for high pressure, risk of penetration injury.
• Before repairs or maintenance are carried out, the system must be relieved of any
remaining pressure.
• Turn o the tractor and move the hydraulic levers back and forth to release any pressure
that may still be in the oil hoses and pipes before starting any work on them or the
hydraulic cylinders.
• Clean the lter in the suction pipe after 10 hours' work.
• Immediately replace hydraulic hoses if cracks or wear are detected.
• Do not adjust the valve settings. Incorrect adjustment can result in damage to the
machine and/or injury.
• The hydraulic system must only be operated using hydraulic oil intended for the purpose.
Check the oil level before you start the machine!
• When commissioning a new machine, it is recommended that the hydraulic oil is changed
after the rst 10 hours of operation, in order to remove any dirt or metal chips which may
have got into the hydraulic system.
NOTE: The oil becomes hot when it ows through the hydraulic system. Check the oil temperature at regular
intervals in order to avoid overheating. Stop the machine if the oil becomes overheated and allow the oil to
cool down.

Table of Contents
CHEMICALS
To maximise the service life of a product/equipment, maintenance - and not least preventive
maintenance - is important, and this is largely what greases and oils do. Carefully read the
operating manuals for your new products or equipment to ensure correct maintenance and
service life and that the warranty remains valid!
Lubricating greases
First aid measures.
Inhalation - In the event of unintended inhalation of fumes, move the injured person into
fresh air.
Skin contact - Wash with soap and water. Contact a doctor in the event of eczema or skin
complaints.
Eye contact - Remove contact lenses, if any, before rinsing. Rinse thoroughly with large
amounts of water, including under the eyelids. Contact a doctor if discomfort remains.
Ingestion - DO NOT induce vomiting. Drink water in small quantities. In the event of ingestion
or discomfort, contact the poison information service or a doctor.
Hand protection - Wear protective gloves.
Eye protection - Avoid contact with eyes. Wear approved protective goggles.
Body protection - Suitable protective clothing.
Respiratory protection - No protection is necessary during normal handling.
Greases should be stored well-sealed in a cool place in a well-ventilated area. Storage
temperature must not exceed 45°C. Keep away from heat, ames and sparks. The function and
strength of materials such as steel, plastic, oils, grease etc. deteriorates considerably at very
low temperatures (-20 to -30°C).
Degreasing
To ensure the best lubricating eect, you need to clean parts of the product or equipment
from time to time. We recommend degreasing to achieve thorough cleaning and to remove
all residues of old lubricant, which may contain destructive particles.
The degreasing agent we supply at Kellfri is OKQ8, in a 20-litre can.
Keep chemicals out of the reach of children and animals.

Table of Contents
RISKS AND HAZARDS ASSOCIATED WITH THE USE OF GARDEN MACHINERY
Risk of crushing
Observers can be injured when the machine is lowered in the cutting position. Pasture toppers have
crushing points around the hinge areas and between the three-point attachment and the main body.
Respect the risk zone of 15 m!
Rotating blades
WARNING! Any person can risk injury by putting their hands or feet under the machine when it is lifted
from the ground and the blades are still rotating. Nobody is allowed in the vicinity during operation or
when the machine is running.
Risk of crushing
This risk is common in mechanical transmission devices such as belt drives, bevel gears and rollers.
Ensure that all guards are correctly tted.
Rotating blades
Risk when disengaging machine
The heavier a rotating part is, the longer it will continue to rotate after the wheel drive has been
disconnected. This property is called free-wheeling. Rotating blades and other components such as drive
shafts etc. will continue to spin round after the wheel drive has been disconnected. Injuries occur:
• When the operator disconnects the equipment and attempts to clean or adjust the machine before
the components have stopped rotating.
• When the shear bolt in the protective device in the power outlet disintegrates and the rotors continue
to spin while the power outlet has stopped. The operator's awareness is of key importance for safety
around rotating parts. Never raise the machine while the blades are still rotating!
Risk of ejected objects
Machines that cut grass eject material during operation. Foreign objects such as stones, sticks and other
debris can nd their way under the machine and be ejected at great speed. Metal guards at the sides and
front prevent these objects being ejected, but this is no guarantee that they will always capture everything.
Observers or animals standing in the way of an ejected object can suer serious injury.
Never operate the machine when there are observers nearby. Respect the equipment's
risk zone of 15-25 m!
Noise
Note that the machine is intended for outdoor use and that the operator's position is the driver's seat of
the tractor. It is advisable to read the directions given in the tractor manual and maintenance instructions.
The sound pressure level during operation exceeds 70 dB. Hearing protection must therefore be worn
during operation.
Accidents involving slipping and falling are often a result of:
• Slippery surface
• Uneven steps and work platforms.
The risk of slips and falls can be reduced considerably by exercising good judgement.
All unprotected rotating machine parts increase the risk of accidents. Accidents usually occur when
loose-tting clothing or long hair is caught and wrapped around rotating parts, such as PTO shafts or
drive shafts on the machine. Ensure that all guards are correctly tted.

Table of Contents
Drive safely on public roads
• Always follow trac safety rules on public roads, and following the regulations applying
to driving a tractor with towed equipment on a public road.
• Check that reectors, warning signals and/or warning ags indicating protruding
equipment are tted to the machine or tractor. These indicators must be correctly
mounted, and must be visible and easy for drivers of other vehicles to see.
• Observers must not lean against or climb onto the machine during transport or during
work. NEVER allow anyone to travel on the machine!
• The maximum transportation speed must not exceed 20 km/h
• Brake regulations: If the gross weight of the trailer exceeds the gross weight of the towing
vehicle, the trailer must be equipped with a brake. For further information, contact the
trac authorities.
• IMPORTANT! Mark protruding equipment clearly with additional lights or suitable
reectors. It is important that the equipment is visible! If you are driving on a public road,
any load or equipment protruding in front of or behind the tractor must be marked. In
darkness, at dusk or dawn or in weather with poor visibility, the load must be marked
with a white reector and lantern at the front and a red reector and lantern at the rear.
In daylight you can mark the load with a ag or a piece of fabric in colours which are easy
to notice, such as red and yellow.
• Think about front-loaded equipment. As well as marking front-loaded equipment clearly,
you can also try to make front-loaded equipment such as a bucket, bale spike or pallet
forks less aggressive if another driver should collide with it.
• Before going out onto public roads, it is also always advisable to look over your vehicle
and check that the brake system on the following vehicle is working, and that your tow
bar eyes are not too worn. A worn-out towing eye can break if subjected to a heavy loaf,
and you can lose your cart.
• It is also advisable to check that the SMV sign is clearly visible from behind. If it is obscured
by any equipment or load behind, you must hang an additional one at the rear of the
vehicle train.

Table of Contents
WARNING LABELS
Make sure warning labels are always visible and clean them when necessary. Do not use a
high-pressure washer directly on the warning label. If a part with a label is replaced, or the
label becomes worn or in any other way unusable, order a new set of labels.
SYMBOL EXPLANATION
Read the operating manual! Before carrying out work.
WARNING! Rotating machine parts.
WARNING Crushing risk! Never use the machine without all
guards correctly mounted. Do not put your hand or any other
part of your body into the machine while it is running.
Ejection warning!
Respect the equipment's risk zone!
- Lubrication
- Tighten all bolts, nuts and couplings before use.
The machine is for individual work only. Nobody is allowed
in the vicinity during operation.
Warning! Keep o the machine!
Warning! Accident risk for children!
Children are not allowed in the vicinity of the machine.
Always store the product on a dry surface, preferably under
a roof, when not in use.
The product is CE labelled

Table of Contents
BEFORE USING A FLAIL MOWER
Read the towing vehicle's instruction book before connecting equipment.
• Check the cog belt's tension, and adjust when necessary.
• Check that the ails are not defective, and replace if necessary,
• Ensure that all nuts, bolts and installations are securely mounted, that all packing/
transport material such as tape, steel bands, rope etc. has been removed.
• Check that the oil level in the engine is correct and that there is petrol in the tank.
• Check that the tyre pressure is correct. See information on tyre pages. Do not exceed the
maximum pressure!
• Ensure before use that all guards are in place and are not able to come loose.
• Connect the equipment to the ATV’s tow bar ball coupling.
• Press grease into all grease nipples.
ADJUSTMENT OF TOW BAR
The height of the tow bar attachment on the towing vehicle may vary. For adjustment of the
settings, there is a screw rod under the tow bar. It should be lengthened or shortened so that
the ail mower is horizontal on level ground. (This gives a more eective cutting performance.)
Screw/turn the rod: lengthen the rod to raise the tow bar or shorten to lower it (illustration 1)
IMPORTANT! TIGHTEN BOLTS BEFORE STARTING OPERATION AND AFTER THE FIRST
DAY OF OPERATION!
ILLUSTRATION 1
Double attachment
Decide whether you want to have the tow bar assembled
on the left or right side.
Lever. Lateral
adjustment of tow bar

Table of Contents
STARTING THE ENGINE
1. Read and understand the engine's operating manual before using the machine.
2. Observe all safety regulations: Keep hands and feet away from blades and other moving
parts.
3. Ensure that bystanders are at a safe distance from the machine.
4. Ensure that there is space between the blades and the ground/grass.
5. Select an area free of loose objects that can be ejected.
6. Turn the choke to the on position and set at idling.
7. Place one foot on top of the machine so that you have a rm grip and a good balance.
Pull the starter cord and let it return slowly back to the engine.
8. Allow a few minutes for the engine to warm up while idling. Set the throttle at
the factory setting for operation in order for the engine to have a normal working
speed of max. 3600 rpm.
Warning!
Altering the accelerator setting to increase rpm above the recommendations given
can invalidate the warranty. Cutting performance will decline, fuel consumption will
increase and major vibrations may arise, leading to danger for persons and damage
to equipment.
DRIVING AND SPEED
The amount of grass to be cut determines the forward speed; low speed usually produces the
best results. Ensure that you follow the sequence below. Normal speed: 1 km/h for heavy
work, 10 km/h for light work. Start with the lowest possible speed; ensure that the ail mower
is working eectively with the engine at maximum rpm without straining. (If this is not possible
because of very tough cutting conditions, raise the cutting level and cut the same area twice,
the second time with a lower cutting level. Allow at least 24 hours between rst and second
cutting to allow the grass to dry out.)
Increase the forward speed until the engine starts to labour, then slow down immediately and
maintain a speed where the engine runs easily. It is important to always listen to the engine
to be sure that the engine and ail mower are working eectively - slow down or stop if the
engine starts to labour.
Warning!
When changing from normal to heavier cutting, it is usual for the engine to start labouring
with a drop in rpm. SLOW DOWN IMMEDIATELY so that the engine returns to normal rpm
and speed. Follow the instructions above in“Normal speed”. Expected speed is much lower
when the machine is working hard.
FAILURETO DO SOWILL RESULT IN THE POWER-TRANSMISSION SLIPPING ANDVERY SERIOUS
DAMAGETOTHE CLUTCH AND DRIVE BELTS.

Table of Contents
ADJUSTMENT OF CUTTING HEIGHT
The cutting height can be adjusted at three (3) places: the tow bar, the support roller and the
wheels.
To raise or lower the cutting unit, adjust the following: raise or lower the wheels, raise or lower
the tow bar and roller or the tow bar and wheels.
Adjust the height as follows:
STEP 1 Wheels = Raise and lower the wheels by turning the levers. Check that both wheels are
at the same height.
Adjustment of wheel height.
When in operating mode, the
wheels must be adjusted. Turn the
height adjustment levers to raise
and lower the wheels.
STEP 2 Combination of tow bar and support roller = Lengthen the tow bar (screw/turn the
turnbuckle) to raise the tow bar or shorten it to lower it.
Raise the roller by loosening bolt 'B', loosen and remove bolt 'A'. (Repeat this on both sides of
the roller.) Then select a dierent hole and replace bolt 'A'. Tighten bolts 'A' and 'B' (illustration)
A
B

Table of Contents
STEP 3 Combining tow bar and wheels: Raise or lower the tow bar exactly as described in the
previous step. (Turn the turnbuckle in or out to shorten or lengthen the tow bar.)
Raise the wheels by turning the levers on both sides of the machine. Check that both wheels
are at the same height.
Adjustment of wheel height.
When in operating mode, the wheels must
be adjusted. Turn the height adjustment
levers to raise and lower the wheels.
The skids should not drop and touch the ground. The skids are to support the machine over
obstacles such as large stones or mounds of earth. If the skids touch the ground they will
cause ground damage and deep grooves, and the ails will hit the ground.
Important!
TRANSPORT MODE
When the ail mower is to be moved from one workplace to another, it is advisable to raise
the unit to the highest position, using a screw jack. (See section on cutting height.) The engine
must be turned o and the blades must have stopped before changing to transport mode.
Remove any loose material such as grass, etc. from the mower before leaving the eld. Never
move from one place to another with the engine running.
Please note that the ail mower is not legally authorised to use public roads. It should
not therefore be used on public roads. Maximum driving speed is 30 km/h.
LEVER HEIGHT ADJUSTMENT
IMPORTANT! Operating speed should be adjusted to suit the prevailing cutting
conditions. If the engine labours, the speed should be reduced. Be careful when
operating on uneven ground.
Lock. Locks the lever.

Table of Contents
SUPPORT ROLLER AND SIDE SKIDS
The main purpose of the support roller and the side skids is to prevent damage. If one of the
wheels runs down in one direction, or if there is uneven ground between the wheels, the roller
takes the weight of the mower and thus prevents the blades from touching the ground. The
support roller combined with the side skids gives the rotor good protection. The support roller
has the additional advantage of allowing grass edge cutting, as the roller enables the wheels
to hang outside the edge. The factory-set position of the roller and side skids is suitable for
most situations. But if the ail mower is often used in slightly tougher terrain, the roller and
side skids should be lowered to give increased ground clearance for the rotor and blades.
When the ail mower is used for 'trimming', the roller can be raised by using the various holes
to give the desired cutting height, and the wheels can be raised o the ground.
TO ADJUST THE SUPPORT ROLLER:
Loosen level bolt 'B', loosen and remove bolt 'A'. (Repeat this on both sides of the roller.)
Then select a dierent hole and replace bolt 'A'.
Tighten bolts 'A' and 'B'.
A
B
Basic adjustment of skids:
Adjust the skids as protection for the ails, allowing the skids to be about 2 cm closer to the
ground than the skids in their lowest position.
TYRE PRESSURE
Do NOT exceed the recommended tyre pressure. See info on sides of tyres for exact value.
16.5 X 6.508 29 PSI (max) TIGHTEN BOLTS AFTER
A FEW HOURS OF
OPERATION!!!
Important!
INSPECTION OF ROTOR BEARINGS
Turn the rotor axle by hand and feel for any unevenness in the bearings. Also try to move the
axle from side to side to discover any looseness. If you discover any unevenness or looseness,
remove the axle casings to inspect the bearings more closely.
INSPECTION OF OIL LEVEL IN ENGINE
With your mower in a horizontal position, open the oil relling tap
and check that the oil level is up to the brim - see illustration.

Table of Contents
INSPECTION OF COG BELT
A rst inspection and retensioning must be performed after one hour's operation, to ensure
that the cog belt is correctly tensioned. Check the cog belt regularly and tighten when
necessary. Belt tensioning: the belt should move 20 mm (10 mm on each side) under pressure.
ADJUSTMENT BOLT
INSPECTION OF WHEEL BEARINGS
First, ensure that all wheel nuts and bolts are suciently tightened. Raise one side of the ail
mower so that one of the wheels is exactly above the ground. Turn the wheel by hand and
check the wheel's position. To check the bearings, try to move the wheel from left to right and
feel for any looseness. Replace bad bearings.
GREASING THE 50 MM TOW BAR COUPLING
Check the coupling for signs of damage or wear, swivel the coupling 360 degrees and check
that the bushings are not worn. Replace damaged and/or worn parts.
Grease the ball coupling regularly.
BLADE MAINTENANCE
The ail mower is equipped with blades manufactured for a long service life. If a blade loosens
or breaks, it is important to replace it immediately. If this is not done, imbalance may occur,
which could have very serious consequences. When replacing the blade, the blade on the
opposite side of the rotor must also be inspected for damage and wear. If it is partly or wholly
worn, it must be replaced to maintain the correct weight balance. When the rst cutting edge
begins to become blunt, the entire set should be turned or replaced. Use of blunt blades
reduces cutting performance and increases fuel consumption.
Blades must be replaced as follows:
A) Ensure that the engine is switched o and the blades are not rotating. Turn o the fuel tap
and allow the engine to cool down for ve minutes. Remove the spark plug to ensure that the
engine cannot start.
B) Raise the mower to its maximum cutting height.
Carefully raise the tow bar to a slightly inclined position so that the height adjustment bar can
take some weight.
D) Loosen and remove the bolts.
E) Replace the blades. (Take note of the direction of rotation.)
F) Screw the bolts tightly back in place and check that the blades move on the axle.
NOTE: When lubricating wheel bearings: take care not to pump
in too much lubricant. Excess lubricant gets into the drive belts,
causing them to slip and burn.
Remove the protective fairing for a full inspection of the belts
when lubricating, and wipe o excess lubricant if necessary. Lu-
bricate regularly.
This manual suits for next models
2
Table of contents
Other Kellfri Lawn Mower manuals