manuals.online logo
Brands
  1. Home
  2. •
  3. Brands
  4. •
  5. Kenmore
  6. •
  7. Grill
  8. •
  9. Kenmore 415. 16125800 User manual

Kenmore 415. 16125800 User manual

Use andCareGuide
LiquidPropaneGasGrill
Kenrnore ModelNo. 415. 16125800
This Grill is For
Outdoor UseOnly
®
*Read this manual before cooking on
grill. Failure to follow all
manufacturer's instructions could
result in fire or explosion which could
cause property damage, personal
injury or death.
* Combustion by=products produced
when using this product contain
chemicals known to the State of
California to cause cancer, birth
defects, or other reproductive harm.
CAUTION
•Read and follow all Safety
Statements, Assembly Instructions
and Use & Care Directions before
attempting to assemble and cook.
• Some parts may contain sharp edges,
especially as noted in these
instructions. Wear protective gloves
if necessary.
•Parts
•Assembly
•Safety Rules
•Use and Care
•Troubleshooting
Assembly Questions?
Call 1=800=241 =7548
Parts Ordering:
Call 1=800=4=MY=HOME ®
To Installer/Assembler: Leave
these instructions with
consumer.
To Consumer: Keep this
manual for future reference.
Sears, Roebuck and Co., Hoffman Estates, IL 60179 U.S.A.
©2007Sears,RoebuckandCo.,AllRights Reserved Printedin China 464310408.80015598.12-06-07
if you smell gas:
1. Shut off gas to the appliance.
2. Extinguish any open flame.
3. Open lid.
4. ifodor continues, keep away from the
appliance and immediately call your gas
supplier or your fire department.
1. Do not store or use gasoline or other
flammable liquids or vapors in the vicinity of
this or any other appliance.
2. An LP cylinder not connected for use shall not
be stored in the vicinity of this or any other
appliance.
Call Grill Service Center For Help And Parts
If you havequestions or need assistance during assembly,
please call 1-800-241-7548.Youwill be speaking to a
representative of the grill manufacturer and nota Sears
employee. Toorder new parts call Sears at 1-800-4-MY-HOME®.
Product Record
iMPORTANT:Fill out the product record informationbelow.
Model Number
Serial Number
Date Purchased
See ratinglabelongrillforserialnumber.
CAUTION
Forresidentialuseonly. Do notuse for commercial
cooking.
2• 464310408
CALIFORNIA PROPOSITION65
1. Combustion by-products producedwhen using
this productcontain chemicals known to the State of
California to cause cancer, birth defects, and other
reproductiveharm.
2. This product contains chemicals, including lead
and lead compounds, known to the State of
California to cause cancer, birth defects or other
reproductive harm.
Wash your hands after handfinq this product.
Installation Safety Precautions
Use grill, as purchased, only with LP (propane) gas and the
regulator/valve assembly supplied. A conversion kit mustbe
purchased for use with natural gas.
• Grill installation must conform with localcodes, or in their
absence of local codes, with either the National Fuel Gas
Code,ANSI Z223.1/NFPA 54, Natural Gasand Propane
Installation Code, CSAB149.1, or Propane Storage and
Handling Code, B149.2, or the Standard for Recreational
Vehicles,ANSI A 119.2/NFPA1192,and CSAZ240 RV Series,
Recreational VehicleCode, as appficable.
. All electrical accessories (such as rotisserie) must be
electrically grounded in accordance with local codes, or
National Electrical Code,ANSI / NFPA70 or Canadian
Electrical Code, CSA C22.1. Keep any electrical cords and/or
fuel supply hoses away from any hot surfaces.
. This grill issafety certifiedfor use in the United States and/or
Canada only. Do not modify for use inany other location.
Modification will result in a safety hazard.
Safety Symbols
The symbols and boxesshown below explain what each heading
means. Read and follow allof the messages found throughout
the manual.
DANGER: Indicatesan imminentlyhazardous situation
which, if not avoided,will result in death or serious injury.
WARNING: Indicatesan potentiallyhazardoussituation
which, if not avoided, could result in death or serious injury.
rT,o.
CAUTION: Indicates a potentiallyhazardous situationor
unsafe practicewhich, if not avoided, may result in minor
or moderateinjury.
For Your Safety...................................... 2
Grill Service Center................................... 2
Product Record Information ............................ 2
Safety Symbols...................................... 2
Installation Safety Precautions .......................... 2
Kenmore Grill Warranty ............................... 3
Use and Care..................................... 4-11
Parts List.......................................... 12
Parts Diagram...................................... 13
Assembly ....................................... 14-23
Troubleshooting.................................. 24-26
Repair Protection Agreements
Congratulations on making a smart purchase. Your new
Kenmore®product is designed and manufactured for years of
dependable operation. But like all products, it may require repair
from time to time. That's when having a Repair Protection
Agreement can save you money andaggravation.
Purchase a Repair ProtectionAgreement now and protect
yourself from unexpectedhassle and expense.
Here's what the Repair ProtectionAgreement* includes:
[] Expert service by our 10,000 professional repair specialists
[] Unlimited service and no charge for parts and labor on all
covered repairs
[] Product replacement up to $1500 ifyour covered product
can't be fixed
[] Discount of 10%from regular price of service and related
installed parts not covered by the agreement; also, 10% off
regular price of preventive maintenance check
[] Fast help by phone- we call it Rapid Resolution-
phone support from a Sears representative.Think of us
as a "talkingowner's manual."
Once you purchase the Repair ProtectionAgreement, a simple
phone call isall that ittakes for you to schedule service. You can
call anytime day or night,or schedule a service appointment
online.
The Repair ProtectionAgreement is a risk-free purchase. If you
cancel for any reasonduring the product warranty period, we will
provide a full refund. Or, a prorated refundanytime after the
product warranty period expires. Purchase your Repair
ProtectionAgreement today!
Some limitations and exclusions apply.
For prices and additional information call 1-800-827-6655.
Sears Installation Service
For Sears professional installation of home appliances, garage
door openers, water heaters, and other major home items, in the
U.S.A. call 1-800-4-MY-HOME®
KENMORE GRILL WARRANTY
One Year Full Warranty on Kenmore Grill
If this grill fails due to a defect in material or workmanship
within one yearfrom the date of purchase,call 1-800-4-MY-
HOME®to arrange for free repair (or replacement if repair
proves impossible).
Five-Year Limited Warranty on Burners
Forfive years from the date of purchase,any burner that
rusts throughwill be replacedfree of charge.After the first
year from the date of purchase, you payfor labor if you wish
to have it installed.
All warranty coverage excludes ignitor batteries and grill part
paint loss, discoloration or rusting, which are either
expendable parts that can wear outfrom normal usewithin
the warranty period, or are conditions thatcan be the result
of normal use, accident or improper maintenance.
All warranty coverage is void if this grill is ever used for
commercial or rental purposes.
All warranty coverage applies only if this grill is used in the
United States.
This warranty gives you specific legalrights, and you may
also have other rights which varyfrom state to state.
Sears, Roebuck and Co., Hoffman Estates, IL 60179
464316408• 3
LP Tank
•NEVER store a spare LP tank under or near grill or in
enclosed areas
i
•Never fill the cylinder beyond 80% full.
•An overfilled or improperly stored tank is a hazard due
to possible gas release from the safety relief valve.
•if you see, smell or hear escaping gas, immediately get
away from the LP tank/grill and call your fire
department.
•if the above is not followed exactly, a fire causing
death or serious injury may occur.
The LP tank used with your grill must meet the following
requirements:
Use LP tanks only with these required measurements: 12"
(30.5cm) (diameter) x 18" (45.7 cm) (tall) with 20 lb. (9 kg.)
capacity maximum.
LP tanks must beconstructed and marked in accordance with
specifications for LP tank of the U.S. Department of
Transportation (DOT). See LP tank collar for marking.
LP tank valve must have:
o Type 1 outlet compatible with
regulatoror grill.
, Safetyrelief valve.
, ULlisted Overfill Protection OPDHandWheel
Device (OPD). This OPDsafety
feature is identified bya unique triangular hand wheel. Use
only LP tanks equipped with this type of valve.
, LP tank must bearranged for vapor withdrawal and include
collar to protect LP tank valve.
LP cylinder in upright position for vapor withdrawal
LP Tank Removal, Transport And Storage
,Turn OFF all control knobsand LP tank valve.Turn coupling
nut counterclockwise by hand only - do not use tools to
disconnect. Lift LP tank wire upward off of LP tank collar, then
lift LP tank up and off of support bracket. Installsafety cap onto
LP tank valve.Always use cap and strap supplied with valve.
Failure to use safety cap as directed may result in serious
personal injury and/or property damage.
LP TankValve
SafetyCap
RetainerStrap
,A disconnected LP tank in storage or being transported must
have a safety cap installed (as shown). Do not store anLP tank
in enclosed spaces such as a carport, garage, porch, covered
patio or other building. Never leavean LP tank inside a vehicle
which may become overheated bythe sun.
,Do not store an LP tank in an area where children play.
LP (Liquefied Petroleum Gas)
•LP gas is nontoxic, odorless and colorless when produced. For
Your Safety, LP gas has been given an odor (similar to rotten
cabbage) so that it can be smelled.
• LP gas is highlyflammable and may ignite unexpectedly when
mixed with air.
LP Tank Filling
• Useonly licensed and experienced dealers.
• LP dealer must purge tank beforefilling.
• Dealer should NEVERfill LP tank more than 80% of LP tank
volume. Volume of propane in tank will vary by temperature.
• A frosty regulator indicates gas overfill. Immediatelyclose LP
tank valve and call local LP gas dealer for assistance.
o Do not release liquid propane (LP)gas into the atmosphere.
This is a hazardous practice.
o Toremove gasfrom LP tank, contact an LP dealer or call a
local fire department for assistance. Check the telephone
directory under "Gas Companies"for nearest certified LP
dealers.
4• 464310408
LP Tank Exchange
o Many retailers that sell grills offer you the option of replacing
your empty LPtank through an exchange service. Useonly
those reputable exchangecompanies that inspect, precision fill,
test and certify their cylinders. Exchange your tank only for
an OPB safety feature-equipped tank as described in the
"LP Tank" section of this manual.
Always keep newand exchanged LP tanks in upright position
during use, transit or storage.
, Leak test new and exchanged LP tanks BEFORE
connecting to grill,
Connecting Regulator To The LP Tank
1. LP tank must be properly secured onto grill. (Refer to
assembly section.)
2. Turnall control knobs to the OFF position.
3. Turn LP tank OFFby turning OPD hand wheel clockwise to a
full stop.
4. Remove the protective cap from LP tank valve.Always use
cap and strap supplied with valve.
LP Tank Leak Test
For your safety
•Leak test must be repeated each time LP tank is exchanged or
refilled.
Do not smoke during leak test.
• Do not use an open flame to check for gas leaks.
Grill must be leak tested outdoors in a well-ventilated area,
away from ignition sources such as gas fired or electrical
appliances. During leak test, keep grill away from open flames
or sparks.
, Usea clean paintbrush and a 50/50 mild soap and water
solution. Brush soapy solution onto areas indicated by arrows
in figure below. Leaks are indicated by growing bubbles.
If "growing" bubbles appeardo not use or move the LP tank.
Contact an LP gas supplier or your fire department!
A Do not use household cleaning agents. Damage to gas
train components can result.
Do not use a POL transport plug
(plastic part with external threads)!
itwill defeat the safety feature of
the valve.
5. Hold regulator and insertnipple into LP
tank valve. Hand-tightenthe coupling
nut, holding regulator in a straight line
with LPtank valve so as not to cross-
thread the connection.
Nipple hasto be centered
intothe LPtankvalve.
464310408• 5
Holdcoupling nutand regulator
asshown for properconnection
to LP tank valve.
Leak TestingValves, Hose and Regulator
1. Turnall grill controlknobs to OFF.
,
3.
Be sure regulator istightly connected to LP tank.
Completely open LP tank valve byturning OPD hand wheel
counterclockwise. If you hear a rushing sound, turn gas off
immediately.There is a major leak at the connection. Correct
before proceeding by calling Sears for replacement parts at
1-800-4-MY-HOME®.
4. Brush soapy solution onto areas where bubbles are shown in
picture below:
6. Turn the coupling nutclockwise and tighten to afull stop. The
regulatorwill seal on the back-checkfeature in the LP tank
valve, resulting in some resistance.An additional one-half to
three-quarters turn is required to complete the
connection. Tighten by hand only - do not use tools.
NOTE:
If you cannot complete the connection, disconnect regulator and
repeat steps 5 and 6. If you are still unable to complete the
connection, do not use this regulator!
A Neverremovethreaded
orifice atend of valve.
•Do not insert any toolor foreign object intothe valve
outlet or safety relief valve.You may damagethe valve
and causea leak. Leaking propane mayresult in
explosion, fire, severepersonal injury,or death.
•Outdoorgasappliance isnot intendedto be installed
in or ona boat.
•Outdoorgasappliance isnot intendedto be installed
in or onan RV.
•Never attemptto attach this grill to theself-contained
LPgas system of a campertrailer or motorhome.
•Do not usegrill until leak-tested.
•If a leak is detectedat any time, STOPand call thefire
department.
•If youcannot stop a gas leak,immediately close
LPcylindervalve and call LPgas supplier or yourfire
department!
5. ff "growing" bubblesappear, there is a leak. Close LP tank
valve immediately and retighten connections. If leaks cannot
be stopped do not try to repair, Call Searsfor replacement
parts at 1-800-4-MY-HOME®.
6. Always close LPtank valve after performing leak test by
turning hand wheel clockwise.
6• 464310408
For Safe Use Of Your Grill And To Avoid Serious
injury:
•Donot letchildren operate or play near grill.
• Keep grill area clear and free from materials that burn.
• Donot block holes in bottom or back of grill.
• Check burnerflames regularly.
• Use grill only in well-ventilated space. NEVER use in
enclosed space such as carport, garage, porch, covered
patio, or under an overhead structure of any kind.
• Donot usecharcoal or ceramic briquets in a gas grill.
(Unlessbriquets are supplied with your grill.)
•Use grill at least 3ft. from any wall or surface. Maintain
10ft. clearance toobjects that can catch fire or sources of
ignitionsuch as pilot lights on water heaters, live electrical
appliances, etc.
Apartment Dwellers:
Checkwith management to learn the requirements and fire
codes for using an LP gas grill in your apartment complex. If
allowed, use outside on the ground floor with a three (3) foot
clearance from walls or rails. Do not use on or under
balconies.
• NEVER attempt to light burner with lid closed. A buildup
of non-ignited gas inside aclosed grill is hazardous.
• Never operate grill with LP tank out of correct position
specified in assembly instructions.
• Always close LP tank valve and remove coupling nut
before moving LP tank from specified operation
position.
Safety Tips
,A. Beforeopening LP tank valve, check the coupling nut for
tightness.
A When grill is not in use, turn offall control knobs and LP tank
valve.
A Never move grill while in operation or still hot.
A Use long-handled barbecue utensils and oven mitts to avoid
burnsand splatters.
A Maximum load for shelves is 10 Ibs.
,A. Donot usea cooking pot larger than 9" on grid.
A The grease cup must be attached to grease cup clip and
emptied after each use. Do not remove grease cup until grill
hascompletely cooled.
A Clean grill often, preferably after eachcookout. If a bristle
brush is used to clean any of the grill cooking surfaces,
ensure no loose bristles remain on cooking surfaces prior to
grilling. It is not recommended to clean cookingsurfaces
while grill is hot.
,A. If you notice grease or other hot material dripping from grill
onto valve, hose or regulator, turn off gas supply at once.
Determinethe cause, correct it, then clean and inspect valve,
hoseand regulator before continuing. Perform a leaktest.
,A. The regulator may make a humming or whistling noiseduring
operation. This will not affect safety or use of grill.
,A. If you have agrill problem see the "TroubleshootingSection".
_fthe regulator frosts, turn off grill and LP tank valve
immediately. This indicates a problem with the tank and it
should not be used on any product. Return to supplier!
m m
cAuTIo.
• Putting out grease fires by closing the lid is not
possible. Grills are well ventilated for safety reasons,
• Do not use water on a grease fire. Personal injury may
result, if a grease fire develops, turn knobs and LP tank
off.
Do not leavegrill unattended while preheating or
burning off food residue on high. ifgrill has not been
regularly cleaned, a grease fire can occur that may
damage the product. Follow instructions on General
Grill Cleaning and Cleaning The Burner Assembly to
prevent grease fires.
464316408• 7
Main Burner ignitor Lighting
ADo not lean over grill while lighting.
1. Open lid during lighting.
2. Turn ON valve from source or tank.
3. Push and turn ignition Burner control knob to_. Hi and
immediately press and hold Electronic ignition button.
4. if ignition does NOT occur in 5 seconds, turn Left Burner
control knob OFF, wait 5 minutes for gas to clear and repeat
the lighting instructions.
5.To Light Other Burners turn control knob to Hi.
if ignitor does not work, follow match lighting instructions.
After Lighting: Turn knobs to HI position for 15 minutes to pre-
heat grill. Then turn knob to desired setting for cooking.
CAUTION
if burner does not light,turn knobs to OFF, wait 5
minutes, and try again. Always close valve during the 5
minute waiting period, ifthe burner does not ignite with
the valve open, gas will continue to flow out of the burner
and could accidentally ignite with risk of injury.
Match-Lighting
ADo not lean over grill while lighting,
1. Open lid during lighting.
2. Place match into match holder (hanging from side of cart).
Light match, placeinto lighting hole on right side offirebox.
3. Push in and turn right knob to HiGH position. Be sure burner
lights and stays lit.
4. Light other burners by pushing knob in and turning to _¢. Hi
position.
Sideburner Ignitor Lighting
1. Top cover must be open when burner is operational.
2. Toignite SlDEBURNER, open sideburner cover.
3. Turnsideburner knobto _ _, push and hold ELECTRONIC
iGNITOR button.
4. if sideburner does NOT light in 5 seconds, turn knobto OFF,
wait 5 minutesfor gas to clear, then repeat lighting
procedure.
Sideburner Match Lighting
1. Open top cover. Turn on gas at LP tank.
2. Holdlit match to any port on the burner. Push in and turn
sideburner knob to_ _ HIGH. Be sure burner lights and
stays lit.
Before Your First Cookout
,Light burners, check to make sure they are lit, close the lid and
warm up grill on HiGH for 15 minutes. This curing of paint and
parts will produce an odor only on first lighting.
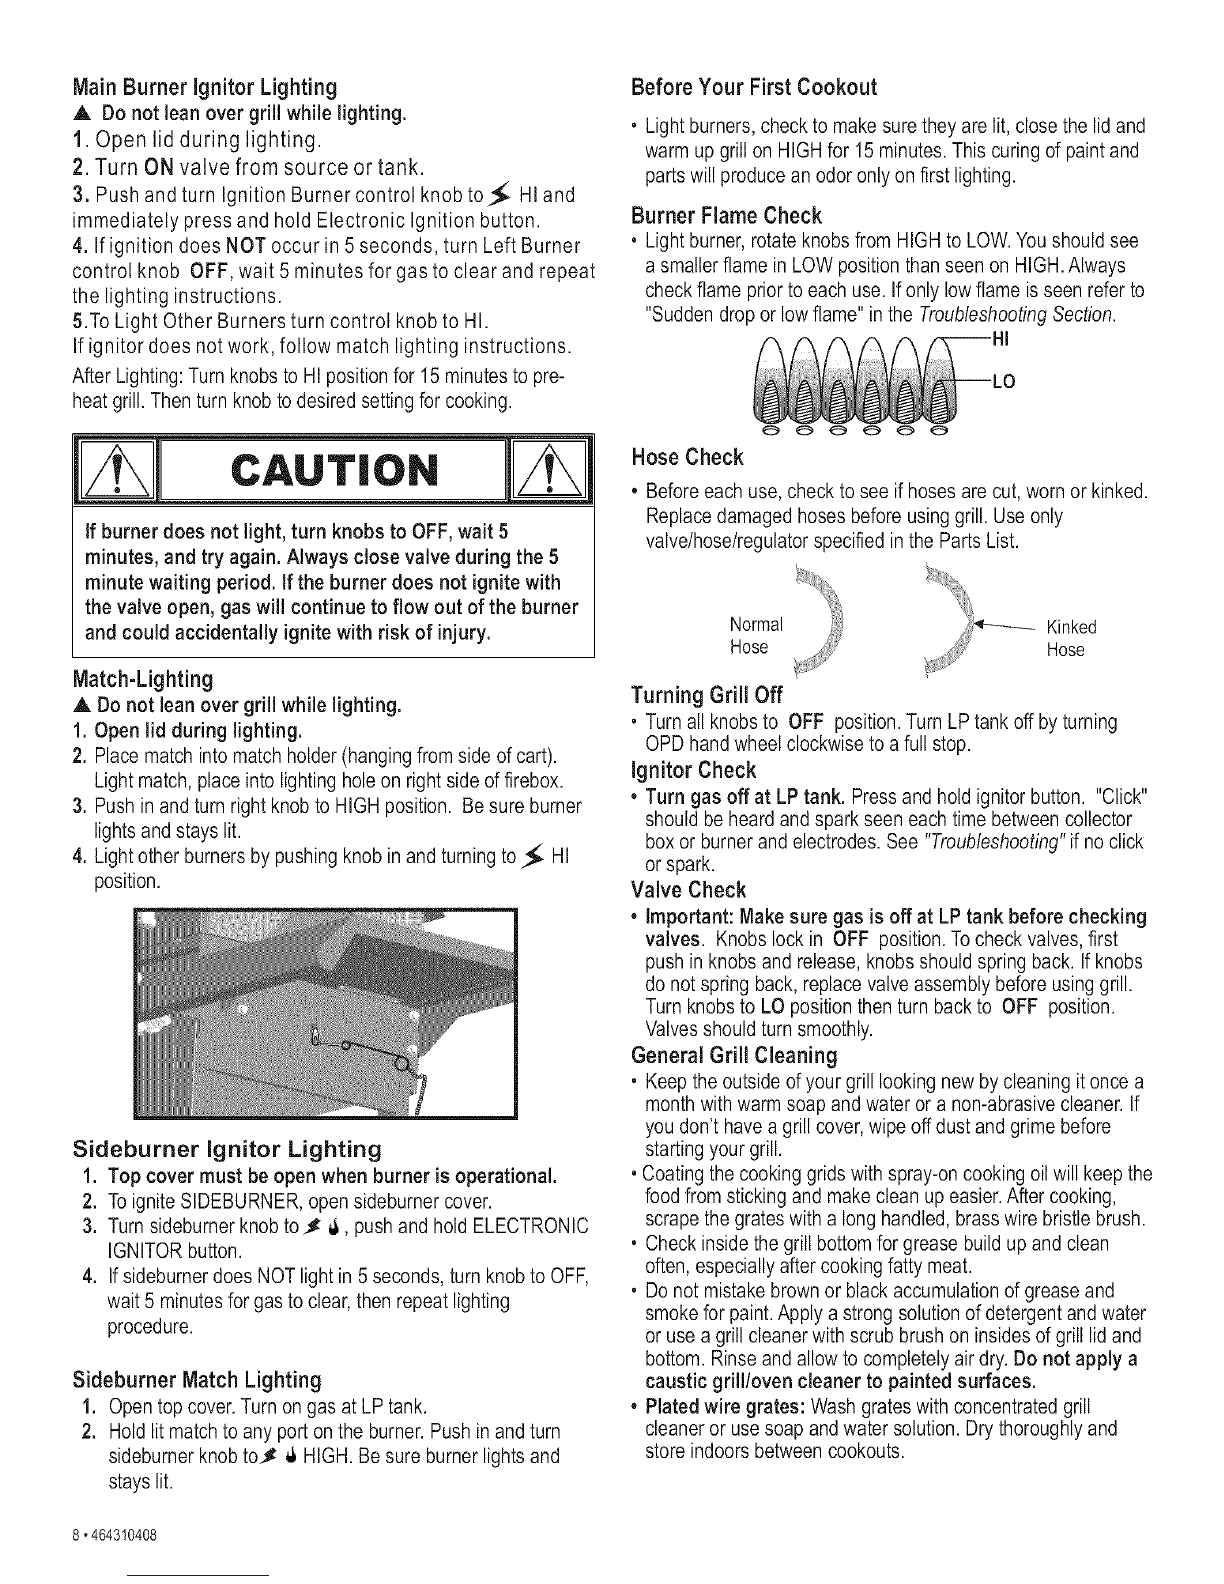
Burner Flame Check
o Light burner, rotateknobs from HIGHto LOW.You should see
a smaller flame in LOW position than seen on HIGH.Always
check flame prior to each use. Ifonly lowflame is seen refer to
"Sudden drop or low flame" in the TroubleshootingSection.
Hose Check
*Beforeeach use, check to see if hoses arecut, worn or kinked.
Replace damaged hoses before using grill. Use only
valve/hose/regulator specified in the Parts List.
Normal Kinked
Hose Hose
Turning Grill Off
, Turn all knobs to OFF position.Turn LP tank off by turning
OPD hand wheel clockwise to afull stop.
ignitor Check
*Turn gas off at LP tank, Press and hold ignitor button. "Click"
should be heard and spark seen each time between collector
box or burner and electrodes. See "Troubleshooting"if no click
or spark.
Valve Check
*important: Make sure gas is off at LP tank before checking
valves. Knobs lock in OFF position. Tocheck valves, first
push in knobs and release, knobs should spring back. If knobs
do not spring back, replace valve assembly before using grill.
Turn knobs to LO position then turn back to OFF position.
Valves should turn smoothly.
General Grill Cleaning
o Keep the outsideof your grill looking new by cleaning it once a
month with warm soap and water or a non-abrasive cleaner, if
you don't havea grill cover, wipe off dust and grime before
starting your grill.
oCoating the cooking grids with spray-on cooking oil will keep the
food from sticking and make clean up easier.After cooking,
scrape the grates with a long handled, brass wire bristle brush.
, Check inside the grill bottom for grease build up and clean
often, especially after cooking fatty meat.
, Do not mistake brown or black accumulation of grease and
smoke for paint. Apply a strong solution of detergent and water
or use a grill cleanerwith scrub brush on insidesof grill lid and
bottom. Rinse and allow to completely air dry. Do not apply a
caustic grill/oven cleaner to painted surfaces.
*Plated wire grates: Wash grates with concentrated grill
cleaner or use soap and water solution. Dry thoroughly and
store indoors between cookouts.
8• 464310408
, Plastic parts: Washwith warm soapy water and wipe dry.
,A.Do not use citrisol, abrasive cleaners, degreasers or a
concentrated grill cleaner on plastic parts. Damage to and
failure of parts can result.
• Porcelain grates: Because of glass-like composition, most
residue can be wiped awaywith baking soda/water solution or
specially formulated cleaner. Use non-abrasive scouring
powderfor stubborn stains.
•Cooking surfaces: Ifa bristle brush is used to clean any of
the grill cooking surfaces, ensure no loose bristles remainon
cooking surfaces prior to grilling. It is not recommended to
clean cooking surfaces while grill is hot.
CAUTION
/SPIDER ALERT!
SPIDER AND WEBS
INSIDE BURNER_
Ifyou notice thatyour grill isgetting hard to lightor that the
flame isn't asstrong asit should be,take thetime to checkand
cleanthe burner's.
CONTROLPANEL. SPIDER WEBS
INSIDETUBE
...._: BURNER
Insomeareasofthecountry,spidersorsmallinsectshavebeen
knownto create"flashback"problems.Thespidersspinwebs,build
nestsandlayeggstnthegrill'sburnertube(s)obstructingtheflowof
gastotheburner.Thebacked-upgascanignitein thetubebehind
thecontrolpanel.Thisis knownasa flashbackanditcandamage
yourgrillandevencauseinjury.
Topreventflashbacksandensuregoodperformancetheburner
assemblyshouldberemovedfromthegrillandcleanedbeforeuse
wheneverthegrillhasbeenidleforanextendedperiod.
,. j
Cleaning the Burner Assembly
Follow these instructions to clean and/or replace parts of burner
assembly or if you havetrouble igniting grill.
1. Turn gas off at control knobs and LP cylinder.
2. Removecooking grates and heat tents.
3. Removescrews and flame carryover tubes from rear of
burners.
4. Removescrew and washers to disengage burner from
bracket on firebox.
5. Removescrews to detach electrode from burner.Electrode
should remain in firebox.
6. Carefully lift each burner up and away from valve openings.
We suggest three ways to clean the burner tubes. Use the one
easiest for you.
(A) Bend a stiff wire (a light weight coat hanger works well)
into a small hook. Run the hook through each burner
tube several times.
(B) Use a narrow bottle brush with a flexible handle (do not
use a brass wire brush), run the brushthrough each
burner tube several times.
(C) Wear eye protection: Use an air hoseto force air into
the burner tube and out the burner ports. Check each
port to make sure air comes out each hole.
7. Wire brush entire outer surface of burner to removefood
residue and dirt.
8. Clean any blocked ports with a stiff wire such as an open
paper clip.
9. Check burnerfor damage, due to normal wear and corrosion
some holes may become enlarged. If any large cracks or
holes are found replace burner.
VERY IMPORTANT: Burner tubes must re-engage valve
openings. See illustrations at right. Correct
10. Attach electrode to burner, burner-to-valve _J
engagement
11. Carefully replace burners.
12. Attach burnersto brackets on firebox. E_
13. Repositionflame carryover tubes and attach
to burners. Replace heat tents and _1_'1"
cooking grates.
464310408.9
Indirect Cooking
Poultry and largecuts of meat cook slowly to perfection on the
grill by indirect heat. The heatfrom selected burners circulates
gently throughout the grill, cooking meat or poultry without the
touch of a direct flame. This method greatly reduces flare-ups
when cooking extra fatty cuts because there is no direct flame to
ignite the fats and juices that dripduring cooking.
Storing Your Grill
, Clean cooking grates.
, Store in dry location.
, When LP tank is connected to grill, store outdoors in well-
ventilated space and out of reachof children.
, Cover grill if stored outdoors.
, Store grill indoors ONLYif LP tank is turned offand
disconnected, removedfrom grill and stored outdoors.
, When removing grill from storage follow "Cleaning Burner
Assembly" instructions before starting grill.
1Burner Cooking
Cook with direct or indirect heat.
Best for smaller meals or foods.
Consumes less fuel.
Indirect Cooking Instructions
, Always cook with the lid closed.
,Due to weather conditions, cooking times may vary. During
cold and windy conditions the temperature setting may need
to be increased to insure sufficient cooking temperatures
Food Safety
Food safety isa very important part of enjoying the outdoor
cooking experience. Tokeepfood safe from harmful bacteria,
follow these four basic steps:
Clean: Wash hands, utensils, and surfaces with hot soapy water
before and after handling raw meat and poultry.
Separate: Separate raw meats and poultry from ready-to-eat
foods to avoid cross contamination. Use a clean platter and
utensils when removing cooked foods.
Cook: Cook meat and poultry thoroughly to kill bacteria. Usea
thermometer to ensure proper internalfood temperatures.
Chill: Refrigerate prepared foods and leftovers promptly.
For more informationcall: USDA Meat and Poultry Hotline at
1-800-535-4555 (In Washington, DC (202) 720-3333, 10:00 am-
4:00 pm EST),
2 Burner Cooking
Great indirect cooking on low.
Produces slow, even heating.
Ideal for slow roasting and baking.
Sear and Grill TM Burner Feature
This grill includes a high output BTU burner on the far right side
of the grill (far right control knob). This burner gets hotter than the
other burners when the knob is in the Searing position.This is
excellent for searing steaks, chops and other foods.
Tooperate this feature, follow the normal lightinginstructions.
Then turn the far right control knob to the Searing position.Allow
burner to heat up for 5 minutes. Sear yourfood for 2 minutes on
each side, then grill on low to desired doneness.
When not using the Searing feature, adjustthe knobto the same
temperature as the other burners.
"°":Y r
How To Tell If Meat Is Grilled Thoroughly
• Meat and poultry cooked on a grill often browns very fast on the
outside. Use a meat thermometer to be sure food has reached
a safe internal temperature, and cut into food to check for
visual signs of doneness.
• Whole poultry should reach 180° F; breasts,170° F.Juices
should run clear and flesh should not be pink.
• Hamburgersmade of any ground meat or poultry should reach
160° F,and be brown inthe middlewith no pinkjuices. Beef,
veal and lamb steaks, roasts and chops can be cooked to 145°
RAll cuts of pork should reach 160° R
• NEVER partially grill meat or poultry and finish cooking later.
Cook food completely to destroy harmful bacteria.
• When reheating takeout foods or fully cooked meats like hot
dogs, grill to 165° F,or until steaming hot.
10.464310408
1 1
2 1
3 1
4 1
5 1
6 1
7 4
8 16
9 2
10 2
11 1
12 2
13 1
14 1
15 1
16 1
17 12
18 1
19 1
20 1
21 1
22 4
23 4
24 3
25 1
26 2
27 1
28 1
29 1
30 12
31 4
32 8
33 1
34 1
35 12
36 1
37 1
38 1
39 1
Description ........................ Part#
RightLegAssembly.................. 80015595
LeftLegAssembly.................... 80009041
MatchLighterw/Chain ................ 80004320
TankExclusionWire.................. 80008616
BottomShelf........................ 80009035
TankThumbscrew.................... 80006484
1/4-20x1-1/2"Screw.................. 80009345
1/4-20FlangeNuts................... 80009345
LegExtenders....................... 80008596
Wheels............................ 80013777
AxleRod........................... 80009036
WheelSpacer....................... 80009345
8mmFlatWasher.................... 80009345
HitchPin........................... 80009345
Lower FrontPanel................... 80011622
UpperFrontPanel................... 80009038
#8x3/8"Self-TapScrew................ 80009345
Firebox............................ 80009059
ControlPanel ....................... 80015590
Valve/Hose/Regulator................. 80015594
IgnitorModule....................... 80014404
Bezels............................. 80014406
ControlKnobs....................... 80014405
MainBurners........................ 80012284
MainBurnerElectrode................ 80009029
FlameCarry-OverTubes .............. 80009028
TopLid ............................ 80015603
TemperatureGauge .................. 80009025
LogoPlate.......................... 80010554
1/4-20x1/2"Screw.................... 80009345
7mmLockWashers.................. 80009345
7ramFlatWasher.................... 80009345
RightSideShelf ..................... 80009063
RightFascia........................ 80015592
7 mmFiberWashers.................. 80009345
SideburnerShelf .................... 80016433
LeftFascia ........................ 80015593
SideburnerLid...................... 80015642
Sideburner,W/Electrode.............. 80015596
Key _ Description........................ Part#
40 1 Wingnut........................... 80009345
41 1 SideburnerClip ..................... 80009345
42 1 SideburnerGrate.................... 80000638
43 3 HeatDiffusers....................... 80008530
44 3 CookingGrates...................... 80014381
45 1 HandleEndCap,Left ................. 80015604
46 1 HandleEndCap,Right................ 80015605
47 1 HandleBar ......................... 80014429
48 1 LedHandleLight,Left................. 80014434
49 1 LedHandleLight,Right ............... 80014435
50 4 1/4-20x3/4",Machinescrew............ 80009345
51 4 #8-32x3/8",Machinescrew............. 80009345
52 1 SwingAway......................... 80008532
53 1 GreaseCup......................... 80000270
54 1 GreaseCupClip..................... 80000271
55 2 #8-32X3/8"StainlessScrew........... 80009345
56 1 DripPan ........................... 80014344
1 AssemblyInstructions(English)......... 80015598
1 AssemblyInstructions(Spanish)......... 80015599
1 HardwarePack...................... 80009345
1 SideburnerClip
1 HitchPin
2 WheelSpacer
12 1/4-20X 1/2",MachineScrew
4 1/4-20X 1-1/2",MachineScrew
2 #8-32X 3/8"StainlessScrew
12 #8-32X 3/8",TappingScrew
1 8mmFlatWasher
8 7ramFiberWasher
4 7mmLockWasher
4 7mmFlatWasher
12 1/4-20,FlangeNut
1 WingNut
HardwareForHandleLight:
4 1/4-20x3/4",Machinescrew
4 #8-32x3/8",Machinescrew
4 1/4-20FlangeNut
4 7mmFlatWasher
4 7mmFiberWasher
464310408• 11
®
®
®
®
12°464310408
@
@@
o
®
®\
@
©
J
@
@
®\
©
©
®
Tank Exclusion Wire
Placelegsasshown(A).Leftlegassemblyhaslargeaxleholeson endsoflegs.Hooktankexclusionwire intorightandleft leg
assemblies(B),
MatchHolder
LeftLe_
ATankExclusionWire
RightLegAssembly
/
464310408.13
Bottom Shelfto Legs
PlacebottomshelfendwithcutoutholeforLPcylinderbetweenlegswithaxleholes.Attachto rightandleftlegassemblieswith
(4)1/4-20x1-1/2"screws and1/4-20flange nuts,
Tightensecurely.
8
1/4-20Flangenuts
Qty.4
!
BottomShelf
|
7
1/4-20x1-1/2"Screws
Qty.4
14°464310408
WheelsandLegExtendersto Cart
Turnassemblyupsidedown.
Insertaxlerodthroughwheel,wheelspacer,legs,wheelspacerandotherwheel.Attachwith(1)8mmflatwasherandhitchpin.
Hammerlegextendersintorightlegs.
12
WheelSpacer
Qty.2 13
8mmFlatWasher
Qty.1
14
HitchPin
Qty.1
LegExtenders
\
AxleRod
\
"Cone" sideof wheelagainst leg
12
12
\
Wheel
\13 14
464310408o15
Front Panels
Standcart upright.
Attachonefront paneltolowerhalfofcartwith (4)#8x318"self-tapscrews.
Slideslot inotherpanelontotankexclusionwireandattachtoupperhalfofcartwith (4)#8x3/8" self-tap screws.
!"
17
#8x3/8"
self-tapscrews
Qty.8
FrontPanel
FrontPanel
\
16,464310408
Grill Headto Cart
Thissteprequirestwo peopleto liftandpositiongrill headontocart.
Carefullylowerthegrillheadontothecart.Makesuretheregulatorhoseishangingoutsidethecart.Attachwith (4)
1/4-20x1/2"screws, 7ramlock washers and7ramflat washers,
GrillHead
X
30 31 32
7mmlockwashers 7mmflatwashers
1/4-20x1/2"screws
Qty.4 Qty.4 Qty.4
464310408.17
Right SideShelf
Hooksidewallof shelfoversupportbracketson sideoffirebox(A).
Insert(2)7mmfiber washersand1/4-20x1/2"screws through
insidefrontoffireboxand(2)throughoutsidebackoffireboxfor
eachsideasshown(B).
Attachshelfwith (4)1/4-20flange nuts (C),
30 35 8
1/4-20xl/2"screws 7mmFiberWasher 1/4-20FlangeNut
Qty.4 Qty.4 Qty.4
30
35
RightSideShelf
\
Lid removed for clarity
Right Fascia
Attachfasciaandsideshelftofireboxwith#8x3/8"self-tap screw.
CAUTION:Fascia'smustbesecurelytightenedtofireboxtosafelymovegrill.
!'
17
#8x3/8"
self-tapscrews
Qty.2
RightFascia
18. 464310408
Side Burner Shelf
Hooksidewallof sideburnershelfoversupportbracketsonsideoffirebox(A).
Insidefireboxinsertfiber washers and1/4-20x1/2"screws asshown(B},
Attachshelfusingfiber washersand 1/4-20flange nuts oneachside(C),
30 35
Lid removed for clarity
SideBurnerShelf
3O
1/4-20xl/2"screws
Qty.4
35
7mmFiberWasher
Qty.4
8
1/4-20FlangeNut
Qty.4
Left Fascia
Attachfasciatofireboxwith(2)#8x3/8"self-tapscrews.
CAUTION:Fascia'smustbe securelytightenedtofireboxtosafelymovegrill.
17
LeftFascia
!'
17
#8x3/8"
self-tapscrews
Qty.2
464310408o19
SideburnerValve, Sideburner,Sideburner Bezel,IgnitorWire,Control Knob and
Positionvalvebehindfasciaand lineupholes.
Insert(1)ofthe#8-32x3/8"stainlesssteelscrews,do notfullytighten.
Slipbezelunderscrewinsertedandpositionasshown(A).
Lineupotherholeandinsertscrew#8-32x3/8"throughbezelandintovalve.
Tightenbothsecurely.
Placesideburnerintoshelf(B).Makesurevalveisinsidesideburnertube.Attachsidebumerwith (1)wing nut (C). Under
sideburnershelf,installsideburnercliptosidebumertubeandvalve.Attachsideburnerignitorwiretoelectrodeasshown(D).
Placegrateontosideburnershelf(E).
Presscontrolknobontosideburnervalvestem(F).
SideburnerBezel []
Sideburner
[]
SideburnerGrate
Correctly assembled burner-to-valve engagement
55 40
#8-32X3/8"SSScrew WingNut
Qty 2 Qty 1
•BurnerClip
SideburnerControlKnob
[]
20.464310408

Other manuals for 415. 16125800

1

Other Kenmore Grill manuals

Kenmore 119.163018 User manual

Kenmore

Kenmore 119.163018 User manual

Kenmore 415.162080 User manual

Kenmore

Kenmore 415.162080 User manual

Kenmore PG-40405S0L-SE User manual

Kenmore

Kenmore PG-40405S0L-SE User manual

Kenmore 141.15227.1 User manual

Kenmore

Kenmore 141.15227.1 User manual

Kenmore 119.1643301 User manual

Kenmore

Kenmore 119.1643301 User manual

Kenmore 90117 User manual

Kenmore

Kenmore 90117 User manual

Kenmore 259.162190 Parts list manual

Kenmore

Kenmore 259.162190 Parts list manual

Kenmore 122.33492410 User manual

Kenmore

Kenmore 122.33492410 User manual

Kenmore 464223610 User manual

Kenmore

Kenmore 464223610 User manual

Kenmore 415.16645900 User manual

Kenmore

Kenmore 415.16645900 User manual

Kenmore 146.16142210 User manual

Kenmore

Kenmore 146.16142210 User manual

Kenmore 119.16676800 User manual

Kenmore

Kenmore 119.16676800 User manual

Kenmore 141.152230 User manual

Kenmore

Kenmore 141.152230 User manual

Kenmore 415.162100 User manual

Kenmore

Kenmore 415.162100 User manual

Kenmore 141.166801 User manual

Kenmore

Kenmore 141.166801 User manual

Kenmore 415.16107 User manual

Kenmore

Kenmore 415.16107 User manual

Kenmore 16657 - 3 Burner Grill User manual

Kenmore

Kenmore 16657 - 3 Burner Grill User manual

Kenmore 141.15284900 User manual

Kenmore

Kenmore 141.15284900 User manual

Kenmore 415.1612801 User manual

Kenmore

Kenmore 415.1612801 User manual

Kenmore Kenmore 415.16237 User manual

Kenmore

Kenmore Kenmore 415.16237 User manual

Kenmore 415.16139111 User manual

Kenmore

Kenmore 415.16139111 User manual

Kenmore 141.16223.1 User manual

Kenmore

Kenmore 141.16223.1 User manual

Kenmore 415.152061 User manual

Kenmore

Kenmore 415.152061 User manual

Kenmore 141.16226 User manual

Kenmore

Kenmore 141.16226 User manual

Popular Grill manuals by other brands

Uniflame NPG2301-C owner's manual

Uniflame

Uniflame NPG2301-C owner's manual

NutriChief PYLE PKGRST32 user manual

NutriChief

NutriChief PYLE PKGRST32 user manual

Weber 55556 owner's guide

Weber

Weber 55556 owner's guide

Gourmia GEG1400 manual

Gourmia

Gourmia GEG1400 manual

Brixton BQ-6386F instruction manual

Brixton

Brixton BQ-6386F instruction manual

Imetec M0201 Instructions for use

Imetec

Imetec M0201 Instructions for use

FULGOR FOBQ 1000 G MBK Instructions for installation and use

FULGOR

FULGOR FOBQ 1000 G MBK Instructions for installation and use

Philips HD6320 user manual

Philips

Philips HD6320 user manual

Taurus Galexia manual

Taurus

Taurus Galexia manual

Americana Grills SIZZLER 3335 user manual

Americana Grills

Americana Grills SIZZLER 3335 user manual

Team Kalorik TKG COG 1001 manual

Team Kalorik

Team Kalorik TKG COG 1001 manual

Wooshka SCCS001 user guide

Wooshka

Wooshka SCCS001 user guide

SILESIA VELOX CG1 Operating instructions and general guide

SILESIA VELOX

SILESIA VELOX CG1 Operating instructions and general guide

Electri-Chef 4400-EC-336-PB-24 Features

Electri-Chef

Electri-Chef 4400-EC-336-PB-24 Features

Grillstream GSC35MG user manual

Grillstream

Grillstream GSC35MG user manual

Electri-Chef 4400-EC-336-CB-24 Features

Electri-Chef

Electri-Chef 4400-EC-336-CB-24 Features

Holland Grill BHA136SU1 instruction manual

Holland Grill

Holland Grill BHA136SU1 instruction manual

Fritel BBQ 3256 instruction manual

Fritel

Fritel BBQ 3256 instruction manual

manuals.online logo
manuals.online logoBrands
  • About & Mission
  • Contact us
  • Privacy Policy
  • Terms and Conditions

Copyright 2025 Manuals.Online. All Rights Reserved.