Kenwood M1GC7 User manual

M1GC7
© English /01 (E) 0610
INSTRUCTION MANUAL
DIGITAL AUDIO PLAYER

English2
Contents
Safety precautions............................................3
Operating Precautions ....................................5
Handling ......................................................................5
Maintenance of the unit....................................5
Unpacking ...........................................................5
Read Before Use
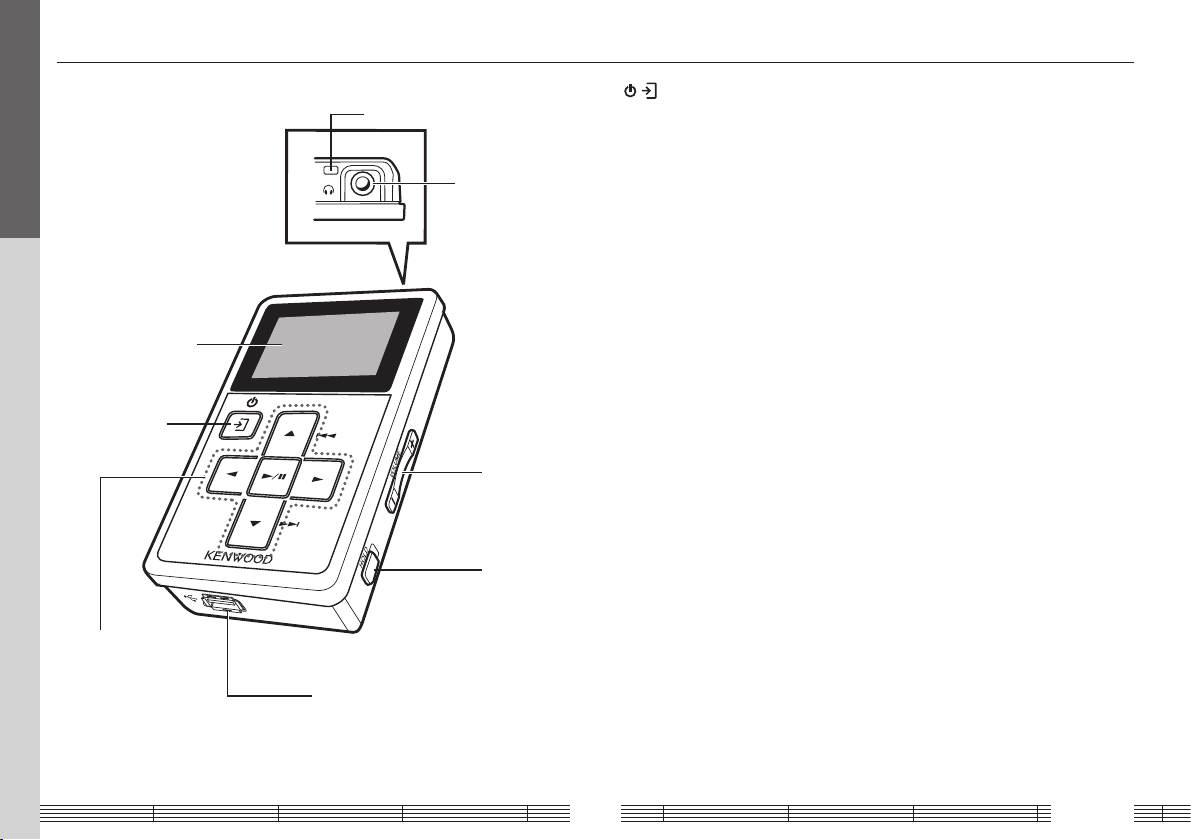
Names and functions of parts......................6
Flow for music playback.................................7
Screen display items........................................7
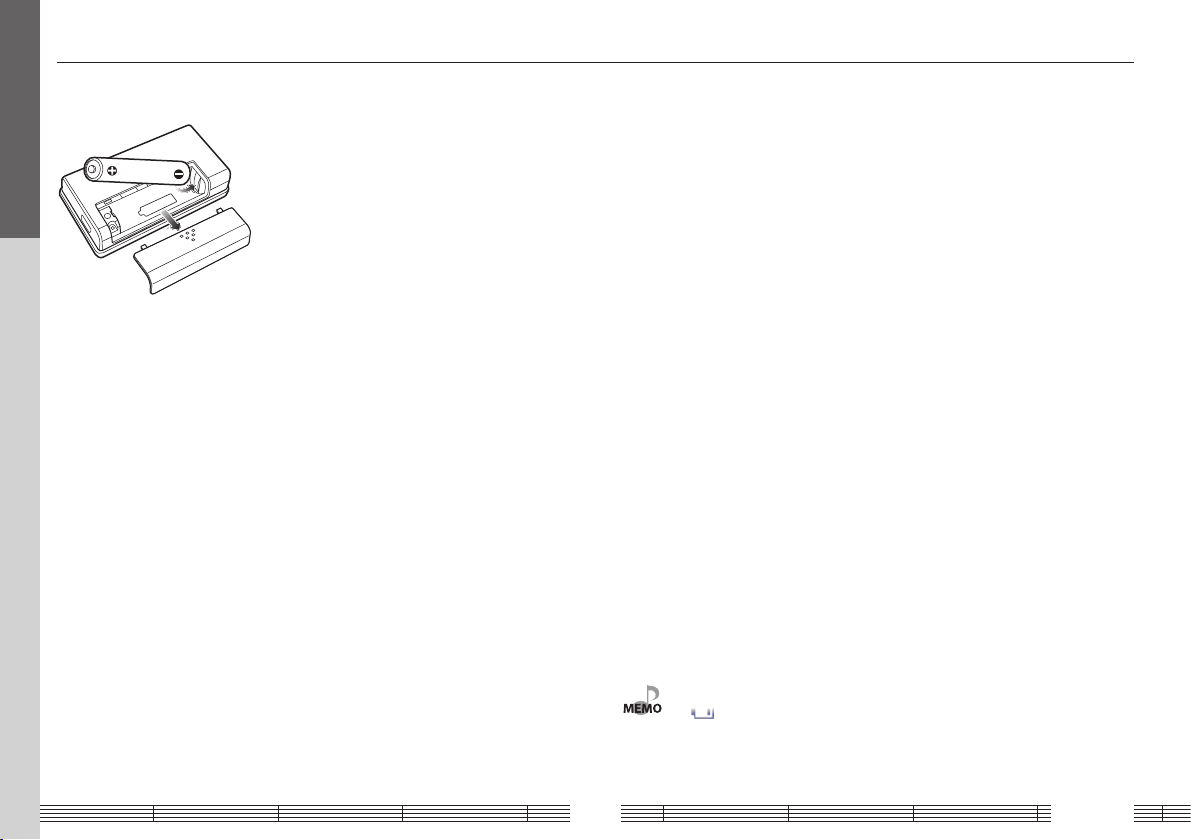
Loading the battery .........................................8
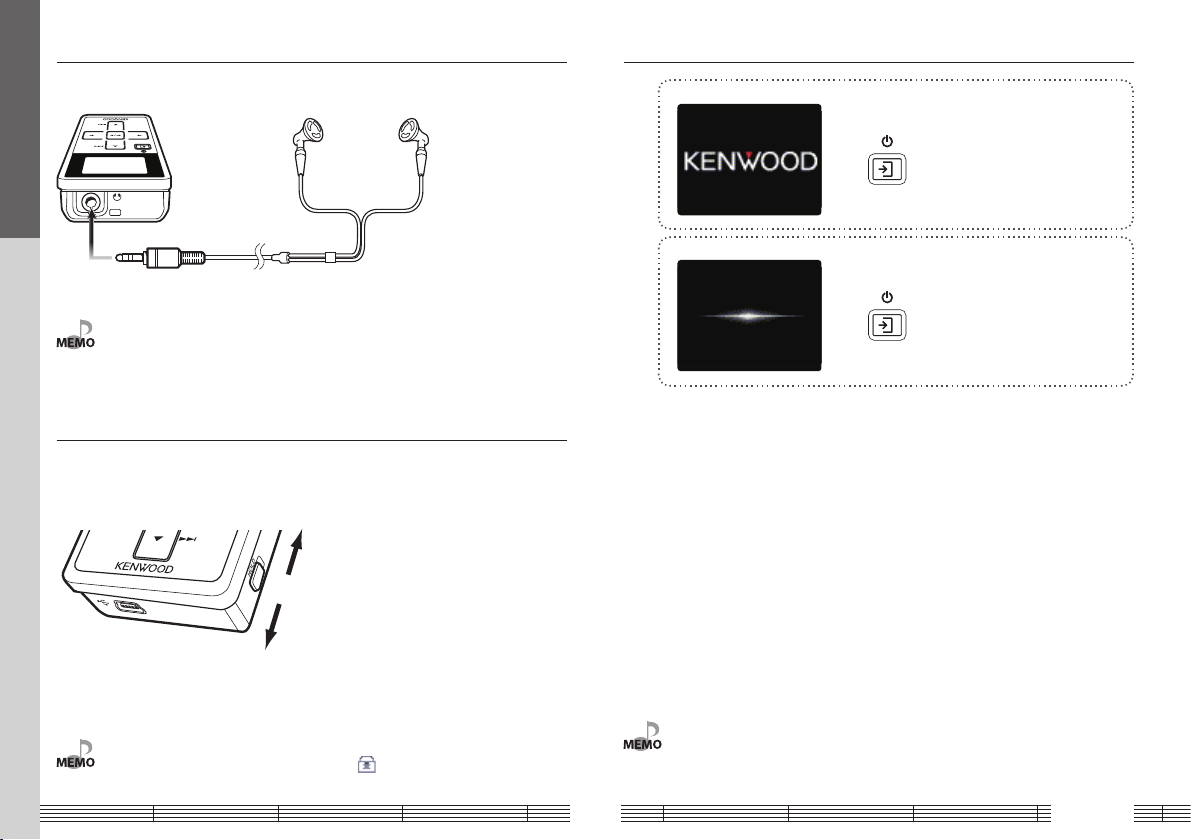
Connecting stereo headphones..................9
HOLD function ...................................................9
Switching Power ON/OFF ..............................9
For first use
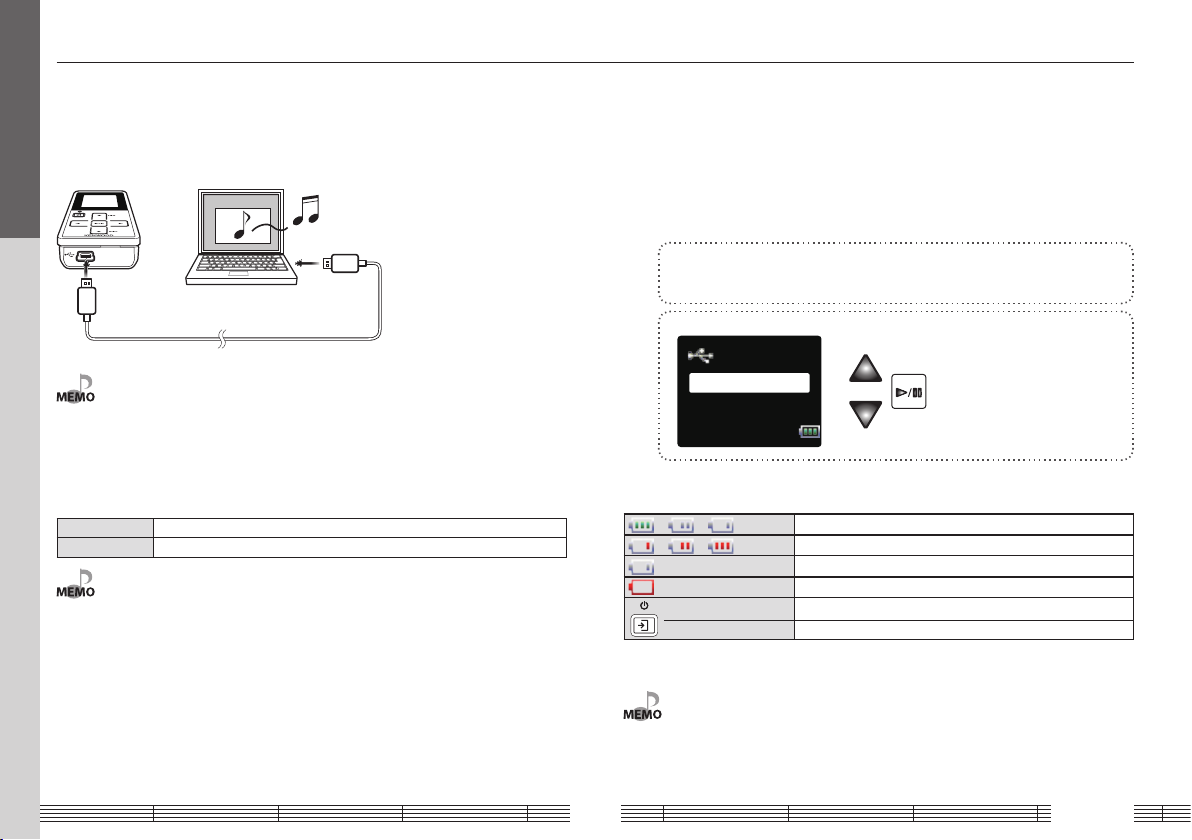
Recharging Battery/ Connecting a PC....10
Recharging Battery/ Connecting a PC...10
PC system configuration requirements 10
Recharging and battery indication.......... 10
Disconnecting the Player from the PC.. 11
Capturing Music in PC..................................12
The Player can play the following three
types of music files........................................12
Using Windows Media Player 10/9 .......... 12
Transferring Music from PC........................ 13
Using Windows Media Player 10/9 .......... 13
Data transfer by drag & drop....................... 13
Playing music tracks
Selecting music for playback.....................14
Display during playback..............................15
Operations available during playback ... 16
To skip an item:.....................................................16
Various play modes.......................................17
Favorite ..............................................................17
Receiving FM broadcasting
Selecting FM broadcasting......................... 18
Display for FM reception ............................. 18
Tuning a FM station.......................................19
Auto tuning............................................................. 19
Manual tuning.......................................................19
Preset tuning.......................................................... 20
Presetting FM stations.................................. 21
Presetting by auto tuning..............................21
Presetting by manual tuning.......................21
Deregistering a preset FM station ............22
Monaural reception.......................................22
Adjusting the audio
Adjusting the audio ......................................23
Adjusting the volume....................................... 23
Selecting the sound effects..........................23
Managing files
Viewing files.....................................................25
Deleting tracks................................................ 26
Setting and adjusting the Player
Sleep timer and alarm timer...................... 27
Various setups ................................................. 28
Function items that can be set ................. 28
Setting the menu language....................... 29
Initialization/Formatting .............................30
Appendix
Connection of external components......31
Connecting to the headphones jack...... 31
Connecting to the USB connector........... 31
Digital Audio Player Link ............................. 32
Glossary ............................................................. 33
Error messages................................................33
Troubleshooting............................................. 34
Specifications...................................................35

English3
Safety precautions
6. Heat – Avoid placing the appliance under direct sunlight or near a source of
heat such as heating equipment. Particularly, never leave it in an automobile or on
the dashboard.
7. Temperature–Theappliancemaynotfunctionproperlyifusedatextremelylow,
or freezing temperatures. The ideal ambient temperature is above +5°C (41°F).
8. Water and moisture – The appliance shall not be exposed to dripping and
splashing — for example, near a bathtub, washbowl, kitchen sink, laundry tub, in
a wet basement, or near a swimming pool, etc. Do not place an object containing
liquid, such as a ower vase, on the appliance.
9. Dust and moisture – Avoid places where is dusty or where the humidity is
high.
10. Vibrations – Avoid placing the appliance on an unstable place such as a shelf
or in a place subject to vibrations.
11. Magnetic elds – Keep the appliance away from sources of magnetic elds
such as TV sets, speaker systems, radios, motorized toys or magnetized objects.
12. Cleaning – Do not use volatile solvents such as alcohol, paint thinner, gasoline,
or benzine, etc. to clean the cabinet. Use a clean dry cloth.
13. Nonuse periods – The power cord of the unit should be unplugged from the
outlet when left unused for a long period of time.
14. Damage requiring service – The appliance should be serviced by qualied
service personnel when :
A. The power-supply cord or the plug has been damaged.
B. Objects have fallen, or liquid has been spilled into the appliance.
C. The appliance has been exposed to rain.
D. The appliance does not appear to operate normally or exhibits a marked
change in performance.
E. The appliance has been dropped, or the enclosure damaged.
15. Servicing – The user should not attempt to service the unit beyond that
described in the operating instructions. All other servicing should be referred to
qualied service personnel.
¤Caution:
Read this page carefully to ensure safe operation.
WARNING :
TO PREVENT FIRE OR ELECTRIC SHOCK, DO NOT EXPOSE THIS APPLIANCE
TO RAIN OR MOISTURE.
IMPORTANT SAFETY INSTRUCTIONS
Read Instructions – All the safety and operating instructions should be read
before the product is operated.
Retain Instructions – The safety and operating instructions should be retained
for future reference.
Heed Warnings – All warnings on the product and in the operating instructions
should be adhered to.
Follow Instructions – All operating and use instructions should be followed.
1. Powersources–Theappliance should beconnected to apowersupply only of
the type described in the operating instructions or as marked on the appliance.
2. Enclosure removal – Never remove the enclosure. If the internal parts are
touched accidentally, a serious electric shock might occur.
3. Drop – Do not drop the unit or apply strong shock to it. (Damage due to
dropping the unit is not covered by the warranty.)
4. Ventilation – Avoid hindering the ventilation of the appliance by covering it
with a cloth, etc.
5. Abnormal smell – If an abnormal smell or smoke is detected, immediately
turn the power OFF and pull out the power cord. Contact your dealer or nearest
service center.

English4
Information on Disposal of Old Electrical and Electronic
Equipment (applicable for EU countries that have adopted
separate waste collection systems)
Products with the symbol (crossed-out wheeled bin)cannot be
disposed as household waste.
Old electrical and electronic equipment should be recycled
at a facility capable of handling these items and their waste
byproducts.
Contact your local authority for details in locating a recycle facility
nearest to you.
Proper recycling and waste disposal will help conserve resources
whilst preventing detrimental effects on our health and the
environment.
Notes on using through car stereo
• Do not leave the products or batteries in the car, particularly above the dashboard,
for this may lead to malfunction or damage due to solar heat.
• If the unit is connected to a car stereo using an audio cord, noise may sometimes
interfere.
Safety precautions

English5
Operating Precautions
Handling
• Do not apply an excessive force to the display part. Otherwise, it may be damaged.
• Avoid storing the player in a bag together with a hard object. Otherwise, the player may be
damaged when the bag is pushed.
• Do not expose the player to an insecticide or other volatile substance or bring the player
in extended contact with a rubber or vinyl material. Otherwise, discoloration or peeling of
the surface finish may result.
• Do not put the player in a pocket of trousers. Otherwise, it may be damaged due to a
strong impact when you sit down, etc.
• Protect the player against sweat and moisture.
Do not use the player by putting it in a breast pocket for long hours in the summer or
during exercise. Otherwise, penetration of moisture or sweat may cause malfunction or
failure.
Maintenance of the unit
When the front panel or case becomes dirty, wipe with a soft, dry cloth.
Do not use thinner, benzine, alcohol, etc. for these agents may cause discoloration.
Unpacking
Player (main unit)
USB cable
Headphones
Rechargeable battery
Strap
Quick start manual
M1GC7
QUICK ST
ART MANUAL
DIGITALAUDIO PLA
YER
M1GC7
QUICK ST
ART MANUAL
DIGITALAUDIO PLA
YER
M1GC7
QUICK ST
ART MANUAL
DIGITALAUDIO PLA
YER
M1GC7
QUICK ST
ART MANUAL
DIGITALAUDIO PLA
YER
M1GC7
QUICK ST
ART MANUAL
DIGITALAUDIO PLA
YER
M1GC7
QUICK ST
ART MANUAL
DIGITALAUDIO PLA
YER

English6
Names and functions of parts
/ Power/Menu button
• Press shortly to open the pop-up
menu. Pressing the button again
closes the pop-up menu.
• Press and hold to switch the power
ON/OFF.
• Press when the display is turned off
(screen saver mode) to turn on the
display.
Multi-control button
5Up button
• Press to move the cursor upward.
• Press during playback to skip to
the beginning of the current track.
Pressing the button at the beginning
of a track skips to the beginning of
the previous track.
• Press and hold to fast reverse the
music.
• Also used for tuning stations during
FM broadcast reception.
∞Down button
• Press to move the cursor downward.
• Press during playback to skip to the
beginning of the next track.
• Press and hold to fast forward the
music.
• Also used for tuning stations during
FM broadcast reception.
2Left button
• Press to return to the previous (left)
display. This can be used for example
to return from the playback display to
the track list.
• Press and hold to return to the home
screen.
• Also used to hide a pop-up menu.
3Right button
• Press to enter an item and advance to
the next (right) item.
6Play/Pause button
• Press to play a track or let it pause.
• Press while the menu is displayed to
enter a selected item.
• Also used to switch the tuning mode
during FM broadcast reception.
VOLUME button
• Press to increase (+) or decrease (-)
the volume. Pressing and holding a
button segment varies the volume
gradually.
HOLD switch
• Press to defeat all other buttons. This
helps prevent erroneous operation of
the Player when it is carried in a bag,
etc.
Phones jack
• Connect the provided stereo
headphones.
USB jack
• Connect to a PC using the provided
USB cable to transfer music files or
recharge the battery.
Display
USB jack
Multi-control button
Power/Menu
button
VOLUME
button
HOLD
switch
Phones jack
Strap eyelet
Read Before Use

English7
Flow for music playback
Loading the battery (page 8)
Connecting stereo headphones (page 9)
Canceling the HOLD function (page 9)
Switching Power ON (page 9)
Recharging Battery/ Connecting a PC (page 10)
Capturing Music in PC (page 12)
Transferring Music from PC (page 13)
Playing music tracks
Selecting music for playback (page 14)
Operations available during playback (page 15-17)
Receiving FM broadcasting
Selecting FM broadcasting (page 18)
Operations available during FM reception (page 18-22)
Screen display items
Artist (page 14)
Album (page 14)
Track (page 14)
Favorite (page 14)
Genre (page 14)
Year (page 14)
Folder (page 25)
FM radio (page 18)
Settings (page 28)
To Home screen
SPRM (page 23)
Sound mode (page 23)
Play mode (page 17)
Add favorite (page 17)
Delete favorite (page 17)
Skip+ (page 16)
Skip– (page 16)
Timer setting (page 27)
Properties (Music properties
information)
Illumination (page 28)
Brightness (page 28)
Screen saver (page 28)
Auto power off (page 28)
Beep (page 28)
Theme color (page 28)
Language (page 29)
Format (page 30)
Initialize (page 30)
System (page 28)
To Home screen
Timer setting (page 27)
Multiplex (page 22)
Add preset (page 21)
Delete preset (page 22)
Auto preset (page 21)
Artist
Album
Track
Favorite
Tracktitle
Soundmode
SPRM
Playmode
ToHomesc
Home screen Pop-up menu
Preparation
Preparation of
music les
Playback of music
Adjusting the audio
Adjusting the volume (page 23)
Selecting the sound effects (page 23)
Volume and tone
adjustments
Read Before Use

English8
Loading the battery
Insert the provided rechargeable battery in the Player.
A commercially available AAA (LR03) size alkaline battery can also be used.
¤WARNING
If the alkaline fluid of the battery enter your eyes, immediately rinse with abundant
water and see the doctor. Otherwise, loss of vision or injury may result.
¤CAUTION
When inserting the battery, always fit the ·end first. Do not insert the battery by
force, as this may break the battery coating and cause short-circuiting, burst, fluid leak
and/or burns.
• Before using the battery, connect the Player to the PC and fully recharge the battery.
• If (white) is displayed, connect the Player to the PC to recharge the battery.
• Always use the NB-3A90 rechargeable battery that is provided but also available optionally.
Never attempt to recharge a battery other than the dedicated battery from Kenwood.
• If you use a dry cell battery, use an alkaline battery. Normal operation may not be possible if a
manganese battery is used.
Read Before Use
Caution on use of rechargeable battery (NiMH rechargeable battery NB-
3A90)
• The Player is powered by a NiMH (Nickel Metal Hydride) rechargeable battery. As the
rechargeable battery discharges spontaneously even when it is not used, it should
be recharged at least every other month.
• The rechargeable battery can be recharged for up to about 300 times.
• When the operation time reduces even after full recharging, replace the
rechargeable battery with new one. (Please purchase the optional NB-3A90.)
• A small amount of current flows through the Player even when the Power switch is
set to OFF. Remove the rechargeable battery when the Player is not to be used for a
long period of time.
• The rechargeable battery may warm during recharging or use, but this is not
malfunction.

English9
Read Before Use
Connecting stereo headphones
Connect the provided stereo headphones to the Player.
• The headphones also play the role of an antenna. Always connect them when receiving FM
broadcasting.
HOLD function
The HOLD function defeats all of the Player’s buttons and helps prevent erroneous
operation when the Player is carried in a bag, etc.
The HOLD function should be canceled before using the Player.
HOLD canceled
HOLD
(Red indication is visible.)
• When the HOLD function is switched on and the display is in the screen saver mode, the
Power/Menu button blinks twice every 5 seconds. " " is displayed when the display is turned
on.
1Switch the Player ON.
Press and hold the Power/Menu button until
the KENWOOD logo is displayed.
ThePlayerentersthe modebefore thelast time
it was switched OFF.
2Switch the Player OFF.
Press and hold the Power/Menu button until
the display is turned off.
• The display is turned off automatically when the Player has not been operated for a certain
period of time (screen saver mode). The Power/Menu button blinks every 5 seconds in the
screen saver mode. The time until the screen saver mode is activated can be changed (page
28).
Switching Power ON/OFF

English10
Recharging Battery/ Connecting a PC
Connect the Player to a PC to transfer music from the PC to the Player and to recharge
its battery.
Recharging Battery/ Connecting a PC
Using the provided USB cable, connect the Player to a PC.
• Start up the PC before connecting the Player.
• The Player is switched ON automatically at the moment it is connected to the PC.
• When the USB connection, always use a supplied USB cable.
• The player should be connected directly to the USB port of the PC. We cannot guarantee the
operation if the player is connected via a USB hub.
PC system configuration requirements
OS Microsoft®Windows® XP/2000
USB connector Compliant to USB 1.1/2.0 standard (USB 2.0 recommended)
• All of the above specified PC environment does not guarantee full operation of the Player.
• Use a PC in which either OS mentioned above is preinstalled. Operation is not guaranteed on a
PC running an upgraded OS or a PC assembled by yourself.
The Player and PC can be connected in either connection mode below.
• Storage
Mode for data transfer and battery recharging. The Player cannot be operated while
it is connected in this mode.
• Player
Mode for operating the Player for playback, etc., while recharging the battery. Data
transfer from the PC is not available in this mode.
1Connect the Player to a PC.
See page 10.
2Select the connection mode.
USBmode
Storage
Player
Recharging and battery indication
= = (White) Shows the remaining power of the battery.
= = (Red) Indications during recharging.
(White) Thebattery isnearlyexhausted.Rechargeitifitisrechargeable.
(Red) The battery is not inserted or not rechargeable.
(ON) The indicator lights during recharging.
(OFF) The indicator is extinguished when recharging completes.
Recharging completes in about 3 hours.
• The Player can recharge only the NB-3A90 rechargeable battery that is provided but also
available optionally. Never attempt to recharge a battery other than the dedicated battery from
Kenwood.
For first use

English11
Connecting a PC/Recharging Battery
Disconnecting the Player from the PC
1Click the [Safe To Remove Hardware] icon.
2Click [Safely remove USB Mass Storage Device].
∞
When the message showing that the Player
can be disconnected safely, disconnect it from
the PC.
• If the connection mode is the Player mode, simply unplug the USB cable from the PC.
For first use

English12
Capturing Music in PC
To play music files as tracks of this Player, first rip music files in the PC.
The Player can play the following three types of music files.
• MP3 (*.mp3) : MPEG-1 Audio Layer-3
Sampling frequency 44.1 KHz
Transfer bit rate 64k – 320 kbps
Variable Bit Rate (VBR) 64k – 320 kbps
ID3 tag Ver. 2.2/ 2.3/ 2.4
• WMA (*.wma) : Windows Media Audio
Sampling frequency 44.1 KHz
Transfer bit rate 32k – 320 kbps
Variable Bit Rate (VBR) 32k – 355 kbps
• WAV (*.wav) : WAVE file (PCM)
Sampling frequency 44.1 KHz
Bit count 16 bit
Channel Stereo/Monaural
• For the operating procedures of software including the Windows Media Player 10/9, refer to
the manuals and help information for the software.
• If copy protection is set, when capturing tracks of a music CD into the PC using the Windows
Media Player 10/9, transferring the music file to the Player is limited only to the Windows Media
Player 10/9. The music files which are transferred using drag & drop or copy & paste cannot be
played.
• Before transferring a music file, view it with the Windows Media Player 10/9 to confirm that the
genre, artist name, album title and track title are set correctly.
For first use
Using Windows Media Player 10/9
A music CD can be ripped into the PC using the Windows Media Player 10/9.
(The following steps describes the operation with the Windows Media Player 10.)
1Launch the Windows Media Player.
2Click the [Rip] button on the top.
3Place a music CD in the CD-ROM drive of the PC.
4Check the checkboxes of the CD tracks to be ripped.
5Click the [Rip Music] button.
• For selecting a destination folder or a file format, go to [Tools] menu > [Options] > [Rip music]
tab.

English13
The obtained music files can then be transferred to the Player.
Using Windows Media Player 10/9
(The following steps describes the operation with the Windows Media Player 10.)
1Connect the Player to a PC.
2Launch the Windows Media Player.
3Click the [Sync] button on the top.
4Select the removable disk (KENWOOD_DAP) corresponding to
this Player.
5Add the music files to be transferred in the Sync List.
6Click the [Start Sync] button.
For first use
Transferring Music from PC
Data transfer by drag & drop
Open the Windows Explorer and drag & drop the desired file from the PC’s hard disk drive
to this Player (expressed as [KENWOOD_DAP] on Windows). Copy & paste can also be
used for data transfer.
1Open the removable disk corresponding to this Player.
Click [Start] – [My Computer] – [KENWOOD_DAP].
2Open the folder storing the desired music file.
3Drag & drop the music file into the removable disk.

English14
Playing music tracks
Selecting music for playback
Select and play the desired track.
Artist Select Artist name =Album title =Track title.
Album Select Album title =Track title.
Track Select Track title directly.
Favorite Select one of the tracks registered as favorite tracks.
Genre SelectGenre=Artistname=Albumtitle=Tracktitle.
Year Select Year of release =Track title.
Folder Select Folder and then follow the hierarchy to select the music file for the desiredTrack.
When a major item is selected, the list of intermediate items located below it is displayed.
Press the Play/Pause button when the item to be played (Track or item name) is displayed
starts its playback.
When a track is selected from the album title, the tracks are played in order they are recorded
in the album. When a track is selected from other item, the tracks are played in order of track
titles.
1Connect headphones and switch the Player ON.
See page 9.
2Open the home screen.
Press and hold the Left button
until the home screen appears.
3Select a major item ("Album", for example).
Artist
Album
Track
Favorite
Press the Up/Down button to move the cursor
to the desired item.
4Select a major item ("Album", for example).
Artist
Album
Track
Favorite
Press the Right button to enter the selection.
Thelist forthe major item (intermediate items)
is displayed.
5Select an intermediate item ("Album 2", for example).
Album1
Album
Album2
Album3
6Select an intermediate item ("Album 2", for example).
Album1
Album
Album2
Album3
If the Play/Pause button is pressed now, all of
the tracks in the selected intermediate item
will be played.
For example, pressing the Play/Pause button after
selecting an album plays all of the tracks in that
album.
7Select a track ("Track 2", for example).
Album2
Track1
Track2
Track3

English15
Selecting music for playback
8Play a track ("Track 2", for example).
Track1
Album2
Track2
Track3
Playback starts with the track selected in step
7 of the intermediate item selected in step 6.
In this example, playback starts with "Track 2"
in "Album 2".
• A track that does not contain tag information is classified as "Unknown".
• If you commit a mistake and want to reselect an item, press the Left button to return to the
previous item.
• To restart the selection from the beginning, press and hold the Left buttonto return to the
home screen.
• In this page, the "selection" and "entry" are described in two steps (steps 3 and 4, for example).
From the subsequent pages, these operations will be described in a single step.
Playing music tracks
Display during playback
Tracktitle
Elapsed time
progress bar
Mode
3: Play
8: Pause
Supreme/
Sound mode
(page 23)
Remaining battery
power
(page 10)
Track title
Play mode
(page 17)
HOLD switch
(page 9)
: HOLD
None: HOLD canceled
Sleep timer/
Alarm timer
(page 27)
: Alarm timer on
: Sleep timer on
Elapsed play time
Track No./
Number of
selected tracks
The display shows various information during playback.

English16
Playing music tracks
Operations available during playback
• The Player switches OFF automatically after it has been left in pause mode for a certain period
of time (Auto Power-OFF). The time until Auto Power-OFF occurs can be changed (page 28).
• When the pop-up menu is opened in the middle of playback and "Properties" is selected, the
properties information on the track being played is displayed.
Power/Menu button
Displays the pop-up menu.
Press in screen saver mode
to turn the display on.
Left button
Displays the previous list.
Down button
Play mode:
Each press plays the next track (Skip-up).
Press and hold to fast forward the music.
Pause mode:
Each press skips to the beginning of the next
track (Skip-up).
Press and hold to skip to the subsequent tracks
one after another.
Up button
Play mode:
Each press skips to the beginning
of the current track or of the
previous track (Skip-down).
Press and hold to fast reverse
the track.
Pause mode:
Each press skips to the beginning
of the current track or of the
previous track (Skip-down).
Press and hold to skip to the
previous tracks one after another.
Play/Pause button
Play mode:
Lets playback pause
temporarily.
Pause mode:
Resumes playback.
To skip an item:
Played tracks can be skipped on a per-item basis as shown below.
Artist skip Skips to the tracks of the next (Artist skip+) or previous (Artist skip-) artist.
Album skip Skips to the tracks of the next (Album skip+) or previous (Album skip-) album.
Genre skip Skips to the tracks of the next (Genre skip+) or previous (Genre skip-) genre.
Year skip Skips to the tracks of the next (Year skip+) or previous (Year skip-) year of release.
The item to be skipped is determined according to the item used to select the track being
played. (page 14)
1Open the pop-up menu during playback.
Tracktitle
2Select "Artist skip+" or "Artist skip-".
Tracktitle
Artistskip−
Artistskip+
Timersetting
Addfavorite
The displayed items vary to "Artist skip",
"Album skip", "Genre skip" or "Year skip"
depending on the item used to select the track
being played.

English17
Various play modes
One of the following six play modes can be selected.
Off Playback stops after having played the tracks in the list.
Repeat one Playback of the same track repeatedly.
Random Playback of all of the tracks in the list in a random order, playing every track once.
Repeat Playback of all of the tracks in the list repeatedly.
Repeat random Repeated playbackof allofthetracksinthelistinarandomorder.
Intro Playback of the introduction parts of all of the tracks in the list, playing the first 10 seconds of every
track.
The tracks in the list vary depending on the item used for selecting the track being played.
(page 14)
1Display the pop-up menu.
Tracktitle
Press during playback.
2Select "Play mode".
Tracktitle
Playmode
SPRM
Soundmode
ToHomesc
3Select the desired play mode.
Tracktitle
Random
Repeatone
Repeat
Off
Playing music tracks
Favorite
Tracks you are particularly fond of can be registered in the Favorite folder for playing
only the favorite tracks later.
1Play a track you like and open the pop-up menu.
Tracktitle
2Select "Add favorite".
Tracktitle
Artistskip−
Artistskip+
Timersetting
Addfavorite
3To deregister a track from the favorite tracks…
Tracktitle
Artistskip−
Artistskip+
Timersetting
Deletefavori
Play the track, open the pop-up menu and
select "Delete favorite".
• To play only the favorite tracks, open the home screen and select "Favorite".
• Up to 30 tracks can be registered as favorite tracks.

English18
Selecting FM broadcasting
The Player can be used to receive FM broadcasting.
1Open the home screen.
Press and hold the Left button
until the home screen appears.
2Select the FM radio mode.
Folder
FMradio
Genre
Year
• The headphones also play the role of an antenna. Always connect them when receiving FM
broadcasting.
Receiving FM broadcasting
Display for FM reception
The FM radio display shows various information.
Auto
Remaining battery
power
(page 10)
HOLD switch
(page 9)
: HOLD
None: HOLD canceled
Sleep timer/
Alarm timer
(page 27)
: Alarm timer on
: Sleep timer on
Tuned frequency
Stereo/Monaural
(page 22)
: Stereo
broadcasting
received
: Set for monaural
reception
None: Other than
above
Tuning mode
(page 19)
Auto: Auto tuning
Manual: Manual tuning
Preset: Preset tuning

English19
Receiving FM broadcasting
Tuning a FM station
Auto tuning
Tunable FM stations can be searched automatically.
1Select the auto tuning mode.
Auto
Each press of the button switches the tuning
mode in order of "Auto" ="Manual" =
"Preset".
2Start auto tuning.
Auto
: Auto tuning by decreasing frequencies.
: Auto tuning by increasing frequencies.
• The default tuning mode set before the Player left the factory is "Auto". • The default tuning mode set before the Player left the factory is "Auto".
Manual tuning
FM stations can be searched manually.
1Select the manual tuning mode.
Auto
Each press of the button switches the tuning
mode in order of "Auto" ="Manual" =
"Preset".
2Start manual tuning.
Manual
: Decreases frequencies.
: Increases the frequency.
Pressing and holding the Up or Down button
varies the tuned frequency continuously.

English20
Receiving FM broadcasting
Tuning a FM station
Preset tuning
FM stations can be preset and recalled later.
1Select the preset tuning mode.
Auto
Each press of the button switches the tuning
mode in order of "Auto" ="Manual" =
"Preset".
2Select a preset number.
Preset
: Recalls the previous preset number.
: Recalls the next preset number.
• For the method of presetting stations, see pages 21 and 22.
• The default tuning mode set before the Player left the factory is "Auto".
Other manuals for M1GC7
1
Table of contents
Other Kenwood MP3 Player manuals