6
PREPARING THE DEVICE FOR USE
1Preparation and User Environment
The environmental information appropriate for using this device
is as follows.
•Appropriate temperature: 10–35°C (50–95°F) / Appropriate
humidity: 30–75% / Atmosphere pressure: 700–1060 hPa
•Do not use the device in a place that it is exposed to direct
sunlight, heat sources, or near a fire.
2Assembly
•Charge the battery sufficiently when using the device for the
first time or after long-term storage.
•Be sure to charge the battery using the cable and AC/DC
adapter included in the package.
•Sterilize the contra angle when using the device for the first
time, after long term storage and after every patient.
•Do not attach and use any device other than the contra
angle included in the package.
•Do not use deformed or damaged Ni-Ti files.
•Ensure that the Ni-Ti file is properly secured to the contra
angle latch before use.
NOTE:
•Refer to “Getting Started”for more information on how to
change, install, or remove the battery.
•Refer to “Initial Set-up”for more information on how to
attach and remove the contra angle and Ni-Ti files.
•Refer to “Cleaning, Disinfection, Lubrication, Packaging
and Sterilization Instructions”for more information on
how to clean and sterilize the contra angle.
USING THE DEVICE
•Refer to “Initial Set-up”to connect the contra angle and
NiTi file to the device.
1Basic Functions
1. Press the [Main] button on the motor handpiece. The power
turns on, and the main screen appears on the display.
2. Tables indicating all the pre-set memories and functions is
available in “Contents Overview”.
3. Press the [/]button to check the motor operation
information by memory. Then press the [ ] button when
the desired memory number is displayed between M1 and
M4. The memory number is selected, and the next menu is
highlighted
.
4. Select the motor operation method, and set the motor speed,
motor torque limit, rotation angle, and auto reverse options.
•Press the [ ] button: Save the settings and highlight the
next menu.
•[/]button: Change menu options and settings.
NOTE:
The setting menu appears differently depending on the motor
operation method.
5. Press the [Main] button to start the treatment. The motor
runs, and the operation shows up on the display. The main
button light flashes.
•On the operation screen, review the torque value ( ) of the
motor in operation and the torque limit value ( ) set in
the memory.
•To stop the motor operation, press the [Main] button.
Here, the memory number and motor operation settings
can be adjusted on the main screen.
•If [CW], [CCW], [Adaptive] or [RCP] are selected as the
motor operation method, the files can be rotated in the
opposite direction by following these instructions:
• Press and hold the [Main] button on the main screen to rotate
the motor in the opposite direction of the current setting.
• The motor rotates in the opposite direction only while the
button is pressed and stops when released.
• Here, the operation screen does not appear on the display,
and the main screen remains on.
6. To turn off, press any two buttons simultaneously for
2 seconds. The power and display are turned off.
7. Refer to “Disassembling the Device”for more
information on how to attach and detach the Ni-Ti file and
contra angle from the motor handpiece.
8. Refer to “MAINTENANCE”for more information on how to
clean and sterilize the contra angle.
2Creating Memory
The motor's operation method, menu options, and settings to
memory can be pre-assigned. By doing this, the treatment can
start right away by selecting the appropriate memory number
for each situation.
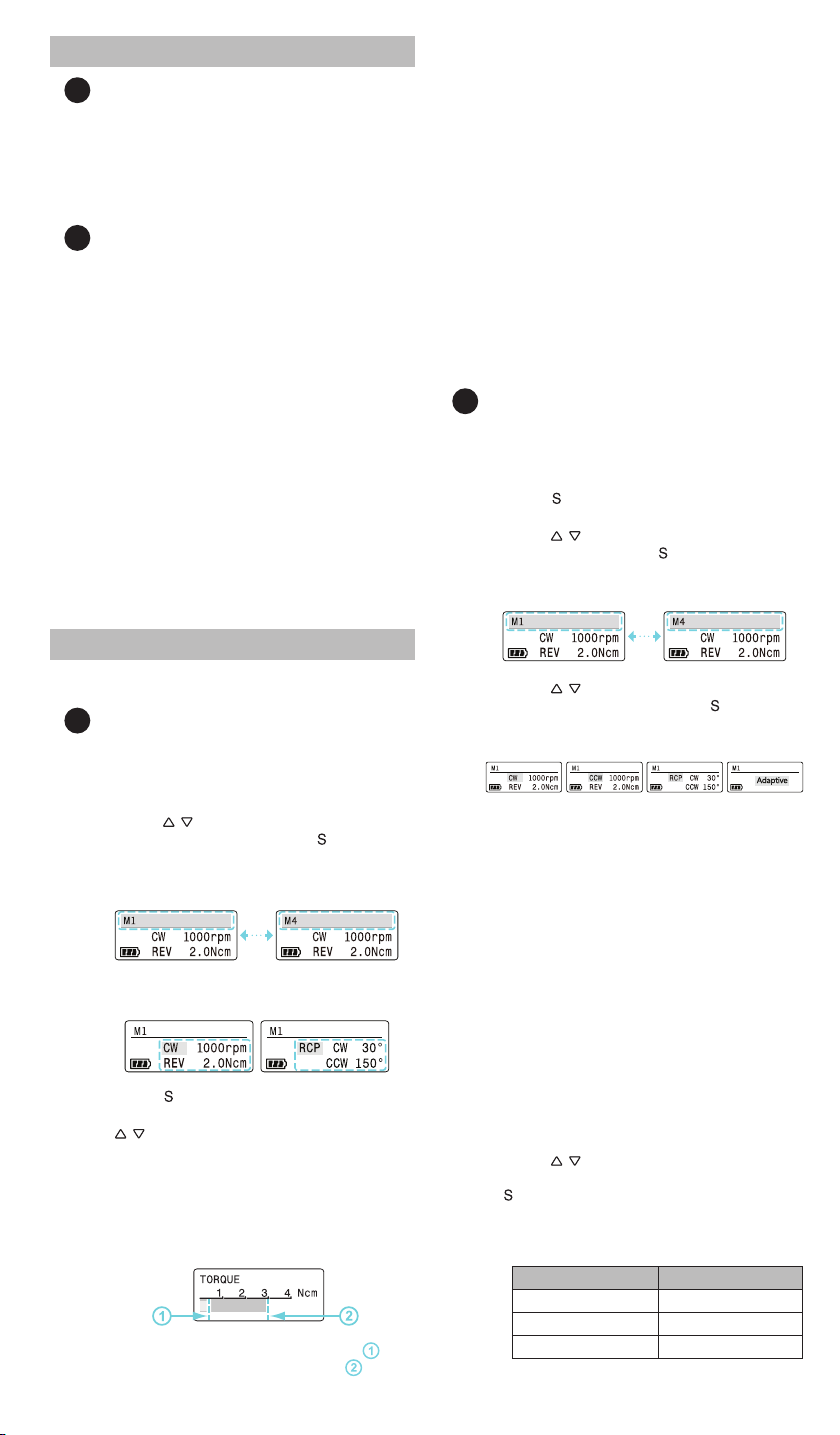
1. Press the [ ] button on the main screen to highlight the
memory area.
2. Press the [/]button, and when the desired memory
number is displayed, press the [ ] button to select.
The memory number is selected, and the next menu is
highlighted.
3. Press the [/]button, and when the desired motor
operation method is displayed, press the [ ] button
to select. The settings are saved, and the next menu is
highlighted.
•[CW]: The motor rotates clockwise.
•[CCW]: The motor rotates counterclockwise.
•[RCP]: The motor alternates between clockwise and
counterclockwise rotation.
•[Adaptive]: Adaptive Motion relies on a patented feedback
algorithm that changes the motion of the file based on
the applied load (stress). When the file is doing minimal
work—when there is no stress on the file—the motion is
purely rotary (clockwise rotation only).
• When the file begins to cut more dentin, the motion begins
to “adapt”from pure rotary to reciprocation (clockwise and
counterclockwise rotation).This action disengages the file
from grabbing too much of the canal wall.
• The new Elements Motor adapts the motion based on
the amount of pressure on the file. It may or may not
reciprocate and does not pull into the canal. Reciprocating
angles vary: no load 600° forward and 0° backwards,
loaded 370° forward and up to 50° backwards, based on
file load.
4. Press the [/]button to set the motor speed, torque
limit, rotation angle, and autoreverse options, then press the
[ ] button. The settings are saved, and the next menu is
highlighted.
• When selecting [CW], [CCW] the torque limit value can be
set according to the motor speed range.
Speed Torque limit value
100–600 rpm 1.0–4.0 Ncm
650–800 rpm 1.0–3.0 Ncm
850–1,000 rpm 1.0–2.0 Ncm