KEY 900FT-20K User manual

* Fotodispositivo infrarosso regolabile
* Photo device infrared adjustable
* Cellule infrarouge avec rotation
FOTOCELLULE A RAGGI INFRAROSSI
INFRARED PHOTOCELLS
CELLULES PHOTOELECTRIQUES A RAYONS INFRAROUGES
PRINCIPALI COMPONENTI
Contenitore circuito ottico-elettronico
Circuito ottico-elettronico
Copertura con schermo infrarosso incorporato
DESCRIZIONE DI MONTAGGIO
-Allineare e ssare le fotocellule ad un’altezza di
50 cm circa da terra.
-Predisporre l’arrivo dei cavi e, se necessario,
ricavare un vano di alloggiamento per il conte-
nitore da incasso ssandolo adeguatamente.
- Fissare quindi il circuito al muro o alla base di
ssaggio usando le apposite viti in dotazione.
- Procedere ai collegamenti richiesti (vedi retro),
e alla ne montare il coperchio a schermo
infrarosso.
MAIN COMPONENTS
Optoelectronic-circuit enclosure
Optoelectronic circuit
Cover with incorporated infrared screen
ASSEMBLY DESCRIPTION
- Align and x the photocells at a height of ap-
proximately 50 cm from the ground. - Make the
necessary arrangements for cable access; if using
the ush-mounted enclosure, make a space in
which it may be properly housed.
- Then x the container of circuit to the wall or
at the xing base using the screws provided and
adding any inserts as necessary.
- Make the necessary connections (see back) and
conclude by tting the cover with infrared screen.
COMPOSANTS PRINCIPAUX
Boîtier circuit optique-électronique
Circuit optique-électronique
Couvercle avec écran infrarouge incorporé
DESCRIPTION DU MONTAGE
- Aligner et xer les photocellules à environ 50
cm du sol.
- Prévoir l’arrivée des câbles; préparer un com-
partiment où xer le boîtier à encastrer de façon
appropriée, s’il est utilisé.
- Fixer ensuite le boîtier du circuit au mur ou à la
base de xation à l’aide des vis fournies de sèrie
et en ajoutant éventuellement les chevilles.
- Eectuer les branchements voulus (voir au
dos) et enn monter le couvercle à écran infra-
rouge
SEKUR FT
900FT20K 900FT31 900FT40K*
CODICE CODE DESCRIZIONE DESCRIPTION
900FT20K Coppia di fotocellule da esterno (80x30x28 mm).
Pair of photocells for external use (80x30x28 mm).
900FT-31 Coppia di fotocellule da esterno e incasso.
Pair of photocells for external use and ush-mounting.
900FT40K Coppia di fotocellule da esterno con orientamento 180° (120x30x30 mm).
Pair of photocells for external use. Adjustable through 180° (120x30x30 mm).
900FT20K 900FT-31 900FT-40K
portata / range 20 m 20 m 20 m
alimentazione / power 12/24 Vac/Vdc 12/24 Vac/Vdc 12/24 Vac/Vdc
consumo rx / rx consumption 30 mA 30 mA 30 mA
consumo tx / tx consumption 20 mA 20 mA 20 mA
corrente max contatti relais / relay contacts max supply 1 A 1 A 1 A
tensione max contatti relais / relay contacts max voltage 24 Vdc 24 Vdc 24 Vdc
temperatura di funzionamento / operating temperature -20° +70°C -20° +70°C -20° +70°C
CARATTERISTICHE TECNICHE TECHNICAL DATA
Dichiarazione CE conformità / EC declaration of conrmity / EG-Konformitatserklarung / Déclaration CE de conformité / Declaracion CE de
conformidad
900FT-20K/ 900FT-31 / 900FT-40K
è conforme alle seguenti disposizioni pertinenti: complies with thefollowing relevantprovisions: folgenden einschlagigen Bestimmun-
gen entspricht: correspondaux dispositions pertinentes suivantes: sotisface las disposiciones pertinentessiguientes:
89/336/CEE, 93/68/CEE

TX 1 RX 1 TX 2 RX 2
1 2 3 1 2 3 4 1 2 3 1 2 3 4
abilitare sincronismo solo 12/24Vac
activate the synchronisation only 12/24Vac
active la synchronisation 12/24Vac
Alimentazione in 12/24Vac
Power supply 12/24Vac
Alimentation 12/24Vac
1/2 - ON
1 2
ON
Si consiglia: TX Micro switch 2-OFF minima potenza, in particolar modo nei casi in cui si possono vericare problemi dovuti a fenomeni di riessione (pavimenti, muri, superci
lucide o particolarmente riettenti).
In caso di utilizzo contemporaneo di più copie di fotocellule, ad esempio interne ed esterne ad un cancello scorrevole, fare molta attenzione al loro parallelismo per evitare
eventuali fenomeni di riessione non desiderati.
It is recommended: TX Micro switch 2-OFF minimum power, in particular in cases of reection (oors, walls, and shiny or particularly reecting surfaces, etc).
If using two pairs of photocells simultaneously, for example inside and outside a sliding gate, pay attention on the parallelism to prevent any undesired reection phenomen.
Il est conseillé: TX Micro switch 2-OFF minimale puissance, en particulier lorsqu’il pourrait y avoir des problèmes dus à des phénomenès de réexion (planchers, murs ou
surfaces polies ou trèsrééchissantes....)
En cas d’utilisation simultanée de plusieurs paires de photo-électriques, par exemple des cellules situées à l’intérieur ou à l’extérieure.
Connessioni per abilitare il sincronismo
Connections to enable the synchronism
Connexions pour permettre le synchronisme
1 2
ON 1 - ON abilita sincronismo solo 12/24Vac
activate the synchronisation only 12/24Vac
active la synchronisation 12/24Vac
1 - OFF disabilita sincronismo
deactivate the synchronisation
désactive la synchronisation
2 - ON massima potenza (consigliato)
maximum power (raccomended)
maximale puissance (recommandée)
2 - OFF minima potenza (evita possibili riflessioni)
minimum power (avoid reflections)
minimale puissance (éviter situations de réflexion)
1 2
ON 1 - ON abilita sincronismo solo 12/24Vac
activate the synchronisation only 12/24Vac
active la synchronisation 12/24Vac
1 - OFF disabilita sincronismo
deactivate the synchronisation
désactive la synchronisation
2 - ON disabilita il ritardo e consente il sincronismo; deactivate the pla-
ning intervention time and you can use the synchronisation;
désactive temp d’intervention et permet la synchronisation
2 - OFF ritarda di circa 300 ms l’intervento del relè,“neve”
!!!! Se si sceglie questa funzione bisogna disabilitare il sincroni-
smo 1- OFF !!!!
delays by 300 ms the relay activation,“snow compensation”
!!!! If you use this function, don’t use the syunchronisation 1-
OFF !!!!
temp d’intervention du relais de 300 ms,“neige”
!!!! Si vous choisissez de désactiver cette fonctionnement il faut
déactiver le synchronisation 1- OFF !!!!
• In corrente alternata e a sincronizzazione abilitata, il led sul RX
rimane parzialmente acceso.
• When you use in AC and the synchronisation is activated, the light
receiver remains partially lit.
• Si la courant est alterné et si la synchronisation est activée, la LED
sur le recepteur est partiellement allumée.
NO NC
Settaggio di default / factory setting Settaggio di default / factory setting
TX RX
- 0Vac/dc
+ 12/24Vac/dc
- 0Vac/dc
+ 12Vdc
+ 12/24Vac/dc
FT-20K/31/40K
580ISFT20K3140K rev04
Attenzione: Per estrarre la scheda dal box, svitare le 2 viti di ssaggio dell’adattatore plastico e non far
leva su scheda o ganci in plastica.
Caution: to take out the board from the box remove the 2 screws of the plastic adaptor without pushing
the plastic fastenings and the board itself.
Attention: Pour extraire l’armoire du boite, dévisser les 2 vis de xation de l’adaptateur plastique et ne
pas faire levier sur l’armoire ou sur les crochets en plastique. plastique.
OK
OK
• Per aprire la fotocellula fare leva con un cacciavite tra
il coperchio e la parete, aiutandosi con una protezione
per non intaccare l’eventuale intonaco.
• Open the photocell with a screwdriver between the
bottom and the wall.
• Ouvrir la photocellule avec un tournevis entre le cou-
vercle et le mur.
-5 °
+5 °
0 °
1
8
0
°

* Einstellbare Infrarot-Fotozellenvorrichtung
* Fotodispositivo infrarrojo regulable
*Regulowane urządzenie z fotokomórkami na pod-
czerwień
INFRAROT-FOTOZELLEN
FOTOCÉLULAS DE RAYOS INFRARROJOS
FOTOKOMÓRKI NA PODCZERWIEŃ
SEKUR FT
900FT20K 900FT31 900FT40K*
ARTIKELNUMMER / CÓDIGO / KOD BESCHREIBUNG / DESCRIPCIÓN / OPIS
900FT20K Fotozellenpaar für Außenbereiche (80x30x28 mm).
Par de fotocélulas para exteriores (80x30x28 mm).
Para fotokomórek do użytku zewnętrznego (80x30x28 mm).
900FT-31 Fotozellenpaar für Außenbereiche und zum Einbau.
Par de fotocélulas para exteriores y de empotrar (80x30x28 mm).
Para fotokomórek do użytku zewnętrznego i montowania podtynkowego.
900FT40K Fotozellenpaar für Außenbereiche mit 180° Ausrichtung (120x30x30 mm).
Par de fotocélulas para exteriores con orientación de 180° (120x30x30 mm).
Para fotokomórek do użytku zewnętrznego Regulowane o 180° (120x30x30 mm).
900FT20K 900FT-31 900FT-40K
Leistung / capacidad /zasięg 20 m 20 m 20 m
Versorgung / alimentación /moc 12/24 Vac/Vdc 12/24 Vac/Vdc 12/24 Vac/Vdc
RX Verbrauch / consumo rx / zużycie rx 30 mA 30 mA 30 mA
TX Verbrauch / consumo tx / zużycie tx 20 mA 20 mA 20 mA
Höchststrom Relaiskontakte /corriente máx. contactos relés /maks. zasilanie styków przekaźnika 1 A 1 A 1 A
Höchstspannung Relaiskontakte / tensión máx. contactos relés / maks. napięcie styków przekaźnika 24 Vdc 24 Vdc 24 Vdc
Betriebstemperatur / temperatura de funcionamiento / temperatura pracy -20° +70°C -20° +70°C -20° +70°C
TECHNISCHE MERKMALE
CARACTERÍSTICAS TÉCNICAS
DANE TECHNICZNE
Dichiarazione CE conformità / EC declaration of conrmity / EG-Konformitatserklarung / Déclaration CE de conformité / Declaracion CE de
conformidad
900FT-20K/ 900FT-31 / 900FT-40K
è conforme alle seguenti disposizioni pertinenti: complies with thefollowing relevantprovisions: folgenden einschlagigen Bestimmun-
gen entspricht: correspondaux dispositions pertinentes suivantes: sotisface las disposiciones pertinentessiguientes:
89/336/CEE, 93/68/CEE
COMPONENTES PRINCIPALES
Caja del circuito óptico-electrónico
Circuito óptico-electrónico
Cubierta con pantalla infrarroja incorporada
DESCRIPCIÓN DEL MONTAJE
-Alinee y je las fotocélulas a una altura aproxima-
da de 50 cm desde el suelo.
-Prepare la llegada de los cables y, en caso necesa-
rio, realice un hueco de alojamiento para la caja de
empotrar, jándola adecuadamente.
- Luego je el circuito a la pared o a la base de
jación usando los tornillos previstos, suministra-
dos de serie.
- Realice las conexiones necesarias (véase el
reverso), y al nal monte la cubierta con pantalla
infrarroja.
HAUPTKOMPONENTEN
Gehäuse des optisch-elektronischen Kreislaufs
Optisch-elektronischer Kreislauf
Abdeckung mit eingebautem Infrarotschirm
MONTAGEBESCHREIBUNG
-Die Fotozellen in einem Abstand zum Boden von
etwa 50 cm ausrichten und befestigen.
-Das Eintreen der Kabel vorbereiten und falls
notwendig ein Unterbringungsfach für das
Einbaugehäuse herstellen und es sachgerecht
befestigen.
- Danach den Kreislauf mit den beiliegenden
Schrauben an der Wand oder am Befestigungsun-
terteil anbringen.
- Die erforderlichen Anschlüsse (siehe Rückseite)
ausführen und zum Schluss den Deckel mit dem
Infrarotschirm montieren.
GŁÓWNE KOMPONENTY
Obudowa obwodu optoelektronicznego
Obwód optoelektroniczny
Pokrwya z wbudowanym ekranem na podczerwień
OPIS MONTAŻU
- Ustaw i przymocuj fotokomórki na wysoko-
ści około 50 cm od podłoża. - Dokonaj zmian
niezbędnych dla umożliwienia dostępu do
przewodów; w przypadku korzystania z obudowy
podtynkowej, zachowaj odpowiednią przestrzeń,
aby zapewnić jej prawidłowe umieszczenie.
- Następnie przymocuj do ściany lub podstawy
złącznej kontener zawierający obwód, korzystając
z dostarczonych śrub i dodając wkładki wedle
potrzeby.
- Wykonaj niezbędne podłączenia (zobacz tył) i
zakończ procedurę, montując pokrywę z ekranem
na podczerwień.

TX 1 RX 1 TX 2 RX 2
1 2 3 1 2 3 4 1 2 3 1 2 3 4
1/2 - ON
1 2
ON
NO NC
TX RX
- 0Vac/dc
+ 12/24Vac/dc
- 0Vac/dc
+ 12Vdc
+ 12/24Vac/dc
FT-20K/31/40K
580ISFT20K3140K rev04
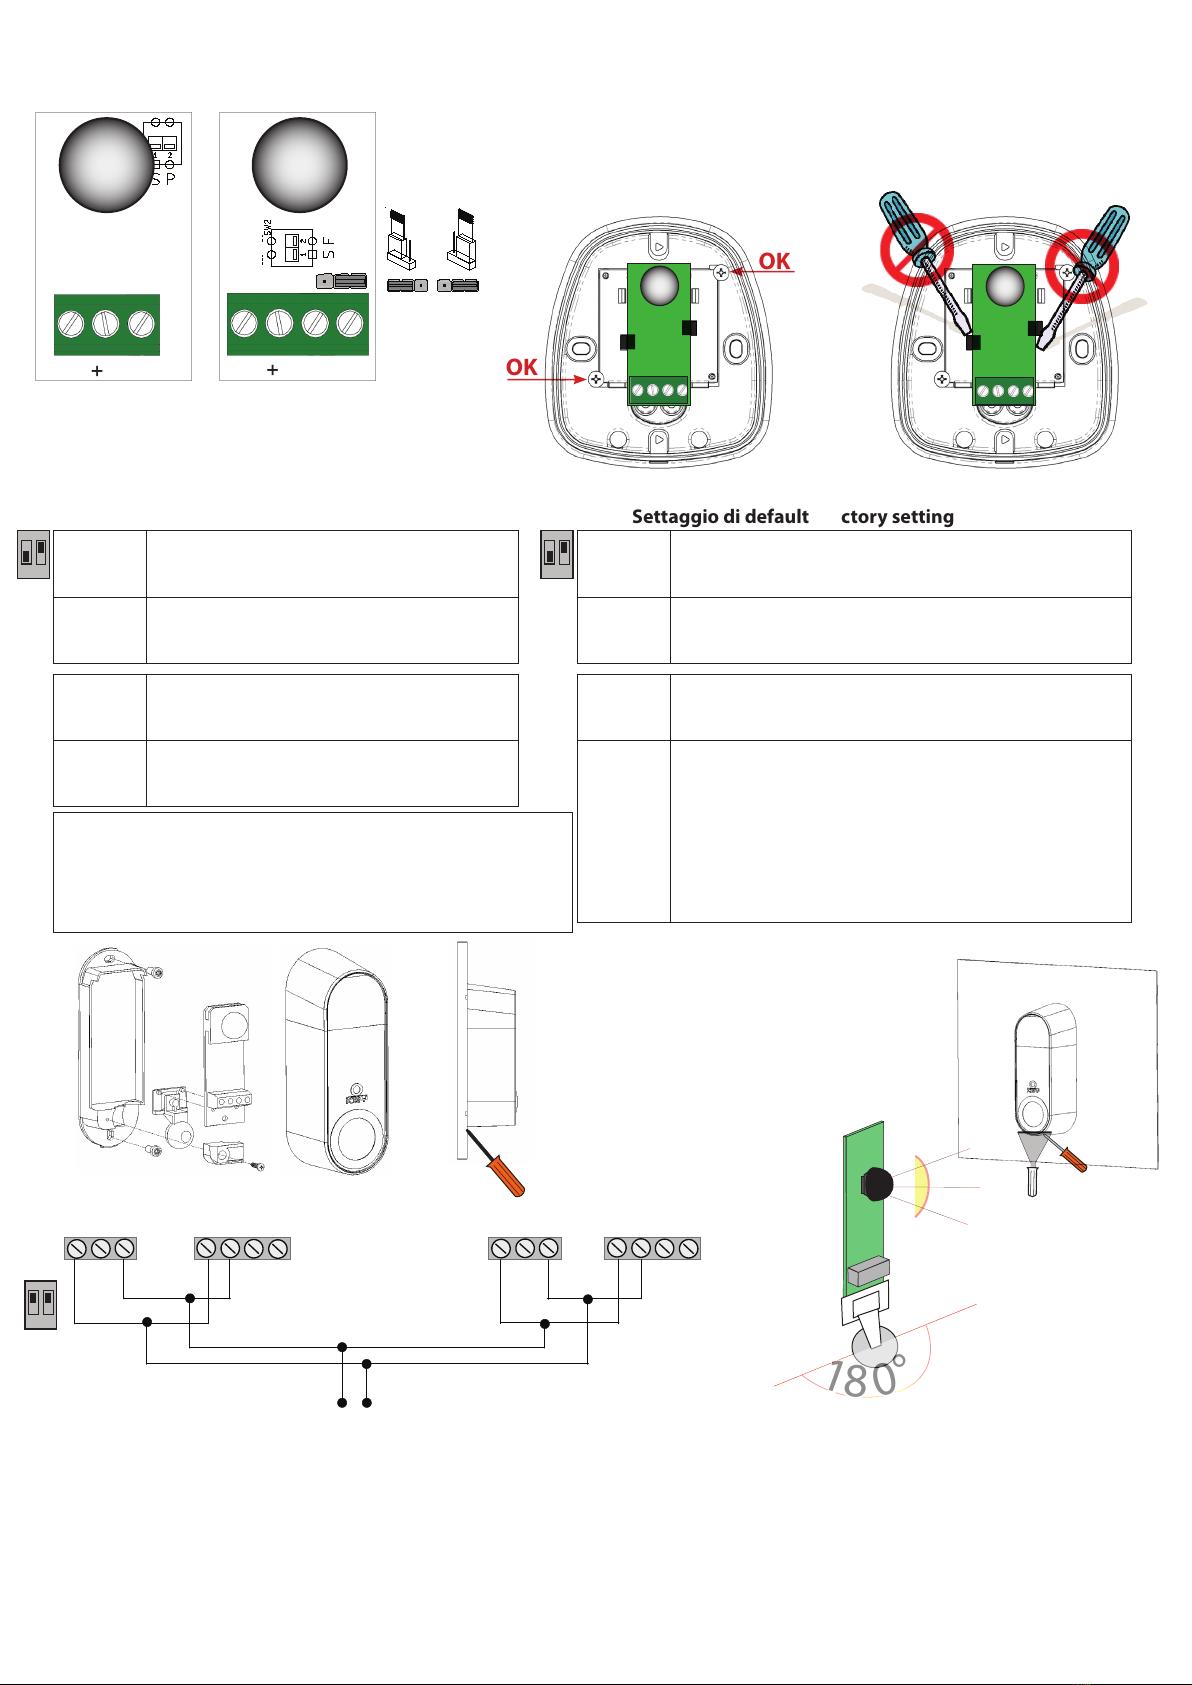
Achtung: Zur Herausnahme der Platine aus dem Gehäuse, die 2 Halteschrauben des Kunststoadapters
herausdrehen und keine Hebelwirkung auf die Platine oder die Kunststohaken ausüben.
Atención: para extraer la tarjeta de la caja, desenrosque los 2 tornillos de jación del adaptador plástico
y no haga palanca en la tarjeta o en los ganchos de plástico.
Uwaga: aby wydobyć płytę z pudełka, należy usunąć 2 śruby plastikowego adaptera, nie naciskając na
plastikowe złączenia ani samą płytę.
OK
OK
• Zum Önen der Fotozelle einen Schraubenzieher zum
Anheben zwischen Abdeckung und Wand benutzen, um
den Putz nicht zu beschädigen, ggf. einen Schutz dazwi-
schenklemmen.
• Para abrir la fotocélula, haga palanca con un destorni-
llador entre la tapa y la pared, utilizando una protección
para no estropear el enlucido.
• Otwórz fotokomórkę pomiędzy jej dolną częścią i ścia-
ną, korzystając ze śrubokręta.
-5 °
+5 °
0 °
1
8
0
°
1 2
ON 1 - ON schaltet nur Gleichlauf 12/24Vac ein
habilita sincronismo solo 12/24Vca
aktywuj synchronizację wyłącznie 12/24Vac
1 - OFF Gleichlauf abschalten
deshabilita sincronismo
dezaktywuj synchronizację
2 - ON Höchstleistung (empfohlen)
máxima potencia (recomendado)
maksymalna moc (zalecana)
2 - OFF Mindestleistung (verhindert mögliche Reexionen)
mínima potencia (evita posibles reejos)
minimalna moc (zapobieganie odbiciom)
1 2
ON 1 - ON schaltet nur Gleichlauf 12/24Vac ein
habilita sincronismo solo 12/24Vca
aktywuj synchronizację wyłącznie 12/24Vac
1 - OFF Gleichlauf abschalten
deshabilita sincronismo
dezaktywuj synchronizację
2 - ON schaltet die Verzögerung ab und ermöglicht den Gleichlauf; desha-
bilita el retardo y permite el sincronismo
planowanie czasu interwencji; możesz skorzystać też z synchroni-
zacji;
2 - OFF verzögert um etwa 300 ms den Eingri des Relais,“Schnee”
!!!! Falls man diese Funktion wählt, muss der Gleichlauf 1- OFF
abgeschaltet werden!
retrasa unos 300 ms el disparo del relé,“nieve”
!!!! Si se selecciona esta función, hay que deshabilitar el sincro-
nismo 1- OFF !
opóźnia o 300 ms aktywację przekaźnika,“rekompensata śniegu”
!!!! Jeśli korzystasz z tej funkcji, nie korzystaj z synchronizacji
1- OFF !!!!
• Im Wechselstrom ist der Gleichlauf aktiviert, die Led auf RX bleibt
teilweise eingeschaltet.
• Con corriente alterna y sincronización habilitada, el led del RX
permanece parcialmente encendido.
• Jeśli korzystasz w AC i synchronizacja została aktywowana, od-
biornik światła pozostanie częściowo podświetlony.
Standardeinstellung / Conguración predeterminada /
Empfohlen wird: TX Micro Switch 2-OFF Mindestleistung, besonders in Fällen bei denen Schwierigkeiten durch Reexionen auftreten können (Fußböden, Wände, glänzende
oder extrem reektierende Flächen).
Bei gleichzeitigem Einsatz mehrerer Fotozellenpaare, zum Beispiel außen und innen an einem Schiebetor, muss sehr sorgfältig auf ihre Parallelität geachtet werden, um uner-
wünschte Reexionen zu verhindern.
Se recomienda: TX Micro switch 2-OFF de mínima potencia, especialmente en aquellos casos en que se puedan producir problemas por fenómenos de reexión (suelos, pare-
des, supercies brillantes o especialmente reectantes).
Si se utilizan varios pares de fotocélulas simultáneamente, por ejemplo, por dentro y por fuera de una cancela corredera, asegúrese de que sean paralelas entre sí para evitar
posibles fenómenos de reexión no deseados.
Zaleca się użycie mikroprzełącznika TX 2-OFF o minimalnej mocy, w szczególności w razie odbić (podłóg, ścian, wyjątkowo połyskliwych lub odblaskowych powierzchni, itp.)
W razie korzystania z dwóch par fotokomórek jednocześnie, na przykład w środku i na zewnątrz bramy posuwnej, zwróć uwagę na równoległość, aby zapobiec niepożądanym
odbiciom.
nur Gleichlauf 12/24Vac einschalten
habilita sincronismo solo 12/24Vca
aktywuj synchronizację wyłącznie dla 12/24Vac
Versorgung bei 12/24Vac
Alimentación a 12/24Vca
CN1 Zasilanie 12-24 Vac
Verbindungen zum Einschalten des Gleichlaufs
Conexiones para habilitar el sincronismo
Podłączenia do aktywacji synchronizmu
This manual suits for next models
2