KEYBOARDPARTNER HX3.6 User manual

User Manual
HX3.6 MIDI Expander
with Extended License
(preliminary, as of firmware version 6.010, March 2023)
keyboardpartner.com

2 HX3.6 MIDI Expander
Please read this manual carefully before using the HX3 Expander.
Only use appropriate power supply as advised. Input voltages exceeding
15V may damage the device.
Designed for indoor use only. Do not use HX3 Expander in moist places.
Do not spill liquids or solvents into unit.
No user-serviceable parts inside. Refer to qualified technician or service
representative if problems occur.
Only clean with damp soft cloth. Using detergents or solvents may
deteriorate finish and lettering.
Keep packaging in case of service shipment.
EU conformity declaration
The producer/distributor
KEYBOARDPARTNER UG
Entwicklung elektronischer Musikinstrumente
Carsten Meyer
Ithweg 37, D-30851 Langenhagen
info@keyboardpartner.de
hereby declares, that the product
HX3.6 MIDI Expander
has been designed, produced and examined in compliance with the DIN VDE 0580 standard and in
accordance with the EU Low Voltage Directive.
Following directives, standards and guidelines have been used:
EMV-Richtlinie 2014/30/EU
Niederspannungsrichtlinie 2014/35 EU
RoHS-Richtlinie 2011/65/EU
Langenhagen, March 2023
____________________________
Carsten Meyer / Geschäftsführer

HX3.6 MIDI Expander 3
Contents
HX3.6 MIDI Expander......................................................................................................................4
Features...........................................................................................................................................4
Jack Connections.............................................................................................................................5
Swell Pedal/Volume Control.........................................................................................................5
HX3 Apps and Tools........................................................................................................................6
HX3.6 Manager............................................................................................................................6
TouchOSC for HX3 ......................................................................................................................6
Menu Panel......................................................................................................................................7
Saving settings .........................................................................................................................7
Menu Overview ............................................................................................................................8
Start menu................................................................................................................................9
Upper Voice............................................................................................................................10
Lower Voice............................................................................................................................11
Pedal Voice.............................................................................................................................12
Audio Setup............................................................................................................................13
Reverb Levels.........................................................................................................................14
Rotary Setup...........................................................................................................................14
Percussion Setup....................................................................................................................15
Vibrato Setup..........................................................................................................................16
Phasing Mode.........................................................................................................................16
Organ Setup ...........................................................................................................................17
Keyboard/MIDI........................................................................................................................19
MIDI Control...................................................................................................................................21
Panic button ...............................................................................................................................21
Supported keyboards and MIDI controllers ................................................................................22
Updates..........................................................................................................................................24
DSP Files ...................................................................................................................................24
How To …?....................................................................................................................................26
Touch control by tablet / smartphone.............................................................................................26
Serial numbers and licenses..........................................................................................................27

4 HX3.6 MIDI Expander
HX3.6 MIDI Expander
HX3.6 MIDI Expander is a tonewheel emulator with all the features of a classic electromagnetic
organ. It is controllable via MIDI with selectable CC sets for various keyboards. The CC sets are
editable. Additional CC sets are loadable.
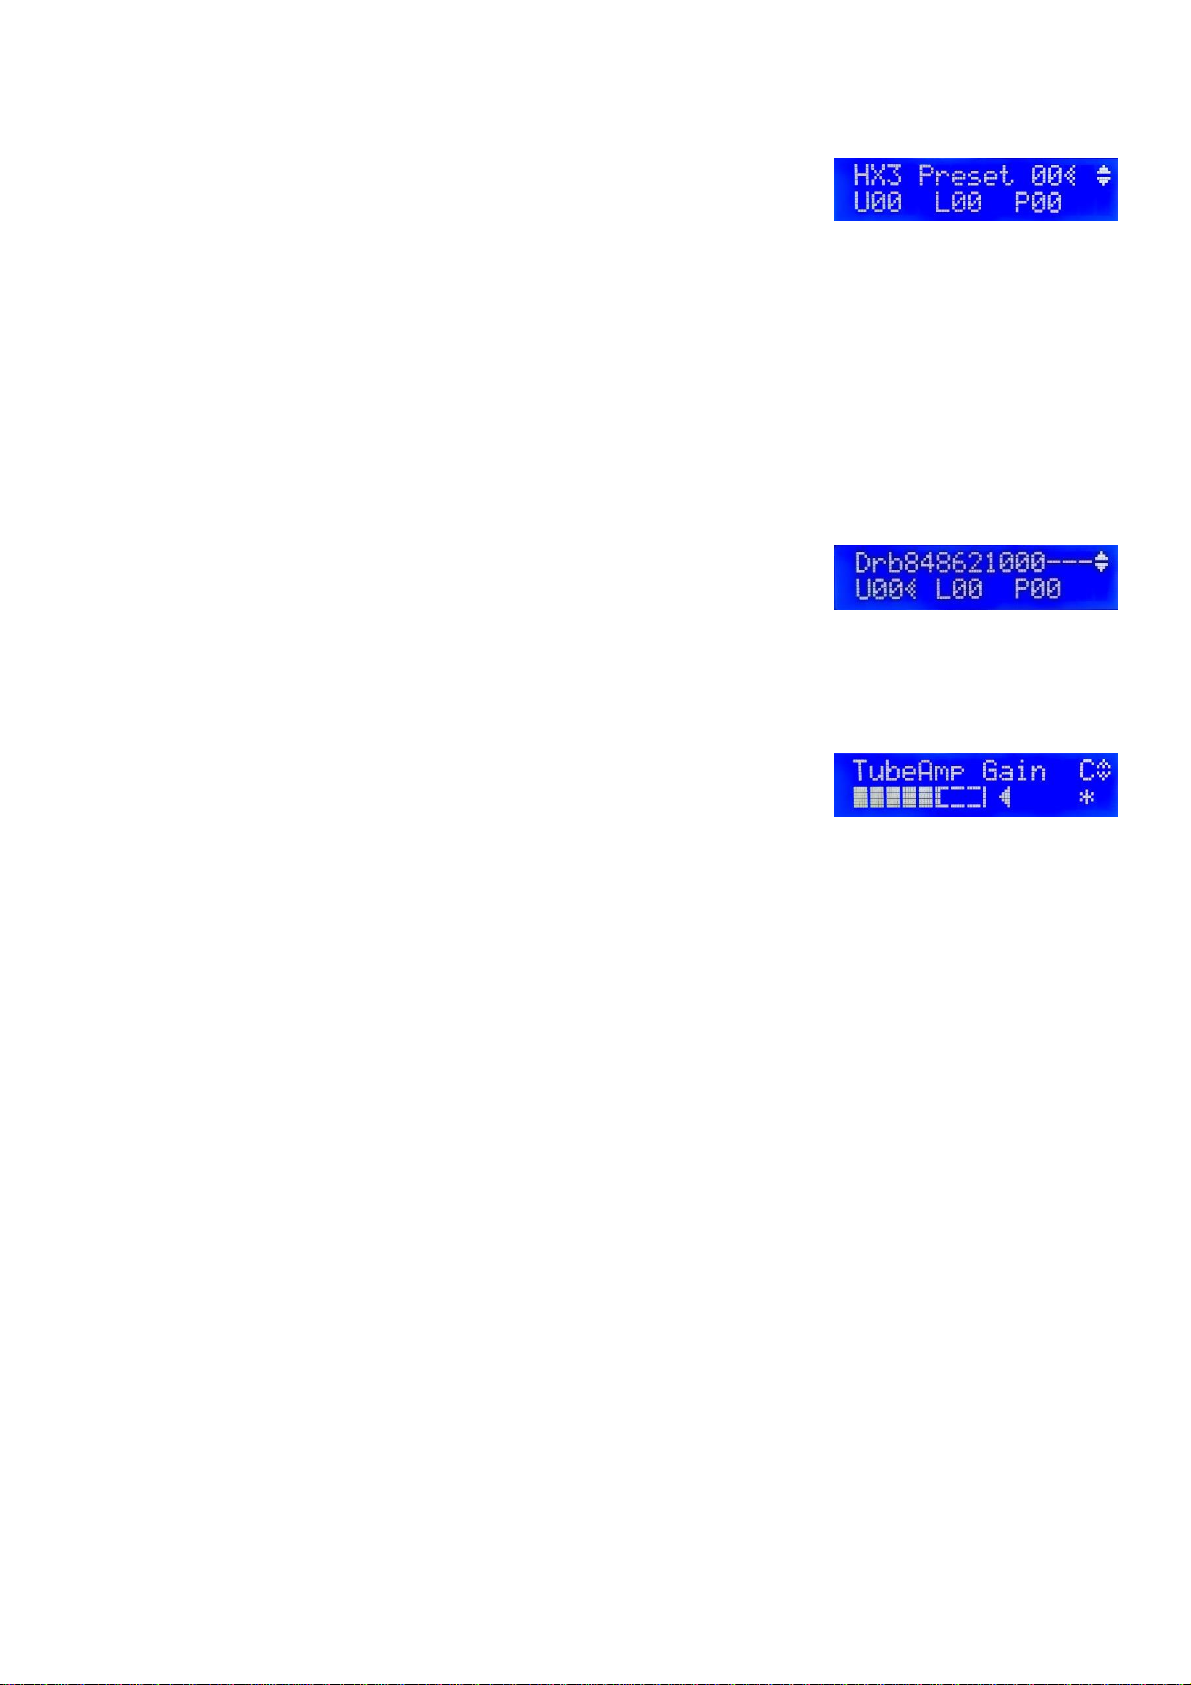
HX3 offers unlimited polyphony, 100 presets, 3 x 15 drawbar presets and CaM rotor simulation
with rotary speaker, scanner vibrato and amp 122. General MIDI sounds such as piano and strings
are also available.
As an option (extended license required), the HX3 RealOrgan engine is capable of emulating all
electromagnetic organs including the famous H100, combo organs, concert organs of the 70s and
80s like Böhm Orchester and Wersi Helios. This implies up to 15 harmonics, up to 12 drawbars
per manual with individual mixtures, including phasing rotor (WersiVoice). An ADSR envelope is
available on all drawbars, also H100 percussion and "Harp Sustain". Various tone generator
waveforms are selectable, for "cheesy" combo organs as well as fully fledged concert organs.
Features
Compact organ emulator in aluminum box, 222 x 150 x 42 mm
Authentic reproduction of generator. Key contacts, percussion, rotary effect, scanner vibrato
and TubeAmp realized using physical modeling in pure hardware.
Extremely low internal latency of 50 microseconds Key-to-Audio. However, MIDI transmission
delay is about 1 ms per note played.
Natural key click due to 9 (B3 mode) or 12 (H100 mode) contacts closing in succession
Authentic ‘CaM Rotor’ simulation with 122 tube amp
Predefined, editable organ models and rotary models
General MIDI (GM) Synth, 54x polyphonic
Tunable in range of A = 433 through 447 Hz
Effects DSP with 3 reverb levels
Dual MIDI IN for two keyboards or bass pedal, swell (expression) pedal and footswitch jacks
LC display and menu system
USB for MIDI over USB, firmware updates, parameter editing
Made in Germany
Default MIDI setting: channels 1/2/3 for upper/lower/bass, MIDI CC NI B4.
DC input 9 to 12V, 500 mA min., 5.5/2.1 mm plug, plus on center.
Trademarks Hammond®, B3® and Leslie® belong to Hammond Suzuki Corporation (Japan). Trademark NI B4
belongs to Native Instruments GmbH, Germany. Product and company names used in this document apply for
illustration and example purposes only. Keyboardpartner is not related to these trade marks in any way.

HX3.6 MIDI Expander 5
Jack Connections
Left to right:
SWELL ¼” stereo jack. Expression pedal input is compatible with Yamaha FC-7 and similar
expression. Plug connection: Sleeve = ground / potentiometer start, ring = potentiometer tap,
tip = potentiometer end. Resistor value 10 kOhm to 50 kOhm.
FOOTSW ¼”stereo jack. Single or double footswitch controls simulated rotary speed:
SLOW/FAST on plug tip, RUN/STOP on plug ring. By default configured for latching foot
switches; can be configured for momentary (button type) switches (parameter #1502, set bit 0
to 0. If single footswitch used, Rotary is always on RUN (no plug ring, input grounded by plug
sleeve).
USB USB B-type connector for MIDI over USB, updates, parameter editing. USB port and
MIDI IN/OUT cannot be used at the same time.
MIDI IN/OUT Factory default secondary MIDI input for additional lower manual, bass pedal or
MIDI controller. Optionally internally jumpered to supply +5V/200ma to our Drawbar Controller
or our Bass25 MIDI (phantom voltage). May be changed to act as MIDI OUT by internal jumper
swap. See HX3 Installation Manual for details.
MIDI IN Primary input from MIDI keyboard.
DC IN Use stabilized DC wall wart 9 to 12V with at least 500mA current output, inner/outer
plug diameter 2.1/5.5 mm on DC input jack. Polarity: positive voltage on inner tip.
AUDIO1/AUDIO2 Main audio stereo output. Output level is approx. 300 mV at full swell.
Swell Pedal/Volume Control
Output level of all output channels is controlled by Master volume setting in menu or MIDI CC #7
“Volume”, whichever occurs last.
Organ's swell pedal position is controlled by an expression pedal or MIDI CC #11 “Expression”,
whichever occurs last. The loudness curve is similar to the swell pedal of a classic tonewheel
organ, so expression volume will not reach zero. We recommend connecting an expression pedal
Yamaha FC-7 or similar (1/4" jack, 10k to 47k total resistance) directly to the HX3 module.
MIDI CC #11 and #7 may be altered via menu to any valid MIDI CC number.

6 HX3.6 MIDI Expander
HX3 Apps and Tools
The following chapter describes how you can control the HX3 device completely via the menu
panel. However, there are other, more convenient options: Use the Panel in the HX3.6 Manager
for operation via PC or notebook. Use TouchOSC for operation via tablet or smartphone.
HX3.6 Manager
The HX3.6 Manager supports the use of your HX3 device
with a variety of functions:
The Panel contains switches and drawbars for your HX3
device. In the panel window you can adjust sounds and
effects, create, name and save presets. When the panel is
open, you can recall presets live using the function keys on
your PC keyboard.
The Preset Mover makes it easy to manage presets. It lets
you try out, move, and rename presets. You can transfer
presets from a file to the HX3 device or save them to a file.
The Editor lets you set up the HX3 for all conceivable
hardware configurations, gives you access to all available
parameters, and lets you fine-tune sounds and effects.
With the CC Set Editor you can edit the MIDI CC Sets of the
HX3, create CC Sets or load them from a file from your PC.
This allows you to get the most out of your keyboard
controller, even if none of the included CC Sets fit right
away.
The Updater updates the operating software of your HX3
device completely in an automatic process or individual
selected parts. Use the Updater also to activate an Extended
License or to change the username.
TouchOSC for HX3
Control your HX3 device via tablet or smartphone with the TouchOSC mk1 app from Hexler, which
you can get for a few euros in the Apple App Store or Google Play. For wireless connection of iOS
or Android mobile devices, the optional WiFi interface for plugging onto the HX3 mainboard is
required. Wireless control is only possible when the HX3 Manager is not connected. iOS devices
can also communicate with TouchOSC via MIDI over USB.

HX3.6 MIDI Expander 7
Menu Panel
After power on the Preset/Drawbar Menu is present. Pressing the
rotary knob twice briefly will let you return to the home position from
any other menu position.
Turn the rotary knob to scroll through the menu. A hatched arrow indicates the menu position.
Press the rotary knob once to edit a parameter value. A white arrow indicates the selected
entry that may be altered. Turn the rotary knob to change that value. Press the rotary know once
again to continue scrolling through the menu.
In the preset/drawbar menu the rotary knob selects the Presets 0 …99. Presets consist of
drawbar settings and optionally tab switch settings (percussion, vibrato etc., including rotary
Run/Fast/Slow), volume and 122 tube amp gain as well as all other effects.
Scroll downwards (= turn the rotary knob clockwise) to the drawbar
presets (Voices) for Upper manual, Lower manual, and Pedal. The
top display line shows the drawbar positions as numbers from 0 –8.
Scroll down one more step to get to the Master Volume setting. Master Volume adjusts the
overall volume for all outputs. Higher values are recommended for the best signal to noise ratio.
Scroll down to the TubeAmp Gain setting. TubeAmp Gain sets the
internal tube amp simulation.
Saving settings
Parameter values tagged by the letter Care part of a single preset. Values tagged by Dapply to
all presets and are stored as defaults. The assignment can be changed in the editor of the HX3
Manager with parameter #1498 or on the Presets page of the Manager’s Panel.
Values tagged by U, L, or Pare part of the current voice for upper, lower, or pedal. These are
saved as Voice (Drawbar settings only) if you save them while one of these markers is displayed.
An asterisk appears at the bottom right of the display when a value has been changed. To save
the setting, keep the rotary knob pressed until one of the following prompts appears on the
display:
"Saved Defaults done" for default values.
"Save to Preset #XX" for presets ("XX" stands for the number of the currently active preset).
Change the number as desired and press the knob again.
"Save Upper to #XX", "Save Lower to #XX" or "Save Pedal to #XX" ("XX" stands for the
number of the currently active Voice). Change the number as desired and press the knob
again.

8 HX3.6 MIDI Expander
Menu Overview
From the HX3 menu you can access all control functions, such as rotary speed, percussion,
chorus/vibrato. You can select organ models and rotary models. You can adjust many sound-
defining parameters. You can create and recall Common Presets and Voice Presets (drawbar
settings only). You can perform updates of the operating software, optionally even without the
HX3.6 Manager.
Important to know:
The HX3 menu is arranged in function groups and has two levels: The main menu, shown in
green, contains the operating functions that are frequently used. In the submenu of the respective
function group, shown in blue, you will find parameters that are used less frequently, usually the
pre-settings.
Press the lower button to switch from a main menu to a submenu. An "S" symbol then appears at
the bottom right of the display. Press the upper button to return to the main menu.
Turn the rotary knob to navigate through the menu. Press the rotary knob briefly to change a
setting. Briefly press the rotary knob again to navigate further.
The menus are arranged in a ring. The last menu item in the list is therefore followed by the first
again when you scroll down further, and the same applies vice versa.
Some menu items are only available with the Extended License. These are shown in italics in the
following overview. It also depends on which organ model is selected (default: B3 Standard). In
the overview, a light blue Hmarks menu items that only appear in H100 mode, and a red E marks
menu items that are available in EnvelopeGen (EG) mode. Depending on the device type, some
menu items are omitted or replaced by physical controls.
As of firmware version 5.637, the menu is shorter and therefore clearer than in previous versions.
Rarely used parameters have been removed from the menu, but are still adjustable with
TouchOSC, with the Panel or with the Editor of the HX3 Manager. Please use this method for the
manifold settings in EG mode.
The editor can be used to remove other unwanted menu items from the menu or added to the
menu.

HX3.6 MIDI Expander 9
Start menu
HX3 Preset: Selection of Common Presets 00 ... 99.
Common Presets include Drawbar settings and optionally Tab Switch settings (Percussion,
Vibrato etc.), Rotary Run/Fast/Slow, TubeAmpGain, and other effect settings. In the Editor or
Panel of the HX3 Manager you can define which parameters are saved in presets. Preset 0
determines the settings when the device is switched on.
Edit Name: The name of the preset can be edited in this submenu. Press the rotary knob
once. Turn the knob to select the desired letter and press the knob again to save the change.
Turn the knob to edit the next letter. Turn the rotary knob past the last digit or turn the rotary
knob from the first letter to the left to navigate to the other submenu items.
LED Dimmer: Brightness of the LEDs on connected control panels and on the menu panel of
the HX3 MIDI Expander.
Save Defaults: Saves all settings as default values that apply at power-up.
SD File Exec: Selection of a script file on the SD card when the SD card adapter is connected.
Bootld Update: Press the rotary knob for two seconds to launch the bootloader for operating
software updates. HX3.6 performs a system reset and puts itself into a special communication
mode for "Device Firmware Upgrades" (DFU mode).
DFU upload ... Fast and secure transfer of firmware via DFU (see chapter Updates).
DFU packages can be transferred to the device using the DreamDFU app or
DreamDFU_kbp for macOS. Under Windows, this is also possible with the updater of the
HX3.6 Manager.
FPGA recover from FAILSAFE Restore the FPGA configuration from the backup copy
stored in the device.
FW recover from FAILSAFE Restore the microcontroller firmware from the backup
copy stored in the device.
Exit update, start HX3.6 Exit the DFU mode with a reset, Connect of the HX3.6 manager
via MIDI over USB is then possible again. WiFi Init Def: Reset WLAN interface to factory
default.
Preset Init: Sets the live preset 0 to a basic B3 organ sound.

10 HX3.6 MIDI Expander
Upper Voice
U00 ... U15: Selection of the drawbar presets (voices). The upper line shows the drawbar settings
as numbers from 0 ... 8. In H100 and EnvelopeGen mode, three mixer drawbars are active in
addition to the standard drawbars.
Voice 0 takes over the live setting of the drawbars, if present (not with HX3 MIDI Expander). An
additional 15 settings can be stored to maintain compatibility with organs with preset keys.
UpperDB 16 ... UpperDB 1: Settings of the standard drawbars for the upper manual.
HEUpperDB Mix1 ... UpperDB Mix 3: Settings of the mixture drawbars for the upper manual.
Mixtures consist of up to 3 higher harmonics with individual levels.
In H100 mode the following options are available:
HH100 Harp Sustain: Activates the Harp Sustain Effect, 4‘ harmonics fading, polyphonic, no
vibrato. Independent of 4‘ drawbar and 4‘ percussion.
HH100 2nd Voice: Harmonics selected by H-Perc Mask sound continuously at full level.
Percussion bypasses vibrato like on the H100. Combined with drawbar voices on vibrato and
2nd Voice activated this results in a neat chorus effect.
HE H-Perc 16 …Mix 3: Selects harmonics for the
percussion/2nd Voice circuit. Each “o”-symbol represents a
harmonic from 16’ up to Mixture 3. The selected harmonic that
may be activated by turning the encoder is underlined. If activated the respective “o”-symbol is
filled white.
H H100 PercToDry: Harmonics selected by H-Perc Mask are bypassing vibrato and phasing
rotor “dry”.
In addition to the organ sounds, General MIDI (GM) instruments are available that can sound as
layers simultaneously. To activate a GM instrument, set its level as desired. To deactivate the
organ, set all drawbars to 0.
UpperGM Prg 1: Selection of GM instrument by program number
UpperGM Lvl 1: Level setting of GM voice
UpperGM Hrm 1: Harmonic transposition of GM voice
With the Extended License, another sound layer can be used. This may be detuned to achieve a
richer sound.
UpperGM Prg 2: Selection of second GM instrument (overlay)
UpperGM Lvl 2: Level setting of second GM voice
UpperGM Hrm 2: Harmonic transposition of second GM voice
UpperGM Detn2: Detuning of second GM voice

HX3.6 MIDI Expander 11
Lower Voice
L00 ... L15: Selection of the drawbar presets (voices). The upper line shows the drawbar settings
as numbers from 0 ... 8. The set keyboard mode (mechanical or electronic keying) is also valid for
the lower manual. In H100 and EnvelopeGen mode three mixer drawbars become active in
addition to the standard drawbars.
Voice 0 takes over the live setting of the drawbars, if present (not with HX3 MIDI Expander). An
additional 15 settings can be stored to maintain compatibility with organs with preset keys.
LowerDB 16 ... LowerDB 1: Drawbar settings for the lower manual.
HELowerDB Mix1 ... LowerDB Mix 3: Mixture drawbar settings for the lower manual. Mixes
consist of up to 3 higher harmonics with individual levels. Unlike the original H100, HX3 also
provides three mixtures for the lower manual.
E EnvEna 16 …Mix 3: The mask determines for which harmonics the ADSR envelope
becomes effective. There is no amplitude shaping for the non-activated harmonics.
In addition to the organ sounds, General MIDI (GM) instruments are available that can sound as
layers simultaneously. To activate a GM instrument, set its level as desired. To deactivate the
organ, set all drawbars to 0.
LowerGM Prg 1: Selection of the GM instrument by program number.
LowerGM Lvl 1: Level setting of the GM Voice
LowerGM Hrm 1: Harmonic transposition of the GM voice
With the Extended License, another sound layer can be used. This may be detuned to achieve a
richer sound.
LowerGM Prg 2: Selection of the second GM instrument (overlay)
LowerGM Lvl 2: Level setting of the second GM Voice
LowerGM Hrm 2: harmonic transposition of the second GM voice
LowerGM Detn2: Detuning of the second GM-Voice

12 HX3.6 MIDI Expander
Pedal Voice
P00 …P15: Selection of the drawbar presets (voices). The upper line shows the drawbar settings
as numbers from 0 ... 8.
PedalDB 16, PedalDB 8: Drawbar settings for the pedal.
PedalDB 16H, PedalDB 8H: Drawbar settings for the pedal, smoother sound.
Pedal Release: Changes decay time of pedal sound (often called string bass "sustain" on
other organs).
In addition to the organ sounds, General MIDI (GM) instruments are available that can sound as
layers simultaneously. To activate a GM instrument, set its level as desired. To deactivate the
organ, set all drawbars to 0.
PedalGM Prg 1: Selection of the GM instrument by program number.
PedalGM Lvl 1: Level setting of the GM Voice
PedalGM Hrm 1: Harmonic transposition of the GM voice
With the Extended License, another sound layer can be used. This may be detuned to achieve a
richer sound.
PedalGM Prg 2: Selection of the second GM instrument (overlay)
PedalGM Lvl 2: Level setting of the second GM Voice
PedalGM Hrm 2: harmonic transposition of the second GM voice
PedalGM Detn2: Detuning of the second GM-Voice

HX3.6 MIDI Expander 13
Audio Setup
Master Volume: Sets the volume for all outputs. Higher values result in a better signal to noise
ratio.
TubeAmp Gain: Sets the level of the simulated tube amplifier. The amplifier enters saturation and
distorts at high values and higher swell pedal values. So the distortion level is controlled with the
swell pedal as well. If Gain Vol Compensation is set in parameter 1501 of the editor, Gain works
almost volume-neutral.
TubeAmpBypass: When ON, the rotary tube amplifier is bypassed.
The Audio Setup menu items have a common submenu:
Equ Bypass: When ON, the equalizer is bypassed.
Bass Equal: Bass level adjustment
Bass Equ Frq: Bass filter frequency, invalid if Parameter B/T is set to OFF.
Bass Equ Q: Bass filter Q (bandwidth), invalid if Parameter B/T is set to OFF
Mid Equal: Mids level adjustment
Mid Equ Frq: Mids filter frequency
Mid Equ Q: Mids filter Q (bandwidth)
Treble Equal: Treble level adjustment
Treb Equ Frq: Treble filter frequency, invalid if Parameter B/T is set to OFF.
Treb Equ Q: Treble filter Q (bandwidth), invalid if Parameter B/T is set to OFF.
Parametr B/T: Parametric equalizer also for bass/treble. If Parameter B/T is set to OFF, the
equalizers for bass and treble act as shelving filters.
Upper Lvl Adj: Allows separate upper manual default level setting.
Lower Lvl Adj: Allows separate lower manual default level setting.
Pedal Lvl Adj: Allows separate pedal default level setting.
Perc Lvl Adj: Allows percussion level setting.
PedalRotBypas: Routes the pedal signal to bypass the CaM Rotor, optionally only to the
separate pedal output, if No Pedal on Main is set in parameter #1501, Bit 3 of the editor.
AO28 Tone Pot: Tone potentiometer setting on preamp.
AO28 Gain Cap: Overall gain of AO28 preamp.
AO28 MinSwell: Minimum volume of swell pedal in heel position.
AO28 Tube Age: Age of the preamp tubes. The older, the more clearly the triode distortion
becomes audible.

14 HX3.6 MIDI Expander
Reverb Levels
Reverb Prgm: Reverb program selection (OFF, 1, 2, 3).
Reverb 1 Lvl: Reverb portion in position REV 1.
Reverb 2 Lvl: Reverb portion in position REV 2.
Reverb 3 Lvl: Reverb portion in position REV 3.
Rotary Setup
Rotary Motor: RUN/STOP switch of the rotary simulation.
Rotary Fast: SLOW/FAST switch of the rotary simulation.
Bypass: Switching off the rotary simulation.
Rotary Model: HX3 contains predefined rotary models that are editable. With the Standard
license you can choose from 6 models, with the Extended License from 16.
o122 Std SmR (Model 122 Standard, small room)
o122 Std LgR (Model 122 Standard, large room)
o122 Old SmR (Model 122 alt, small room)
o122 Old LgR (Model 122 alt, large room)
o147 New SmR (Model 147, small room)
o147 New LgR (Model 147, large room)
o760 Std SmR (Modell 760, small room)
o760 Std LgR (Modell 760, large room)
oSpaceSound
oSharma2001
oFibertone
oTinacord100
oCLS-222
oCustom 1
oCustom 2
oCustom3

HX3.6 MIDI Expander 15
The Rotary Setup menu items have a common submenu:
HornSlowSpeed: Rotation speed of the horn in SLOW position.
RotrSlowSpeed: Rotation speed of the rotor in SLOW position.
HornFastSpeed: Rotation speed of the horn in FAST position.
RotrFastSpeed: Rotation speed of the rotor in FAST position.
HornRampUp: Horn ramp up time.
RotorRampUp: Rotor ramp up time.
HornRampDown: Horn runout time
RotorRampDown: Rotor runout time.
Rotary Throb: Microphone placement.
Rotary Spread: Stereo width.
Rotary Balnce: Level balance between rotor and horn.
Percussion Setup
Percussion: Percussion selection stepwise in all possible combinations of NORM/SOFT,
FAST/SLOW, 2nd/3rd (not for H100) and OFF. This menu is not active when EnvelopeGen mode
is set. Then only (EG ADSR) appears to indicate that a percussion effect can be achieved here by
shaping the ADSR envelope.
PercNormLvl: Level in position NORMAL.
PerSoftLvl: Level in position SOFT.
PercLongTm: Decay time in position LONG.
PercShortTm: Decay time in position SHORT.

16 HX3.6 MIDI Expander
Vibrato Setup
Vibrato UPR: Scanner vibrato upper manual OFF/ON.
Vibrato LWR: Scanner vibrato lower manual OFF/ON.
Vibr: Vibrato knob with the positions V1 ... C3.
The Vibrato Setup menu items have a common submenu:
Scanner Gear: Vibrato frequency.
Ch Scanner Lvl: Scanner portion in chorus positions C1 ... C3.
Ch Bypass Lvl: Dry portion in chorus positions C1 ... C3.
V1/C1 FM Mod: Modulation depth at positions V1, C1.
V2/C2 FM Mod: Modulation depth at positions V2, C2.
V3/C3 FM Mod: Modulation depth at positions V3, C3.
Phasing Mode
(not with B3, M100)
Phasing Fast: Switch to fast phasing effect.
Phasing Upper: Activates phasing rotor (PHR) for upper manual (insert effect).
Phasing Lower: Activates phasing rotor (PHR) for lower manual (insert effect).
The Phasing Mode menu items have a common submenu:
PHR We/Boe:Selection of different phasing rotor models: On = We, OFF = Boe.
PHR Ensemble: Strings effect with multiple modulation.
PHR Celeste: Deep modulation with feedback.
PHR Fading: Slow phasing effect.
PHR Weak: Weak modulation, combinable.
PHR Deep: Deeper modulation, combinable.
PHR RotFast: Fast rotary effect.
PHR Ramp up: Ramp-up effect for rotor slow/fast, combinable.
Without options, a slow rotary effect is active. Weak, Deep, RotFast and RampUp can be
combined with it. Two additional vibrato effects can be achieved by simultaneously selecting the
Ensemble and Celeste options as well as Celeste and Fading. These effects can be used, for
example, as an additional vibrato channel for the H100 emulation.
Sync PHR/Rotr:The fast / slow switching of the phasing takes place together with the rotor
switching. So one footswitch can serve for both functions.

HX3.6 MIDI Expander 17
Organ Setup
Organ Model: HX3 contains predefined organ models that are editable. With the Standard license
4 models are available, with the Extended License 16.
oB3 Standard (B3 with nine drawbars per manual).
oB3 Old (1955 B3, Flutter and Leakage increased).
oB3 Recapped (B3 with new capacitors).
oM100/M3
oH100/12 DrB (H100 with three additional mixed drawbars per manual).
oBeam 2000 (electronic key contacts, ADSR envelope).
oBeam CnT/L (electronic key contacts, ADSR envelope).
oVersy Space (electronic key contacts, ADSR envelope).
oVersy Sacrl (electronic key contacts, ADSR envelope).
oFarvisCombo (electronic key contacts, ADSR envelope).
oFox Conti (electronic key contacts, ADSR envelope).
oKonn/Church (electronic key contacts, ADSR envelope).
oCustom 1
oCustom 2
oCustom 3
oCustom 4
TG Tuning: Allows organ generator tuning in range from A = 433 through 447 Hz.
The organ setup menu items have a common submenu:
Gating Mode:
B3/9 Drb: The HX3 default setting (B3 mode) implies mechanical key contacts, 2 2/3’ or 4’
percussion, and 9 drawbars per manual. The remaining menu items require an Extended
License.
oH100/12 Drb switches to the H100 organ model including 3 additional mixtures. This
activates the respective drawbars. B3 percussion is de-activated in this mode, instead the
H-Perc 16‘ …H-Perc Mixt3 in submenu Voice Upper settings are effective if Perc ON is
selected. By means of this mask you may assign percussion individually to each available
harmonic. Percussion always sounds without vibrato and phasing rotor. This mode may be
combined with all generator models.

18 HX3.6 MIDI Expander
oEnvelopeGen (EG) substitutes “mechanical” keying, which generates a key click, by “soft”
electronic keying. This is the way to model the entirely electronic organs of the 80s. In this
mode three additional mixtures are available; the respective drawbars are active. An ADSR
envelope is applied to the harmonics selected by means of the EnvEna 16‘ …EnvEna
Mixt3 settings on the Panel or with TouchOSC.
oEG +PercDrb works like EnvelopeGen (EG), but instead of the ADSR envelope a
percussion envelope is active on the harmonics selected by the EnvEna 16‘ …EnvEna
Mixt3 settings in submenu Voice Upper. The percussion effect amount can be adjusted with
the Envelope Generator Drawbars (EGenvDB 16‘ …Mixt3) on the Panel or with TouchOSC.
oEG +TimeDrb as well works like EnvelopeGen (EG), but in this mode the Envelope
Generator Drawbars (EGenvDB 16‘ …Mixt3) affect the decay and release times of the
ADSR envelope on harmonics selected by the EnvEna 16‘ …EnvEna Mixt3 settings in
submenu Voice Upper. Thus you can create interesting transient and decay effects similar
to a Fourier synthesizer by using time settings depending on the respective harmonics.
TG WaveSet: Determines the content of harmonics in the generated sound. Automatically set
for the selected generator, but can be overridden in this menu:
oB3 25%...38% k2 –B3, clean to rich harmonics (new to old organ)
oSine 2% k2 –clean LSI/transistor sine generator
oSawt Fltrd –Sawtooth-like tone
oSine LC Gen –sine wave generator with moderate k2 content
oSine TOSGen –square wave generator with sine wave filtering, sounds slighty hollow
TG Flutter: Adjusts tone generator "sloppyness" (spring clutch tension, bearing precision, and
resulting slow phase shifts and pitch changes).
TG Leakage: Sets tone generator leakage (crosstalk noise of adjacent notes, “growl”).
ContSpringFlx: Adjusts key contact spring flex, thereby affecting click frequency.
ContSpringDmp: Adjusts key contact spring damping, thereby affecting click length.
ContEarlyActn: Fatar keyboards only: Sound triggering on upper key contact. If OFF, the
organ sound is triggered with the lower key contact. MIDI NOTE ON on the other hand is
always sent with velocity and thus after closing the lower contact.
NoDB1@Perc: With the original, the 1' foot position is switched off during percussion when
PERC is ON. This behavior can be switched off here.

HX3.6 MIDI Expander 19
Keyboard/MIDI
MIDI Transpose: Allows transposition of sound generation by up to +24/-24 half note steps. Note:
Like the original, tonewheel generator includes 5 octaves. Notes outside this range do not sound.
MIDI CHANNEL: Sets the MIDI basic receive channel from 1 to 10 (upper manual, lower
manual +1 , pedal + 2).
MIDI OPTION: Sets the MIDI Routing to
oLocal Tx –own MIDI Events are sent to MIDI OUT
oInp 1 Thru –MIDI IN1 is routed as THRU to MIDI OUT
oInp 2 Thru –do not use
oUSB InThru –USB MIDI IN is routed as THRU to MIDI OUT
MIDI CC Set: Sets the HX3 accepted MIDI CC set to
oNI B4 d3c: Native Instrument B 4, Döpfer d3c controller (default), NI B4D
oHammond XK
oHammond SK (Note: Hammond changed MIDI CC set between XK and SK series, so try
out which fits)
oVersatile MIDI CC Set
oNord C1/C2 MIDI CC Set
oVoce Drawb –Voce MIDI drawbars
oKeyB/Duo
oHamichord (or „Mojo“, same hardware)
oHX3.5/KBP MIDI CC Set
oMIDI Custom CC Set
oMIDI Custom CC Set B
MIDI Swell CC: CC number for swell pedal (default 11, expression pedal).
MIDI VolumeCC: CC number for Master Volume (default 7, volume pedal).
MIDI PresetCC: CC number for presets (default #32 bank select LSB)
TransposeOffs: Transposition of directly connected Fatar keybed can be shifted for special
purposes. Affects MIDI OUT only.
Local On/Off: Interrupts the connection from a directly connected keyboard to the tone
generator. Notes are only sent via MIDI.
Split Keyb: When ON, the keyboard is split into two zones at the set split point.

20 HX3.6 MIDI Expander
Split Point: Sets split point (when split is ON) as key number (24 is second „C“ on manual).
Split Mode: Default split setting on power-up, engaged when split set to ON.
o'PedalToLower', map pedal to lower manual up to split point.
o'LowerToUpper', map lower to upper manual up to split point.
o'PedalToUpper', map pedal to upper manual up to split point.
o'Lower+1 ToU', map lower to upper manual up to split point, transpose lower +1 octave.
o'Lower+2 ToU' map lower to upper manual up to split point, transpose lower +2 octave.
o‘LwrAddPedal’, links the pedal to the lower manual up to the split point.
Split point and split mode may also be changed by one of the following procedures:
oPedal to Lower: Press a single key on lower manual key while switching SPLIT on to obtain a
custom split point.
oLower Add Pedal: Press a two keys on lower manual key while switching SPLIT to link the
pedal to lower manual up to the split point.
oLower to Upper: Press a single key on upper manual while switching SPLIT on to map lower
to upper manual up to this key.
oPedal to Upper: Press two keys simultaneously on upper manual while switching SPLIT on to
map pedal to upper manual up to highest of both keys pressed (useful for playing pedal bass
lines on single manual keyboards without bass pedal).
oLower +1 to Upper: Press three keys simultaneously on upper manual while switching SPLIT
on to map lower to upper manual up to highest of all keys pressed. Lower notes range is
transposed one octave up (useful for left-hand 8’ accompaniment chords on single manual
keyboards).
oLower +2 to Upper: Press four keys simultaneously on upper manual while switching SPLIT
on to map lower to upper manual up to highest of all keys pressed. Lower notes range is
transposed two octaves up (useful for left-hand 16’ accompaniment chords on single manual
keyboards).
Other manuals for HX3.6
1
This manual suits for next models
1
Table of contents
Other KEYBOARDPARTNER Extender manuals
Popular Extender manuals by other brands

Foxun
Foxun SX-EX36 operating instructions

UTC Fire and Security
UTC Fire and Security VAT1200 Installation & operation instructions

StarTech.com
StarTech.com ST121HDWP instruction manual

Megaelektronik
Megaelektronik SIMNANO+ manual

Milwaukee
Milwaukee FUEL PROPEX M12 Operator's manual

Icron
Icron EL4500 user guide