KEYSWERK BOHM SEMPRA SE20 User manual

1

2

3
SEMPRA OPERATING INSTRUCTIONS
Böhm Operating Instructions
Version 1.1
Art.-Nr. 62500
Date: 28.01.2018
The information contained in this document may be changed without notice and represents no
commitment on the part of the Keyswerk music GmbH.
The information is correct at the time of publication.
The display illustrations in this manual are examples only and may differ from the actual displays
on your instrument.
Technical details for the descriptions, data and illustrations in this manual are subject to change.
The Keyswerk music GmbH can accept no liability for bugs and incorrect information in the
documentation and their consequences.
© Keyswerk 2018
All rights reserved.
Responsible for the content:
BÖHM Orgeln
KEYSWERK Musikelektronik GmbH & Co. KG
Warbersche Str. 32
31675 Bückeburg
Tel.: 05722 905088
Internet http://www.keyswerk.de
E-Mail info@keyswerk.de

4
SEMPRA OPERATING INSTRUCTIONS

5
SEMPRA OPERATING INSTRUCTIONS
Index
Congratulations ....................................................................................................................................... 8
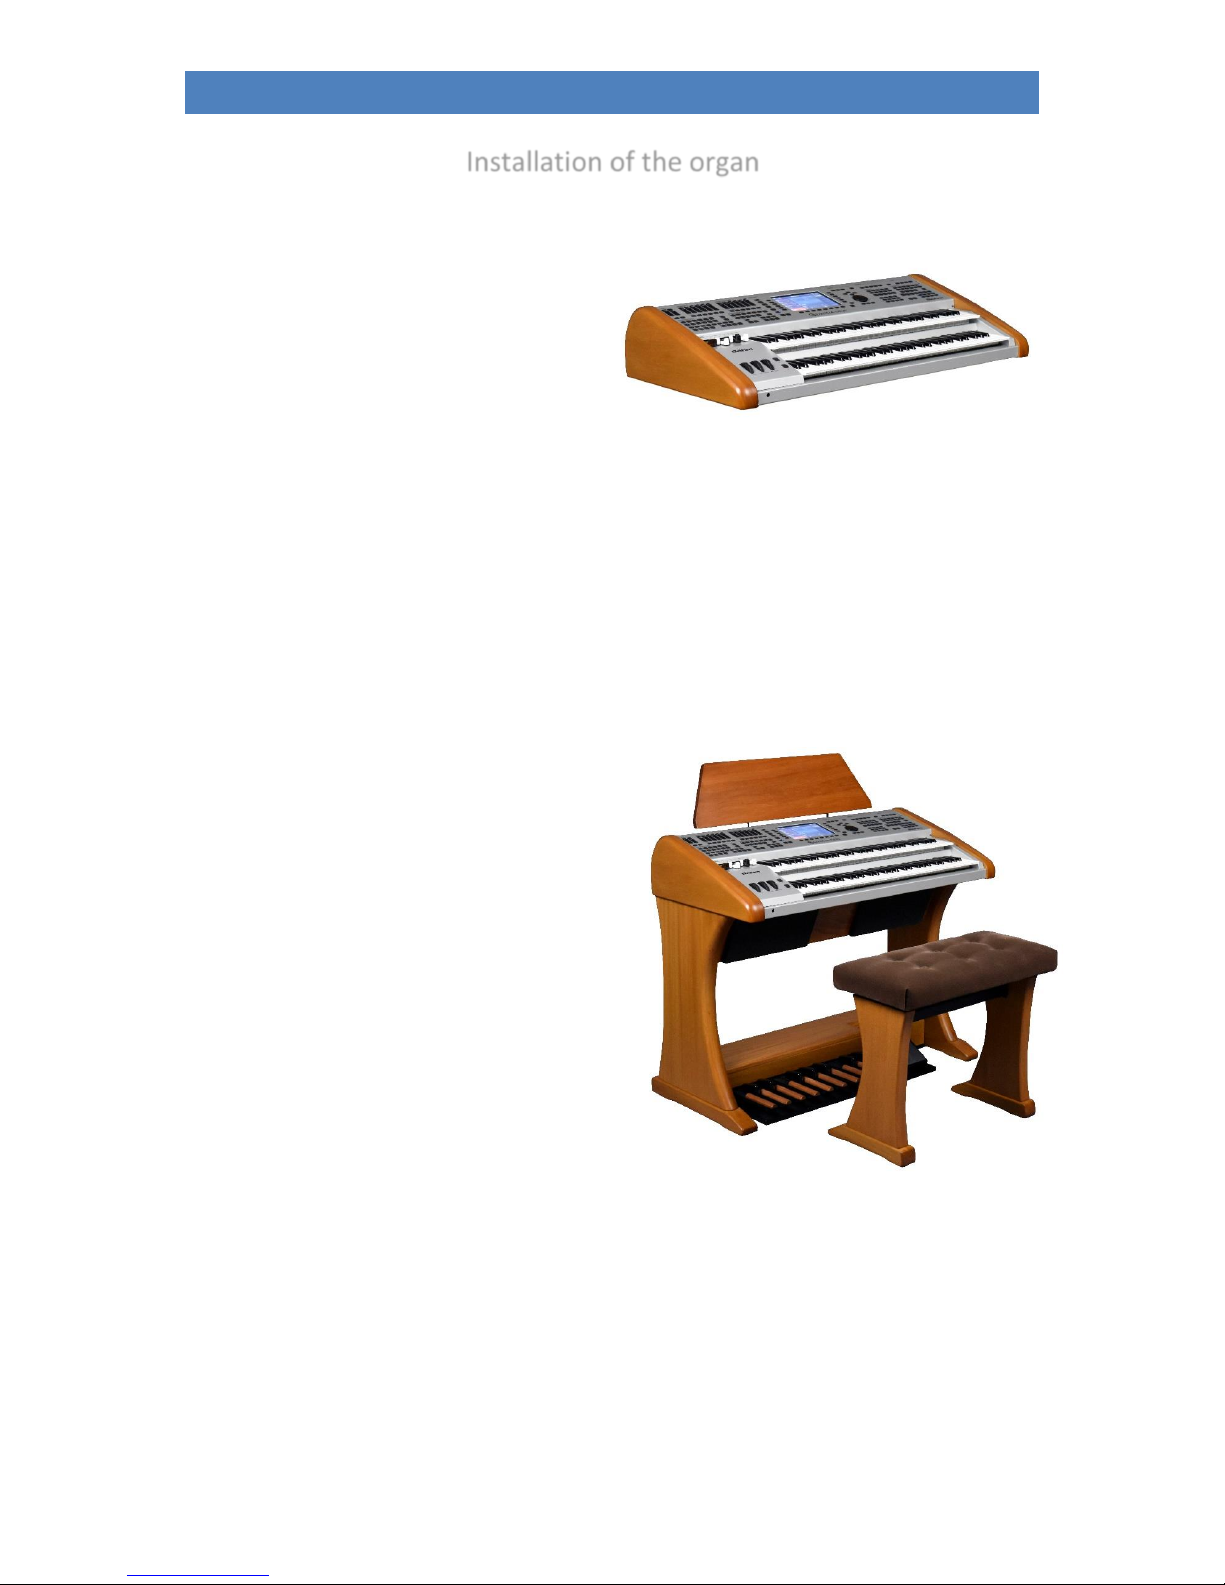
Installation of the organ........................................................................................................................ 10
SEMPRA SE20 - 2-manual keyboard version ..................................................................................... 10
SEMPRA SE20 - home ........................................................................................................................ 10
SEMPRA SE40 - home ........................................................................................................................ 11
SEMPRA SE60 - home ........................................................................................................................ 12
Switching the organ on and off ............................................................................................................. 12
Turn on the SEMPRA: ........................................................................................................................ 12
SEMPRA switch off (all versions except converted Overture organs):.............................................. 13
Power off on upgraded Overture organs: ......................................................................................... 13
Notes for SEMPRA organs with cloud Studio: ................................................................................... 15
Power on/off synchronisation of organ and Cloud Studio............................................................ 15
SEMPRA panel overview........................................................................................................................ 16
Connections........................................................................................................................................... 21
Headphones ...................................................................................................................................... 22
The Touch Display ................................................................................................................................. 23
Playing the SEMPRA .............................................................................................................................. 27
Select SONGS and PRESETS ............................................................................................................... 28
The preset designations ................................................................................................................ 29
SONGS - searching by name .......................................................................................................... 30
SONG-List filtering ......................................................................................................................... 31
Voices - select and distribute ............................................................................................................ 33
Sound (Voice) Selection................................................................................................................. 35
The drawbar organ (REAL ORGAN).................................................................................................... 40
Activating the REAL ORGAN for the manuals and the pedal......................................................... 41
Drawbar adjustment –upper or middle manual........................................................................... 42
Setting the drawbars for lower manual and pedal ....................................................................... 42
Rotor-Effect (Leslie)....................................................................................................................... 45
Other REAL ORGAN Functions:...................................................................................................... 45
[F-] button functions in the REAL ORGAN menu........................................................................... 49
Select organ type........................................................................................................................... 51
Play with Styles.................................................................................................................................. 54
....................................................................................................................................................... 55
Select styles and other accompaniments...................................................................................... 55
Style-/Pattern functions ................................................................................................................ 58
Tempo functions............................................................................................................................ 60
Accompaniment functions ............................................................................................................ 60

6
SEMPRA OPERATING INSTRUCTIONS
Solochord........................................................................................................................................... 65
Volume setting for manuals/pedal and accompaniment.................................................................. 67
Keyboard split.................................................................................................................................... 70
How to set a split point ................................................................................................................. 71
Cancel keyboard split .................................................................................................................... 72
Special features of the lower manual split.................................................................................... 73
Part Editor Setting sounds and their playing parameters .................................................................... 74
Call Part-Editor .................................................................................................................................. 74
Sound selection ............................................................................................................................. 77
Setting the part parameters.......................................................................................................... 80
Key Zoness –individual split zones for parts................................................................................. 90
Key Zone festlegen: ....................................................................................................................... 90
Part options ................................................................................................................................... 92
Part Setup...................................................................................................................................... 95
SONGS and Global Presets .................................................................................................................... 99
3-D Presets ........................................................................................................................................ 99
Save SONGS / Global Presets .......................................................................................................... 102
Edit SONG ........................................................................................................................................ 106
Delete SONGs / Global Presets........................................................................................................ 108
Copy Global Presets to another SONG............................................................................................ 109
Update the SEMPRA firmware (operating system)............................................................................. 110
Perform the firmware update on the SEMPRA............................................................................... 110
Appendix 1: System setups ................................................................................................................. 112
1. Calibrate the Touchscreen....................................................................................................... 113
2. Calibrating of pitch- an modulation wheels, aftertouch ans swell pedal(s)............................ 115
3. Setting a basic velocity for each manual ................................................................................. 118
4. setting date and clock time ..................................................................................................... 120

7
SEMPRA OPERATING INSTRUCTIONS

8
SEMPRA operating instructions
Congratulations
You have chosen an innovative, modern and melodious musical instrument - a Boehm SEMPRA Organ.
We break new ground with SEMPRA and introduce a new level of musicality, hitherto unknown in an
organ. An overview of the special characteristics of SEMPRA:
VERY QUICK - the fastest time of all current organs: SEMPRA is ready to play in only 5 seconds! We set
a modern industry standard in the organ with the SEMPRA realtime performance Operating System.
The result is a lightning-fast performance in all functions that would be unavailable using, for example,
Windows - or Linux-based PC organ systems.
Ease of use - the completely newly designed, easy-to-understand user interface makes playing and
registering the organ a simple pleasure.
TOUCH or button - virtually all functions are either available on the ultra quick 9 "wide view touch
display or can be reached via the control buttons and knobs. You have the choice!
3D PRESETS - new and innovative: up to 6 single Global Presets (General settings) incl. the style or
playback accompaniment (MIDI file), etc. are saved together and are instantly available in SONGS.
These SONGS can be sorted at any time according to various criteria using the appropriate control
buttons. They can be catalogued in albums and topics for easy retrieval. So, you can anytime instantly
find and retieve your settings from amongst hundreds and thousands of SONGS. This completely new
preset system provides for a intuitive playing.
MANUAL PRESETS - new for Böhm: with the practical manual preset buttons between lower and upper
manual you can call up the 6 linked presets of the currently selected SONG. These buttons are available
while playing, without taking your hands off the keyboards. The two buttons left turn through the 6
presets in ascending or descending order (not available in modified organs).
EASY STYLE CREATOR - styles can be modified using the new EASY STYLE EDITOR This is easy to use,
also for the quick recording of new tracks, patterns and and intros etc. Styles in the Yamaha® format
(up to 5 of tyre) can be used immediately or edited and saved it in the style library of SEMPRA.
INTERACTIVE PLAYBACKS - MIDI files can be used just as aflexibly as styles - this dream becomes reality
with SEMPRA. MIDI files can not only have adapted instrumentation, but also by using markers can be
divided into up to six sections such as intro, verse, chorus, bridge, etc. These sections or pattern can
play with the style pattern and at the push of a button, at any time, you can order and control so the
flow of the MIDI files and thus your music piece is flexible. They become a perfect song-related support,
and the use of a MIDI file in SEMPRA is not as restricted as in a conventional file player but becomes
part of your arrangement.
Advanced memory techniques - what you store in your SEMPRA, is always retained. There is no RAM
memory which could be lost. All your data can be delete directly and also saved at lightning speed in
the internal flash memory. If necessary this can even be backed-up. Your working data can not be lost.
Saving/loading data on connected USB storage media (memory sticks) takes place at lightning speed.

9
SEMPRA operating instructions
USER accounts –this way each SEMPRA becomes your SEMPRA. Your family or friends want to play
backing tracks, also on your SEMPRA, but with their respective own registrations, styles, etc.? No
problem: You can put multiple user accounts on the organ. The individuals own data is then in the
currently enabled user account. Any player who uses the organ, can hold his own data in his personal
account. And the best: user accounts can be exported to a USB stick and then the complete organ can
be played from the stick. In this way your friend who has also a SEMPRA, can save his organ data to a
stick which can be used in your organ without altering your data settings.
REAL Organ - all nine - anyone can! The new SEMPRA drawbar organ offers several more legendary
organ simulations with expandable footage range (up to 12 drawbars) and sensational sound in
addition to the classic Hammond sound with 9 footages. Of course, all typical effects of each organ
type are reflected realistically. So as well as rich, sounding bars system like the BÖHM real organ you
will find other famous instruments - a musical feast for all lovers of the legendary sound.
MULTI-SOLOCHORD - a well known effect: the Solochord responds according to the notes played on
the accompanying manual and enhances the melody with is own sounds. For example with only one
finger of the right hand to play a solo clarinet and add a polyphonic saxophone set via Solochord in the
same way as similar functions in other manufacturers.
At the SEMPRA, the possibilities go further still: you can make any manual or pedal instrument an
individual Solochord instrument. Each of these instruments can also still play a total of 14 different
types of Solochord. For example a Glen Miller solochord set on the right, on the left a choir with trio
lineup, on the right lower manual the transposed strings... no problem. This innovative feature opens
up completely new creative freedom in the playing and arranging!
Cloud Studio integration - if your SEMPRA is equipped with the optional Böhm Cloud Studio, you will
find its sounds integrated into the respective sound groups and categories. Now you can play virtual
instruments and sample libraries like e.g. the pre-installed Steinberg Halion6 / absolute 3 package
which can be combined with the AMADEUS sound of the organ. At the same time, the large touch
screen of the cloud Studios you show the manuscript of your piece of music. The manuscript can be
linked with the preset chosen on the organ. Nothing is more convenient!
In the following chapters, we describe the above functions, and many other functions of your
SEMPRA. Many functions are intuitive in use. However, we ask you to read this manual thoroughly
and understand the explanations as they relate to the SEMPRA. So, you will best learn, and
appreciate the many exciting possibilities. Much pleasure for you!
Your
BÖHM Team

* currently not yet implemented
10
SEMPRA operating instructions
Installation of the organ
Depending on the model and design your SEMPRA consists of several parts:
SEMPRA SE20 - 2-manual keyboard version
The two-manual-keyboard version of SE20.
•Set the instrument on a sturdy table or a
frame. Use only suitable keyboard tables
or stands, which offer a sufficiently large
support surface - at home as well as on
the stage -.
•Make sure that the SEMPRA on the table/base is securely fixed and cannot slip off.
•Now plug the music stand into the designated sockets at the back of the control panel and take
- as described in the following section - the connections (power cord, line out for external
amplifier/mixing desk, if necessary, pedal and swell ...).
•Place if necessary the free foldable pedal and the sill under the organ and connect as explained
in the following section. to the back.
•Insert the mains plug into a socket.
•The organ is now ready to play.
SEMPRA SE20 - home
In this version, the SE20 has a complete solid wood
frame incl. active speaker system, sills and (usually)
bass pedals.
•Decide where the organ is to go. To prevent
damage you should select a site where the
instrument is not exposed to moisture, nor
excessive heating (radiators).
•With help lower the upper part onto the lower
part, and slide the rubber feet from the bottom
of the keyboards into the recesses provided for
this purpose in the side supports of the base.
This top is firmly fixed on the base.
•Now plug the music stand into the designated
sockets in the bar at the back of the control
panel and remove - as described in the following
section - the connections (power cord, speaker
system, pedal and foot skirts...).
•Place the swell/bass pedal unit, or the 25-key pedal in front of the base and insert the connection
cable(s) into the appropriate socket(s) in the bottom of the base. Note the different plugs/sockets
for the expression pedal or the bass pedal.

* currently not yet implemented
11
SEMPRA operating instructions
•Now carefully slide the pedal unit into the box of the base. Make sure that the unit is not tilted to
avoid pressure points in the wood.
•Insert the mains plug into a wall socket.
•Place the seat before the organ and adjust to a comfortable seating height.
•The organ is now ready to play.
SEMPRA SE40 - home
The home model consists of the base with active
speaker system, the keyboards and the pedal
unit (17 or 25 keys).
•With an assistant place the upper part
on the base. The electrical connections
take place automatically using a multi-
pin plug/socket right at the bottom of
the side panels or in the table. Place the
upper part carefully so that the plug and
socket fit together and slide the wooden
pins in the side beams of frame into the
corresponding holes in the side panels
of the keyboards. Attention: Take care
that you do not trap your, or your
assistant’s fingers!
•Now plug the music stand into the
sockets at the back of the control panel.
•Place the pedal - sill unit, or 25-key pedal in front of the base and plug the connection cable
into the appropriate sockets in the bottom of the base.
•Move the pedal unit into the box of the base. Make sure that the unit is not tilted to avoid
pressure points in the wood.
•Insert the power cord into a power outlet.
•Place the seat before the organ and adjust to a comfortable seating height.
•The organ is now ready to play.
Note: All necessary connections for the operation of
the HOME model are automatically made via the
connectors between the upper and lower part. If you
want to connect the organ with other components,
you will find the connections behind the flap at the
back of the upper part.
You can open it by pressing on the door, the lock is
released and the flap can be tilted downwards.
You can now access the connections.
This is closed by folding up and some pressure on the catch.

* currently not yet implemented
12
SEMPRA operating instructions
SEMPRA SE60 - home
The installation is performed in the same manner
as described above for the SE40.
Switching the organ on and off
Turn on the SEMPRA:
•On the right side panel of the organ you will find the power button. Turn
the organ on using a short press on the button.
•A modified stage Overture / SEMPRA SE20 turn on the organ as usual at
the mains switch on the back of the shell.
•The start screen appears in the display
after 5 seconds:

* currently not yet implemented
13
SEMPRA operating instructions
•If multiple user accounts are installed
you wil be prompted during the startup
process, to select the account you want
to use. Select the desired account by
tapping the desired account (or button)
then tap on the Enter button on the
display or the button [ENTER]. By
turning the [dial] right of the display
confirm the selected account.
•The display now changes to the basic
screen, the organ is now ready:
Note: After switching on the "BASIC SONG" (list on the left) with the corresponding preset
"CLEAR REG." is always selected in the display (bottom of the 6 preset fields on the right). This
is a simple basic preset, which serves as the starting point for new registrations. It can be
recalled at any time by pressing the button [CLEAR REG.] on the right on the control panel.
SEMPRA switch off (all versions except converted Overture organs):
•To switch the organ off press the power button. The organ will be shut
down and a backup of the latest data changes will be automatically saved.
Then, the organ is switched off permanently.
Power off on upgraded Overture organs:
Caution! As in the upgraded Overture the previous power supply is maintained and a "shutdown" via
the mains button is not possible, you must use the display menu "shut down." Now a backup of the
latest data changes will be saved.
If you have a converted Overture, please turn it off as follows to ensure that all previously changed
data is preserved:

* currently not yet implemented
14
SEMPRA operating instructions
•Press the [MENU] button below the data wheel.
•The menu display is shown. Tap on field
[Shut down instrument].
•A window appears as shown. Confirm
that you want to shut down the
instrument by tapping on [ENTER] in the
display type or press the [ENTER] button
on the panel.
•The system will now shut down and the
data backup is written.
•Updated SE40/60 organs will directly shut down
•Updated SE20: When this window
appears in the display iut is safe to turn
off the organ using the [power button]
on the rear panel.

* currently not yet implemented
15
SEMPRA operating instructions
Notes for SEMPRA organs with cloud Studio:
•The switching on and off the organ is performed in the same way as described.
•The organ and the integrated Cloud Studio will shut down together. But, please note:
•When switching on, the actual organ is playable after approx. 5 seconds, with the appearance
of the basic screen. The Cloud Studio, however, takes about 1.5 minutes to fully install, because
first the sample material has to be loaded into in the main memory of the PC system.
•So we recommend to start playing, or to use the first SONG preset with cloud Studio sounds
not before the complete loading of the Cloud Studio. For more details, see the separate
operating instructions of the Cloud Studio.
Power on/off synchronisation of organ and Cloud Studio
When you turn the SEMPRA off and then on again too fast - before the Cloud Studio was also
completely shut down and switched off –it can happen that the Cloud Studio does not restart again
with the organ, because the switch-off process of the Cloud Studio is still running, while the organ
starts already again. The Cloud Studio is then further turning down in the background and is therefore
not ready to play. It would rather launch if you back off the organ via the power button because it
responds to the impulse.
To re-synchronize the power on of the organ and the Cloud Studio in such a case, please shut down
the organ –after the Cloud Studio has completely been turned off –once through the menue (same
procedure as described above for the updated Overture organs).
After that the organ and the Cloud Studio can be launched again together with the power button.

* currently not yet implemented
16
SEMPRA operating instructions
SEMPRA panel overview
MIXER
Sliders for total volume and microphone level
ACCOMPANIMENT
Slider for the volume of the accompaniment: Drums,
bass, combo 1-3, arpeggio *.
SUB MIXER / INSTR. VOLUME
Sliders for the volume of manual ranges (when enabled in
the basic screen) or the single manual instruments (when
selector is enabled)
INFO *
TALK *

* currently not yet implemented
17
SEMPRA operating instructions
MUTE
Mute for the accompanying groups: when the LED lights
up in the respective button, each group is muted.
SLIDER PRESETS
Retrieval of up to four different function
assignements of the sliders and the 9 drawbars (the
first 4 of the up to 16 slider presets will be assigned to
this buttons
(Pedal) SUSTAIN *.
Activates sustain on the pedals.
LYRICS *.
Show text display for MIDI files
ACCOMPANIMENT SELECT
12 buttons for the accompaniment categories. If one of
the buttons is pressed the display shows the currently
selected type of accompaniments (styles, MIDI playback,
arpeggio*, sidelines*), sorted into categories and subsets.
2 buttons for selecting accompaniment types: styles,
MIDI backing tracks, arpeggio* or sidelines*.
ACCOMPANIMENT FUNCTIONS
ACC ON: On / off for the automatic chords
ACC easy: enable the EASY accompaniment modes (hold
down longer to select one of the different modes, like One
Finger BÖHMAT, One Finger Others, Organist or Pianist
Low bass: the bass of the auto accompaniment plays the
lowest fingered note, so dependent on the chord
inversion.
Man. Bass: Coupling of the pedal bass to the
accompaniment manual. The bass (root note) can be
heard in the pedal tone to the played chord.
Memory: hold function for the LOWER tone (or other
manual instruments with activated part function
MEMORY). The notes sounding even after releasing the
buttons.
Solochord: On / Off the Solochord function
Lower: Switching On/Off the registrations of the left side
lower manual (accompaniment manual).
Arpeggio * / semi automatic *.
Arpeggio on, arpeggio 1... 4*
Semi automatic, activates up to two drum instruments
triggered by the lower keyboard and the pedalboard
DRUM MUTE
The 8 groups of drum/percussion instruments
Bassdrum...Percussion 2 can individually switched on and
off (the target group is muted, if the corresponding
button is illuminated). All keys are activated (all 8 LEDs are
lit), no drums can be heard.
Control buttons for the accompaniment
(pattern and start/stop functions)
Intro/ending 1... 4: The styles have up to four
Intros/endings.
Pressed, while accompaniment is stopped: the current
style starts with an appropriate intro.
Pressed, while accompaniment is playing: the appropriate
ending will be played, then the accompaniment will stop
Pressed two times while accompaniment is playing: the
appropriate intro will be played and then again the basic
accompaniment.
Variation 1... 4: Switching of up to four style variations. If
button Auto Fill is also switched on, a Fill up/down can be
heard when switching between the variations.
By pressing the currently enabled variation button a Fill
can be played.
Bridge: The button plays the Bridge 1 style pattern:
Break: Plays a drum solo (Break1-pattern)
Fade (in/out): When continuous monitoring: fade out,
i.e., accompaniment and organ are fade away to silence.
When "starting" accompanied by: fade in, i.e. organ and
accompaniment fade in when you start the
accompaniment.
Ritard / Tap: When accompaniment is playing a fill is
played, the tempo slows and the rhythm stops.
Before playing the accompaniment tempo can be set by
repeatedly pressing the button here. Depending on the
time signature of the selected style tap the button several
times at the desired pace. This starts the accompaniment
at the desired tempo.
Sync. Start: The accompaniment starts with the first
chord recognition on the accompaniment manual. The
Sync start can be assigned to an any manual / pedal part.
Sync. Stop: Stops the accompaniment on the first beat of
the next bar.
Tempo hold: Maintains the current pace of style, even if
the style or the preset is changed. With the buttons
[Tempo-] / [Tempo +] the speed can still be changed.
Start/stop: Instant starting and stopping of the
accompaniment
Tempo - / Tempo +.
Gradual or continuous (keep the button pressed)
decrease or increase of the accompaniment tempo.
SONG FILTER
The SONG list left in the display can be displayed
completely (switch [No filter] selected) or filtered by
bank, style (category), genre (musical styles) or sorted in
albums (own cataloging of up to 6 songs each in up to 100
albums).
Pressing one of the buttons once sets the type of filtering,
further pressing allows the selection in the respective
filter category (see list in the display).

* currently not yet implemented
18
SEMPRA operating instructions
Preset Couple
Determines which stored settings are used when select a
global preset. Up to six Global Presets are available per
SONG. You can choose, for example, whether the
accompaniment (style / playback), the switch
assignements, the lower registration, etc. should be
switched with the Global Presets or not.
The button allows selection of four different adjustable
coupler configurations:
1: Both LEDs in the switch on
2: only LED Couple 1
3: only LED Couple 2
4: both LEDs off
If the switch is held for longer the coupling functions can
be set.
2 x 6 soft buttons for display control
The 6 buttons right and left of the display get their
functions from the respectively corresponding fields on
the display. You can access the corresponding functions
by either tapping the fields directly on the screen or by
using this 2 x 6 buttons.
9" touch display
To display and select registrations, to select playing and
menu functions shown on the display.
8 F-button (function button)
The 8 F-button below the display will be assigned to their
function in the single display menus on the bottom status
bar. In up to 16 button presets the functions of these
buttons for the basic screen can be individually set (and
also for further ones, like foot switches, etc.)
Shift / Shift Lock
In many display menus, there are two levels for each of
the 8 F-buttons. While [Shift] is hold, the second level is
displayed temporarily. Pressing [Shift lock] causes the
second level to be retained until another press on [Shift
lock] returns to the first level. When entering names, etc.
on the number / letter buttons , can be toggled with the
Shift buttons between small and capital letters.
Page -, Page +, Edit
Page- / Page +: Some display menus consist of several
pages. With these two buttons, you can switch between
the display pages. Alternatively, you can type the required
tab in the display.
Edit: When an input is required for a function in the
display or different setting options are offered, the LED
flashes in the [Edit] button. After pressing [Edit] the
selection or enter of the desired value can be made.
Store
The [Store] button is generally used to save settings. The
SONGS or Global Presets from the basic screen,
mixerpresets in the mixer menu, style changes in the style
editor, etc...
Cursor buttons
With these four arrow buttons, you can move the cursor
(markers for the currently selected field or the selected
function in the display) within the display. Alternatively,
you can perform the selection by tapping on a field in the
display.
Data wheel
With this wheel you can cycle through parameter values
and move very quickly go through lists, etc. on the display.
On the main screen the wheel scrolls the SONG list on the
left.
Menu, Esc, Enter
Menu: the BMC menu (Böhm Music Computer) in the
display opens the way to different functions in SEMPRA.
ESC (Escape): With this button you can cancel input, or
return from the current menu out to the previous level.
Enter: used to confirm input.
FUNCTION
Transpose - / Transpose +: With this, you can change the
overall transposition (key) of the organ in semitone steps
(descending or ascending). If you press both buttons at
the same time, the SEMPRA will return to the initial pitch
of C.
In the Part Editor you can change the octave position of
the currently selected part directly in octave steps
(ascending or descending) using these two buttons.
Key Transpose*: To transpose to a chosen key.
Split: Used to set the main split point for the upper or
lower manual. The "right" part of the relevant manual is
to right from the point of the split, the "left" part is to the
left after entering a split point via this button.
Function 1*
ALBUM SELECT
If the filter type "ALBUM" ( ) is chosen for the SONG list
and you’ve already set own SONG albums through the
BMC menue, you can select these albums via these
button group. The buttons can contain up to to 100
albums. There are 5 albums (button A...E) in 20 ranks
(button 1/11...10/20), so all 100 albums in the current
topic can be direcly accessed. Up to 6 songs of the
selected album are retrievable then in the 6 fields left in
the display.
Alphanumeric buttons
Via this button group you can input names in the same
way as on a mobile phone to locate or enter - while
creating or editing -presets, styles, etc. By repeatedly
pressing of one of the buttons you page through the
letter, numbers and special characters assigned to the
button. Using the [cursor keys] navigate left / right
between the text. [Shift] or [Shift lock] switch to
uppercase. [+ >] adds an empty position, [- <] deletes
the current position.

* currently not yet implemented
19
SEMPRA operating instructions
Clear Registration
With this button you can “clean up” the SEMPRA and go
back to a basic setting. It is called "basic song" and in it is
the preset "Clear Reg.". With this preset, all settings
return to a defined configuration. This is ideal as a base
for completely new songs/presets.
When pressing the button (and also when you switch on
the SEMPRA), the top one of the up to 6 CLEAR presets
will be selected automatically.
MENU
Some functional areas can be selected directly using the
buttons in this group:
DSP: This menu invokes the mixer and the effect DSP of
the internal Crystal Mixer.
MENU 1 *
MENU 2:dimmer function for the illumination of the
panel, music stand and pedal board.
USB: If a USB storage medium (stick) is connected this
opens the menu for saving/loading data to / from the USB
device.
USB socket:
Here you can connect a USB stick as a storage medium.
For other USB devices such as a USB keyboard and a USB
MIDI adapter, we recommend the additional USB ports
(available only on new built SEMPRA organs) on the back
of the top of the organ (in SEMPRA SE40/60 you will find
them behind the back cover).
SOUND SELECT
The 12 category buttons [Piano]…[Bass] select the
appropriate sound categories. In the basic screen, they
are first assosciated with the UPPER part 1. The sounds
that are called when you press the button can be set also.
These buttons are also used to make changes within the
sound categories within the sound list in the display. The
respective subgroups per category and the individual
sounds are selected via the display.
Manual/Part Selector
With these buttons you can call up the Part Editor for the
manual that you want to register. The display shows all
parts for the respective manual, and these can be filled
with voices or muted as required. Also a lot of settings can
be done here for each part.
Upper: Parts selector for the upper manual.
Lower: Parts selector for the lower manual.
Pedal: (SE20/40): Part selector for the pedal.
Pedal/Solo (SE60): Part selector for the pedal and solo
manual.
User: (currently) Part selector lower manual.
MIDI In: Part selector for the 16 MIDI-In Parts
REAL ORGAN, Rotor, drawbars
Button group is used to control the functions of the
REAL ORGAN drawbars. With the buttons [Upper], [Lower
left/right] and [Pedal] you can activate the REAL ORGAN
for the corresponding keyboard-(area). The upper manual
drawbar settings can be changed directly via the drawbar
set . You use the [Menu] button to call the REAL ORGAN
display menu on. The drawbar settings of all manuals and
many other parameters can be set here.
The virtual drawbars on the display react instantaneously
to your gestures. The percussion, the three chorus and
vibrato types (C1... C3 or V1... V3) as well as their separate
activation for upper and lower manual can be activated
directly via the corresponding buttons.
The [Rotor] and [Fast] buttons serves to activate the
rotary effect and to vary the rotary speed between slow
and fast.
Pitch / Modulation wheels
PITCH: pitch bend to +/- up to a full octave. The wheel has
a middle position and automatically returns to its initial
position.
MODULATION 1: Modulation for the upper manual
MODULATION 2: Modulation for the lower manual right
area.
The wheels can be assigned individually with a variety of
functions.
S1 / S2
These two keys are freely programmable with functions.
In the factory setting, see [S1] again speed switch
slow/fast for the Leslie effect of the REAL organs
(drawbars organ) and on [S2] the FX rotary speed switch
(FX-rotor = internal rotary effect of the AMADEUS organ
sounds).
Manual Presets
The 6 presets per SONG are not only available via the
display, but also on the right 6 buttons on the bar
between the manuals which can be used for a preset
change even quicker than using the display.
The two left buttons allow sequential changes both
forwards and backwards within the 6 presets.
Power button
Here turn on/off your SEMPRA (see p. 10).
Pattern buttons accompaniment
(only for SE60)
For better accessibility of the main accompaniment
features while playing the three manual SE60. These
buttons are a little different assigned (because of the
space) compared to the pattern buttons on the top panel,
but they work in the appropriate way.

* currently not yet implemented
20
SEMPRA operating instructions
Table of contents