KGS Corporation BL-1000 User manual

I n s t r u c t i o n M a n u a l
B r a i l l e L a b e l e r
BL-1000
L I N K

2
Microsoft ® and Windows ® are either registered trademarks or
trademarks of Microsoft Corporation in the United States and/or
other countries.
All other trademarks are the property of their respective owners.
Instruction Manual for Braille Labeler BL-1000 LINK
Rev 1.0 October, 2020
© 2020 KGS Corporation. All Rights Reserved.

3
Contents
1. Preface .................................................................................................................................. 4
1.1 Confirmation of contents in the package......................................................................... 4
1.2 Precautions on use ............................................................................................................ 5
1.3 FCC Statement.................................................................................................................. 6
1.4 International Compliance................................................................................................. 7
1.4.1 2014/35/EU Low Voltage Directive ......................................................................... 7
1.4.2 2014/30/EU EMC Directive ..................................................................................... 7
1.4.3 2014/53/EU Radio Equipment Directive ................................................................ 7
1.4.4 2011/65/EU RoHS Directive .................................................................................... 7
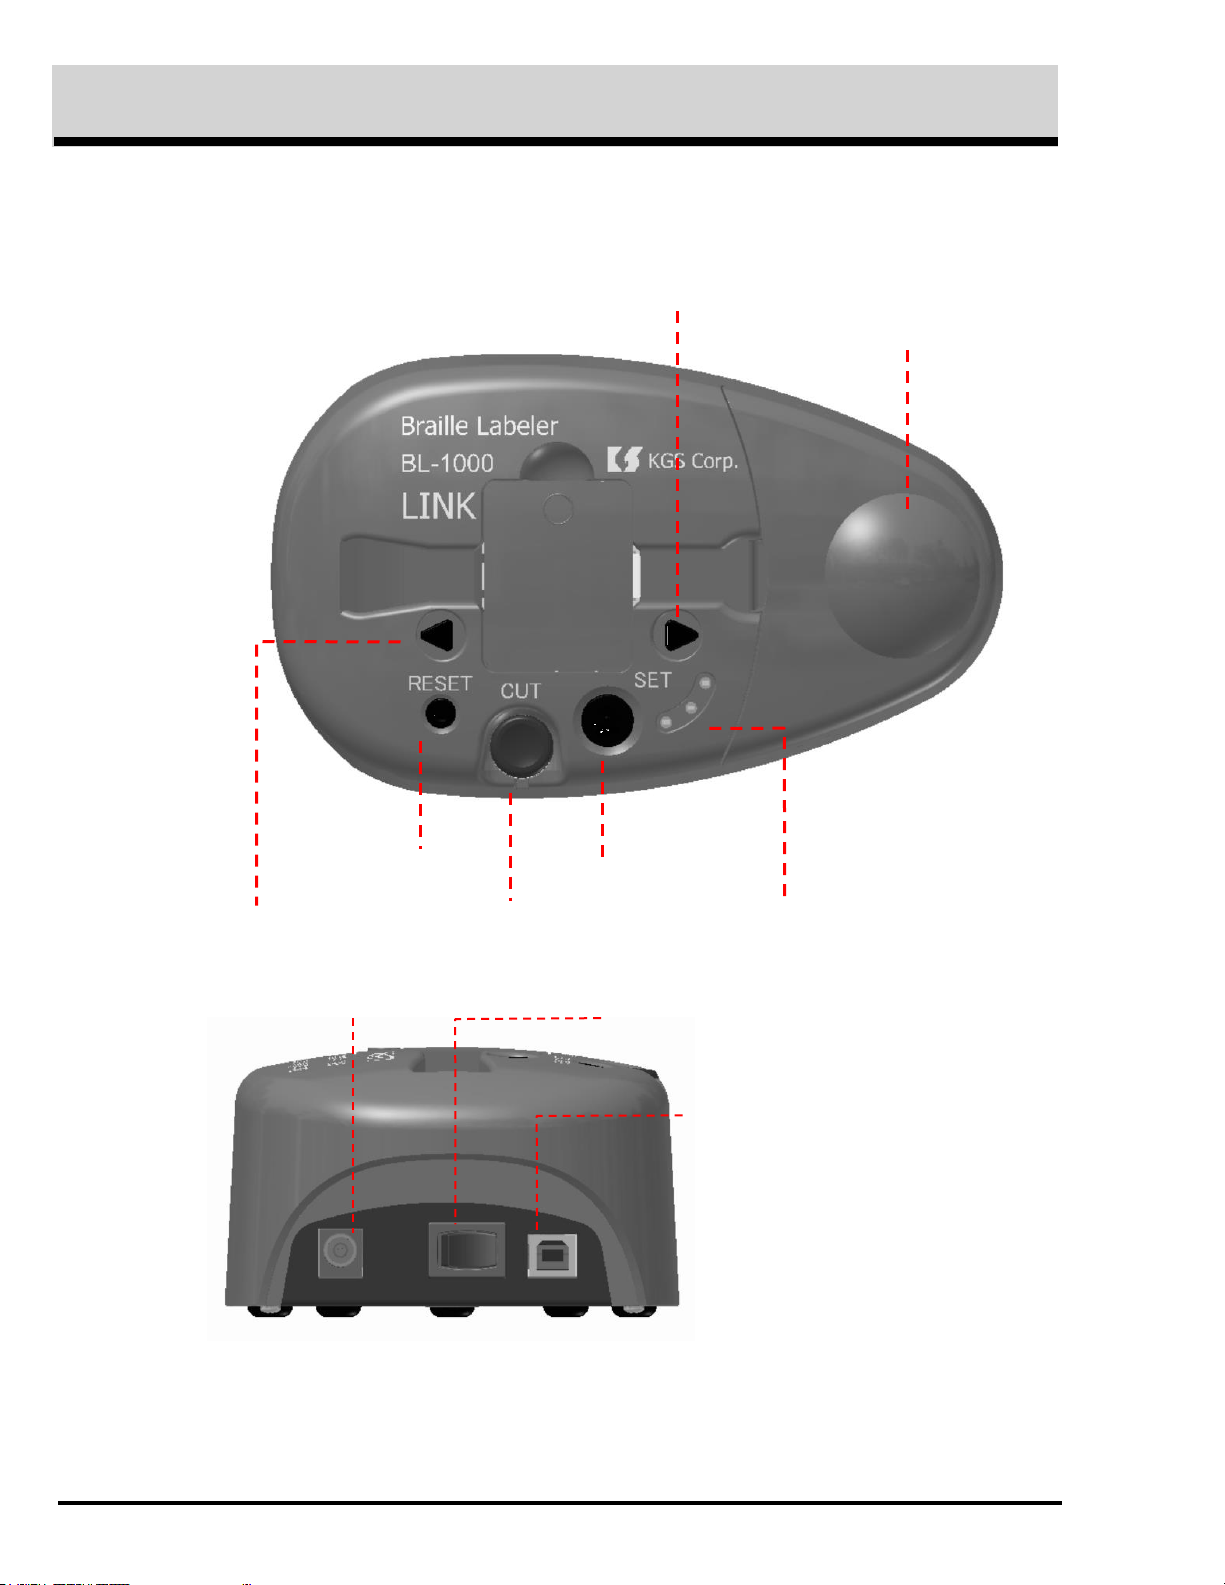
1.5 Name of Keys of BL-1000 LINK....................................................................................... 8
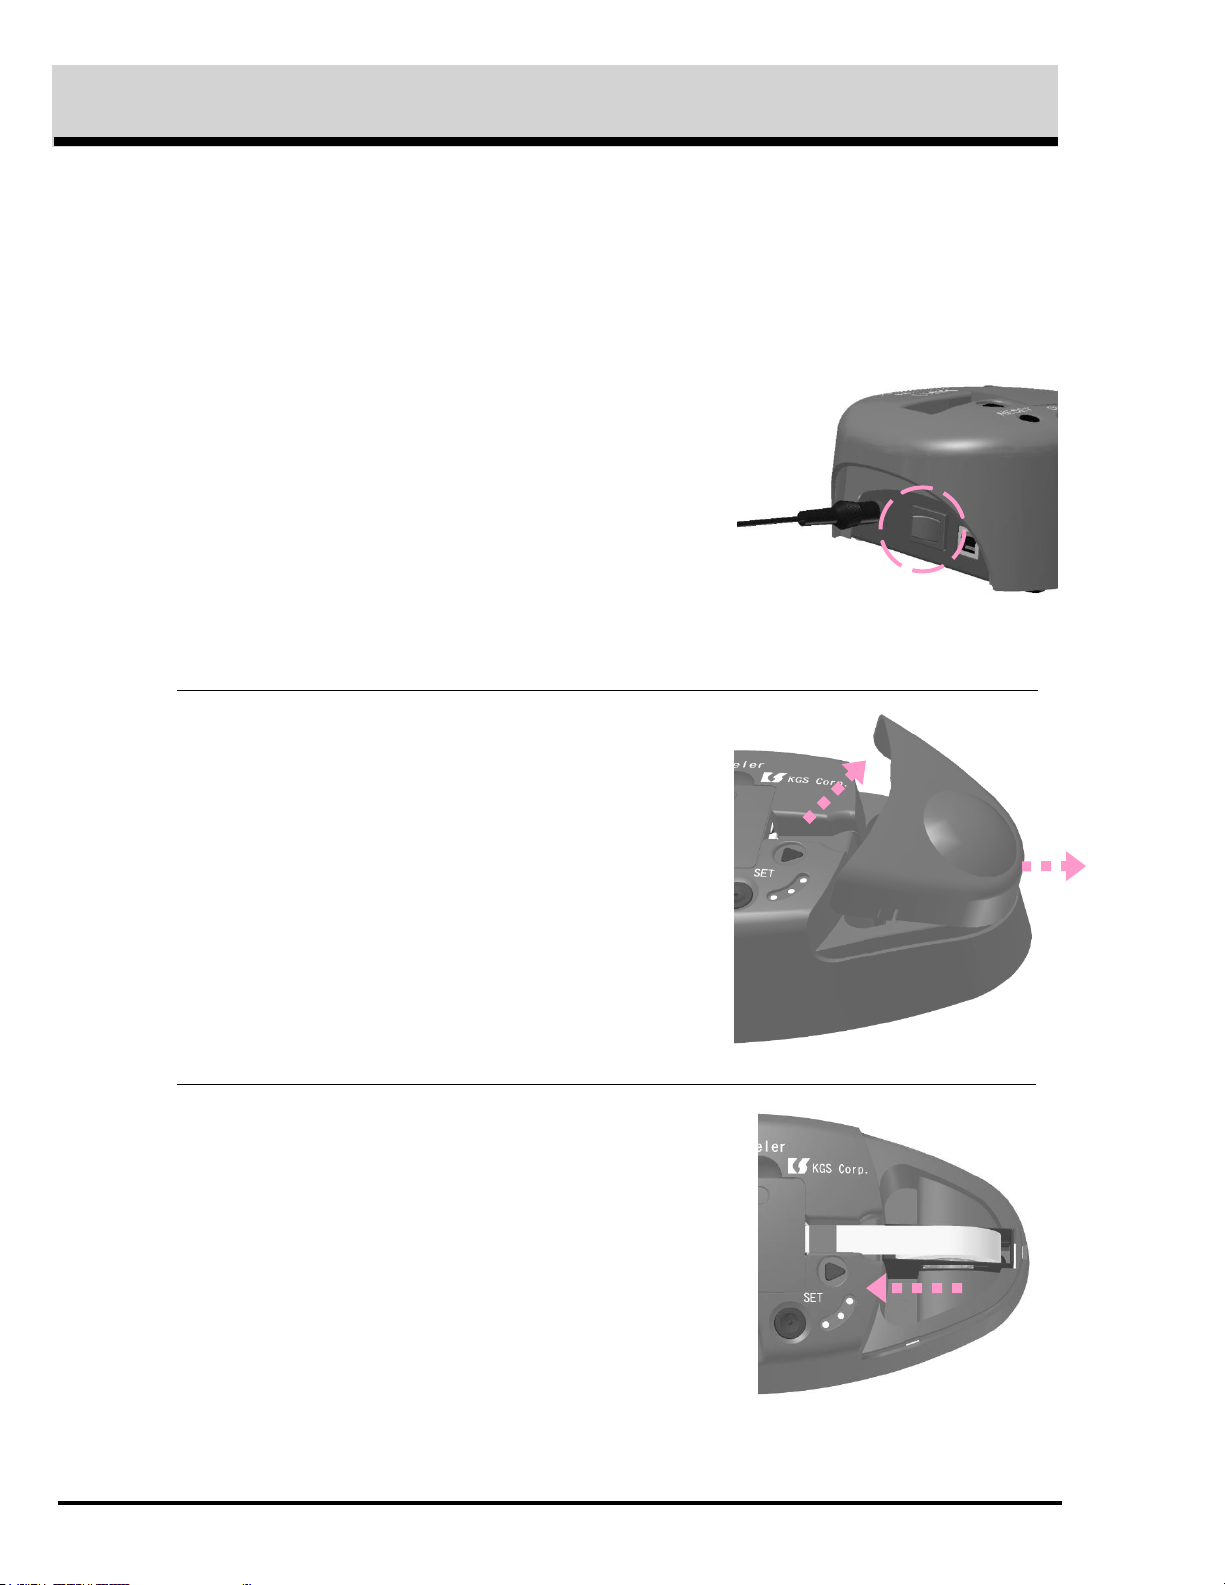
1.6 How to set a braille tape................................................................................................. 10
1.7 Test print.......................................................................................................................... 12
1.8 Preparation for PC before connect BL-1000 LINK with it........................................... 14
1.8.1 How to install USB Driver....................................................................................... 15
1.8.2 How to install the Braille Labeler Utility............................................................... 17
2. How to make braille tape ..................................................................................................... 19
2.1 Connecting BL-1000 LINK with PC .............................................................................. 19
2.1.1 USB Connection........................................................................................................ 19
2.1.2 Bluetooth Connection ............................................................................................... 19
2.2 Making the braille dots tape by use of Braille Labeler Utility.................................... 21
2.2.1 Boot and Exit ............................................................................................................ 21
2.2.2 Editing the inputted text in Data File to be printed.............................................. 22
2.2.3 Implementing printing dots..................................................................................... 24
2.2.4 Function of the sequence of numeric....................................................................... 28
2.2.5 How to input braille data......................................................................................... 30
2.2.6 Braille Translator Option......................................................................................... 30
2.2.7 Text File Management ............................................................................................. 31
3. Make a braille dot tape by use of common braille print software..................................... 33
3.1 Requisite Conditions of Communication port ............................................................... 33
3.2 Braille Code ..................................................................................................................... 33
4. Transaction of received data ................................................................................................ 34
5. Specification .......................................................................................................................... 35
The contents of this manual shall be subject to change without prior notice.

Instruction Manual
4
KGS Corporation
1. Preface
Thank you very much for your purchasing Braille Labeler BL-1000 LINK. Before
you’ll start to use it, we hope you have carefully read this instruction manual so
as to have fully understood each of the functions, please pay much your attention
about how to use it while keeping the instruction for use and duly confirm the
way of how to operate it.
Attention before use of BL-1000 LINK
Please make sure that you install the attached software in your PC first, before
Braille Labeler BL-1000 LINK connects to PC.
If BL-1000 LINK connects to PC before installation of USB Driver (attached
software), USB driver isn’t installed normally sometimes after it.
Please read and confirm “the chapter 1.8 preparation of PC to be connected”, in
this instruction manual before connecting BL-1000 LINK to PC.
1.1 Confirmation of contents in the package
The package of BL-1000 LINK includes the followings.
□Braille Labeler BL-1000 LINK
□AC Adaptor
□Braille tape for BL-1000 LINK
□Attached Software CD
□USB cable
□Instruction Manual Printed matter
□Instruction Manual embossed dots

Braille Labeler BL-1000 LINK
5
1.2 Precautions on use
To preserve and maintain the conditions of the BL-1000 LINK, please take note
of the following precautions listed below.
Do not drop, neither strike, nor apply strong shock to BL-1000 LINK,
since it is a precision instrument.
Avoid spilling water, tea, dryings and etc, into BL-1000 LINK.
Do not keep or stock BL-1000 LINK and braille tape for BL-1000 LINK
exclusive use in the place where the direct rays of the sun pours and or
in the place where it becomes high temperature like in the car, close to
window or stove or so on.
Do not disassemble BL-1000 LINK. By disassembling the BL-1000 LINK,
no guarantee is made.
Use an attached AC adaptor only for BL-1000 LINK exclusive use. Please
do not use other kinds of AC adaptor. It has to be so danger if you’ll use
other kinds of adaptors.
Be sure to earth the AC cord to an earthed outlet. Also, plug it into an
easily accessible outlet near the equipment and unplug it immediately if
there is smoke or a strange odor.
Use a braille tape only for BL-1000 LINK exclusive use. It will be
malfunction and or cause to break BL-1000 LINK like stuffed tapes and
or bad quality of embossed dots, if you’ll use other kinds of tapes.
Use BL-1000 LINK after closing the lid and or cover to be opened and
closed to avoid gathering dust.
Please make sure to fix the cover of both print and braille tape to each
portion to be set.
Do not the following actions to prevent clogged tape inside BL-1000
LINK.
Do not cut the tape on the way of to print dot, to send and or rewind tape.
Do not print at less remains of tape.
Please confirm the braille tape position to be fixed inside the tape guide
rail, which is located in the right side of cover for dots print, before print.
Please change the braille tape at less remains of tape.
If pieces of the braille tape will be remained inside of BL-1000 LINK,
please open the cover for dots print and remove them by a pair of
tweezers and etc.
Due to the properties of the roll tape, the tape may be bent or twisted
when printed continuously for a long time. To keep print quality, it is
recommended to divide it into about 50 columns and cut once.

Instruction Manual
6
KGS Corporation
1.3 FCC Statement
This device complies with Part 15 of the FCC Rules. Operation is subject to
the following two conditions:
(1) This device may not cause harmful interference.
(2) This device must accept any interference received, including
interference that may cause undesired operation.
This equipment has been tested and found to comply with the limits for a
Class B digital device, pursuant to Part 15 of the FCC Rules. These limits are
designed to provide reasonable protection against harmful interference in a
residential installation. This equipment generates, uses and can radiate
radio frequency energy and, if not installed and used in accordance with
the instructions, may cause harmful interference to radio communications.
However, there is no guarantee that interference will not occur in a
particular installation. If this equipment does cause harmful interference to
radio or television reception, which can be determined by turning the
equipment off and on, the user is encouraged to try to correct the
interference by one or more of the following measures:
- Reorient or relocate the receiving antenna.
- Increase the separation between the equipment and receiver.
- Connect the equipment into an outlet on a circuit different from that to
which the receiver is connected.
- Consult the dealer or an experienced radio/TV technician for help.
Changes or modifications not expressly approved by the party responsible for
compliance could void the user’s authority to operate the equipment.

Braille Labeler BL-1000 LINK
7
1.4 International Compliance
1.4.1 2014/35/EU Low Voltage Directive
EN 62368-1:2014+A11: 2017
1.4.2 2014/30/EU EMC Directive
EN 55024:2010
EN 55032:2012+AC: 2013
1.4.3 2014/53/EU Radio Equipment Directive
EN 300 328 V2.2.2
EN 301 489-1 V2.1.1
EN 301 489-17 V3.1.1
EN 62479:2010
1.4.4 2011/65/EU RoHS Directive

Instruction Manual
8
KGS Corporation
1.5 Name of Keys of BL-1000 LINK
Please confirm details of Keys and Functions one by one about the following parts.
Cover for a braille tape
Send Key
Rewind Key
Set Key
Cut Key
Reset Key
LED light display
(Red Green Yellow)
DC Jack
Power Supply Switch
USB Connector

Braille Labeler BL-1000 LINK
9
Set Key
Set Key is used to send the top of a braille tape.
Cut Key
Cut Key is used to cut a braille tape after printed dots.
If inside scissor and or Cut key does not come back to the
normal position, snag the opening in front of Cut key on
something thin and pull up.
Reset Key
Reset Key is used to reset the memory of the data which is
waiting for the print, left in buffer.
Send Key
Send Key is used to send a braille tape to the left side by
rotating a tape roller. Please try to use this key when a
braille tape clogs.
Rewind Key
Rewind Key is used to rewind a braille tape to the right
side by rotating a tape roller. Please try to use this key
when a braille tape clogs.
LED light
display
By a color of Lighting and or Off, you can confirm the
situation of BL-1000 LINK.
Cover for a
braille tape
To set a braille tape in the body, please get the cover off.
Please shut the cover at the printing dots.
LED Light display
Red lighting
It indicates “Turn On”.
Green
lighting
It indicates a braille tape is set properly in right position.
Yellow
lighting
It indicates Waiting data memory is remained in the
buffer.
Buzzer sound
Three times of
Slightly long beep
sound
It indicates a situation that a braille tape is
exhausted and or it isn’t set properly at the “Turn
ON”or pushing Set key.
Two times of
rather short beep
sound
It indicates a situation after printed dots on a braille
tape. This sound continues until printed braille tape
will be removed from a tape exit after cut. Any kind
of jobs will not be accepted without pushing Cut key.
Three times of
short beep sound
It indicates a situation that reset the buffer by
pushing Reset key. Yellow LED is also put out.

Instruction Manual
10
KGS Corporation
1.6 How to set a braille tape
A braille tape is not set inside the body of BL-1000 LINK before shipment. Please
set an attached braille tape for exclusive use for print by the following procedures.
Procedure for setting a tape
1. Connect BL-1000 LINK to AC adaptor, turn
on the power supply switch.
It shortly sounds like a mechanical movement to
send a braille tape to the exit, and slightly long
beep sounds at three times. This means to be out
of a braille tape.
2. Open a cover for a braille tape, set a whole
braille tape with a paper case vertically in the
center between partitions in the body.
Set a paper case which side is higher than
other one, so as to be in the left side in the tape
holder place. (left side is close to the tape
entrance)
3.Remove a seal which fixes an edge of a braille
tape on a roll.
Insert an edge of a braille tape into the entrance
of printing section, and insert it by the place to
meet an inside roller of printing section.
①
②

Braille Labeler BL-1000 LINK
11
4. Push the Set key to arrange the position of an edge of a braille tape so as to
be in right position before printing dots.
It means the inside roller doesn’t take up the
tape properly if slightly long beep sound at
three times after pushing Set key and
mechanical movement sounds shortly.
If so, again insert an edge of a braille tape into
the entrance of printing section, and insert it
by the place to meet an inside roller, and again
push Set key.
5. Close the cover for a braille tape, after
setting a braille tape properly.
①
②

Instruction Manual
12
KGS Corporation
1.7 Test print
Print following four lines as test print.
⠀⠀⠧⠑⠗⠎⠊⠕⠝⠀⠼⠃
⠀⠀⠉⠒⠤⠛⠭⠶⠿⠀⠉⠒⠤⠛⠭⠶⠿⠀⠿⠿⠿⠿⠿⠿⠿⠿⠿⠿
⠀⠀⠠⠠⠅⠛⠎⠀⠠⠃⠗⠁⠊⠇⠇⠑⠀⠠⠇⠁⠃⠑⠇⠑⠗⠀⠠⠠⠃⠇⠤⠼⠁⠚⠚⠚
⠀⠀⠫⠒⠐⠳⠒⠋⠹⠀⠟⠴⠐⠳⠀⠑⠐⠯⠑⠒⠀⠰⠠⠠⠃⠇⠤⠼⠁⠚⠚⠚
The first line Software version number “version *” (English)
The second line Test pattern
The third line “KGS Braille Labeler BL-1000”(English)
The fourth line “KGS Braille Labeler BL-1000”(Japanese)
Procedure of test print
1. After connect AC adaptor with BL-1000 LINK, turn on the power supply
switch while pushing both Set Key
and Reset Key.
A Braille tape isn’t ready, if slightly
long beep sound at three times after
mechanical movement sounds
shortly.
2. Try to set a Braille tape again, while referring to the procedure as shown as
above, if slightly long beep sound at three times.
Push Set key and start to print.
Try to take the same procedure from item (1), if
print doesn’t start.
A Braille tape moves to the tape position to be cut
after the print of one line ends, and the beep starts
to sound at invervals of 2 seconds.

Braille Labeler BL-1000 LINK
13
3. Push Cut Key and cut off printed tape.
The beep sounds at intervals of 10 seconds, after
removing and cutting off printed tape.
4. Push Set key, and the second line starts to print.
5. Push Cut key after print, and cut off printed tape.
6. Push Set key, and the third line starts to print.
7. Push Cut Key and cut off printed tape.
8.Turn off the power supply switch and get off AC Adaptor after whole operation.

Instruction Manual
14
KGS Corporation
1.8 Preparation for PC before connect BL-1000 LINK with it
Two kinds pieces of software are attached with BL-1000 LINK.
(A) USB Driver for BL-1000 LINK –This is the requisite software to connect BL-
1000 LINK with PC through USB cable.
Be sure to install this USB Driver into PC before connect BL-1000 LINK with PC.
(B) Braille Labeler Utility –This is an Utility software to make easily braille
label by use of BL-1000 LINK.
Those software’s are correspondent to the following version of OS.
Windows ®7/8/8.1/10 (64/32)
Please use the PC, that OS as shown above are working inside.
Attention
Depending on your PC environment, you may need administrator privileges to
install the software. In that case, please contact your system administrator.
When you set the attached software CD (Braille Labeler BL-1000 LINK Support
Disk) in CD drive of your PC, the following page index is opened.
If it doesn’t open automatically, please open the CD drive directly and double-
click the “index.htm” file.

Braille Labeler BL-1000 LINK
15
1.8.1 How to install USB Driver
Attention
USB driver has four kinds depending on the OS version.
Choose which one suits OS in your PC, and start to install.
Take the following procedures in order to install USB Driver.
1. Click on any one of “Install the USB driver (Windows 10 64bit)”, “Install the
USB driver (Windows 10 32bit)”, “Install the USB driver(Windows 7/8/8.1
64bit)”or “Install the USB driver(Windows 7/8/8.1 32bit)”on the page index,
and then the program will soon start.
Please follow the instruction shown
on the display, and start.
2. Click [Yes], in order to install USB driver.

Instruction Manual
16
KGS Corporation
3. Click [Next], according to the instruction of the installer.
4. If agree, choose [I accept the agreement] and click [Next].
If don’t agree, you can’t use BL-1000
LINK by the way of USB connection.
5.[Finish] is displayed on the screen.

Braille Labeler BL-1000 LINK
17
1.8.2 How to install the Braille Labeler Utility
Refer to the following procedure in order to install the Braille Labeler Utility.
1. Click on “Install the Braille Labeler Utility”on the page index, and then
setup.exe will soon start.
This program checks whether essential
software of Microsoft Corporation is built
in or not, in order to execute Braille
Labeler Utility.
Please follow the instruction shown on
the display, and start.
2. Click [Install], and then [Yes] on next screen, in order to install Braille
Labeler Utility.

Instruction Manual
18
KGS Corporation
3. Click [Next] and install Braille Labeler Utility according to the instruction of
the Installer.
4. Choice [Everyone] or [Just me], and click [Next].
And click [Next] on the next window, in order
to start the instrallation.
5. Installation is completed completely, click [Close].

Braille Labeler BL-1000 LINK
19
2. How to make braille tape
This chapter mentions procedures to print braille dots on tape after connect BL-
1000 LINK to PC.
If the necessary software’s haven’t been installed into PC, please refer to the
chapter of [1.8 Preparation for PC before connect BL-1000 LINK with it] and start
to install.
2.1 Connecting BL-1000 LINK with PC
Connect AC Adaptor to BL-1000 LINK, turn on the power supply switch.
Then the head of braille tape is automatically at the starting point to print dots.
Set new braille tape, if it is exhausted.
Connect BL-1000 LINK with PC, according to the following instructions.
2.1.1 USB Connection
Procedures
1. Boot PC.
2. Connect BL-1000 LINK with PC by a USB cable.
2.1.2 Bluetooth Connection
Procedures
1. Pair BL-1000 LINK with PC.
Press [Windows] key and [X] key at the same time,
select “Settings” from the menu.
2. Select “Devices” on “Windows Settings”screen.

Instruction Manual
20
KGS Corporation
3.“Bluetooth & other devices” screen
will open.
Check your PC’s Bluetooth is turned
on, then select “Add Bluetooth or
other device”
4. On “Add a device” screen, select “Bluetooth” and then “BL-1000 LINK”
5. After paring BL-1000 LINK and PC, click [Done] and go back to “Bluetooth &
other devices” screen.
Then confirm the COM port from “More Bluetooth options” in Related settings.
When selecting the connection port, select the port whose port direction is
“outgoing” side.
Other manuals for BL-1000
1
Table of contents
Other KGS Corporation Label Maker manuals