KH Industries TRA 100 User guide

Portable
PA Speakersystem
Installation
Setup
Operation
TRA 100
Tel.: + 49 - (0)711 - 45893 - 0
Fax: + 49 - (0)711 - 45893 - 35
e-Mail: [email protected]
Internet: www.klein-hummel.de
058-E0095
Valid since W - No. 2373, Version 19-03-2003
KLEIN + HUMMEL GmbH
Zeppelinstr. 12 73760 Ostfildern/Germany

Page 2 Portable PA Speakersystem TRA 100
Safety Instructions
It is absolutely essential that you read these safety instructions carefully before connecting and using this K+H
product. Your safety depends on it. Furthermore, failure to follow these instructions voids the warranty. Toensure
safe operation for years to come, keep these instructions in a safe place for future reference. K+H has manufactured
this product in accordance with IEC 1992 (SEC) 39 standards, then tested and delivered it in safe operating condition.
To maintain it in this condition, you must:
•observe all safety instructions,
•use the product only as described herein,
•have any maintenance, repairs, or modifications performed only by K+H or other authorized personnel, and
•ensure that the room in which you use this product is wired in accordance with the local electrical code.
Warning!
•When the interior of the cabinet is exposed, touching some parts can lead to an electric shock.
•If you need to gain access to the interior electronics of the unit, always disconnect the unit from any and all power
sources first.
•Any repairs, maintenance, or other service of the unit when its interior compartment is exposed may only be
performed safely (in accordance with VBG 4) by authorized technicians familiar with all the
risks involved. Even in an unplugged state, a fully charged capacitor in the unit can zap the
unsuspecting.
•Loudspeaker output jacks labeled with the IEC 417/5036 emblem (Fig. A, right) may be carrying
dangerously high voltages. If your unit has this emblem, ensure that any connections to be
made between these jacks and the speakers themselves are made before powering up the
unit, and are done so only with manufacturer-approved interconnecting cables.
•If you need to replace any fuses, ensure that the replacements are of exactly the same type,
value and voltage as the originals, as spelled out in the technical specifications at the rear of
this manual.
•Do not use "repaired" fuses.
•If you do not have any fuses on hand of the specified size, type, and value, do not hot-wire the
contacts in the holder by short-circuiting them.
•Certain areas of the cabinet, cover, and rear panel can achieve extreme temperatures and are
therefore marked with a "HOT" label (Fig. B). Refrain from touching any heat sink or ventilation
grille.
•High volume levels are known to cause permanent - i.e. irreversible - hearing damage, especially
when listened to without sufficient breaks. The higher the levels, the more frequent and exten-
ded must be the breaks. Avoid standing too close to loudspeakers that are being driven at high
levels. If you must be exposed to high sound pressure levels over an extended period of time,
use hearing protection.
MainsConnection:
•This unit is designed for continuous operation.
•Ensure that the operating voltage of the unit matches that of the local mains current (AC line voltage).
•Always check before connecting the power cable to the mains socket that the power switch on the unit itself is set
tooff ("O").
•Use the power cable or power supply that came with the unit to connect to the mains socket (wall outlet).
•Power supply: a damaged power cable may not be repaired. Use a new cable.
•Avoid plugging the mains cable into a power strip that already has several other power-consuming devices
connected to it.
•Avoid using extension cables. The unit must be connected to a mains socket close to it, and that socket should
be freely accessible.
Installation:
•This product may only be placed on a stable, clean, horizontal surface.
•Do not expose this product to vibration.
•Do not operate this product anywhere near water or other liquids. Do not use it near a sink, swimming pool,
bathtub, or in any damp room or area. Electrical shocks carried through water can kill. Do not place any beverages
whatsoever on or near this product, as liquids can kill electronic components.
•Ensure sufficient ventilation around the product to allow for adequate heat dissipation, especially near the rear
panel and the sides of the cabinet (minimum of 8 inches from the nearest wall). The unit may only be installed in
a rack if measures are taken to ensure sufficient ventilation and if the mounting instructions of the manufacturer
are followed. Do not block or cover any heat sink, fan, or vent.
•Do not place the product where it will be in the path of direct sunlight, and keep it a safe distance away from
radiators and other heaters of any kind.
•If you bring this product from a cold environment into a warm one (such as from a vehicle into a studio), it is quite
possible that condensation will form inside the cabinet. Please allow the unit sufficient time for acclimatisation
to room temperature (minimum thirty minutes) before connecting and powering up.
•Toavoidaccidents,do notuseany accessoryequipmentwith thisproductwhich isnotapproved bythemanufacturer,
particularly mounting accessories. Do not place this unit on any unstable platform, cart, stand or table. Should the
unit fall, it can cause bodily injury to persons, or can be damaged itself.
•To protect this product from lightning damage during a thunderstorm or from power surges during an extended
absence, disconnect the power cable from the wall outlet.
Fig. A
Fig.B

Portable PA Speakersystem TRA 100 Page 3
This manual contains:
Safety Instructions.........................................2
1. Connection and setup..............................5
1.1 Safety hint................................................5
1.2 This box contains.........................................5
1.3 Conditions for operation.................................5
1.4 Positioning................................................5
1.4.1 On a tripod...................................................5
1.4.2 Wall or ceiling mounting.................................5
1.4.3 Adjustment of the TRA 100............................5
1.5 Connection to AC..........................................5
1.6 Ground Lift switch.........................................5
1.7 Fuses.......................................................5
1.8 External 12 to 16 V power...............................5
1.9 POWER switch............................................6
1.10 POWER ON LED..........................................6
1.1 LED..........................................................6
1.12 Low-Battery protection...................................6
1.13 Connection of audio sources..........................6
1.13.1 Input 1.........................................................6
1.13.2 Input 2.........................................................7
1.13.3 Input 3.........................................................7
1.14 AF and DC outputs........................................7
1.14.1 LINE out.......................................................7
1.14.2 REC out.......................................................7
1.14.3 Monitor speaker............................................7
1.14.4 DC out.........................................................7
2. Operation......................................................8
2.1 Using a dynamic MIC and talking to it from
a distance....................................................8
2.2 Using a dynamic MIC for close-up talking........8
2.3 Using an electret-condenser MIC and talking
to it from a distance.......................................8
2.4 Using an electret-condenser MIC for loud
closeup speech or singing.............................8
2.5 Connecting a mixer or any unit with LINE level.8
2.6 Recording from the TRA 100...........................8
2.7 Tone-Control.................................................8
2.7.1 Low..........................................................8
2.7.2 Mid...........................................................8
2.7.3 High.........................................................8
2.8 Remarks to the internal rechargeable battery
(accumulator)............................................9
2.9 Spare unit and disposing of defective batteries........9
3. In case of a problem..................................10
4. Diagrammes..........................................11-12
5. Warranty......................................................12
6. Technical specifications....................13-15
Illus. 1
Front view

Page 4 Portable PA Speakersystem TRA 100
Illus. 2
Rear view of the system
The numbers in circles are
referred to in the following text

Portable PA Speakersystem TRA 100 Page 5
1. Connection and Setup
1.1 Please read carefully and obeye the
safety instructions on page 2!!
When this speaker-system is operated in
an area above the audience, i.e. hanging
from the ceiling, mounted to a crossbar,
hanging on the wall etc. you must make
sure to provide an additional safety-rope,
tightened to the handle!!
1.2 This box contains
1x active PA speaker-system TRA 100
1 x Power cord (Mains cable)
1 x operation manual
1.3 Conditions for operation
The active PA speaker system TRA 100 has been
designed to work in a temperature-range from –10° C
to +40° C. During storage or transport temperatures
below –15° C will freeze the electrolytic GEL inside
the rechargeable battery and may destroy it.
The TRA 100 can be operated in any position.
This unit should not be exposed to high moisture,
watersplashes, heavy rain etc. It should be used in
low humidity areas only. K+H is offering an optional
raincover, which will protect the system during rain.
Areas with aggressive chemical pollution or high
density of dust should be avoided.
This active PA-system is not designed for permanent
open air installations.
The cones of the speakers are covered with a thin
plastic-film as a protection against moisture and fog,
but there should not be any condensing water on the
speakers.
If after transportation or longer storage in humid
and cold surroundings the system should show
condensed dew on the box or the rear panel, please
allow at least 2 hours for acclimatisation, before
you switch ON the system.
1.4 Positioning
1.4.1 On a tripod:
In the bottom of this unit you will find a speaker
stand-adaptor with a 35mm diameter to accept all
tripods and stands designed in that format. With
the LH 33 adaptor the TRA 100 can be tilted in any
angle between 0° and 15° related to the vertical
position.
The LH 26 is a U-shaped bracket, which can be
mounted to the TRA 100 with 2 x M8
locking screws. This bracket can be mounted to
any 35mm tripod, when it is fitted with the LH 28
tripod-adaptor.
1.4.2 Wall or ceiling mounting:
The TRA 100 is fitted with a number of M 8 threaded
holes on the top and the sides of the cabinet, to
allow for various mounting hardware. On top are
2 x M 8 with a distance of 115 mm, so a TV -
spigot LH 29 can be fitted.
The wall-mount adaptor LH 120 will carry the TRA
100 on it’s 35mm adaptor and it also allows to tilt
the speaker in any angle between 10° to 25° related
to the vertical position.
1.4.3 Adjustment of the TRA 100
Please take care that no microphone will be
positioned directly in front of the speaker to prevent
feedback and howl. The mikes should always be
behind the system, and all levels should be set
low, so no feedback or ear-damage could occur.
1.5 Connection to AC
The TRA 100 has been designed to work with an AC
power input of 230V / 50-60 Hz. For the USA the unit
is supplied with a 117 V / 60 Hz transformer.
The power-cords are according to local specifications,
the special AC-plug needed in your country should
only be mounted by a skilled electrician. Please make
sure that all three wires are properly connected and
the “yellow-green” protective earth wire should not be
isolated!
1.6 Ground Lift switch
In rare cases there might be an audible hum, when
the TRA 100 is connected to other appliances, which
are also grounded. In these cases you may activate
the GROUND LIFT switch, to disconnect the TRA 100
from the ground back. Please make sure to set this
switch back to the NORMAL position when you set it
up in a new location!
1.7 Fuses
The TRA 100 carries two fuses, which should only be
exchanged when the unit is switched OFF and the
power cord is taken out of the AC outlet!
a) Power fuse 230V (or 117 V) next to the AC-input:
T 1 A for 230 V (slow blow)
T 2 A for 117 V (slow blow)
b) Battery fuse in the round holder under the Power-
switch:
T 6,3 A (slow blow type)
1.8 External 12 to 16 Volt power
The TRA 100 is designed to work with any external
DC from 12 to 16 volts. The extern battery input can
be accessed by removing the protection cover. We
can supply the special plug for this connector. Please
!
1
2
3
4
5

Page 6 Portable PA Speakersystem TRA 100
take care for correct connection of the + and – wires
from your external power source. In case you mix up
the correct connection, the system will not be
damaged, but it will keep on working on the internal
battery.
1.9 POWER switch
This POWER switch has three positions:
Pos. O = System is switched OFF, but the internal
rechargeable battery is in CHARGE mode.
Pos. I = System is ON, less MIC receiver is ON,
battery is in CHARGE mode.
Pos. II = System is ON, wireless MIC receiver is OFF
rechargeable battery is in CHARGE mode.
If you have the TRA 100 with a built-in wireless MIC
receiver, you should use the TRA 100 in the switch-
mode Position II (if receiver not used) to save energy
for an extended operation-time of the system.
When switching from Pos. I to Pos. II you should at
least allow a pause of 5 seconds, to avoid the low
battery protection system (see 1.12) becoming active.
It is not possible to switch off the TRA 100 remotely
by pulling the mains-plug! In this case the TRA 100
automatically will switch to the internal battery-supply.
1.10 POWER ON LED
When the TRA 100 is switched ON, the green
POWER ON LED will be illuminated. After a delay of
about 3 seconds the system is ready to work.
When in battery-mode this green LED also is used for
capacity display of the battery. If the rechargeable
battery has reached a capacity of 25%, this LED will
start flashing slowly. With a lower capacity this LED
will be blinking faster, so you can see that there will
be only 20 to 30 minutes of operation left from that
battery.
1.11 Loading LED
Charging the battery
If you want to charge the rechargeable battery, you
must connect it to a powered mains outlet and set the
power switch to pos. 0.
When the system is charging the battery, the red LED
will be on. When the battery is very low, recharging
will take about 6 hours to reach a capacity of ca. 90%
and about 10 hours for a capacity of 100%. When the
battery is fully charged, the red LED will be off and
the internal electronics will be in a standby charge
mode. This standby charging system has been
designed in a way that the TRA 100 can stay connected
to the mains all the time.
The charge electronics will power up the rechargeable
battery smoothly and effectively – no matter how low
it is. It is completely separate from the main PSU
system of the TRA 100, so full operation of the system
and recharging the battery is possible, even if the
TRA 100 has to deliver 100 W RMS!
After having purchased the TRA 100 you should
connect it to the mains for about 6 hours to recharge
and fully load the battery. When the TRA 100 has not
been used for a longer time, it also should be
connected to the mains to fully recharge the battery.
When the TRA 100 is connected to an external battery
or PSU the internal battery will not be re-charged.
It is not possible to charge smaller, external batteries
from the DC-output of the TRA 100.
1.12 Low battery protection
When the battery is used and its capacity drops under
a certain level, it may be damaged or destroyed. To
avoid this situation, a low-battery protection is built
into the unit which will switch off the battery before it
will reach this low level status.
When this is happening during the TRA 100 is in
operation on the internal battery, please switch off
the unit with switch and take the first chance to
fully recharge the battery.
1.13 Connection of audio sources
All inputs of the TRA 100 have an overload headroom
of min. 10 dB.
1.13.1 Input 1
Input 1 is an electronically balanced input to
accept a wide range of sound sources from pro-
fessional, semi-pro, or portable devices. For a
perfect matching of levels and impedances we
have provided a 3-position switch to select for:
LINE 0 dBu
AUX –25 dBu
MIC –45 dBu
The connector socket is designed to accept ¼”
MONO or STEREO jacks or 3-pin XLR plugs. The
XLR connector is wired as follows:
Combo - socket balanced
female:
1 = Ground
2 = + signal
3 = - signal
6
7
6
8
6
10
9

Portable PA Speakersystem TRA 100 Page 7
The ¼” jack is wired as follows:
Tip = + signal
Ring = - signal
Frame = Ground
When using unbalanced signal sources, please
solder a bridge between ring and frame in your
¼” jack or between the minus PIN 3 and the ground
of your XLR plug.
In the setting MIC and AUX of the rotary switch
the TRA 100 also applies phantom power to the
input-socket, so you can connect powered
condenser microphones to that input via balanced
XLR or jack!
Please note, that only balanced Mics are
connected to the phantom powered input of the
TRA 100. So your microphone should be connected
with two wires and a screen to it’s connector.
Please note that you cannot use a MONO-
jack to apply phantom power!
1.13.2 Input 2
This is a transformer balanced input for balanced
¼” jacks or 3-pin XLR plugs, accepting all kind of
signal sources. Again we have provided a
3-position switch for:
LINE +6 dBu
AUX –25 dBu
MIC –65 dBu
Pinlayout is as described for INPUT 1.
Input 2 is ideal for dynamic microphones when in
pos. MIC –65 dBu, or for balanced signals from
professional sources or a crosslink from an OB-
van when in the LINE +6 dBu setting.
1.13.3 Input 3
This is an unbalanced CINCH input, which is ideal
to connect CD-or MD-players, Walkman or similar
high-level sources to it. The L+R inputs are summed
for a MONO signal.
With the level control VOLUME 3 you can add
the connected source to your mix.
1.13.4 Internal input for RF-receiver
The TRA 100 is fitted with a slide-in compartment
to accommodate one or two wireless microphone
receivers from almost any manufacturer. In some
cases special mechanical adaptions have to be
made by the customer or his dealer. For a number
of standard units K+H is offering special cover
plates, so you can adjust level or frequency of
your receiver.
To adjust your wireless MIC in the mix, K+H have
provided a separate VOLUME control.
1.14 AF and DC outputs
1.14.1 LINE OUT
The electronically balanced XLR output carries the
MIX-signal of the TRA 100 preamp. So you may
connect other mixers, or a camera etc. to this unit.
The connections are as follows:
XLR-socket balanced male
1 = Ground
2 = + signal
3 = - signal
If you want to connect an unbalanced input to this
socket, please make sure to have a bridge
between pin 1 and 3 in your external connector.
The nominal level at this socket is +6 dBu, the
max. level is +17 dBu.
1.14.2 REC OUT
At this output you can connect any MD, cassette
or other recorder, accepting a reference-level of
- 6dBu. The MONO output signal is on both sockets,
so recordings will be in MONO. The connection
from this output to any recorder should be made
to the LINE IN socket of the external unit.
1.14.3 Monitor speaker
This jack-socket carries an output of 15 W RMS/
4 Ohms to connect any passive add- on speaker,
so you can cover a larger space with the TRA 100.
This output is adjustable via the VOLUME Monitor
speaker control.
1.14.4 DC OUT
K+H have provided a 6 V DC output for the PSU of
external units, such as MD, CD, cassette-decks
or external RF-receiver. This output is short-circuit-
proof and stabilized. It can be selected for 3 V or
9 V by an internal jumper.
Special care has to be taken when connecting
external units to this DC output!
Please do not mix up the + and – of your
external supply input, as KLEIN + HUMMEL can
not be held responsible for any
damage caused to external units.
You also should take care of the
correct grounding of your external
unit! In some units the + of the PSU is connected
to the ground (or the – of your LINE-output
socket) of your player! Make sure and check
with your dealer first!
Any unit connected to this DC output will reduce
the capacity of the internal battery, so the duration
of performance might be reduced.
16
18
19
12
13 20
21
15
17
!
22
!

Page 8 Portable PA Speakersystem TRA 100
2. Operation
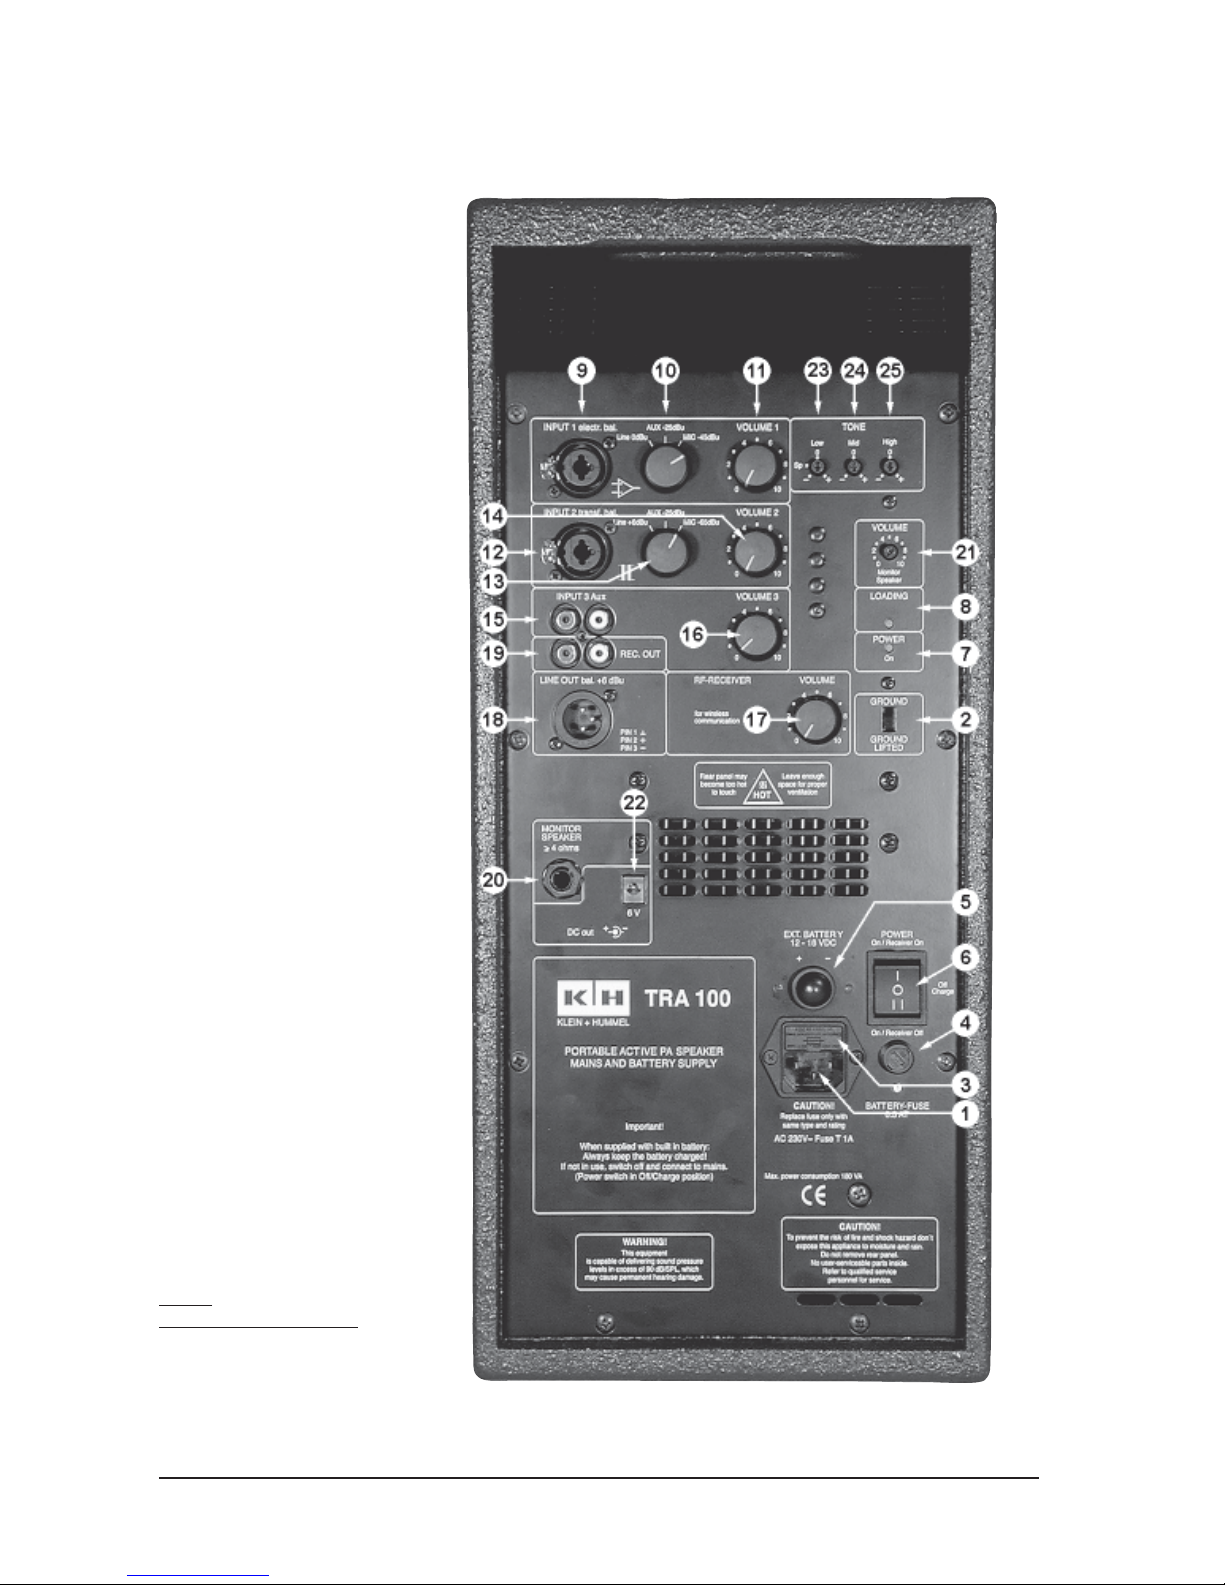
When selecting one of the three presets in the inputs
1 and 2, please make sure that their VOLUME
is fully turned down, as that switching may cause
audible clicks. These clicks do not do any harm or
damage to the speaker system.
2.1 Using a dynamic MIC and talking to it
from a distance
If you are planning to connect a dynamic MIC and
want to speak to that MIC from a distance of 10 to 30
inches (which is the case when reading from a table
or holding a speech), you should connect that MIC to
input 2, turn down the volume and then select
MIC –65 dBu. After having selected that preset, you
may adjust the VOLUME 2 to meet the required level.
2.2 Using a dynamic MIC for close-up
talking
If you want to talk right into the MIC from a very close
distance (1 to 5 inches), which is the case if you want
to make a speech in a noisy environment, or if you
are going to sing with a loud voice, you should connect
the MIC to input 1, turn down the volume
and select MIC –45 dBu, then adjust the
VOLUME 1 to meet the required level.
2.3 Using an electret MIC and talking to it
from a distance
When talking to this type of MIC from a distance of
10 to 30 inches, you should connect the MIC to IN-
PUT 1, turn down the volume and select
MIC –45 dBu, then adjust the VOLUME 1 to meet the
required level.
2.4 Using an electret MIC for loud
closeup-search or singing
If you are going to speak or sing loud into this kind of
MIC in a noisy environment, you may connect it to
INPUT 1 or INPUT 2 and select AUX –25 dBu, when
the volume or is turned down. Then adjust the
VOLUME to your required level.
When using an elektret-condenser mike with reduced
output level you can also use input 1 selecting
MIC –45 dBu.
2.5 Connecting a mixer or any unit with
LINE level
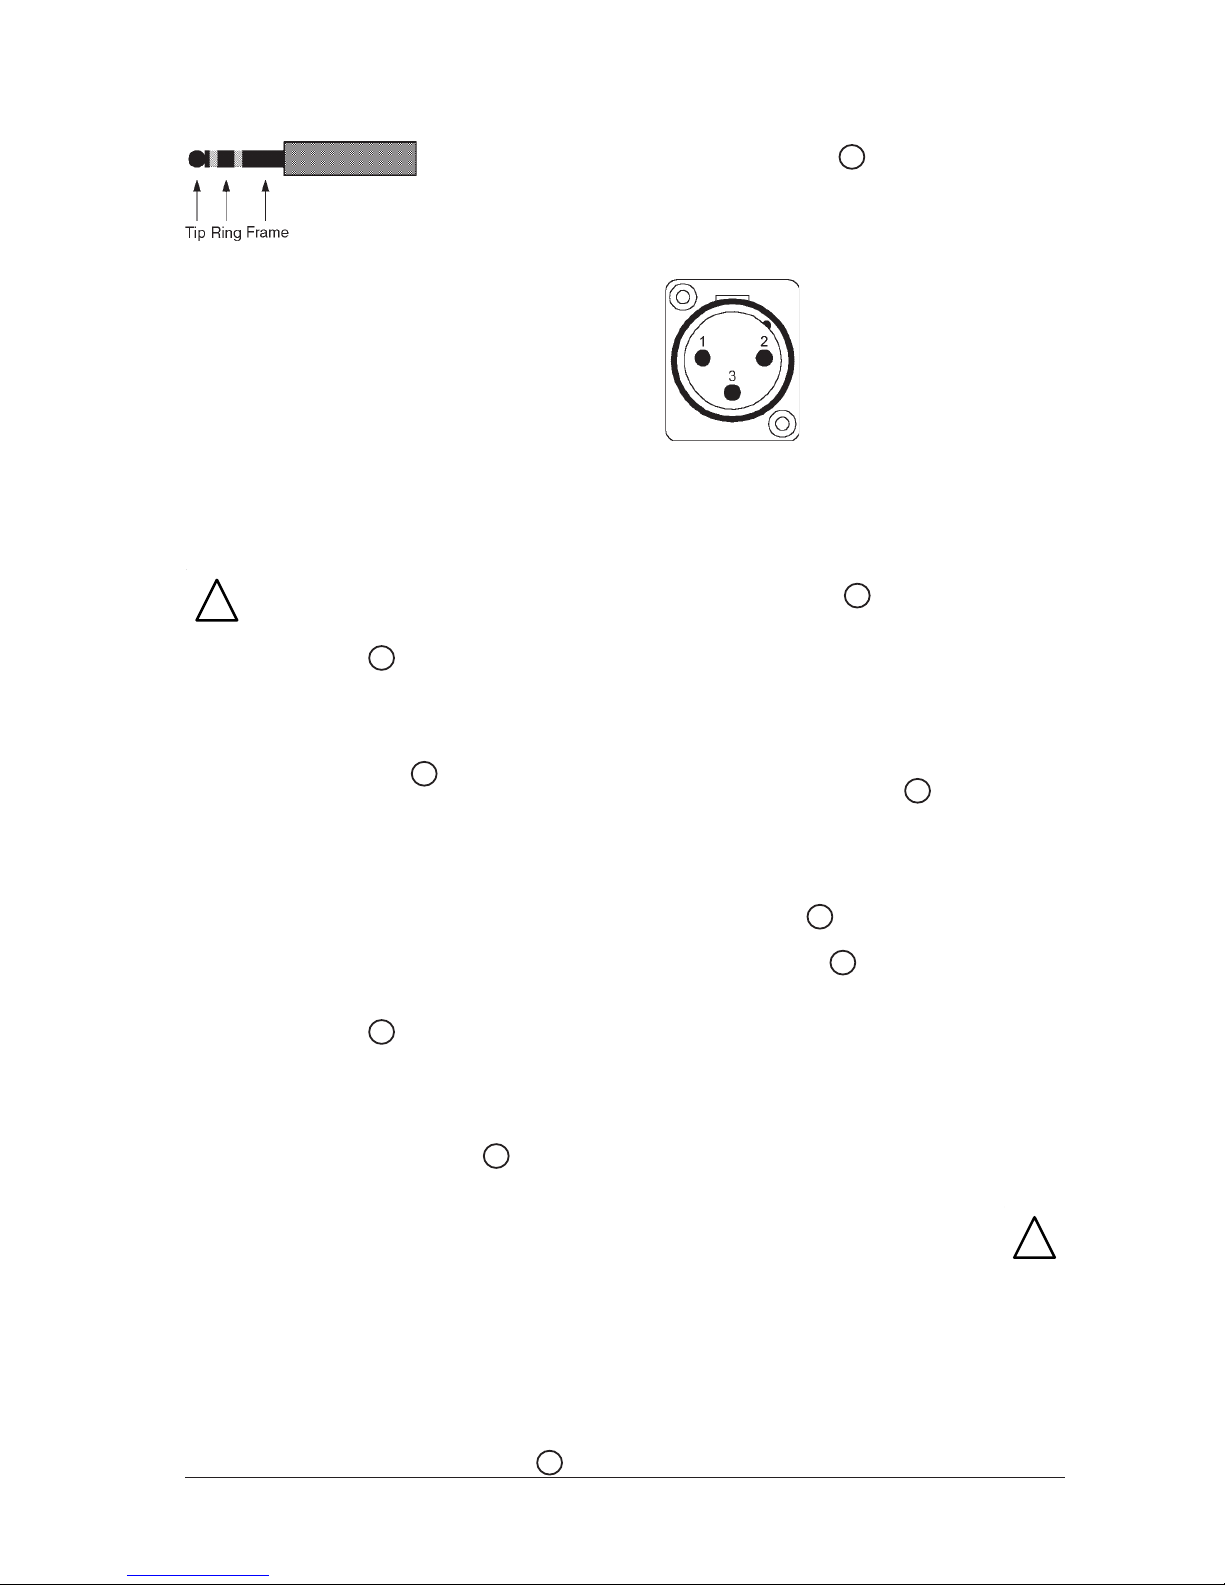
Here you may connect the signals to either INPUT 1
or INPUT 2. As INPUT 2 is fitted with a balancing
transformer, this input should be preferred to avoid
hum-problems or other audible influences. Both inputs
are of the same quality.
2.6 Recording from the TRA 100
The TRA 100 has a recording output, which can be
connected to any input of an external recording
device (cassette, taperecorder, DAT-recorder or MD-
recorder).
Please make sure, that VOLUME 3 is
turned down, if the unit you are
recording to is also connected to the
INPUT 3 AUX of the TRA 100 (otherwise
you will have a loud feedback in your
system), as many units have the record-
input linked to the output.
2.7 TONE control „EQ“
The TRA 100 is fitted with a three band EQ for “LOW”,
“MID” and “HIGH”.
2.7.1 Low
The LOW EQ is mainly used to achieve an
optimised reproduction of voices or music.
The marking SP is our suggestion for a max. quality
for speech, but as every room sounds different,
you may adjust this control to your personal taste.
When using with music, you should turn it to the
“O” position, but again, you are free to raise the
low end by turning towards +, or to have less low
end by turning towards -.
Turn these controls slowly, so you can hear the
changing sound.
2.7.2 Mid
With this control you can take much influence on
the frequencies around 1800 Hz, where speech
normally has much presence, and where you often
may face feedback problems due to too close MIC
positioning, too high volume or odd acoustic
influences.
By turning this control slowly, you can eleminate
some of these problems, or you can adust the
quality of the vocals.
When listening to music this control should be in
the “O” position, but you are free to adjust to “+” or
“-“ to your personal taste.
2.7.3 High
This control is mainly used to add some clarity /
treble to voices, or to adjust some sibilances by
turning it towards “-“.
For playback of music programmes this control is
often used to take out the “sharp sound” or hiss in
some analog or digital recordings.
11
14
11
11 14
24
14
11
!
25
23

Portable PA Speakersystem TRA 100 Page 9
In general you should not make too ex-
tensive use of these controls. When
using with a MIC you always should be
very careful when turning one or all
controls towards “+”, as you may enter
regions where sharp and loud feedback
may occur, which then could damage
your system or the ears of people
standing close-by or in the direct
soundfield of the TRA 100!
2.8 Remarks to the internal rechargeable
battery (accumulator)
The internal battery is a high-quality device of a
leakproof type. It is normally used in delicate security
systems and is well known for it’s long term stability
and many charging-cycles. This type of rechargeable
battery should not to be looked at as a “car battery”,
the acid inside is not liquid, it is a gel-type and can be
operated in any position, even upside-down.
The main advantage towards NiCd type batteries is
the far lower self-discharging load and a better
capacity / vs. volume relation.
This battery is free of the so-called “memory effect”,
so it can be recharged at any time. As this type of
battery should not be stored over too long a period
when not fully charged, you should always recharge it
every time you have used your TRA 100.
2.9 Spare unit and disposing of defective
batteries
To obtain and maintain the best
performance, the internal battery should
only be exchanged with a new unit of the
same type, or a unit which has passed the
safety-test of KLEIN + HUMMEL. Please
contact your KLEIN + HUMMEL dealer or
distributor for details.
Defective batteries are to be treated as
hazardons waste and should be
returned to your dealer for correct waste
disposal.
!
!
!

Page 10 Portable PA Speakersystem TRA 100
3. In case of a problem
:melborP:esuacelbissoP:erucotwoH
:dnuosoN
noitisopgnorwnihctiwsFFO/NO
krowtonnacreviecer-CIMos
dnareviecerC
IMos,I.soPothctiwstuP
NOdehctiwseblliwPMA
denrutera)71,61,41,11(slortnocEMULOV
nwodylluf
.puslortnocEMULO
VehtnrutylwolS
otdetcennocsiCAonnehwytpmesiuccA
-wol,ecitcaDEL-rewopon,001ARTeht
evitcasinoitcetorp-yret
tab
ehttcennocdna,yrettabehtegrahceR
sniam-CAehtot001ART
sidnuoS
:detrotsiD
teserpgnorwehtdetcelesevahyamu
oY
)31(ro)01(rotceleshtiw
ehttcelesnehtdnaemulovehtnwodnruT
)31(ro)01(hctiwsgninrutybtneserpthgir
ytpmesi
CIMniyrettabroevitcefedCIMyrettabro/dnaCIMegnahC
001ART
:FFOsehctiws
ytpmesiyrettaB gnitcennocybyrettabeht
egrahceresaelP
sniam-CAotti
ninoitareporegnolybdesuacgnitaehrevO
htiwrosmoormrawyrevro,enihsnuslluf
htolc
emosebyam(gnilooc-noitcevnocdab
)wolfrianoitcevnocehtgnikcolbera
tilitnutiawdnawodahsehtnitinuehtecalP
l
eveltuptuoehtrewoldnadeloocsah
htiwkcabdeeF
:hctiphgiH
doogtonsigninoitisoP osCIMehtmorfyawarekaepsduoleh
tnruT
ehtmorfdnuosehtpukciptonlliwti
001ART
hgihoottessistupniCIMfoleveLnwodEMULOVehtnruT
dnaepytlanoitcer
idinmonafosiCIMehT
esoprupAProfdesuebtondluohs
CIMdioidracaesuesaelP
001ARTehtotdetcennocsiredrocerA
syal
ptios,edom-DROCERnidnametsyS
001ARTehtotnikcablangisdedrocereht
;yletelpmoc3EMULOVehtnwodnruT
ruoyfonoitcnufdrocerehtFFOhctiws
redrocer
edisduoL
nehwesion
ehtgnivom
:CIM
aebdluoc,evitcefedebyamelbacCIM
aro,gulpeh
tedisninoitcennocesool
evitcefedaro,elbacehtedisnieriwnekorb
.elbacehtfognidleihs
elbacCIMwenaekaT
evitce
fedsiCIMCIMwenaekaT
evitcefedsirotcennoC etacolotyrtdnayltnegelbacCIMehtevoM
.melborpehtsesuacelbacfoedis
hcihw
.enowenarofegnahcxenehtdnatikraM

Portable PA Speakersystem TRA 100 Page 11
4. Diagrammes
The superb acoustic performance of the TRA 100 can
not only be heard, K+H also has made very detailed
acoustic measurements to prove these data in printing:
Illus. 3: Free field frequency response TRA 100
The characteristics of the tone-controls have been
“tailored” to the special needs in the field of smaller
PA-systems and to the environment these units mainly
are used in:
Illus. 4: frequency-response of the EQ-section
The perfect directivity is documented in illustrations 5 and 6:
Illus. 5: horizontal directivity of the TRA 100

Page 12 Portable PA Speakersystem TRA 100
Illus. 6: vertical directivity of the TRA 100
5. Warranty Information
All K+H products undergo an extensive procedure of
quality control testing before leaving the factory. Before
semiconductors are mounted on the circuit board, they
are subject to rigorous tests. Every single unit is
guaranteed to match its technical specifications within
strict predetermined tolerances.
Please store the original carton in a safe, dry place. If
you should ever need warranty service, put the unit in
its original packing material and carton together with
a detailed description of the problem, and ship it
(freight prepaid) to our distributor or directly to:
KLEIN + HUMMEL GmbH
Customer service
Zeppelinstrasse 12
73760 Ostfildern / Germany
K+H warrants, that the product is free from any defects
in both material and manufacturing and that it meets
the specifications. A warranty case can only be
acknowledged under condition that the complaint is
filed to our distributor or to us in writing within 8 days
after delivery or detection of the fault. Not covered
under this warranty are damages due to inexpert
packing and shipment, wear and tear, improper
handling, installation, operation and maintenance.
The limitation period for warranty claims is described
in the terms and conditions of K+H GmbH. Its our
choice to repair, to supply a new product or to withdraw
from the contract.
In the event warranty service is required, presentation
of a warranty card will not be necessary. Proof of
purchase date can be made by filing copies of
appropriate documents (invoice, delivery note).

Portable PA Speakersystem TRA 100 Page 13
6. Technical specifications TRA 100
Please note: 0 dBu = 0.775 V effective!
Principle
Active powered 2-way speaker system with internal electronic crossover and separate amplifiers
for the woofers and the tweeter. The unit is designed to work with the internal 12 V rechargeable
battery (charger is part of the unit) and the internal mains power supply, which can be ordered
for operation in 100/117 V or 230 V mains-systems.
The mixing amplifier offers 4 inputs, three external outputs (monitor-speaker 15 W RMS/4 Ohms,
LINE out and TAPE-record), the electronic 2-way crossover, frequency-effecting limiter to increase
loudness in speech-mode, a 2-channel power amplifier, two woofers and one horn tweeter with a
moulded external baffle.
Frequency range
80 Hz - 15 kHz ± 3 dB
THD
THD in 1 m distance at 100 dB / SPL above 150 Hz < 1%
SPL
in a fullroom environment at 3% THD above 150 Hz 105 dB
Speech by tweaking the Bass to zero 113 dB
Electronics:
Power amplifiers
Max. power of all internal amps,
measured under 100% PSU 100 W RMS
Continuous power of woofer amp, THD < 0,5% 50 W RMS
Tweeter-amp, THD < 0,5% 15 W RMS
Monitor-amp THD < 0,5 % 15 W RMS
Active 2-way crossover
24 dB/Oct at 3 kHz
Tone-control
Subsonic-filter in all inputs 50 Hz – 3dB, steepness 6 dB / Oct.
Bass EQ +/- 8 dB at 50 Hz
Mid EQ +/- 4 dB at 1,8 kHz
High EQ +/- 12 dB at 10 kHz
Protection
Bass distortion detecting limiter with preceeding low-cut
Horn distortion detecting limiter and thermolimiter
Inputs
Input 1 electronically balanced,
Level selectable Mic –45 dBu / AUX –25 dBu / LINE 0 dBu
12 dB headroom
combined XLR and ¼ “ stereo-jack

Page 14 Portable PA Speakersystem TRA 100
Input 2 transformer balanced
Level selectable Mic –65 dBu / AUX –25 dBu / LINE +6 dBu
10 dB / 12 dB / 12 dB headroom
combined XLR and ¼ “ stereo-jack
Phantom power for MIC and AUX on input 1 only!
Input 3 unbalanced, level –6 dBu
12 dB headroom
Cinch sockets for stereo, but with MONO-summing
RF-Receiver
transformer balanced, -26 dBu, up to 2 receivers can be mixed
Mounting-sets can be supplied separately
Outputs
Monitor Speaker
adjustable output offering 15 W/RMS into 4 Ohms, ¼” jack socket
Min. impedance 4 Ohms, short-circuit-proof.
LINE OUT electronically balanced, + 6dBu, XLR-socket male, can be supplied with
output transformer as an option!
REC OUT unbalanced – 6 dBu, Cinch-socket 2 x Mono
Optical controls
Power ON LED green / Charging red
Power supplies
Mains 230 V AC +/- 10 %, 50/60 Hz, optional 100/117 V
External battery 12 to 16 V
Internal battery 12 V
Power consumption
Mains max. 160 VA
Ext. Battery 14V, max. 6A
Power-supply for external units
DC-output at 6 V, internal bridge to either 3 V or 9V, max. 0.5 A, stabilized and short-circuit-proof
Protection
Class 1, Chassis to ground
Rechargeable battery:
12 V, 7.2 Ah, service-free, leak-proof type
Charging
Constant current, when full switching to constant voltage for keeping the max.
loading capacity. Red LED OFF when in “Hold” mode, unit can be used during loading procedure
on Mains-supply, even when the internal battery is fully discharged.
It is not possible to charge the unit from external batteries!
When an external 12 to 16 V source is connected ( car battery, Solar-panel etc.) the internal
battery will not be recharged!

Portable PA Speakersystem TRA 100 Page 15
Charging time: about 10 hours for 100%, 6 hours for 90% of capacity.
Time of operation when in battery mode (100% full when switching ON)
About 13 hours with low-level music
About 6.5 hours with speech, just before limiter gets working
About 5.5 hours with music, at full blast, just before limiter gets working
The time for operation may be shorter, when external units are fed from the DC-output
of the TRA 100 system and when operating with RF-Receivers
Mechanical specifications:
Climatic conditions
Operating temperature from –10° C to + 40° C, storage not below –15° celcius
Humidity do not expose to rain or high moisture without protection!
When using the optional raincover, a certain protection is provided, but
the unit should not be used excessively under such conditions!
Dimensions
W x H x D 218 x 490 x 260 mm
Gewicht
without receivers 13.5 KG
Speakers
2 x 6.5” woofers, 1” tweeter with additional horn
Cabinet
birch-plywood, surface charcoal-grey paint, front-grille is removable
with acoustic foam on the outside, optional fibre nap coated black,
grille as above
Mounting points
35mm speaker stand adaptor on the bottom
2x M8 screw socket on sides for LH 26 mounting bracket
2x M8 screw socket on top for LH 29 TV-spigot
Optional accessories
Mounting sets for RF-receivers:
1x Sennheiser Evolution Diversity and 1x Evolution Bodypack
1 - 2x Sennheiser Evolution Bodypack
Shure UT or UC
Mounting adaptors:
LH 26 mounting bracket
LH 28 tripod bushing (only in combination with LH 26 or LH 36)
LH 33 tilting adaptor 0° to 15°
LH 36 tilting adaptor
LH 120 wall bracket
LH 29 TV-spigot
C 15 eyebolt
LST 60 stand with pike
SR 21 stand pipe
LRH 100 raincover
LTR 100 carrying-case
LRR 100 trolley for LTR 100

Tel.: + 49 - (0)711 - 45893 - 0
Fax: + 49 - (0)711 - 45893 - 35
e-Mail: [email protected]
Internet: www.klein-hummel.de
KLEIN + HUMMEL GmbH
Zeppelinstr. 12 73760 Ostfildern/Germany
Table of contents