For warranty information please visit: kichler.com/warranty
Para informacion de la garantia por favor visite: kichler.com/warranty
INSTRUCTIONS PERTAINING TO A RISK OF FIRE,OR INJURY TO PERSONS
IMPORTANT SAFETY INSTRUCTIONS
Lighted lamp is HOT!
WARNING — To reduce the risk of FIRE OR INJURY TO PERSONS.
1) Turn off / unplug and allow to cool before replacing lamp.
2) Lamp gets HOT quickly! Contact only switch / plug when turning on.
3) Do not touch hot lens or cowl.
4) Donottouchlamporxtureifwarm
5) Do not look directly at lamp when on.
6) Keep lamp away from combustible materials.
7) Useonlywithwattageandlampmarkedonxture.
8) Do not touch the inner glass envelope of the lamp at any time.
Use a soft cloth. Oil from skin may damage lamp.
9) Donotoperatethexturewithadamagedormissinglens.
SAFETY INSTRUCTIONS READ THIS FIRST
KEEP THESE INSTRUCTIONS
CAUTION – RISK OF SHOCK –
Disconnect Power at the main circuit breaker panel or main fusebox before starting and during
the installation.
This xture is intended for installation in accordance with the National Electric Code (NEC) and
Local code specications. Failure to adhere to these codes and instructions may result in serious
injury and/or property damage and will void the warranty. If you are not familiar with code require-
ments, installation by a certied electrician is recommended.
1) WARNING:Thisxtureisnottobeinstalledwithin10feet(3M)ofapool,spaorfountain.
2) Thisxtureistobeusedonlywithalistedpowerunit(transformer)ratedamaximumof300W(25
AMPS)15volts.
3) The#18ga.xturewireisnotintendedfordirectburialorconnectedtoatransformer.
4) Directburialratedwireistobeburiedaminimumof6"(152mm)beneaththesurfaceoftheground.
NOTE: IfadditionalDirectBurialwireisneeded,contactyourlocalKichler®landscape distributor.
• 8GAwirecanbepurchasedinlengthof250'(76M),15503-BK.
• 10GAwirecanbepurchasedinlengthof250'(76M),15504-BK.
• 12GAwirecanbepurchasedinlengthsof100'(30M),15501-BK;250'(76M),15502-BK;
500'(152M),15505-BK;and1000'(304M),15506-BK.
5) Fixtureshallnotuseatungstenhalogenlampunlessthextureismarkedforusewithsuchlamps.
6) Wiringconnectionsmustbemadewithapproved/listedwireconnectiondevice(s)suitableforthe
application.Donotexceedmanufacturers’wiringcombinationspecicationsforsizeandquantityof
conductors.
CAUTION
WHEN INSTALLING KICHLER LANDSCAPE LIGHTING (LINE VOLTAGE OR LOW VOLTAGE),
CARE SHOULD BE TAKEN TO KEEP CLEAR OF POTENTIALLY COMBUSTIBLE MATERIALS.
WHEN MAINTAINING THE FIXTURES, BE SURE TO REMOVE LEAVES, PINE NEEDLES, GRASS
CLIPPINGS, MULCH, OR ANY DEBRIS THAT HAS ACCUMULATED ON THE LIGHT BULB, LENS,
OR BODY OF THE FIXTURE.
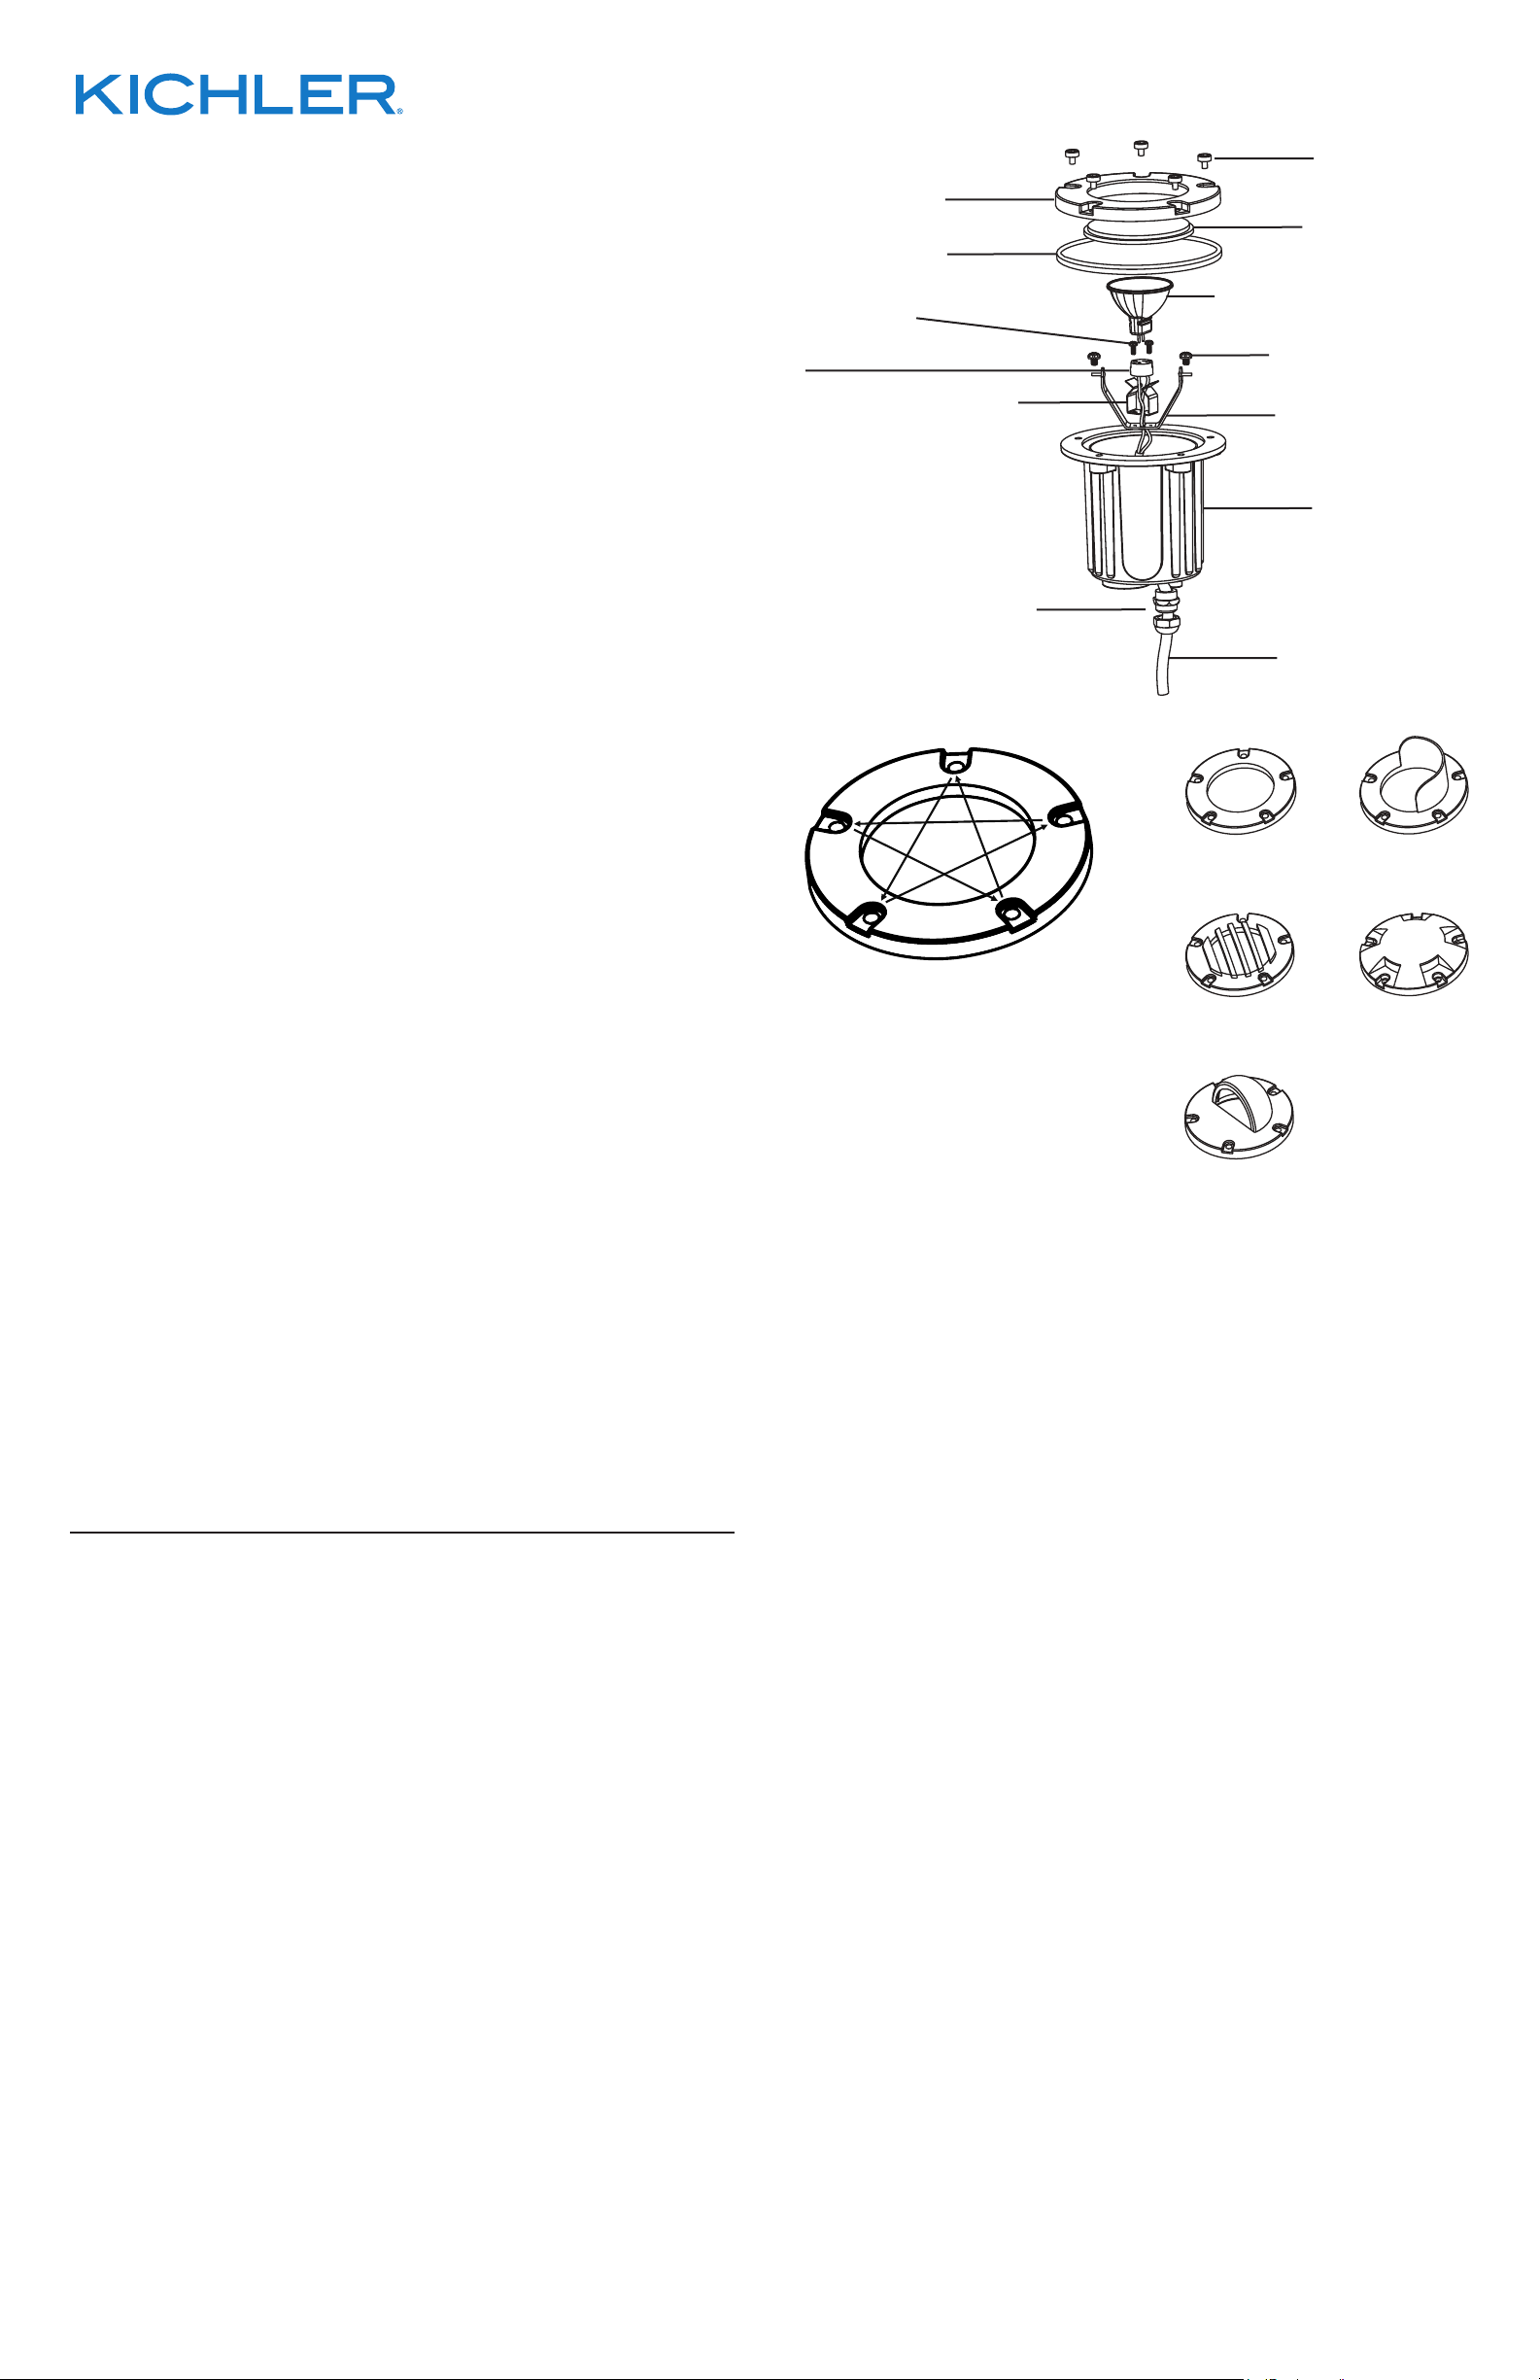
ASSEMBLY AND INSTALLATION
1) TURN OFF POWER.
2) Determinedesiredlocationforinstallation.Checkareaforobstructionssuchassprinklers,plant
material,etc.Assesssoilconditions.
3) Digaholeapproximately12”deepby3”widerthanthewelllight.Thisallowsapproximately3”of
peagravelorsandtosurroundABShousing(Forconcreteapplications,usea51/4”coredrill,
12”deep).
4) Withascrewdriver,loosencoverscrewsandinstalllampintosocket.
5) Returnthecoverbackon,aligntheholesandtightenscrewsaccordingtothestarpattern
shown in Fig. 1.
6) Stripthetwoleadwiresfromxturepigtailwire.Usingwireconnectors(notincluded),connectthe
leadsfromtheluminairetothemainsupplycableleads.Allow12-18”ofextrawire(coiledinside
the bottom of the well light) to allow for lamp removal / replacement.
7) Placextureatnalheightleaving1-2”ofthextureabovegradetominimizedebriscollection(in
lawnareastheyshouldbeushwithgrade).
8) Installluminaireinholeandllholeafterinstallationwithpeagravelorsand.Backllandcompact
thesoilaroundthexturethussecuringitintheground.
9) Restorepowertoxturetocheckforproperoperation.
Call Factory for additional installation options.
INSTRUCCIONES PERTINENTES A UN RIESGO DE ICENDIO
O LESION A LAS PERSONAS
INSTRUCCIONES IMPORTANTES DE SEGURIDAD
¡La lámpara encendida es CALIENTE!
ADVERTENCIA — Para disminuir el riesgo de INCENDIO O LESION A LAS PERSONAS.
1) Apague / desenchufe y deje que se enfríe antes de cambiar la lámpara.
2) ¡La lámpara se CALIENTA rápidamente! Haga contacto del conmutador/enchufe sólo cuando encienda.
3) No toque la lente o la capucha caliente.
4) No toque la lámpara o el artefacto si está caliente.
5) No mire directamente a la lámpara cuando esté encendida.
6) Mantengalalámparalejosdematerialesinamables.
7) Use solamente con el vatiaje y la lámpara marcados en el artefacto.
8) No toque el vidrio del interior de la lámpara en ningún momento. Use un paño suave. El aceite del
cuerpo puede dañar la lámpara.
9) No haga funcionar el artefacto con una lente dañada o faltante.
INSTRUCCIONES DE SEGURIDA PRIMERO LEA ESTO
GUARDE ESTAS INSTRUCCIONES
PRECAUCIÓN – RIESGO DE DESCARGA ELÉCTRICA –
Desconecte la electricidad en el panel principal del interruptor automático o caja principal de
fusibles antes de comenzar y durante la instalación.
Este artefacto se debe instalar de acuerdo con el Código Eléctrico Nacional (NEC, por sus siglas
en inglés) y con las especicaciones del código local. No cumplir con estos códigos e instruc-
ciones puede resultar en lesiones graves y/ o en daños a la propiedad y anulará la garantía. Si no
está familiarizado con los requisitos del código, la instalación se recomienda un electricista
certicado.
1) ADVERTENCIA:Esteartefactonodebeinstalarseamenosde10pies(3m)deunapiscina(alberca),
spa o fuente.
2) Esteartefactodebeutilizarsesolamenteconunaunidaddepotencia(tranformador)aprobadacon
capacidadnominalmáximade300vatios(25amp.)15voltios.
3) El cable del artefacto de 18 ga no está destinado para uso subterráneo directo ni para ser
conectado al transformador.
IS-15495-15496-15497-15498-15499-US
4) DeacuerdoconlosrequisitosdelCódigoEléctricoNacional(NECporsussiglaseninglés),el
alambreclasicadoparasoterradodirectosedebeenterrarunmínimode6pulgadas[152mm]debajode
lasuperciedelterreno.
NOTA: Siserequiereuncableparausosubterráneodirecto,contácteseconsudistribuidorde
paisajismo local de Kichler®.
• Elalambrecalibre8puedecomprarseenlongitudde250’(76m.),15503-BK
• Elalambrecalibre10puedecomprarseenlongitudde250’(76m.),15504-BK.
• Elalambrecalibre12puedecomprarseenlongitudesde75’(22m.),15550-BK;100’(30m.),
15501-BK;250’(76m.),15502-BK;500’(152m.),15505-BK;y1000’(304m.),15506-BK.
5) Elartefactonodebeutilizarseconlámparasdehalógeno,amenossqueelartefactoestémarcado
para usar con tales lámparas.
6) Lasconexionesdecableadosedebenhacerconlasconexionesdel(los)dispositivos)deconexión
decableadoaprobados/delalista,adecuadosparalaaplicación.Noexcedalasespecicaciones
de combinación de cableado del fabricante para el tamaño y cantidad de conductores.
PRECAUCION
CUANDO SE INSTALE SISTEMAS DE ALUMBRADO KICHLER PARA JARDINES (YA SEA DE
VOLTAJE DE LINEA O CON VOLTAJE BAJO) SE DEBE TENER CUIDADO DE MAINTNERLOS
ALEJADOS DE MATERIALES QUE PUEDAN SER COMBUSTIBLES EN POTENCIA.
AL DAR SERVICIO DE MANTENIMIENTO A ESTOS SISTEMAS, ASEGURESE DE DESPEJAR LAS
HOJAS, CONOS DE PINO, RECORTES DEL PASTO, CUBIERTA DE PAJA O CUALQUIER BASURA
QUE SE HAYA ACUMULADO EN LA BOMBILLA DE LUZ, EL LENTE O EL SOPORTE DE LA
BOMBILLA.
MONTAJE E INSTALACIÓN
1) DESCONECTE EL SUMINISTRO DE ENERGÍA ELÉCTRICA.
2) Determinelaubicacióndeseadaparalainstalación.Veriquequenohayaobstruccionesenla
zona,comoporejemploaspersores,materialvegetal,etc.Evalúelascondicionesdelsuelo.
3) Caveunpozodeaproximadamente12”deprofundidadquesea3”másanchoquelaluzdelpozo.
Estopermitecolocaraproximadamente3”degravillaoarenaporalrededordelacubiertaABS
(Parainstalacionesenconcreto,utiliceunabrocahuecade51/4”,12”deprofundidad).
4) Conayudadeundestornillador,aojelostornillosdelatapaeinstalelalámpara
en el portalámparas.
5) Vuelvaacolocarlatapaensulugar,alineandolosoriciosyajustandolostornillosconformeal
diseño de estrella que se muestra en la Fig. 1.
6) Pelelosdosconductoresprincipalesdelcableexibledelartefacto.Utilizandoconectoresdecable
(noproporcionados),conectelosconductoresdelaluminariaalosconductoresdelcablede
suministroeléctricoprincipal.Deje12-18”decableextra(enrolladodentrodelabasedelaluzdel
pozo)parapermitirelretiro/reemplazodelalámpara.
7) Coloqueelartefactoalaalturanaldejando1-2”delartefactoporencimadelniveldelterrenopara
minimizarlaacumulacióndesuciedad(enáreasdecésped,debencolocarseaniveldelsuelo).
8) Instalelaluminariaenelpozoyrelleneelpozocongravillaoarenaunaveznalizadalainstalación.
Vuela a rellenar y compacte el suelo alrededor del artefacto para asegurarlo en su lugar.
9) Vuelvaaconectarlaenergíaalartefactoparavericarsufuncionamientoadecuado.
Llame a la fábrica para obtener información sobre opciones de instalación adicionales.
We’re here to help 844-542-4537
Hrs: M-F 8am to 6:30pm EST
Estamos aquí para ayudarle 844-542-4537
Horario: Lunes-Viernes 8am a 6:30pm EST (hora ocial del este)
COVERSCREW
TORNILLODETAPA
COVER
TAPA GLASS
VIDRIO
GASKET
JUNTA LAMP(soldseparately)
LÁMPARA(sevendeporseparado)
SOCKETSCREW
TORNILLODELPORTALÁMPARAS BRACKETSCREW
TORNILLODELSOPORTE
SOCKETCLIP
ABRAZADERA DEL
PORTALÁMPARAS
BRACKET
BRACKETSOPORTE
HOUSING
CUBIERTA
CORDGRIP
SUJECIÓNDELCORDÓN
WIRE
CABLE
Fig. 1
1
2
3
4
5
15495
Flat Glass Cover
TapadeVidrioPlana
15497
Rockguard Cover
TapadelaProtección
ContraPiedras
15498
Indicator Cover
Tapa del Indicador
15496
Cowl Cover
Tapa de la Capucha
15499
Side-FireCover
Tapa Contra Incendios
SOCKET
PORTALÁMPARAS


