manuals.online logo
Brands
  1. Home
  2. •
  3. Brands
  4. •
  5. Kingkraft
  6. •
  7. Bathroom Fixture
  8. •
  9. Kingkraft Assist Classic Basin Specification sheet

Kingkraft Assist Classic Basin Specification sheet

1
0114 2690697
www.kingkraft.co.uk
Product User Guide
Assist Classic Basin
Range
PLEASE READ THIS USER GUIDE CAREFULLY BEFORE USE
2
3
Assist Classic Range
Contents
04 Product Intended Use
05 Important Safety Instructions
07 Operating Instructions
08 Installation & Maintenance Information
10 Bluetooth Remote Pairing Instructions
11 Serial Number & Guarantee Information
12 Kingkraft Contact Information
4
Assist Classic Range
Product Overview
This product manual has been written to cover the user operation and maintenance information for the Assist
Class Basin Range. This range includes:
• Assist Classic Basin
• Assist Classic Plus Basin
• Assist Classic Artisan Basin
The Assist Classic range consists of a basin mounted on top of a lifter. The height adjustable basin moves up and
down, ensuring that everything is at the specic correct height for each individual user.
Choose from either the Corian Calm or Corian Energy Bowls which will both give a large area for washing, whilst
providing additional space around the basin for support.
Complete with Pop up Waste and Bluetooth Wireless Control Handset.
Choose from a variety of options and add-ons including: Taps, Illuminated Mirror on Corian Up-stand, overow
and Grab Handles.
Pop-up waste
Waste & water supply pipes
Basin Surround
TMV3 Tap
LED Illuminated
Mirror mounted on
Corian Up-stand
Wireless Bluetooth Remote
Control to adjust basin height
5
Important
Safety Instructions
Please read these instructions carefully before using your Kingkraft product.
Be sure to keep the instructions safe for future reference.
Please ensure that all persons who use the basin are familiar with these instructions.
All safe-use instructions should be adhered to every time the product is in use.
Warning Symbols
The symbols below are used in this user manual to draw attention to hazards which may be encountered whilst
using this product.
If you have any doubt in the safe use of this basin, please contact Kingkraft for further advice on 0114 269 0697. A
digital copy of these instructions can be downloaded from www.kingkraft.co.uk. It is recommended you download
and save a digital copy, in the event that your printed booklet is damaged or lost.
WARNINGS given in this manual identify possible hazards in proce-
dures or conditions, which if not correctly followed, could result in
death, injury or other serious adverse reactions.
CAUTIONS given in this manual identify possible hazards in procedures
or conditions, which if not followed, could result in equipment damage
or failure, and indicate moderate risk.
WEIGHT HAZARD symbols appears when there is a potential weight
related hazard. This could be component weight, or a caution about
Patient/User weight or loading.
6
Important
Safety Instructions
WARNING. Maximum Safe Working Load (SWL) = 50kg. Do not overload the Basin.
WARNING. Always read the product instructions before using the Basin.
WARNING. Always carry out a risk Assessment before using the Basin, on both
the individual(s) who will use it, and the environment in which it is used.
WARNING. Always ensure the User has been Clinically Risk Assessed as to their
suitability before prescribing the Basin, in particular their size and medical/mental
health condition.
WARNING. Do not attempt to modify or repair the basin, it’s components or any
of its accessories in any way, doing so could potentially result in a hazard. Only
competent individuals should maintain and repair the Basin.
WARNING It is the owners responsibility to perform a visual inspection prior to
each use to check for any damage on the unit. If you suspect damage to the unit,
contact Kingkraft for further advice, maintenance or repair.
WARNING The basin is provided with a TMV3 tap to limit water temperatures,
however temperatures should always be checked prior to use. We recommend
this should be done using a calibrated thermometer.
If you are in any doubt about the safe use of this product or require to arrange a repair,
contact Kingkraft on 0114 2690697.
WARNING. Do not sit or stand on the basin,
WARNING. It is not recommended that patients should be left unattended with
the product unless they are competent independent users.
WARNING. The basin is supplied with a splined actuator. If something were to
become trapped underneath, the actuator will simply stop moving so no damage
is inicted. If trapping does occur, simply raise the basin top upwards.
7
Product
Operating Instructions
Raising & Lowering The Basin
Prior to adjusting the height of the basin, it is vital that a visual inspection is done to
ensure that no persons or equipment are positioned where lowering or raising the
basin could cause harm/damage.
To Raise the Basin
Holding the wireless Bluetooth remote control, simply press the UP ARROW.
To Lower The Basin
Holding the wireless Bluetooth remote control, simply press the DOWN ARROW.
Using the Tap
As standard, all Kingkraft products are tted with Thermostatic Mixer Taps.
PLEASE NOTE: If the pressure of the water supply to the basin and tap is too
high, there is a possibility of water overow from the basin.
Controlling the tap to utilise Hot/Cold/OFF Functionality
• Turn the lever to the RIGHT to turn on hot water
• Turn the lever to the LEFT to turn on cold water
• Turn the lever to the middle position to switch OFF
Mixed temperatures are blended when the lever is moved towards the middle setting. REMEMBER: the water
temperature must be checked on EVERY occasion before a dependent person uses the basin- this should
ideally be done using a calibrated thermometer.
Contemporary Infrared Sensor Tap Upgrade:
If you have chosen to upgrade to the infrared sensor taps, please note that operation is
dierent. The sensor taps are thermostatically controlled and the temperature is pre-set, The
tap is operated by the presence of the users hands being detected in front of the sensor,
Assist Sense Infrared Sensor Upgrade (Assist Plus / Artisan only):
If you have chosen to upgrade to the infrared sensor taps, please note that operation is dierent.
The sensor taps are thermostatically controlled. The hot setting is indicated with a red circle and
the cold setting is indicated with a blue circle. The taps have been set to cut o after 15 seconds
of use. These can be increased in 5 second intervals. Contact Kingkraft if you wish to change this
setting.
Operating the Pop Up Waste
Filling your basin is easy and hand-operated. Simply push the pop up waste button down to close.
To empty your basin, simply push down again to open the plug- this will empty the water from your
basin.
8
Installation & Maintenance
Information
Installation
Installation of your Kingkraft product should have been carried out by a competent person or Kingkraft
engineer. The pre-installation guides should have been adhered to at all times. If you are in any doubt
about the safety of your product, please contact Kingkraft for further advice.
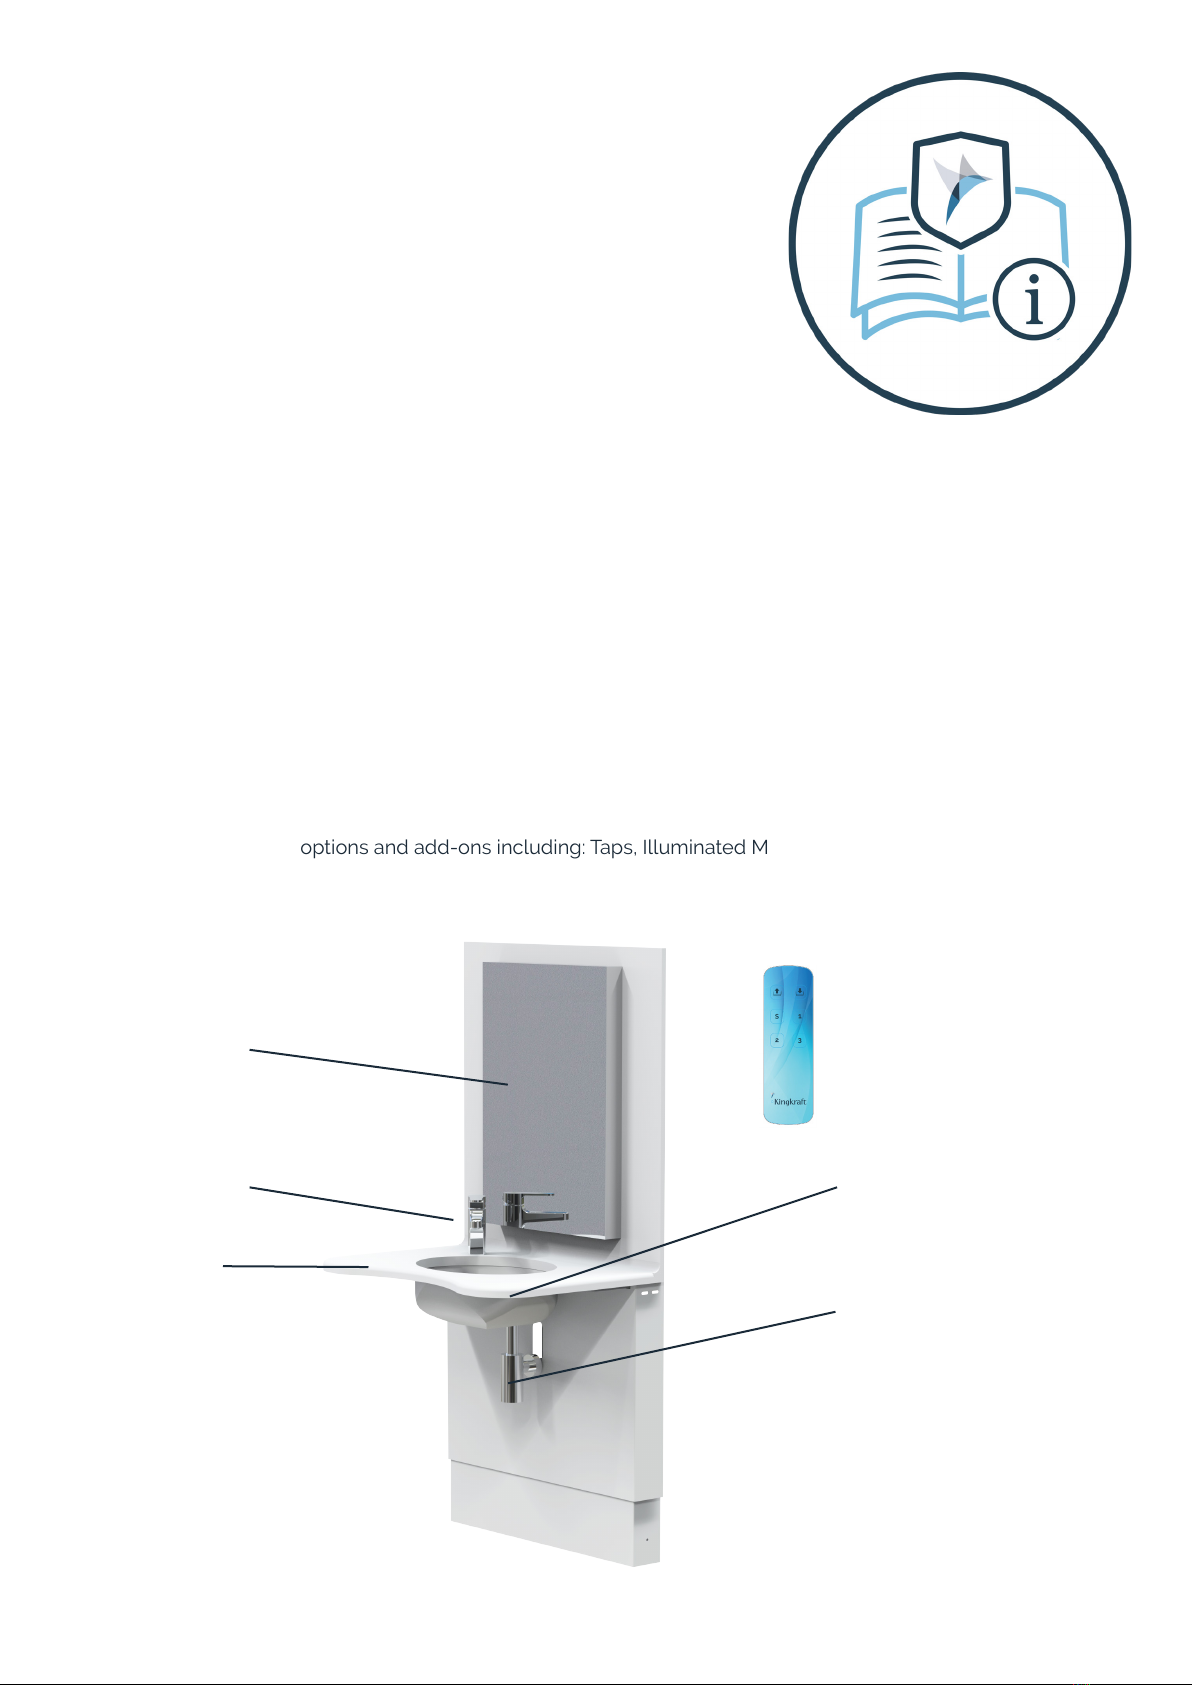
If you require the basin to be relocated for any reason, Kingkraft can oer this service. Alternatively,
instructions are available.
Units with electrical service must only be wired in accordance with the IEE wiring regulations. This
product must NOT be connected via a plug and socket!
The power supply to the basin must be wired into the supply via an isolator which supplies only the basin
and must have double pole switching with contact separation of at least 3mm. If the isolator is not within
sight of a person maintaining the unit, it must be lockable in the ‘o’ position.
We recommend that your basin is connected via a Residual Current Circuit Breaker (RCD) with an operating
current of no greater than 30mA.
Ensure that the wall and oor on which the basin is to be installed can withstand the full weight load of the
unit load as well as the user leaning on it for support.
Maintenance Guide:
• If your basin is not going up and down, rstly check that the mains power supply has not been turned o.
• If you nd any faults with the unit, ensure they are rectied in any event before the basin is next used.
• We recommend that the Assist Classic product is serviced annually. Kingkraft are able to carry out this
work for you, please contact us for further advice.
• Do not attempt maintenance until the basin is empty.
• Check the unit regularly for any damage. If you are unsure about the safe use of the basin, consult
Kingkraft for further advice.
• The unit must be installed by a competent person who must connect it to a circuit breaker mechanism
provided by others to ensure safety. If a fault has occurred in the electrical supply, the circuit breaker is
designed to cut out. The fault must be traced and rectied by a competent person before the reset switch
on the circuit breaker is operated. The frame and control system itself should not be tampered with as
it is only designed for repair by a competent person. In all cases, safety advise should be sought from
Kingkraft.
9
Installation & Maintenance
Information
RISK OF SCALDING. Your Assist Classic Basin has been installed as standard with a TMV3 Tap to mini-
mise any risk of scalding. Users must be aware that this is not fail safe.
We recommend that the water temperature is independently veried on every occasion it is used,
BEFORE use. We recommend that a calibrated thermometer should be used.
Contact Kingkraft immediately if the water is too cold or too hot. Do not use the basin until the problem is
corrected.
Certain chemical additives may damage the plastic used for the covers on the basin, especially if they
contain bleach or other corrosives. Use only water, normal soap and approved cleaning agents. If in
doubt, please contact Kingkraft for advice about the suitability of the additives you wish to use.
We recommend that your Kingkraft Classic Basin should be cleaned and disinfected with a non-bleach,
non-abrasive solution such as ‘Chemgene’ which is available to buy from us. See the section on cleaning
below for instructions on how to safely and completely clean your unit. Under no circumstances must
acid bleach based cleaners be used. If such products are used, this will immediately invalidate your
product guarantee.
Do not use pressurised water jets to clean any areas of the basin, including the controls. Do not steam
clean.
Do not attempt maintenance unless the basin is empty.
Check the unit frequently for damage. If you nd signs of damage, do not use the basin. Contact Kingkraft
as soon as possible to arrange for service or repair.
Maintenance Information:
• If you nd any faults with the unit, ensure they are rectied before the basin is next used.
• Only suitably qualied personnel should perform servicing, We recommend that the Assist Classic product is
serviced annually. Kingkraft are able to carry out this work for you, please contact us for further advice.
• For spare parts please contact Kingkraft.
WARNING. Do not attempt to modify or repair the basin, it’s components or any of its accessories in any
way, doing so could potentially result in a hazard. Only competent individuals should maintain and repair
the Basin.
10
Pairing Instructions For
Bluetooth Remote
Your Assist basin in supplied pre-paired with a Bluetooth remote control. If you need to re-pair the controller with
the basin, or you have taken delivery of a new remote control, simply follow the 3 steps below:
Direct Pairing to your Assist Range Basin
Your Assist Basin requires pairing to a new remote control prior to successful operation.
1. Entering Pairing Mode
Place the supplied magnet over the ‘‘hall’ sensor element. Press and hold key number ‘1’ for 3 seconds to enter
pairing mode.
2. Move the hand controller close to the basin
Try to position the handset close to the control box on the underside of the basin.
3. Pair the controller with the control box on the basin
When in pairing mode, the control box buzzer will begin to beep, and the LED will begin to blink. The control unit
LED will also begin to blink at the same rate as the control box.
11
Serial No & Guarantee
Information
WEEE (Waste Electrical & Electronic Equipment Regulations 2006)
The aim of this Directive is to minimise the impact of electrical and electronic equipment on the environment
when products become waste. All electrical components on this product must be disposed of in accordance with
the WEEE 2006 regulations, either through reuse, recovery, recycling or environmentally sound disposal.
If this Kingkraft product is at the end of its life cycle and is being disposed of by people other than Kingkraft
engineers, please contact Kingkraft to discuss arrangements regarding the disposal of any electrical equipment.
Below is an example of a product sticker that will be located on your basin:
YOUR SERIAL NUMBER
To keep your records up to date, ensure that you write
your product serial number in the box provided
PRODUCT BAR CODE
Product Guarantee & Extended Warranties
Your Kingkraft Assist Classic range basin is guaranteed for two years. This covers any breakdowns and parts for
this period only. Full terms and conditions of your guarantee can be found on our website.
In addition to this, you may have opted to take out an extended warranty of up to ve years when you made your
product purchase. If you are unsure, please check upon receiving your product whether you have an extended
warranty as we cannot oer this once your item has been installed.
In the unfortunate event that you experience a breakdown and you think you are still covered under guarantee or
extended warranty please contact our main oce on 0114 2690697 or inf[email protected].
Product out of warranty? If you are experiencing problems, we can still attend, however charges will apply for
our engineers to visit. Please ensure you know who would be funding this charge when you call us as we cannot
attend a product without prior authorisation from the bill payer.
12
This product user guide has been issued to provide all important user operation and maintenance details.
Please ensure you keep this document in a safe place so that you can refer to it when required.
Kingkraft are here to help and we want to ensure that our customers get the most out of using our products.
If you have any queries, or require clarication on any section of this guide, please contact a member of the team
using the contact details below:
Unsure About Anything?
Contact Us Today!
Kingkraft Ltd
26D Orgreave Crescent,
Dore House Industrial Estate,
Sheeld,
S13 9NQ
+44 (0)114 269 0697
inf[email protected]
13
www.kingkraft.co.uk

This manual suits for next models

2

Popular Bathroom Fixture manuals by other brands

Foremost LAGOON manual

Foremost

Foremost LAGOON manual

Geberit IDO Glow 600 Operating and maintenance instruction

Geberit

Geberit IDO Glow 600 Operating and maintenance instruction

Grohe ATRIO 19 169 manual

Grohe

Grohe ATRIO 19 169 manual

Santec HANA 4164TR Series quick start guide

Santec

Santec HANA 4164TR Series quick start guide

Fantini Rubinetti Venezia 3429000001 Care and maintenance

Fantini Rubinetti

Fantini Rubinetti Venezia 3429000001 Care and maintenance

Hans Grohe Croma Classic 100 28539 Series Assembly

Hans Grohe

Hans Grohe Croma Classic 100 28539 Series Assembly

STROMBERG LENO Assembly & Operating Instruction

STROMBERG

STROMBERG LENO Assembly & Operating Instruction

habitat et jardin Fresh 7 1365-93338 manual

habitat et jardin

habitat et jardin Fresh 7 1365-93338 manual

Salvatori ISHIBURO manual

Salvatori

Salvatori ISHIBURO manual

Price Pfister Avalon 16-CB manual

Price Pfister

Price Pfister Avalon 16-CB manual

Hans Grohe Raindance Select E 120 26620000 Assembly instructions

Hans Grohe

Hans Grohe Raindance Select E 120 26620000 Assembly instructions

Signature Hardware GLENLEY PRESSURE BALANCE 918385 installation manual

Signature Hardware

Signature Hardware GLENLEY PRESSURE BALANCE 918385 installation manual

Anzzi RONIN SP-AZ025 install guide

Anzzi

Anzzi RONIN SP-AZ025 install guide

Jacuzzi Professional Sienna Instructions for preinstallation

Jacuzzi

Jacuzzi Professional Sienna Instructions for preinstallation

Jacob Delafon E14F70-GA user manual

Jacob Delafon

Jacob Delafon E14F70-GA user manual

PALAZZANI YOUNG 99270610+07102110 Installation and maintenance instructions

PALAZZANI

PALAZZANI YOUNG 99270610+07102110 Installation and maintenance instructions

Gessi VIA TORTONA 44667 manual

Gessi

Gessi VIA TORTONA 44667 manual

Panasonic DH-3VL1 Operating and installation instructions

Panasonic

Panasonic DH-3VL1 Operating and installation instructions

manuals.online logo
manuals.online logoBrands
  • About & Mission
  • Contact us
  • Privacy Policy
  • Terms and Conditions

Copyright 2025 Manuals.Online. All Rights Reserved.