KitchenBrothers KB4004 User manual

BROODROOSTER MET DISPLAY
NL – Handleiding - Broodrooster met display
EN – User manual - Toaster with display
FR – Manuel d’utilisation - Grille-pain avec écran
KB4004
Lees de instructies - Please read the manual - Veuillez lire ce mode d’emploi
1
2
3
4
5
6
0:53

Nederlands
2 3
NL – Handleiding
VOORWOORD
Over dit document
Deze handleiding bevat alle informatie voor correct, efciënt en veilig gebruik van
het product. Zorg ervoor dat je de instructies in deze handleiding volledig gelezen
en begrepen hebt voordat je het product installeert of gebruikt. Bewaar deze
handleiding voor toekomstig gebruik.
Oorspronkelke instructies
Deze handleiding is oorspronkelijk geschreven in het Nederlands. Alle andere talen
zijn vertalingen van de oorspronkelijke Nederlandse handleiding.
Service en garantie
Indien je service of informatie nodig hebt omtrent je product, neem dan contact op
met onze klantenservice via [email protected].
Wij verlenen 2 jaar garantie op onze producten. De klant dient een aankoopbewijs
te kunnen tonen wanneer er beroep wordt gedaan op de garantie. Productdefecten
moeten binnen 2 jaar na aankoopdatum worden gemeld bij ons. Let op, de garantie
geldt niet: bij schade veroorzaakt door onjuist gebruik of reparatie; voor aan slijtage
onderhevige onderdelen; voor gebreken waarvan de klant bij aankoop op de hoogte
was; bij defecten door eigen schuld van de klant, bij schade door derden.
Index
NL – Handleiding 3
EN – User manual 15
FR – Manuel d’utilisation 27

Nederlands
4 5
INHOUDSOPGAVE
1. Introductie 5
1.1 Beoogd gebruik 5
1.2 Productoverzicht 5
1.3 Productspecicaties 6
1.4 Overige eigenschappen 6
1.5 Inhoud verpakking 7
1.6 Bijgevoegde accessoires 7
2. Veiligheid 7
2.1 Algemeen 7
2.2 Personen 8
2.3 Gebruik 8
2.4 Elektra 9
3. Instructies voor gebruik 10
3.1 Voor het eerste gebruik 10
3.2 Brood roosteren 11
3.3 Bevroren brood ontdooien 11
3.4 Geroosterd brood opwarmen 12
3.5 Roostercyclus annuleren 12
3.6 Vastzittend brood verwijderen 12
4. Onderhoud en reiniging 12
5. Opslag 13
6. Weggooien en recyclen 13
7. Symbolen 13
8. Disclaimer 14
1. INTRODUCTIE
Bedankt dat je hebt gekozen voor ons KitchenBrothers product! Volg altijd de
veiligheidsvoorschriften voor veilig gebruik.
1.1 Beoogd gebruik
Dit product wordt gebruikt om brood te roosteren en bepaalde soorten gebak op te
warmen.
De leverancier is vrijgesteld van aansprakelijkheid voor enig letsel of schade
veroorzaakt door het gebruik van het product buiten het beoogde gebruik ervan.
Elke wijziging van het product kan gevolgen hebben voor je veiligheid en garantie.
1.2 Productoverzicht
1. Sleuf
2. Verwarmingselement
3. Behuizing
4. Schuifhendel voor de sleuven
5. CANCEL: Knop voor annuleren/stoppen
6. REHEAT: Knop voor opwarmen
7. DEFROST: Knop voor ontdooien
8. Display
9. 1 – 6: Draaiknop met warmtestanden
10. Stroomkabel met stekker
11. Display: Warmtestand
12. Display: Resterende roostertijd
13. Kruimellade
1
2
3
4
5
REHEAT
CANCEL
DEFROST
6
0:53
1 2
8
11
3
12
4
7 6 5
9
10
13

Nederlands
6 7
1.3 Productspecicaties
Afmeting Product: 26,5 x 15,9 x 18,3 cm
Sleuf: 14 x 3,6 cm
Gewicht 1250 g
Kleur RVS
Materiaal Roestvrijstaal
Snoerlengte 75 cm
Veiligheidsklasse stekker 1
Vermogen 685 - 815W
Stroomverbruik 0.75kWh
Spanning 220 – 240V~
Frequentie 50/60Hz
Bedrijfstemperatuur -10 tot 50°C
Opslagtemperatuur -10 tot 50°C
Bedrijfsvochtigheid < 50%
Opslagvochtigheid < 50%
Max. capaciteit 2 sneetjes brood tegelijk
Warmtestanden 6 (roostertijd oplopend van 70 tot 220
seconden)
Functies 3 (ontdooien, opwarmen, annuleren)
Oververhittingsbeveiliging Nee
1.4 Overige eigenschappen
• Voorzien van een display dat de roosterstand en de roostertijd weergeeft.
• Met ‘self-centering’-functie: Het brood wordt automatisch in het midden
gecentreerd bij het naar beneden drukken van de schuifhendel.
• Met ‘high-lift’-functie: Als de schuifhendel omhoog gaat, kun je handmatig de
schuifhendel nog 1 cm extra omhoog drukken. Hierdoor zijn ook kleine sneetjes
brood uit het product te verwijderen zonder je vingers te verbranden.
• Met ‘anti-jam’-functie: Als brood klem komt te zitten waardoor het niet
automatisch omhoog kan worden geschoven, schakelt het product alsnog uit aan
het eind van het programma.
1.5 Inhoud verpakking
Controleer of de inhoud van het pakket overeenkomt met de pakbon wanneer je
de verzending ontvangt. Licht je leverancier in als er onderdelen ontbreken. Lijkt
het product beschadigd, dien dan onmiddellijk een klacht in bij de vervoerder en
geef de leverancier een gedetailleerde beschrijving van de schade. Bewaar de
beschadigde onderdelen en verpakking om je klacht te onderbouwen.
KitchenBrothers Broodrooster met display - RVS - 2 sleuven - Model KB4004 - EAN
8720195258988
1.6 Bgevoegde accessoires
• 1x Handleiding
2. VEILIGHEID
Let erop dat het verpakkingsmateriaal niet in handen komt van
kinderen. Zij kunnen erin stikken!
Lees voor gebruik de handleiding en de veiligheidsinformatie zorgvuldig
door. De leverancier is niet verantwoordelijk voor het niet opvolgen van de
veiligheidsinformatie over het gebruik en de omgang met het product of schade aan
eigendommen of persoonlijk letsel.
Neem altijd de volgende voorzorgsmaatregelen in acht wanneer je gebruik maakt
van ‘de Broodrooster met display’, hierna te noemen ‘het product’.
2.1 Algemeen
• Als dit de eerste keer is dat je het product gebruikt is het belangrijk om de
handleiding en instructies zorgvuldig door te nemen.
• Als het product niet goed functioneert, gevallen of beschadigd is, gebruik het
product dan niet en raadpleeg onze klantenservice.
• Controleer voor elk gebruik de onderdelen en accessoires op schade of slijtage
(barsten/breuken) die het functioneren negatief kunnen beïnvloeden en vervang
ze, als hiervan sprake is, door originele of door de fabrikant aanbevolen
onderdelen en accessoires.
• Gebruik geen accessoires die niet aangeboden worden door de leverancier. Deze
kunnen een gevaar vormen voor de gebruiker en het product beschadigen.
• Gebruik het product alleen voor de doeleinden aangegeven in deze handleiding.
• Haal het product niet uit elkaar, repareer en herstel het product niet. Dit kan
schade aan het product aanbrengen. Voor de eigen veiligheid mogen deze
onderdelen alleen vervangen worden door geautoriseerd onderhoudspersoneel.

Nederlands
8 9
Stuur het product altijd naar een servicecentrum voor reparaties om schade en
persoonlijk letsel te voorkomen.
• Let op de risico’s en consequenties die verbonden zijn aan verkeerd gebruik van
het product. Verkeerd gebruik van het product kan leiden tot persoonlijk letsel en
schade aan het product.
• Verwijder voor het eerste gebruik al het verpakkingsmateriaal en eventuele
stickers.
• Het product is alleen bedoeld voor huishoudelijk gebruik, en niet: in
personeelskeukens, in winkels, in kantoren en andere werkomgevingen, door
klanten in hotels, motels en andere residentiële omgevingen, in bed & breakfast-
omgevingen, op boerderijen etc.
• Houd het product uit de buurt van hitte, ruimtes waar de temperatuur relatief
hoog is en hittebronnen zoals ovens en kookapparatuur.
• Voor of tijdens het eerste gebruik kan er een lichte geur van het product
afkomen. Dit is normaal en de geur trekt na een tijdje vanzelf weg.
• Het product is alleen geschikt voor binnenshuis. Gebruik het product niet
buitenshuis. Dit kan leiden tot schade aan het product.
2.2 Personen
• Het product mag door kinderen van 8 jaar en ouder worden gebruikt, mits
ze goed worden begeleid en geïnformeerd zijn m.b.t. het veilig gebruik van
het product en de mogelijke gevaren hiervan begrijpen. Het reinigen en
onderhouden van het product mag niet door kinderen worden uitgevoerd,
behalve als ze ouder zijn dan 8 jaar en onder toezicht staan. Houd het product en
het snoer buiten het bereik van kinderen jonger dan 8 jaar.
• Het product mag gebruikt worden door mensen met een fysieke of mentale
beperking, mits ze goed worden begeleid en geïnformeerd zijn m.b.t. het veilig
gebruik van het product en de mogelijke gevaren hiervan begrijpen.
• Gebruik en bewaar het product en de netsnoer buiten het bereik van kleine
kinderen en huisdieren.
2.3 Gebruik
• Het product wordt heet als het aanstaat. Raak het product niet aan tijdens het
gebruik en houd je handen, gezicht, haar en kleren uit de buurt van het product
om brandwonden te voorkomen.
• Wacht totdat het product is afgekoeld voordat je het verplaatst, schoonmaakt en
opbergt.
• Dek het product niet af als het aanstaat. Dit kan tot brandgevaar, een elektrische
schok, persoonlijk letsel of schade aan het product leiden.
• Gebruik het product niet in een natte omgeving zoals in de buurt van een (was)
back gevuld met water.
• Maak het product niet nat en raak het niet aan met natte handen, dit kan een
schok of ander persoonlijk letsel veroorzaken.
• Laat het product niet vallen en stel het product niet bloot aan grote schokken.
• Plaats het product altijd op een effen, stabiel en niet ontvlambaar oppervlak.
• Plaats het product niet op plekken waar vaak schokken of trillingen voorkomen.
Dit kan leiden tot omvallen van en/of schade aan het product.
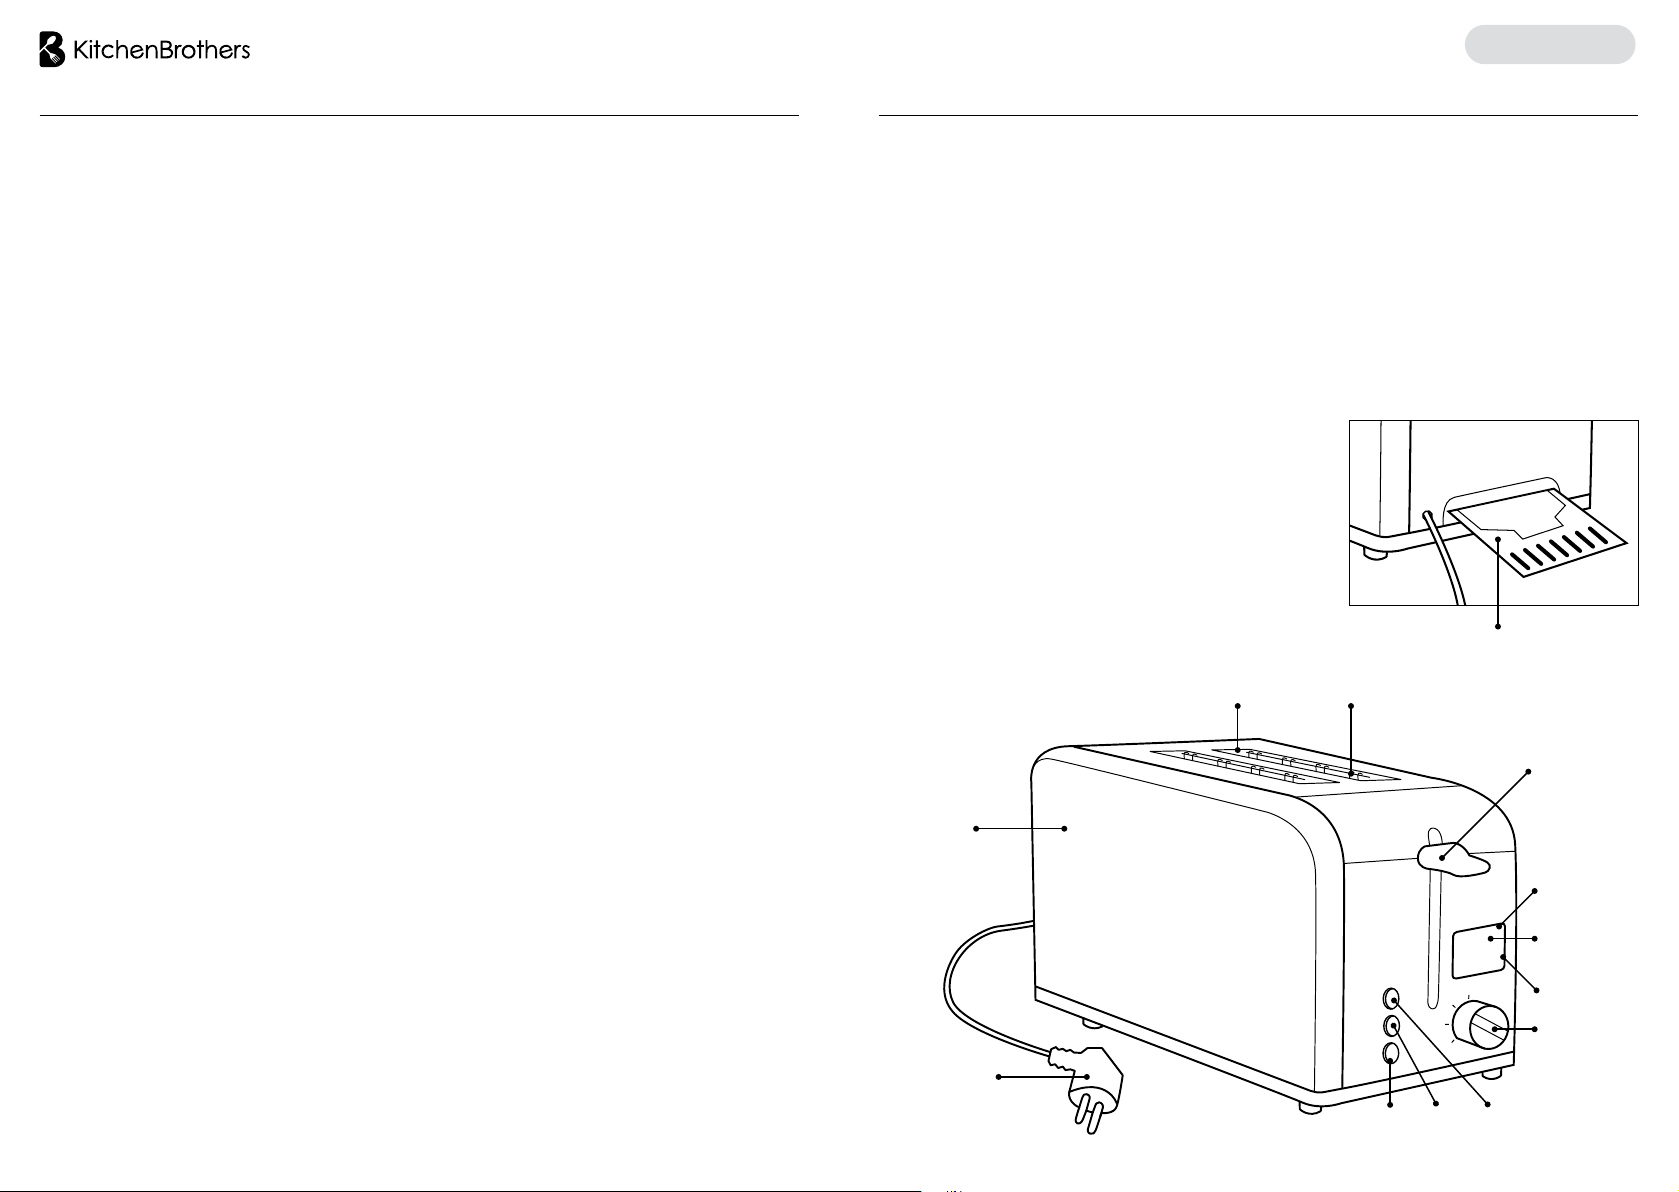
• Plaats altijd de kruimellade voordat je het product aanzet. Als je dit niet
doet komen er onnodig kruimels in het product, dit kan effect hebben op de
levensduur van het product.
• Gebruik het product alleen voor het roosteren van broodproducten.
• Gebruik het product alleen om brood van max. 12 x 12 cm en 1,4 cm dik te
roosteren.
• Plaats geen brood op het product terwijl het opwarmt.
• Zet het product niet aan als er geen brood in zit. Dit kan schade aan het product
veroorzaken.
• Doe geen belegd brood, brood met boter erop en geglazuurd of gevuld gebak in
het product. Dit kan schade aan het product veroorzaken.
• Doe geen gescheurde, gekrulde of misvormde sneetjes brood in het product,
anders kan het product vastlopen.
• Brood, gebak en koekjes kunnen bij oververhitting vlam vatten. Houd het product
tijdens het gebruik op een geschikte afstand van meubels, muren, planken,
gordijnen en andere voorwerpen.
• Zorg ervoor dat je de hitte-elementen niet beschadigt als je het brood verwijdert.
Gebruik geen metalen objecten of kookgerei om het brood te verwijderen of het
product schoon te maken.
• Het geroosterde brood kan heet worden, let op dat je je niet verbrandt als je het
uit het product haalt.
2.4 Elektra
• Het product mag maximaal 6 keer achter elkaar gebruikt worden. Hierna moet je
het product minimaal 5 minuten uitschakelen om het af te laten koelen voordat je
het weer gebruikt.
• Zorg ervoor dat de netspanning die op het type-aanduidingsplaatje staat
aangegeven, overeenkomt met die van je stroomnet, voor je het product aansluit.
• Laat het product niet in contact komen met water. Als er toch water in of op
het product komt, zet het product dan direct uit en neem contact op met onze
klantenservice.
• Verplaats het product niet door aan het snoer te trekken en draai het snoer niet.
• Haal de stekker van het product niet uit het stopcontact door aan de stroomkabel
te trekken. Dit kan brand of een elektrische schok veroorzaken.
• Komt er zwarte rook uit het product, haal de stekker dan onmiddellijk uit het
stopcontact. Wacht tot de rook weg is voordat je de inhoud van het product
verwijdert en neem contact op met onze klantenservice.
• Als de stroom tijdens het gebruik uitvalt, zet het product dan direct uit en haal de
stekker uit het stopcontact.

Nederlands
10 11
• Als het oppervlak van het product gebarsten is, zet dan het product uit om een
elektrische schok te voorkomen.
• Controleer zowel netsnoer als stekker regelmatig op tekenen van schade
of slijtage. Gebruik het product niet als je vermoedt dat de stroomkabel of
de stekker beschadigd zijn, om een elektrische schok te voorkomen. Een
beschadigde stroomkabel of stekker moeten gerepareerd of vervangen worden
door een professional (een geautoriseerde distributeur).
• Gebruik en bewaar het product zo dat de kabels niet beschadigd kunnen raken.
• Laat het product niet onbeheerd achter wanneer het in gebruik is. Haal de stekker
uit het stopcontact en zet het product uit wanneer je het product niet gebruikt en
voordat je het product schoonmaakt.
• Het product is niet geschikt om bediend te worden via een externe timer of een
afzonderlijke afstandsbediening.
• Steek nooit (metalen) voorwerpen in de sleuven van het product, je kunt
onderdelen raken die onder spanning staan. Dit kan brand en/of elektrische
schokken veroorzaken.
3. INSTRUCTIES VOOR GEBRUIK
Het product wordt heet als hij aan staat, raak de hete oppervlakken
niet aan. Let er op dat je je niet verbrandt als je het brood uit de
sleuven haalt.
3.1 Voor het eerste gebruik
1. Kies een geschikte locatie om het product te plaatsen:
• Vlak, hittebestendig en niet-brandbaar;
• Minstens 20 cm verwijderd van muren en/of de achterkant van je aanrecht;
• Minstens 30 cm verwijderd van kasten en/of rekken die boven het product kunnen
staan;
• Uit de buurt van brandbare materialen, zoals gordijnen en muurbekleding;
• Uit de buurt van een gasfornuisvlam of elektrisch element.
2. Zorg ervoor dat zich geen vreemde voorwerpen (bijv. verpakkingsmateriaal) in de
sleuven bevinden voordat je het product in gebruik neemt.
3. Reinig de buitenkant van het product met een vochtige doek.
4. Plaats de uitneembare kruimellade in de kruimelladegleuf.
5. Steek de stekker in het stopcontact. De sluifhendel zal niet vergrendelen als het
product niet op een stopcontact is aangesloten.
6. Duw de schuifhendel helemaal naar beneden tot deze vergrendelt.
7. Laat een roostercyclus doorlopen. Daarna springen de sleuven omhoog en het
product schakelt automatisch uit.
Let op: Doe geen brood in de broodrooster als je het product voor de eerste keer
gaat gebruiken! Tijdens het eerste gebruik worden de nieuwe warmte-elementen
voorverwarmd en wordt eventueel stof dat zich tijdens opslag of fabricage heeft
opgehoopt afgebrand. Het is normaal dat deze verbranding een geur veroorzaakt.
Na het eerste gebruik zal deze geur verdwijnen.
3.2 Brood roosteren
Het product mag maximaal 6 keer achter elkaar gebruikt worden.
Hierna moet je het product minimaal 5 minuten uitschakelen om het af
te laten koelen voordat je het weer gebruikt.
1. Haal de kruimellade eruit, maak deze schoon en zet hem terug.
2. Steek de stekker in het stopcontact.
3. Plaats het sneetje brood in een sleuf. Als je 2 sneetjes wil roosteren, moet je ieder
sneetje in één sleuf plaatsen.
4. Gebruik de draaiknop om de gewenste roosterstand te selecteren. Hoe hoger het
getal, hoe langer het brood wordt geroosterd en hoe bruiner het wordt: Stand 1
is licht en stand 6 is donker.
5. Druk de schuifhendel volledig omlaag.
6. Het lampje rond de annuleertoets gaat aan en de
verwarmingselementen worden warm. Op de display
verschijnt de gekozen stand (tussen 1 en 6) en de resterende
roostertijd in minuten en seconden.
7. Als het gekozen niveau is bereikt, springen de sleuven
omhoog en gaat de display uit. Het product schakelt
automatisch uit.
Welke stand moet je kiezen?
De keuze van de roosterstand hangt af van je eigen smaak maar ook van het type en
de versheid van het brood. Als indicatie kan je het volgende aanhouden:
• Lagere stand: Zoete broodproducten (wafels,
rozijnenbrood, etc.), dun brood, oud brood, wit brood.
• Hogere stand: Dik brood, vers brood, roggebrood.
3.3 Bevroren brood ontdooien
Deze functie past automatisch de roostertijd om eerst het
brood te ontdooien en dan pas te roosteren volgens het
gekozen niveau.
1. Volg de stappen 1 tot en met 5 van “3.2 Brood
roosteren”
Toaster
6
0:53
1
2
3
4
5
3
2:45
Toaster
Defrost
REHEAT
CANCEL
DEFROST

Nederlands
12 13
2. Druk gelijk op de knop ‘DEFROST’ (Ontdooien) nadat je de schuifhendel omlaag
hebt gedrukt.
3. Het licht van de knop ‘DEFROST’ gaat aan en de display toont het woord
‘Defrost’ en de resterende tijd.
3.4 Geroosterd brood opwarmen
Verwarm niet brood dat al is belegd met boter of iets anders.
Deze functie gebruikt automatisch de beste stand om
geroosterd brood opnieuw te verwarmen, ongeacht de
stand van de draaiknop.
1. Volg de stappen 1 tot en met 5 van “3.2 Brood
roosteren”
2. Druk gelijk op de knop ‘REHEAT’ (Opwarmen) nadat je
de schuifhendel omlaag hebt gedrukt.
3. Het licht van de knop ‘REHEAT gaat aan en de display
toont het woord ‘Reheat’ en de resterende tijd.
3.5 Roostercyclus annuleren
Druk op de knop ‘CANCEL’ (Annuleren) om het roostercyclus onmiddellijk te
stoppen. De sleuven springen omhoog en het indicatielicht gaat uit. Het product
schakelt automatisch uit.
3.6 Vastzittend brood verwderen
Probeer vastzittend brood nooit met scherp of puntig gereedschap te
verwijderen. Dit kan het product beschadigen en een elektrische
schok veroorzaken.
1. Haal de stekker uit het stopcontact.
2. Laat het product volledig afkoelen.
3. Verwijder het brood voorzichtig uit de sleuven. Je kunt het product omkeren en
zachtjes schudden om het samen met de kruimels eruit te krijgen.
4. ONDERHOUD EN REINIGING
Schakel het product altijd uit, haal de stekker uit het stopcontact en laat het product
volledig afkoelen voordat je het schoonmaakt.
• Kruimellade: Kruimels hopen zich op in de kruimellade als ze niet regelmatig
worden geleegd. Verwijder kruimels regelmatig, ze zijn onhygiënisch en kunnen
brand veroorzaken. Haal hiervoor de kruimellade uit en maak het leeg. Veeg het
af met een vochtige doek, droog het af en schuif het terug in het product.
• Binnenkant: Zorg ervoor dat de bovenkant en binnenkant van het product stofvrij
zijn voor gebruik. Probeer niet zelf de binnenkant te reinigen.
• Buitenkant: Neem de buitenkant van het product af met een vochtige doek en
een beetje afwasmiddel. Gebruik geen schurende schuurmiddelen, staalwol,
metaalschuurmiddel, hete schoonmaakmiddelen of ontsmettingsmiddelen,
omdat deze het product kunnen beschadigen. Maak het product niet nat en zet
geen delen in de vaatwasser. Het product moet volledig droog zijn voordat je het
weer gebruikt.
5. OPSLAG
• Bewaar het product op een schone en droge plek.
• Zorg ervoor dat het niet kan kantelen of vallen en dat geen andere voorwerpen er
op kunnen vallen.
• Bewaar het product niet in extreem hoge of lage temperaturen.
• Zorg ervoor dat er geen mechanische of elektrische schokken plaats kunnen
vinden.
• Bewaar het product buiten het bereik van jonge kinderen.
• Plaats geen harde of zware voorwerpen op het product of onderdelen ervan.
• Reinig het product voordat je het opbergt als je het langere tijd niet gebruikt.
• Wikkel het netsnoer om de snoeropbergruimte aan de onderkant van het
product.
6. WEGGOOIEN EN RECYCLEN
Denk aan het milieu en lever een bijdrage aan een schonere leefomgeving! Dit
product is onderworpen aan de Europese richtlijn (EU) 2012/19/EU. Gooi het product
aan het einde van zijn levensduur niet weg met het normale huisvuil, maar lever hem
in op een door de overheid aangewezen inzamelpunt om het te laten recyclen.
7. SYMBOLEN
Symbool Omschrijving
Lees en bewaar de handleiding!
Let op!
1
2
3
4
5
3
0:26
Toaster
Reheat
REHEAT
CANCEL
DEFROST

15
English
14
Recycle dit product.
AEEA-symbool: niet als ongesorteerd afval weggooien, maar
gescheiden inzamelen met het oog recycling.
Geschikt voor binnenshuis.
CE-markering: in overeenstemming met de Europese regelgeving.
BPA-vrij: Dit product is vrij van Bisfenol A.
Voedselveilig.
Veiligheidsklasse 1 stekker.
8. DISCLAIMER
Veranderingen onder voorbehoud; specicaties kunnen veranderen zonder opgaaf
van redenen.
EN – User manual
FOREWORD
About this document
This manual contains all the information for correct, efcient and safe use of the
product. Make sure you have fully read and understood the instructions in this
manual before installing or using the product. Keep this manual for future use.
Original Instructions
This manual was originally written in Dutch. All other languages are translations of
the original Dutch manual.
Service and warranty
If you need service or information regarding your product, please contact our
customer service at [email protected].
We provide a 2-year warranty on our products. Customer must be able to show proof
of purchase when claiming warranty. Product defects must be reported to us within
2 years from the date of purchase. Please note that the warranty does not apply: for
damage caused by improper use or repair; for parts subject to wear and tear; for
defects known to the customer at the time of purchase; for defects caused by the
customer’s own fault, for damage caused by third parties.

16 17
English
TABLE OF CONTENTS
1. Introduction 17
1.1 Intended use 17
1.2 Product overview 17
1.3 Product specications 18
1.4 Other features 18
1.5 Contents of package 19
1.6 Included accessories 19
2. Safety 19
2.1 General 19
2.2 Persons 20
2.3 Use 20
2.4 Electronics 21
3. Instructions for use 22
3.1 Before rst use 22
3.2 Toasting bread 22
3.3 Defrosting frozen bread 23
3.4 Reheating toasted bread 23
3.5 Cancelling the toasting cycle 24
3.6 Removing stuck bread 24
4. Maintenance and cleaning 24
5. Storage 24
6. Disposal and recycle 24
7. Symbols 25
8. Disclaimer 26
1. INTRODUCTION
Thank you for choosing our KitchenBrothers product! Please always follow the
instructions for safe usage.
1.1 Intended use
This product is used to toast bread and reheat certain types of pastries.
The supplier is released from liability for any injury or damage caused by using the
product beyond its intended use. Any modication of the product may affect your
safety and warranty.
1.2 Product overview
1. Slot
2. Heating element
3. Housing
4. Sliding lever for slots
5. CANCEL: Stop button
6. REHEAT: Button for heating
7. DEFROST: Button for defrosting
8. Display
9. 1 - 6: Rotary knob with heat settings
10. Power cable with plug
11. Display: Heat setting
12. Display: Remaining toasting time
13. Crumb tray
1
2
3
4
5
REHEAT
CANCEL
DEFROST
6
0:53
1 2
8
11
3
12
4
7 6 5
9
10
13

18 19
English
1.3 Product specications
Dimension Product: 26.5 x 15.9 x 18.3 cm
Slot: 14 x 3.6 cm
Weight 1250 g
Color Stainless steel
Material Stainless steel
Cord length 75 cm
Safety plug 1
Power 685 - 815W
Power consumption 0.75kWh
Voltage 220 - 240V~
Frequency 50/60Hz
Operating temperature -10 to 50°C
Storage temperature -10 to 50°C
Operating humidity < 50%
Storage humidity < 50%
Max. capacity 2 slices of bread
Heat modes 6 (toasting time from 70 to 220 seconds)
Functions 3 (defrost, reheat, cancel)
Overheating protection No
1.4 Other features
• Equipped with a display that shows the toasting level and time.
• With ‘self-centering’ function: The bread is automatically centered when pushing
down the sliding handle.
• With ‘high-lift’ function: When the slide lever goes up, you can manually push the
slide lever up an additional 1 cm. This makes it possible to remove even smaller
bread without burning your ngers.
• With “anti-jam” function: If bread gets stuck so that it cannot be pushed up
automatically, the product still switches off at the end of the selected setting.
1.5 Contents of package
When receiving your shipment, make sure that the contents are consistent with the
packing list. Notify your distributor of any missing items. If the equipment appears
to be damaged, le a claim immediately with the carrier and notify your distributor
at once, giving a detailed description of any damage. Save the damaged parts and
packing container to substantiate your claim.
KitchenBrothers Toaster with display - SS - 2 slots - Model KB4004 - EAN
8720195258988
1.6 Included accessories
• 1x User manual
2. SAFETY
Please ensure that the packaging is kept out of the reach of children!
Risk of suffocation!
Before use, read the manual and safety information carefully. The supplier is not
responsible for failure to follow the safety information on the use and handling of the
product or damage to property or personal injury.
Always observe the following precautions when using ‘the Toaster with display’,
hereinafter referred to as ‘the product’.
2.1 General
• If this is your rst time using the product, it is important to read the manual and
instructions carefully.
• If the product is not working properly, has been dropped or damaged, do not use
the product and contact our customer service.
• Before each use, inspect the parts and accessories for damage or wear (cracks/
breaks) that could impair function and if so, replace them with original parts and
accessories recommended by the manufacturer.
• Do not use accessories not offered by the supplier. They may pose a danger to
the user and damage the product.
• Use the product only for the purposes indicated in this manual.
• Do not disassemble or repair the product. This may damage the product. For your
own safety, these parts should only be replaced by authorized service personnel.
Always send the product to the service center for repairs to avoid damage and
personal injury.
• Be aware of the risks and consequences associated with incorrect use of the

20 21
English
product. Improper use of the product can lead to personal injury and damage to
the product.
• Before rst use, remove all packaging material and any stickers.
• The product is intended for household use only, and not: in staff kitchens, in
stores, in ofces and other work environments, by customers in hotels, motels and
other residential environments, in bed & breakfast environments, on farms etc.
• Keep the product away from heat, areas where the temperature is relatively high
and heat sources such as ovens and cooking equipment.
• When the product is rst used, there may be a distinct odor or slight smoke. This
is normal and will disappear after several uses.
• The product is suitable for indoor use only. Do not use the product outdoors.
Doing so may result in damage to the product.
2.2 Persons
• This product may be used by children aged 8 years and above if they are properly
supervised and informed about the safe use of the product and understand the
potential hazards involved. Cleaning and maintenance of the product should
not be carried out by children unless they are older than 8 years and supervised.
Keep the product and cord out of the reach of children under 8 years old.
• The product may be used by people with physical or mental disabilities, provided
they are properly supervised and informed about the safe use of the product and
understand the potential hazards involved.
• Use and store the product and the cable out of the reach of young children and
pets.
2.3 Use
• The product gets on when turned on. Do not touch the product when in use and
keep your hands, face, hair and clothes away from the product to avoid (burn)
wounds.
• Wait until the product has cooled down before moving it, cleaning it and storing
it.
• Do not cover the product when it is on. This could result in a re hazard, electric
shock, personal injury or damage to the product.
• Do not use the product near a wet environment such as a sink lled with water.
• Do not let the product get wet and do not touch it with wet hands, as this may
cause a shock or other personal injury.
• Do not drop the product or subject it to large shocks.
• Always place the product on a level, stable and non-ammable surface.
• Do not place the product in areas subject to frequent shock or vibration. This may
result in tipping over and/or damage to the product.
• Always insert the crumb tray before turning on the product. If you don’t do this,
crumbs get into the product unnecessarily, this can affect the life of the product.
• Use the product only for toasting bread products.
• Use the product only to toast bread of max. 12 x 12 cm and 1.4 cm thick.
• Do not place bread on the product while it is heating up.
• Do not turn on the product if there is no bread in it. This may cause damage to
the product.
• Do not put bread topped with butter or such and pastries glazed or lled with jam
in or on the product. This may cause damage to the product.
• Do not put torn, curled or misshapen slices of bread in the product, otherwise the
product may jam.
• Bread and pastries may catch re if overheated. During use, keep the product at a
suitable distance of furniture, walls, shelves, curtains and other objects.
• Be careful not to damage the heat elements when removing the bread. Do not
use metal objects or cooking utensils to remove the bread.
• The toasted bread and sandwiches can get really hot, be careful not to burn
yourself when removing them from the product.
2.4 Electronics
• The product may be used a maximum of 6 times in a row. After this, you need to
turn it off for at least 5 minutes to let it cool down before using it again.
• Before connecting the product, make sure that the mains voltage indicated on the
type rating plate corresponds to that of your mains supply.
• Do not let the product get in contact in water. If water does get inside or on
the product, turn the product off immediately and contact our customer service
department.
• Do not move the product by pulling or twisting the cord.
• Do not unplug the product by pulling on the power cord. This may cause re or
electric shock.
• If black smoke comes out of the product, unplug the power cord immediately.
Wait for the smoke to clear before removing the contents of the product and
contact our customer service.
• If the power fails during use, turn off the product immediately and unplug the
power cord.
• If the surface of the product is cracked, please turn off the product to avoid
electric shock.
• Periodically inspect both power cord and plug for signs of damage or wear. To
avoid electric shock, do not use the product if you suspect that the power cord or
plug is damaged. A damaged power cord or plug must be repaired or replaced
by a professional (an authorized distributor).
• Use and store the product so that the cables cannot be damaged.
• Do not leave the product unattended when in use. Unplug the product and turn
off the product when not in use and before cleaning the product.
• The product is not suitable for operation via an external timer or separate remote
control.
• Never insert (metal) objects into the slots of the product, you could hit electrical
elements. This may cause re and/or electric shock.

22 23
English
3. INSTRUCTIONS FOR USE
The product gets hot when it is on, do not touch the hot surfaces.
Be careful not to burn yourself when removing bread from the slots.
3.1 Before rst use
1. Choose a suitable location to place the product:
• A at, heat-resistant and non-ammable surface;
• At least 20 cm away from walls and/or the back of your countertop;
• At least 30 cm away from cabinets and/or shelves that may be above the product;
• Away from combustible materials, such as curtains and wall coverings;
• Away from any gas stove ame or electrical element.
2. Make sure no foreign objects (e.g. packaging material) are in the slots before
operating the product.
3. Clean the outside of the product with a damp cloth.
4. Place the removable crumb tray in the crumb tray slot.
5. Plug in the power cord. The sliding lever will not lock if the product is not
plugged in.
6. Push the sliding lever all the way down until it locks.
7. Run a toasting cycle. At the end of it, the slots will pop up and the product will
automatically turn off.
Note: Do not put bread in the toaster when using the product for the rst time.
During the rst use, the new heat elements are preheated and any dust accumulated
during storage or manufacturing is burned off. It is normal for this burning to cause
an odor. After the rst use, this odor will disappear.
3.2 Toasting bread
The product may be used a maximum of 6 times in a row. After this,
you need to turn it off for at least 5 minutes to let it cool down before
using it again.
1. Remove the crumb tray, clean it and put it back.
2. Plug in the power plug.
3. Place the slice of bread in a slot. If you want to toast 2 slices, place each slice in
one slot.
4. Use the rotating knob to select the desired toasting setting. The higher the
number, the longer the bread is toasted and the browner it gets: Position 1 is light
and position 6 is dark.
5. Push the sliding lever all the way down.
6. The light around the cancel button lights on and the heating
elements heat up. The display shows the heating position
and the toasting time left in minutes and seconds.
7. When the selected level is reached, the slots pop up and the
display goes out. The product turns off automatically.
Which setting should you choose?
The choice of the toasting setting depends on your own taste but also on the type
and freshness of the bread. As an indication, you can use the following:
• Lower setting: Sweet bread products (wafes, raisin bread, etc.), thin bread, old
bread, white bread.
• Higher setting: thick bread, fresh bread, rye bread.
3.3 Defrosting frozen bread
1. This feature automatically adjusts the toasting time to
rst defrost the bread and then toast it according to the
selected level.
2. Follow the steps 1 to 5 as explained in “3.2 Toasting
bread”.
3. Press the DEFROST button right after pushing the
sliding lever down.
4. The DEFROST button lights up and the display shows
the word ‘Defrost’ and the resting time.
3.4 Reheating toasted bread
Do not reheat bread if it is already topped with butter or anything
else.
1. This function automatically uses the best setting to
reheat toasted bread, regardless of the position of the
rotary knob.
2. Follow the steps 1 to 5 as explained in “3.2 Toasting
bread”.
3. Press the REHEAT button right after pushing the sliding
lever down.
4. The REHEAT button lights up and the display shows the
word ‘Defrost’ and the resting time.
Toaster
6
0:53
1
2
3
4
5
3
2:45
Toaster
Defrost
REHEAT
CANCEL
DEFROST
1
2
3
4
5
3
0:26
Toaster
Reheat
REHEAT
CANCEL
DEFROST

24 25
English
3.5 Cancelling the toasting cycle
Press the CANCEL button to stop the toasting cycle immediately. The slots jump up
and the indicator light goes out. The product switches off automatically.
3.6 Removing stuck bread
Never try to remove stuck bread with sharp or pointed tools. This
could damage the product and cause an electric shock.
1. Remove the plug from the power outlet.
2. Allow the product to cool completely.
3. Carefully remove the bread from the slots. You can turn the product over and
gently shake it to get it out along with the crumbs.
4. MAINTENANCE AND CLEANING
Turn off the product, unplug it and let it cool completely before cleaning.
• Crumb tray: Crumbs accumulate in the crumb tray if not emptied regularly.
Remove crumbs regularly; they are unsanitary and can cause a re. To do this,
remove the crumb tray and empty it. Wipe it with a damp cloth, dry it and slide it
back into the product.
• Inside of the product: Make sure the top and inside of the product are dust-free
before use. Do not try to clean the inside of the product yourself.
• Exterior of the product: Wipe the outside of the product with a damp cloth
and a little detergent. Do not use abrasive scourers, steel wool, metal abrasive,
hot cleaners or disinfectants as these may damage the product. Do not let the
product get wet and do not put any part of it in the dishwasher. The product must
be completely dry before using it again.
5. STORAGE
• Store the product in a clean and dry place.
• Make sure that it cannot tip or fall and that no other objects can fall on it.
• Do not store the product in extremely high or low temperatures.
• Do not allow mechanical or electrical shock to occur.
• Store the product out of the reach of young children.
• Do not place hard or heavy objects on the product or its parts.
• Clean the product before storing it when not using it for long periods of time.
• Wrap the power cord around the cord storage area on the bottom of the product.
6. DISPOSAL AND RECYCLE
Think about the environment and contribute to a cleaner living environment! This
product is subject to the European Directive (EU) 2012/19/EU. At the end of its
service life, do not dispose of the product with normal household waste, but deliver
it to a collection point designated by the authorities for recycling.
7. SYMBOLS
Symbol Description
Read and save the manual!
Caution!
Please recycle this product.
WEEE symbol: do not dispose of as unsorted waste, collect separately
for recycling.
Suitable for indoor use.
CE mark: in accordance with European regulations.
BPA-free: this product is free of Bisphenol A.
Food safe.
Safety class 1 plug.

27
Français
26
8. DISCLAIMER
Changes reserved; specications are subject to change without stating grounds for
doing so. FR – Manuel d’utilisation
AVANT-PROPOS
À propos de ce document
Ce manuel contient toutes les informations nécessaires à une utilisation correcte,
efcace et sûre du produit. Assurez-vous d’avoir bien lu et compris les instructions
de ce manuel avant d’installer ou d’utiliser le produit. Conservez ce manuel pour une
utilisation ultérieure.
Instructions originales
Ce manuel a été rédigé à l’origine en néerlandais. Toutes les autres langues sont des
traductions du manuel original en néerlandais.
Service et garantie
Si vous avez besoin d’un service ou d’une information concernant votre produit,
veuillez contacter notre service clientèle via service@kitchenbrothers.nl.
Nous offrons une garantie de 2 ans sur nos produits. Pour obtenir un service pendant
la période de garantie, le produit doit être retourné avec une preuve d’achat. Les
défauts du produit doivent être signalés dans un délai de deux ans à compter de la
date d’achat. Cette garantie ne couvre pas : les dommages causés par une mauvaise
utilisation ou une réparation incorrecte ; les pièces d’usure ; les défauts dont le client
avait connaissance au moment de l’achat ; les dommages ou défauts causés par la
négligence du client ; les dommages ou défauts causés par des tiers.

28 29
Français
TABLE DES MATIÈRES
1. Introduction 29
1.1 Utilisation prévue 29
1.2 Description du produit 29
1.3 Spécications du produit 30
1.4 Autres caractéristiques 30
1.5 Contenu de l’emballage 31
1.6 Accessoires inclus 31
2. Sécurité 31
2.1 Général 31
2.2 Personnes 32
2.3 Utilisation 32
2.4 Équipement électrique 33
3. Mode d’emploi 34
3.1 Avant la première utilisation 34
3.2 Griller du pain 35
3.3 Décongeler du pain congelé 35
3.4 Réchauffer du pain grillé 36
3.5 Annulation du cycle 36
3.6 Retirer le pain coincé 36
4. Entretien et nettoyage 36
5. Stockage 37
6. Élimination et recyclage 37
7. Symboles 37
8. Clause de non-responsabilité 38
1. INTRODUCTION
Merci d’avoir choisi ce produit KitchenBrothers ! Suivez toujours les instructions pour
une utilisation sûre.
1.1 Utilisation prévue
Cet appareil sert à griller du pain et à réchauffer certains produits de boulangerie.
Le fournisseur est dégagé de toute responsabilité en cas de blessures ou de
dommages causés par l’utilisation du produit au-delà de l’usage prévu. Toute
modication du produit peut affecter votre sécurité et la garantie.
1.2 Description du produit
1. Fente
2. Élément chauffant
3. Boîtier
4. Poignée coulissante pour les fentes
5. CANCEL : Bouton d’annulation/arrêt
6. REHEAT : Bouton de chauffage
7. DEFROST : Bouton de décongélation
8. Afchage
9. 1 - 6 : Roue de réglage du temps de chauffe
10. Câble d’alimentation avec che
11. Afchage : Niveau sélectionné
12. Afchage : Temps restant
13. Bac à miettes
1
2
3
4
5
REHEAT
CANCEL
DEFROST
6
0:53
1 2
8
11
3
12
4
7 6 5
9
10
13

30 31
Français
1.3 Spécications du produit
Dimensions Produit : 26,5 x 15,9 x 18,3 cm
Fente : 14 x 3,6 cm
Poids 1250 g
Couleur Acier inoxydable
Matériau Acier inoxydable
Longueur du cordon 75 cm
Prise de catégorie de sécurité 1
Puissance 685 - 815W
Consommation électrique 0.75kWh
Tension d’alimentation 220 - 240V~
Fréquence 50/60Hz
Température de fonctionnement -10 – 50°C
Température de stockage -10 – 50°C
Humidité de fonctionnement < 50 %
Humidité de stockage < 50 %
Capacité maximale 2 tranches de pain
Modes de chauffage 6 (de 70 s à 220 s)
Fonctions 3 (décongélation, réchauffage, annulation)
Protection contre la surchauffe Non
1.4 Autres caractéristiques
• Équipé d’un écran qui indique le niveau et la durée du programme.
• Avec fonction “auto-centrage” : le pain est automatiquement centré lorsque le
levier est poussé vers le bas.
• Avec fonction “highlift” : lorsque le levier coulissant est relevé, vous pouvez
pousser manuellement le levier vers le haut sur 1 cm supplémentaire. Cela
permet de retirer des tranches de pain plus petites sans se brûler les doigts.
• Avec fonction “anti-bourrage” : si le pain reste coincé et ne peut pas être poussé
automatiquement vers le haut, l’appareil s’éteint quand même à la n du cycle.
1.5 Contenu de l’emballage
Vériez que le contenu du colis correspond au bordereau d’expédition lorsque
vous recevez l’envoi. Informez votre fournisseur si des pièces sont manquantes. Si
le produit semble endommagé, déposez immédiatement une plainte auprès du
transporteur et donnez au fournisseur une description détaillée des dommages.
Conservez les pièces endommagées et l’emballage pour étayer votre plainte.
KitchenBrothers Grille-pain avec écran - Inox - 2 fentes - Modèle KB4004 - EAN
8720195258988
1.6 Accessoires inclus
• 1x Manuel d’utilisation
2. SÉCURITÉ
Veillez à ce que le matériel d’emballage ne tombe pas entre les mains
des enfants. Ils pourraient s’étouffer avec !
Avant toute utilisation, lisez attentivement le manuel et les informations de sécurité.
Le fournisseur n’est pas responsable du non-respect des consignes de sécurité
relatives à l’utilisation et à la manipulation de le produit, ni des dommages matériels
ou corporels.
Respectez toujours les précautions suivantes lors de l’utilisation du “ Grille-pain avec
écran “, ci-après dénommé “ le produit “.
2.1 Général
• Si c’est la première fois que vous utilisez ce produit, il est important que vous
lisiez attentivement le manuel d’utilisation et les instructions.
• Si le produit ne fonctionne pas correctement ou si l’appareil est tombé ou
endommagé, ne l’utilisez pas et consultez le service clientèle.
• Après chaque utilisation, contrôlez les pièces et les accessoires an de détecter
tout signe de dommage ou d’usure (ssures/cassures) susceptibles d’affecter le
fonctionnement du produit. En cas de dommage ou d’usure, remplacez-les par
des pièces ou des accessoires originaux ou recommandés par le fabricant.
• N’utilisez pas d’accessoires autres que ceux mis à disposition par le fournisseur. Ils
pourraient présenter un danger pour l’utilisateur et endommager le produit.
• Utilisez le produit uniquement aux ns indiquées dans ce manuel.
• Ne démontez pas le produit et ne le réparez pas vous-même. Cela risquerait
d’endommager le produit. Pour votre propre sécurité, ne faites remplacer les

32 33
Français
pièces que par un personnel de maintenance autorisé. Envoyez toujours le
produit à un service de réparation pour éviter tout dégât et blessure.
• Faites attention aux risques et aux conséquences liés à une mauvaise utilisation
du produit. Une utilisation non conforme peut entraîner des dommages corporels
et des dégâts à l’appareil ou aux produits qui y sont reliés.
• Avant la première utilisation, retirez tous les matériaux d’emballage et tous les
autocollants.
• Ce produit est conçu exclusivement pour un usage dans un environnement
domestique et n’est pas autorisé dans les situations suivantes : cuisine réservée
au personnel ; magasin ; bureau et environnement de travail ; espace clientèle
d’un hôtel, motel et autre environnement résidentiel ; fermes, etc.
• Conservez le produit à l’écart de la chaleur, des zones où la température est
relativement élevée et des sources de chaleur telles que les fours et appareils de
cuisson.
• Lors de la première utilisation du produit, il peut y avoir une odeur distincte ou
une légère fumée. Ceci est normal et disparaîtra après quelques utilisations.
• Le produit est adapté à un usage intérieur uniquement. N’utilisez pas le produit à
l’extérieur. Cela peut entraîner des dommages au produit.
2.2 Personnes
• Le produit peut être utilisé par des enfants âgés de 8 ans et plus, à condition
qu’ils soient correctement supervisés et instruits sur l’utilisation sûre du produit et
qu’ils comprennent ses dangers éventuels. Le nettoyage et l’entretien du produit
ne doivent pas être effectués par des enfants, sauf s’ils ont plus de 8 ans et sont
surveillés. Gardez le produit et le cordon hors de portée des enfants de moins de
8 ans.
• Le produit peut être utilisé par des personnes souffrant d’un handicap physique
ou mental, à condition qu’elles soient correctement supervisées et informées sur
l’utilisation sûre du produit et qu’elles comprennent ses dangers éventuels.
• Utilisez et stockez le produit et le câble électrique hors de portée des jeunes
enfants et des animaux.
2.3 Utilisation
• Le produit devient très chaud lorsqu’il est allumé. Ne touchez pas le produit
pendant l’utilisation et tenez vos mains, visage, cheveux et vêtement à l’écart du
produit pour éviter tout risque de brûlure et blessure.
• Laissez entièrement refroidir le produit avant de le déplacer, de le nettoyer ou de
le stocker.
• Ne couvrez pas le produit lorsqu’il est utilisé. Cela risquerait de provoquer un
incendie, une décharge électrique, des dommages corporels ou des dégâts à
l’appareil.
• N’utilisez pas le produit à proximité d’humidité, par exemple près d’un évier
rempli d’eau.
• Ne mouillez pas le produit et ne le touchez pas avec des mains mouillées, cela
risquerait de provoquer un choc électrique ou d’autres dommages et blessures.
• Ne laissez pas tomber le produit et ne le soumettez pas à des chocs importants.
• Placez toujours le produit sur une surface plane, stable et ininammable.
• Ne placez pas le produit dans des endroits soumis à des chocs ou à des vibrations
fréquentes. Cela peut entraîner le basculement et/ou l’endommagement du
produit.
• Insérez toujours le bac à miettes avant de mettre le produit en marche. Si vous ne
le faites pas, des miettes pénètrent inutilement dans le produit, ce qui peut nuire
à sa durée de vie.
• N’utilisez ce produit que pour griller des produits de boulangerie adaptés.
• N’utilisez le produit que pour griller des tranches de pain de 12 x 12 cm et de 1,4
cm d’épaisseur au maximum.
• Ne placez pas de pain sur le produit pendant qu’il chauffe.
• Ne mettez pas le produit en marche s’il n’y a pas de pain à l’intérieur. Cela
pourrait endommager le produit.
• Ne mettez pas de pain beurré ou de pâtisseries glacées ou fourrées dans
l’appareil, cela risquerait de l’endommager.
• Ne mettez pas de tranches de pain déchirées, pliées ou de formes inhabituelles
dans l’appareil, cela risquerait de le bloquer.
• Le pain, les gâteaux et les biscuits peuvent s’enammer en cas de surchauffe.
Pendant le fonctionnement, tenez le produit à une distance appropriée des
meubles, des murs, des étagères, des rideaux et d’autres objets.
• Veillez à ne pas endommager les éléments chauffants lorsque vous retirez le pain.
N’utilisez pas d’objets métalliques ou d’ustensiles de cuisine pour retirer le pain.
• Les tartines de pain peuvent être brûlantes une fois grillées. Veillez à ne pas vous
brûler lorsque vous les sortez du grille-pain.
2.4 Équipement électrique
• Le produit peut être utilisé au maximum 6 fois de suite. Éteignez-le ensuite
pendant au moins 5 minutes pour le laisser refroidir avant de l’utiliser à nouveau.
• Assurez-vous que la tension du réseau qui est indiquée sur l’image indication-
modèle, correspond à celle de votre réseau électrique avant que vous branchiez
le produit.
• Ne laissez pas le produit entrer au contact de l’eau. Si de l’eau pénètre à
l’intérieur ou sur le produit, éteignez-le immédiatement et contactez notre service
clientèle.
• Ne déplacez pas le produit en tirant sur le cordon ou en le tordant.
• Ne tirez pas sur le cordon d’alimentation pour débrancher la che de la prise
électrique. Cela peut provoquer un incendie ou une décharge électrique.
• Si la fumée noire émet du produit, retirez immédiatement la che de la prise
électrique. Attendez jusqu’à ce que la fumée disparaisse avant que vous retiriez le
contenu du produit et contactez notre service clientèle.

34 35
Français
• En cas de coupure d’électricité lors de l’utilisation, éteignez immédiatement le
produit et retirez le cordon d’alimentation de la prise électrique.
• Si la surface de ce produit est ssurée, éteignez-le an d’éviter tout choc
électrique.
• Contrôlez le cordon d’alimentation et la che régulièrement pour des signes de
dommages ou d’usure. N’utilisez pas le produit si vous suspectez que le cordon
d’alimentation ou la che sont endommagés pour éviter une décharge électrique.
Un cordon d’alimentation endommagé ou une che endommagée doivent être
remplacées par un professionnel (un distributeur autorisé).
• Utilisez et stockez le produit de manière à ce que les câbles ne puissent pas être
endommagés.
• Ne laissez pas le produit sans surveillance lorsqu’il est utilisé. Retirez la che de la
prise électrique et éteignez le produit si vous ne l’utilisez pas et avant que vous le
nettoyiez.
• Le produit n’est pas approprié pour être contrôlé par un minuteur externe ou une
télécommande séparée.
• N’insérez pas d’objets (métalliques) dans les fentes de ce produit, vous risqueriez
de toucher des pièces sous tension. Cela pourrait provoquer un incendie et/ou
une électrocution.
3. MODE D’EMPLOI
Le produit devient chaud lorsqu’il est en marche, ne touchez pas les
surfaces chaudes. Veillez à ne pas vous brûler lorsque vous retirez le
pain.
3.1 Avant la première utilisation
1. Choisissez un emplacement approprié pour placer l’appareil :
• une surface plane, résistant à la chaleur et incombustible ;
• à 20 cm minimum des murs et/ou de l’arrière du plan de travail ;
• à 30 cm minimum des armoires et/ou des étagères qui pourraient se trouver au-
dessus de l’appareil ;
• éloignée des matériaux inammables, tels que les rideaux et les revêtements
muraux ;
• éloignée des ammes d’une cuisinière à gaz ou d’un élément électrique.
2. Assurez-vous qu’il n’y a pas de corps étrangers (par exemple des matériaux
d’emballage) dans les fentes avant d’utiliser le produit.
3. Nettoyez l’extérieur de l’appareil avec un chiffon humide.
4. Placez le bac à miettes dans la fente prévue à cet effet.
5. Insérez la che dans la prise. Le levier coulissant ne se verrouillera pas si l’appareil
n’est pas branché.
6. Poussez le levier coulissant vers le bas jusqu’à ce qu’il s’enclenche.
7. L’appareil commence à chauffer. A la n du cycle, les fentes se relèvent et
l’appareil s’éteint automatiquement.
Remarque : ne mettez pas de pain dans le grille-pain lorsque vous utilisez l’appareil
pour la première fois. Lors de la première utilisation, les nouveaux éléments
chauffants sont préchauffés et la poussière accumulée pendant le stockage ou la
fabrication est brûlée. Il est normal que cette combustion provoque une odeur.
Après la première utilisation, cette odeur disparaîtra.
3.2 Griller du pain
Le produit peut être utilisé au maximum 6 fois de suite. Éteignez-le
ensuite pendant au moins 5 minutes pour le laisser refroidir avant de
l’utiliser à nouveau.
1. Retirez le bac à miettes, nettoyez-le et remettez-le en place.
2. Insérez la che dans la prise de courant.
3. Placez la tranche de pain dans une fente. Si vous souhaitez
griller 2 tranches, placez chaque tranche dans une fente.
4. Utilisez la molette pour sélectionner le réglage souhaité.
Plus le chiffre est élevé, plus le pain est grillé longtemps et
plus il sera sombre : la position 1 donne un résultat plutôt
clair et la position 6 un résultat plutôt foncé.
5. Poussez le levier coulissant vers le bas jusqu’à ce qu’il s’enclenche.
6. Le voyant autour de la touche d’annulation s’allume et l’appareil commence à
chauffer. L’écran afche le réglage choisi (entre 1 et 6) et le temps restant en
minutes et seconde.
7. Lorsque le temps est écoulé, les fentes se soulèvent et le témoin lumineux
s’éteint. L’appareil s’éteint automatiquement.
Quel réglage choisir ?
Le choix du niveau dépend de votre goût, mais aussi du type et de la fraîcheur du
pain. A titre indicatif, vous pouvez utiliser les éléments suivants :
• Réglage inférieur : produits de boulangerie sucrés (gaufres, pain aux raisins, etc.),
pain n, vieux pain, pain blanc.
• Réglage supérieur : pain épais, pain frais, pain de seigle.
3.3 Décongeler du pain congelé
1. Cette fonction ajuste automatiquement le temps an de décongeler d’abord le
pain et de le griller ensuite selon le niveau sélectionné.
Toaster
6
0:53

36 37
Français
2. Suivez les étapes 1 à 5 de la section “3.2 Griller du
pain”.
3. Appuyez sur la touche “DEFROST” immédiatement
après avoir enclenché le levier coulissant.
4. Le voyant de la touche “DEFROST” s’allume et l’écran
afche le mot “Defrost” et le temps restant.
3.4 Réchauer du pain grillé
1. Ne réchauffez pas du pain déjà recouvert de beurre.
2. Cette fonction utilise automatiquement le meilleur
réglage pour réchauffer du pain déjà grillé, quelle que
soit la position de la molette.
3. Suivez les étapes 1 à 5 de la section “3.2 Griller du
pain”.
4. Appuyez sur la touche “REHEAT” immédiatement après
avoir enclenché le levier coulissant.
5. Le voyant de la touche “REHEAT” s’allume et l’écran
afche le mot “Reheat” et le temps restant.
3.5 Annulation du cycle
Appuyez sur la touche “Annuler” (CANCEL) pour arrêter immédiatement le cycle de
chauffage. Les fentes se relèvent et le témoin lumineux s’éteint. L’appareil s’éteint
automatiquement.
3.6 Retirer le pain coincé
N’essayez jamais de retirer du pain coincé à l’aide d’outils pointus ou
tranchants. Cela risque d’abîmer le produit et de provoquer un choc
électrique.
1. Retirez la che de la prise murale.
2. Laissez l’appareil refroidir complètement.
3. Retirez délicatement le pain des fentes. Vous pouvez retourner l’appareil et le
secouer doucement pour le faire sortir avec les miettes.
4. ENTRETIEN ET NETTOYAGE
Éteignez l’appareil, débranchez-le et laissez-le refroidir complètement avant de le
nettoyer.
• Bac à miettes : les miettes s’accumulent dans le bac à miettes s’il n’est pas vidé
régulièrement. Enlevez régulièrement les miettes, elles ne sont pas hygiéniques
et pourraient prendre feu. Retirez le bac et videz-le. Essuyez-le avec un chiffon
humide, séchez-le et remettez-le en place dans l’appareil.
• Intérieur du produit : assurez-vous que le dessus et l’intérieur de l’appareil sont
dépoussiérés avant de l’utiliser. N’essayez pas de nettoyer vous-même l’intérieur
du produit.
• Extérieur du produit : essuyez l’extérieur du produit avec un chiffon humide
et un peu de détergent. N’utilisez pas de produits abrasifs, de laine d’acier,
d’abrasifs métalliques, de nettoyants chauds ou de désinfectants, car ils risquent
d’endommager le produit. Ne mouillez pas le produit et ne mettez aucune partie
au lave-vaisselle. Le produit doit être complètement sec avant d’être réutilisé.
5. STOCKAGE
• Stockez le produit dans un endroit propre et sec.
• Veillez à ce qu’il ne puisse pas basculer ou tomber et à ce qu’aucun autre objet
ne puisse tomber dessus.
• Ne stockez pas le produit à des températures extrêmement élevées ou basses.
• Veillez à ce qu’aucun choc mécanique ou électrique ne puisse se produire.
• Conservez le produit hors de portée des jeunes enfants.
• Ne placez pas d’objets durs ou lourds sur le produit ou ses pièces.
• Nettoyez le produit avant de le ranger si vous ne l’utilisez pas pendant une
longue période.
• Enroulez le cordon d’alimentation à l’endroit prévu à cet effet sous l’appareil.
6. ÉLIMINATION ET RECYCLAGE
Pensez à l’environnement et contribuez à un cadre de vie plus propre ! Ce produit
est soumis à la directive européenne (UE) 2012/19/EU. En n de vie, ne jetez pas
le produit avec les déchets ménagers normaux, mais déposez-le dans un point de
collecte désigné par les autorités pour le recyclage.
7. SYMBOLES
Symbol Description
Lisez et conservez le manuel !
Attention !
Veuillez recycler ce produit.
1
2
3
4
5
3
0:26
Toaster
Reheat
REHEAT
CANCEL
DEFROST
1
2
3
4
5
3
2:45
Toaster
Defrost
REHEAT
CANCEL
DEFROST

38
Symbole DEEE : ne pas jeter avec les déchets non triés, collecter
séparément pour le recyclage.
Convient pour une utilisation à l’intérieur.
Marque CE : conforme à la réglementation européenne.
Sans BPA : ce produit ne contient pas de bisphénol A.
Sécurité alimentaire.
Prise de classe de sécurité 1.
8. CLAUSE DE NON-RESPONSABILITÉ
Sous réserve de modications ; les spécications peuvent être modiées sans
justication.
Table of contents
Languages:
Other KitchenBrothers Toaster manuals