Knight Stratus Pro User manual

0901225 Rev: X6 (draft 10/09/20) Page 1 of 12
PRE-RELEASE COPY -- NOT FOR DISTRIBUTION
Stratus ProTM Electrostatic Sprayer
Instruction Manual

Page 2 of 12 0901225 Rev: X6 (draft 10/09/20)
PRE-RELEASE COPY -- NOT FOR DISTRIBUTION
TABLE OF CONTENTS
Important Safety Instructions................................................................................ 3
Grounding Instructions ......................................................................................... 3
General Safety...................................................................................................... 3
Introduction........................................................................................................... 4
Applications .......................................................................................................... 4
Specifications ....................................................................................................... 4
Requirements ....................................................................................................... 4
Additional Safety Precautions............................................................................... 5
Initial Setup........................................................................................................... 5
Operation........................................................................................................... 5-6
After Use .............................................................................................................. 7
Maintenance ......................................................................................................... 7
Troubleshooting.................................................................................................... 8
Replacement Parts ............................................................................................... 9
Component Diagrams.................................................................................... 10-11
Warranty Information .......................................................................................... 12
Knight Locations ................................................................................................. 12
SAVE THESE INSTRUCTIONS

0901225 Rev: X6 (draft 10/09/20) Page 3 of 12
PRE-RELEASE COPY -- NOT FOR DISTRIBUTION
WARNING: Do not touch the tip of the sprayer when in use.
CAUTION: Wear protective clothing and eyewear when dispensing chemicals or
other materials. Observe safety handling instructions (SDS) of chemical mfrs.
CAUTION: To avoid severe or fatal shock, always disconnect main power when
servicing the unit.
CAUTION: When installing any equipment, ensure that all national and local
safety, electrical, and plumbing codes are met.
IMPORTANT SAFETY INSTRUCTIONS
WARNING - When using the Stratus ProTM, basic precautions should always be followed, including the following:
(a) Read all the instructions in this manual before using the Stratus ProTM.
(b) To reduce the risk of injury, close supervision is necessary when the Stratus ProTM is used near children.
(c) Do not contact moving parts.
(d) Only use attachments recommended or sold by Knight.
(e) Do not use outdoors. For indoor commercial use only.
(f) The following shall be adhered to by the user:
-- To disconnect, turn all controls to the off ("O") position, then remove plug from outlet.
-- Do not unplug by pulling on cord. To unplug, grasp the plug, not the cord.
-- Unplug from outlet when not in use and before servicing or cleaning.
-- Do not operate the Stratus ProTM with a damaged cord or plug, or after the appliance malfunctions or is
dropped or damaged in any manner. Return the appliance to Knight for examination, repair, or electrical or
mechanical adjustment.
(g) To reduce the risk of electrical shock, do not put nozzle in water or other liquid. Do not place or store appliance
where it can fall or be pulled into a tub or sink.
(h) Connect to a properly grounded outlet only. See grounding instructions below.
(i) Do not use below garage floor or grade level.
GROUNDING INSTRUCTIONS
This appliance must be grounded. In the event of malfunction or breakdown, grounding provides a path of least
resistance for electric current to reduce the risk of electric shock. This appliance is equipped with a cord having an
equipment-grounding conductor and a grounding plug. The plug must be plugged into an appropriate outlet that is
properly installed and grounded in accordance with all local codes and ordinances.
DANGER – Improper connection of the equipment-grounding conductor can result in a risk of electric
shock. The conductor with insulation having an outer surface that is green with or without yellow stripes is
the equipment-grounding conductor. If repair or replacement of the cord or plug is necessary, do not
connect the equipment-grounding conductor to a live terminal. Check with a qualified electrician or
serviceman if the grounding instructions are not completely understood, or if in doubt as to whether the
appliance is properly grounded. Do not modify the plug provided with the appliance – if it will not fit the
outlet, have a proper outlet installed by a qualified electrician.
DANGER – A qualified electrician should be consulted if there is any doubt as to whether an outlet box is
properly grounded.
GENERAL SAFETY

Page 4 of 12 0901225 Rev: X6 (draft 10/09/20)
PRE-RELEASE COPY -- NOT FOR DISTRIBUTION
INTRODUCTION
Electrostatic spraying is a preferred method of application as the solution wraps around objects to surfaces out of the
direct line of spray. This assures better coverage even to uneven surfaces. Also, due to the droplets having the same
charge, the droplets repel each other rather than clumping together as they exit the spray nozzle. This assures an
even coating across surfaces to maximize coverage and contact.
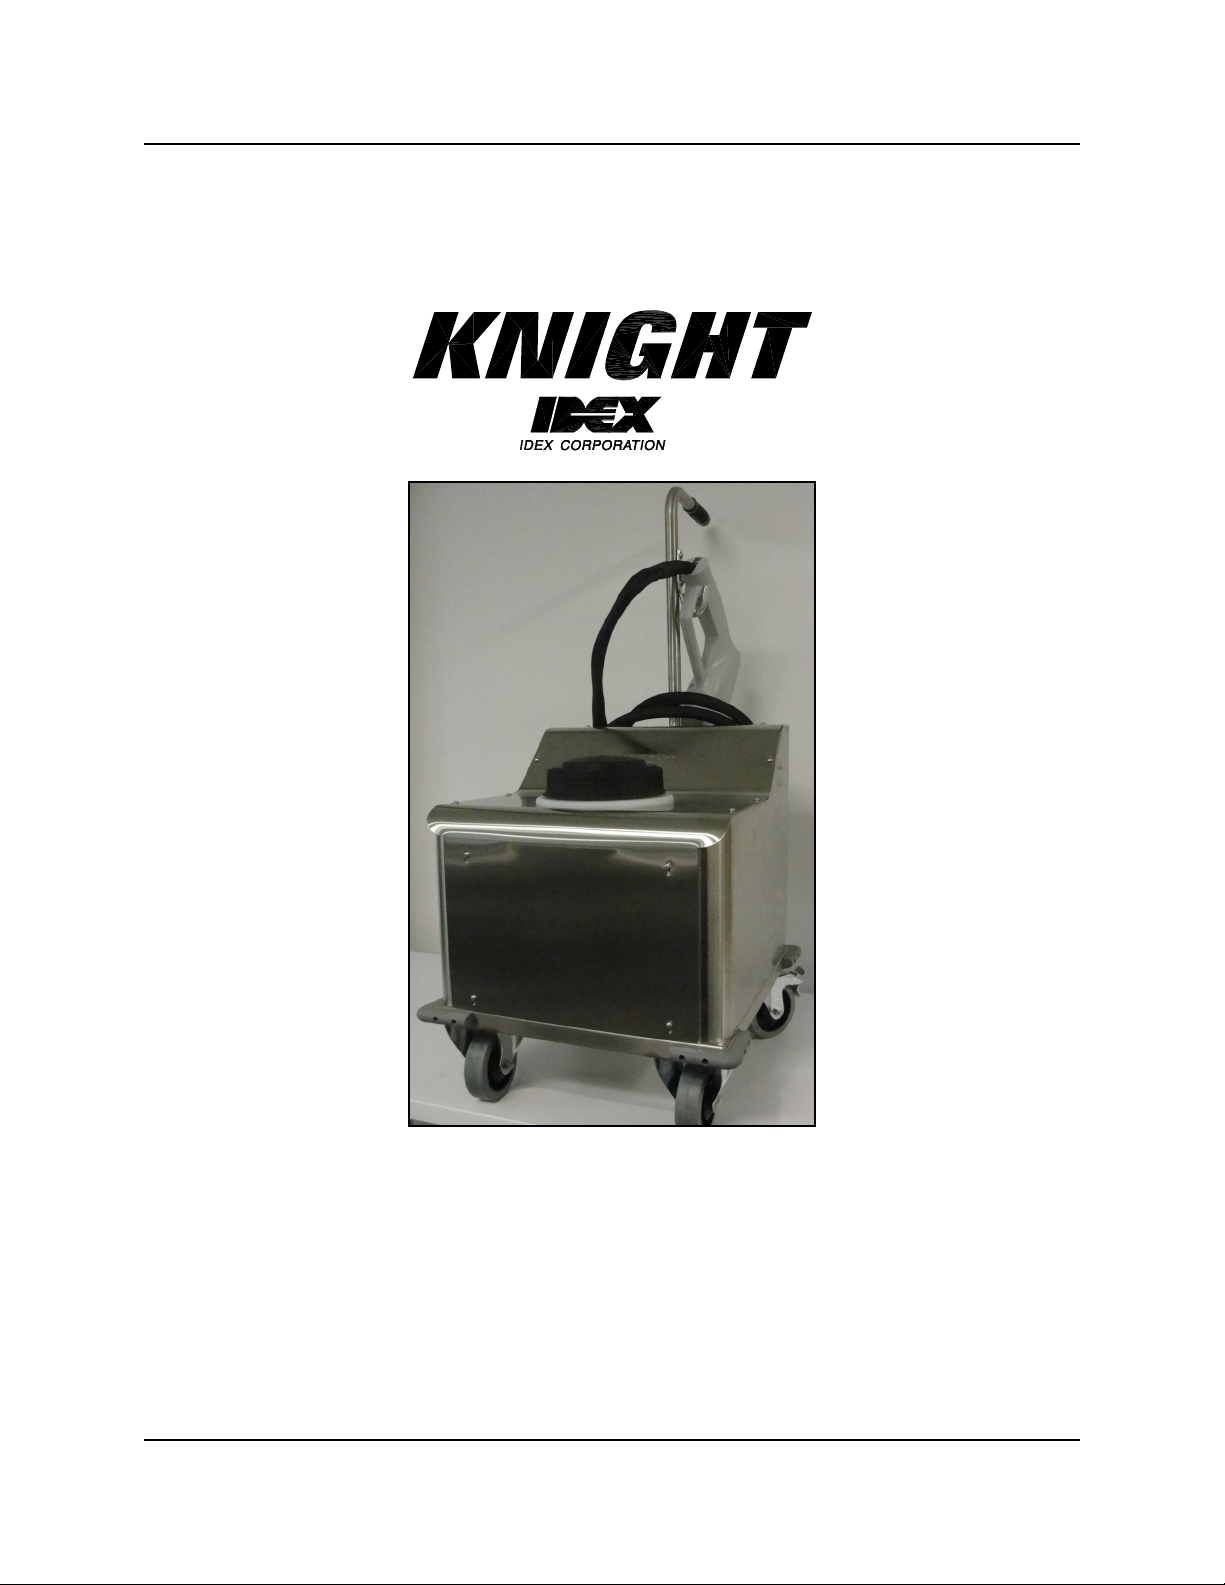
Knight’s Stratus ProTM is a rapid coverage spray system offering electrostatic spray as a feature that can be enabled
or disabled to comply with the requirements of the product you are using. The Stratus ProTM produces a spray mist
that evenly coats surfaces at a rapid pace allowing for quick, easy coverage of large surface areas.
APPLICATIONS
Healthcare: Bedrails, door handles, hallway railings, walkers, bathroom surfaces, chair surfaces, etc.
Schools: Desktops, chairs, door handles, lockers, restroom surfaces, water fountains, cafeteria tables, etc.
Fitness Centers: All equipment, doors, desk, restrooms, etc.
Airports: Chairs, scanners, desks, kiosks, restrooms, escalators/elevators etc.
Hotels: Door handles, lobby area, breakfast area, tables, remote controls, chairs, curtains, bathrooms, etc.
Veterinary Practice / Kennels: Cages, kennels, stables, crates, tables, etc.
SPECIFICATIONS
• Flow Rate: 4.0 oz/min (+/- 0.2 oz).
• Spray Distance: 3 – 5 feet (apex of cone).
• Spray Width: 1 – 2 feet.
• Droplet Size: 43.4 to 57.3 microns VMD (depending on distance from spray nozzle).
• Sprayer features electrostatic electrode at end of nozzle giving spray solution an electrical charge which will
encourage the spray to wrap around objects out of the direct spray path for better coverage.
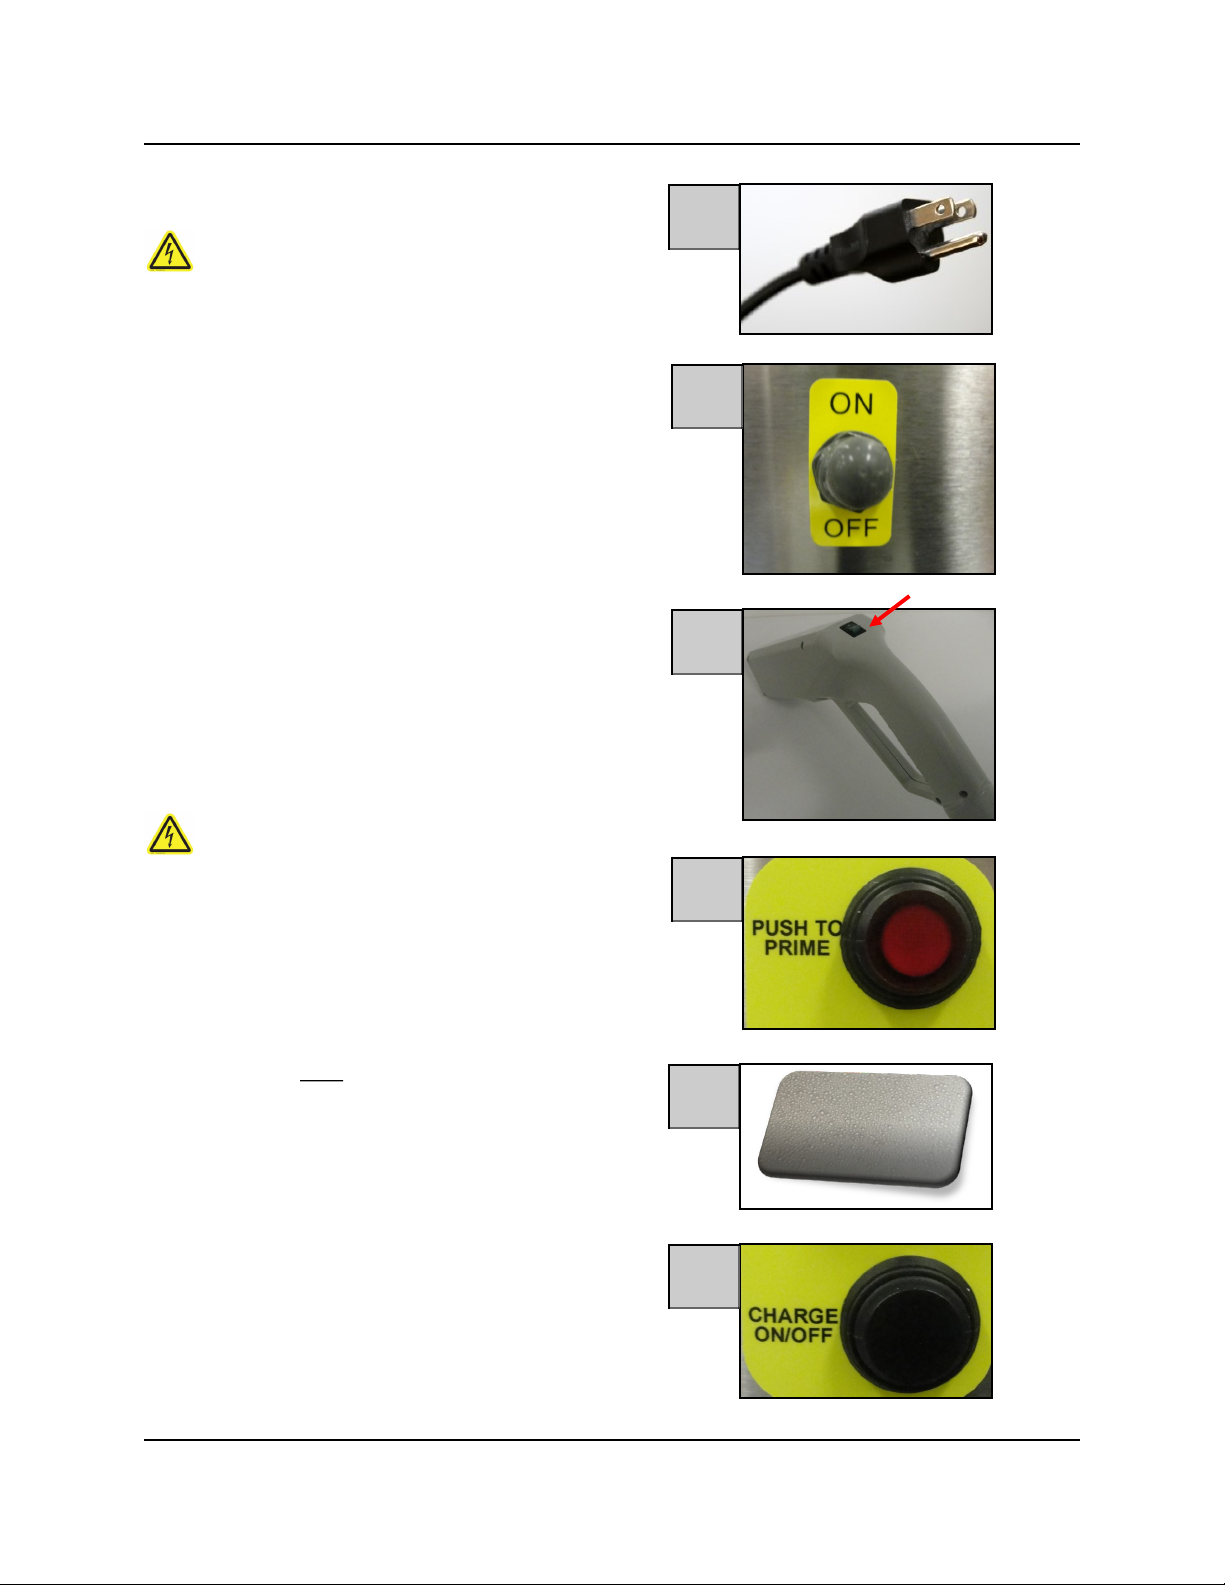
• Operating Air Pressure: 24 psi (+/- 3 psi).
• Available Spray Time: 90minutes (full tank).
• Hose: 10 feet. A reinforced outer hose containing within a separate air hose, electrical wires required for
electrostatic module and a chemical supply line running together (possibly wrapped together) to the sprayer.
• Electrical: 115 VAC (USA applications), 50 foot cord.
• Circuit breaker at back of unit for electrical feed (15A).
• Switch to disengage electrostatic feature yet allow sprayer to work otherwise.
• For indoor commercial use only.
• (Pending) The Knight Stratus ProTM meets Underwriters Laboratories published and nationally recognized
standards for safety.
REQUIREMENTS
• 115 VAC main power source.
• Chemical requirement: The Stratus ProTM is designed to use diluted chemical. The use of a proportioner is
recommended for easy, accurate dilution of concentrates. Follow all use directions and precautions on the product
label and SDS.

0901225 Rev: X6 (draft 10/09/20) Page 5 of 12
PRE-RELEASE COPY -- NOT FOR DISTRIBUTION
ADDITIONAL SAFETY PRECAUTIONS
• Read and understand the SDS sheets for the cleaning chemicals that will be used — consult your chemical
supplier if you have any questions.
• Always wear PPE. Safety goggles, cloth face mask and gloves are recommended. Refer to product label for
cautions and appropriate PPE.
• Follow recommended dilution, application instructions, and precautions listed on chemical product label used.
• Avoid contact of cleaning agents with skin and eyes. If contact occurs, refer to SDS sheet for proper attention.
• Do not use flammable chemicals with sprayer.
• Drain fluid contents from unit and flush out tank if using different types of chemicals from one operation to the next.
• Never point the spray nozzle at anyone.
• Never leave unit unattended while discharge hose is under pressure.
• Never spray directly into an uncovered electrical outlet or electrical panel.
• Avoid breathing direct spray mist.
INITIAL SETUP
The handle for the unit is provided in the shipping carton and
requires installation in the field before use.
(1) [Fig. A] Attach handle to the back of the cart with the two
screws and lock-washers provided.
(2) [Fig. B] The power cord is attached to a receptacle on the
back of the cart. Ensure that the cord is plugged in firmly to
the receptacle and did not get pulled loose during removal of
unit from the shipping carton.
OPERATION
(1) [Fig. C] Remove lid to solution tank and fill with diluted
chemical — consult your product label or chemical supplier
for proper dilutions. Solution tank holds 2.8 gallons — Do
not overfill tank.
(2) Move cart to the desired work area. Press down the brake
lever on both rear casters to secure cart in place. Press the
brake release on the casters when ready to move cart.
CAUTION: Do not move the cart by pulling on the sprayer
hose or the power cord. Do not lift the unit or pull it up a
staircase by the handle.
Figure
B
Figure
C
Figure
A

Page 6 of 12 0901225 Rev: X6 (draft 10/09/20)
PRE-RELEASE COPY -- NOT FOR DISTRIBUTION
Figure
H
Figure
D
(3) [Fig. D] Plug power cord into a suitable power source.
WARNING: See page 2 for important safety
instructions and proper grounding practices.
(4) [Fig. E] Turn main power switch on base unit ON.
(5) [Fig. F & G] Press green rocker switch on spray
nozzle to the ON position, then hold down PRIME
button for about 25 seconds to prime the fluid pump.
If the spray pattern is choppy or uneven, continue
priming for about 10 seconds longer until the spray
begins to flow smoothly.
NOTE: Point the spray nozzle into an open area while
priming to avoid wetting an unintended surface.
WARNING: Do not touch the tip of the sprayer
when in use.
(6) [Fig. H] Point nozzle toward surface to be sprayed
and slowly move nozzle in a back and forth motion
until the surface is satisfactorily covered with an even
coating. Use a clean cloth to wipe excess chemical
deposits that may buildup on the sprayer gun due to
blowback during operation.
NOTE: For complete wrapping coverage of the
sprayed solution, press the CHARGE button on the
back panel to the ON position [Fig I]. Unit can be
operated with charge feature off if wrapping is not
needed, for example a large flat surface.
(7) [Fig. F] Turn sprayer off by pressing rocker switch on
spray nozzle to OFF position.
Figure
G
Figure
E
Figure
F
Figure
I

0901225 Rev: X6 (draft 10/09/20) Page 7 of 12
PRE-RELEASE COPY -- NOT FOR DISTRIBUTION
MAINTENANCE
• Periodically check the electric pump for leaks or evidence of wear/breakdown.
• Periodically check the hose connections to main unit and to nozzle to assure they are tight.
• Clean and/or replace air filter on air compressor annually.
• Check filter strainer inside tank and clean off any debris as needed.
AFTER-USE
(1) [Fig. J] Empty tank by opening the drain valve at rear
of unit to allow contents to exit tank into an
appropriate drain.
(2) Rinse the tank with fresh water thoroughly while drain
valve remains open.
(3) [Fig. J] Close drain valve and add enough water to fill
approximately 1 inch within the tank.
(4) Plug electrical cord into a nearby outlet. Turn main
power on. Point gun nozzle into the open tank and
press and hold the Prime button as a stream of water
will flow through nozzle and into tank flushing any
contents from the internal components and lines
leading to nozzle gun. Repeat step 1 to empty tank.
(5) [Fig. K] Wrap the power cord around the holder on the
back of the cart for transporting to a different location.
CAUTION: Do not move the cart by pulling on the
sprayer hose or the power cord. Do not lift the unit or
pull it up a staircase by the handle.
(6) [Fig. L] Hang the sprayer on the hook provided on the
handle.
Figure
J
Figure
K
Figure
L

Page 8 of 12 0901225 Rev: X6 (draft 10/09/20)
PRE-RELEASE COPY -- NOT FOR DISTRIBUTION
TROUBLESHOOTING
Problem Solution
(1) Unit will not operate. Check breaker reset switch on base unit.
Check for loose wire connections.
Check for blockage on pump discharge line.
Check power source to ensure it is live.
(2) Unit will not spray. Make sure there is product in the solution tank.
Check air filter on compressor for blockage.
Replace if necessary.
Check if air compressor is operational.
Check for air leaks between compressor and
nozzle.
(3) Pump cycles but no liquid is discharged. Check to see if pump is primed.
Suction line leak.
Pump fittings loose or broken.
Remove pump head. Flush with water and re-
assemble.
Clogged filter strainer in tank.

0901225 Rev: X6 (draft 10/09/20) Page 9 of 12
PRE-RELEASE COPY -- NOT FOR DISTRIBUTION
REPLACEMENT PARTS
Part Number Description Qty
2000839 Power cord 1
9600987 Power switch boot 1
1800632 Bumpers 4
7649345 Front casters 2
7649344 Rear casters (lockable) 2
7455106 Cart handle 1
1901174 Hand grip (for handle) 1
7455006-1Spray nozzle 1
0600885 Nozzle checkvalves 2
0800382 Nylon braided tubing Various
7020165 Hose clamps Various
1601064 Air compressor 1
1600136-01 EDP pump 1
1600807 EDP elbow fittings 2
2000841 Cooling fan 1
7455011 DIN rail assembly 1
7455001 Spray gun assy 1
9600854 3-way solenoid 1
1800993 Tank/cap 1

Page 10 of 12 0901225 Rev: X6 (draft 10/09/20)
PRE-RELEASE COPY -- NOT FOR DISTRIBUTION
MOBILE CART & SPRAYER
1.) SOLUTION PRIME SWITCH
2.) ELECTROSTATIC ON/OFF
3.) CIRCUIT BREAKER
4.) MAIN POWER SWITCH
5) ELECTRIC DIAPHRAGM PUMP
6.) SOLUTION TANK
7.) FILTER—AIR COMPRESSOR
8.) AIR COMPRESSOR
9.) DRAIN VALVE
10.) ON/OFF SWITCH—NOZZLE
4
2
1
3
5
6
7
8
9
10

0901225 Rev: X6 (draft 10/09/20) Page 11 of 12
PRE-RELEASE COPY -- NOT FOR DISTRIBUTION
CART & HANDLE
1.) CART
2.) HANDLE
3.) LOCKABLE CASTERS
• Shipping weight: 110 lbs (49.9 kg)
• Weight with full tank: TBD
1
2
3

Page 12 of 12 0901225 Rev: X6 (draft 10/09/20)
PRE-RELEASE COPY -- NOT FOR DISTRIBUTION
DISCLAIMER
Knight LLC does not accept responsibility for the mishandling, misuse, or non-performance of the described items
when used for purposes other than those specified in the instructions. For hazardous materials information consult
label, MSDS, or Knight LLC. Knight products are not for use in potentially explosive environments. Any use of our
equipment in such an environment is at the risk of the user, Knight does not accept any liability in such
circumstances.
WARRANTY
All Knight controls and pump systems are warranted against defects in material and workmanship for a period of
ONE year. All electronic control boards have a TWO year warranty. Warranty applies only to the replacement or
repair of such parts when returned to factory with a Knight Return Authorization (KRA) number, freight prepaid, and
found to be defective upon factory authorized inspection. Bearings and pump seals or rubber and synthetic rubber
parts such as “O” rings, diaphragms, squeeze tubing, and gaskets are considered expendable and are not covered
under warranty. Warranty does not cover liability resulting from performance of this equipment nor the labor to
replace this equipment. Product abuse or misuse voids warranty.
FOOTNOTE
The information and specifications included in this publication were in effect at the time of approval for printing. Knight
LLC reserves the right, however, to discontinue or change specifications or design at any time without notice and
without incurring any obligation whatsoever.
KNIGHT LLC,
A Unit of IDEX Corporation (www.knightequip.com)
Knight Headquarters
Tel: 949.595.4800
Fax: 949.595.4801
USA Toll Free
Tel: 800.854.3764
Fax: 800.752.9518
Knight Canada
Tel: 905.542.2333
Fax: 905.542.1536
Table of contents
Popular Paint Sprayer manuals by other brands

SMK
SMK C100WO Operator's safety and service manual

Boyens Backservice
Boyens Backservice Jelly Mini Boy Digital Airmix instruction manual

Cima
Cima BLITZ 45T Instructions for use and maintenance

Draper
Draper CGS instructions

Graco
Graco HYDRA-MASTIC 206-718 Instructions-parts list

Fast
Fast AG SOLUTIONS 973PT owner's manual