manuals.online logo
Brands
  1. Home
  2. •
  3. Brands
  4. •
  5. Knowledge
  6. •
  7. Accessories
  8. •
  9. Knowledge ADC-VDB750 User manual

Knowledge ADC-VDB750 User manual

Alarm.com Video Doorbell (ADC-VDB750) - Installation Guide
Pre-installation checklist
• ADC-VDB750 with included accessories
• Wired doorbell transformer (recommended 16VAC 10VA) or power supply (minimum 15VDC 8W); specifications are
often written directly on the power source
• Wi-Fi (2.4 or 5 GHz) connection to broadband Internet (Cable, DS , or Fiber Optic)
• A computer, tablet, or smartphone with Wi-Fi is required if the router does not have the Wi-Fi Protected Setup
(WPS) feature
• (Optional) Wired compatible mechanical or digital chime
• (Optional) ADC-VDB750 Power Module (sold separately as ADC-VDBA-PM-750; only required if wired to a digital
chime)
• (Optional) ADC-VDB750 Backplate Adapter (sold separately as ADC-VDBA-750-BPA; can be used if replacing a
Slim ine Doorbell Camera and it is preferred to not reconnect the wiring)
• (Optional) ADC-VDB750 Wedge Mount Kit (sold separately as ADC-VDBA-750-WMK; can be used to optimize the
captured field of view)
https://answers.alarm.com/Partner/Installation_and_Troubleshooting/Video_Devices/Alarm.com_Video_Doorbell_(ADC-VDB7…
Updated: Thu, 08 Jun 2023 16:11:26 GMT
1
In the box
• ADC-VDB750 video doorbell
• ADC-VDB750 wallplate (with pre-assembled set screw and wire terminal screws)
• Wall anchors (x2) & ST3.5 x 22mm screws (x2)
• Installation card with scannable QR code
https://answers.alarm.com/Partner/Installation_and_Troubleshooting/Video_Devices/Alarm.com_Video_Doorbell_(ADC-VDB7…
Updated: Thu, 08 Jun 2023 16:11:26 GMT
2
• A resistor for mechanical chime installations, if needed
Install the ADC-VDB750
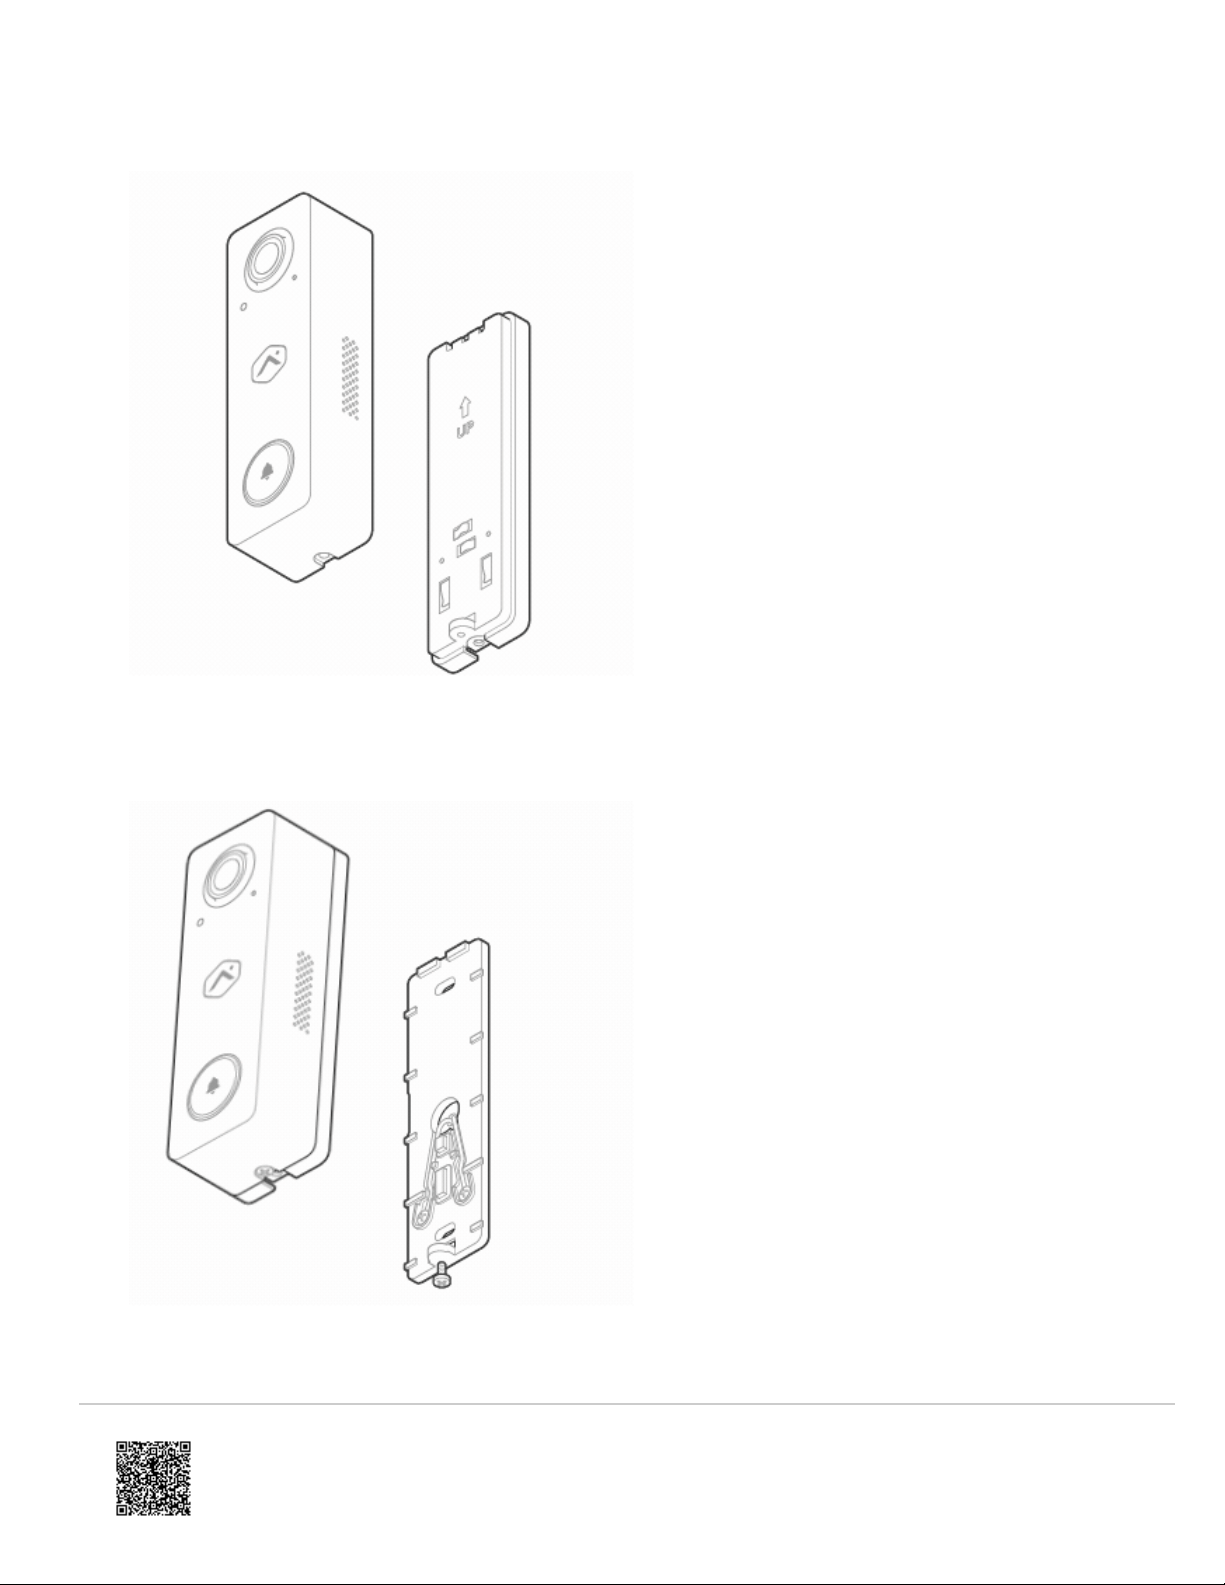
Physical installation (New install or standard video doorbell replacement)
Note: If replacing an existing Slim ine (I/II) Doorbell Camera, see Physical installation (Slim ine I/II
replacement) below for an alternative (optional) physical installation process that requires the ADC-VDB750 Backplate
Adapter (sold separately as ADC-VDBA-750-BPA).
1. Turn off power to the doorbell circuit (transformer). The recommended transformer rating is 16VAC 10VA.
2. Remove any existing power module from the in-home chime (from previous ADC-VDB770 installations with
mechanical or digital chimes or from Slim ine installations with a digital chime).
3. Verify that the chime wire terminals are connected to one wire run from the transformer and one wire run from the
doorbell.
◦ If the in-home chime is digital (rather than mechanical), connect the ADC-VDB750 Power Module (sold
separately as ADC-VDBA-PM-750) to the chime by connecting one wire to each of the terminals (leaving the
existing wires in place, polarity does not matter).
◦ If there is no wired in-home chime, verify that the power source (AC or DC) meets the product requirements,
and wire directly (polarity does not matter) to the ADC-VDB750 (no in-line resistor is required).
Important: The Power Module should not be used with mechanical chimes. If a mechanical chime is humming
or ringing unexpectedly after the ADC-VDB750 is installed, the included resistor should be used. To install,
connect one wire lead of the resistor to each of the chime terminals, leaving the existing wires in
https://answers.alarm.com/Partner/Installation_and_Troubleshooting/Video_Devices/Alarm.com_Video_Doorbell_(ADC-VDB7…
Updated: Thu, 08 Jun 2023 16:11:26 GMT
3
place. Polarity does not matter.
4. Remove the existing doorbell from the wall and disconnect the wires. Secure the wires so that they can be
connected in a later step.
5. If using an optional wedge, thread the wires at the doorbell through the center of the wedge and mount the wedge
to the surface with the provided screws/anchors.
https://answers.alarm.com/Partner/Installation_and_Troubleshooting/Video_Devices/Alarm.com_Video_Doorbell_(ADC-VDB7…
Updated: Thu, 08 Jun 2023 16:11:26 GMT
4
6. Thread doorbell wires through wallplate, making sure to thread wires underneath plastic bridges of wallplate
leading to screw terminals, and secure to wallplate screw terminals.
Important: Minimize the length of excess wire leads protruding from the area surrounding the screw
terminals. Excess wire can interfere with the assembly to the ADC-VDB750 and may result in the device not
powering on.
https://answers.alarm.com/Partner/Installation_and_Troubleshooting/Video_Devices/Alarm.com_Video_Doorbell_(ADC-VDB7…
Updated: Thu, 08 Jun 2023 16:11:26 GMT
5
7. Determine whether to secure the wallplate to the optional wedge or mount it directly to the surface.
◦ If using an optional wedge, secure the wallplate to the mounted wedge using the two machine screws
provided with the Wedge Mount Kit.
◦ If not using an optional wedge, mount the wallplate to the surface with the provided screws/anchors.
https://answers.alarm.com/Partner/Installation_and_Troubleshooting/Video_Devices/Alarm.com_Video_Doorbell_(ADC-VDB7…
Updated: Thu, 08 Jun 2023 16:11:26 GMT
6
8. Connect ADC-VDB750 device to wallplate by first securing/latching the top edge, then pushing the device into the
wallplate, and lastly securing the bottom set screw with a screwdriver.
9. Restore power to the doorbell circuit (transformer).
Physical installation (Slim Line I/II replacement)
Note: This optional procedure is optimized for easy replacement of Slim ine (I/II) models with an ADC-VDB750 using
the original Slim ine wallplate and ADC-VDB750 Backplate Adapter (ADC-VDBA-750-BPA), eliminating the need to
rewire.
The use of optional wedges is not supported with this method.
If wedges are required, the wallplate will need to be replaced, and the ADC-VDB750 Backplate Adapter accessory
should not be used.
1. Turn off power to the doorbell circuit (transformer). The recommended transformer rating is 16VAC, 10VA.
2. If the Slim ine Doorbell camera is wired to a digital chime, remove the existing Skybell Digital Doorbell Adapter.
Connect the ADC-VDB750 Power Module (sold separately as ADC-VDBA-PM-750) to the digital chime by
connecting one wire to each of the terminals, leaving the existing wires in place. Polarity does not matter.
https://answers.alarm.com/Partner/Installation_and_Troubleshooting/Video_Devices/Alarm.com_Video_Doorbell_(ADC-VDB7…
Updated: Thu, 08 Jun 2023 16:11:26 GMT
7
If there is no wired in-home chime, verify that the power source (AC or DC) meets the product requirements, and
wire directly (polarity does not matter) to the ADC-VDB750 (no in-line resistor is required).
Important: The Power Module should not be used with mechanical chimes. If a mechanical chime is humming or
ringing unexpectedly after the ADC-VDB750 is installed, the included resistor should be used. To install, connect
one wire lead of the resistor to each of the chime terminals, leaving the existing wires in place. Polarity does not
matter.
https://answers.alarm.com/Partner/Installation_and_Troubleshooting/Video_Devices/Alarm.com_Video_Doorbell_(ADC-VDB7…
Updated: Thu, 08 Jun 2023 16:11:26 GMT
8
3. Remove existing Slim ine Doorbell Camera from existing wallplate by loosening the bottom set screw.
4. Keep the wallplate installed, verifying that the wiring is connected well to the two screw terminals and ensuring that
the bottom set screw is loosened sufficiently to not be protruding at all above the threads at the bottom of the
wallplate.
5. Secure the ADC-VDB750 device to the ADC-VDB750 Backplate Adapter and secure at the bottom of the adapter
https://answers.alarm.com/Partner/Installation_and_Troubleshooting/Video_Devices/Alarm.com_Video_Doorbell_(ADC-VDB7…
Updated: Thu, 08 Jun 2023 16:11:26 GMT
9
with the provided set screw.
6. Connect the Mounting Adapter (with ADC-VDB750 device attached) to the existing Slim ine wallplate by latching
the top edge, then pushing the device into the wallplate, and then securing the original bottom set screw.
7. Restore power to the doorbell circuit (transformer).
https://answers.alarm.com/Partner/Installation_and_Troubleshooting/Video_Devices/Alarm.com_Video_Doorbell_(ADC-VDB7…
Updated: Thu, 08 Jun 2023 16:11:26 GMT
10
Connect the ADC-VDB750 to the network
AP Mode (recommended)
1. Verify that device boots (flashing red ED) to AP mode (flashing white ED). If the ED is not white after two
minutes, hold down the doorbell button and release when the ED begins to blink white (about 35 seconds).
2. On an Internet-enabled device, connect to the Wi-Fi network ADC-VDB750 (XX:XX:XX) where XX:XX:XX is the
last six characters of the ADC-VDB750’s MAC address, which is located on the device or on the packaging.
3. On the same device, open a web browser and enter http://vdb750install.com or 192.168.1.1 in the UR field.
Follow the on-screen instructions to add the ADC-VDB750 to the Wi-Fi network. The ED may briefly turn red
before blinking green. The ED will be solid green when the connection is complete.
4. Add the device to the account by either selecting the account in the MobileTech app or by using a web browser
and entering the following UR : www.alarm.com/addcamera (you will need the customer user name and
password).
5. Select the device from the video device list or enter its MAC address to begin adding. The MAC address is located
on the device or on the packaging.
6. Follow the on-screen instructions to finish adding the device.
WPS Mode
1. Verify that device boots (flashing red ED) to AP mode (flashing white ED). Hold down the doorbell button and
release when the ED begins to blink blue (about 30 seconds).
2. Activate WPS mode on the router. The device will begin to connect to the Wi-Fi network. The ED will be solid
green when the connection is complete.
3. Add the device to the account by either selecting the account in the MobileTech app or by using a web browser
and entering the following UR : www.alarm.com/addcamera (you will need the customer user name and
password).
4. Select the device from the video device list or enter its MAC address to begin adding. The MAC address is located
on the device or on the packaging.
5. Follow the on-screen instructions to finish adding the device.
Customer - Customer app installation wizard
1. og into the Customer app. You will need the username and password of the account to log in.
2. Tap Add Device. If you do not see the Add Device option, please use the instructions above to complete your
installation.
3. Tap Doorbell Camera.
4. Tap ADC-VDB750.
5. Follow the on-screen instructions.
https://answers.alarm.com/Partner/Installation_and_Troubleshooting/Video_Devices/Alarm.com_Video_Doorbell_(ADC-VDB7…
Updated: Thu, 08 Jun 2023 16:11:26 GMT
11
Service provider technician - MobileTech app installation
1. og into the MobileTech app.
2. Find the customer account.
3. Tap Quick Actions.
4. Tap Add Device.
5. Tap Video.
6. Follow the on-screen instructions.
LED reference guide
LED pattern Description
Off
Power off
Blinking yellow
Camera power cycling (press and hold button for 40-45
seconds)
Solid red
No local or Internet connection
Blinking red
Power on, camera booting
Alternating red and green
Camera resetting to factory default (press and hold
button for 45-50 seconds)
https://answers.alarm.com/Partner/Installation_and_Troubleshooting/Video_Devices/Alarm.com_Video_Doorbell_(ADC-VDB7…
Updated: Thu, 08 Jun 2023 16:11:26 GMT
12
LED pattern Description
Solid green
Connected to Alarm.com
Blinking green
ocal network connection
Blinking blue
WPS mode (press and hold button for 30-35 seconds)
Blinking white
Wi-Fi Access Point mode (press and hold button for
35-40 seconds)
Alternating blue and green
Firmware update
Notices
Product installation height should be less than 2 m (6’ 7”) from floor level and in a vertical orientation.
Operating temperature:
-49° to 120°F (-45° to 50°C)
Ingress Protection: IP65
https://answers.alarm.com/Partner/Installation_and_Troubleshooting/Video_Devices/Alarm.com_Video_Doorbell_(ADC-VDB7…
Updated: Thu, 08 Jun 2023 16:11:26 GMT
13
FCC statements
Any changes or modifications not expressly approved by the party responsible for compliance could void the user’s
authority to operate this equipment. This device complies with part 15 of the FCC Rules. Operation is subject to the
following two conditions:
1. This device may not cause harmful interference, and
2. This device must accept any interference received, including interference that may cause undesired operation.
ISED statements
This device contains licence-exempt transmitter(s)/ receiver(s) that comply with Innovation, Science and Economic
Development Canada’s licence-exempt RSS(s). Operation is subject to the following two conditions:
1. This device may not cause interference.
2. This device must accept any interference, including interference that may cause undesired operation of the device.
This equipment complies with FCC and ISED radiation exposure limits set forth for an uncontrolled environment. This
equipment should be installed and operated with a minimum distance of 20cm between the equipment and your body.
This device and its antenna(s) must not be co-located or operating in conjunction with any other antenna or transmitter.
Cet appareil contient des émetteurs ou récepteurs exempts de licence qui sont conformes aux RSS exempts de licence
du Sciences et du Développement économique Canada. e fonctionnement de l’équipement dépend de deux conditions
:
1. Cet appareil ne doit pas provoquer d’interférence.
2. Cet appareil doit accepter toute interférence, y compris celles qui pourraient provoquer un fonctionnement
indésirable de l’appareil.
Cet appareil est conforme aux limites d’exposition aux radiofréquences établies par la FCC et l’ISED pour un
environnement non contrôlé. Cet appareil doit être installé et utilisé à une distance minimale de 20 centimètres entre
l’appareil et votre corps. Cet appareil et son ou ses antennes ne doivent pas être situés ou fonctionner en conjonction
avec une autre antenne ou un autre émetteur.
EU Declaration of Conformity statement
Hereby, Alarm.com Incorporated declares that the radio equipment type ADC-VDB750 is in compliance with Directive
2014/53/EU. The full text of the EU declaration of conformity is available at the following internet address:
https://www.alarm.com/about/international/eu-red
https://answers.alarm.com/Partner/Installation_and_Troubleshooting/Video_Devices/Alarm.com_Video_Doorbell_(ADC-VDB7…
Updated: Thu, 08 Jun 2023 16:11:26 GMT
14

Popular Accessories manuals by other brands

Parallax 555-27401 manual

Parallax

Parallax 555-27401 manual

SUTO S452 Instruction and operation manual

SUTO

SUTO S452 Instruction and operation manual

Dometic 3316736.000 Installation & operating instructions

Dometic

Dometic 3316736.000 Installation & operating instructions

ipf electronic ON430570 manual

ipf electronic

ipf electronic ON430570 manual

Stadler Form TINA operating instructions

Stadler Form

Stadler Form TINA operating instructions

Invacare 1038599 Assembly, installation and operating instructions

Invacare

Invacare 1038599 Assembly, installation and operating instructions

Grundfos LiqTec Installation and operating instructions

Grundfos

Grundfos LiqTec Installation and operating instructions

MKS HPS 903 Series Operation and maintenance manual

MKS

MKS HPS 903 Series Operation and maintenance manual

Digigram UAX220 user manual

Digigram

Digigram UAX220 user manual

Aranet 4 manual

Aranet

Aranet 4 manual

Schick WiFi Battery Replacement

Schick

Schick WiFi Battery Replacement

Zamel exta MCR-01 user manual

Zamel

Zamel exta MCR-01 user manual

Nuaire Group CO2RM installation guide

Nuaire Group

Nuaire Group CO2RM installation guide

THORLABS DET02AFC operating manual

THORLABS

THORLABS DET02AFC operating manual

Texecom PRESTIGE HD installation instructions

Texecom

Texecom PRESTIGE HD installation instructions

Numark DJio Quick start manual

Numark

Numark DJio Quick start manual

myfox TA 4004 user guide

myfox

myfox TA 4004 user guide

cimuka PRODI CT Series user manual

cimuka

cimuka PRODI CT Series user manual

manuals.online logo
manuals.online logoBrands
  • About & Mission
  • Contact us
  • Privacy Policy
  • Terms and Conditions

Copyright 2025 Manuals.Online. All Rights Reserved.