KOCASO M752 User manual

I
Catalogue
Catalogue......................................................................................................................................... I
Use tips...........................................................................................................................................III
Cleaning equipment......................................................................................................................III
1.Outlook description......................................................................................................................1
2. Power button usage.....................................................................................................................2
3. Touch screen................................................................................................................................2
4. Transfer connection....................................................................................................................2
U Disk.......................................................................................................................................2
5. TF card Usage .............................................................................................................................3
Support 32GB memory card..................................................................................................3
Cancel TF Card.......................................................................................................................3
6. Start to use...................................................................................................................................3
Battery charging......................................................................................................................3
Battery management...............................................................................................................3
Set-up .......................................................................................................................................4
Wi-Fi network setting.............................................................................................................4
3G settings................................................................................................................................4
7. Desktop.........................................................................................................................................6
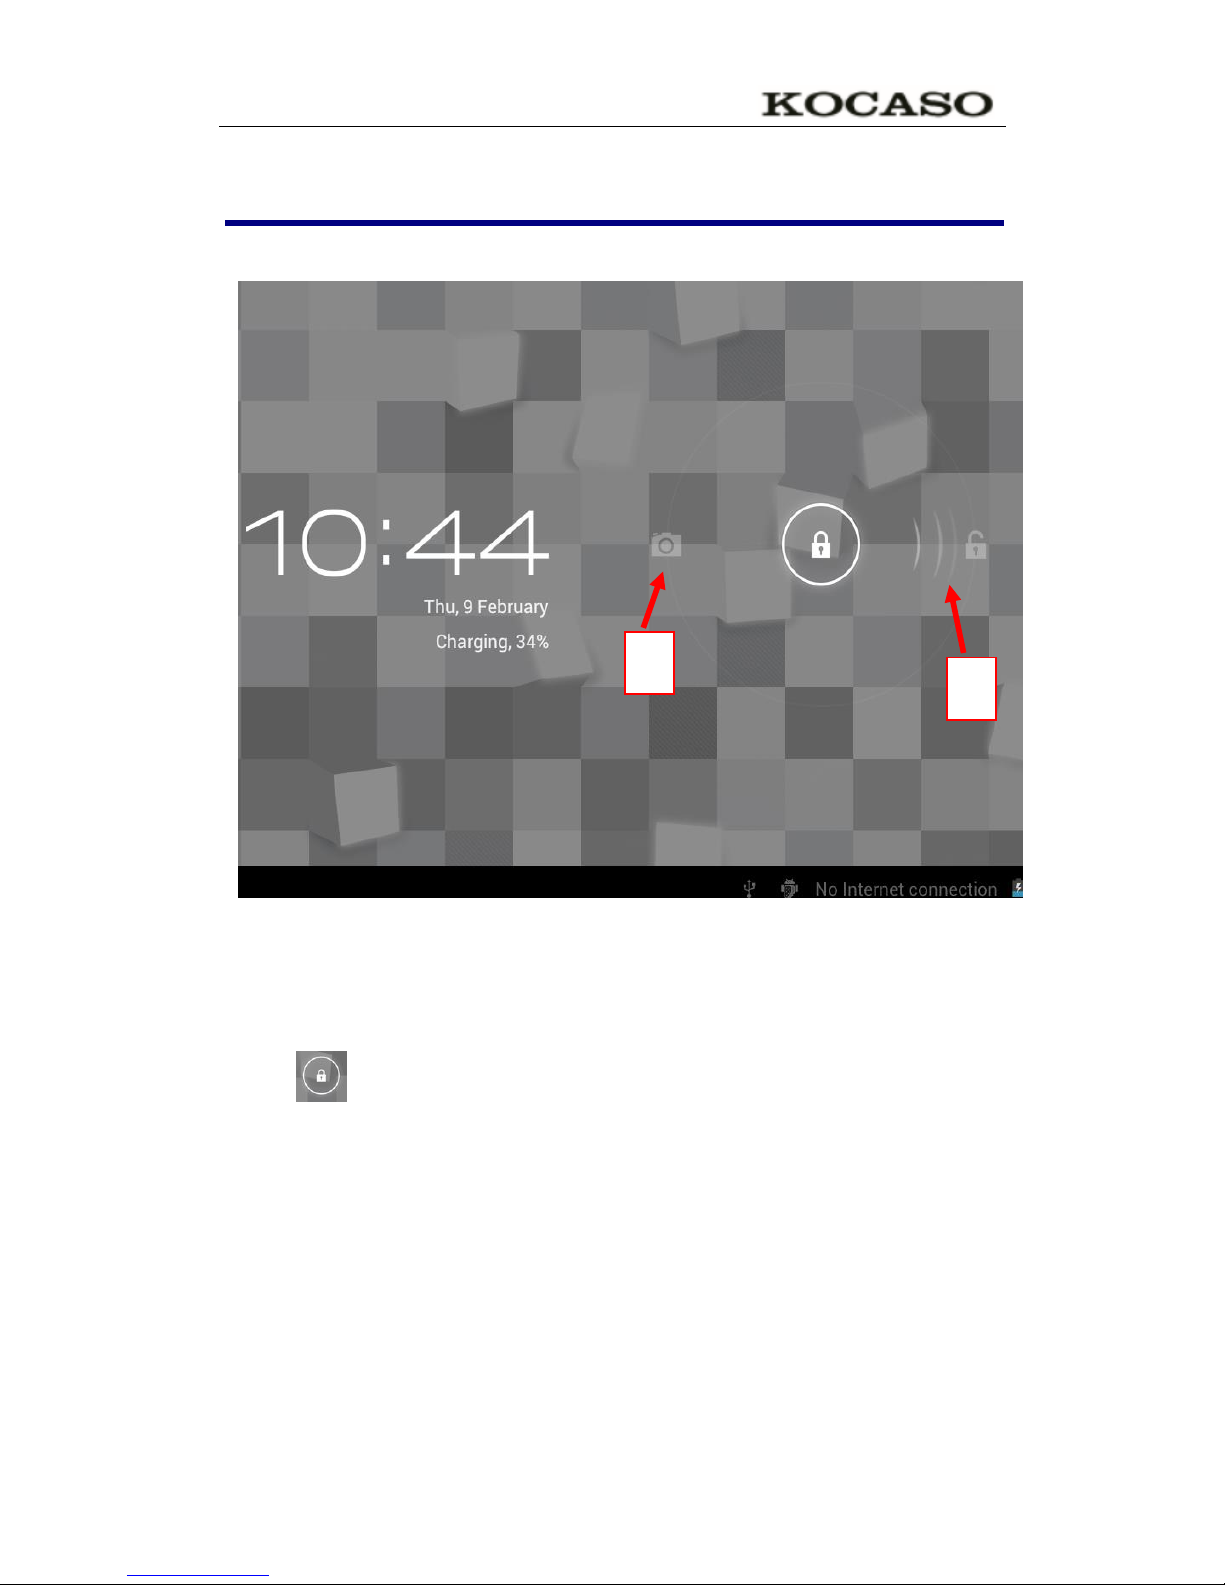
8. Screen lock interface...................................................................................................................7
9. Program.......................................................................................................................................8
10. Menu.........................................................................................................................................10
11. Application program...............................................................................................................10
Install applications................................................................................................................10
Download applications from Internet .................................................................................10
Connect to PC and save files................................................................................................11
Uninstall application.............................................................................................................11
12. Sound record ...........................................................................................................................12
13. Clock.........................................................................................................................................12
Alarm clock............................................................................................................................12
Add new alarm clock ............................................................................................................13
Disable alarm clock...............................................................................................................13
Enable Alarm clock...............................................................................................................13
Edit alarm clock....................................................................................................................13
Delete alarm clock.................................................................................................................13
14. Download applications and install.........................................................................................14
15. Browser....................................................................................................................................14
16. Calendar...................................................................................................................................15
New activities.........................................................................................................................15
17. Camera.....................................................................................................................................15

II
Take photos............................................................................................................................15
Video recording.....................................................................................................................16
18. Calculator ................................................................................................................................16
19. E-mail.......................................................................................................................................16
Add E-mail account ..............................................................................................................16
Inbox.......................................................................................................................................17
Open E-mail...........................................................................................................................17
Compose New E-mail............................................................................................................17
Edit E-mail account ..............................................................................................................17
Delete E-mail Account..........................................................................................................18
Sets the default email account..............................................................................................18
20. File explorer.............................................................................................................................18
Copy files from computer to tablet PC................................................................................19
Delete files..............................................................................................................................19
21. Music........................................................................................................................................20
Play music..............................................................................................................................20
Delete pictures and Dynamic switching wallpaper Settings..............................................21
25. Local search.............................................................................................................................22
26. Android market.......................................................................................................................22
27. Setting.......................................................................................................................................23
AppendixⅠFrequently Asked Questions..................................................................................26
AppendixⅡ3G support list ........................................................................................................28

III
Use tips
When using your equipment please obey the following basic security matters
need attention in order to reduce fire, electric shock and risk of injury.
●Don't let the product itself get wet in the rain or become damp.
●Please keep device away from direct sunlight and heat objects.
●Protect power cable. When connect the power cable, please don't let it be
stepped on or above placed items, avoid to be extrusion. Pay special attention to
protection of equipment connector.
●Please use the original power adapter for charging, using other charger will
cause damage
●Don't dismantle the equipment or repair yourself.
Cleaning equipment
Touch the screen gently. To clean the fingerprint or dust on the screen, it is
better to use such as camera use soft cloth but not gauze to clear the dust.

1
1.Outlook description

2
2. Power button usage
Starting up:Long press the power button for 3 seconds.
Power off:Long press the power button for 3 seconds →click power
off →click confirms.
Screen off and on:Short press power button to turn off or turn on
screen
Mandatory shutdown: If the device has no response, long press the
power button for 6 seconds to perform mandatory power off.
Notice: In case of no necessary conditions, it’s better not use
mandatory power off. Power off should be performed normally
according to the standard steps.
Reset button: Press “reset” button to restart the equipment.
3. Touch screen
According to following user guide, and know how to use touch screen.
Click: Click an optional icon on screen as your choice.
Longer press: chose one icon and press longer, can drag then show
the icon on desktop menu.
Dragging: Icons can be put into different screen interfaces by
dragging the icon between different screen interfaces.
☆To protect the screen, please don’t put any objects above the screen
surface.
4. Transfer connection
Before using USB device please connect transfer line to computer.
USB data line
U Disk
Connect U disk with transfer line →insert USB OTG port with OTG

3
transfer line. When U disk is ready then you can use.
☆Please don't push U disk frequently ,or will damage the U disk.
5. TF card Usage
Support 32GB memory card
Insert the memory into the card slot then the screen will display “SD
card is in readying now “, when the words disappear, it means the TF
card have been prepared that can use.
Cancel TF Card
Close all programs or documents in the card .Click →setting →
TF card and internal memory →Uninstall TF card,press and popup a
half of card then take it out.
☆Please don't insert or push the card for more times or will damage the Card.
☆Use brand card to avoid incompatible.
6. Start to use
Battery charging
One port of the power adapter insert into socket, another port
connect to DC interface of device to charge ,when the battery is in
charging will display as:When the battery is fully charged, battery
ICONS display as:.
☆Can use a USB cable to connect the PC to charge.
☆Can Use the device when it is in charging, but have to spend more time for
charging.
Battery management
The battery is not fully charged when packaged , advise you to make
battery fully charging for 4 hours at least before you use the device.

4
Rechargeable battery life, generally depend on the times of charging
and discharging. However, you can also play through the following
Suggestions to extend the life of battery:
●To use the device at least once a week.
●Regularly for battery fully charge.
●Don't let the battery in long time no power.
●Always keep device and battery far away from heat objects.
Set-up
Long press the power button for 5 seconds.
Wi-Fi network setting
Since many functions need with Wi-Fi connected, set Wi-Fi network
first before using.
1. Click →setting →Wireless and network setting.
Choose and open Wi-Fi menu to enter Wi-Fi settings
Then all usable Wi-Fi networks can be automatic searched and displayed. If
showed as among the Wi-Fi networks, then need to input password for
connection.
2. Click the Wi-Fi network you need →If need password then input it →Click
link.
3. Click button to back desktop
☆If the Wi-Fi set is hidden ,won’t be searched out of itself. Need to click add
Wi-Fi network, then input relevant information to add your Wi-Fi.
3G settings
1. Before connect 3G network, please choose the suitable 3G network card to
support the tablet pc device, this model only support external USB dongle, the
dongle models can be found in search path setting →wireless and
network→more →3G support model information is shown in the equipment
as below :
2. 3G card loaded with SIM card then connect the 3G USB dongle to the table
pc.

5
3. After connected 3G dongle ,click setting →wireless & network
→more→mobile network,to set the 3G network。
4. Open mobile network: click data flow started→data wander to choose
“Access Point Names”, then click “Menu” button, then to set “New APN” Take
Chinese WCDMA mobile operator as example to set the 3G network as below:
Name:3GWAP / APN:3gnet / Proxy:Not set/ Port:80 / Username:Not set/
Password:Not set/ Server:Not set/ MMSC: Not set / MMS proxy Not set/ MMS
port: Not set / MCC:460/ MNC:01/ Authentication type:Not set/ APN type:
Not set.
After setting finished, then 3G network is connected then will
display ,if this logo show as darker state it means it is searching
of the network ,if show as blue state means it has been connected
with network , display means the date is under transmission.

6
7. Desktop
③②①
④⑤⑥⑦⑧A B C D
①:Click it to view all applications
②:Searching voice quickly function
③: Quickly open browser interface
④: Return to the current operation
⑤: Back to desktop from app screen
⑥: Select key for multi-page
⑦: Menu function shortcut key
⑧: USB connection
A: TF Card sate of connection
B: Current time
C: 3G/WIFI sate of connection
D: Battery status
☆Click on any program icon to run it.
☆Long press and drag icon, move it to other parts of the screen.
☆press longer and drag icon to move it from the desktop
cleanup.

7
8. Screen lock interface
Long time no using device or short press power button, the device will
access to standby state. There are two states: first is deep sleeping
standby, the device’s screen is turned off, then need to press power
button to enter standby screen, for example the above picture, press
the red unlock.
Switch it will display the point A\B as above picture, press A point
for camera using ,press B for unlocking ,it show as B condition ,press
unlock button to B will realize unlocking function ,press unlock button
to A to use Camera function.
B
A

8
9. Program
Recorder
Record outside sounds
Clock
Show time and set time
Download
Quick install the apk downloaded
Browser
Connect to Internet browser
Calendar
Set calendar
Camera
Take photos and video
Calculator
For simple calculating
Email
Receive and send email with existed email address
File viewer
Check and manage files, install Android apps and backup
SD files

9
Music
Play and manage music files.
My video
Play and manage my video files
My gallery
View and manage my photo files
Map
Check your local position when network connected
Places
Connect with internet to check your location and relative
places near your location.
Google
Market
Login to download applications ,games etc.
Search
Search tool, search anything you need online.
Setting
Set your system.
☆Long press to drag the icon.
☆Long press icon and drop in to remove it from menu.

10
10. Menu
On the desktop, use the menu button to display the menu
Function, at the same time can realize commonly used procedures
setting in the desktop .The way of setting are pressing the procedures
logo to desktop.
11. Application program
Install applications
A lot of Free and interesting Applications are available on internet, you
just need search by” Android applications” key words.
The Android Applications you downloaded are saved in , you
can install it easily:
1. Copy the apk application to SD or USB device →Put the SD card into Tablet or
connect USB device with Tablet.
2. Click .files browser logo.
3. Click or find the file with apk.
4. Click the APK application →Install.
After install successfully, the new application icon will show in Menu.
5. Click icon to run application or finish to return browser interface.
Download applications from Internet
User could download any Android application from internet and install

11
it easily and fast.
1. Click to search application in internet.
2. Input website address, click the download link to download the application.
3. After download finished, long press the application (saved in download
history) →Click and open →install.
Connect to PC and save files
1. Connect Tablet with PC by USB cable. One side is USB OTG port , another
side connect PC USB port.
2. After connection, it will display image ,choose run it ,
then click Turn on USB device then user can exchange files between PC and
Tablet device, as below:
Uninstall application
User can easily to uninstall Android applications as below:
1. Click Menu button→setting →applications→manage applications.
2. Choose the application →uninstall.
3. Click Yes to confirm uninstall.

12
12. Sound record
Click icon will display as below:
Click start to record, click to stop record, click to
view the record document and the documents will named according to
the time you record. Click the record document to play record, click
to set the record you made.
13. Clock
☆Click icon , User can check current Date and time.
Alarm clock
A few different alarm clock can exist in same Tablet.
When the icon show in top of Screen, it means at least one alarm
clock is working.

13
Add new alarm clock
1. Click icon .
2. Click menu button→add clock。
3. Set new alarm clock.
☆If you didn’t set repeat, after alarm works on time, system will auto-delete
the information.
☆Click to start use the new alarm clock.
4. Finish
Disable alarm clock
When the alarm time on, a window with Clock will pops out.
If User need alarm again after 10mins,click Pause.
Click Cancel to stop alarm.
Enable Alarm clock
Regarding the alarm clock which already set in repeat, Then usually
User need suspense using it not delete it:
1. On interface of Clock,click icon to suspend use this alarm clock.
2. Click to resume.
Edit alarm clock
1. Click →click 。
2. Entry the clock User need edit →reset.
Delete alarm clock
1. Click icon →click .
2. Open the alarm clock user need delete.
3. Choose delete it.
4. Click return to desktop.

14
14. Download applications and install
1. Click icon .
2. User can check and install the available applications from PC.
15. Browser
User can reach to internet by browser.
Click icon to open internet:
①②③④
①:Visited web site;②:Current web site;③:Add web sites;④:Menu
Search
history
Bookmarks
Current Website
Refresh
Search
Forward

15
16. Calendar
Click the calendar program icon.
First used calendar, need to add an exchange account. Input account
email address and password. Click on next, according to the prompt
complete account configuration,after that the calendar can be
used.
New activities
1. In the calendar interface, click new event dates you want to build.
2. Choose activity time - input relevant activity details in every field.
3. Click finish.
☆Color display for gray date mean there are agenda on the day.
17. Camera
Click to open camera then display icon
Take photos
1. Click to take photos.
2. Pictures will be kept.
3. Click the thumbnail to enter into my album to view pictures.
4. Click back icon to return back to camera.
5. Click to realize camera setting.

16
Video recording
1. Click switch to Video.
2. Click to start recording,click to pause recording.
Video will be kept.
3. Click the thumbnail to play the video.
Click back icon to return back to camera.
4. Click to quit camera and back to UI interface.
5. Click to realize vedio recording setting.
Note:You can click to switch front- camera and back- camera to take
photos.
18. Calculator
1. Click the calculator program icon.
2. Click numbers and operational symbol to start calculate.
3. Click remove to remove all display.
19. E-mail
☆Supports POP3 and SMTP accounts
Add E-mail account
You can enter one or more E-mail address on device to use
1. Click E-mail program icon。
2. In your account interface, click next.
3. Click E-mail address options, →input your E-mail address.
4. In the password options, →enter your E-mail passwords.
5. Click finish

17
Manual Setup (Optional): Server setting can full in the E-mail provider
(like gmail.com) according to your E-mail account .If you need to
revise the server setting; you could click "manual setup" to make
some change.
6. Click "Next Step".
7. Optional:Input account name.
8. Display the account name when send and receive E-mail, Click "Finish".
☆After Settings, if you cannot connect to a free email account, please contact
with your email providers to confirm if their server support (POP) and (SMTP)
transmission agreement.
Inbox
1. Click E-mail program icon.
2. If only added one E-mail account, it will open promptly. If added several
E-mail account, it will display the account list.
3. Click the E-mail account you intended to check→Click "Inbox".
Open E-mail
1. In the inbox, to click E-mail and open it.
2. As for attachment,Click "open" to start related application or click "Save" to
save the attachment to SD card.
3. For reply,click "reply or reply all".
4. Click "delete" to delete E-mail.
Compose New E-mail
1. Click→"Compose" icon.
2. Click " To",then add the addressee's E-mail account.
3. If needed, Click "Menu' to add attachment.
4. E-mail finished, then click "send".
Edit E-mail account
1. Click E-mail program icon.
2. Choose "Account Setting" from "Menu".
This manual suits for next models
2
Table of contents
Other KOCASO Tablet manuals