KOCASO MX836 User manual

I
Catalogue
General Notices for Use................................................................................................II
Disclaimer....................................................................................................................II
Box Contents................................................................................................................II
1. Product Basics.....................................................................................................- 1 -
1.1 Buttons and Connections...................................................................................- 1 -
1.2 Start Up and Shut Down....................................................................................- 1 -
2. Introduction to Google Android 4.4......................................................................- 2 -
2.1 The Desktop ....................................................................................................- 2 -
2.2 The App Drawer –Right Side............................................................................- 3 -
2.3 Google Search / Voice Search –Top Left Corner.................................................- 4 -
2.4 Navigation Icons –Bottom................................................................................- 4 -
2.5 System Information Area –Top .........................................................................- 5 -
3. General Operation...............................................................................................- 5 -
3.1 Battery Status / Charging Your Tablet ................................................................- 5 -
3.2 Installing Apps.................................................................................................- 5 -
3.3 Administer / Remove Apps................................................................................- 6 -
3.4 Add an Account ...............................................................................................- 7 -
4. Basic Setup..........................................................................................................- 8 -
4.1 Changing Operating Language...........................................................................- 8 -
4.2 Wi-Fi Settings..................................................................................................- 9 -
4.3 Wireless Connecting.......................................................................................- 10 -
4.4 Connecting the Tablet to Your PC....................................................................- 12 -
AppendixⅠFrequently Asked Questions...............................................................- 13 -
AppendixⅡ3G Support List ................................................................................. - 15 -

II
General Notices for Use
—This product is a highly advanced electronic device. Disassembly, customization, or
repairs without the appropriate knowledge and pre-cautions can lead to dangerous situations
with chance of damaging the product and serious self-injuries.
—Avoid use in extreme conditions such as high and low temperatures, high humidity or
moist environments, and around magnetic fields. Also, avoid long-term exposure to sunlight.
—Only use manufacturer permitted accessories to avoid damage to the product and
possible warranty loss.
—Please follow the relevant local environmental regulations to deal with obsolete
machines and accessories.
—Use a protective case to avoid extreme physical shocks to the device (i.e. dropping).
Disclaimer
—The screenshots are for Android reference only. They may be made on a device with a
different resolution or hardware configuration from yours and therefore can be slightly
different from the final product.
—The manufacturer takes no responsibility for loss of information or data caused by
hardware or software failure. The user is responsible for performing timely backups of
important data.
—All information and images used in this user manual are provided ‘as is’ and are subject
to change without notice.
—The manufacturer accepts no liability for the information offered in this document.
Box Contents
—1 x Tablet
—1 x Device Charger (DC / 5V –1.5A)
—1 x Instruction Manual
—1 x USB Cable
—1 x OTG Cable
—1 x Earbuds
—1 x Stylus Pen
—1 x Screen Protector
—1 x Carrying Pouch
- 1 -
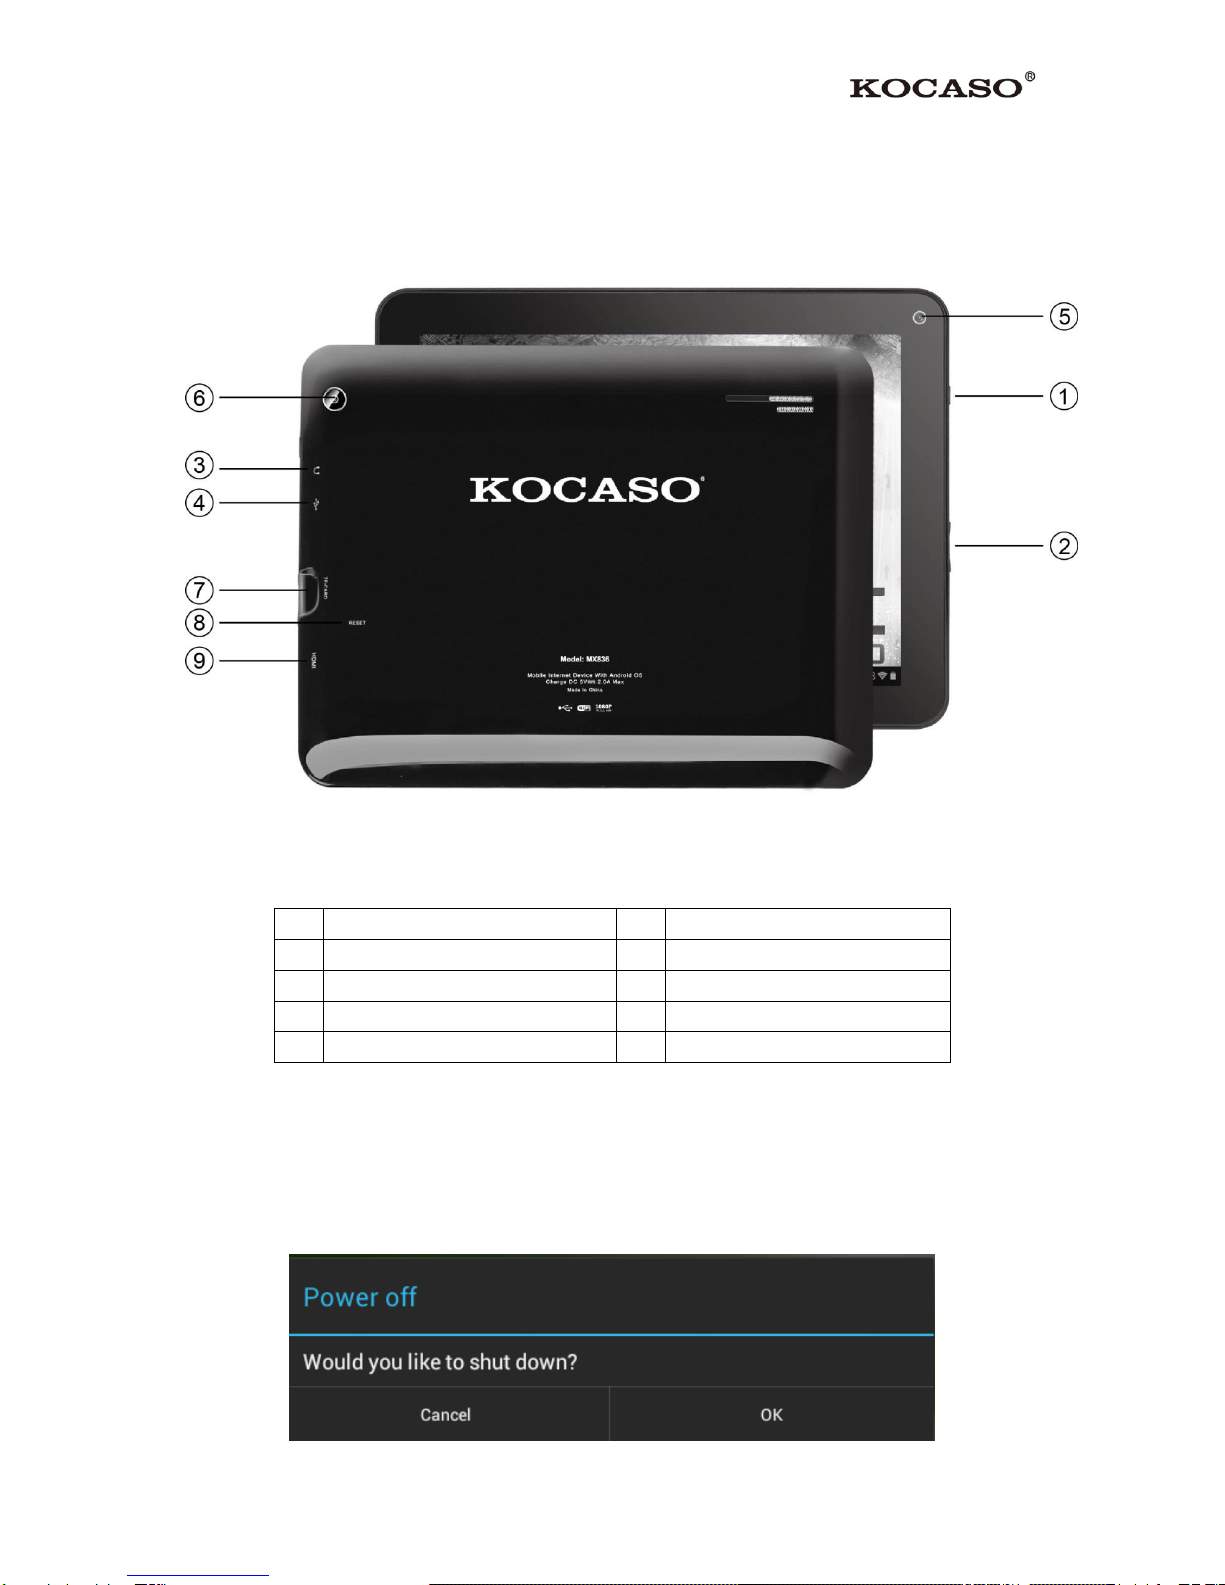
1. Product Basics
1.1 Buttons and Connections
1
Power Button
2
Volume +/- Button
3
Headphone Jack
4
Micro USB Port
5
Webcam
6
Webcam
7
Micro SD Slot
8
Reset
9
Mini HDMI Port
1.2 Start Up and Shut Down
To start your device, press and hold the ‘Power Button’ until the screen lights up.
To shut down your device, press and hold the ‘Power Button’ until the following dialog
popup appears.

- 2 -
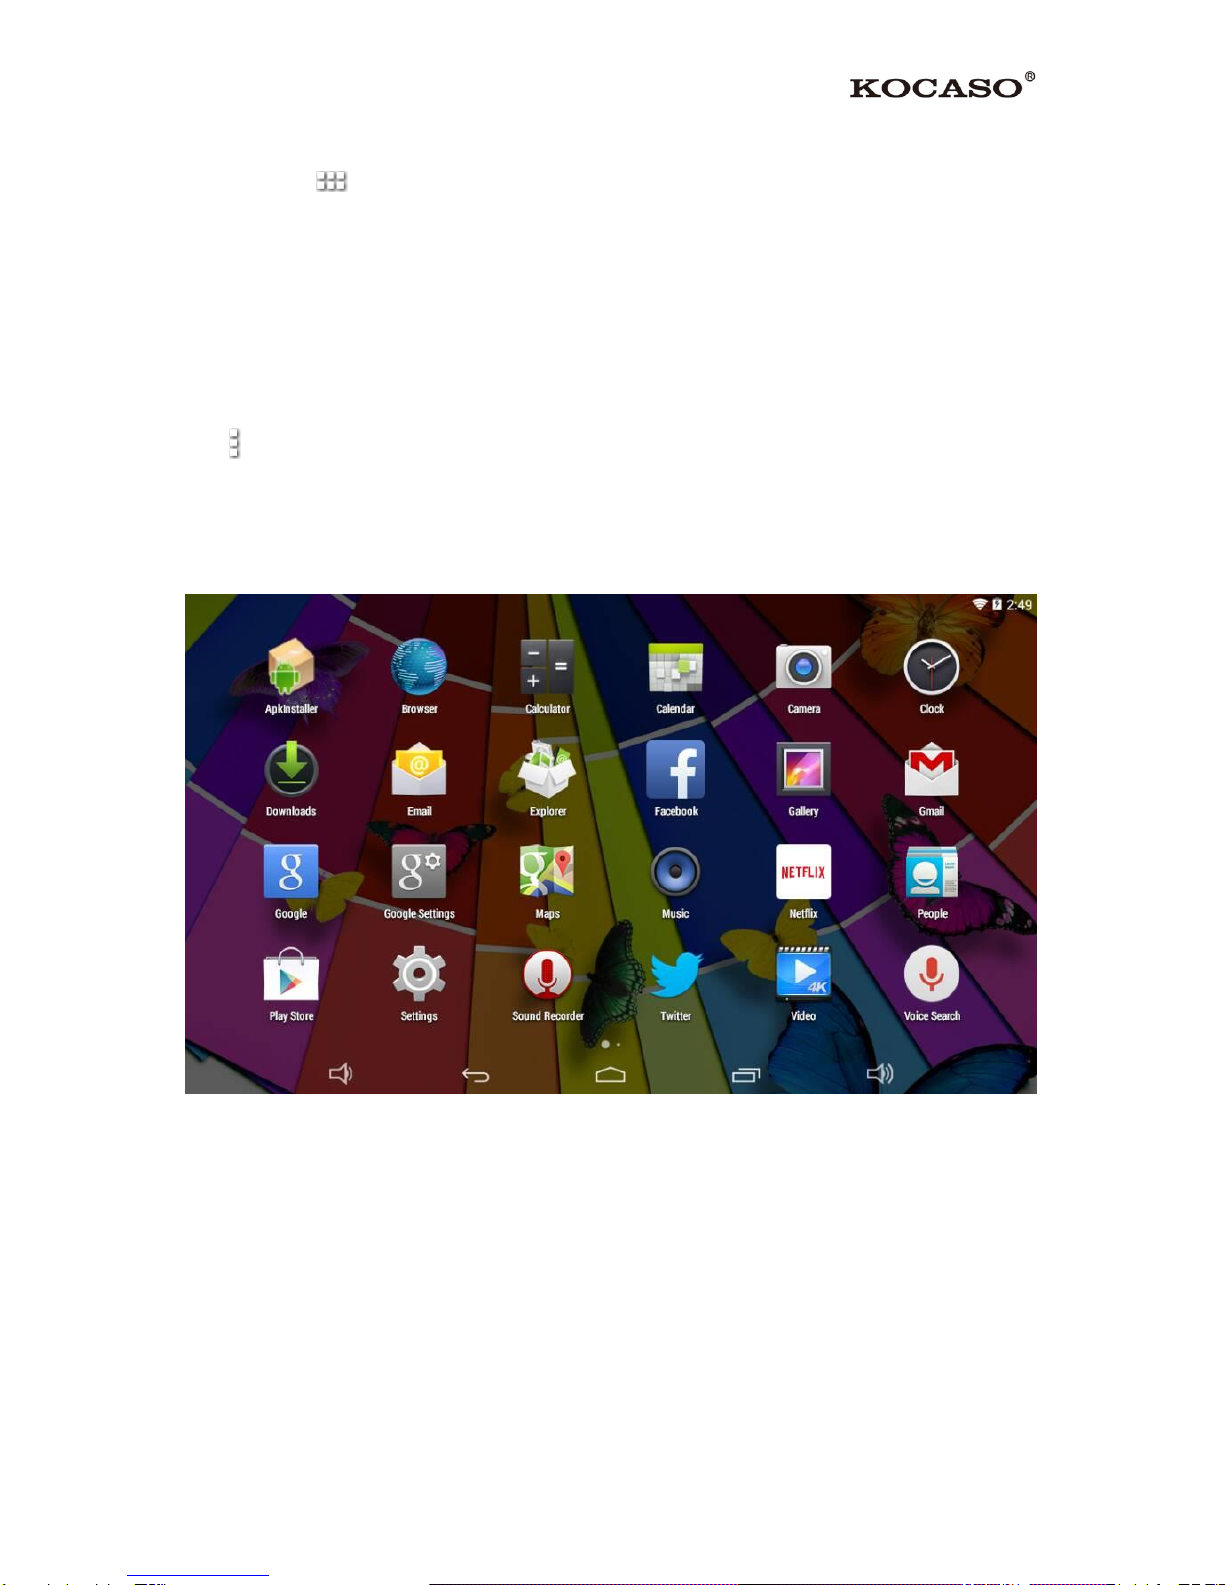
2. Introduction to Google Android 4.4
1
System Information Bar
2
Open Search Bar
3
Scroll Left or Right to Other Panels
4
Access Application List and Widgets
5
Task Bar
2.1 The Desktop
The main area of interest will be the desktop itself. Here you will place shortcuts to Apps or
Widgets –a visual application that can display real-time information. There may be some pre-
installed icons and widgets on your tablet.
To change the desktop background image of your tablet return to your desktop by tapping the
‘HOME’ icon . Tap and hold a blank space on the desktop (don’t tap an icon) - until a
popup appears named ‘Select wallpaper from’. In the list may appear multiple options to
select an image or animated image of choice. The option ‘Live Wallpapers’ will show the pre-
installed animated desktop images. Other options such as a ‘Super-HD Player’, ‘Gallery’ or
‘Wallpapers’ allow you to select (widescreen) photos, downloaded images or other images,
depending on the features of that specific application.
To place a widget or app shortcut on the desktop, touch and hold the icon until the App
drawer fades and the desktop appears. Move your finger to the location where you want to
place the icon and release your touch to place the icon.
To move or delete icons and widgets from your desktop, touch and hold the icon until a grid
appears. Move the icon to the new location or drag it to the ‘Remove’ bar on the top of the
screen to remove it. Releasing the touch screen will confirm your action.
- 3 -
2.2 The App Drawer –Right Side
Press the icon on the right side of the screen to open the App drawer. Here you have
access to two tabs; ‘APPS’ and ‘WIDGETS’. The ‘APPS’ tab displays all applications that
are available on the tablet. The ‘WIDGETS’ tab contains the optional widgets that can be
added to the desktop.
To place a widget or app shortcut on the desktop, touch and hold the icon until the App
drawer fades and the desktop appears. Move your finger to the location where you want to
place the icon and release your touch to place the icon.
When using apps or other parts of the operating system you will often see the ‘Extra options’
icon .
Tapping this icon will open a secondary menu with more options. Functions like opening an
advanced settings menu, switching to a different account or refreshing the displayed
information are often ‘hidden’ behind this icon.

- 4 -
2.3 Google Search / Voice Search –Top Left Corner
By clicking the ‘Google Search’ / Microphone button you can quickly type or speak keywords
you want to search. The search application will automatically determine whether the
keyword(s) apply to an application or a web search. In the latter case, a web browser will be
opened and the results of your query will be displayed on the Google search engine.
Note that both the ‘Google Search’ function as well as the ‘Voice Search’ require the tablet to
have access to the internet (via Wi-Fi).
2.4 Navigation Icons –Bottom
At the bottom of the screen in the task bar you will find three icons: HOME, RETURN, and
RECENT ACTIVITY. Use the navigation icons ‘HOME’ or ‘RETURN’ to close the
App drawer and return to your desktop. The ‘RECENT ACTIVITY’ icon will show an
overview of the active and recently opened applications. Click on the small displayed preview
to open that application.
Recent Activity Preview

- 5 -
2.5 System Information Area –Top
The top right of the system information bar will show some system information (i.e.
). Tapping it will open a small overlay menu displaying the date/time information,
the tablet’s current network status, the battery status and a shortcut icon to another quick
menu. The quick menu is where some things like ‘Airplane Mode’, ‘Wi-Fi On/Off’, the
screen brightness and other options can be set or toggled. Also, this quick menu contains a
shortcut to the ‘Settings’ menu. Simply clicking elsewhere on the screen will close this menu.
The top left part of the system information bar will show any notifications you may have. The
contents of this area can change if installed applications place additional information here.
3. General Operation
3.1 Battery Status / Charging Your Tablet
The current battery status will be always displayed in the top right of the screen in the system
information bar. The battery icon will change according to the battery status.
When connected to the DC charger, the status area on the bottom bar will display the
charging icon. Note the lightning symbol on the battery icon.
3.2 Installing Apps
You can install your own Apps by opening the App Store, which can be found in the
‘App drawer’. Note that not all applications may function properly for your tablet. Some are
made specially for small screen devices such as phones.

- 6 -
3.3 Administer / Remove Apps
The ‘Apps’ option in the ‘Settings’ menu will display an overview of the installed apps.
There are four tabs available which filter the displayed app list. Select an app to view its
detailed information. In the detailed information you also have the options ‘Force Stop’,
‘Uninstall’, ‘Clear data’ and ‘Move to SD card’. Moving apps to your SD card can save you
some internal storage memory on the tablet.
The ‘Clear cache’ and ‘Clear defaults’ can be used when you are experiencing issues with a
specific app. Clearing cached information, plus possibly wrong default settings, may solve the
problem. Clearing this information will also wipe any stored login information. Clearing the
cache of your social media app will also force you to re-login afterwards.
Apps may also be removed in the apps content page of the market / shop application.
- 7 -
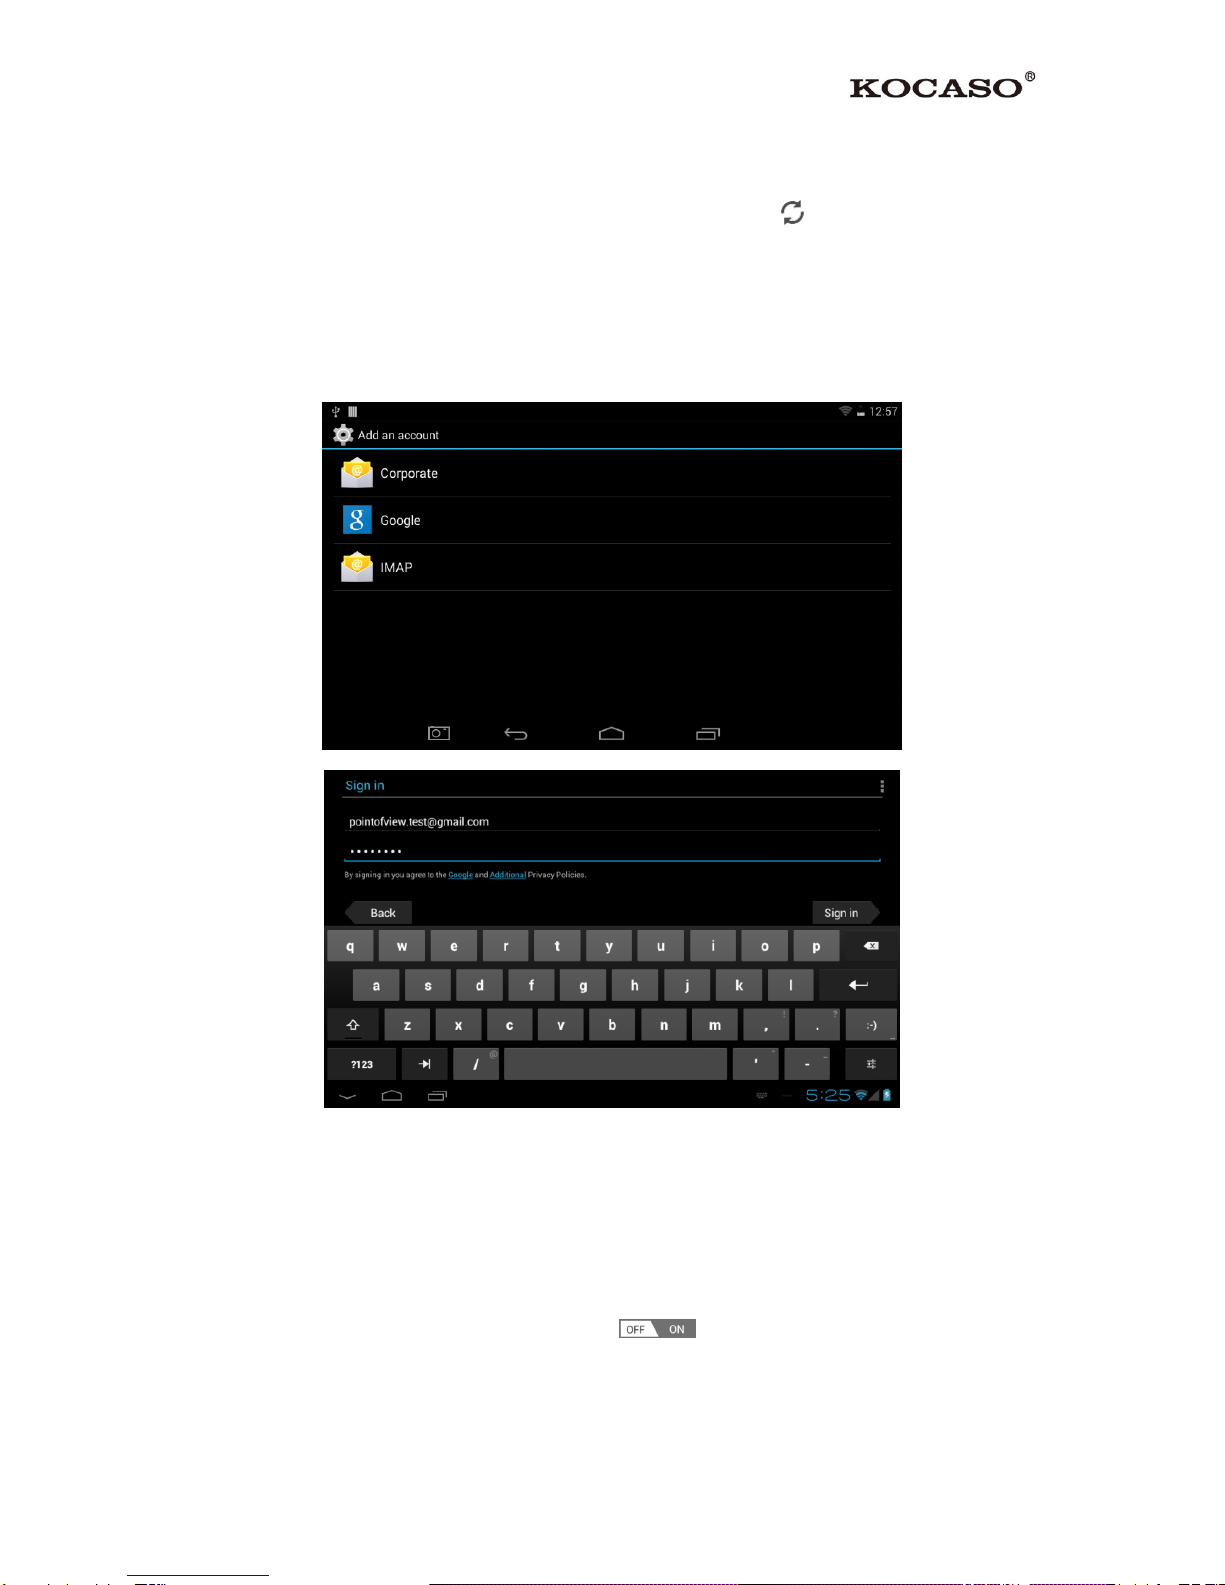
3.4 Add an Account
The best way to fully make use of your Android tablet is by linking your Google / Gmail
account to your device. Open the ‘Settings’ menu and choose the ‘Accounts & sync’
option. Without any added accounts, the right pane will display nothing. Instead, select the
option ‘Add account’. To add a Google / Gmail account please select ‘Google’ in the pop-up
and follow the instructions on the screen. After entering your Google username and password
you have the option to automatically back-up your apps, settings (i.e. bookmarks and Wi-Fi
passwords) and other data.
You can also add a POP3, IMAP or Exchange email account by selecting ‘Email’. The pop-
up option ‘Corporate’ will setup a ‘Microsoft Exchange’ link.
Your system or network administrator can supply you with the server information and login
credentials. Follow the steps displayed on-screen to complete the account linking process.
After you successfully linked your account(s) with the tablet you can toggle the automatic
synchronization on and off by using the switch next to the ‘Add account’ option.

- 8 -
4. Basic Setup
4.1 Changing Operating Language
Tap the icon on the right side of the screen to open the App drawer. Select the ‘Settings’
option to open the Android settings menu.
When selecting the option ‘Language & input’ the contents will be displayed in the right
pane. Now open the option ‘Language’ and choose a language for your tablet to operate in.
This pane also displays the keyboard settings which you can customize, enable or disable.
Table of contents
Other KOCASO Tablet manuals

KOCASO
KOCASO MX9300 User manual

KOCASO
KOCASO m836 User manual

KOCASO
KOCASO M776H User manual

KOCASO
KOCASO M770 User manual

KOCASO
KOCASO Tablet PC User manual

KOCASO
KOCASO Tablet User manual

KOCASO
KOCASO M752 User manual

KOCASO
KOCASO MX9200 User manual

KOCASO
KOCASO M9300 User manual

KOCASO
KOCASO M1052 User manual


Popular Tablet manuals by other brands

Laser
Laser MID-1060 Quick operation guide

MUNBYN
MUNBYN IRT09J Easy setup guide

Motorola
Motorola MC3090R - Win CE 5.0 Professional 520 MHz quick start guide

Dell
Dell Latitude ST Setup and features information

Lenovo
Lenovo IdeaTab S6000L Hardware Maintenance Manual

Venturer
Venturer WT9L11 quick start guide


