manuals.online logo
Brands
  1. Home
  2. •
  3. Brands
  4. •
  5. Kogan
  6. •
  7. Cooker
  8. •
  9. Kogan SMARTERHOME KASMPRCBLA User manual

Kogan SMARTERHOME KASMPRCBLA User manual

Other Kogan Cooker manuals

Kogan KASOUSVIDXA User manual

Kogan

Kogan KASOUSVIDXA User manual

Kogan KA9SOUSVIDA User manual

Kogan

Kogan KA9SOUSVIDA User manual

Kogan KASTKSOVIDA User manual

Kogan

Kogan KASTKSOVIDA User manual

Kogan 1800W Portable Induction Cooker User manual

Kogan

Kogan 1800W Portable Induction Cooker User manual

Kogan KASOUPMAKERA User manual

Kogan

Kogan KASOUPMAKERA User manual

Popular Cooker manuals by other brands

Logik LFTG50A12 installation manual

Logik

Logik LFTG50A12 installation manual

Smeg SUK61CMA5 user manual

Smeg

Smeg SUK61CMA5 user manual

Rayburn 200G/L Gas Fired Cooker Installation and servicing instructions

Rayburn

Rayburn 200G/L Gas Fired Cooker Installation and servicing instructions

VacPak-It SV158 manual

VacPak-It

VacPak-It SV158 manual

Electrolux N7E Installation and operating manual

Electrolux

Electrolux N7E Installation and operating manual

Electrolux EKE6100 Instruction book

Electrolux

Electrolux EKE6100 Instruction book

ARO SHC5065 instruction manual

ARO

ARO SHC5065 instruction manual

Baumatic BCE905SS user manual

Baumatic

Baumatic BCE905SS user manual

Bosch HCE744350R instruction manual

Bosch

Bosch HCE744350R instruction manual

Modena FC 7645 SGM User manual book

Modena

Modena FC 7645 SGM User manual book

Stanley Donard 60 Installation and operating instructions

Stanley

Stanley Donard 60 Installation and operating instructions

Bartscher 201TC manual

Bartscher

Bartscher 201TC manual

Parkinson Cowan 50 GR/BU installation instructions

Parkinson Cowan

Parkinson Cowan 50 GR/BU installation instructions

Creda S150E Installation and user instructions

Creda

Creda S150E Installation and user instructions

Creda HB48309 instructions

Creda

Creda HB48309 instructions

Bosch HCE743220F instruction manual

Bosch

Bosch HCE743220F instruction manual

Tricity Bendix SE545P manual

Tricity Bendix

Tricity Bendix SE545P manual

NEFF E1461A2/01 Instructions for use

NEFF

NEFF E1461A2/01 Instructions for use

manuals.online logo
manuals.online logoBrands
  • About & Mission
  • Contact us
  • Privacy Policy
  • Terms and Conditions

Copyright 2025 Manuals.Online. All Rights Reserved.

KOGAN SMARTERHOME™
THERMOBLEND FOOD
PROCESSOR & COOKER
KASMPRCBLA
2
Safety & Warnings
3
Overview
6
Assembly
8
Before First Use
15
Operation
16
Connect to SmarterHome™ App
20
Automatic Programs
23
Simple Chef Recipes
27
Google Home Control
39
Amazon Alexa Control
42
Cleaning & Care
45
Specifications
45
Troubleshooting
46
3
Read these instructions thoroughly before using the appliance. Keep this user guide for
future reference, and pass on to new owners if sold.
General Safety Instructions
•WATCH OUT! BLADES ARE SHARP. HANDLE THEM WITH CARE!
•Warning: Avoid spillage on the connector.
•Inspect the appliance for visible signs of damage before use. Do not use a damaged
device.
•This appliance is intended for private and non-commercial use. Any use other than
previously stated is considered as improper use. No claims of any kind will be accepted
for damage resulting from use of the appliance for other than its intended purpose. The
risk must be borne solely by the user.
•This appliance is intended to be used in household and similar applications such as:
ostaff kitchen areas in shops, offices and other working environments
ofarmhouses
oby clients in hotels, motels and other residential type environments
obed and breakfast type environments
•This appliance complies with the standards in force for this type of product.
•Place the unit on a stable surface. Do not slot it in.
•Always connect the appliance to an accessible power outlet.
•When unplugging the power cord, always pull it at the plug; do not pull on the cord.
•This appliance can be used by persons with reduced physical, sensory or mental
capabilities or lack of experience and knowledge if they have been given supervision or
instruction concerning use of the appliance in a safe way and understand the hazards
involved. Children shall not play with the appliance.
•Do not allow children to use this appliance. Keep the appliance and its cord out of the
reach of children.
•Do not run the appliance with an empty jug.
•Do not use the appliance without the lid being securely locked in place.
•Do not move the appliance whilst in use.
•Always make sure there is sufficient ventilation around the appliance when it’s in use.
•The jug body becomes hot during use, always hold via the handle provided.
•Do not use the appliance outdoors.
•Do not use the appliance:
oIf the plug or the power cord are damaged
oIf the appliance is in anyway damaged
oIf it has fallen or been dropped
SAFETY & WARNINGS
4
•Do not let the power cord hang over the edge of a table or the work surface and ensure
it does not make contact with hot surfaces.
•Do not place and do not use this appliance nearby any heat source (hot or heating).
•Avoid wrapping the cord around the appliance, and do not bend it.
•Use only the accessories supplied with the appliance.
•Never immerse the appliance, its power cord or its plug, in water or any other liquid.
•Do not handle the cord or appliance with wet hands.
•Make sure to unplug the unit when not in use.
•If the product is damaged, it must be repaired by Kogan.com or an authorised
representative. This particularly applies to replacing a damaged connection cable.
Unqualified repairs can lead to considerable danger for the user.
•If the supply cord is damaged, it must be replaced by Kogan.com, its service agent or
an authorised representative. Cease use immediately and contact help.Kogan.com for
assistance.
•Always leave the appliance to cool down before cleaning.
•Keep the appliance out of the reach of children when it is plugged in or cooling after
use.
•Do not use the lid cap / measuring cup for carrying food or hot liquids.
•When mixing hot liquids, take care to avoid splashing any hot liquid that could cause
burns.
•Do not remove the lid when water is boiling.
•Regarding the detailed information on how to use the accessories, read this user guide.
•It is essential to keep this appliance clean since it is in direct contact with food.
•Regarding the instructions for cleaning surfaces in contact with food or oil, refer to the
Cleaning & Care section of this user guide.
•Children must be kept under supervision to ensure that they do not play with the
appliance.
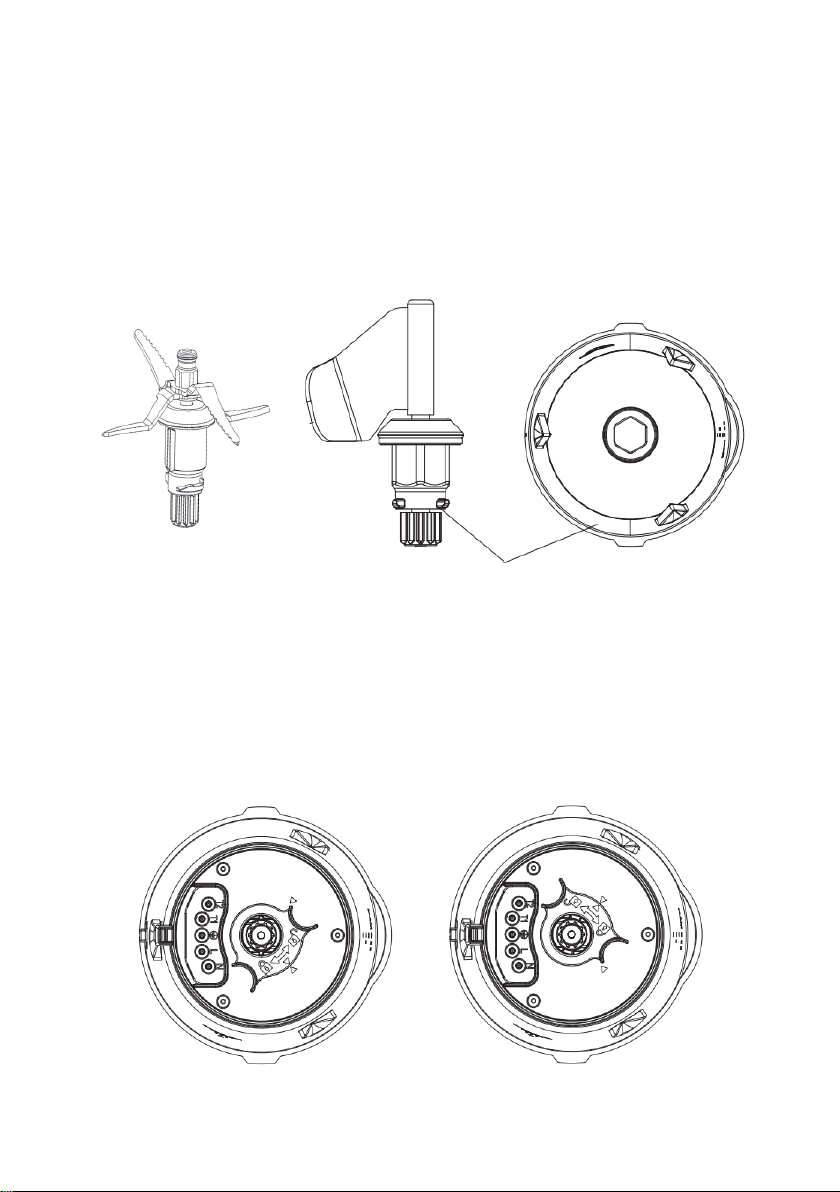
•Great care must be taken when handling the blades while emptying the jug, during
cleaning, and while changing the installed blade.
•Switch off the appliance and unplug it from the power supply before handling or
changing the accessories, or getting near to any of the parts that move during
operation.
•Always unplug the appliance from the power supply if left unattended before
assembling, dismantling or cleaning.
•Be careful when pouring a hot liquid into the cooking processor or blender to avoid any
splashes escaping from the appliance caused by sudden boiling.
•The appliance is only to be used with the stand (motor unit) provided.
•The heating element surface is subject to residual heat after use.
•Care shall be taken when handling the sharp cutting blades, emptying the jug and
during cleaning.
•Be careful when touching the front grip while opening the lid immediately after use
– Hot surface.
5
•If the blades are blocked when mixing, always unplug the appliance before attempting
to clear the blockage or removing food.
•Warning: Potential injury from misuse.
Special Safety Instructions
•Check the main body, jug, steamer and other components regularly for damage. If any
damage is detected, do not use the appliance.
•The hole on the jug lid can only be covered with the measuring cup. Do not use clothing
or other objects.
•Do not exceed the MAX mark on the jug body.
•The jug’s surface may reach high temperatures when operating over 60°C, use
protection when touching or moving it after use and only hold by the handle.
•Misuse of the food processor and mixer may result in serious injury.
•Be careful if hot liquid is poured into the food processor or blender as it can be ejected
out of the appliance due to a sudden steaming.
•When using the steamer: Ensure the steamer and the jug are properly fixed.
•When use the machine at high speed, use it only with its lid and lid cap correctly
secured.
•Do not expose any body part to the steam produced during operation.
•Make sure the vents on the unit are not covered or blocked as this may cause damage
to the appliance.
•Keep the connector dry, and avoid water spillage on the connector.
6
1 Lid 4 Lid cap / measuring cup
2 Stainless steel jug 5 LED display
3 Unit body 6 Control knob
OVERVIEW
7
7 Multifunctional blade 12 Large steamer body
8 Kneading blade 13 Small steamer basket
9 Butterfly whisk accessory 14 Silicone spatula
10 Large steamer lid 15 Blade lock
11 Large steamer basket
8
Stainless steel jug
1. Place the lid on the stainless-steel jug so that the two small arrows on the lid and
on the jug handle are properly aligned.
2. Then turn the cover clockwise from the open lock to the closed lock until it is
closed securely. If the lid is not closed properly, the unit will not run.
3. Place the jug on the main body making sure it fits properly in its correct position. If
the jug is not properly placed, the unit will not operate.
ASSEMBLY
Note:
The jug has marks on one of its sides and the effective maximum capacity is 2L. Do
not exceed this quantity to ensure good operation.
9
Multifunctional blade and kneading blade
The multifunctional blade is suitable for general use like chopping or mixing while cutting,
while the kneading blade is recommended for kneading and gentle mixing with no cutting.
1. Fix the sealing ring on the blade’s unit.
2. Place the blade on the location provided on the base of the jug. Make sure the
three prongs on the blade’s base aligns with opening on the base of the jug (see
diagram below)
3. Turn the jug over while holding the blade gently so that it does not fall. Ensure you
are careful while holding the multi-functional blade, as it is sharp.
4. Fit the plastic blade lock correctly on the underside of the jug and turn it clockwise
to secure the blade. Ensure the blade is secured firmly before letting go.
Align the three prongs with the
larger openings of the jug’s base
Locked Unlocked
10
To uninstall a blade:
1. Hold the blade gently to ensure it doesn’t drop when released.
2. On the underside of the jug, turn the plastic blade lock counter clockwise.
3. Remove the blade carefully. Make sure it does not fall suddenly, as it may cause
damage or be damaged itself.
Butterfly whisk accessory
This accessory works installed on top of the multifunctional blade,
this way it helps with mixing food and removing lumps. To install
the butterfly whisk accessory, align the hole on the whisk
accessory with the centre of the shaft, then push the whisk
accessory down to secure. To remove, simply pull up from the
multifunctional blade.
Notes:
•We recommend using a cloth to cover the blades before handling to avoid injury.
•If the blade is not properly attached, food or liquids may splash during cooking.
•Do not use the kneading blade above speed ‘3’ as the jug may vibrate and
present a risk.
•The distance between the kneading blade and the jug wall is 1 cm, which could
cause food to get stuck. If this happens, the unit's engine will stop working and go
into self-protection mode. Use the spatula to mix and remove stuck food so that
the appliance can resume cooking.
Notes:
•The butterfly whisk will not fit on top of the kneading blade, or on its own. It must
be fitted to the multifunctional blade.
•Do not use the butterfly whisk unless the multifunctional blade is fixed securely in
place.
•Do not use the butterfly whisk above speed ‘4’.
•Do not use the butterfly whisk at the same time with the spatula.
•Do not pour food into the jug while it is operating with this accessory fitted, as this
may cause blockage or damage.