Kogan 9 F98V Series User manual

(
SERIES 9 9
QUICK START GUIDE
KALED40F98VA )
FV
40" F HD LED Smart Google TV
8


COMPONENTS
A Kogan 40” Smart HDR
FHD LED TV
B Remote control
C Stand (x2)
D Ba4 x 18mm screw (x4)
E AAA battery (x2)
F Quick-start guide
G Warranty card
B C D
E G
NOT INCLUDED
Phillips head screwdriver, antenna cable, broadband internet connection.
A
(KALED43U94 VA)
SERIES 9 U94
(KALED43U94 VA)
SERIES 9 U94V
43" UH
F

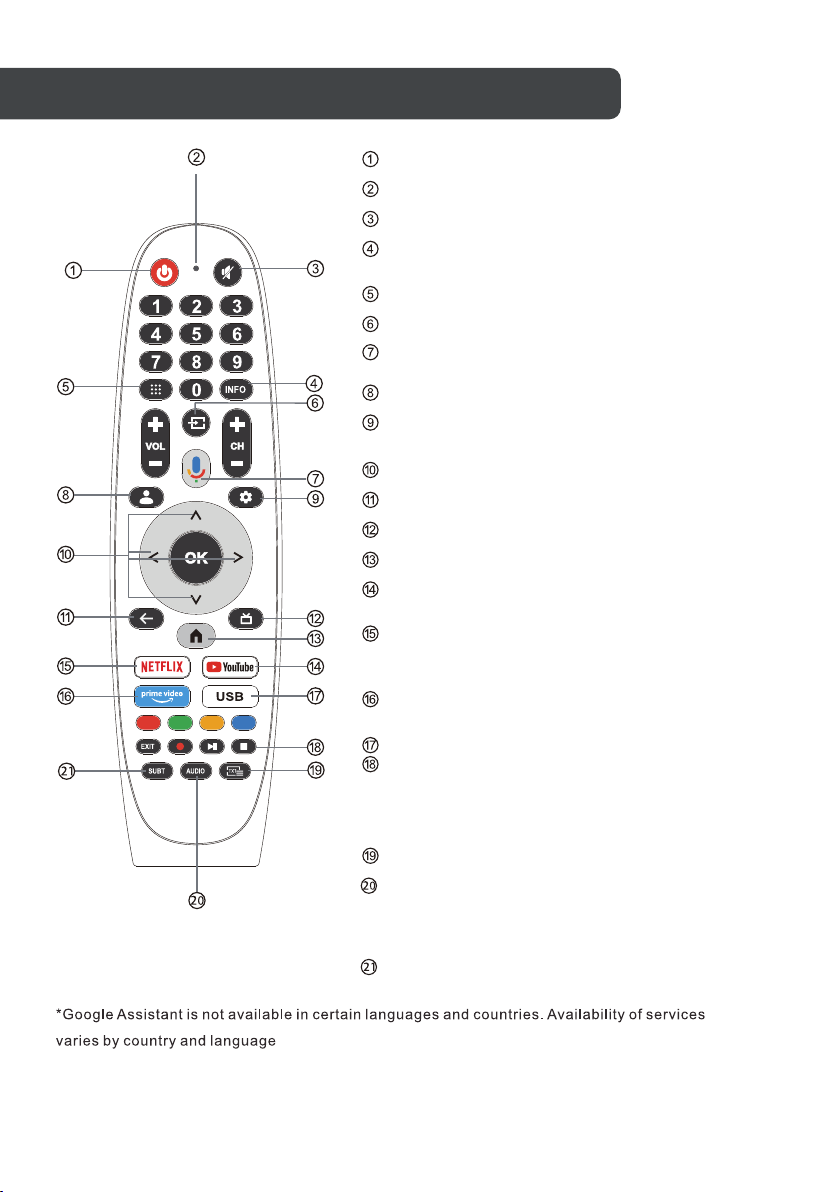
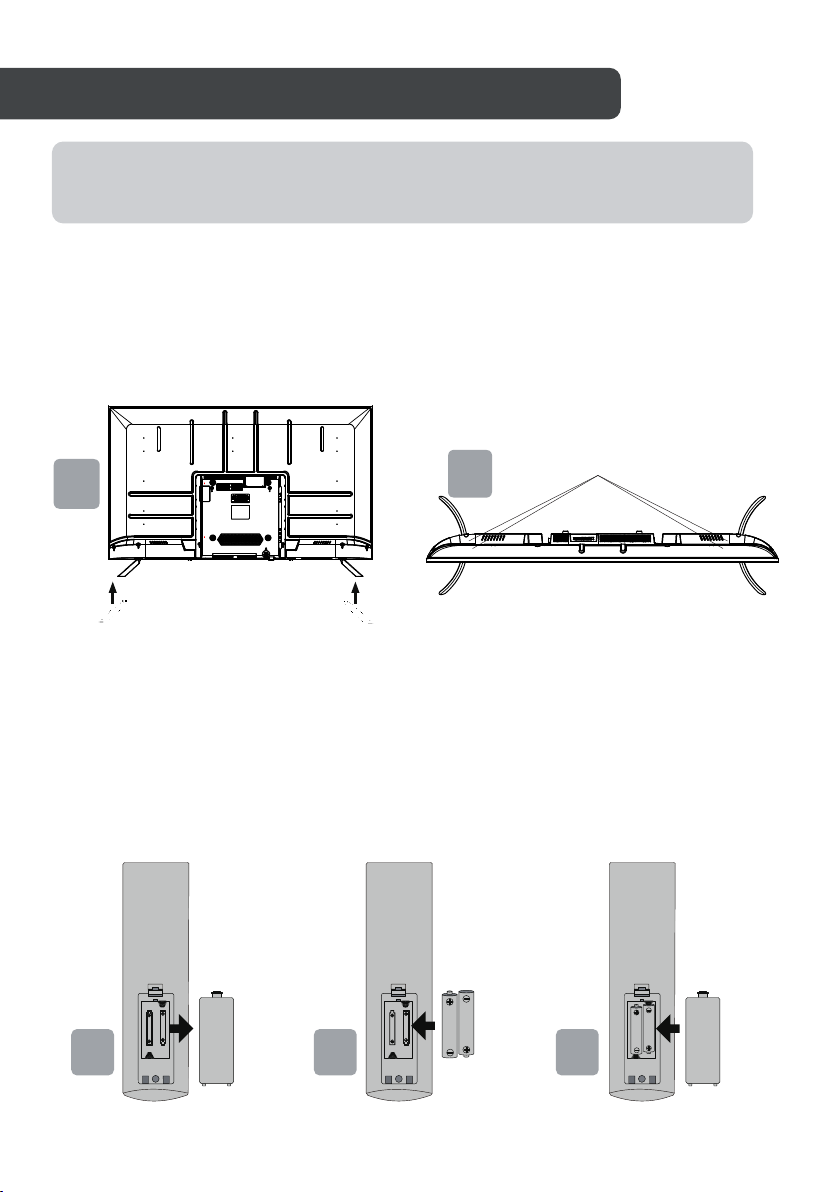
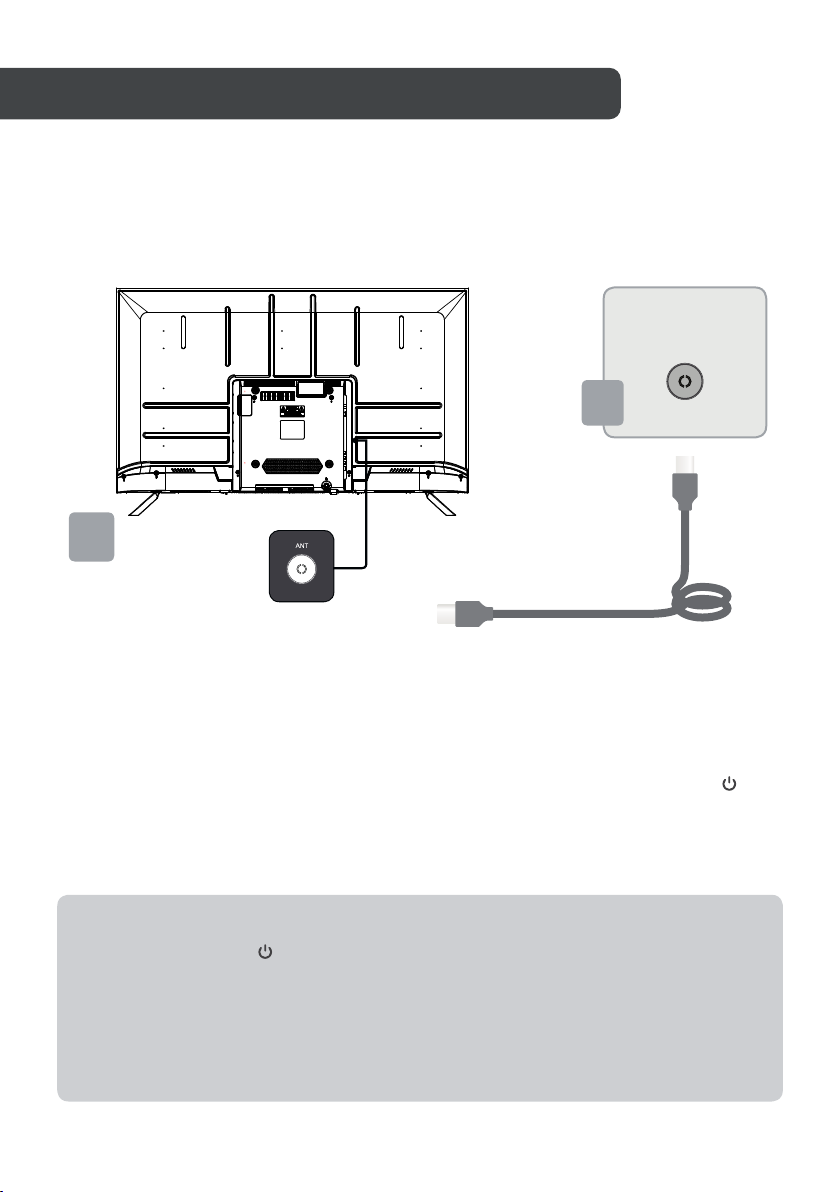
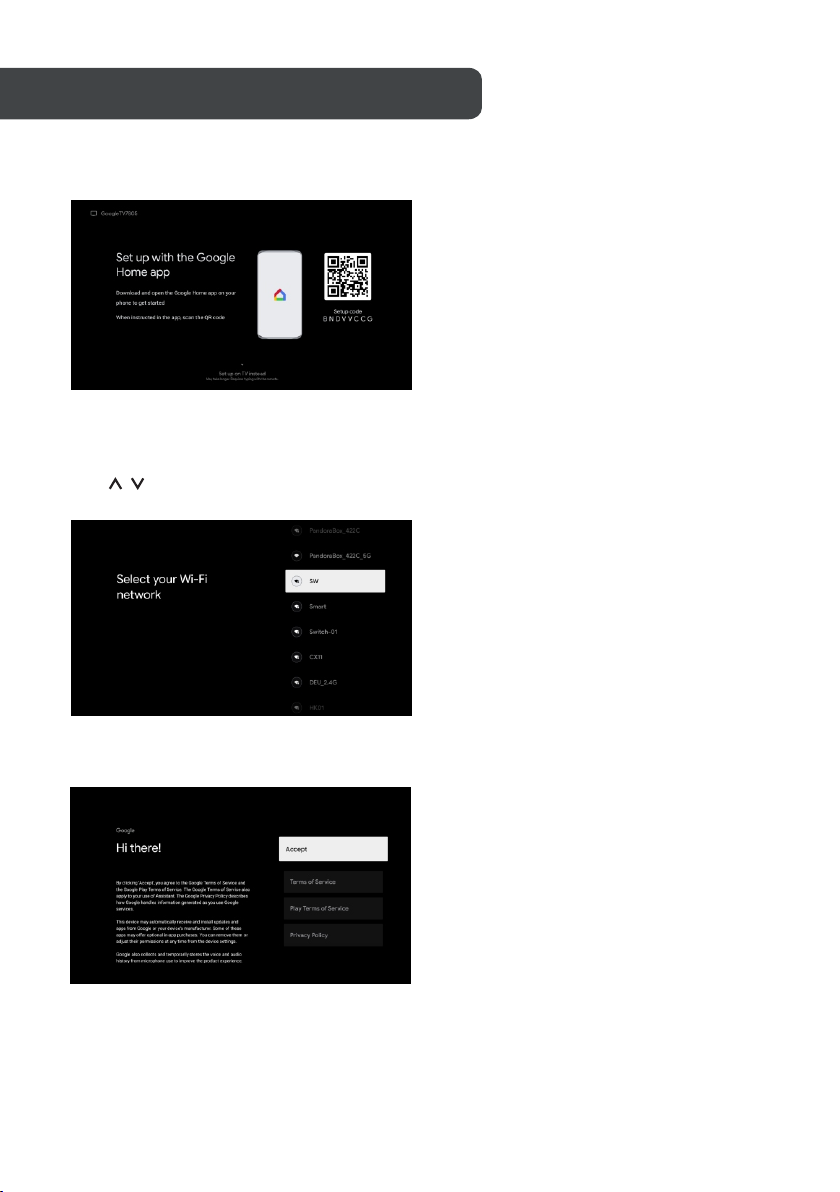
REMOTE CONTROL OVERVIEW
Switches the TV between on and standby mode.
Indicator light.
Mute or restore your TV sound.
INFO: Displays the present channel information
such as the current time and channel name.
Apps: Open the Apps page.
Inputs: Display/S elect signal source options.
Google Assistant:
Talk to Google to control your TV using your voice.
Kids: Switch to Kids mode.
Setting: In the HOME page, this button is "Dashboard"
function. On the Live TV, this button is "Menu" function
Navigation buttons :Cursor UP/LEFT/RIGHT/DOWN.
Back: Press to move back through menus.
Live Guide: Open the Live TV EPG.
HOME: Displays the home screen.
RYouTube:
Connects to YouTube (internet connection required).
NETFLIX:
Connects to NETFLIX for viewing online TV shows
and films (internet connection required).
Prime video:
Connects to Prime video (internet connection required).
USB: Press to enter Multimedia Player.
Exit: Exit the OS D menu.
PVR:Record Live TV programme.
Play the last/next program
Play/Pause/Stop program
TXT: Press to enter Teletext when play the program.
Audio: Displays the Audio Language list and select an
audio language or audio format if available (only
applicable when the TV programme has this feature).
SUBT: SUBT.

BA4X18 (4 PCS)
1b
Spread cushioning flat to lay the TV on. This will help to prevent damage.
Insert two 18 mm screws for each stand, and use Phillips head screwdriver
(not supplied) to tighten.
BEFORE YOU GET STARTED
1. Stand assembly
a. Attach stands to base of TV.
b.
2. Remote control assembly
a. Open the battery compartment cover on the back side.
b. Insert two 1.5V AAA size batteries, making sure to match the polarity markings
(+ / -) of the batteries with the diagram inside the compartment.
c. Replace battery compartment cover.
2a2b2c
ASSEMBLY AND INSTALLATION
1a

ASSEMBLY AND INSTALLATION
3a
Antenna cable
(not supplied)
3. Connect to antenna
a. Connect an antenna cable (not supplied) via the 'ANT' input port at the back
of the TV.
b. Ensure the antenna cable is also connected to a working antenna,either via
an antenna wall socket in your home, or directly.
4. Turning TV on
Plug the power cord into a suitable power outlet, then press the POWER ( )
button on the remote control, making sure to aim it at the sensor at the front of
the TV. Alternatively, you can press the power button on the lower side of the
back panel on the TV.
Press the POWER ( ) button on the remote control to enter standby mode.
To power down the TV completely, unplug the power cord from the power
outlet.
Do not leave your set in standby mode for long periods of time. If you will
not use the TV for a long time, it is recommended to unplug the set from
both the power outlet and aerial.
TURNING TV OFF
3b
Antenna
wall socket

INITIAL SETUP
1. Initial Setup
For the first initial setup, on-screen setup wizard will guide you through setting up your TV.
Please follow the guide to setup your TV correctly.
1.1 Language select
Use / buttons to select system languages, then press【OK】to confirm.
1.2 Region or Country select
Use / buttons to select your region or country, then press【OK】to confirm.
1.3 TV set-up select
Use / buttons to select your TV setup, then press【OK】to confirm.
1.3.1 Set up Google TV
TM
1.Use your Android Smart phone to download and open the Google Home app on your phone.
2.Use the Google Home to scan the QR code on the TV device.
3.Follow the instructions in the Google Home app.
Note: Press “BACK” to cancel
If you just want to use your TV normally, please select “Set up basic TV”

INITIAL SETUP
1.3.2 Set up basic TV
Press “OK” button enter to the next page to Select your wifi network.
1.3.2.1 Configure the wifi network
Press / buttons to select Wi-Fi you wish to connect to,enter the password and then confirm
to connect. If you select “Skip”, it could be performed in homepage or settings menu.
1.4 Terms of Service
By accepting the Google Terms of Service to improve the product expreience,Select “Accept”
to proceed with this condition.
1.5 Google Services TM
Select “Accept” to confirm if you want your location identified on your Google TV and agree
to automatically send diagnostic information to Google to help improve your Google experience.
NOTE:This interface is pushed by Google Service according to the actual region.
Some regions may not have this interface. The actual push by Google Service prevails.

INITIAL SETUP
1.6 Pairing Bluetooth Remote
1.Press ‘BACK ’ and ‘Home ’ simultaneously on remote control to enter the Bluetooth
pairing mode.
The Indicator light on remote control will flash when starting the pairing mode.
2.Select the ‘Skip’ icon to skip the pairing mode.
1.7 Password set up
Press “OK” button to set up the password.
1.8 Select TV mode (Home/Retail)
Please be sure in this step, select “Home” if you are using this TV for use at home.
Make sure to confirm once you have selected “Home”.

INITIAL SETUP
TM
1.9 Chromecast built-in
Select On/Off to make Chromecast built-in always available.
1.10 Tuner mode Setting
Select Antenna/Cable/Satellite to scan TV channel.
If you select “Skip”, the channel scan could be performed in menu.
1.11 Setup completed and Disclaimer Terms
1.12 Play Auto Installs
Select install or un-install the recommended apps and Google apps by using this process.
Select “Start exploring” to the next page.

HOME
2. HOME
Once you have completed initial setup, you will now enter the home by screen or press
button to display the homepage.
*Some countries home screen UI may display different as above image,please refer to the
product for details.
1.Search
Use your voice to jump toshows, control devices, and more—just ask Google.
2.For you
Selected the “For you” to browse content from across your apps, intelligently organized
just for you.
3. Movies & 4. Shows
Discover new movies and shows from across your subscriptions. Suggestions based on
what you’ve watched and what interests you make it easier to find your next favorite.
5.Apps
Selected the “Apps” to have access to all your applications. Pre-installed applications are
available for you in this row.
6 Library
One list for all your discoveries. When you see an interesting show or movie, add it to your
Watchlist to keep track of your new discoveries.
①③
②⑥
⑤
④

SETTINGS
3.Settings
Allows to set various performance of your TV .
1.Press / button to select “Settings” which is in the upper right corner of the screen.
2.Press / button to select the option which you want to adjust in the Settings menu.
3.Press【OK】to enter.
Channel and inputs
Display the scan sub-menu based on different channel installation modes.
1.Press / button to select “Channel Source” & Inputs”.
2.Press【OK】to enter “Channels”, then press / choose Analog,Antenna,Cable etc to
scan the channels.
3.Press / button to select “Inputs”,press【OK】to enter “Inputs”,then press / choose
HDMI1,HDMI2,HDM3,HDMI4,Composite etc.
Network & Internet
Adjust all network setting and check connection if you have connection problems.
1.Press / button to select “Network & Internet” in the settings menu.
2.Press / button to select: Wi-Fi/Add new network/Scanning always available/Proxy
settings/IP settings.
System
1.Press / button select the options of About, Date & Time, Timer, Language, Inputs,
Picture, Sound, Google Assistant, Reset and others.
2.Press【OK】to jump to the corresponding sub-option.

About
1.Press / button to check additional information such as System update, Device name,
Restart, Status, and more.
2.Press button to return to the previous menu.
Press button to exit the menu.
* The above pictures are for reference only, please refer to the product for details.
Factory reset
If Factory reset is selected, it will erase all data from your device’s internal storage,
including: your Google Account, system and app data and settings, and downloaded apps.
SETTINGS

TV SOURCE SETTING
4.Tv Source setting
To enter TV source in Homepage:
1.Press button to select input source.
2.Press button, then select “Channels” and select “New Channels Available” to enter.

ACCOUNTS SIGN-IN
5. Accounts & sign-in
To have access and to download applications, you must sign in with a Google Account.
Once you open Google Play, you will be promted to sign in or create a new account.
Once you have signed in, you will be brought to the below page, scroll through the list of
applications available for download or go to the search button, and search via entering
text or by asking Google on your voice remote.
* The above pictures are for reference only, please refer to the product for details.

BASIC TROUBLESHOOTING
Poor picture and sound quality
No picture or sound in TV status
No sound or sound is too low at
maximum volume
No colour, wrong colour or tints
Picture rolls vertically
Blurred or snowy picture, distorted
sound
Try a different channel
Adjust the antenna
Check all connections
Try another channel
Press the TV/AV button
Make sure TV is plugged in
Check the antenna connection
Check the volume settings on any
external speakers connected to
your television
Adjust the TV volume accordingly
Check another channel or input
Check that MUTE hasn't been
turned on
Make sure the program itself is
broadcast in colour
Select the picture menu, then
adjust the colour and tint submenus
Check all connections
Issues may be caused by the use of
an indoor antenna (poor signal)
Check direction, location and
connections to your antenna
Replace remote control batteries
Check battery terminals
Remote is out of range, move closer
to TV
Remove any obstructions between
remote and IR sensor of TV
Remote control malfunctions
Image is not centred on the screen
"No Signal" on HDMI source
For our full TV troubleshooting
guide and extended User Manual
for this TV, head online to
help.kogan.com
Make sure the power cord to your TV
is plugged in and turned on
Adjust the horizontal and vertical
position
Test the device with a different HDMI
cable
Plug the device into another HDMI
port
Try a different device connected to
the same cable and port
Perform a factory reset on your TV

NOTES

Need more information?
This is a Quick Start Guide
This manual suits for next models
1
Table of contents
Other Kogan Smart TV manuals