komodo EW3500DLX User manual

Owner's Manual
Owner's Manual
Congratulations on your purchase. You have purchased a dependable and sturdy Winch but only by
proper care and operation can you expect to receive the service and long life designed and built into it.
This manual contains valuable information about your new Winch. It has been carefully prepared to
give you helpful suggestions for operating, adjusting, servicing and ordering repair parts.
#EW3500DLX
3500lbs.
3500lbs.ATV/UTVWinch
ATV/UTVWinch

BLANK

Keep this manual in a convenient place for quick and easy reference. Study it
carefully. If in the future your seeder may need new parts to replace those that are
worn or broken, if so, call 1 (800)333-8889 and provide the model, part number, and
proof of purchase and we will replace the part as outlined in our Limited Warranty.
WARNINGS
WARNINGS
Read, study and follow all instructions before operating this device. Failure to heed
these instructions may result in personal injury and/or property damage.
Operate, lubricate, assemble and maintain the equipment in accordance with all
instructions and safety procedures in this manual.
Inspect the equipment and replace or repair any parts that are damaged or worn which
under continued operation would cause damage, wear to other parts, or cause a safety
hazard.
Your winch can develop tremendous pulling forces and if used unsafely or improperly
could result in property damage, serious injury or death
It is the purchaser and/or operator's responsibility to:
Pay particular attention to the notes preceded by these symbols as they are written
for your safety. Ultimately, safe operation of this device rests with you, the operator.
WARNING – DO NOT EXCEED RATED CAPACITY.
WARNING – Intermittent use only.
WARNING - Do not use winch in lifting or moving or persons.
CAUTION Indicates a potentially hazardous situation which, if not avoided,
may result in minor or moderate injury. This notation is also
used to alert against unsafe practices.
WARNING Indicates a potentially hazardous situation which, if not avoided
could result in death or serious injury.
!
!
!
!
!
ImportantSafetyInformation
THE FOLLOWING SAFETY RECOMMENDATIONS ARE TO SAFEGUARD YOU
THEREFORE IT IS NECESSARY TO READ THEM CAREFULLY, MEMORIZING AND
ALWAYS APPLYING THEM.
The warnings in this manual regard exclusively the allowed uses and reasonably
foreseeable. All below Instructions must be used with common sense and adequate
measures to prevent accidents.
The machine must be used by an experienced, of age operator.
All the listed instructions must be carefully respected.
Possible changes to the machine, not authorized by the manufacturer (by written copy),
exclude his responsibility.
Check for correct functioning of the machine, before every use.
Carefully read this manual before proceeding to start, operate, employ or maintenance the
machine.
Watch, in addition to the warnings of this manual, all the safety, accident prevention rules of
general nature.
The manual must always be handy, so as to consult it, in order to check working cycle and
safety information. In case of loss or damage, it will be necessary to ask for a replacement copy.
1

WARNING - A minimum of five wraps of cable around the drum barrel is necessary for pulling and
holding the rated load. The cable clamp is not designed to hold the load without 5 wraps of cable around
the barrel.
WARNING - Keep yourself and others a safe distance to the side of the cable when under tension.
WARNING - The wire rope may break before the motor stalls. For heavy loads at or near rated
capacity, use a pulley block/snatch block to reduce the load on the wire rope.
WARNING -Never step over a cable, or near a cable under load.
WARNING - Don't move the vehicle to pull a load (towing) on the winch cable. This could result in cable
breakage.
WARNING-Disconnect the remote control and battery leads when not in use.
WARNING- Do not exceed maximum pull rating. Avoid “shock loads” by using the control switch
intermittently to take up the slack in the wire rope. “Shock loads” can far exceed the rate capacity for the
wire rope and drum.
WARNING- Do not exceeds maximum line pull ratings shown on the tables.
WARNING-When re-spooling the cable, ensure that the cable spools in the under-wind position with
the cable entering the drum from the bottom, not the top. To re-spool correctly, and while wearing
gloves, keep a slight load on the cable while pushing the remote button to draw in the cable. Walk
toward the winch not allowing the cable to slide through your hands. Do not let your hands get within
12?of the winch while re-spooling. Turn off the winch and repeat the procedure until a few feet of cable
is left. Disconnect the remote control and finish spooling by hand by rotating the drum by hand with the
clutch disengaged. Keep hands clear of the fairlead and drum while the winch is under power.
Do not use as a hoist. Do not use for overhead lifting.
Failure to heed these warnings may result in personal injury and/or property damage.
WARNING - Use gloves to protect hands when handling the cable. Never let the cable slide through
your hands.
WARNING – Never connect the cable back to itself.
Apply blocks to the wheels of the vehicle when on an incline..
No modifications, alterations, or deviation to the winch are authorized by the manufacturer and SHALL
not be made.
Duration of winching pulls should be kept as short as possible. If the motor becomes uncomfortably hot
to the touch, stop winching immediately and let it cool down for a few minutes. Do not pull for more than
one minute at or near the rated load.
CAUTION - If the motor stalls do not maintain power to the winch. Electric winches are designed and
made of intermittent use and should not be used in constant duty applications.
CAUTION - Never release the free-spool clutch when there is a load on the winch.
CAUTION - Use hand saver hook when handling the hook for spooling or un-spooling the wire rope.
!
!
!
!
!
The winch is rated at 3500 lbs capacity when spooling the first rope layer on the drum. Overloads
can damage the winch/motor/ or wire rope. For loads over 1800 lbs. we recommend the use of
the pulley block/snatch block to double the wire rope line. It will aid in two ways: a) reduce the
number or rope layers on the drum, as well as, b) reduce the load on the wire rope by as much as
50%. When doubling the line back to the vehicle, attach to the frame or other load bearing part.
The vehicle engine should be kept running during operation of the winch to minimize battery drain
and maximize power and speed of the winch. If the winch is used for a considerable time with the
engine off the battery may be drained and too weak to restart the engine
GENERALTIPSFORSAFEOPERATION
!
!
!
!
!
!
!
!
!
2

GETTINGTOKNOWYOURWINCH
Your 3500lb winch is a powerful piece of machinery. It is important that you understand the
basics of its operation and specifications so that when you need to use it, you can use it with
confidence and safety. Below is a list of the components of your winch and their use. Practice
using your winch before you are in a situation where you need to use it.
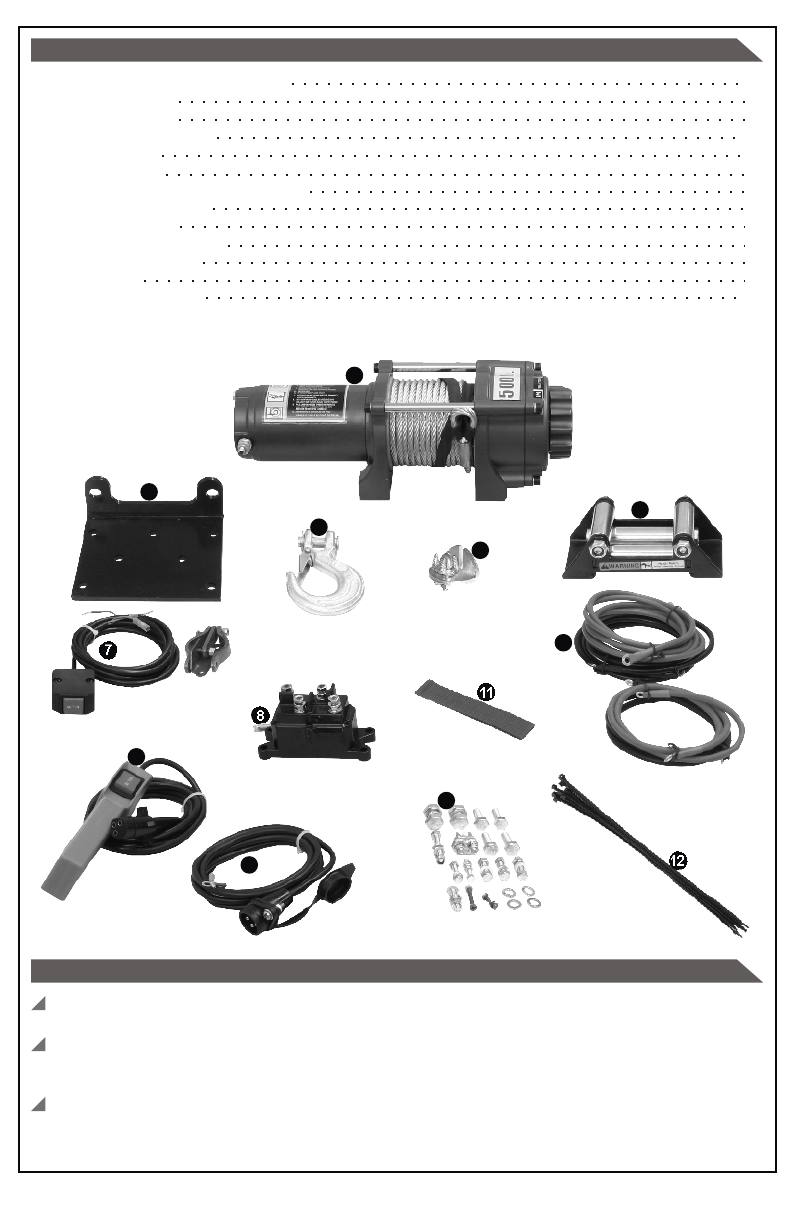
Motor: Your 1.3hp motor is powered by a 12 volt battery and provides power to the gear
mechanism which turns the drum and winds the wire rope;
Winch Drum: The winch drum is the cylinder on which the wire rope is stored. It can feed or
wind the rope depending on the remote winch switch.
Wire Rope: Your winch has a 7/32"X42' galvanized aircraft cable designed specifically for
load capacity of 3500lbs. The wire rope feeds onto the drum in the “under wind” position
through the roller fairlead and is looped at the end to accept the clevis hook pin.
Roller Fairlead: When using the winch at an angle the roller fairlead acts to guide the wire
rope onto the drum and minimizes damage to the wire rope from abrasion on the winch
mount or bumper.
Mechanic Gear System: The reduction gears convert the winch motor power into extreme
pulling forces.
Braking System: Braking action is automatically applied to the winch drum when the winch
motor is stopped and there is a load on the wire rope. The braking action is applied by a
separate mechanical brake.
Free Spooling Clutch: The clutch allows the operator to manually disengage (“Out”) the
spooling drum from the gear train, free spool. Engaging the clutch (“In”) locks the winch into
the gear system.
Control System: your winch has multiform operations for a variety of applications, you can
directly control your winch by using Power Cord/Switch Assembly, you can also control your
winch through a solenoid control box by pressing a button on the power switch you selected
to use.
Solenoid: Power from the vehicle battery flows through the weather sealed switch before
being directed to the winch motor.
Remote Switch: The Power switch leads has a dual switch for powering in or powering out
your winch drum. The Power switch leads allow you to stand clear of the wire rope when the
winch is under load.
Universal Flat Bed Mounting Plate: Your winch is being supplied with a flat bed mounting
plate that can be mounted to most flat surfaces such as trailers, step bumpers, truck beds,
etc. The mounting plate also has holes to accept your roller fairlead.
Get to know your winch before you actually need to use it. We recommend that you set up a few
test runs to familiarize yourself with rigging techniques, the sounds your winch makes under
various loads, the way the cable spools on the drum, etc.
Inspect the wire rope and equipment before each use. A frayed or damaged rope shall be
replaced immediately. Use only manufacturer's identical replacement rope with the exact
specifications.
Inspect the winch installation and bolts to ensure that all bolts are tight before each operation.
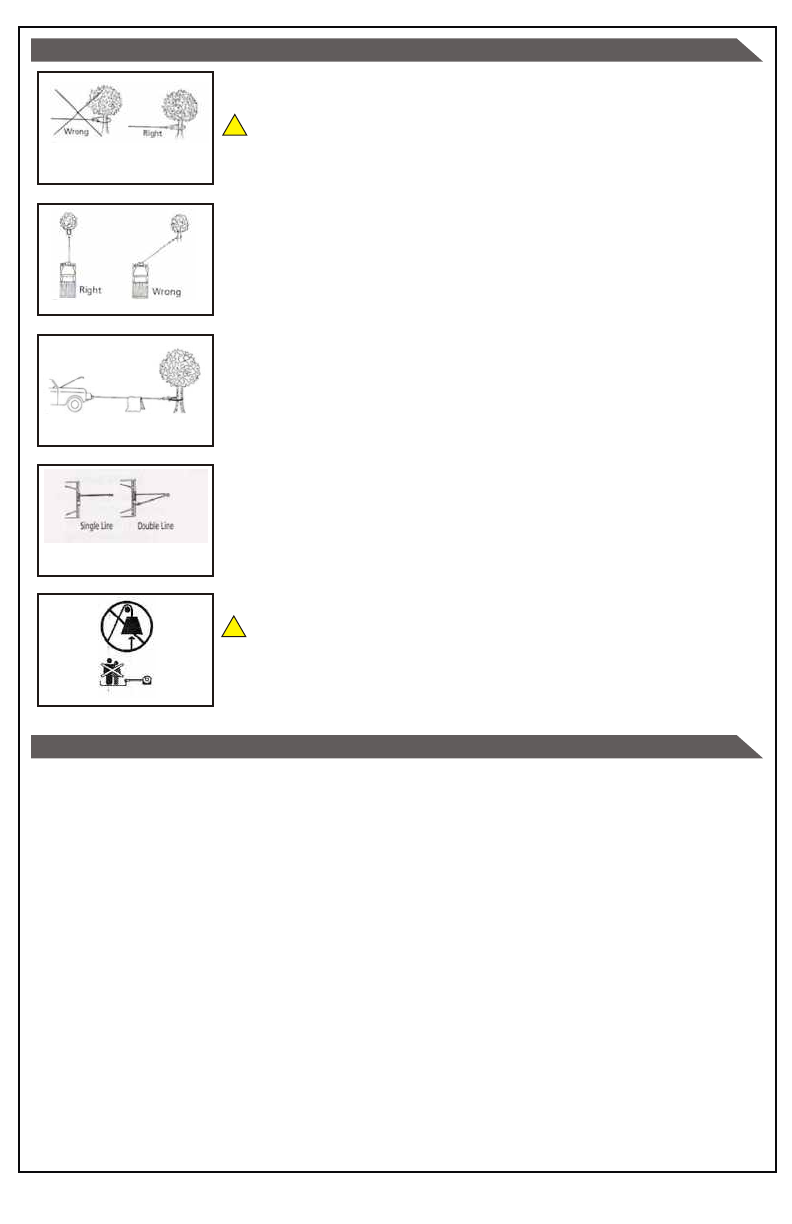
Never connect the cable back to itself. This will cause cable damage. Always use a snatch
block, sling or chain of suitable strength.
Store the remote control inside your vehicle in a place that it will not be damaged.
Any winch that appears to be damaged in any way, is found to be worn, or operates abnormally
SHALL BE REMOVED FROM SERVICE UNTIL REPAIRED. It is recommended that the
necessary repairs be made by a manufacturer's authorized repair facility.
Pull only on areas of the vehicle as specified by the vehicle manufacturer.
Only attachments and/or adapters supplied by the manufacturer shall be used.
3

1. Winch Assembly with Wire Rope
2. Mounting Plate
3. Roller Fairlead
4. Motor & Battery Cables
5. Clevis Hook
6. Cable Stopper
7. Rocker Switch & Mounting Bracket
8. Solenoid & "Y" Cable
9 Remote Control
10.Remote Control Socket
11.Non-marring Strap
12.Cable Ties
13.Mounting Hardware
IncludedWithYourWinch
1
AccessoriesYouWillNeed
1
1
4
1
1
1
1
1
1
1
1
1
Gloves – For handling the wire rope and hook strap.
Anchor Strap/Chain – Tree saver anchor straps are made of high quality nylon with high
tensile strengths from 5,000lbs to 10,000lbs.
Heavy Blanket – place on the cable to absorb energy should the wire rope break.
(notincludedwithyourwinch)
4
1
2
3
4
5
7
8
9
10
11
12
13
6

WinchAssemblyAndMounting
IN
OUT
RemoteControlSocketMounting
5

Your 3500lb winch is designed with a bolt pattern that is standard in this class of winch.
Many winch mounting kits are available that utilize this bolt pattern for the most popular
ATV's and mounting plates. It is not guaranteed that this plate will fit onto your particular
ATV/UTV. Check with your reseller for a more accurate fitting mounting plate. If you will
utilize the mounting plate you must ensure that it is mounted on a flat surface so that the
three major sections (motor, drum and gear housing) are properly aligned. Proper
alignment of the winch will allow even distribution of the full rated load.
Start by connecting the roller fairlead (part #3 ) to the mounting plate (part #2) using 2
each of the cap screw m8 x 20, flat washer, lock washer and securing with a nut m8
(make sure the screw is placed through the mounting plate and roller fairlead from
inside the plate. this will allow enough clearance for the winch to be placed in the plate
without obstruction.)
Assemble the winch to the mounting plate (part #2) by first pulling and releasing the
clutch knob to “off” position (free spooling). pull out a few inches of cable from the drum
and feed the wire loop through the opening in the front of the mounting plate and roller
fairlead. Now, using the remaining m8 x 15 cap screws and lock washers secure the
winch to the mounting plate.
Connect the battery and motor leads as the previous drawing.
CAUTION – Batteries contain gases which are flammable and explosive. Wear eye
protection during installation and remove all jewelry. Do not lean over battery while
making connections.
Assemble the clevis hook to the cable. take off the pin from the clevis hook, connect the
clevis hook to the cable and mount the pin back to the clevis hook.
Always use the Hand Saver when free-spooling and re-spooling the wire rope. Using the
Hand Saver keeps your hands and fingers away from the rotating drum.
Check for proper drum rotation. Pull and turn the clutch knob to the “off” position (Free-
spooling). Pull out some cable from the drum, and then turn the clutch knob to the “In”
position to engage the gears. Press the cable out button on the power switch. If the
drum is turning and releasing more cable then your connections are accurate. If the
drum is turning and collecting more cable then reverse the leads on the motor. Repeat
and check rotation.
!
6

Locate a suitable anchor such as a strong tree trunk or boulder.
Always use a sling as an anchor point.
CAUTION Do not attach the clevis hook back onto the cable as
this could cause damage to the cable.
As shown in Fig 3.1
RiggingTechniques
RiggingTechniques
Do not winch from an acute angle as the wire rope will pile up on
one side of the drum causing damage to wire rope and the winch.
Fig 3.2
Short pulls from an angle can be used to straighten the vehicle.
Long pulls should be done with the wire rope at a 90° angle to the
winch/vehicle.
When pulling a heavy load, place a blanket or jacket over the wire
rope five or six feet from the hook. In the event of a broken cable it
will dampen the snap back. For additional protection open the
hood of the vehicle as shown in Fig 3.3
(SelfRecovery)
(SelfRecovery)
!
For pulls over 1800lbs, we recommend the use of the snatch
lock/pulley block to double line the wire rope. Fig 3.4
This reduces the load on the winch and the strain on the rope by
approximately 50%.
WARNING - Never use your winch for overhead hoisting or for
lifting people or moving people
!
WinchingTechniquesA-Z
A. Take time to assess your situation and plan your pull.
B. Put on gloves to protect your hands.
C. Disengage the clutch to allow free-spooling and also save battery power.
D. Attach the hand saver hook to the clevis hook.
E. Pull out the wire rope to your desired anchor point using the hand saver hook.
F. Secure the clevis hook to the anchor point: Sling, chain or snatch block. Do not attach the hook
back onto the wire rope.
G. Engage the clutch.
H. Connect the remote control to the winch.
I. Start your engine to ensure power is being replenished to the battery.
J. Power in the wire rope guiding the wire under tension to draw up the slack in the wire. Once the
wire is under tension stand well clear. Never step over the wire rope.
K. Double check your anchors and make sure all connections are secure.
L. Inspect the wire rope. Make sure there are at least 5 wraps of wire rope around the winch drum.
M. Drape a blanket or jacket over the wire rope approximately 5 to 6 feet from the hook. Open the
hood for added protection.
N. Clear the area. Make sure all spectators all well back and that no one is directly in front or behind
the vehicle or anchor point.
O. Begin winching. Be sure that the wire rope is winding evenly and tightly around the drum. The
vehicle that is being winched can be slowly driven to add assistance to the winching process. Avoid
shock loads; keep the wire rope under tension.
Fig 3.1
Fig 3.2
Fig 3.3
Fig 3.4
Fig 3.5
7

P. The vehicle to be winched should be placed in neutral and the emergency brake released. Only
release the brake pedal when under full tension. Avoid shock loads to the winch. This can damage
the winch, rope and vehicle.
Q. The winch is meant for intermittent use. Under full load with a single line rig do not power in for
more than a minute without letting the motor cool down for a few minutes and then resume the
winching operation.
R. The winching operation is complete once the vehicle is on stable ground and is able to drive
under its own power.
S. Secure the vehicle. Be sure to set the brakes and place the vehicle in park.
T. Release the tension on the wire rope. The winch is not meant to hold the vehicle for long periods
of time.
U. Disconnect the wire rope from the anchor.
V. Rewind the wire rope. Make sure that any wire already on the drum has spooled tightly and
neatly. If not, draw out the wire and re-spool from the point where the rope is tight.
W. Keep your hands clear of the winch drum and fairlead as the wire rope is being drawn in.
X. Secure the hook and hook strap.
Y. Disconnect the remote control and store in a clean, dry place.
Z. Clean and inspect connections and mounting hardware for next winching operation.
WinchingTechniquesA-Z
(Ctd.)
(Ctd.)
Maintenance
Maintenance
Periodically check the tightness of mounting bolts and electrical connections. Remove all dirt or
corrosion and always keep clean.
Do not attempt to disassemble the gear box. Repairs should be done by the manufacturer or an
authorized repair center.
The gear box has been lubricated using a high temperature lithium grease and is sealed at the
factory. No internal lubrication is required.
The Manufacturer is not responsible for damages caused by an improper and unforeseen
use of the machine.
The Manufacturer is not responsible for:
Improper use of the machine, use by untrained staff;
Serious deficiencies in the foreseen maintenance;
Changes or not allowed modifications;
Use of non-original or specified spare parts;
Failure to fully or partially comply with the instructions;
Failure to comply with the common safety rules during work;
Unusual cases.
ReplacingTheWireRope
If the wire rope has become worn or is beginning to show signs of strands breaking, it must be
replaced before being used again. To do this, remove the defective rope by free spooling.
Remove the screw M5x8 on the drum and release the rope.
Insert the end of the new rope and secure the screw M5 x 8 tightly.
Engage the clutch and re-spool the new rope on the drum keeping tension on the rope as it
spools. Ensure that the rope is re-spooling in the under wind position.
Replace the wire rope only with identical replacement parts recommended by the
manufacturer
WARNING
WARNING
ATTENTION
ATTENTION
8

Motor does not
turn on
TroubleShooting
TroubleShooting
SYMPTOM POSSIBLE CAUSE SUGGESTED ACTION
Switch Assembly not
connected properly
Loose battery cable
connections
Defective Switch Assembly
Defective motor
Water has entered motor
Insert Switch Assembly all the way into the
connector.
Tighten nuts on all cable connections.
Replace Switch Assembly.
Check for voltage at armature port with
Switch pressed. If voltage is present, replace
motor.
Allow to drain and dry. Run in short bursts
without load until completely dry.
Motor runs but
cable drum does
not turn
Clutch not engaged Turn clutch to the “In” position. If problem
persists, a qualified technician needs to
check and repair.
Motor runs slowly
or without normal
power
Insufficient current or
voltage
Battery weak, recharge. Run winch with
vehicle motor running.
Loose or corroded battery cable connections.
Clean, tighten, or replace.
Motor overheating -Winch running time too
long
Allow winch to cool down periodically.
Motor runs in one
direction only
Defective Switch
Assembly
Loose or corroded battery cable or motor
cable connections. Clean and tighten.
Repair or replace switch assembly.
9

WinchAssemblyDrawing(3500lbs)
10
48
17
2
3
18
16
14
13
15
12
11
38
9
10
7
8
5
6
4
2
3
8
30
1
39
19
8
24
23
20
21
22
30
25
27
28
29
35
34
36
31 32 33
37
33
32
31
26
O
U
T
IN
40
41
42
43
44
45
46
47

No. Part # Qty Description Remark
1 P250100 1 Motor Assembly
2 P250001 4 Locking Washer Ö8
3 P250002 4 Cap Screw M8 x 15
4 P250003 1 Transition Shaft
5 P250004 2 Tie Bar
6 P250005 1 Hexagonal Shaft
7 P250006 1 Front Bush Drum
8 P250007 6 Spring Washer Ö6
9 P250008 1 Screw M5 x 8
10 P250009 2 Cap Screw M6 x 65
11 P250010 1 Drum
12 P250011 1 Rear Bush Drum
13 P250012 1 Front Thrust Washer
14 P250013 1 Gear Ring Output
15 P250200 1 Gear Carrier Assembly
16 P250014 1 Gear Ring
17 P250015 1 Thrust Washer
18 P250016 1 Gear Housing / End Bearing
19 P250017 1 Bearing Holder
20 P250018 1 Roller Bearing
21 P250019 1 Clutch axes
22 P250020 1 Cam Clutch Gear
23 P250021 1 Spring
24 P250022 1 Cover Clutch Housing
25 P250023 1 Roller Bearing
26 P250024 1 Elastic Collar
27 P250025 1 Clutch Handle
28 P250026 1 Locking Washer Ö5
29 P250027 1 Cap Screw M5 x 12
30 P250028 4 Cap Screw M6 x 20
31 P250029 4 Hex Flange Nut M8
32 P250030 4 Locking Washer Ö8
33 P250031 4 Thick Flat Washer Ö8
34 P250300 1 Roller Fairlead
35 P250032 1 Mounting Plate
36 P250033 2 Cap Screw M8 x 20
37 P250034 2 Cap Screw M8 x35
38 P250400 1 Cable Assembly
39 P250035 1 Non-marring Strap
40 P250500 1 Cable Stopper
41 P250600 1 Solenoid
42 P250700 1 Y Cable
43 P250800 1 Battery Cables
44 P250900 1 Motor Cables
45 P251000 1 Rocker Switch
46 P251100 1 Remote Control (RC4)
47 P251200 1 Remote Control Socket
48 P250036 2 Terminal Protector
WinchPartsList(3500lbs)
11

Rated line pull 3500 lbs (1588 kgs)
Motor: permanent magnet 1.3hp/1.0kw(DC 12V)
Gear reduction ratio 170:1
Cable (Dia.×L) Ø7/32"×42'
Drum size (Dia.×L) Ø1.46"×3.15"
Mounting bolt pattern 3.13" (79.5 mm) 4-M8
Overall dimensions
(L×W×H) 13.2"×4.6"×4.4"
Net weight
Ibs(kg) 23(10.4)
Pull, Speed, Amperes, Volts (First layer):
Line Pull Line Speed ft/min (m/min) Current A
Ibs (kgS) 12V DC 24V DC 12V DC 24V DC
0 10.5(3.2) 10.5(3.2) 20 16
1000(454) 9.0(2.7) 9.5(2.9) 75 40
2000(907) 7.7(2.3) 8.9(2.7) 130 75
3500(1588) 4.6(1.4) 7.7(2.3) 200 120
Line Pull And Rope Capacity In Layer
Layer Rated line pull lbs (kgs) Total rope on the drum ft (m)
1 3500(1588) 6.0(1.8)
2 2789(1265) 13.6(4.1)
3 22.1(6.7)
4 31.2(9.5)
5 42.0(12.8)
Specifications
Specifications
12
2319(1052)
1984(900)
1733(786)

KOMODOATVAccessories
1311 John Reed Ct.
City of Industry, CA 91745 USA
1(800)333-8889
KOMODO., (“Distributor”) warrants its 3500lbs ATV/UTV Winch (the “Products”) as follows:
1. Limited Warranty.
Distributor warrants to original purchaser, providing Proof of Purchase, that the Products sold hereunder will be
free from defects in material and workmanship for a period of one year from date of purchase. If the products do
not conform to this Limited Warranty during the warranty period (as herein specified), Buyer shall notify Distributor,
in writing, within the warranty period, and the defects are of such type and nature as to be covered by this warranty,
Distributor shall, at its own expense, furnish replacement products or, at Distributor's option, replacement parts for
the defective products. Shipping and installation of the replacement Products or replacement parts shall be at
Buyer's expense.
2. Other Limits.
THE FOREGOING IS IN LIEU OF ALL OTHER WARRANTIES, EXPRESS OR IMPLIED, INCLUDING BUT NOT
LIMITED TO THE IMPLIED WARRANTIES OF MERCHANT ABILITY AND FITNESS FOR A PARTICULAR
PURPOSE. Distributor does not warrant against damages or defects arising out of improper or abnormal use or
handling of the Products; against defects or damages arising from improper installation, against defects in
products or components. Distributor passes on to Buyer the warranty received (if any) from the maker thereof of
such Manufacturer made products or components. This warranty also does not apply to Products upon which
repairs have been affected or attempted by persons other than pursuant to written authorization by Distributor.
Fasteners are not covered in this warranty.
3. Exclusive Obligation.
THIS WARRANTY IS EXCLUSIVE. The sole and exclusive obligation of Distributor shall be to repair or replace
the defective Products in the manner and for the period provided above. Distributor shall not have any other
obligation with respect to the Products or any part thereof, whether based on contract, tort, strict liability, or
otherwise. Under no circumstances, whether based on this Limited Warranty or otherwise, shall Distributor be
liable for incidental, special, or consequential damages.
4. Other Statements.
Distributor's employees or representatives' ORAL OR OTHER WRITTEN STATEMENTS DO NOT CONSTITUTE
WARRANTIES, and shall not be relied upon by Buyer, and are not a part of the contract for sale or this Limited
Warranty.
5. Entire Obligation.
This Limited Warranty states the entire obligation of Distributor with respect to the Products. If any part of this
Komodo 3500lbs ATV/UTV Winch Limited Warranty
13
EW3500DLX

KOMODOATVAccessories
1311 John Reed Ct.
City of Industry, CA 91745 USA
1(800)333-8889 EW3500DLX.031709
ATVUniversalWheelChock
#UWCP#UWCP
PortableWinchMount
PortableWinchMount
#PWM#PWM
UTVBedExtender
UTVBedExtender
#UTVBE#UTVBE
UTVSideCargoBox
UTVSideCargoBox
#UTVCB#UTVCB
We at Komodo are constantly
looking for new ideas to make
your ATV/UTV use experience
easier. Expect more great
products from us in a near
future.
MoreToCome
MoreToCome

Table of contents
Popular Winch manuals by other brands

Sealey
Sealey TW16500/12 instructions

Gude
Gude 55127 Translation of original operating instructions

Harken
Harken Radial Winch 35.2 PT BBB Installation and maintenance manual

Portable Winch
Portable Winch PCH1000 user guide

Rhino Winch
Rhino Winch 8004698 quick start guide

XPOtool
XPOtool 62974 Operation manual

Sealey
Sealey GWE1200M instructions

BGS technic
BGS technic 3485 instruction manual

TRAC
TRAC Small Craft T10121-C Installation and operating instructions

Portable Winch
Portable Winch PORTABLE CAPSTAN WINCH PCW5000 quick start guide

Comeup
Comeup DV-9i quick start guide

Tractor Supply
Tractor Supply Traveller X User's manual & operating instructions