Konexx USB Phone 2 PC User manual

9235 Activity Road Phone: (858) 537-5010
Suite 108
San Diego, CA 92126 Fax : (858) 537-5020
Konexx USB Phone 2 PC Products
Version 4.6
White Paper

Table of Contents
INTRODUCTION........................................................................................................................................................................1
SOFTWARE.................................................................................................................................................................................1
BASIC EDITION............................................................................................................................................................................1
ADVANCED EDITION...................................................................................................................................................................2
CALL CENTER EDITION...............................................................................................................................................................2
SECURE EDITION.........................................................................................................................................................................3
LAW ENFORCEMENT EDITION..................................................................................................................................................... 3
Law Enforcement with Transcription.....................................................................................................................................4
BASIC WITH TRANSCRIPTION ......................................................................................................................................................4
COMPUTER REQUIREMENTS...............................................................................................................................................4
HARDWARE ...............................................................................................................................................................................5
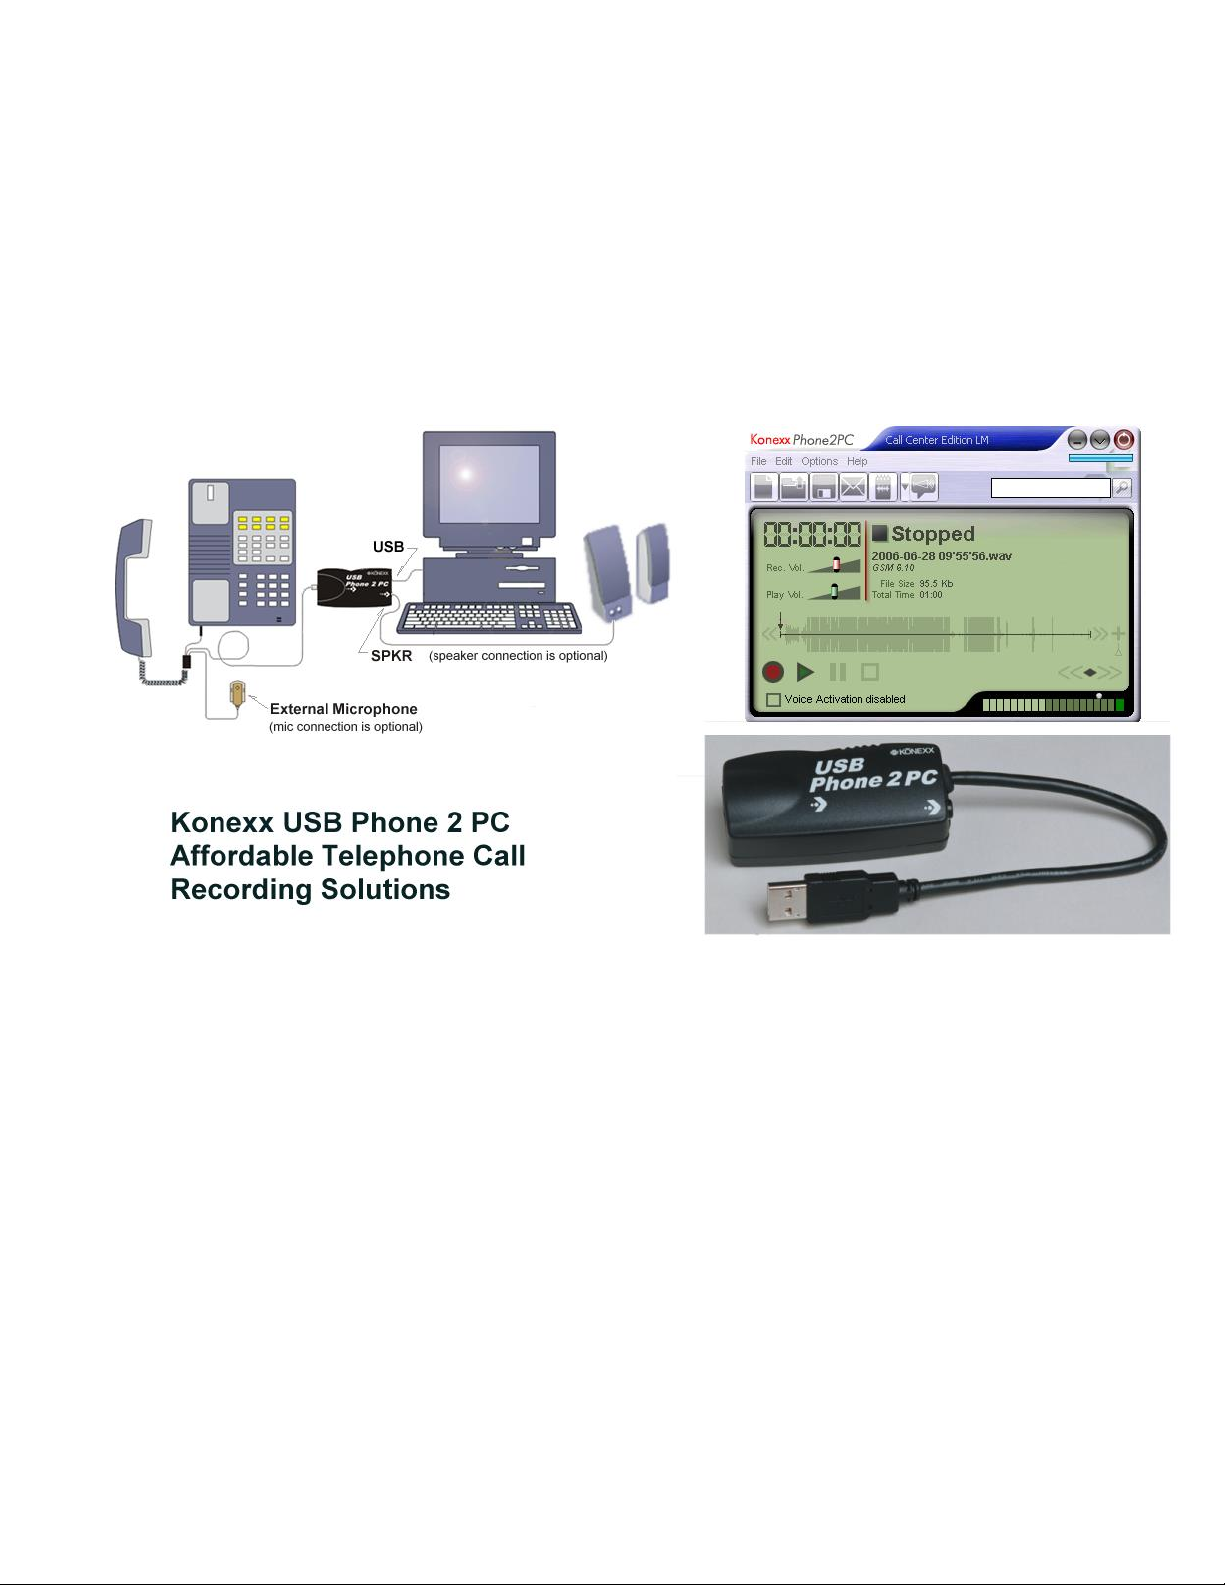
USB PHONE 2PC INTERFACE .....................................................................................................................................................5
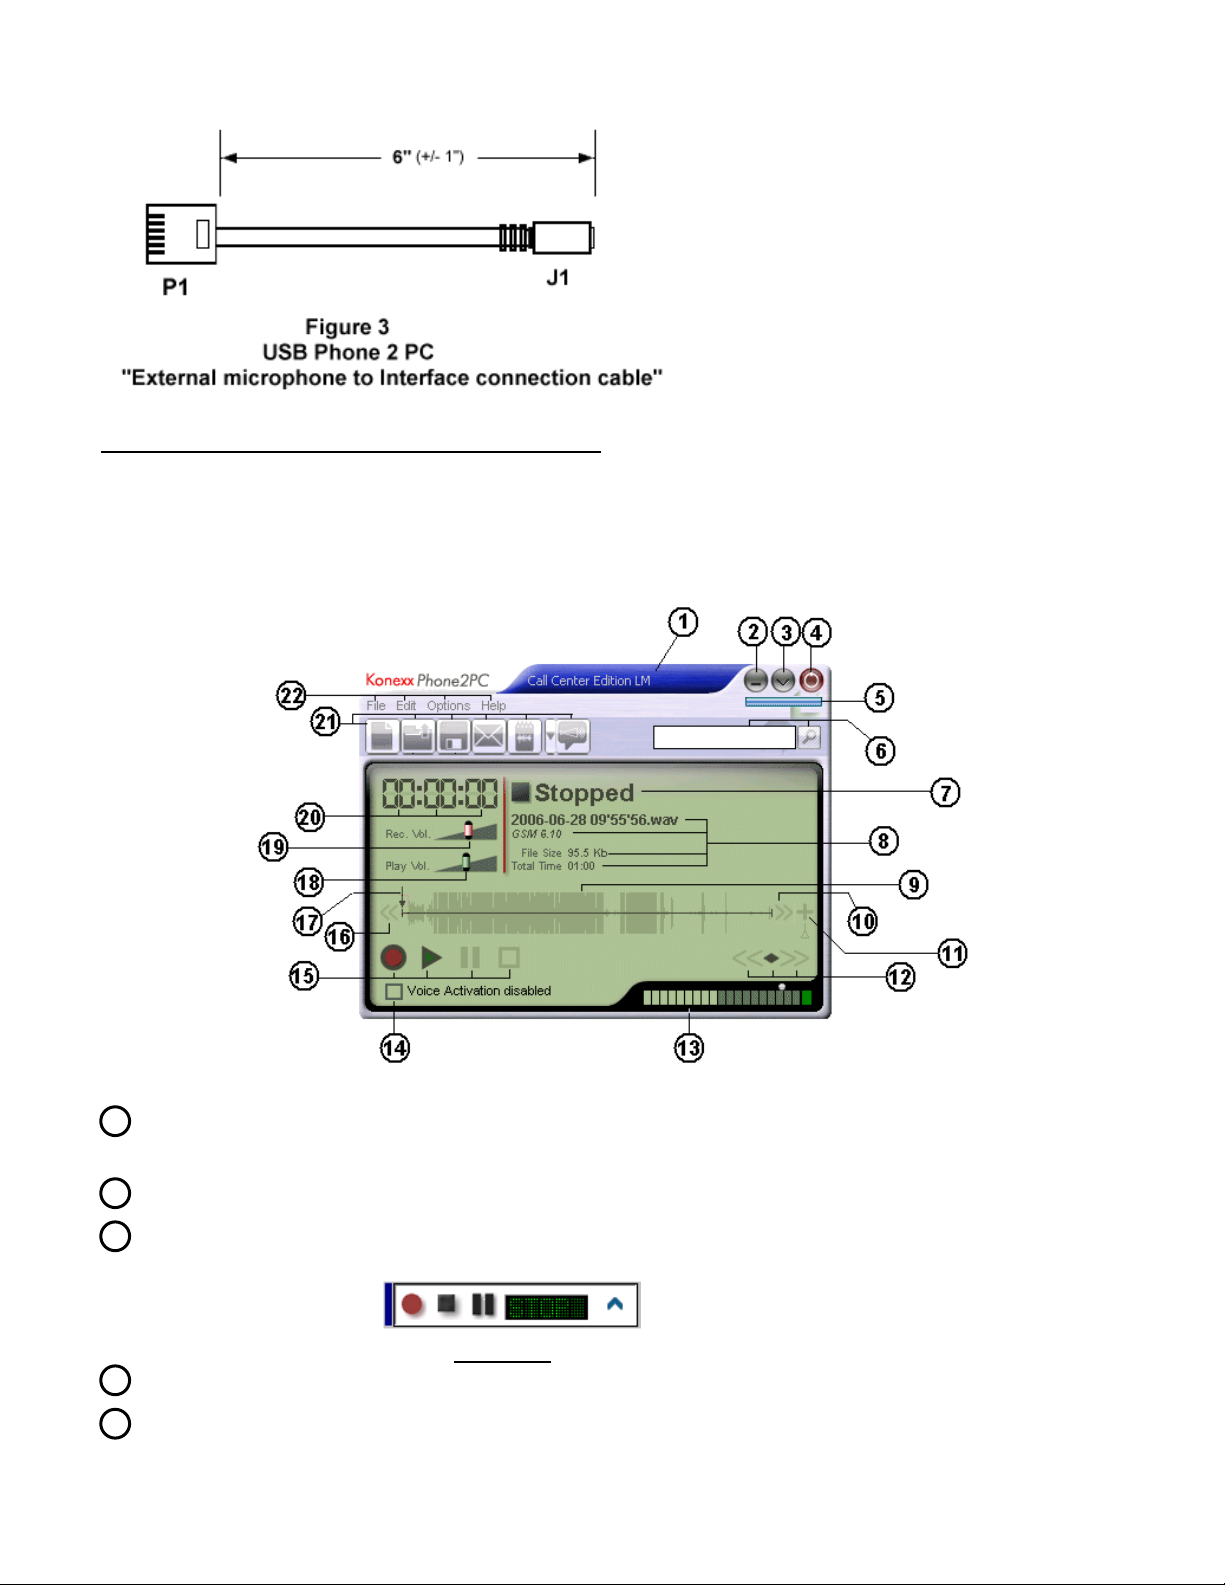
TELEPHONE TO INTERFACE CONNECTION CABLE......................................................................................................................... 5
EXTERNAL MICROPHONE............................................................................................................................................................6
EXTERNAL MICROPHONE TO INTERFACE CONNECTION CABLE....................................................................................................6
MAIN GRAPHICAL USER INTERFACE (GUI) ROAD MAP .............................................................................................7
GETTING STARTED .................................................................................................................................................................9
HARDWARE INSTALLATION ........................................................................................................................................................9
SOFTWARE INSTALLATION........................................................................................................................................................10
BASIC OPERATION ....................................................................................................................................................................10
Recording.............................................................................................................................................................................10
Pause.................................................................................................................................................................................... 11
Play ...................................................................................................................................................................................... 11
FEATURES ................................................................................................................................................................................ 11
“FILE”DROP DOWN MENU.........................................................................................................................................................11
New....................................................................................................................................................................................... 11
Open.....................................................................................................................................................................................11
Save As.................................................................................................................................................................................11
Send by e-mail...................................................................................................................................................................... 11
Rename.................................................................................................................................................................................11
Properties.............................................................................................................................................................................11
File Merger .......................................................................................................................................................................... 12
File Converter......................................................................................................................................................................12
Search...................................................................................................................................................................................15
“EDIT”DROP DOWN MENU ........................................................................................................................................................ 16
Record..................................................................................................................................................................................16
Play ...................................................................................................................................................................................... 16
Pause.................................................................................................................................................................................... 16
Stop....................................................................................................................................................................................... 16
Record from current position............................................................................................................................................... 16
Add annotation..................................................................................................................................................................... 17
Sound Editor......................................................................................................................................................................... 17
Add Bookmark...................................................................................................................................................................... 19
“OPTIONS”DROP DOWN MENU.................................................................................................................................................. 20
Preferences........................................................................................................................................................................... 20
Recording Source................................................................................................................................................................. 29
Playback Destination ........................................................................................................................................................... 29
Playback Speed ....................................................................................................................................................................30
Master Volume ..................................................................................................................................................................... 30
Clean Temporary Files......................................................................................................................................................... 30
Audio Settings Wizard..........................................................................................................................................................30
Adjust USB Volume all the way up....................................................................................................................................... 30

Table of Contents
Upgrader..............................................................................................................................................................................30
“HELP”DROP DOWN MENU .......................................................................................................................................................31
Introduction.......................................................................................................................................................................... 31
Index..................................................................................................................................................................................... 31
Keyboard..............................................................................................................................................................................31
View Statistics…...................................................................................................................................................................31
Diagrams… .......................................................................................................................................................................... 31
About….................................................................................................................................................................................31
FEATURE AND CONTROL ICONS AVAILABLE FROM MAIN GUI................................................................................................. 32
Icons located in the upper right corner of the main GUI..................................................................................................... 32
Function/Feature Tool Bar Icons......................................................................................................................................... 32
Search For Text Icon............................................................................................................................................................33
Volume Controls................................................................................................................................................................... 33
Rewind and Fast Forward Controls..................................................................................................................................... 33
Add Bookmark...................................................................................................................................................................... 33
Main Function Controls....................................................................................................................................................... 33
Playback Speed Setting Control........................................................................................................................................... 33
Voice Activation Check Box.................................................................................................................................................34
OPERATIONS ........................................................................................................................................................................... 34
SELECTING THE DEVICE THE PHONE 2PC APPLICATION WILL USE FOR RECORDING AND PLAYBACK ........................................34
Recording Device................................................................................................................................................................. 34
Playback Device...................................................................................................................................................................34
Record from.......................................................................................................................................................................... 35
Playback through ................................................................................................................................................................. 35
Recording Feedback............................................................................................................................................................. 35
SETTING THE RECORDING LEVEL............................................................................................................................................... 35
SETTING UP AND USING VOICE ACTIVATION............................................................................................................................. 36
Threshold Slider................................................................................................................................................................... 37
Noise Timer..........................................................................................................................................................................37
Dead Air Timer ....................................................................................................................................................................37
SETTING UP AND USING ANNOUNCEMENTS............................................................................................................................... 39
Announcement Manager ...................................................................................................................................................... 40

Konexx USB Phone 2 PC
1
Introduction
Konexx has been designing and manufacturing computer to telephone interface products for more than 20 years. In 1999
Konexx expanded its computer to telephone product line to include a suite of cost effective telephone conversation recording
solutions called Phone 2 PC. This recording solution suite consisted of an easy to install telephone to computer sound card
interface device and a suite of recording software programs. The software programs were developed to satisfy the recording
needs for various business applications.
The USB Phone 2 PC is a recording solution consisting of the USB Phone 2 PC interface and recording software. The USB
Phone 2 PC interface is a combination telephone to computer interface and sound card combination. The USB Phone 2 PC
interface obtains its power from the computer’s USB port and does not require any other power source, making it ideal for
laptop users. The USB Phone 2 PC is compatible with computers running Microsoft Windows 2000, XP, Vista, Windows 7,
Windows 8 or Windows 10 32 bit or 64 bit Operating System (OS).
With the USB Phone 2 PC solution, you can record telephone conversation, conference calls via a speakerphone, dictations or
meetings. The USB Phone 2 PC comes with hardware to connect to your telephone handset or headset port for recording phone
conversations. An optional connection for the supplied external microphone is provided for recording calls made on the
speakerphone, meetings or dictation. The USB Phone 2 PC enables the playback of audio files through the telephone set for
parties at the other end of your call to hear them. User’s of the USB Phone 2 PC can also enable a recording “Beep Tone”
generation to comply with the “two party notification” recording laws in some states.
The USB Phone 2 PC solution is easy to use and easy to install. The software comes with an installation wizard to walk you
through the install process. The software registration is coded into the USB Phone 2 PC interface, eliminating the need to
register the software on-line or via telephone and making it simple to relocate the software from one computer to another.
The USB Phone 2 PC records conversations directly to your computer. Recordings can be saved directly to your hard drive or a
server. The recordings are stored in the form of a “wav” file. 1 hour of recording consumes only 5.6 MB of disk space.
Recordings can be archived to a CD or DVD. Over 100 hours of recordings can be archived to a CD.
Software
The USB Phone 2 PC recording solution suite offers different software solutions for your recording needs. There are three (3)
main software editions to select from and four (4) specialty editions. The three main software editions are:
Basic
Advanced
Call Center
The four specialty software editions are:
Secure
Law Enforcement
Law Enforcement with Transcription
Basic with Transcription
The USB Phone 2 PC software requires Microsoft Windows 2000, XP, Vista, Windows 7, Windows 8 or Windows 10 32 bit or
64 bit Operating System (OS) and will not run unless the USB Phone 2 PC hardware is attached to the computer.
All editions of the USB Phone 2 PC software includes an easy to follow “Installation Wizard” that steps the user through the
entire process of installing the hardware and software. The “Installation Wizard” also provides the installer with steps to test
the connections to ensure proper operation.
The following provides a brief description of the various software editions. Information on the feature details of the various
software editions will be covered in the “Features” section of this document.
Basic Edition
Basic Edition is an “On Demand” recording solution. “On Demand” means the user must manually start and stop the recording
function by clicking on an icon. The Basic Edition contains (as the name implies) the basic recording functions and is absent of
some of the features such as “Book Marking”, “Annotation” and “Voice Activation” contained in our more advanced recording
software. The Basic Edition does provide the ability to:
Record telephone calls or from the external microphone.
Email recordings directly from the program.

Konexx USB Phone 2 PC
2
Select automatic file naming.
Name recordings with a date and time stamp.
Ability to play audio files through the telephone to parties at the other end of your call.
Enable “Beep Tone” insertion to alert that calls are being recorded.
Records in a highly compressed good sound quality GSM mode, which only consumes 5.6MB of disk space per hour of
recording.
Announcement Manager –Allows an easy to use file selection table for selecting audio files to play through the
telephone, even while recording. This is a great utility for automatically making announcements, presentations or any
repetitive statements to the called party.
Advanced Edition
Advanced Edition contains all the capabilities of the Basic Edition, which are:
Record telephone calls or from the external microphone.
Email recordings directly from the program.
Select automatic file naming.
Name recordings with a date and time stamp.
Ability to play audio files through the telephone to parties at the other end of your call.
Enable “Beep Tone” insertion to alert that calls are being recorded.
Records in a highly compressed good sound quality GSM mode, which only consumes 5.6MB of disk space per hour of
recording.
Advanced Edition also includes the following additional capabilities:
Voice Activation option –which automatically starts the recording process when sound is detected and automatically
stops the recording process when a user-defined period of silence is detected.
Annotation –the ability to append a recorded note or message to the end or beginning of a recording.
Book Marking –the ability to insert a visible mark on a recording “time line” during the recording or playback process.
The “Book Marking” of important points in the recording is a great tool for training purposes or to save time when
playing long recordings by enabling the listener to go straight to the salient points in the recording.
Announcement Manager –Allows an easy to use file selection table for selecting audio files to play through the
telephone, even while recording. This is a great utility for automatically making announcements, presentations or any
repetitive statements to the called party.
File Editor –allows the editing (cutting or cropping) of recordings.
Minimized Screen Mode –allows the application to be run in a reduced screen mode, taking up less space on your
computer monitor.
Call Center Edition
Call Center Edition is designed for use in a location where management does not want the user to have any control over the
recording process or have access to any of the feature settings, such as a call center agent’s desk. Call Center Edition contains
all the capabilities of the Advanced Edition, which are:
Record telephone calls or from the external microphone.
Email recordings directly from the program.
Select automatic file naming.
Name recordings with a date and time stamp.
Ability to play audio files through the telephone to parties at the other end of your call.
Enable “Beep Tone” insertion to alert that calls are being recorded.
Records in a highly compressed good sound quality GSM mode, which only consumes 5.6MB of disk space per hour of
recording.
Voice Activation option –which automatically starts the recording process when sound is detected and automatically
stops the recording process when a user-defined period of silence is detected.
Annotation –the ability to append a recorded note or message to the end or beginning of a recording.
Book Marking –the ability to insert a visible mark on a recording “time line” during the recording or playback process.
The “Book Marking” of important points in the recording is a great tool for training purposes or to save time when
playing long recordings by enabling the listener to go straight to the salient points in the recording.
Announcement Manager –Allows an easy to use file selection table for selecting audio files to play through the
telephone, even while recording. This is a great utility for automatically making announcements, presentations or any
repetitive statements to the called party.
File Editor –allows the editing (cutting or cropping) of recordings.

Konexx USB Phone 2 PC
3
Minimized Screen Mode –allows the application to be run in a reduced screen mode, taking up less space on your
computer monitor.
Call Center Edition also includes the following additional capability:
Has an optional screen mode called “Agent Logger Mode” which takes all control and intervention away from the user.
The “Agent Logger Mode” only presents a small (.38 “ X .38”) icon on the monitor and activates the voice activated
recording and auto naming functions of the program.
Secure Edition
Secure Edition was developed for applications that require recordings to be resistant to tampering or that may be used for
evidentiary purposes. Such as private investigators, insurance companies, etc.. Much like Basic Edition, Secure Edition is an
““On Demand” recording solution. “On Demand” means the user must manually start and stop the recording function by
clicking on an icon.
Secure Edition contains the following capabilities:
Record telephone calls or from the external microphone.
Email recordings directly from the program.
Select automatic file naming.
Name recordings with a date and time stamp.
Recordings are “Voiced Stamped”. This means that when a recording is made, the program encapsulates the original
recording between a pre and post recording announcement. Encapsulating the original recording between a pre and post
announcement helps to maintain the integrity of the original recording for evidentiary purposes.
Annotation –the ability to append a recorded note or message to the end or beginning of a recording (before or after the
“Voice Stamps”).
Book Marking –the ability to insert a visible mark on a recording “time line” during the recording or playback process.
The “Book Marking” of important points in the recording is a great tool for training purposes or to save time when
playing long recordings by enabling the listener to go straight to the salient points in the recording.
Ability to play audio files through the telephone to parties at the other end of your call.
Records in a highly compressed good sound quality GSM mode, which only consumes 5.6MB of disk space per hour of
recording.
Minimized Screen Mode –allows the application to be run in a reduced screen mode, taking up less space on your
computer monitor.
Announcement Manager –Allows an easy to use file selection table for selecting audio files to play through the
telephone, even while recording. This is a great utility for automatically making announcements, presentations or any
repetitive statements to the called party.
Law Enforcement Edition
Law Enforcement Edition was developed specifically for Law Enforcement Agencies. Konexx will only sell Law Enforcement
Edition to “official” law enforcement agencies not to other businesses or agencies. Law Enforcement Edition recordings are
resistant to tampering which makes the recordings more useful for evidentiary purposes. Much like Basic Edition, Law
Enforcement Edition is an “On Demand” recording solution. “On Demand” means the user must manually start and stop the
recording function by clicking on an icon.
Law Enforcement Edition contains the following capabilities:
Record telephone calls or from the external microphone.
Email recordings directly from the program.
Select automatic file naming.
Name recordings with a date and time stamp.
Recordings are “Voiced Stamped”. This means that when a recording is made, the program encapsulates the original
recording between a pre and post recording announcement. Encapsulating the original recording between a pre and post
announcement helps to maintain the integrity of the original recording for evidentiary purposes.
Annotation –the ability to append a recorded note or message to the end or beginning of a recording (before or after the
“Voice Stamps”).
Book Marking –the ability to insert a visible mark on a recording “time line” during the recording or playback process.
The “Book Marking” of important points in the recording is a great tool for training purposes or to save time when
playing long recordings by enabling the listener to go straight to the salient points in the recording.
Ability to play audio files through the telephone to parties at the other end of your call.

Konexx USB Phone 2 PC
4
Records in a highly compressed good sound quality GSM mode, which only consumes 5.6MB of disk space per hour of
recording.
Minimized Screen Mode –allows the application to be run in a reduced screen mode, taking up less space on your
computer monitor.
Announcement Manager –Allows an easy to use file selection table for selecting audio files to play through the
telephone, even while recording. This is a great utility for automatically making announcements, presentations or any
repetitive statements to the called party.
Law Enforcement with Transcription
Law Enforcement with Transcription has the same software as the Law Enforcement Edition only a special foot pedal control
function is enabled allowing the use of an included 3 key foot pedal to control the playback feature. Also enabled in the
software is a convenient counter to keep you informed of the current position in the playback. See Law Enforcement Edition
information (above) for the software capabilities beyond the foot pedal control and counter. The Law Enforcement with
Transcription purchase includes a separate “play only” software program with the intent of having the “play only” software
installation at the Transcriber’s computer with the included foot pedal. The other, “full capability” software is for use at the
recorder’s computer where phone calls, meetings, interviews or dictation can be recorded then sent to the transcriber for
transcription.
Figure A is a picture of the foot pedal and the convenient counter window included with the Law Enforcement with
Transcription package.
A
Basic with Transcription
Basic with Transcription has the same software as the Basic Edition only a special foot pedal control function is enabled
allowing the use of an included 3 key foot pedal to control the playback feature. Also enabled in the software is a convenient
counter to keep you informed of the current position in the playback. See Basic Edition information (above) for the software
capabilities beyond the foot pedal control and counter. The basic with Transcription purchase includes a separate “play only”
software program with the intent of having the “play only” software installation at the Transcriber’s computer with the
included foot pedal. The other, “full capability” software is for use at the recorder’s computer where phone calls, meetings,
interviews or dictation can be recorded then sent to the transcriber for transcription.
Figure A (above) is a picture of the foot pedal and the convenient counter window included with the Basic with Transcription
package.
Computer Requirements
Konexx recommends the following computer requirements for using the USB Phone 2 PC product:
Operating system - Microsoft Windows 2000, XP, Vista, Windows 7, Windows 8 or Windows 10 (32 bit or 64 bit)1
Processor –Pentium II @350 MHz, 128 MB RAM and 1 GB free hard disk space. 2
USB Port –1.0, 1.1, 2.0 or 3.0 and either OHCI or UHCI serial bus controller.1
1These attributes are required for using Konexx USB Phone 2 PC product.
2These attributes are only recommendations for optimized performance. Konexx USB Phone 2 PC will run quite well on systems with less
capability than those recommended.

Konexx USB Phone 2 PC
5
Hardware
The Konexx USB Phone 2 PC recording solutions come with the following hardware:
USB Phone 2 PC Interface
Telephone to Interface connection cable.
External microphone
External microphone to Interface connection cable.
USB Phone 2 PC Interface
This device connects the telephone to the computer. The interface unit contains a USB audio (USB sound card) circuit and
components to interface a telephone set (the telephone’s handset port) to the computer. Playing of audio files through the
telephone is supported with this interface. The interface is compatible with any telephone set (analog or digital) that has a
“modular handset connection”3. The product can also interface between a headset and the telephone in lieu of the handset port.
An optional connection to an external microphone is included for dictation purposes or to record conference calls or meetings.
The interface obtains its power from the computer’s USB port. The interface contains the software license, making it easy for
the user to relocate the Phone 2 PC recording solution from one computer to another, eliminating the email or phone software
registration process.
The USB Phone 2 PC interface contains 3 connections (see Figure 1). The connections are:
USB -
This connection is a cable approximately 8 inches long and has a fixed termination to the USB Phone 2 PC interface at
one end. The other end terminates to a USB type A plug. The USB cable connects to the computer’s USB port.
SPKR –
This connection is a 3.5mm stereo jack. This jack is for connection of external speakers. If your computer already has
speakers connected to an existing sound card, it is not necessary to relocate them to the USB Phone 2 PC interface, the
USB Phone 2 PC software allows you to use the existing sound card for audio playback.
HANDSET –
This connection is a RJ11 (6P6C) jack. The “HANDSET” jack is used in conjunction with the “Telephone to Interface
connection cable”, connecting the telephone set to the USB Phone 2 PC interface. It can optionally be used to connect an
external microphone only utilizing the supplied “External Microphone to Interface” connection cable.
The USB Phone 2 PC interface has a small-unlabeled slide switch located on the side of the unit. This switch is called the
“Hum Switch” (ref. Figure 1). The “Hum Switch” is normally not used. In some installations users may experience a hum or
buzz in the recordings or on their telephone’s receiver when the interface is connected. If this hum or buzz is experienced, the
“Hum Switch” should be switched to the opposite side.
Telephone to Interface connection cable
This cable connects your telephone set to the USB Phone 2 PC interface. This cable also has a jack to optionally connect the
supplied external microphone if you wanted to alternate between telephone recording and dictation without reconnecting
cables. The “Telephone to Interface connection cable has 4 connectors (see Figure 2). The 4 connectors are:
P1 –
This is a RJ11 (6P6C) plug. This plug connects to the USB Phone 2 PC interface jack labeled “HANDSET”.
3A “modular handset connection” means that the handset-coiled cord unplugs from the telephone base.

Konexx USB Phone 2 PC
6
P2 –
This is a RJ22 (4P4C) plug. This plug connects to the telephone base unit where the handset-coiled cord normally
connects. Alternately, if you are using a headset with an amplifier box, this plug connects to the telephone set where the
headset amplifier box would normally connect.
J1 –
This is an RJ22 (4P4C) jack. This jack is where the telephone handset (with coiled cord attached) should be connected.
Alternately, if you were using a headset with an amplifier box, the headset amplifier box would connect to this jack.
J2 –
This is a 3.5mm stereo jack. This jack is provided for connecting the supplied external microphone. Connection of the
external microphone is optional.
External Microphone
This microphone has good sensitivity and comes with a “saddle” for the microphone to set in. The “saddle” can be affixed to
your computer monitor or the telephone set. The microphone has a cable approximately 6 foot long with a 3.5mm stereo plug
(see Illustration 1).
External Microphone to Interface connection cable
The use of this cable is optional. It is supplied for the user that wants to dictate, record conference calls, meetings or interviews
and does not need to record phone conversations. The cable has two connectors (see Figure 3). The connectors are:
P1 –
This is a RJ11 (6P6C) plug. This plug connects to the USB Phone 2 PC interface jack labeled “HANDSET”.
J1 –
This is a 3.5mm stereo jack. This jack is provided for connecting the supplied external microphone.

Konexx USB Phone 2 PC
7
Main Graphical User Interface (GUI) Road Map
The following is a screen shot of the Phone 2 PC Version 4.X.X.XXX main GUI. The various elements presented in the main
GUI are identified with ballooned numbers. The ballooned numbers correspond to text identifying what the particular element
is. In later sections of this document more detail on the various elements is provided. The Konexx USB Phone 2 PC product
line includes many different software editions. The edition presented in this document is the Call Center Edition, which has
more functions and features than the other software editions. If a specific element shown in this document is absent in a
particular software edition, it will be noted in the text identifying that element.
1This section will contain text indicating the software edition and is also an area you can place your cursor on to
reposition the GUI on your desktop.
2Minimize control –clicking on this icon will minimize the GUI to the task bar.
3Switch to Mini Skin –clicking on this icon will take the GUI from Main Screen Mode to a small user interface with
limited controls. (not available in Basic Edition)
4Exit –clicking on this icon will exit the application.
5“In Focus” indicator –When this bar is blue the Phone 2 PC GUI is the current Windows application in “focus”.
Mini Skin
GUI

Konexx USB Phone 2 PC
8
6Search For Text –This is a text search utility created by Konexx. It can be used to find files (recordings) containing the
text you are searching for. This utility will only search “wav” files. It will search for the indicated text in file names, the
file properties data and in the bookmark data.
7Application State Indication –Displays the state of the application (i.e. Stopped, Playing, Recording, etc.).
8Current File Data –Displays the current (opened) file data (i.e. File Name, File Format, File Size and Total Time).
9Current File Wave Form Representation Display –When a recording is opened or “loaded” in the Phone 2 PC program a
visual representation of the recording will be displayed here. If bookmarks are created for the recorded file, they will also
be displayed in their assigned position in this area. The visual representation of the recording will not show during the
recording process, when the recording process is stopped the visual representation will be displayed.
10 Fast Forward –This control is to fast-forward the playing of a recording. This control is only active when playing a
recording.
11 Add Bookmark –Click on this icon to add Bookmarks to a recording. Bookmarks can only be added during the play
process. An alternate method of adding a Bookmark is by pressing the Numpad “+” key during the play process. (not
available in Basic Edition)
12 Playback Speed Setting Control –This set of icons enables the setting of the recording playback speed. There are five
different playback settings; Very Slow, Slow, Normal, Fast and Very Fast. If just the center diamond icon is bold, then
the playback speed is set for “Normal” (not available in Basic Edition).
13 Audio Input Indicator –This bargraph indicator displays incoming audio (recording audio level), provides a visual
indication of threshold setting and amplitude of the incoming audio. This display is active during recording and playback
functions.
14 Voice Activation Check Box –Provides one of two methods for enabling or disabling the Voice Activation function.
This area also provides text indicating whether voice Activation is enabled or disabled. (not available in Basic Edition)
15 Main Function Control Icons –These four icons are the main function controls. Click on to record. Click on
to play. Click on to pause. Click on to stop playing or recording.
16 Reverse/Rewind –This control is to reverse/rewind the playing of a recording. This control is only active when playing a
recording.
17 Play Position Indicator –This pointer indicates the play position on the recording time line. It will show the playing
position of the opened file when playing a recorded file.
18 Play Volume –This control is the volume adjustment for the play audio.
19 Record Volume –This control is the record volume adjustment. It is used to adjust the recording level (volume of the
audio being recorded).
20 Elapsed Time Indicator –This display shows elapsed time during the record or play process. The time is displayed in
Hours/Minutes/Seconds.
21 Function/Feature Tool Bar Icons –These icons are for commonly used functions or features. The functions or features
are (from left to right):
Prepares for a new recording , Opens a file , Saves current file , Send E-mail ,
Add annotation (not available in Basic Edition) , Announcement menu (not available in Basic, Secure or
Law Enforcement Editions), Play announcement (not available in Basic, Secure or Law Enforcement Editions).
22 Functions and Features Selection Menus –Clicking on any of these four text elements (File, Edit, Options and Help)
will expose a drop down menu to access various features and functions.

Konexx USB Phone 2 PC
9
Getting Started
The USB Phone 2 PC software requires Microsoft Windows 2000, XP, Vista and Windows 7 (32 bit or 64 bit) operating
systems and will not run unless the USB Phone 2 PC hardware is attached to the computer.
All editions of the USB Phone 2 PC software include an easy to follow “Installation Wizard” that steps the user through the
entire process of installing the hardware and software. The “Installation Wizard” also provides the installer with steps to test
the connections to ensure proper operation. The following Hardware Installation diagrams are provided as reference, Konexx
recommends you follow the easy steps provided by the Installation Wizard on the provided CD.
Hardware Installation
Connecting the USB Phone 2 PC hardware is simple.
Figure 4 is a connection diagram showing the hardware connected to a desktop computer using the Interface for the speaker
connection and the external microphone connected to the “Telephone to Interface connection cable”.
The connection of external speakers to the USB interface jack labeled “SPKR” is optional. Most users will
elect to use the speakers connected to their existing soundcard and direct the Phone 2 PC application to
play audio through their existing soundcard.
Connection of speakers to the USB
interface is optional
Figure 5 is a connection diagram showing the hardware connected to a desktop computer using the Interface for the speaker
connection and the use of a headset.

Konexx USB Phone 2 PC
10
Figure 6 is a connection diagram showing the hardware connected to a laptop computer using the External microphone
connected to the interface with the “External microphone to interface connection cable”. This is a typical installation when the
product is being used for recording dictation, meetings, interviews or conference calls.
Software Installation
As previously mentioned, the Installation Wizard will automatically install the software application on the computer. The
software installation process will prompt you for certain responses, in most installations, using the default response (responding
with “Next”) is recommended.
After successful installation of the software application, the Konexx icon will be placed on the computer’s desktop.
Double clicking on the icon will open the application.
Basic Operation
This section will describe the “basic” operations, i.e. recording, pause and playing of a recording. The method of recording
described in this section will be “On Demand” recording (starting a recording by clicking the Record icon and stopping the
recording by clicking on the Stop icon). This “Basic Operation” section is intended to be a “quick start” guide, using the “voice
activation” recording as well as use of the various special features, options and utilities will be discussed in detail under the
“Features” section of this document.
Recording
To start a recording, click on the recording icon located in the lower left corner of the Phone 2 PC GUI. The text in the
“Application State Indicator” section should now read “Recording”. When recording the GUI’s “Audio Input Indicator” should
be lighting (modulating) when either party in the call is talking. The “Audio Input Indicator” displays incoming audio
(recording audio level) and provides a visual indication the amplitude of the incoming audio. If the “Audio Input Indicator” is
not lighting up (modulating when someone is speaking), the program is not recording the conversation. Check your settings
and connections.
The “Record Volume” control slider is used to adjust the recording level. An ideal recording level is when
someone is speaking, the yellow boxes of the “Audio Input Indicator” light up (peak) close to the small white dot above the bar
graph.
Note that this indicator will modulate (move with the level of the speaker’s voice) and not stay lit up to a certain point all the time.
To stop the recording, click on the stop icon . When the recording is stopped, a “Save As” window will open enabling
you to name and save the recording (unless you have selected “Auto file naming” in the Preferences section of the program).
“Audio Input Indicator” indicating an
ideal recording audio level

Konexx USB Phone 2 PC
11
Pause
You can pause recording or playback. To pause click on the pause icon . To resume playing or recording, click on the
pause icon again. Alternatively you can click the play icon if paused during the play function to resume playing or the record
icon to resume recording if paused during the record function.
Play
To play a recording with the Phone 2 PC program, a recording must be opened (loaded). To open a recording with the Phone 2
PC program, click on the “Open a File” icon , select the recording you want to play, then click on the play icon .
Alternatively, to open a file (recording), you can click on the “File” drop down menu, select “Open”, then select the file you
want to play.
You can adjust the play volume (loudness) using the “Play Vol.” adjustment in the GUI.
The recordings made by the Phone 2 PC program do not have to be played using the Phone 2 PC program. Almost any media player
can play them. If you double click on the file you want to play, your Windows default player will open and allow you to play with that
program.
Features
The following sections will describe the various features, utilities and options available in the Phone 2 PC program. The
Konexx USB Phone 2 PC product line includes many different software editions. The edition presented in this document is the
Call Center Edition, which has more functions and features than the other software editions. If a specific element shown in this
document is absent in a particular software edition, it will be noted in the text identifying that element.
“File” drop down menu
New
If a recording is open (loaded into the Phone 2 PC), the opened recording is unloaded.
Open
Used to open (load into the Phone 2 PC) a recording.
Save As
Used to save an opened recording by another name. The original file will still exist if it had been saved.
Send by e-mail
Used to send the opened recording to someone else via e-mail. This requires that you have a MAPI compliant email program
on your computer.
Rename
Used to save an opened recording by another name. The renamed file will replace the original file.
Properties
(Not available in Basic Edition) This function is a utility that will allow you to view, edit or add properties in the form of text for
the loaded file (recording) and for the Bookmarks. This utility will be useful for entering specific data (text) that can be used by
the Phone 2 PC “Search” utility to locate files, because the “Search” utility will look for text in the Properties and Bookmarks
of a recording. When the Properties function is selected, the following screen will be displayed:

Konexx USB Phone 2 PC
12
File Merger
This function is a utility that will allow you to merge two or more recording files into a single recording (file). When the File
Merger function is selected, the following screen will be displayed:
To select recording files to merge together, click “Add Files to Merge”, an “Open” window will display. Select the recordings
you want to merge into one file. You can re-arrange the sequence the selected files will be merged in by using “Move Up” or
“Move Down”. Once the recordings to be merged have been opened (selected), type the path and file name in the “Merged
File” box or select the “Browse” icon and navigate to the directory you want to save the merged file to, then select or
type the name you want to save the merged file as. Next, click the “Merge File” button. The files will then be merged. You can
play the merged file from this screen by clicking the “Play Merged File button.
File Converter
(not available in Basic Edition) This function is a utility that will allow you to convert a file or batches (several files) from one
codec/format to another codec/format (i.e. GSM 6.10 8 kHz Mono wav to PCM 8.00 kHz, 8bit, Mono wav). There are
limitations on codecs and formats this utility can convert files to.
The limitation relative to the codec (i.e. GSM 6.10, PCM, MPEG layer 3, ADPCM, etc.) is that the codec you want to convert
to must be installed and functional on the computer you are using. As an example, most generic Microsoft Windows Operating
If you click the
“Bookmarks” tab the
screen to the right will be
displayed.

Konexx USB Phone 2 PC
13
Systems do not include a codec for MP3, so converting a recording from GSM 6.10 to MP3 would not work unless you had the
MP3 codec installed on your computer. Another limitation is the ability to convert a compressed wav file (such as the GSM
6.10 that Phone 2 PC records in) to a high resolution PCM wav file needed to burn an audio CD. The Konexx File Converter
utility will enable you to convert the recordings made by the Phone 2 PC program to a high resolution PCM wav (PCM 44.100
kHz, 16 Bit, Stereo) needed to burn the recording on to a CD as an audio CD, however it will take two conversion processes.
Note that you can archive Phone 2 PC recordings without converting them on a CD as a data CD. When archiving GSM 6.10 wav files
(the format Phone 2 PC records in), you can save over 100 hours or recordings on a single CD.
The following is an example of how to use the Konexx File Converter utility to convert recordings made by the Phone 2 PC
program to a PCM 44.100 kHz 16 Bit, Stereo wav file needed to burn to an audio CD:
When the File Merger function is selected, the following screen will be displayed:
The default “Target Format” (the format the recordings will be converted to) will be set to PCM 8.00kHz, 8 Bit, Mono. To
change the default “Target Format”, click on the “Change” button . When the Change button is clicked a “Change
Default Format” screen will display enabling you to change the default “Target Format”. In this example, we will not change
the default “Target Format” from the PCM, 8.000 kHz, 8 Bit, Mono on the first conversion process because we need to take
two conversion steps to convert the GSM 6.10 wav file to the PCM, 44.100 kHz, 16 Bit Stereo (which is needed to burn an
audio CD).
The Konexx File Converter utility provides the user the option of Overriding (replacing the original file) or creating converted
files with a new name, leaving the original files (recordings) intact. Konexx recommends that you select “New File Name”
option so that you will have the original recording available if an error is made in converting the recording. This option
selection is located in the bottom right corner of the File Converter window. When this option is selected, the converted file
name would be the same as the original file name only with “_newformat” added to the end.
It may be possible that some audio degradation happens when converting a compressed wav file to a high-resolution wav file.

Konexx USB Phone 2 PC
14
Add the files (recordings) that you want to convert by clicking on the “Add Files to Convert” (located in the top left section of
the File Converter screen). The files added should show in the chart.
You can customize the converted file name by highlighting (clicking) the file name and clicking the “Properties”
icon. When the “Properties icon is clicked, a Properties window will open. The file name that will be used for the converted
file is in the field called “Destination File Name”. You can change/customize the name there. Below is a screenshot of the File
Converter with two recordings added and the Properties window opened.
To convert the recordings added in the File Converter chart, click the Convert icon. When the files have been
converted a red check will show in the chart “File Name” column.
This is the completion of the first conversion in this example, changing the recordings from the GSM 6.10 wav format to a
PCM 8.000 kHz, 8 Bit, Mono format. The second conversion in this example will convert files we just converted to PCM 8.000
kHz, 8 Bit, Mono format to the PCM 44.100 kHz, 16 Bit, Stereo format needed for burning to an audio CD.
Clear the File Converter chart by clicking on the “Clear List” (located in the top center section of the File Converter screen).
Add the files we just converted to PCM 8.000 kHz, 8 Bit, Mono format to the chart using the “Add Files to Convert” function
(as described previously in this section). Then using the “Change” button , change the Default Target Format to
PCM 44.100 kHz, 16 Bit, Stereo and complete the 2nd conversion as described previously (click the “Convert” icon). The files
converted to the PCM 44.100 kHz, 16 Bit, Stereo wav format are now able to be burned to an audio CD.
The Konexx USB Phone 2 PC program does not include a CD burning application. You will have to get that from a third party if you
do not already have one. Konexx does not provide support for problems you may encounter using the third party CD burning
application –contact the maker of that application.
Note that the format required for burning recordings to an audio CD are high bit rate files (large size files) and a typical audio CD will
only hold about 1 hour recordings.

Konexx USB Phone 2 PC
15
Search
This very useful utility will search for any recording (wav extension files) containing the search text. The search utility will
search for the “search text” in the recordings file properties, file name or bookmarks.
When the Search function is selected, the following screen will be displayed:
Enter the text you want the utility to search for in the “Search for” field, then click the go button . Search options are:
Recursive Search
If selected the utility will search all sub folders of the specified search location(s).
Recording Folder
If selected the utility will search the folder specified in the Phone 2 PC application’s preferences as the default location to save
the recordings to (Recording Path, accessed from Options-Preferences –File Tab).
Temp Folder
If selected the utility will search in the Phone 2 PC temp folder for files containing the search text.
Custom
If selected the utility will search in the folder identified in the field to the right of this item. You can use the browse
button to browse to the location to enter in the Custom search.
Clicking the Stop button during a search will terminate the search process. When a file in the “Results” table is selected, you
can click the Open button and the file will open in the Phone 2 PC application.

Konexx USB Phone 2 PC
16
“Edit” drop down menu
Record
Clicking on this item will start a recording. This is an alternate method (other than using the Toolbar icon) to manually start a
recording. The Function 3 (F3) key is a hot key for the Record function, this hot key is only functional when the Phone 2 PC
application is “in focus” (is the active window).
Play
Clicking on this item when a file (recording) is opened will play the recording. This is an alternate method (other than using the
Toolbar icon) to manually start the play function. The Function 6 (F6) key is a hot key for the Play function, this hot key is
only functional when the Phone 2 PC application is “in focus” (is the active window). This item is only available if a file is
loaded (opened) in the Phone 2 PC application
Pause
Clicking on this item when a file (recording) is being played or when recording will pause the playing or recording. This is an
alternate method (other than using the Toolbar icon) to manually pause the playing or recording function. The Function 7 (F7)
key is a hot key for the Pause function, this hot key is only functional when the Phone 2 PC application is “in focus” (is the
active window). This item is only available if a file playing or a recording is in process in the Phone 2 PC application.
Stop
Clicking on this item when a file (recording) is being played or when recording will stop the playing or recording. This is an
alternate method (other than using the Toolbar icon) to stop. The Function 9 (F9) key is a hot key for the Stop function, this hot
key is only functional when the Phone 2 PC application is “in focus” (is the active window). This item is only available if a file
playing or a recording is in process in the Phone 2 PC application.
Record from current position
(not available in Basic, Secure or Law Enforcement Editions) Selecting this feature will enable the recording of audio starting from
the current location of the main application’s “play position indicator”.
Note that if this feature is selected, any recorded audio to the right of the “play position indicator” will be replaced with the new
recorded audio (overwritten).
To use this feature, open the recording you want to add to, or overwrite part of, from the main application. Play the recording
until the playing (the “play position indicator”) reaches the spot you want to start the added recording, or the spot you want to
over write with the new recording and pause the play process at that point. Select Edit –Record from current position, unless
you had directed otherwise, the following message will display:
When the Ok button is clicked, the following message will display:

Konexx USB Phone 2 PC
17
If the Yes button is clicked, the above message will go away and the main application will start recording from the current
position of the “play position indicator”.
If the No button is clicked, the Record from current position function will be cancelled.
Add annotation
(not available in Basic Edition) Clicking on this item when a file (recording) is opened will bring up a small recording control
window which will let you add a voice annotation to the beginning or the end of the opened recording. This is an alternate
method (other than using the Toolbar icon) to use the Annotation feature. The small recording control window will let you
choose to save the annotated recording as a new file of as the original recorded file.
Sound Editor
(not available in Basic, Secure or Law Enforcement Editions) Clicking on this item when a file (recording) is loaded (opened in the
application) will open the Phone 2 PC Sound Editor. Use the "Konexx Phone 2 PC Sound Editor" to make changes to an
existing recording. The Sound Editor will convert the recording from the GSM 6.10 compressed format to a PCM 8.000 kHz, 8
Bit, Mono format so the recording can be edited. The recording will be converted back to the GSM 6.10 format when the
edited recording is saved or if the editor function is cancelled. When the Sound Editor function is selected the following screen
will be displayed:
CAUTION –Using the tools and utilities in the Sound Editor may alter your recording. Konexx
suggests making a copy of the original recording to work with in this area so you can revert back to
the original, if you do not end up with the desired results of your editing.
With the "Konexx Phone 2 PC Sound Editor" you can cut and/or crop sections of the current recording. The Sound Editor also
contains the following tools:
Silence Remover –This utility will remove periods of silence from a recording.
Level Normalizer –This utility will adjust audio in the recording, within a prescribed sound level (amplitude) window to be at
an equal volume level.
Increase Volume 10% - This utility will increase the volume of the recording by 10%.
Decrease volume 10% - This utility will decrease the volume of the recording by 10%.
The Sound Editor will display the recording waveform in the o’scope area of the editor window. Information on the file to be
edited is also shown in the text area of the Sound Editor screen.
Table of contents
Popular Measuring Instrument manuals by other brands

Agilent Technologies
Agilent Technologies PNA Series Service guide

AFLOWT
AFLOWT MT Pro M Series Operation manual

Laser Reference
Laser Reference Pro Shot Alpha Operation guide

American Magnetics
American Magnetics 150 Installation, operation and maintenance manual

Solinst
Solinst 101 Replacement manual

SUTO
SUTO S551 Instruction and operation manual