Kong TubeChimp 15DL User manual

HERZLICHEN GLÜCKWUNSCH ZUM KAUF DEINES
NEUEN KONG TubeChimp 15DL Head!
Der TubeChimp 15 Deluxe Head ist ein vielseitiger Vollröhren-Verstärker
der dank seiner zahlreichen digitalen Amp-Simulationen für alle Genres
den richtigen Sound liefert! Mit seinen drei fußschaltbaren Speicherbän-
ken für Sound-Voreinstellungen und eingebauten Modulations- und De-
lay/Reverb-Effekten stehen dir etliche Sounds und Styles zur Verfügung.
Mithilfe des integrierten LINE-IN kannst du deine Songs auf Smartphone,
Laptop oder anderen Audioquellen begleiten. Über den DI-Ausgang
kannst du direkt in ein Recording-Interface oder ein Mischpult spielen.
Dabei stehen dir zusätzlich sogar noch verschiedene Voreinstellungen zur
Lautsprechersimulation zur Verfügung.
Viel Spaß mit deinem neuen KONG-Verstärker!
DEUTSCH

Bedienung
1. INPUT Hier wird deine Gitarre angeschlossen.
2. GAIN Regelt den Verzerrungsgrad der aus-
gewählten Amp-Simulation.
3. VOLUME Regelt die Lautstärke der ausge-
wählten Amp-Simulation.
4. BASS Regelt die tiefen Frequenzen.
5. MIDDLE
Regelt die mittleren Frequenzen.
6. TREBLE Regelt die hohen Frequenzen.
7. AMP Auswahl des Amp-Modeling.
8. MODULATION Regelt je einen von vier ein-
gebauten Modulations-Effekten.
9. DELAY/REVERB Regelt je einen von vier ein-
gebauten Delay- bzw. Reverb-Effekten.
10. CAB SIM – DI OUT Lautsprecher/Mikrofon-
Simulation für den DI-Ausgang: [Active/Bypass]
= ein/aus, [Open/Sealed] = offene oder ge-
schlossene Box, [Modern/Vintage] = moderne
oder traditionelle Box, [Mic Pos] = Mikrofon-
position vom Rand zum Zentrum der Membran.
11. MEMORY
Speicher für Sound-Voreinstellungen.
12. TAP/TUNER Manuelle Geschwindigkeitsein-
gabe für Effekt-Module (Tapping) bzw. Tuner
(gedrückt halten).
13. LINE-IN Eingang für Audiosignal (3,5mm
Klinke). Dieser Eingang wird nicht vom Equalizer
oder Volumenregler des Verstärkers beeinflusst.
Um die Lautstärke oder den Ton des Audiosig-
nals zu regeln, benutze die Regelmöglichkeiten
des angeschlossenen Geräts.
14. MASTER Regelt die Gesamtlautstärke.
15. STANDBY Um die Röhren zu schonen, emp-
fiehlt es sich, den Verstärker im Standby-Modus
einzuschalten und auch vor dem Ausschalten
wieder auf Standby zu wechseln.
16. POWER Ein-/Ausschalter
17. NETZANSCHLUSS/SICHERUNG Anschluss
für das Netzkabel des Verstärkers. Beim Tausch
der Sicherung auf den korrekten Wert achten
(am Gehäuse angegeben).
18. SPEAKER OUTPUT Hier kannst du eine
Lautsprecher anschließen. Stelle sicher, dass
du die korrekte Impedanz gewählt hast (1x 16,
1x 8 oder 2 x 16Ω) und den Verstärker niemals
ohne angeschlossenen Lautsprecher betreibst,
da es sonst zu elementaren Schäden am Gerät
kommen kann!
DEUTSCH
SPEAKER OUTPUT DI OUTPUT FX LOOP FOOT SWITCH
1x16
Ω
1x8
Ω or
2x16
Ω
Level Send Return CH/Rev
Bal. out
session GmbH & Co. KG · Wiesenstraße 2–6 · 69190 Walldor f · info@session.de · WEEE Nr. DE 149773 34
Serial Number
WARNING
TO REDUCE THE RISK OF FIRE OR ELECTRIC SHOCK DO NOT
EXPOSE THIS EQUIPMENT TO RAIN OR MOISTURE.
AVIS
RISQUE DE CHOC ELECTRIQUE NE PAS OUVRIR.
230
V, 50
Hz, 90
W
Tube
BASS
MIDDLE TREBLE
INPUT GAIN VOLUME
ACTIVE
OPEN
MODERN
SEALED
BYPASS
VINTAGE
MEMORY TAP/ TUNER
ok
Hold
to
save
A
B
C
MIC POS
CAB SIM – DI OUT
MASTER STANDBY POWER
P
h
a
s
e
r
F
l
a
n
g
e
r
C
h
o
r
u
s
T
r
e
m
o
l
o
R
o
o
m
E
c
h
o
D
e
l
a
y
H
a
l
l
Line-in
+d
Acoustic
Deluxe Clean
Jazz Clean
UK Blues
UK Classic
US Metal
DE Metal
US High Gain
US Classic
US Blues
UK High Gain
AMP
Tap
hold
17 18 19 20 21
4
1 2 3 7 9 11 12 14 15 16
5 6 108 13

DEUTSCH
19. DI OUTPUT Schließe deinen Verstärker über
diesen symmetrischen Ausgang direkt an ein
Recording-Interface oder ein Mischpult an.
20. FX LOOP Der Effekteinschleifweg befindet
sich im Schaltkreis zwischen der Vor- und der
Endstufe des Verstärkers. Hier können u.a.
Echo-Effekte oder Modulationseffekte in den
Signalweg „eingeschliffen“ werden. Manche
Effekte klingen besser, wenn sie mit einem be-
reits verstärkten Signal (dieses kommt aus der
FX-Send-Buchse) arbeiten. Es empfiehlt sich
einfach zu experimentieren. FX-Send wird im-
mer an den Eingang des Effekts angeschlossen,
FX-Return an den Ausgang des Effektgerätes.
21. FOOT SWITCH Anschluss für optionalen
Fußschalter, um durch die Speicherbänke zu
schalten.
MEMORY-FUNKTION
Der momentan per Regler eingestellte Sound (mit
Ausnahme der [MASTER]-Einstellung) lässt sich in
einem von drei Speicherbänken ablegen, indem du
eine der drei [MEMORY]-Tasten (A/B/C) für einen
Moment gedrückt hältst. Alle LEDs blinken kurz, um
anzuzeigen, dass der Speichervorgang erfolgreich
war. Abgerufen wird die entsprechende Voreinstel-
lung, indem du die jeweilige Taste kurz drückst. Die
LED der ausgewählten Speicherbank leuchtet dann
rot. Indem du die Taste nochmal kurz drückst, ver-
lässt du die gespeicherte Voreinstellung und kehrst
zurück zum aktuell per Regler eingestellten Sound.
Die mittlere LED leuchtet dann grün.
HINWEIS: Während du einen gespeicherten Sound
nutzt, sind alle Regler mit Ausnahme des [MASTER]-
Reglers sowie die [TAP]-Taste außer Funktion.
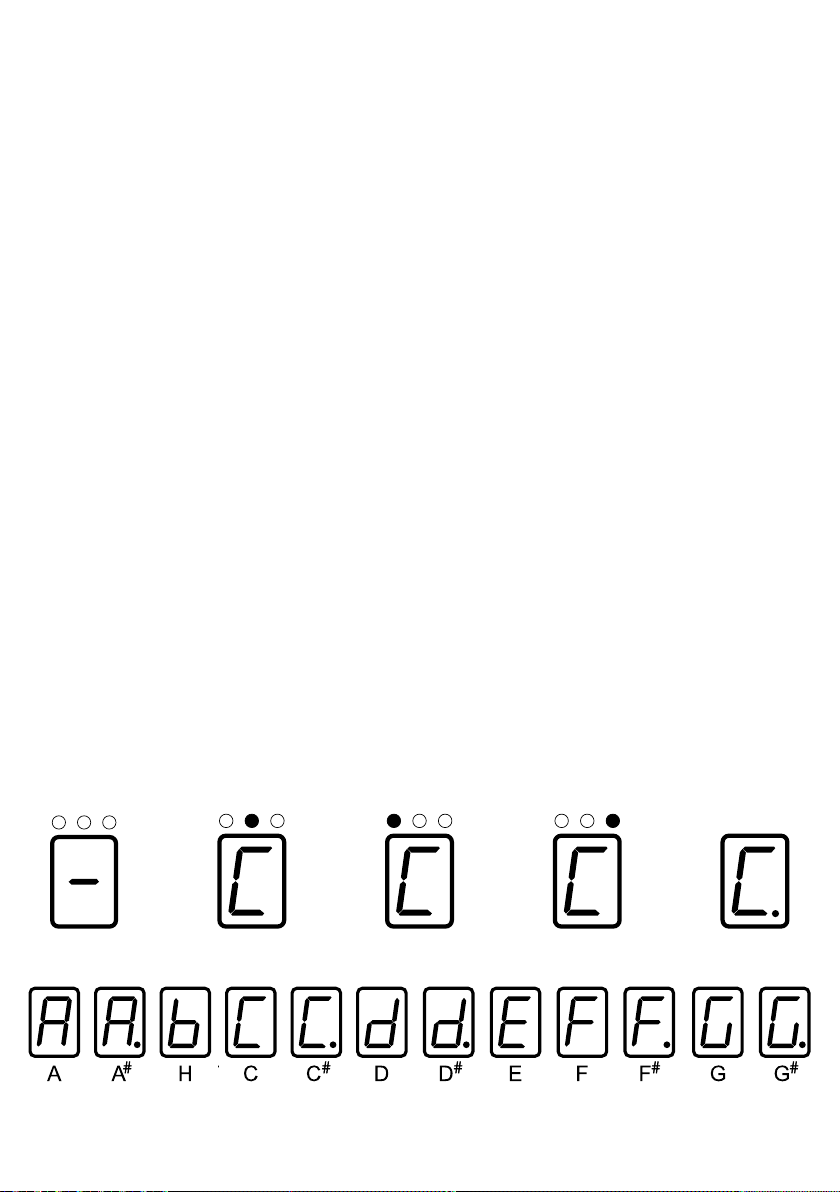
TUNER-FUNKTION
Referenz-Ton: A4/440 Hz. Halte die [TAP]-Taste für
einen Moment gedrückt, um die [TUNER]-Funktion
zu verwenden. Das Digital-Display rechts daneben
zeigt eine horizontale Linie an und der Verstärker
schaltet auf stumm (Abb. 1).
Stimme die einzelnen Saiten bis die mittlere LED
grün leuchtet und der angestrebte Ton stabil im
Display angezeigt wird (Abb. 2).
Die linke LED zeigt an, wenn der Ton noch zu tief
ist (Abb. 3), die rechte LED, wenn der Ton noch zu
hoch ist (Abb. 4).
Der Punkt in der unteren rechten Ecke des Displays
zeigt einen Halbton über dem Ton an (Abb. 5). Die
12 Töne werden entsprechend im Display angezeigt
(Abb. 6).
Um die [TUNER]-Funktion zu verlassen, drücke eine
beliebige Taste.
TAP-TEMPOFUNKTION
Mit der [TAP]-Tempofunktion lässt sich die Ge-
schwindigkeit der Modulations- und Delay-Effekte
beeinflussen.
Drücke dazu wiederholt die [TAP]-Taste. Das Inter-
vall deines „Tappings“ stellt den Tempo-Wert ein.
Die LED blinkt dabei in der entsprechenden Ge-
schwindigkeit.
HINWEIS: Ist die Tapping-Geschwindigkeit zu
hoch, wird die Geschwindigkeit des Effekts auf den
Maximalwert gesetzt, ist die Tapping-Geschwin-
digkeit zu niedrig, wird die Geschwindigkeit des
Effekts auf den Minimalwert gesetzt. Ist sowohl
das Modulation- als auch das Delay/Reverb-Modul
aktiv, wirkt sich das Tapping nur auf das Delay/Re-
verb-Modul aus. Sind beide Module in Off-Stellung,
steht Tap-Tempo nicht zur Verfügung.
Abb. 1 Abb. 2 Abb. 3 Abb. 4 Abb. 5
Abb. 6

Technische Daten
• Leistung: 15W
• Abmessungen: 40 x 24x 21cm (B xT x H)
• Gewicht: 10,7kg
Haftungsausschluss: Technische Eigenschaften
können ohne vorherige Ankündigungen geändert
werden.
Sicherheitshinweise
Vor Gebrauch bitte sorgfältig lesen!
STROMVERSORGUNG
Stecke den Netzstecker in eine Steckdose mit kor-
rekter Ausgangsspannung. Eine höhere Netzspan-
nung als 230 V kann zu gefährlichen Schäden und
zur Explosion führen. Trenne den Netzstecker von
der Steckdose, wenn das Gerät nicht benutzt wird
sowie während Gewittern.
ANSCHLÜSSE
Schalte dieses und alle angeschlossen Geräte aus,
bevor du Kabel anschließt und abziehst, um Störun-
gen bzw. Beschädigungen zu vermeiden. Vergewis-
sere dich vor dem Transport, dass alle Anschluss-
und Stromversorgungskabel getrennt sind.
session GmbH & Co. KG
Wiesenstraße 2-6
69190 Walldorf
info@session.de
WEEE Nr. DE 14977334
GEBRAUCH
Wende beim Bedienen der Regler nicht zu viel
Kraft auf. Lass kein Papier, metallische oder andere
Objekte in das Gerät gelangen. Lass das Gerät
nicht fallen und setze es weder Stößen noch hohem
Druck aus.
REINIGUNG
Reinige das Gerät nur mit einem weichen, trocke-
nen Tuch. Wenn nötig, kann das Tuch leicht an-
gefeuchtet werden. Verwende keine scharfen Reini-
gungsmittel, Alkohol, Verdünner, Wachs, Lösungen,
Reinigungsflüssigkeiten oder Reinigungstücher mit
chemischen Bestandteilen.
ELEKTRISCHE STÖRUNGEN
Der Betrieb in der Nähe von Radio- oder Fernseh-
geräten kann Empfangsstörungen verursachen. Be-
treibe das Gerät in einem angemessenen Abstand
zu Radios und Fernsehern.
EINSATZORT
Um Verformung, Verfärbung oder ernsthafte Schä-
den zu vermeiden, schütze das Gerät vor folgenden
Einflüssen: direktes Sonnenlicht, Magnetfelder,
übermäßige Staubeinwirkung oder Verschmutzung,
starke Erschütterungen, Hitzequellen, extreme Tem-
peraturen, starke Feuchtigkeit oder Nässe.

CONGRATULATIONS ON THE PURCHASE OF YOUR
NEW KONG TubeChimp 15DL Head!
The TubeChimp 15 Deluxe Head is a versatile tube-amplifier with many
digital amp-simulations which make it suitable for all kinds of genres!
With its three foot-switchable memory banks for your sound presets and
built-in modulation- and delay/reverb effects, you can access countless
sounds and styles. With the integrated LINE-IN you can accompany your
songs on your smartphone, laptop or other audio sources. The DI output
lets you play directly into a recording interface or a mixer – and it comes
with different options for cabinet simulation, too.
Have fun with your new KONG amplifier!
ENGLISH

Bedienung
Funktionen der Frontblende und Rückseite.
1. INPUT Plug in your guitar here.
2. GAIN Adjusts the distortion of the selected
amp-modeling.
3. VOLUME Adjusts the volume of the selected
amp-modeling.
4. BASS Adjusts the low frequency response.
5. MIDDLE Adjusts the mid-range response.
6. TREBLE Adjusts the high-frequency
response.
7. AMP Selects the amp-modeling.
8. MODULATION Adjusts one of four built-in
modulation effects.
9. DELAY/REVERB Adjusts one of four built-in
delay/reverb effects.
10. CAB SIM – DI OUT Simulation of cabinet/mi-
crophone for the DI-Output: [Active/Bypass] =
on/off, [Open/Sealed] = open or sealed cabinet,
[Modern/Vintage] = modern or vintage cabinet,
[Mic Pos] = microphone position from edge to
center.
11. MEMORY Memory banks for sound presets.
12. TAP/TUNER Input for speed of the built-in
effect modules (tap) or tuner (hold).
13. LINE-IN Input for audio signal (optional cable
with mini jack plug required). This input is not
affected by the equalizer or volume control
of the amplifier. To control the volume or tone
of the audio signal, use the controls of the
connected device.
14. MASTER Adjusts the overall volume.
15. STANDBY To reduce stress on your amps
tubes it’s recommended to switch to standby
mode before you turn your amp on or off.
16. POWER On/off switch
17. AC INPUT/FUSE Connection for the ampli-
fier’s power supply. When replacing the fuse
please pay attention to the correct value (indi-
cated on the case).
18. SPEAKER OUTPUT Here you connect the
speakers (1x 16, 1x 8 or 2 x 16Ω) . Always make
sure that you have chosen the correct impe-
dance and never operate the amplifier without
ENGLISH
SPEAKER OUTPUT DI OUTPUT FX LOOP FOOT SWITCH
1x16
Ω
1x8
Ω or
2x16
Ω
Level Send Return CH/Rev
Bal. out
session GmbH & Co. KG · Wiesenstraße 2–6 · 69190 Walldor f · info@session.de · WEEE Nr. DE 149773 34
Serial Number
WARNING
TO REDUCE THE RISK OF FIRE OR ELECTRIC SHOCK DO NOT
EXPOSE THIS EQUIPMENT TO RAIN OR MOISTURE.
AVIS
RISQUE DE CHOC ELECTRIQUE NE PAS OUVRIR.
230
V, 50
Hz, 90
W
Tube
BASS
MIDDLE TREBLE
INPUT GAIN VOLUME
ACTIVE
OPEN
MODERN
SEALED
BYPASS
VINTAGE
MEMORY TAP/ TUNER
ok
Hold
to
save
A
B
C
MIC POS
CAB SIM – DI OUT
MASTER STANDBY POWER
P
h
a
s
e
r
F
l
a
n
g
e
r
C
h
o
r
u
s
T
r
e
m
o
l
o
R
o
o
m
E
c
h
o
D
e
l
a
y
H
a
l
l
Line-in
+d
Acoustic
Deluxe Clean
Jazz Clean
UK Blues
UK Classic
US Metal
DE Metal
US High Gain
US Classic
US Blues
UK High Gain
AMP
Tap
hold
17 18 19 20 21
4
1 2 3 7 9 11 12 14 15 16
5 6 108 13

ENGLISH
connected loudspeakers, as this could lead to
major damage to the device!
19. DI OUTPUT Via this balanced output you can
connect your amp directly to a recording inter-
face or mixer.
20. FX LOOP This is the effect loop of your amp.
It is located in the circuit between the amplifier’s
input and output stages. Delay-Effects or mo-
dulation effects can be placed between preamp
and power amp. Some effects just sound better
when they are “fed” with an already amplified
signal (this signal comes from the effects send
jack). It’s recommended to experiment with
different combinations – you will find some
interesting sounds. FX-Send should always be
connected to the input of the effect unit, FX-Re-
turn to the output of the device.
21. FOOT SWITCH Connection for the optional
foot switch, to control the channels and reverb.
PRESET MODE
You can save the dialed in sound in one of three
preset-banks by pressing and holding one of the
three [MEMORY] buttons (A/B/C). The flashing
LEDs indicate, that the saving process has been
successful. To recall the preset, press the respec-
tive button. If the LED turns red, your preset is
loaded. Push the button again to leave the preset
mode and return to the currently dialed in sound.
This is indicated by the middle LED turning green.
NOTE: While using a preset, all knobs are without
function, except the [MASTER] knob and the [TAP]
button.
TUNER
Reference pitch: A4/440 Hz. Press and hold the
[TAP] button to enter the [TUNER] mode. The digital
display right next to it shows a horizontal line and
the amp gets muted (Fig. 1).
Tune the single strings until the middle LED lights
green and the desired pitch is shown steady in the
display (Fig. 2).
The left LED lights up, if the string is tuned too low
(Fig. 3), the right LED lights up, if the string is tuned
too high (Fig. 4).
The dot on the bottom right corner of the display
represents a semitone above the shown key (Fig. 5).
The 12 tones are shown accordingly in the display
(Fig. 6).
To leave the [TUNER] mode, press any random
button.
TAP TEMPO
The [TAP] tempo button can be used to affect the
speed of the modulation- und delay-effects.
To do so, repeatedly press the [TAP] button. The in-
tervals of your ‚tapping‘ determine the tempo value.
The LED is flashing in the respective tempo.
NOTE: If the ‚tapping‘ is too fast, the speed will be
set to the maximum value, if it is too slow, it will be
set to the minimum value. If the modulation module
and the delay/reverb module are active, [TAP]
tempo will only affect the delay/reverb module. If
both modules are inactive, the [TAP] tempo button
is without function.
Fig. 1 Fig. 2 Fig. 3 Fig. 4 Fig. 5
Fig. 6

session GmbH & Co. KG
Wiesenstraße 2-6
69190 Walldorf
info@session.de
WEEE Nr. DE 14977334
Specifications
• Power: 15 W
• Dimensions: 40 x24x21cm (w xd x h)
• Weight: 10.7kg
Disclaimer: Rights of error and technical
modifications reserved.
Precautions
Please read carefully before proceeding!
POWER SUPPLY
Please connect the mains plug to an outlet with the
correct voltage. Any voltage exceeding 230 V can
lead to dangerous damage including explosion of
the device. Unplug the mains plug when not in use
and during electrical storms.
CONNECTIONS
Always turn off the power of this and all other
equipment before connecting or disconnecting, this
will help prevent malfunction and/or damages. Also
make sure to unplug all connection cables and the
power cord before moving the unit.
HANDLING
Do not apply excessive force to the switches or
controls. Do not let paper, metallic, or other objects
get into the unit. Take care not to drop the unit and
do not subject it to shock or excessive pressure.
CLEANING
Clean only with a soft, dry cloth. If necessary,
slightly moisten the cloth. Do not use abrasive
cleanser, cleaning alcohol, paint thinners, wax,
solvents, cleaning fluids or chemically impregnated
wiping cloths.
INTERFERENCE WITH OTHER
ELECTRICAL DEVICES
Radios and televisions placed nearby may expe-
rience reception interference. Operate this unit at a
suitable distance from radios and televisions.
LOCATION
To avoid deformation, discoloration, or other
serious damage, do not expose this unit to the fol-
lowing conditions: direct sunlight, magnetic fields,
excessive dust or dirt, strong vibration or shocks,
extreme temperatures, high humidity or moisture.
Table of contents
Languages:
Other Kong Amplifier manuals
Popular Amplifier manuals by other brands

Sams
Sams AA-4lt user manual

B&K
B&K 1606 Instructions and applications

Sound Performance Lab
Sound Performance Lab Preference Mic Pre 2711 user manual

Magnat Audio
Magnat Audio MA1000 Important notes for installation & warranty card

Harman
Harman JBL Stage A6002 Service manual

Peavey
Peavey Tour TKO 115 user guide