Konica Minolta cm-5 User manual

Spectrophotometer
CM-5
Instruction Manual
Please read before
using the instrument.

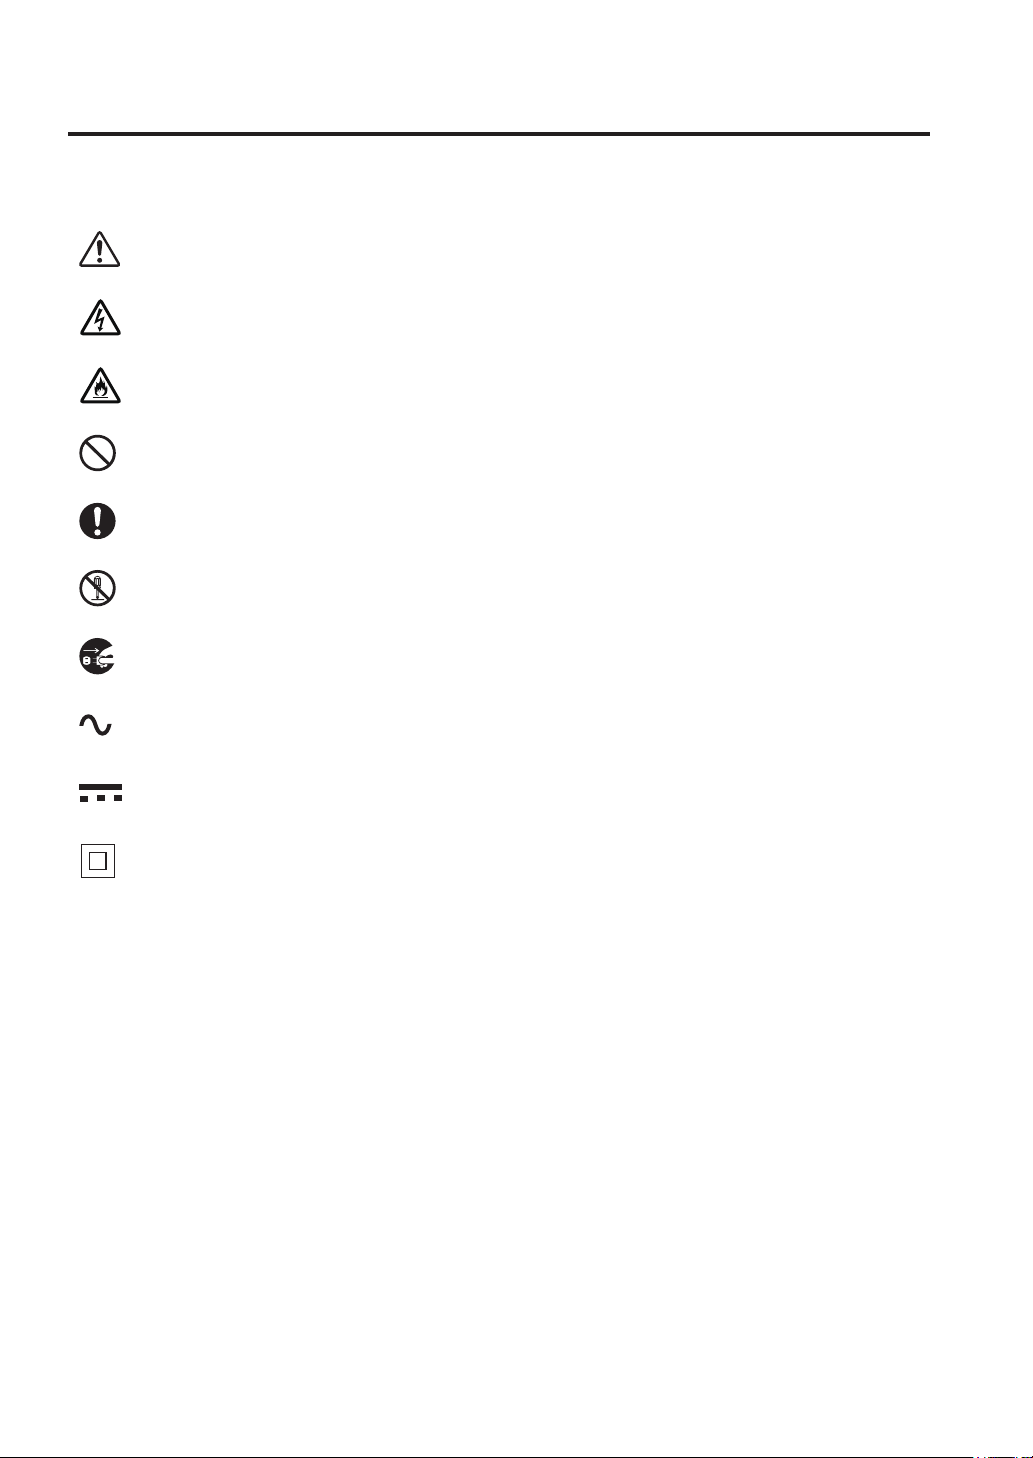
Safety Symbols
The following symbols are used in this manual to prevent accidents which may occur as a result of incorrect use of
the instrument.
Denotes an instruction regarding a safety warning or note.
Read the instruction carefully to ensure safe and correct use.
Denotes an instruction regarding the risk of electric shock.
Read the instruction carefully to ensure safe and correct use.
Denotes an instruction regarding the risk of re.
Read the instruction carefully to ensure safe and correct use.
Denotes a prohibited operation.
This operation must never be performed.
Denotes an instruction.
This instruction must be strictly adhered to.
Denotes a prohibited operation.
Never disassemble the instrument.
Denotes an instruction.
Be sure to disconnect the AC adapter from the AC outlet.
This symbol indicates A.C.
This symbol indicates D.C.
This symbol indicates class II protection against electric shock.
Trademarks
• Windows®is a registered trademark of Microsoft Corporation in the United States and other countries.
Notes on this Manual
• Copying or reproduction of all or part of the contents of this manual without the permission of KONICA
MINOLTA is strictly prohibited.
• The contents of this manual are subject to change without prior notice.
• Every effort has been made in the preparation of this manual to ensure the accuracy of its contents.
• However, should you have any questions or nd any errors, please contact your retailer or a KONICA MINOLTA-
authorized service facility.
• KONICA MINOLTA will not accept any responsibility for consequences arising from the use of the instrument.

E1
Safety Precautions
To ensure correct use of this instrument, read the following points carefully and adhere to them.
After you have read this manual, keep it in a safe place where it can be referred to anytime a question arises.
WARNING (Failure to adhere to the following points may result in death or serious
injury.)
Do not use the instrument in places where
ammable or combustible gases (gasoline
etc.) are present.Doing so may cause a re.
Do not disassemble or modify the
instrument or the AC adapter. Doing so
may cause a re or electric shock.
Always use the AC adapter supplied as a
standard accessory or the optional AC
adapter, and connect it to an AC outlet of
the rated voltage and frequency. If an AC
adapter other than those specied by
KONICA MINOLTA is used, it may result
in damage to the unit, re or electric
shock.
Take special care not to allow liquid or
metal objects to enter the instrument and
the AC adapter. Doing so may cause a re
or electric shock. Should liquid or metal
objects enter the instrument, turn the
power OFF immediately, disconnect the
AC adapter plug from the AC outlet, and
contact the nearest KONICA MINOLTA-
authorized service facility.
If the instrument will not be used for a
long time, disconnect the AC adapter plug
from the AC outlet. Accumulated dirt or
water on the prongs of the AC adapter’s
plug may cause a re and should be
removed.
The instrument should not be operated if it
is damaged or the AC adapter is damaged,
or if smoke or odd smells occur. Doing so
may cause a re. In such situations, turn
the power OFF immediately, disconnect
the AC adapter plug from the AC outlet
and contact the nearest KONICA
MINOLTA-authorized service facility.
Do not forcibly bend, twist, or pull the AC
adapter power cable. Do not scratch or
alter the power cable or place heavy
objects on it. Doing so may damage the
power cable and cause a re or electric
shock.
Always hold the plug itself when
disconnecting the AC adapter plug from
the AC outlet. Pulling on the power cable
may damage it and cause a re or electric
shock.
Do not insert or disconnect the AC adapter
plug from an AC outlet with wet hands.
Doing so may cause electric shock.
Insert the power plug fully and securely.
Incomplete insertion may cause re or
electric shock.
CAUTION (Failing to adhere to the following points may result in injury or damage
to the instrument or other property.)
Do not perform measurement with the
specimen measuring port directed towards
your eyes. Doing so may damage your
eyes.
Do not place the instrument on an unstable
or sloping surface.Doing so may result in
its dropping or overturning, causing injury.
Be careful not to drop the instrument when
carrying it.
Be careful not to get your hand caught in
the openable section of the instrument.
Doing so may result in injury.
Make sure that the AC outlet is located
near the instrument and that the AC
adapter plug can be connected to and
disconnected from the AC outlet easily.
When cleaning, unplug the power plug.
Leaving it plugged in may cause electric
shock.

E2
Introduction
Thank you for purchasing the CM-5.
This is a precise, benchtop type spectrophotometer developed for color and color difference measurement of
reective/transmitted objective colors in various industries.
Packing materials of the product
Be sure to keep all packing materials used for shipping the product (cardboard box, cushioning material,
plastic bags, etc.).
The CM-5 is a precision measuring instrument.When transporting the instrument to a service facility for
maintenance or for other reasons, be sure to use the packing materials to minimize shock or vibration.
If the packing materials are lost or damaged, contact a KONICA MINOLTA-authorized service facility.
Notes on Use
Be sure to use this instrument properly. Use of this instrument in ways other than those specied in this manual
may result in risk of injury, electric shock, instrument damage, or other problems.
Operating Environment
• Use the CM-5 at an ambient temperature between 13°C and 33°C and relative humidity 80% or less (at 35°C)
with no condensation.
Be sure to use the instrument within this range. Do not use it in areas of rapid temperature changes.
• Do not leave the CM-5 in direct sunlight or near sources of heat, such as stoves etc. The internal temperature
of the instrument may become much higher than the ambient temperature in such cases.
• Do not use the CM-5 in areas where dust, cigarette smoke or chemical gases are present. Doing so may cause
deterioration in performance or a breakdown.
• Do not use the CM-5 near equipment which produces a strong magnetic eld (such as speakers etc.).
• The CM-5 belongs to installation category I products (equipment which is powered by an AC adapter
connected to commercially available power).
• The CM-5 belongs to pollution level 2 products (equipment which may cause temporary electrical hazards due
to contamination or condensation or products which are used in such an environment).
• Do not use the CM-5 at altitudes higher than 2,000 m.
• The CM-5 and the AC adapter supplied as a standard accessory have been designed exclusively for indoor use.
They should never be used outdoors because rain or other factors may damage the instrument.
Measurement
• Make sure no dirt or dust get into the specimen measuring port.
• Use a blower to remove dust and dirt from the shutter before using the instrument after a long period of
disuse.
• When using the instrument for long periods of time, the measurement value may change depending on
changes in the environment. Therefore, in order to achieve accurate measurements, we recommend that white
calibration be done regularly using the White Calibration Cap.
White Calibration Plate
There are two types of white calibration plate for use with this instrument: the built-in White Calibration Plate
inside the shutter and an external White Calibration Plate as an optional accessory.
• The calibration data for the White Calibration Plate was measured at 23°C.
To achieve the highest accuracy when measuring absolute values (colorimetric values), calibration and
measurement should be performed at 23°C.
• Do not allow the White Calibration Plate (optional accessory) to get scratched or stained, or get ngerprints on
it.
• When the White Calibration Plate (optional accessory) is not in use, be sure to close the cap so that the White
Calibration Plate is not exposed to ambient light.
Target Mask
There are three types of Target Masks for use with this instrument: the standard ø30 mm mask, and optional ø3
mm and ø8 mm masks.
• The ø30 mm Target Mask must be used in combination with the instrument that bears the same pairing
number.
• Do not touch the Target Mask's inner surface by hand, scratch it or make it dirty.
• When not in use, Target Masks should be stored in the packing used for shipment or in the optional accessory
case so that they will not be exposed to ambient light.

E3
Power Source
• Make sure that the power switch is set to OFF (“”) when the CM-5 is not in use.
• This instrument can be powered from the AC adapter (AC-A305).
• Always use the AC adapter supplied as a standard accessory (AC-A305) and connect it to an AC outlet of the
rated voltage and frequency. Use an AC power supply of the rated supply voltage (within ±10%).
• Do not connect the AC adapter to an overloaded electrical circuit. In addition, do not wrap or cover the AC
adapter with cloth or other material while in use. Doing so may cause an electric shock or re.
System
• Do not subject the CM-5 to strong impact or vibration.Doing so may cause deterioration in performance or a
breakdown.
• Since the specimen measuring port and integrating sphere are extremely precise optical components, great
care should be taken to prevent them getting dirty or exposing them to impact.
• The CM-5 may cause interference if used near a television, radio, etc.
• When the instrument is exposed to strong external static electricity, the LCD may go blank or the
measurement result may not be displayed properly. If the instrument is communicating with an external
device, the communication may be interrupted. In these cases, turn the power OFF and then turn it ON again.
If black smudges appear on the LCD, wait until they disappear naturally.
• When turning the power OFF and then ON again, wait several seconds after turning the power OFF.
Backup Battery
• Measured data and various settings are stored in the memory backed up by batteries. The backup batteries are
automatically charged during operation of this instrument, and can retain the contents of the memory for three
months if they have been fully charged. At the time of purchase, the backup battery may not be fully charged.
To charge the backup battery, set the power switch to ON. The backup battery is fully charged in 72 hours
while the instrument is switched on, and there is no danger of overcharging.
• It is recommended to keep a backup of your important data on another recording medium using the optional
Color Management Software SpectraMagic™ NX (CM-S100w).
Notes • The backup batteries’ model number is ML2020 (3 V).
• Do not try to replace the backup batteries by yourself. Contact a KONICA MINOLTA-authorized service
facility.

E4
Notes on Storage
• The CM-5 should be stored at temperatures between 0°C and 40°C, and at a relative humidity of 80% or less
(35°C) without condensation.Do not store the instrument in areas subject to high temperatures, high humidity,
sudden changes in temperature, or where freezing or condensation may occur, because these circumstances
may cause a breakdown.It is recommended to store the CM-5 with a drying agent at a temperature around
20°C.
• Do not leave the CM-5 inside a car such as in the cabinet or trunk. Otherwise, the temperature and/or
humidity may exceed the allowable range for storage during midsummer or midwinter, resulting in a
breakdown.
• Keep the packing materials used for shipment and use them to transport the CM-5. This protects the
instrument from sudden changes in temperature, vibration, and shock.
• Do not store the CM-5 in areas where dust, cigarette smoke or chemical gases are present.Doing so may cause
deterioration in performance or a breakdown.
• Entry of dust into the specimen measuring port will hinder accurate measurement.When the instrument is not
in use, you must close the transmittance specimen chamber and cover the instrument with the supplied Dust
Cover to prevent the entry of dust into the integrating sphere.
• The White Calibration Plate (optional accessory) may become discolored if left exposed to light. Therefore,
make sure to close the cap when it is not in use so that the White Calibration Plate is not exposed to ambient
light during storage.
• The Target Masks may discolor if they are left exposed to light. When they are not in use, keep them in a safe
place to prevent exposure to light and to protect them from scratches and dust.
• Be sure to keep all packing materials (cardboard box, cushioning material, plastic bags, etc.). They can be
used to protect the instrument during transportation to the service facility for maintenance (re-calibration
etc.).
Notes on Cleaning
• If the CM-5 becomes dirty, wipe it with a soft, clean dry cloth.Never use solvents such as thinner or benzene.
• If the White Calibration Plate (optional accessory) becomes dirty, wipe it with a soft, clean dry cloth.If dirt is
difcult to remove, wipe it off with a cloth dampened with commercially-available lens cleaning solution.
Then remove the solution with a cloth dampened with water, and leave the plate to dry.
• If the inner surface of the Target Masks, the inside of the integrating sphere , or the built-in White Calibration
Plate get dirty, contact a KONICA MINOLTA-authorized service facility.
• Should the CM-5 break down, do not try to disassemble and repair it by yourself. Contact a KONICA
MINOLTA-authorized service facility.
Disposal Method
• Make sure that the CM-5, its accessories, and the packing materials are either disposed of or recycled
correctly in accordance with local laws and regulations.

E5

E6
Table of Contents
Safety Precautions ........................................................................................................................... 1
Introduction...................................................................................................................................... 2
Notes on Use.................................................................................................................................. 2
Notes on Storage............................................................................................................................ 4
Notes on Cleaning ......................................................................................................................... 4
Disposal Method ........................................................................................................................... 4
Conventions................................................................................................................................... 8
Chapter 1 - Before Using the Instrument
Accessories...................................................................................................................................... 10
Standard Accessories .................................................................................................................. 10
Optional Accessories................................................................................................................... 11
System Diagram ............................................................................................................................. 14
Names and Functions of Parts ...................................................................................................... 15
Cleaning Parts ............................................................................................................................. 17
Connecting the Functional Ground Cable .................................................................................. 19
Connecting the AC Adapter ........................................................................................................ 20
Turning power ON/OFF .............................................................................................................. 20
Items You Must Know ................................................................................................................... 21
Initial Settings of the CM-5......................................................................................................... 21
Control Panel ............................................................................................................................... 21
Data Saving ................................................................................................................................. 25
Chapter 2 - Preparation for Measurement
Flow of Measurement .................................................................................................................... 28
Quick Setting Wizard.................................................................................................................... 29
Setting a specimen ......................................................................................................................... 42
Reectance measurement............................................................................................................ 42
Petri Dish/Mini Petri Dish measurements.................................................................................. 43
Specimen Viewing Mirror (Optional)......................................................................................... 47
Transmittance Measurement and Liquid Measurement ............................................................. 48
Calibration...................................................................................................................................... 52
Zero Calibration (0% Calibration) .............................................................................................. 52
White Calibration (100% Calibration) ........................................................................................ 55
User Calibration .......................................................................................................................... 58
Condition Setting ........................................................................................................................... 59
Setting the Measurement Conditions.......................................................................................... 59
Measurement Option Settings..................................................................................................... 63
Setting the Display Conditions ................................................................................................... 67
Color Difference Target Color Data Operation .......................................................................... 76
Settings ........................................................................................................................................ 76
Editing Target Color Data ........................................................................................................... 78
Other Settings ................................................................................................................................ 93
Setting Automatic White Calibration (100% Calibration) to ON/OFF ...................................... 93
Setting the Measurement Result Display.................................................................................... 95
Setting the Screen Options........................................................................................................ 101
Setting the Date and Time......................................................................................................... 105
Batch Setting of Conditions ........................................................................................................ 108

E7
Chapter 3 - Measurement
Measurement ................................................................................................................................ 112
Displaying the Measurement Results......................................................................................... 113
<Sample> Detail Screen: Absolute ...........................................................................................113
<Sample> Detail Screen: “Difference” Tab...............................................................................114
<Sample> Detail Screen: “Abs. & Diff.” Tab ...........................................................................114
<Sample> Detail Screen: “Custom” Tab ..................................................................................115
<Sample> Detail Screen: “Abs.Graph” Tab ..............................................................................115
<Sample> Detail Screen: “Diff.Graph” Tab .............................................................................116
<Sample> Detail Screen: “Assess.Graph” Tab .........................................................................117
<Sample> Detail Screen: “Spectral” Tab ..................................................................................118
<Sample> List Screen ...............................................................................................................119
Switching the Display Contents of the Measurement Results.................................................. 120
Sample Data Operation ............................................................................................................... 122
Saving the Current Sample Data to a USB Memory Device.................................................... 123
Performing Statistical Calculations on Sample Data................................................................ 125
Edit Name.................................................................................................................................. 126
Print ........................................................................................................................................... 127
Delete......................................................................................................................................... 128
Sample=>Target......................................................................................................................... 129
Saving Data onto a USB Memory Device ................................................................................ 130
Auto Target ................................................................................................................................ 132
Delete All................................................................................................................................... 133
Average Measurement ................................................................................................................. 134
Manual Measurement................................................................................................................ 134
Auto Measurement .................................................................................................................... 136
Chapter 4 - Other Functions
Pass/Fail Judgment for Color Difference .................................................................................. 138
Pass/Fail Judgment Based on Tolerances.................................................................................. 138
Connecting to an External Device.............................................................................................. 141
Connecting a USB Memory.......................................................................................................141
Connecting a USB Keyboard .................................................................................................... 143
Connecting a Personal Computer.............................................................................................. 144
Printer Connection .................................................................................................................... 145
System-related Functions............................................................................................................ 152
Displaying the Instrument Information .................................................................................... 152
Annual Service Recalibration Recommendation Message ...................................................... 153
Initialization .............................................................................................................................. 155
Chapter 5 - Troubleshooting
Error Messages............................................................................................................................. 160
Troubleshooting............................................................................................................................ 163
Chapter 6 - Appendix
Principles of Measurement ......................................................................................................... 166
Illuminating/Viewing System................................................................................................... 166
Illumination Area and Measurement Area ............................................................................... 167
Main Specications...................................................................................................................... 168
Dimensions.................................................................................................................................... 170

E8
Conventions
This manual describes how to safely operate the CM-5 using a specic procedure to perform measurement.
• Page layout
Symbols used in this manual are explained below.
* Note that the page shown in the illustration is for explanatory purposes only, and is not an actual page from
this manual.
For the version of the instrument rmware
The version of the instrument rmware can be conrmed on the <Information> screen. For details, refer to
page 152 “Displaying the Instrument Information” in this manual.
Memo
Provides useful
information,
supplementary
explanations, and
similar details.
Notes
Provides information that
you need to know in order
to operate the CM-5
correctly. Always read
this information before
operating the CM-5.
Procedure
Indicates an operating
procedure.
Start screen
Indicates the initial
screen from which the
operation is commenced.
Settings
Describes ranges and
provides explanations
regarding settings for the
screen in question.
Screenshot
Indicates the state of the
screen when the
operation described in
the procedure to the left
is carried out.
E50
E51
Condition Setting
The CM-5 requires condition settings (measurement condition, measurement option, and color) before
measurement can be started.
Memo To congure condition settings, select “Meas. Condition” (measurement conditions), “Meas. Option” (measurement
options) or “Color” (display conditions) from the <Conguration> screen to open an appropriate screen.
Notes If any predened condition is selected, the condition setting (measurement condition /measurement option/color) is
disabled. Set the condition to OFF before starting condition setting.
Setting the Measurement Conditions
To set measurement conditions, select “Meas. Condition” from the <Conguration> screen.
You can select or specify the following three items as the measurement conditions:
Meas. Type: Select the measurement type such as reectance measurement or transmittance •
measurement.
Meas. Area: When the measurement type is reectance measurement, select an measurement area.•
SCI/SCE: When the measurement type is reectance measurement, select the specular component •
mode.
[Setting Procedure]
Press the [Menu] button.1.
The <Conguration> screen is displayed.
Use the2. or button of the cross key to move the
cursor to “Meas. Condition” and then press the [Enter/
Edit] button.
The <Measurement Condition Settings> screen is
displayed.
The• <Measurement Condition Settings> screen shows the
current settings.
After you set the measurement conditions, you can3.
press the [BACK] button to return to the screen
displayed before you press the [Menu] button in Step 1.
Memo To return to the <Conguration> screen, press the
[Menu] button.

E9
Before Using the Instrument
1
Chapter 1
Before Using the Instrument

E10
Accessories
Standard and optional accessories are available with the instrument.
Memo The shape of some products may be different from those shown.
Standard Accessories
Make sure that all the following items are present.
Target Mask: ø30 mm CM-A197
During reectance measurement, this target mask can be replaced
with the optional target mask (ø3 mm or ø8 mm) to change the
illumination area (specimen measuring port size) according to the
specimen.
Transmittance Mask ø20 mm CM-A200
Attached to the instrument.
Guides light to the Transmittance Specimen Chamber when
conducting transmittance measurement.
AC Adapter: AC-A305
Used to supply power from an AC outlet to the instrument.
Input: 100-240 V 50/60 Hz 24-38 VA
Output: 5 V 2 A
Plug design: Center-negative
USB Cable (2 m): I F-A19
Used to connect the instrument to a personal computer (PC).
Functional Ground Cable: CM-A211
Used to prevent communication problems caused by static
electricity when connected to a PC.
Dust Cover: CM-A191
Used to protect the instrument by preventing dust from entering the
inside.

E11
Before Using the Instrument
1
Optional Accessories
You may purchase the following accessories if necessary.
Petri Dish Measurement Full Set CM-A205
Petri Dish: CM-A128 Target Mask (for Petri Dish):
CM-A203
Calibration Glass
(for Petri Dish): CM-A212
Used to perform reectance
measurement using a Petri Dish.
Used for calibration for reectance
measurement using a Petri Dish.
Zero Calibration Box: CM-A124 White Calibration Plate:
CM-A210
(with CD-ROM containing calibration
data and data-setting software)
Accessory Case: CM-A193
Used to perform zero calibration. Can be used in place of the built-in
White Calibration Plate to perform
white calibration.
Mini Petri Dish Measurement Full Set CM-A164
Mini Petri Dish: CM-A157 Target Mask (for Mini Petri
Dish): CM-A158
Calibration Glass
(for Mini Petri Dish): CM-A159
Used to perform reectance
measurement using a Mini Petri
Dish.
Used for calibration for reectance
measurement using a Mini Petri
Dish.
Zero Calibration Box: CM-A124 White Calibration Plate:
CM-A210
(with CD-ROM containing calibration
data and data-setting software)
Accessory Case: CM-A193
Used to perform zero calibration. Can be used in place of the built-in
White Calibration Plate to perform
white calibration.
Notes Instructions and notes regarding the use of the Mini Petri Dish CM-A157 and its accessories are the same as for the
Petri Dish CM-A128 unless otherwise specied.

E12
Transmittance Measurement Set CM-A206
Transmittance Zero Calibration
Plate: CM-A213
Transmittance Specimen Holder
Attachment: CM-A199
Accessory Case: CM-A193
A light-shielding plate used for zero
calibration for transmittance
measurement.
Used to attach the transmittance
specimen holder to the receiving
window side.
Transmittance Specimen Holder:
CM-A96
10 mm Wide Cell Measurement Set CM-A207
Transmittance Specimen Holder (10 mm wide): CM-A198 Transmittance Zero Calibration
Plate (10 mm): CM-A204
Set of accessories used to perform transmittance measurement of liquid specimen using a commercially
available 10 mm-wide Cell.
Color Management Software SpectraMagic™ NX
CM-S100w
Used to operate the instrument from a PC for data processing and
le management.
Connecting Cable: CM-A58
Used to connect the instrument to a commercially available serial
data printer.

E13
Before Using the Instrument
1
Target Mask
Target Mask: ø3 mm
CM-A195
Target Mask: ø8 mm
CM-A196
Used to switch the illumination area (specimen measuring port size) according to the specimen.
Cell
Cell: 2 mm
CM-A97
Cell: 10 mm
CM-A98
Cell: 20 mm
CM-A99
A glass container to contain the liquid specimen during transmittance measurement.
Plastic Cell
Plastic Cell: 2 mm
CM-A130
Plastic Cell: 10 mm
CM-A131
Plastic Cell: 20 mm
CM-A132
A plastic container to contain the liquid specimen during transmittance measurement.
Specimen Viewing Mirror CM-A202
Used to check the measurement points on the specimen for
reectance measurement.
Color Tiles (14 colors)

E14
System Diagram
AC Adapter AC-A305
Target Mask: ø3 mm
CM-A195
Target Mask: ø8 mm
CM-A196
Target Mask: ø30 mm
CM-A197
Connecting Cable CM-A58
Functional Ground Cable: CM-A211
USB Cable (2 m) IF-A19
Dust Cover
CM-A191
Spectrophotometer
CM-5
USB Memory
(commercially available)
Personal computer
(commercially available)
Data Printer
(commercially
available)
Color Management Software
SpectraMagic™ NX
CM-S100w
Professional Edition, Lite Edition
Transmittance Mask ø20 mm
CM-A200
Cell
CM-A97
(2 mm)
Cell
CM-A98
(10 mm)
Cell
CM-A99
(20 mm)
Plastic Cell:
2 mm
CM-A130
(x 100)
Plastic Cell:
10 mm
CM-A131
(x 100)
Plastic Cell:
20 mm
CM-A132
(x 100)
Specimen Viewing Mirror
CM-A202
Transmittance Measurement /
Petri Dish Measurement Full Set CM-A214
Transmittance Measurement Set CM-A206
• Transmittance Zero Calibration Plate CM-A213
• Transmittance Specimen Holder CM-A96
• Transmittance Specimen Holder Attachment
CM-A199
• Accessory Case CM-A193
Petri Dish Measurement Full Set CM-A205
• White Calibration Plate CM-A210
(with CD-ROM containing calibration data and data-
setting software)
• Zero Calibration Box CM-A124
• Target Mask (for Petri Dish) CM-A203
• Petri Dish CM-A128
• Calibration Glass (for Petri Dish) CM-A212
• Accessory Case CM-A193
Mini Petri Dish Measurement Full Set CM-A164
• White Calibration Plate CM-A210
(with CD-ROM containing calibration data and data-
setting software)
• Zero Calibration Box CM-A124
• Target Mask (for Mini Petri Dish) CM-A158
• Mini Petri Dish CM-A157
• Calibration Glass (for Mini Petri Dish) CM-A159
• Accessory Case CM-A193
10 mm Wide Cell Measurement Set CM-A207
• Transmittance Specimen Holder (10 mm wide)
CM-A198
• Transmittance Zero Calibration Plate (10 mm)
CM-A204
10 mm-wide Cell
(commercially available)
USB keyboard
(commercially
available)
Color Tiles (14 colors)
Standard accessories
Optional accessories

E15
Before Using the Instrument
1
Names and Functions of Parts
1
2
34
56 7 8
10 11 12 13
9

E16
1LCD screen Displays setting items, measurement results and messages.
2Control panel Used to switch screens or select/determine/save setting items.
For details, refer to page 23 “Control Buttons”.
3Specimen measuring port The port for measuring the specimen. The port size can be changed by
changing the Target Masks. This port opens its shutter only for
measurement. Inside the shutter is the built-in White Calibration Plate.
4Target Mask During reectance measurement, this target mask can be replaced with
the optional target mask ø3 mm (CM-A195) or ø8 mm (CM-A196) to
change the illumination area (specimen measuring port size) according
to the specimen.
5Illumination window The port for measuring the specimen.
6Transmittance Mask Guides light to the Transmittance Specimen Chamber when conducting
transmittance measurement.
7Transmittance Specimen
Chamber
For transmittance measurement, set a specimen in this chamber.
8Transmittance Specimen
Chamber Cover
Slide this cover to open/close the Transmittance Specimen Chamber.
9USB connection terminal
(A type)
Used to attach a USB memory device to the instrument. When a USB
memory device is properly connected to the instrument, the (USB
memory device connected) icon is displayed.
A USB keyboard can also be used to input le names and sample data
names. The screen display does not change when a USB keyboard is
attached.
10 USB connection terminal
(B type)
Used to connect the instrument to a PC with the supplied USB cable
(IF-A19).
11 Power switch Used to turn ON/OFF power. Setting this switch to “” turns the power
OFF, and setting it to “ ❙” turns the power ON.
12 AC adapter terminal When using the supplied AC adapter (CM-A305), connect the adapter’s
plug to this terminal.
13 RS-232C Connector Used to connect the instrument to the optional data printer with the
optional connecting cable (CM-A58).

E17
Before Using the Instrument
1
Cleaning Parts
This section explains how to clean the Target Mask, White Calibration Plate, Zero Calibration Box, and the
inside of the integrating sphere.
Target Mask and Transmittance Mask (Standard/optional accessory)
Use a blower to remove dirt and dust from the Target Masks.
Notes Do not touch the inside (edge) of the Target Mask with your
ngers. If it becomes dirty, wipe it with a soft, clean dry cloth. Edge
White Calibration Plate (Optional)
• When the White Calibration Plate becomes dirty, gently wipe the
dirt off with a soft dry cloth. If the dirt is difcult to remove,
wipe it off with a cloth dampened with commercially available
lens cleaning solution. Then remove the solution with a cloth
dampened with water, and leave the plate to dry.
• When parts other than the White Calibration Plate become dirty,
lightly wipe the dirt off with a cloth dampened with water or
soapy water. Never use solvents such as thinner or benzene.
Notes Be careful not to scratch the White Calibration Plate.
White Calibration Plate
Zero Calibration Box (Optional)
Use a blower to remove dirt from the inside of the box.
If the inner surface is accidentally touched with hands or ngers,
wipe off the ngerprints or other traces gently with a soft dry cloth.
Zero Calibration Box
CM-A124
Edge

E18
Inside the Integrating Sphere
1. Set specular component to SCE.
Memo For the procedure for switching the specular component,
refer to “SCI/SCE” on page 62.
2. Ensure that there is nothing in the Transmittance
Specimen Chamber.
3. Block the receiving window of the Transmittance
Specimen Chamber so that no dust or dirt enters through
it.
Receiving
window
4. Open the shutter and blow off the dust and dirt in the
Integrating Sphere with a blower.
Memo For the procedure for opening/closing the shutter, refer to
page 66 “Shutter Open/Close”.
Notes Do not touch the white-coated inner surface of the
integrating sphere, wipe it with a cloth or put an object inside
it. If the inside is so dirty that dirt cannot be removed with a
blower, contact the nearest KONICA MINOLTA-authorized
service facility.
Shutter
Other manuals for cm-5
2
Table of contents
Popular Test Equipment manuals by other brands

Leader Electronics Corp.
Leader Electronics Corp. LTC-906 instruction manual

Sealey
Sealey BT2101 instructions

Macherey-Nagel
Macherey-Nagel Visocolor ECO Test instructions for visual determination

pitsco
pitsco Straw Rocket user guide

Apera
Apera 201-C user manual

Agilent Technologies
Agilent Technologies E4406A VSA Series Service guide