Konig Onstage OSP-TTA210 User manual

OSP-TTA210
MANUAL (p. 2)
Belt Drive DJ turntable with direct record
MODE D’EMPLOI (p. 12)
Platine DJ entrainée par courroie avec
enregistrement direct
MANUALE (p. 23)
Giradischi DJ con registrazione diretta
BRUKSANVISNING (s. 46)
Remdrift DJ skivspelare med
direktinspelning
MANUAL DE UTILIZARE (p. 56)
Pick-up DJ cu curea şi înregistrare directă
BRUGERVEJLEDNING (p. 67)
Bæltetrukket DJ pladespiller med direkte
optagelse
HASZNÁLATI ÚTMUTATÓ (o. 35.)
Szíjhajtású DJ lemezjátszó közvetlen
rögzítési funkcióval
KÄYTTÖOHJE (s. 41)
Hihnavetoinen DJ-levysoitin with suoralla
tallennuksella
ANLEITUNG (s. 7)
Riemengetriebener Plattenspieler mit
Direktaufnahme
GEBRUIKSAANWIJZING (p. 18)
Riemaangestuurde DJ draaitafel met directe
opname
MANUAL DE USO (p. 29)
Tocadiscos DJ de transmisión por correa
con grabación directa
NÁVOD K POUŽITÍ (s. 51)
DJ gramofonový talíř s řemenovým
pohonem pro přímý záznam
ΕΓΧΕΙΡΙΔΙΟ XPHΣHΣ (σελ. 61)
Περιστρεφόμενος Τροχός με μετάδοση
κίνησης με ιμάντα με άμεση εγγραφή για DJ
VEILEDNING (p. 72)
Beltedrevet DJ-platespiller med
direkteopptak

2
ENGLISH
Introduction:
Belt Drive DJ turntable with USB and SD card record function. Max. 4 GB storage capacity and provided with
33, 45 and 78 rpm.
Description:
01. Start/stop buttons
Press this button to start or stop the platter.
02. Platter
The platter is equipped with a slip mat. This makes it easier to manipulate the record for scratch
performances.
03. USB & SD SOCKET
Plug a USB stick and SD card into this socket, the LED will illuminate during operation.
04. Target light
Insert the target light into the deck and it will light up.
05. 33 Rpm speed select buttons
This is used to select the desired speed. Press the “33” button to select the 33 rpm speed.
06. 45 & 78 rpm speed select buttons
Press the “45” button to select the 45 rpm speed.
Press the “33” and “45” buttons at the same time to select the 78 rpm speed.
07. Reverse button
This button is used to reverse rotate the platter.

3
08. Headshell
Install the cartridge here. When installing a cartridge, refer to the installation instructions supplied by the
manufacturer of that cartridge. During installation, attach the stylus protector to guard the stylus tip from
damage.
Attach the wires as following:
White (L+) Left channel +
Blue (L -) Left channel –
Red (R+) Right channel+
Green (R-) Right channel –
09. Headshell locking nut
Attach the headshell by inserting it into the front end of the tone arm and then turn the locking nut
clockwise.
10. Tone arm
This is a fully manual tone arm. To start playback, gently place the stylus on the record using the head
shell finger support or use the tone arm lifter (see 12).
11. 45 Rpm adaptor
Place the centre spindle to play 7” records with large center holes.
12. Tonearm lift
Controls the up and down action of the tone arm.
13. Anti-skate knob
This applies inward force to the tone arm so it does not skip outward across the record due to the
centrifugal force of the spinning record. Cartridge manufacturers usually specify the proper setting for this.
14. Counterweight
Adjustment creates the proper downward pressure of the stylus on the record. Attach by sliding the
counterweight onto the rear of the tone arm. Twist it lightly and it will screw onto the rear shaft of the
tone arm.
Counterweight adjustment: Bring tone arm to 0-level with the counterweight. When leveled, set the
scale on the counterweight to 0 (watch the stripe). Now turn the counterweight until it shows the specified
downward pressure in grams. The right downward pressure is given in the stylus specifications.
15. Motor off button
Press the button to enable motor off, and the LED will flash. Press the button again to disable this
function.
16. Play & pause songs from the USB & SD and start recording
Each press of this button toggles PLAY/PAUSE during playback from USB or SD.
In addition, this button starts and pauses recording from the vinyl to the SD/USB when the record has
been setup previously (see 18)
17. Skip button (+/-)
Press it to select any single track in the USB stick or SD card.
18. Start & pause recording action
This button (de)activates the record function. In order to record a vinyl, the LED beside this button has
to be lit.
19. Audio select
This button selects the source to listen to. In order to record/listen to a vinyl, the LED “PH” must be lit.
20. Record volume
Used to adjust the level of volume during recording.
21. Ground

4
22. Output L & R
This is the standard analog output (RCA jacks) which can be connected either to a phone or line input
on any DJ mixer, depending on the setting of the phone/line selector.
23. USB socket
USB connection (USB cable limit within 3 m).
24. Power cord connector
Used to connect to the mains, using the supplied power cord.
25. Power ON/OFF switch
Used to turn the turntable on and off.
Specications:
Motor: DC motor
Driving method: Belt drive
Starting & braking time: Less than 1 sec
Speed adjustment: 33 1/3, 45, 78 Rpm
Wow & flutter: +/- 10%
Tone arm type: Static balanced S-shaped tone arm
Computer interface: USB 1.1 compliant, Windows XP or MACOS X
Power supply: AC 115/230 V, 60/50 Hz, user selectable
Single voltage: AC 100 V, 50/60 Hz (Japan)
AC 120 V, 60 Hz (U.S.A. and Canada)
AC 127 V, 60 Hz (Mexico)
AC 220 V, 50 Hz (Chile and Argentina)
AC 240 V, 60 Hz (Australia)
AC 220 V, 60 Hz (Philippines and Korea)
AC 230 V, 50 Hz (Europe, U.K., New Zealand, South Africa, and Singapore)
Dimensions: 449 x 370 x 145 mm
Power consumption: 5.5 W
Weight: 4 Kg
Audacity software overview:
Audacity is a free software, licensed under the GNU General Public License (GPL). More information as well
as the open source code can be found on the web at http://audacity.sourceforge.net/
Note: Please ensure that you have installed the software before starting.
Setting up your PC to work with Audacity
1. Connect an input source to the unit
2. Connect the USB lead to your computer
3. Install the Audacity recording software
4. Open the Audacity program
5. Select “Preference” from the Edit tab in the Audacity menu

5
6. Select the Audio I/O tab at the top left
• UnderPlayback,device,selectyourinternal sound card.
• UnderRecording,device,selectUSB Audio CODEC.
• UnderRecording,channels,select2 (Stereo).
• ChecktheboxmarkedPlay other tracks while recording new one.
• ChecktheboxmarkedSoftware Playthrough.
Recording albums with Audacity
1. Saving a project
• Audacitywritesallthechangedandrecordedaudiotoadirectorycalledprojectname data, which is
located right where you saved the project file itself.
• Thus,selectSave Project As from your Audacity File tab and choose a location and filename for
your project.
• PleasenotethatwhenyoustartupanewsessionofAudacity,onlythe“Save As…” menu option is
available.
2. How to record
• SetupyourUSBturntabletoplaythesongoralbumyouwanttorecord
• Click on the red REC button to start the recording.
• Lowerthetonearmontheturntableontothealbumandtrackyouwanttorecord.
• Click on the blue Pause button to pause the recording. Press it again to continue.
• Click on the yellow Stop button.
That’s it. You can now play around with your recording and explore the editing capabilities of Audacity.
Remember that you can use the Undo function almost without limits while the project is open.

6
Note: CDs cannot be burned directly from the Audacity application. Other CD burning applications should be
used.
FAQ:
Software:
Q: I Cannot listen to the record while recording
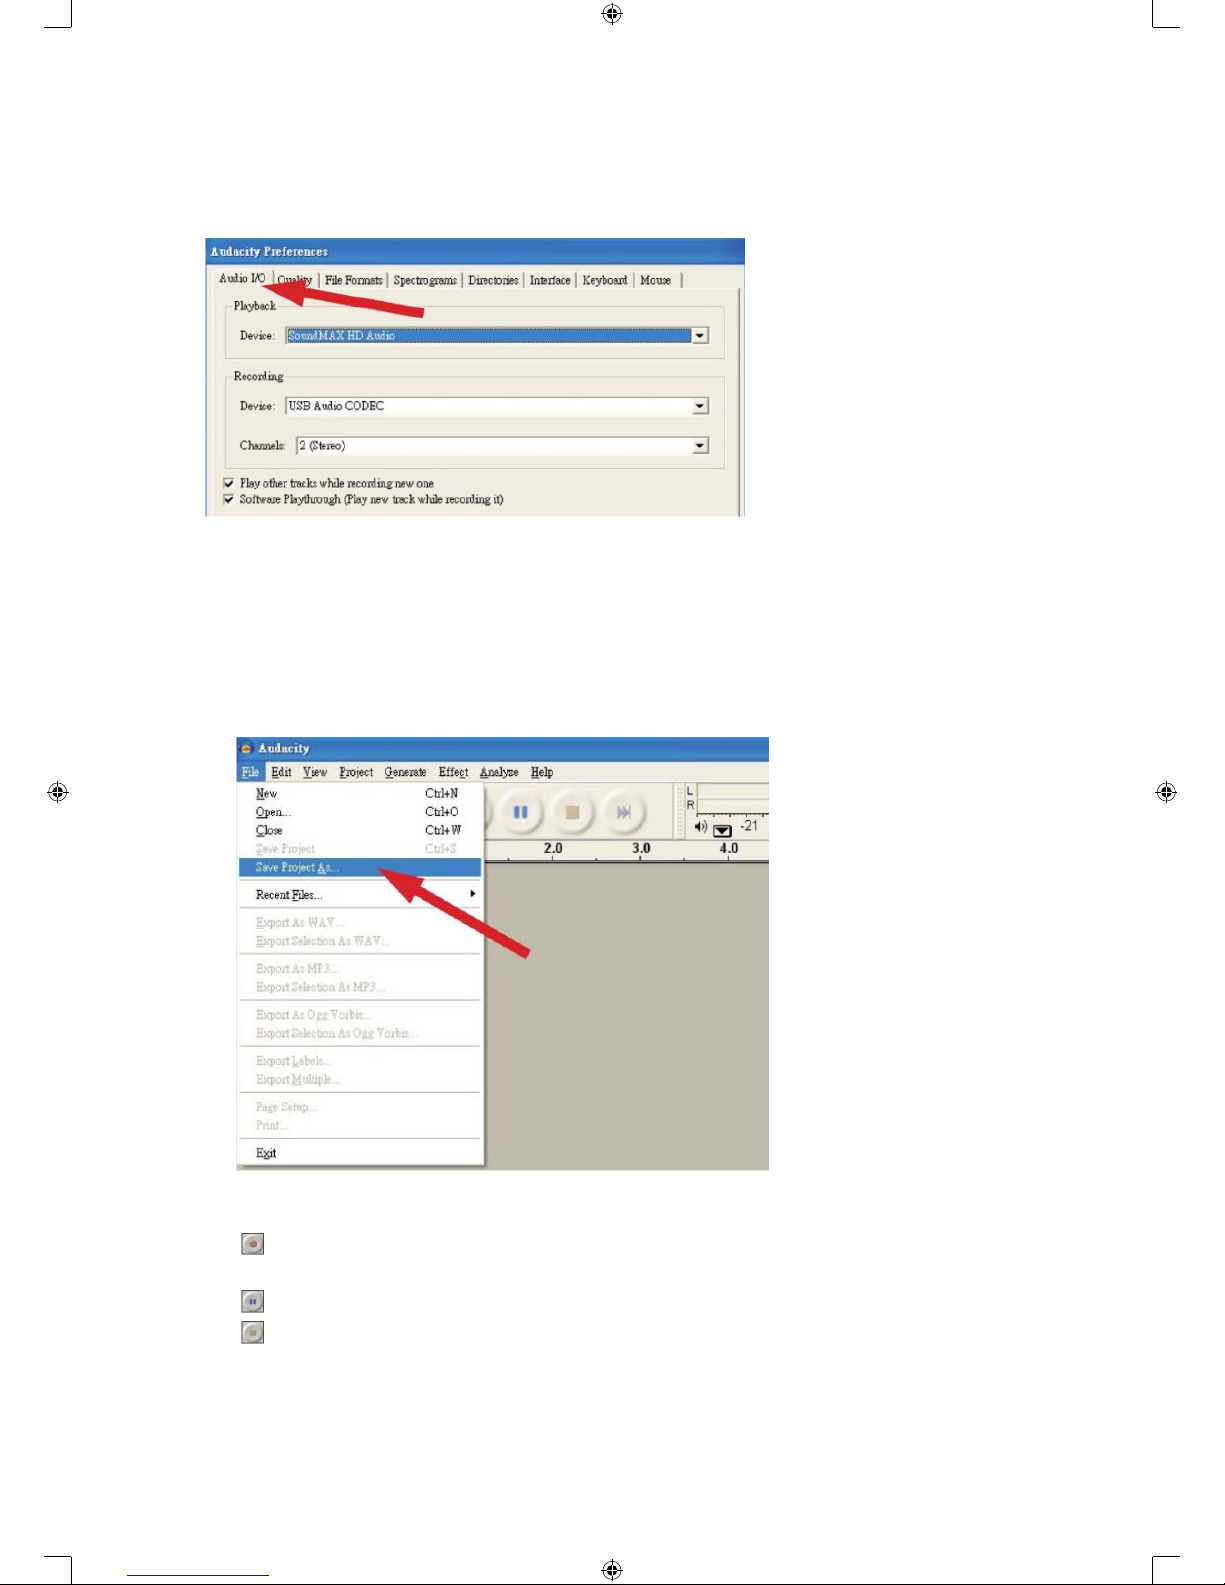
A: Please activate “Software Playthrough” in Audacity as shown in IM.
Check the record source (USB Audio Codec) as shown in IM.
Check the volume settings of your computer.
Q: I Cannot store songs as MP3
A: Please download LAME MP3-Codec from the internet.
Q: I Cannot record
A: The player has to be connected with the computer first, then Audacity may be started.
Q: I Can only record MONO
A: This occurs mostly with VISTA. Please select “stereo”, not “mono” or “microphone”, in Windows
configuration recording source.
Player:
Q: The sound is crackling
A: Please make sure that this player is connected to a high-level-input of your amplifier. High-level inputs
are: CD, AUX and TAPE. The input PHONE is not suitable. The player has a built-in pre-amplifier.
Clean the stylus and the vinyl.
Check for correct counterweight setting.
Check for correct anti-skating level.
Q: Direct coding is not possible
A: The USB stick/card is write-protected.
Check the correct file system (FAT16).
Q: Direct coded songs are oversteered when recorded
A: Check for the correct recording level, see point 20 of IM.
Safety precautions:
To reduce risk of electric shock, this product should ONLY be opened
by an authorized technician when service is required. Disconnect the
product from mains and other equipment if a problem should occur.
Do not expose the product to water or moisture.
Maintenance:
Clean only with a dry cloth. Do not use cleaning solvents or abrasives.
Warranty:
Noguaranteeorliabilitycanbeacceptedforanychangesandmodicationsoftheproductordamage
caused due to incorrect use of this product.
General:
Designsandspecicationsaresubjecttochangewithoutnotice.
All logos brands and product names are trademarks or registered trademarks of their respective holders and
are hereby recognized as such.
Keep this manual and packaging for future reference.
Attention:
This product is marked with this symbol. It means that used electrical and electronic products should
not be mixed with general household waste. There is a separate collections system for these products.
RISK OF ELECTRIC SHOCK
DO NOT OPEN
CAUTION

7
DEUTSCH
Einleitung:
Riemengetriebener Plattenspieler mit USB- und SD-Karten-Aufnahmefunktion. Max. 4GB Speicherplatz und
mit Geschwindigkeiten 33, 45, 78 U/min.
Übersicht:
01. Start/Stopp
Ein-/Ausschalten des Plattentellers.
02. Plattenteller
Auf dem Plattenteller befindet sich eine für das Scratchen hilfreiche Slip-Mat.
03. USB & SD-Karten ANSCHLUSS
Schließen Sie USB-Stick oder SD-Karte an diesen Anschluss an, die LED leuchtet während des Betriebs.
04. Nadelbeleuchtung
Steckplatz für eine abnehmbare Nadelbeleuchtung
05. 33 U/min Geschwindigkeitsregler
Geschwindigkeitsregler für den Plattenteller.
Drücken der Taste „33” aktiviert 33 U/min-Abspielgeschwindigkeit.
06. 45 und 78 U/min Geschwindigkeitsregler
Drücken der Taste „45” aktiviert 45 U/min-Abspielgeschwindigkeit.
Gleichzeitiges Drücken der Tasten „33” & „45” aktiviert 78 U/min-Abspielgeschwindigkeit.
07. Reverse-Knopf
Schaltet die Wiedergabe auf Reverse.

8
08. Headshell
Bringen Sie das Tonabnehmersystem hier an. Wenn Sie ein neues System anbringen, benutzen
Sie die Montageanleitung vom Hersteller dieses Systems. Stecken Sie während der Installation den
Nadelschutz auf, um die Tonabnehmernadel vor Beschädigung zu schützen.
Anschluss der Kabel:
Weiß (L+) Kanal links +
Blau (L -) Kanal links –
Rot (R+) Kanal rechts +
Grün (R-) Kanal rechts –
09. Headshell-Befestigung
Stecken Sie die Headshell auf den Tonarm und fixieren Sie sie, indem Sie die Manschette im
Uhrzeigersinn drehen.
10. Tonarm
Tonarm von Hand bewegen. Zur Wiedergabe positionieren Sie den Tonarm über der Platte und setzen
Sie die Nadel vorsichtig darauf ab. Oder per Hebel am Tonarm (siehe 12).
11. 45 U/min Adapter
Zum Abspielen von 17,78cm (7”) Platten mit größerer Öffnung.
12. Tonarmlift
Hiermit heben und senken Sie den Tonarm.
13. Anti-Skating-Regler
Mit diesem Regler wird die Fliehkraft auf den Tonabnehmer ausgeglichen und verhindert damit ein
Abdriften des Tonarms bei sich drehender Platte.
14. Tonarmgewicht
Stellt den Druck ein, mit der die Nadel auf der Platte liegt. Veränderung der Einstellung durch
Verschieben des Gewichts am hinteren Ende des Tonarms.
Justierung des Tonarmgewichtes: Bringen Sie den Tonarm mit dem Gegengewicht in 0-Stellung.
Eichen Sie, wenn er sich im Gleichgewicht befindet, die Anzeige am Gegengewicht auf 0. Drehen Sie
dann das Gegengewicht auf den Wert, der in der Dokumentation der Nadel angegeben ist.
15. Motor-Aus-Taste
Drücken Sie die Taste, um den Motor auszuschalten. Die LED beginnt zu blinken. Drücken Sie die
Taste erneut, um den Motor wieder einzuschalten.
16. Wiedergabe (Play) & Pause (USB-/SD-Wiedergabe) und Start der Aufnahme
Startet und pausiert die Wiedergabe von USB oder SD-Karte.
Außerdem startet und pausiert diese Taste die Aufnahme von Platte auf USB/SD-Karte, wenn das
Gerät auf Aufnahme eingestellt ist (s. 18)
17. Titelwahl (+/-)
Zur Wahl eines bestimmten Titels von USB-Stick, bzw. SD-Karte.
18. Start & Pause (für die Aufnahme)
Diese Taste (de-)aktiviert die Aufnahme. Die LED neben der Taste zeigt die Aufnahmebereitschaft an.
19. Audio-Auswahl
Zur Auswahl des Wiedergabegeräts. “PH” steht für die Wiedergabe von Schallplatte.
20. Aufnahmepegel
Zur Einstellung des Aufnahmepegels.
21. Masse-Anschluss
22. Ausgang L & R
Standard-Analog-Ausgang (Cinch), der wahlweise, je nach Einstellung des Phono/Line-Schalters mit
einem Phone- oder Line-In-Eingang an einem DJ-Mixer verbunden werden kann.

9
23. USB-Anschluss
USB-Anschluss (USB Kabllänge max. 3 m).
24. Netzkabelanschluss
zum Anschließen des beiligenden Netzkabels.
25. EIN-/AUS-Schalter
Schaltet den Plattenspieler ein oder aus.
Techn. Merkmale:
Motor: Gleichstrom
Antrieb: Riemenantrieb
Start- & Bremsgeschw.: < 1 s
Drehgeschwindigkeit: 33 1/3, 45, 78 U/min
Wow & Flutter: +/-10%
Tonarm-Typ: Statische Balance, S-Form
PC-Anschluss: USB 1.1, Windows XP oder Mac-OS X
benötigte Netzspannung: ~115/230V, 60/50Hz, einstellbar
Netzspannung: ~100V, 50/60Hz (Japan)
~120V, 60Hz (USA und Kanada)
~127V, 60Hz (Mexiko)
~220V, 50Hz (Chile und Argentinien)
~240V, 60Hz (Australien)
~220V, 60Hz (Philippinen und Korea)
~230V, 50Hz (Europa, Großbritannien, Neuseeland, Südafrika und Singapur)
Abmessungen: 449 x 370 x 145 mm
Stromverbrauch: 5,5 Watt
Gewicht: 4 kg
Verwendung von Audacity:
Bei Audacity handelt es sich um eine GNU General Public License (GPL)-lizensierte freie Open-Source-
Software zur Aufnahme und Bearbeitung von Tönen. Weitere Informationen, sowie der Source-Code des
Programms sind erhältlich unter http://audacity.sourceforge.net/
Hinweis: Bitte sorgen Sie vor Start der Arbeit für eine fehlerfreie Installation der Software.
PC-Setup für die Verwendung von Audacity
1. Machen Sie den Plattenspieler betriebsbereit
2. Schließen Sie den Plattenspieler über USB an den Computer an
3. Installieren Sie Audacity
4. Starten Sie Audacity
5. Wählen Sie innerhalb von Audacity Einstellungen aus dem Menü „Bearbeiten“
6. Aktivieren Sie das Tab Audio E/A (oben links)
• WählenSieunterWiedergabe,GerätIhreinterne Soundkarte

10
• UnterAufnahme,Gerät,wählenSieUSB Audio CODEC
• UnterAufnahme,Kanäle,wählenSie2 (Stereo)
• SetzenSieeinenHakenbeiderOptionMultiplay
• SetzenSieeinenHakenbeiderOptionSoftware Playthrough
Aufnahme eines Albums mit Audacity
1. Speichern eines Projektes
• AufnahmeundÄnderungenwerdenvonAudacityineinemVerzeichnismitdemNamenprojectname
data, abgelegt, das sich in dem Ordner befindet, in dem das Projekt gespeichert wurde.
• ZumAnlegeneinesProjekteswählenSiebitteausdemMenü„Datei“dieOption„Projekt speichern
unter...“ und bestimmen Sie anschließend Ort und Namen Ihres Projekts.
• Hinweis:BeimStartvonAudacityistzumSpeichernnurdieOption„Projekt speichern unter...“
verfügbar.
2. Aufnahme
• BereitenSieIhrenUSB-PlattenspielerzurWiedergabedesSongsoderdesAlbumsvor.
• Mit der roten REC-Taste starten Sie die Aufnahme.
• SenkenSiedenTonarm,ummitderWiedergabedesTitels,bzw.Albumszubeginnen.
• Klicken Sie auf den blauen Pause-Button, um die Aufnahme zu pausieren, bzw. fortzusetzen.
• Klicken Sie auf den gelben Stopp-Button.
Und so einfach ist das. Sie können nun mit Ihrer Aufnahme arbeiten, herumexperimentieren und sich mit den
verschiedenen Edit-Funktionen von Audacity vertraut machen.
BeachtenSiedienützlicheUndo-Funktion,mitderÄnderungenamgeöffnetenProjektleichtrückgängig
gemacht werden können.

11
Hinweis: CDs können mit Audacity nicht direkt gebrannt werden. Hierzu benötigen Sie eine dafür geeignete
zusätzliche Anwendung.
FAQ:
Software:
F: Das gleichzeitige Hören der Aufnahme ist nicht möglich
A: Bitte aktivieren Sie die Funktion „Software Playthrough” in den Einstellungen von Audacity (s.o.).
Kontrollieren Sie, ob die korrekte Aufnahmequelle (d.h. USB Audio Codec) aktiviert ist.
Kontrollieren Sie die Lautstärkeeinstellung am Computer.
F: Kein Speichern im MP3-Format möglich
A: Bitte downloaden Sie den LAME MP3-Codec aus dem Internet.
F: Keine Aufnahme möglich
A: Zuerst muss das Wiedergabegerät an den Computer angeschlossen werden. Erst danach darf
Audacity gestartet werden.
F: Nur MONO-Aufnahmen möglich
A: Dieses Problem tritt häufig unter Windows VISTA auf. Bitte stellen Sie in der Windows-
Audiokonfiguration die Aufnahme auf „Stereo” (nicht „Mono” oder „Mikrofon“).
Plattenspieler:
F: Knistern bei der Wiedergabe
A: Kontrollieren Sie, ob der Player an einem High-Level-Eingang, d.h. an CD, AUX oder TAPE Ihres
Verstärkers angeschlossen ist. Der PHONO-Eingang ist nicht geeignet. Der Player verfügt über einen
eingebauten Vorverstärker.
Säubern Sie Tonabnehmernadel und Platte.
Kontrollieren Sie die Position des Gegengewichts.
Kontrollieren Sie die Anti-Skating-Einstellung.
F: Direkt-Record funktioniert nicht (TTA 210)
A: Der USB-Stick, bzw. Karte ist möglicherweise schreibgeschützt.
Falsches Dateisystem (FAT16).
F: Direkt-Record-Aufnahmen sind übersteuert (TTA 210)
A: Überprüfen Sie die Aufnahmepegeleinstellungen (s.u., Punkt 20 der Anleitung).
Sicherheitsvorkehrungen:
Um das Risiko eines elektrischen Schlags zu verringern, sollte dieses
Produkt AUSSCHLIESSLICH von einem autorisierten Techniker
geöffnet werden. Bei Problemen trennen Sie das Gerät bitte von der
Spannungsversorgung und von anderen Geräten ab. Stellen Sie
sicher, dass das Gerät nicht mit Wasser oder Feuchtigkeit in Berührung kommt.
Wartung:
Nur mit einem trockenen Tuch säubern. Keine Reinigungs- oder Scheuermittel verwenden.
Garantie:
EskannkeineGarantieoderHaftungfürirgendwelcheÄnderungenoderModikationendesProduktsoder
für Schäden übernommen werden, die aufgrund einer nicht ordnungsgemäßen Anwendung des Produkts
entstanden sind.
Allgemeines:
Design und technische Daten können ohne vorherige Ankündigung geändert werden.
Alle Logos, Marken und Produktnamen sind Marken oder eingetragene Marken ihrer jeweiligen Eigentümer
und werden hiermit als solche anerkannt.
Bitte bewahren Sie Bedienungsanleitung und Verpackung für spätere Verwendung auf.
Achtung:
Dieses Produkt ist mit diesem Symbol gekennzeichnet. Es bedeutet, dass die ausgedienten
elektrischen und elektronischen Produkte nicht mit dem allgemeinen Haushaltsmüll entsorgt werden
dürfen. Für diese Produkte stehen gesonderte Sammelsysteme zur Verfügung.
STROMSCHLAGGEFAHR
NICHT ÖFFNEN
VORSICHT

12
FRANÇAIS
Introduction :
Platine DJ entraînée par courroie avec enregistrement sur clé USB et carte SD. Capacité maximale de
stockage de 4 Go, dotée de 3 vitesses : 33, 45 et 78 tpm.
Description :
01. Touche Marche/Arrêt
Appuyez sur cette touche pour démarrer ou arrêter la platine.
02. Platine
La platine est munie d’une feutrine. Cela facilite la manipulation des disques et prévient les égratignures.
03. Port USB et fente pour carte SD
Insérez une clé USB et carte SD dans ces interfaces, le voyant s’allume pendant le fonctionnement.
04. Lampe d’aiguille
Insérez une lampe d’aiguille dans la platine pour l’allumer.
05. Sélecteur de vitesse 33 tpm
Utilisé pour la sélection de la vitesse.
Appuyez sur la touche “33” pour sélectionner la vitesse 33 tpm.
06. Sélecteur de vitesse 45,78 tpm
Appuyez sur la touche “45” pour sélectionner la vitesse 45 tpm.
Appuyez sur les touches “33” et “45” pour sélectionner la vitesse 78 tpm.
07. Touche d’inversion
Cette touche est utilisée pour inverser la rotation de la platine.

13
08. Porte-pointe de lecture
Installer une cartouche ici. Lorsque vous installez une cartouche, reportez-vous à la notice d’emploi du
fabriquant accompagnant la cartouche. Pendant de l’installation, mettez le protège stylet pour protéger
la pointe de lecture.
Connectez les fils électriques de la manière suivante :
Blanc (L +) Canal gauche +
Bleu (L -) Canal gauche -
Rouge (R +) Canal droit +
Vert (R-) Canal droit -
09. Ecrou de blocage du porte-pointe de lecture
Attachez le porte-pointe de lecture en l’insérant à l’extrémité du bras de lecture puis tournez l’écrou de
blocage dans le sens horaire.
10. Bras de lecture
C’est un bras complètement manuel. Pour démarrer la lecture, placez doucement le stylet sur le disque
en utilisant le support pour doigt de la pointe de lecture ou le levier du bras de lecture (voir 12).
11. Adaptateur 45 tpm
Placez l’adaptateur sur l’axe central pour lire des disques 7” comportant une large ouverture au milieu.
12. Levier du bras de lecture
Utilisé pour lever ou poser le bras de lecture.
13. Bouton de réglage du compensateur de poussée latérale
Il applique une force au bras dirigée vers l’intérieur pour qu’elle ne glisse pas en dehors du disque sous
l’effet de la force centrifuge générée par la rotation du disque. Les fabricants des cartouches spécifient
les réglages appropriés pour cela.
14. Contrepoids
Pour équilibrer la pression qu’exerce la pointe de lecture sur le disque. A attacher en faisant glisser le
contrepoids à l’arrière du bras de lecture. Faites le tourner légèrement pour qu’il prenne place dans la
tige arrière du bras de lecture.
Réglage du contrepoids : Ramenez le bras au niveau 0 avec le contrepoids. Lorsqu’il est à niveau,
régler la graduation du contrepoids à 0 (surveiller la bande). Tournez ensuite le contrepoids jusqu’à ce
qu’il montre la pression descendante indiquée en grammes. La bonne pression descendante est fournie
dans les spécifications du stylet.
15. Touche d’arrêt du moteur
Appuyez sur cette touche pour arrêter le moteur, le voyant se met à clignoter. Appuyez de nouveau sur
cette touche pour désactiver cette fonction.
16 Lire et suspendre la lecture à partir de l’USB et de la carte SD et démarrer l’enregistrement
Chaque pression sur cette touche permet de basculer Lecture/PAUSE durant la lecture de l’USB ou SD.
En plus, cette touche permet de démarrer et de suspendre l’enregistrement du disque vinyle sur la carte
SD / USB lorsque l’enregistrement a déjà démarré (voir 18).
17 Touche Skip (Saut) (+/-)
Appuyez dessus pour sélectionner une seule piste dans la clé USB ou la carte SD.
18 Démarrer et suspendre l’enregistrement
Cette touche active/désactive l’enregistrement. Pour enregistrer un disque vinyle, le voyant à côté de
cette touche doit être allumé.
19 Sélecteur de source audio
Cette touche permet de sélectionner la source à écouter. Pour enregistrer/écouter un disque vinyle, le
voyant “PH” doit être allumé.

14
20 Volume d’enregistrement
Utilisé pour régler le niveau de volume pendant l’enregistrement.
21. Terre
22. Sorties L & R (gauche et droite)
C’est une prise de sortie analogique standard de type RCA, qu’on peut connecter soit une entrée phono
ou ligne ou toute console de mixage DJ, selon la position du sélecteur phono/line.
23. Port USB
A utiliser avec un câble USB ne dépassant pas les 3 m.
24. Prise pour cordon d’alimentation
A utiliser pour brancher l’appareil au secteur à l’aide du cordon d’alimentation fourni.
25. Interrupteur d’alimentation
A utiliser pour allumer ou éteindre la platine.
Spécications :
Moteur : Moteur à courant continu
Mode d’entraînement : Par courroie
Temps de démarrage et de freinage : moins de 1 s
Réglage de la vitesse : 33 1/3, 45, 78 tpm
Pleurage et scintillement : +/-10%
Type de bras de lecture : En forme de S, équilibrée statiquement
Interface ordinateur : Compatible USB 1.1, Windows XP ou MACOS X
Alimentation : 115/230VCA, 60/50Hz, sélectionnable par l’utilisateur
Une seule tension : 100V CA, 50/60Hz (Japon)
120V CA, 60Hz (U.S.A. et Canada)
127V CA, 60Hz (Mexique)
220V CA, 50Hz (Chilien et Argentine)
240V CA, 60Hz (Australie)
220V CA, 60Hz (Philippines et Corée)
230V CA, 50Hz (Europe, R.U., Nouvelle-Zélande, l’Afrique du Sud
et Singapore)
Dimensions : 449 x 370 x 145 mm
Consommation d’énergie : 5,5 Watts
Poids : 4 Kg
Présentation du logiciel Audacity :
Audacity est un logiciel gratuit, cédé sous licence conformément à la licence GPL dans le cadre du projet
GNU. Plus d’information et d’autres logiciels open source (libres) se trouvent sur le site web
http://audacity.sourceforge.net/
Remarque : Ne pas oublier d’installer le logiciel avant de commencer.

15
Conguration de votre PC pour travailler avec Audacity
1. Connecter une source d’entrée à l’unité
2. Connecter le câble USB à l’ordinateur
3. Installer le logiciel d’enregistrement Audacity
4. Lancer le programme Audacity
5. Sélectionnez Preference à partir de l’onglet Edit de la fenêtre Audacity
6. Sélectionnez l’onglet Audio I/O en haut à gauche
• SousPlayback,Device(Lecture,Périphérique),sélectionnezvotrecarte de son interne
• SousRecording,Device(enregistrement,depériphériques),sélectionnezUSB Audio CODEC
• SousRecording,Channels(Enregistrement,canaux),sélectionnez2 (Stereo)
• CochezlacasePlay other tracks while recording new one (Lire d’autres pistes pendant
l’enregistrement d’une nouvelle)
• CochezlacaseSoftware Playthrough

16
Enregistrement d’albums avec Audacity
1. Enregistrement d’un projet
• Audacityécrittouteslesdonnéesaudiomodifiéesetenregistréesdansundossierappelé
projefcftname data, qui est le même qui a servi à enregistrer le fichier projet
• SélectionnezSave Project As (Enregistrer le projet sous) de l’onglet Fichier d’Audacity et choisissez
un emplacement et un nom pour votre projet
• Notequelorsquevousdémarrezunenouvellesessiond’Audacity,seule“Save As…” (Enregistrer
sous ...) est disponible dans le menu.
2. Comment enregistrer
• RéglezvotreplatineUSBpourlirelachansonoul’albumquevoussouhaitezenregistrer
• Appuyez sur le bouton rouge REC pour enregistrer.
• BaisserlebrasdelecturesurlaplatineUSBaudessusdel’albumetlapistequevoussouhaitez
enregistrer.
• Cliquez sur le bouton bleu Pause pour mettre en pause l’enregistrement. Cliquez dessus à
nouveau pour continue.
• Cliquez sur le bouton Stop jaune.
Voilà, c’est tout ! Vous pouvez maintenant lire votre enregistrement et explorer les possibilités d’édition
d’Audacity.
NepasoublierquevouspouvezutiliserlafonctionUndo(Annuler)presqueindénimenttantqueleprojetest
ouvert.
Remarque : On ne peut graver des CD directement depuis l’application Audacity. D’autres applications de
gravure de CD doivent être utilisées.

17
FAQ :
Logiciel :
Q : Impossible d’écouter le disque pendant l’enregistrement
R : activer “Software Playthrough” dans Audacity comme illustré dans l’introduction.
Vérifiez la source d’enregistrement (USB Audio Codec), comme illustré dans l’introduction.
Vérifiez le réglage de volume de votre ordinateur.
Q : Impossible d’enregistrer des chansons en format MP3
R : Téléchargez LAME MP3 Codec sur Internet.
Q : Impossible d’enregistrer
R : Le lecteur doit être connecté à l’ordinateur d’abord avant de démarrer Audacity.
Q : Ne peut enregistrer qu’en mono
R : Cela se produit surtout avec VISTA. Sélectionnez “stereo” et non “mono” ou “microphone”, dans la
configuration de la source d’enregistrement Windows.
Lecteur :
Q : Crépitement dans le son
R : Assurez-vous que ce lecteur est connecté à une entrée haut niveau de votre amplificateur. Les
entrées haut niveau sont les suivants : CD, AUX, TAPE. L’entrée PHONO n’est pas appropriée.
Le lecteur est équipé d’un préamplificateur intégré.
Nettoyer le stylet et le disque vinyle.
Vérifiez le réglage de contrepoids.
Vérifiez le niveau de réglage du compensateur de poussée latérale.
Q : Codage direct impossible
R : La clé USB/Carte est protégée en écriture.
Vérifiez le système de fichier (FAT16).
Q : Les chansons codées directement sont enregistrées lors de survirage
R : Trouvez un bon niveau d’enregistrement, voir le point 20 de l’introduction.
Consignes de sécurité :
Pour réduire le risque de choc électrique, ce produit ne doit être
ouvertqueparuntechnicienqualiésiuneréparations’impose.
Débranchez l’appareil et les autres équipements du secteur s’il y a
un problème. Ne pas exposer l’appareil à l’eau ni à l’humidité.
Entretien :
Ne nettoyez l’appareil qu’avec un chiffon sec. N’utilisez pas de solvants ou de produits abrasifs.
Garantie :
Aucunegarantieouresponsabiliténeseraacceptéeencasdemodicationet/oudetransformationdu
produit ou en cas de dommages provoqués par une utilisation incorrecte de l’appareil.
Généralités :
Ledesignetlescaractéristiquestechniquessontsujetsàmodicationsansnoticationpréalable.
Tous les logos de marques et noms de produits sont des marques déposées ou immatriculées dont leurs
détenteurs sont les propriétaires et sont donc reconnues comme telles dans ce documents.
Conservez ce manuel et l’emballage pour toute référence ultérieure.
Attention :
Cesymboleguresurl’appareil.Ilsigniequelesproduitsélectriquesetélectroniquesnedoivent
pas être jetés avec les déchets domestiques. Le système de collecte est différent pour ce genre de
produits.
RISQUE DE CHOC ELECTRIQUE
NE PAS OUVRIR
ATTENTION

18
NEDERLANDS
Introductie:
Riemaangestuurde DJ draaitafel met USB- en SD-kaart opnamefunctie. Maximaal 4 GB opslagcapaciteit en
voorzien van 33, 45 en 78 toerentallen.
Beschrijving:
01. Start/stop-toetsen
Druk op deze toets om de draaischijf te starten of te stoppen.
02. Draaischijf
Deze draaischijf is uitgerust met een anti-slipmat. Dit maakt het gemakkelijker om de plaat bij het
scratchen te manipuleren.
03. USB- & SD-BUS
Sluit een USB-stick aan op deze bus, de LED zal oplichten tijdens het gebruik.
04. Schijflampje
Plaats het schijflampje in het dek en het zal gaan branden.
05. 33 Toeren-toetsen om de snelheid te selecteren
Deze toets wordt gebruikt om de gewenste snelheid te selecteren.
Druk op de “33”-toets om de snelheid van 33 toeren te selecteren.
06. 45, 78 Toeren-toetsen om de snelheid in te stellen
Druk op de “45”-toets om de snelheid van 45 toeren te selecteren.
Druk tegelijkertijd op de “33”- en “45”-toetsen om de 78 toeren te selecteren.

19
07. Achteruittoets
Deze toets wordt gebruikt om de draaischijf achteruit te laten draaien.
08. De kop van de platenspeler
Installeer hier de cassette. Gebruik de gebruiksaanwijzing die is meegeleverd door de fabrikant om
deze cassette te installeren. Om beschadiging tegen te gaan, sluit u de naaldbeschermer op de
naaldtop tijdens de installatie.
Bevestig de bedrading als volgt:
Wit (L+) Linker kanaal +
Blauw (L -) Linker kanaal –
Rood (R+) Rechter kanaal +
Groen (R-) Rechter kanaal –
09. Vergrendeling van de kop
Bevestig de kop door deze in de toonarm aan de voorkant te steken en draai vervolgens de moer met
de klok mee.
10. Toonarm
Dit is een volledig handmatige toonarm. Om het afspelen te starten, plaatst u de naald voorzichtig op de
plaat met behulp van de kopondersteuning of gebruik de toonarmlift (zie 12).
11. 45 Toeren-oplader
Plaats deze op de centrale as om 17.8 cm platen (45 toeren platen) te kunnen laten spelen die grote
gaten in het midden hebben.
12. Toonarmlift
Bedient de toonarm op en neer.
13. Anti-slipknop
Dwingt de toonarm naar binnen zodat het niet over de plaat heen naar buiten kan schieten als gevolg
van de middelpuntvliedende kracht door het draaien van de plaat. Cassettefabrikanten specificeren
hiervoor meestal de juiste instelling.
14. Contragewicht
Aanpassing hiervan zorgt voor de juiste neerwaartse druk van de naald naar de plaat. Bevestig deze nu
door het contragewicht op de achterkant van de toonarm te schuiven. Draai er voorzichtig aan en het
zal vast komen te zitten op de achteras van de toonarm.
Contragewichtaanpassing: breng de toonarm op het 0-niveau met het contragewicht. Wanneer
deze waterpas is, stel dan de schaal op het contragewicht in op 0 (let op de streep). Draai nu aan
het contragewicht totdat de opgegeven neerwaartse druk in grammen wordt aangegeven. De juiste
neerwaartse druk wordt aangegeven in de naaldspecificaties.
15. Toets om motor uit te zetten
Druk op deze toets om de motor uit te zetten en de LED zal gaan knipperen. Druk nogmaals op deze
toets om deze functie weer uit te schakelen.
16. Speel en pauzeer nummers van de USB en SD-kaart en start de opname
Elke keer dat er op deze toets gedruk wordt, schakelt “spelen/pause” in bij het afspelen van de USB of SD.
Daarnaast kan deze toets gebruikt worden om opnames te starten en te pauzeren naar de SD/USB
wanneer dit van te voren is ingesteld (zie 18).
17. Toets om over te laten slaan (+-)
Druk hierop om een enkel nummer van de USB-stick of SD-kaar over te slaan of terug te gaan.
18. Start en pause opname-actie
Deze knop (de-)activeert de opnamefunctie. Om een plaat op te nemen moet de LED naast deze toets
verlicht zijn.

20
19. Selecteer audio
Deze toets selecteert de te beluisteren bron. Om op te nemen/te luisteren naar een plaat, moet de LED
“PH” verlicht zijn.
20. Opnamevolume
Wordt gebruikt om het volumeniveau tijdens de opname aan te passen.
21. Grond
22. Uitgang L en R
Dit is de standaard analoge uitgang (RCA-schakelaars) die aangesloten kunnen worden op een telefoon
of een lijningang van een DJ-mixer, afhankelijk van de instelling van de telefoon/lijnkeuzeschakelaar.
23. USB-aansluiting
USB-aansluiting (USB-kabellimiet mag niet langer zijn dan 3 meter).
24. Netsnoeraansluiting
Dit wordt gebruikt om verbinding te maken met het lichtnet met behulp van het bijgeleverde netsnoer.
25. Voedingsbron AAN/UIT
Dit wordt gebruik om de draaitafel in en uit te schakelen.
Specicaties:
Motor: DC motor
Aandrijfmethode: Riemaandrijving
Start- en remtijding: Minder dan 1 seconde
Sneldheidsregelaar: 33 1/3, 45, 78 toeren
Wow & Vibratie: +/- 10%
Toonarmtype: Statisch gebalanceeerde S-vormige toonarm
Computerinterface: USB 1.1 congruent, Windows XP of MACOS X
Voeding: AC 115/230 V, 60/50 Hz, door de gebruiker te selecteren
Enkele spanning: AC 100 V, 50/60 Hz (Japan)
AC 120 V, 60 Hz (U.S.A. en Canada)
AC 127 V, 60 Hz (Mexico)
AC 220 V, 50 Hz (Chili en Argentinië)
AC 240 V, 60 Hz (Australië)
AC 220 V, 60 Hz (De Filippijnen en Korea)
AC 230 V, 50 Hz (Europa, U.K., Nieuw-Zeeland, Zuid-Afrika en Singapore)
Afmetingen: 449 x 370 x 145 mm
Energieverbruik: 5.5 W
Gewicht: 4 kg
Audacity software-oversicht:
Audacity is gratis software die onder licentie staat van GNU General Public License (GPL). Meer informatie
alsook de open bron kunnen gevonden worden op de website van http://audacity.sourceforge.net/.
Opmerking: zorg ervoor dat de software geïnstalleerd is voordat u begint.
Uw PC laten werken met Audacity
1. Sluit een ingangsbron aan op de eenheid.
2. Sluit de USB-kabel aan op de eenheid.
3. Installeer de Audacity-opnamesoftware.
4. Open het Audacity-programma.
5. Selecteer “Preference” in het tabblad “edit” in het Audacity-menu.
Table of contents
Languages:
Other Konig Turntable manuals
Popular Turntable manuals by other brands

Philips
Philips 22GA437/00B Service manual

boytone
boytone BT-13B instruction manual

Lenoxx
Lenoxx TT600 instruction manual

Acoustic Signature
Acoustic Signature Ascona MK3 instruction manual

Clearaudio
Clearaudio Statement TT1 user manual

VPI Industries
VPI Industries Scout 2/JMW-9T Setup and instruction manual