KRAFT KF-SH60101MWL User manual

СТИРАЛЬНАЯ МАШИНА
АВТОМАТ
AUTOMATIC WASHING MACHINE
model: KF-SH60101MWL
ИНСТРУКЦИЯ ПО ЭКСПЛУАТАЦИИ
USEr GUIdE
www.kraftltd.com
Телефон службы поддержки клиентов:
8 (800) 200-79-97
Надежно! Выгодно! Доступно!
Safe! Reliable! Affordable!

2 3
СТИРАЛЬНАЯ МАШИНА АВТОМАТ
AUTOMATIC WASHING MACHINE
СТИРАЛЬНАЯ МАШИНА АВТОМАТ
AUTOMATIC WASHING MACHINE
ИНСТРУКЦИЯ ПО ЭКСПЛУАТАЦИИ • USEr GUIdE ИНСТРУКЦИЯ ПО ЭКСПЛУАТАЦИИ • USEr GUIdE
УВАЖАЕМЫЙ ПОКУПАТЕЛЬ!
Поздравляем Вас с приобретением изделия торговой марки TM KRAFT.
Уверены, что наши изделия будут верными и надежными помощниками в Вашем домашнем
хозяйстве.
Не подвергайте устройство резким перепадам температур. Резкая смена температуры
(например, внесение устройства с мороза в теплое помещение) может вызвать
конденсацию влаги внутри устройства и нарушить его работоспособность при включении.
Устройство должно отстояться в теплом помещении не менее 8 часов.
В Вашей стиральной машине установлен сотовый барабан Сrystal Сare,
создающий идеальные условия для бережной и эффективной стирки!
Прежде чем включить стиральную машину, внимательно ознакомьтесь
с настоящей инструкцией по ее эксплуатации!
Общая информация
Уважаемый Покупатель!
С сегодняшнего дня стирка станет более легкой, чем когда-либо. Стиральная
машина KRAFT сочетает очень простое обслуживание с отличными результатами
стирки. После того, как Вы прочитаете инструкцию по эксплуатации стиральной
машины, у Вас не будет проблем с ее обслуживанием.
Перед упаковкой на заводе безопасность и функционирование стиральных ма-
шин проверяется на контрольно-испытательных стендах. Именно поэтому внутри
машины могут быть остатки воды или влага.
Во избежание ненадлежащего обслуживания перед включением стиральной
машины просим внимательно ознакомиться с настоящей инструкцией по эксплуа-
тации и строго соблюдать все изложенные в ней указания и рекомендации.
Храните инструкцию в доступном месте, чтобы в случае необходимости она всег-
да была под рукой. Соблюдайте правила безопасности и меры по предотвращению
несчастных случаев.
ВНИМАНИЕ!
Стиральная машина предназначена исключительно для использования в до-
машнем хозяйстве для стирки текстильных изделий и верхней одежды, пригодной
для машинной стирки в растворе моющего средства.
Разрешается эксплуатировать стиральную машину только после ознакомления
с настоящей инструкцией.
Запрещается использовать стиральную машину вне помещений и в помещениях,
в которых температура может опуститься ниже 0°C.
Не разрешайте пользоваться стиральной машиной детям и лицам, которые не
ознакомились с инструкцией по ее эксплуатации.
ВНИМАНИЕ!
Температура ниже 0°C может привести к повреждению стиральной машины!
В случае хранения и транспортировки машины при температуре ниже 0°C не-
обходимо перед эксплуатацией выдержать машину при комнатной температуре в
течение 8 часов.
Содержание
ОБЩАЯ ИНФОРМАЦИЯ ........................................................................................ 3
УКАЗАНИЯ ПО БЕЗОПАСНОСТИ ....................................................................... 4
УСТАНОВКА СТИРАЛЬНОЙ МАШИНЫ ................................................................ 5
ОПИСАНИЕ СТИРАЛЬНОЙ МАШИНЫ ................................................................ 8
ПАНЕЛЬ УПРАВЛЕНИЯ ......................................................................................... 9
ОПИСАНИЕ ПАНЕЛИ УПРАВЛЕНИЯ.................................................................... 10
УКАЗАНИЯ ПО ОБСЛУЖИВАНИЮ ...................................................................... 11
ПУСК СТИРАЛЬНОЙ МАШИНЫ ............................................................................ 13
ОПИСАНИЕ ПРОГРАММ СТИРКИ ........................................................................ 13
РЕШЕНИЕ ПРОБЛЕМ, ВОЗНИКШИХ В ХОДЕ ЭКСПЛУАТАЦИИ ...................... 17
СТИРАЛЬНОЙ МАШИНЫ ..................................................................................... 17
ОЧИСТКА ................................................................................................................ 18
Т
ЕХНИЧЕСКИЕ ХАРАКТЕРИСТИКИ И КОМПЛЕКТАЦИЯ ................................. 20
СВИДЕТЕЛЬСТВО О ПРИЕМКЕ И ПРОДАЖЕ .................................................... 21
ГАРАНТИЙНЫЙ ТАЛОН ......................................................................................... 22
ТАБЛИЦА ОБОЗНАЧЕНИЙ НА ЯРЛЫКАХ ОДЕЖДЫ ......................................... 27

4 5
СТИРАЛЬНАЯ МАШИНА АВТОМАТ
AUTOMATIC WASHING MACHINE
СТИРАЛЬНАЯ МАШИНА АВТОМАТ
AUTOMATIC WASHING MACHINE
ИНСТРУКЦИЯ ПО ЭКСПЛУАТАЦИИ • USEr GUIdE ИНСТРУКЦИЯ ПО ЭКСПЛУАТАЦИИ • USEr GUIdE
Указания по безопасности
Если электрический соединительный кабель оборудования повреждён, во избе-
жание опасности поражения током, следует заменить его у производителя либо
обратиться в специализированную ремонтную мастерскую к квалифицированному
специалисту.
Моющие средства (детергенты)
Используйте только моющие средства, предназначенные специально для авто-
матических стиральных машин. Не разрешается использовать для стирки какие-
либо средства, содержащие растворители, поскольку эти средства могут повредить
отдельные детали машины и, кроме того, могут образоваться ядовитые испарения,
которые могут привести к возгоранию и взрыву.
Перед началом стирки
Не допускайте попадания внутрь машины посторонних предметов.
Необходимо обязательно освободить карманы, застегнуть молнии и пуговицы.
Мелкие вещи поместить в мешок для стирки или в наволочку, в противном случае
они могут повредиться или повредить барабан и внутренний бак. В барабан можно
загружать только такое количество вещей, которое предусмотрел производитель.
Панель управления
Предохраняйте панель управления от попадания на
нее воды.
Не кладите постиранные вещи на машину!
Транспортировка
До начала работ, связанных с транспортировкой, отсо-
едините стиральную машину от электросети. Установите
блокировочные болты и приспособления, предохраня-
ющие машину на время транспортировки. (см. раздел
УСТАНОВКА СТИРАЛЬНОЙ МАШИНЫ на стр. 6).
Разрешается транспортировать стиральную машину
только в вертикальном положении!
Стеклянная часть дверцы сильно нагревается во время стирки!
Не разрешайте детям находиться вблизи машины.
Проверка устойчивости
После установки стиральной машины, необходимо обязательно проверить ее
положение и устойчивость на всех четырех ножках. Для этого нужно надавить
на каждый угол машины и убедиться, что она ни на одном из углов не качается.
Правильная установка машины является условием ее безопасной, длительной и
безаварийной работы!
ВНИМАНИЕ!
Перед первым включением необходимо выровнять стиральную машину
по уровню в разных плоскостях и снять транспортировочные блокировки.
ВНИМАНИЕ!
Неправильная установка по уровню, а в особенности неустойчивое положение
стиральной машины, может стать причиной вибраций при работе машины.
Не разрешайте без надзора пользоваться прибором детям и лицам с ограничен-
ными физическими, мануальными и умственными способностями, не имеющим
опыта и умения, до тех пор, пока они не будут обучены и ознакомлены с инструк-
цией по эксплуатации прибора.
Утилизация
Перед утилизацией стиральную машину следует для безопасности
привести в полную негодность. Предварительно следует вынуть штекер
из гнезда электросети, а затем отрезать кабель питания. В дальней-
шем следует действовать в соответствии с местными предписаниями,
касающимися утилизации отходов и мусора.
УСТАНОВКА СТИРАЛЬНОЙ МАШИНЫ
- Освободите машину от упаковочных материалов. Снимите защитную пленку
с дисплея (при наличии).
ВНИМАНИЕ!
Чтобы не повредить машину, не перемещайте её, взявшись за лоток, дверцу
или уплотнитель!
- Удалите блокировочные болты
и приспособления, предохраняю-
щие машину на время транспор-
тировки (сохраните их на случай
переезда или перевозки стираль-
ной машины).
- Отвинтите при помощи ключа
4 блокировочных болта. Выньте ре-
зиново-пластиковые распорки вме-
сте с прокладками и болтами.
- Закройте отверстия заглушками,
которые прилагаются в комплекте.
ВНИМАНИЕ!
Перед включением стиральной машины необходимо обязательно снять все тран-
спортировочные блокировки!
P.08 P.09
Install Washing Machine Install Washing Machine
3.Ensure the positioning status of washing machine. Loosen the lock nut with spanner
and turn the leg with hand until it closely contacts with the floor. Press the leg with one
hand and fasten the nut closely to the cabinet with the other hand.
4.After being locked properly, press four corners again to make sure that they has been
adjusted properly. If it is still unstable, it has to repeat Steps 2 and 3.
Connect inlet pipe
Connect the inlet pipe as indicated in the figure.
For the model which has hot valve , please connect
the hot vale to hot water tap. Energy will decrease
automatically for some program.
Install inlet pipe
1.Connect the elbow to tap and fasten it
clockwise.
2.Connect the other end of inlet pipe to the inlet
valve at the backside of washing machine and
fasten the pipe tightly clockwise.
Notes: after connection, if there is any leakage
with hose, then repeat the steps to connect inlet
pipe. The most common type of tap shall be
used to supply water. If tap is square or too big,
then standard tap shall be changed.
Place outlet hose
There are two ways to place the end of outlet hose:
1.Put it beside the water trough.
Unpacking the washing machine
Unpack your washing machine and check if there is any damage during the transportation.
Also make sure that all the items (as shown in Page 5) in the attached bag are received.
If there is any damage to the washing machine during the transportation, or any item is
missing, please contact the local dealer immediately.
Dispose the packing materials
The packing materials of this machine may be dangerous to kids. Please dispose them
properly and avoid easy touch by kids. Please dispose the related packing materials
according to the relevant local regulations. Please do no throw the packing materials
away together with the other daily living rubbishes.
Remove transport bolts
Before using this washing machine, transport bolts
must be removed from the backside of
this machine. Please take the following steps to
remove the bolts:
1.Loosen all bolts with spanner and then remove them.
2.Stop the holes with transport hole plugs.
3.Keep the transport bolts properly for future use.
Select the location
Before installing the washing machine, the location characterized as follows shall be
selected:
- Rigid, dry, and level surface (if not level, please make it level with reference to the
following figure “Adjust Leg”)
- Avoid direct sunlight
- Sufficient ventilation
- Room temperature is above 0 C
- Keep far away from the heat resources such as coal or gas.
Make sure that the washing machine will not stand on power cord.
Do not install the washing machine on the carpet floor.
Adjust Leg
1.When positioning the washing machine, please
first check if the legs are closely attached to the
cabinet. If not, please turn them to their original
positions with hand or spanner and tighten the
nuts with spanner.
2.After positioning the washing machine, press
four corners on top cover of washing machine
in sequence. If the washing machine is not
stable when being pressed, this leg shall be
adjusted.
5.Put a solid cylinder (e.g. pop cans) oppositely on the top cover of the washing machine from in
the left, right, front and back directions. If the cylinder keeps stable, the washing machine is
positioned level. If it rolls, the washing machineis positioned unlevel. The rolling direction is the
direction of lower ground surface.Then, the two legs in this direction shall be raised at the same time
until the washing machine is level. Steps 1~3 are repeated to make the bottom legs closely against
the ground and the nuts shall be locked tightly.

6 7
СТИРАЛЬНАЯ МАШИНА АВТОМАТ
AUTOMATIC WASHING MACHINE
СТИРАЛЬНАЯ МАШИНА АВТОМАТ
AUTOMATIC WASHING MACHINE
ИНСТРУКЦИЯ ПО ЭКСПЛУАТАЦИИ • USEr GUIdE ИНСТРУКЦИЯ ПО ЭКСПЛУАТАЦИИ • USEr GUIdE
Установка и регулировка положения стиральной машины
ВНИМАНИЕ!
Не ставьте машину на ковер или ковровые по-
крытия. Мягкое покрытие пола (ковер, покрытие на
полиуретановой основе и др.) способствует вибра-
ции и ухудшению вентиляции машины!
Пол должен быть ровным, прочным и не иметь
наклона!
- Установите машину по уровню строго горизон-
тально на ровном и прочном полу.
- Слегка ослабьте контргайки на ножках ключом.
- Отрегулируйте положение машины путем отвинчивания/завинчивания ножек.
- Снова затяните контргайки ключом.
После установки стиральной машины необходимо обязательно проверить
горизонтальность ее положения и устойчивость. Для этого нужно надавить на
каждый угол машины и убедиться, что она ни на одном из углов не качается!
Подсоединение к водопроводной сети
Для подсоединения стиральной машины к водопроводу используйте только но-
вые, цельные шланги, входящие в комплект поставки. Запрещается использовать
шланги, бывшие в употреблении. Наливной шланг с уплотнением находится в ба-
рабане стиральной машины. Машина подключается только к сети холодного водо-
снабжения через кран подачи воды с резьбовым патрубком 3/4 дюйма.
Давление воды: мин. 0,05 МПа (0,5 бар), макс. 1 МПа (10 бар).
- Убедитесь, что шланг не перекручен и не пережат.
- Проверьте герметичность соединения наливного шланга и крана.
- Регулярно проверяйте состояние наливного шланга!
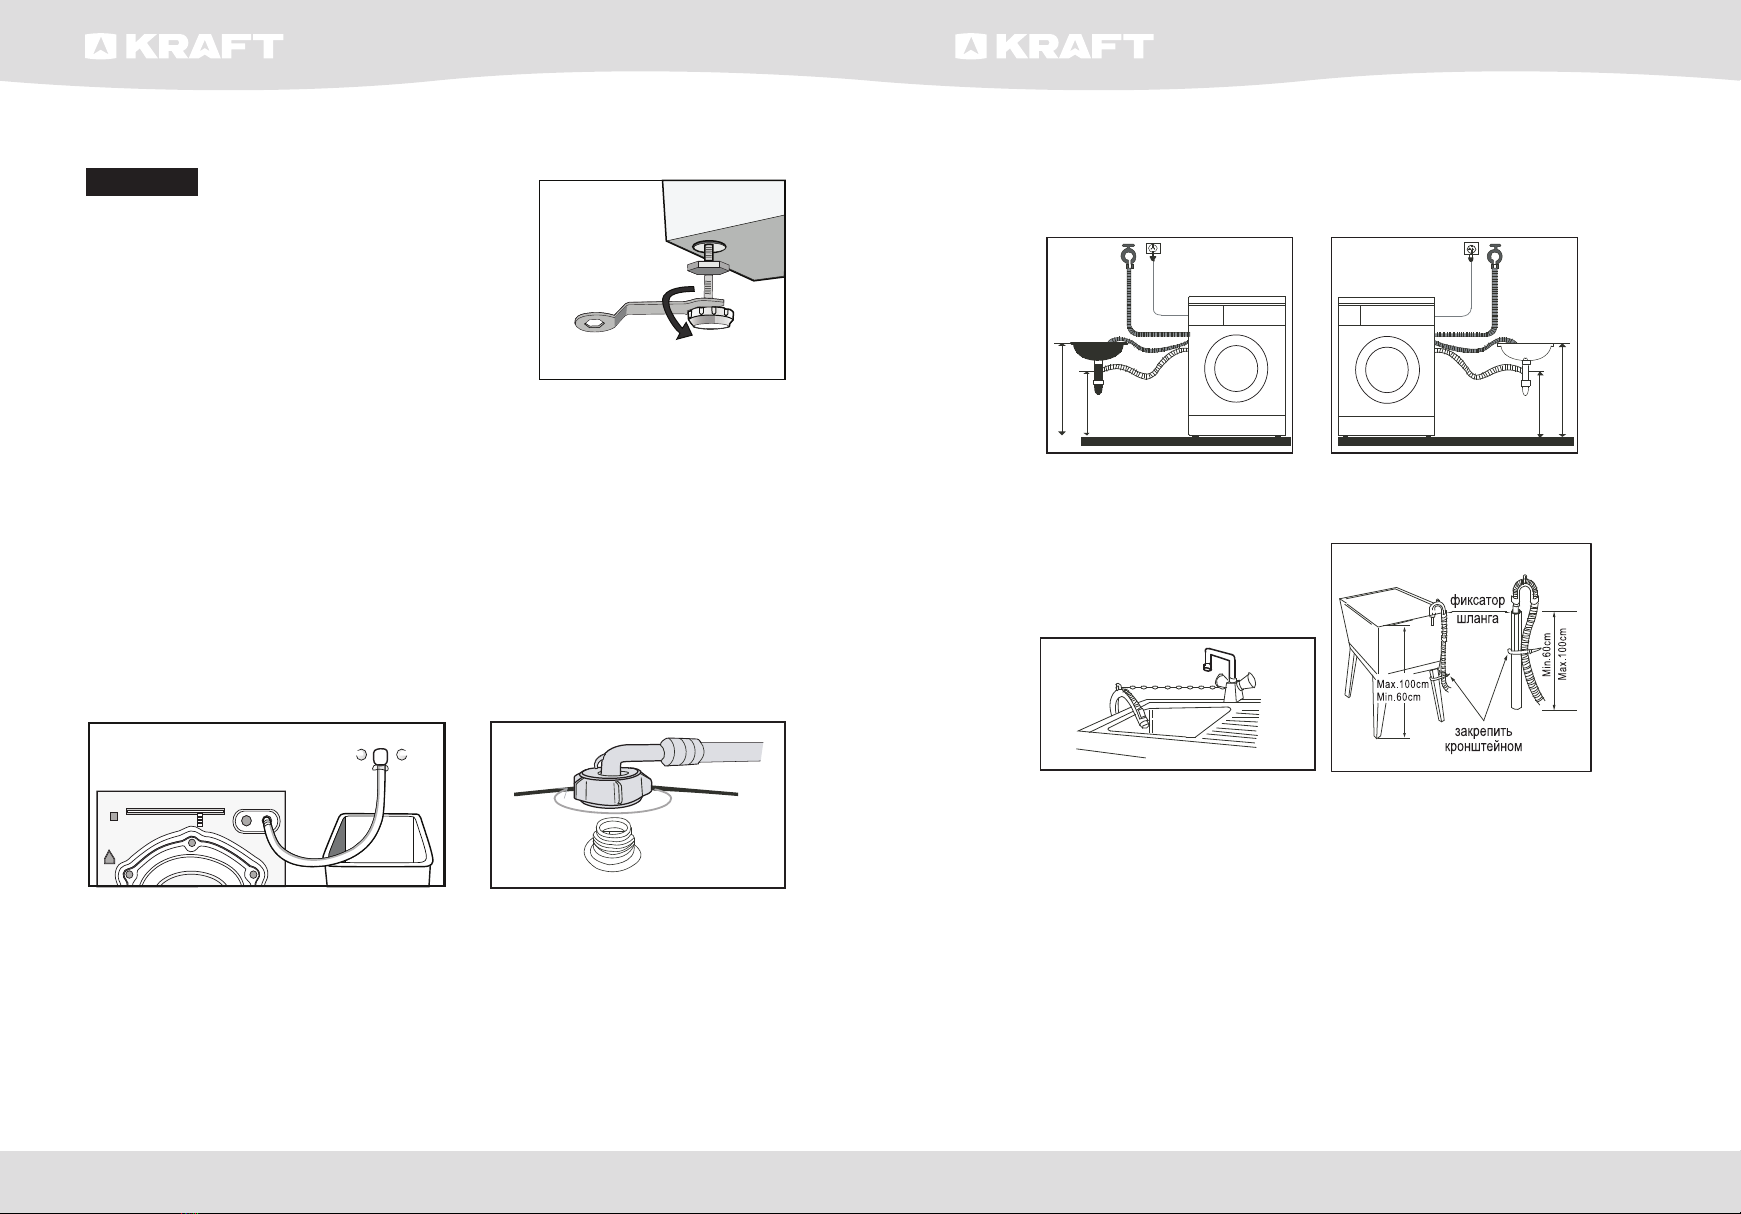
Подключение к канализации
Сливной шланг находится сзади стиральной машины. Закрепите сливной шланг
таким образом, чтобы он был неподвижен во время работы стиральной машины.
Сливной шланг должен находиться на высоте от 60 до 100 см от уровня пола.
При несоблюдении этого требования машина не будет работать.
P.08 P.09
Install Washing Machine Install Washing Machine
3.Ensure the positioning status of washing machine. Loosen the lock nut with spanner
and turn the leg with hand until it closely contacts with the floor. Press the leg with one
hand and fasten the nut closely to the cabinet with the other hand.
4.After being locked properly, press four corners again to make sure that they has been
adjusted properly. If it is still unstable, it has to repeat Steps 2 and 3.
Connect inlet pipe
Connect the inlet pipe as indicated in the figure.
For the model which has hot valve , please connect
the hot vale to hot water tap. Energy will decrease
automatically for some program.
Install inlet pipe
1.Connect the elbow to tap and fasten it
clockwise.
2.Connect the other end of inlet pipe to the inlet
valve at the backside of washing machine and
fasten the pipe tightly clockwise.
Notes: after connection, if there is any leakage
with hose, then repeat the steps to connect inlet
pipe. The most common type of tap shall be
used to supply water. If tap is square or too big,
then standard tap shall be changed.
Place outlet hose
There are two ways to place the end of outlet hose:
1.Put it beside the water trough.
Unpacking the washing machine
Unpack your washing machine and check if there is any damage during the transportation.
Also make sure that all the items (as shown in Page 5) in the attached bag are received.
If there is any damage to the washing machine during the transportation, or any item is
missing, please contact the local dealer immediately.
Dispose the packing materials
The packing materials of this machine may be dangerous to kids. Please dispose them
properly and avoid easy touch by kids. Please dispose the related packing materials
according to the relevant local regulations. Please do no throw the packing materials
away together with the other daily living rubbishes.
Remove transport bolts
Before using this washing machine, transport bolts
must be removed from the backside of
this machine. Please take the following steps to
remove the bolts:
1.Loosen all bolts with spanner and then remove them.
2.Stop the holes with transport hole plugs.
3.Keep the transport bolts properly for future use.
Select the location
Before installing the washing machine, the location characterized as follows shall be
selected:
- Rigid, dry, and level surface (if not level, please make it level with reference to the
following figure “Adjust Leg”)
- Avoid direct sunlight
- Sufficient ventilation
- Room temperature is above 0 C
- Keep far away from the heat resources such as coal or gas.
Make sure that the washing machine will not stand on power cord.
Do not install the washing machine on the carpet floor.
Adjust Leg
1.When positioning the washing machine, please
first check if the legs are closely attached to the
cabinet. If not, please turn them to their original
positions with hand or spanner and tighten the
nuts with spanner.
2.After positioning the washing machine, press
four corners on top cover of washing machine
in sequence. If the washing machine is not
stable when being pressed, this leg shall be
adjusted.
5.Put a solid cylinder (e.g. pop cans) oppositely on the top cover of the washing machine from in
the left, right, front and back directions. If the cylinder keeps stable, the washing machine is
positioned level. If it rolls, the washing machineis positioned unlevel. The rolling direction is the
direction of lower ground surface.Then, the two legs in this direction shall be raised at the same time
until the washing machine is level. Steps 1~3 are repeated to make the bottom legs closely against
the ground and the nuts shall be locked tightly.
Для слива воды непосредственно в канализацию сливной шланг машины уста-
навливается выше колена стока (сифона) в канализационную трубу с внутренним
диаметром не менее 40 мм во избежание обратного засасывания сточной воды в ма-
шину. Сливной шланг может подключаться непосредственно к сифону с патрубком.
P.10 P.11
Install Washing Machine Install Washing Machine
2.Connect it to the branch drain pipe of the trough.
Electrical Connection
- As the maximum current through the unit is 10A when you are using its heating function,
please make sure the power supply system (current, power voltage and wire) at your
home can meet the normal loading requirements of the electrical appliances.
- Please connect the power to a socket which is correctly installed and properly earthed.
- Make sure the power voltage at your place is same to that in the machine's rating label.
- Power plug must match the socket and cabinet must be properly and effectively earthed.
- Do not use multi-purpose plug or socket as extension cord.
- Do not connect and pull out plug with wet hand.
- When connecting and pulling out the plug, hold the plug tightly and then pull it out. Do
not pull power cord forcibly.
- If power cord is damaged or has any sign of being broken, special power cord must be
selected or purchased from its manufacturer or service center for replacement.
1.This machine must be earthed properly. If there is any short circuit, earthing can reduce
the danger of electrical shock.
This machine is equipped with power cord, which includes plug, earthing wire at earthing
terminal.
2.Washing machine shall be operated in a circuit separate from other electrical appliances.
Otherwise, power protector may be tripped or fuse may be burned out.
Operate Washing Machine
Checklist and Preparation before Washing Clothes
Please read this operation method carefully to avoid the troubles of washing machine and
damages of clothes.
Check if the first-washed clothes will bed decolorized.
After a white towel touched with liquid detergent is used to wash the invisible corners of the
clothes, check if the white towel is stained with
clothes' original color.
As for the scarves and those clothes that easily
get decolorized among imported clothes, please
wash them separately before washing.
As for the stains on sleeves, collars and pockets,
use the liquid detergent and wash it with brush
gently. Finally put them into the washing machine
to achieve more ideal washing effects.
As for temperature-sensitive clothes, they shall
be washed as required in the labels. Otherwise,
it may cause color change or distortion.
Keep in Mind:
Never put the clothes to be washed in washing machine for a long period of time.
Otherwise it may get moldy and cause spots. Therefore, please wash the clothes in time.
The clothes also may get color changed or distorted if they are not washed according to
the stated washing temperature.
Clothes that can not be washed by washing machine
The clothes that may get distorted if being immersed in water:
Ties, waistcoats, western-style clothes, outer garments etc. may have obvious shrinkage
if being immersed in water; the decolorized clothes such as blended spinning clothes of
artificial fiber etc.
!
WARNING
Max.100cm
Min.60cm
Min.60cm
Max.100cm
Position outlet hose properly so that the floor will not be damaged by water leakage.
- When installing outlet hose, fix it
properly with a rope.
- Position outlet hose properly so that
the floor will not be damaged by water
leakage.
Trough
Hose Retainer
Bind
Max.100cm
Min.60cm
Min.60cm
Max.100cm
- If outlet hose is too long, do not force
it into washing machine as it will cause
abnormal noises.
Notes:
If the machine has outlet hose support, please install it like the following pictures.
При сливе воды в мойку или ванну шланг необходимо закрепить в месте переги-
ба специальным кронштейном, входящим в комплект поставки. Шланг не должен
быть погружен в воду!
P.10 P.11
Install Washing Machine Install Washing Machine
2.Connect it to the branch drain pipe of the trough.
Electrical Connection
- As the maximum current through the unit is 10A when you are using its heating function,
please make sure the power supply system (current, power voltage and wire) at your
home can meet the normal loading requirements of the electrical appliances.
- Please connect the power to a socket which is correctly installed and properly earthed.
- Make sure the power voltage at your place is same to that in the machine's rating label.
- Power plug must match the socket and cabinet must be properly and effectively earthed.
- Do not use multi-purpose plug or socket as extension cord.
- Do not connect and pull out plug with wet hand.
- When connecting and pulling out the plug, hold the plug tightly and then pull it out. Do
not pull power cord forcibly.
- If power cord is damaged or has any sign of being broken, special power cord must be
selected or purchased from its manufacturer or service center for replacement.
1.This machine must be earthed properly. If there is any short circuit, earthing can reduce
the danger of electrical shock.
This machine is equipped with power cord, which includes plug, earthing wire at earthing
terminal.
2.Washing machine shall be operated in a circuit separate from other electrical appliances.
Otherwise, power protector may be tripped or fuse may be burned out.
Operate Washing Machine
Checklist and Preparation before Washing Clothes
Please read this operation method carefully to avoid the troubles of washing machine and
damages of clothes.
Check if the first-washed clothes will bed decolorized.
After a white towel touched with liquid detergent is used to wash the invisible corners of the
clothes, check if the white towel is stained with
clothes' original color.
As for the scarves and those clothes that easily
get decolorized among imported clothes, please
wash them separately before washing.
As for the stains on sleeves, collars and pockets,
use the liquid detergent and wash it with brush
gently. Finally put them into the washing machine
to achieve more ideal washing effects.
As for temperature-sensitive clothes, they shall
be washed as required in the labels. Otherwise,
it may cause color change or distortion.
Keep in Mind:
Never put the clothes to be washed in washing machine for a long period of time.
Otherwise it may get moldy and cause spots. Therefore, please wash the clothes in time.
The clothes also may get color changed or distorted if they are not washed according to
the stated washing temperature.
Clothes that can not be washed by washing machine
The clothes that may get distorted if being immersed in water:
Ties, waistcoats, western-style clothes, outer garments etc. may have obvious shrinkage
if being immersed in water; the decolorized clothes such as blended spinning clothes of
artificial fiber etc.
!
WARNING
Max.100cm
Min.60cm
Min.60cm
Max.100cm
Position outlet hose properly so that the floor will not be damaged by water leakage.
- When installing outlet hose, fix it
properly with a rope.
- Position outlet hose properly so that
the floor will not be damaged by water
leakage.
Trough
Hose Retainer
Bind
Max.100cm
Min.60cm
Min.60cm
Max.100cm
- If outlet hose is too long, do not force
it into washing machine as it will cause
abnormal noises.
Notes:
If the machine has outlet hose support, please install it like the following pictures.
Подсоединение к электросети
Машина должна подключаться к электрической сети через отдельную двухполюс-
ную розетку с контактом заземления, допустимый ток которой не менее 16 А. К ро-
зетке должен быть подведен трехпроводной кабель с медными жилами сечением
не менее 1,5 мм2 или алюминиевыми жилами сечением не менее 2,5 мм2. Фазный
провод должен быть подключен через отдельное автоматическое устройство за-
щиты электрической сети, рассчитанное на максимальный ток (ток срабатывания)
16 А, с временем срабатывания не более 0,1 с и током отсечки 30 мА.
Подсоединение стиральной машины к электрической сети (сетевая розетка)
должно располагаться в доступном и удобном для пользователя месте!
Стиральная машина должна подсоединяться к электросети только при помощи
правильно установленной розетки с заземляющим контактом!
Запрещается использовать для подсоединения удлинитель!
По вопросу замены поврежденного кабеля питания обращайтесь в авторизован-
ный сервисный центр.

8 9
СТИРАЛЬНАЯ МАШИНА АВТОМАТ
AUTOMATIC WASHING MACHINE
СТИРАЛЬНАЯ МАШИНА АВТОМАТ
AUTOMATIC WASHING MACHINE
ИНСТРУКЦИЯ ПО ЭКСПЛУАТАЦИИ • USEr GUIdE ИНСТРУКЦИЯ ПО ЭКСПЛУАТАЦИИ • USEr GUIdE
Описание стиральной машины
Заглушки Наливной шланг Кронштейн
Панель управления
Сливной шланг
Отсек
для детергентов
Отсек
для детергентов
Крышка
фильтра насоса
Ручка дверцы
Барабан
Аксессуары
1
2
4
3
56 7
89
Примечание:
1. Панель управления приведена
как образец, и может отличать-
ся от реальной.
2. Панель управления может быть
изменена производителем.
3. Когда индикаторы числа обо-
ротов отжима (400, 600, 800,
1000) не горят, это означает,
что число оборотов отжима 0.
Панель управления
10
Программатор
Время
стирки Отложенный
старт Темпе-
ратура Обороты
отжима Быстрая
стирка Доп.
полоска-
ние
Предв
стирка Стирка Полос-
кание
Отжим Замок Защита
от детей Дозагрузка Отключение
сигнала Моя
Программа
Индикация на дисплее
Число оборотов
при отжиме
Время

10 11
СТИРАЛЬНАЯ МАШИНА АВТОМАТ
AUTOMATIC WASHING MACHINE
СТИРАЛЬНАЯ МАШИНА АВТОМАТ
AUTOMATIC WASHING MACHINE
ИНСТРУКЦИЯ ПО ЭКСПЛУАТАЦИИ • USEr GUIdE ИНСТРУКЦИЯ ПО ЭКСПЛУАТАЦИИ • USEr GUIdE
Описание панели управления
1. Кнопка «Вкл/Выкл» предназначена для включения / отключения стиральной
машины и отмены программы.
2. Кнопка «Отложенный старт» служит для выбора времени отсрочки старта
стирки. Доступны настройки в диапазоне до 24 часов.
3. Кнопка «Отжим» служит для выбора скорости отжима. Для изменения скорости
отжима достаточно нажать на кнопку. В зависимости от выбранной программы на
дисплее высвечиваются следующие значения: 400 - 600 - 800 -1000. Если индика-
ции нет, значит выбран режим без отжима.
4. Кнопка «Температура» предназначена для выбора температуры стирки для
всех программ. При нажатии на кнопку высвечиваются доступные для данной про-
граммы температуры воды или опция стирки в холодной воде (без подогрева). В
зависимости от выбранной программы на дисплее появляются следующие возмож-
ности настроек: 20°C, 30°C, 40°C, 60°C, 90°C. Отсутствие индикации температуры
воды означает, что выбран режим стирки в холодной воде.
5. Кнопка «Старт/Пауза» служит для начала цикла стирки и дает пользователю
возможность временно остановить выполнение программы. А так же служит для
использования опции «Дозагрузка белья».
ПРИМЕЧАНИЕ!
Одновременное нажатие на кнопки 3 («Отжим») и 4 («Температура») активирует
функцию «Отключение звукового сигнала».
6. Кнопка «Быстрая стирка» выполняет следующие функции:
• При нажатии после выбора программы в «голубом секторе», активируется функ-
ция сокращения времени стирки (на 20-25% от стандартного времени).
• Удерживайте кнопку нажатой не менее 3 сек. для запоминания настроек наибо-
лее часто используемой программы (Моя Программа). По умолчанию выбраны
установки программы «Хлопок».
7. Кнопка «Доп. полоскание». Если вы считаете, что белье прополоскалось не-
достаточно хорошо, нажмите эту кнопку и повторите полоскание.
8. Кнопка «Предварительная стирка» — проведение цикла «Предварительная
стирка» перед запуском основной программы. Рекомендуется использовать эту
функцию при стирке сильнозагрязненного белья.
ПРИМЕЧАНИЕ!
Одновременное нажатие на кнопки 7 («Доп. полоскание») и 8 («Предварительная
стирка») активирует функцию «Защита от детей».
9. Дисплей
Во время работы стиральной машины дисплей показывает ориентировочное вре-
мя, оставшееся до окончания стирки и выбранную скорость вращения барабана.
Время на дисплее высвечивается ориентировочно и может отличаться от реальной
продолжительности стирки в зависимости от температуры и напора воды, количе-
ства загруженных в барабан вещей, количества стирального порошка и т.п.
При выборе функции «Отложенный старт» на дисплее высвечивается время,
оставшееся до начала стирки.
При выборе скорости отжима на дисплее появляются следующие величины:
400 - 600 - 800 - 1000.
10. Программатор
Во время работы стиральной машины на экране дисплея высвечиваются пикто-
граммы, информирующие о выполняемой в настоящий момент операции и о за-
действованных дополнительных функциях.
Программатор позволяет пользователям выбрать программу стирки в зависи-
мости от степени загрязнения, типа тканей и количества загруженных вещей, что
обеспечивает высокое качество стирки и более эффективную работу устройст-
ва. После включения программы параметры выбранной ранее программы нельзя
изменить посредством переключения ручки программатора в другое положение.
Программатор позволяет выбрать один из 16 режимов стирки:
Моя программа Хлопок ЭКO
Ручная стирка Спортивная одежда
Экспресс-стирка Деликатная стирка
Шерсть Полоскание и отжим
Отжим Слив
Цветное бельё Смешанное бельё
Джинсы Детская одежда
Синтетика Хлопок
ПРИМЕЧАНИЕ!
Время выполнения программ, находящихся в «голубом секторе», может быть
уменьшено при активации функции «Быстрая стирка».
Указания по обслуживанию
При первой стирке
Перед стиркой одежды, необходимо выполнить первую стирку без загрузки белья:
1. Подключите машину к энерго- и водоснабжению.
2. Загрузите небольшое количество моющего средства в отделение II выдвижного
лотка и закройте его.
3. Нажмите кнопку «Вкл/Выкл».
4. Нажмите кнопку «Старт/Пауза».

12 13
СТИРАЛЬНАЯ МАШИНА АВТОМАТ
AUTOMATIC WASHING MACHINE
СТИРАЛЬНАЯ МАШИНА АВТОМАТ
AUTOMATIC WASHING MACHINE
ИНСТРУКЦИЯ ПО ЭКСПЛУАТАЦИИ • USEr GUIdE ИНСТРУКЦИЯ ПО ЭКСПЛУАТАЦИИ • USEr GUIdE
Лоток имеет три отделения, отмеченные цифрами и символом:
I для предварительной стирки с использованием порошкообразных синтетиче-
ских моющих средств (СМС) и отбеливающих средств;
II для основной стирки с использованием порошкообразных и жидких СМС;
для средств спецобработки (кондиционирующих, смягчающих, крахмалящих,
ароматизирующих добавок).
Загрузка детергентов (моющих средств)
Для загрузки детергентов:
1. Выдвиньте лоток.
2. Загрузите в отделение I моющее сред-
ство для предварительной стирки (при
необходимости).
3. Загрузите в отделение II моющее сред-
ство для основной стирки. При исполь-
зовании порошкообразных СМС без
шторки, при использовании жидких
СМС со шторкой.
4. Загрузите средства для спецобработки
в отделение (при необходимости).
Для стирки следует использовать СМС,
отбеливатели и кондиционирующие добав-
ки, предназначенные для автоматических
стиральных машин, с учетом рекоменда-
ций производителя СМС. Густые кондици-
онирующие добавки-гели рекомендуется
перед использованием разбавить водой в
пропорции 1:1.
ВНИМАНИЕ!
Не рекомендуется использовать для стирки отбеливатели-гели.
Выбор СМС зависит от особенности ткани (вид, цвет) и степени загрязнения
изделий, температуры стирки. Дозировка СМС определяется в соответствии с ука-
заниями производителя, с учетом степени загрязнения изделий, жесткости воды
и массы загружаемого белья (при половинной загрузке белья доза СМС на 1/4
меньше максимальной дозы, при минимальной загрузке — в 2 раза меньше).
ВНИМАНИЕ!
Передозировка СМС, а также использование СМС для ручной стирки вызывает
обильное пенообразование, которое снижает эффективность отстирывания и мо-
жет привести к выходу машины из строя. При недостаточном количестве СМС
белье приобретает серый оттенок.
Пуск стиральной машины
Подключите электропитание. Проверьте правильность подсоединения водопро-
водных труб. Полностью откройте кран подачи воды.
Положите в барабан белье для стирки и загрузите в лоток необходимые моющие
средства. Затем нажмите кнопку «Вкл/Выкл», выберите соответствующую про-
граммму и произведите необходимые настройки. Нажмите кнопку «Старт/Пауза».
Выбор режима стирки
Соответствующие режимы стирки следует выбирать в соответствии с типом,
количеством и степенью загрязнения стираемого белья в комбинации со следую-
щим полосканием.
90°С Сильнозагрязненное белое белье (скатерти, полотенца, салфетки)
60°С Достаточно сильнозагрязненное белье, цветные ткани, хлопковые
и синтетические ткани со средней степенью выцветания при стирке
40, 30, 20°С,
холодная вода Одежда со средней степенью загрязнения (синтетика, шерсть)
- Поворотом рукоятки Программатора установите необходимый режим стирки.
- Выберите правильную температуру в соответствии со степенью загрязнения бе-
лья. Обычно, чем выше температура, тем выше расход электроэнергии.
- Выберите правильную скорость вращения. Чем выше скорость отжима, тем суше
бельё, но уровень шума при этом возрастает.
ВНИМАНИЕ!
Для сохранности белья, особенно для деликатных тканей следует выбирать низ-
кую скорость отжима.
Описание программ стирки
• Хлопок ЭКO: для более эффективной стирки используется более продолжитель-
ное время программы. Данную программу можно установить только для стирки
хлопка при температуре 40–60°С.
• Ручная стирка: программа для стирки небольшого количества слабозагрязнен-
ной светлой одежды. По умолчанию стирка производится в холодной воде.
• Спортивная одежда: программа для стирки спортивной одежды.
• Экспресс-стирка: программа подходит для стирки небольшого количества сла-
бозагрязненной одежды.
• Деликатная стирка: программа подходит для стирки деликатных тканей. Умень-
шенное число оборотов при отжиме и сниженная интенсивность cтирки.
• Шерсть: программа для стирки шерстяных изделей. Применяйте только для
изделий с пометкой на ярлыке «Машинная стирка». Установите температуру
стирки в соответствии с указанием на ярлыке. Используйте моющие средства
рекомендованные для стирки шерсти.

14 15
СТИРАЛЬНАЯ МАШИНА АВТОМАТ
AUTOMATIC WASHING MACHINE
СТИРАЛЬНАЯ МАШИНА АВТОМАТ
AUTOMATIC WASHING MACHINE
ИНСТРУКЦИЯ ПО ЭКСПЛУАТАЦИИ • USEr GUIdE ИНСТРУКЦИЯ ПО ЭКСПЛУАТАЦИИ • USEr GUIdE
• Полоскание и отжим: отдельная программа для совмещенных циклов полоска-
ния и отжима.
• Отжим: отдельная программа для отжима. Перед запуском этой программы не-
обходимо слить воду из бака стиральной машины.
• Слив: выполняется слив воды из стиральной машины.
• Цветное бельё: программа для стирки белья ярких расцветок в холодной воде
при уменьшенной загрузке.
• Смешанное бельё: подходит для стирки одежды из плотных тканей, которые
требуют более продолжительной и более интенсивной стирки. Программа так-
же подходит для стирки ежедневно используемого белья, такого как простыни,
наволочки, нижнее белье, халаты и другая домашняя одежда.
• Джинсы: эта программа специально разработана для стирки джинсов.
• Детские вещи: программа при температуре стирки 30°С и увеличенным циклом
полоскания.
• Синтетика: программа для синтетических тканей. Программа короче по времени
по сравнению с программой «Хлопок», стирка менее интенсивная. Рекомендует-
ся для стирки, например, рубашек, пальто, смешанных тканей, штор и ажурных
тканей, текстиля.
• Хлопок: вы можете выбрать эту программу для повседневной стирки. Цикл стир-
ки довольно длинный, стирка интенсивная. Рекомендуется для стирки хлопчато-
бумажных изделий, например: постельное белье, покрывала, наволочки, халаты,
нижнее белье и т.д. Для сильнозагрязненного белья устанавливайте более вы-
сокую температуру стирки.
• Моя программа: для настройки режима «Моя программа» следует настроить
температуру, скорость отжима и дополнительные функции на свое усмотрение.
далее нажмите и удерживайте кнопку «Отжим» в течении 3 секунд для запоми-
нания выбранных настроек.
Основные программы могут быть дополнены следующими функциями:
• Предварительная стирка: используйте эту фукцию для стирки сильнозагряз-
ненного белья. Перед выполнением основной программы добавляется дополни-
тельный цикл стирки.
• Быстрая стирка: эта функция позволяет сократить время стирки любой из про-
грамм в «голубом секторе» на 20-25% от установленного по умолчанию. Для ак-
тивации функции выберите желаемую программу и нажмите на кнопку «Быстрая
стирка». На дисплее отобразится соответствующая пиктограмма.
• Дополнительное полоскание: используйте эту фукцию, если считаете, что тре-
буется еще раз прополоскать бельё (например, если было использовано слишком
большое количество моющего средства). Цикл можно повторить несколько раз.
ОТЛОЖЕННЫЙ СТАРТ
Функция стирки с отложенным стартом позволяет установить начало стирки в те
часы, когда Вам это наиболее удобно, например, чтобы использовать преимуще-
ство ночных тарифов на электроэнергию.
Для активации функции:
1. Установите ручку программатора на нужную Вам программу (см. таблицу про-
грамм).
2. Выберите по желанию дополнительные функции или измените параметры стирки.
3. Нажатием кнопки «Отложенный старт» выберите настройку времени в диапазоне
от 0 до 24 часов. На дисплее появится время от 0 до 24 часов.
4. Нажмите на кнопку «Старт/Пауза». Стиральная машина перейдет в режим ожи-
дания. Стирка начнется автоматически по истечении запрограммированного
времени отсрочки.
Отмена функции: в случае, если программа стирки еще не запущена, нажимай-
те на кнопку «Отложенный старт», пока на дисплее не появится значение 0H, если
программа уже запущена, следует нажать кнопку «Вкл/Выкл». Если выбран режим
отсрочки начала стирки, на дисплее будет высвечиваться время, оставшееся до
включения программы стирки.
В случае сбоя в электроснабжении при работающей машине, выбранная про-
грамма запоминается и при восстановлении энергоснабжения для продолжения
выполнения программы необходимо нажать кнопку «Старт/Пауза».
ЗАЩИТА ОТ ДЕТЕЙ
Функция служит для включения специальной блокировки кнопок, предохраня-
ющей от случайного изменения детьми настроек. Все кнопки, кроме «Вкл/Выкл»
будут заблокированы.
Если питание будет случайно выключено, для продолжения стирки нажмите на
кнопку «Вкл/Выкл». Все ваши настройки сохраняются в памяти.
Чтобы включить защиту от детей, во время цикла стирки следует одновременно
нажать и удерживать 3 секунд кнопки «Дополнительное полоскание» и «Предвари-
тельная стирка» до появления звукового сигнала. для отмены функции в процессе
цикла стирки необходимо повторно нажать и удерживать теже самые кнопки в
течение 3 секунд.
ВНИМАНИЕ!
Если запрограммирована функция защиты от детей, то на дисплее высвечива-
ется ее графический символ.
Блокировка не отключается автоматически после окончания цикла стирки!
ОТКЛЮЧЕНИЕ ЗВУКОВОГО СИГНАЛА
После запуска машины, одновременно нажмите и удерживайте в течение 3 се-
кунд кнопки «Температура» и «Отжим» до появления звукового сигнала.
Для восстановления функции повторите действие.
ВНИМАНИЕ!
После отключения стиральной машины звуковой сигнал не будет активирован
до отмены функции отключения.

16 17
СТИРАЛЬНАЯ МАШИНА АВТОМАТ
AUTOMATIC WASHING MACHINE
СТИРАЛЬНАЯ МАШИНА АВТОМАТ
AUTOMATIC WASHING MACHINE
ИНСТРУКЦИЯ ПО ЭКСПЛУАТАЦИИ • USEr GUIdE ИНСТРУКЦИЯ ПО ЭКСПЛУАТАЦИИ • USEr GUIdE
ДОЗАГРУЗКА БЕЛЬЯ
Во время процесса стирки Вы можете добавить белье в барабан (если что-то за-
были). Для этого нажмите и удерживайте в течении не менее 3 сек. кнопку «Старт/
Пауза».
1. Дождитесь остановки барабана.
2. Откройте дверцу после её разблокировки.
3. Загрузите белье в барабан и закройте дверцу.
4. Нажмите кнопку «Старт/Пауза» для продолжения стирки.
ТАБЛИЦА ПРОГРАММ СТИРКИ
Программа
Макс. загрузка (кг)
Отсеки для
детергентов
Дополнительные
функции
Температура стирки (°С)
Стандартное время
программы (мин)
Скорость отжима по
умолчанию (об/мин)
Предварительная
стирка
Основная стирка
Ополаскиватель
Оложенный старт
Быстрая стирка
Дополнительное
полоскание
Предварительная
стирка
Хлопок 6.0 40 160 800
Синтетика 3.0 40 100 800
Детские вещи 6.0 30 80 800
Джинсы 6.0 60 105 800
Смешанное бельё 6.0 40 73 800
Цветное бельё 3.0 Х Х Холодная вода 70 800
Слив - Х Х Х Х Х Х - 1 -
Отжим 6.0 Х Х ХХ Х Х - 12 800
Полоскание и отжим 6.0 Х Х Х Х - 20 800
Шерсть 2.0 Х Х Х 40 67 600
Деликатная стирка 2.5 Х Х Х 30 50 600
Экспресс-стирка 2.0 Х Х Х Х Холодная вода 15 800
Спортивная одежда 3.0 Х 40 45 1000
Ручная стирка 2.0 Х Холодная вода 60 600
Хлопок ECO 6.0 Х Х Х Х 60 171 1000
Обязательно использовать детергент, без которого стирка будет неэффективной.
Использовать стиральный порошок или ополаскиватель, если это необходимо.
Х Нет необходимости использовать детергент или ополаскиватель.
Решение проблем, возникших в ходе эксплуатации
стиральной машины
Проблема
Предполагаемая причина/Способ устранения
Стиральная машина не работает
- Открыть кран до упора
- Прочистить ситечко на шланге подвода воды
- Закрыть дверцу стиральной машины
- Нажать на кнопку «Старт/Пауза»
Вода под стиральной машиной - Правильно подсоединить наливной шланг под-
вода воды
Стиральная машина не отжимает - Вынуть и еще раз загрузить вещи в барабан,
очистить фильтр насоса
Неприятный запах в барабане
стиральной машины
- Включить цикл автоочистки с пустым бараба-
ном (см. таблицу программ)
В барабане нет воды - На дисплее высвечивается код ошибки Е10.
Открыть водопроводный кран
В отсеке для ополаскивателя
остается вода
- Нажать на «грибок», который находится в цен-
тральной камере отсека
Плохой отжим
- Необходимо правильно дозировать моющее
средство в зависимости от степени загрязнения
вещей и жесткости воды (см. рекомендации на
упаковке моющего средства)
- Прочистить фильтр насоса
Стиральная машина не набирает
воду
- Открыть водопроводный кран
- Проверить параметры программы
- Проверить напор воды
- Еще раз подсоединить шланг подвода воды
- Закрыть дверцу стиральной машины
- Проверить и убедиться, что шланг не перекру-
чен и не пережат
Стиральная машина набирает и
сливает воду одновременно
- Проверить и убедиться, что конец сливного
шланга располагается выше уровня воды в сти-
ральной машине (шланг должен располагаться
на высоте 0,6–1 м от пола)
Неправильный слив воды
- Проверить состояние фильтра насоса
- Проверить состояние сливного шланга
- Проверить расположение сливного шланга, кото-
рый должен располагаться на высоте 0,6–1 м от
пола
Стиральная машина вибрирует
- Проверить и убедиться, что сняты все транс-
портные блокировки
- Отрегулировать положение стиральной маши-
ны по уровню в разных плоскостях
- Зафиксировать ножки (затянуть контргайки)

18 19
СТИРАЛЬНАЯ МАШИНА АВТОМАТ
AUTOMATIC WASHING MACHINE
СТИРАЛЬНАЯ МАШИНА АВТОМАТ
AUTOMATIC WASHING MACHINE
ИНСТРУКЦИЯ ПО ЭКСПЛУАТАЦИИ • USEr GUIdE ИНСТРУКЦИЯ ПО ЭКСПЛУАТАЦИИ • USEr GUIdE
Появляется большое количество
пены через отсеки для стираль-
ного порошка
- Уменьшить дозу моющего средства
- Проверить жесткость воды, а также количество
и тип применяемого детергента
Прерывание процесса стирки до
окончания программы
- Проверить напряжение питания, подачу и слив
воды
Шум после слива воды, вызван-
ный работой сливного насоса
- После слива воды из барабана в шланге и на-
сосе осталось небольшое количество воды. При
непрерывной работе сливного насоса подсасы-
вается воздух и наблюдается характерный шум,
который не обозначает поломки
Временные приостановки в вы-
полнении программы стирки
- Стиральная машина оснащена системой авто-
матического долива воды
- Приостановка вызвана удалением излишка
пены
КОДЫ ОШИБОК СТИРАЛЬНОЙ МАШИНЫ
Cтиральная машина имеет систему внутренней диагностики, которая в случае
возникновения мелких неисправностей, связанных с неправильной эксплуатацией,
помогает определить место неполадок и их причины при помощи «кодов», высве-
чиваемых на дисплее.
Обнаружение ошибки сигнализируется появлением символов:
Код ошибки Причина Устранение неполадки
E10
Низкий напор воды, отсут-
ствие воды в стиральной
машине
Открыть водопроводный кран,
проверить шланг подачи воды, про-
верить фильтр на шланге подачи
воды и напор воды
E21 Засорившийся фильтр насоса Прочистить фильтр насоса
E30 Не закрыта дверца
Проверить и убедиться, что дверца
стиральной машины закрыта, а
вещи не зажаты дверцей
Кроме этого при обнаружении ошибки стиральная машина издает звуковой сиг-
нал (если он активен).
ОЧИСТКА
ВНИМАНИЕ!
Запрещается использовать растворители и абразивные чистящие средства (на-
пример, чистящие порошки и гели) для очистки корпуса стиральной машины и
пластиковых деталей!
Используйте только деликатные жидкие моющие средства и мягкую тряпочку.
Не используйте губки.
ОЧИСТКА ФИЛЬТРА НАСОСА
Рекомендуется очищать фильтр насоса через примерно 20 стирок. Несвоевре-
менная очистка фильтра приводит к засорению фильтра и затрудняет слив воды
из машины!
- Отсоедините стиральную машину от электросети.
- Закройте водопроводный кран.
- Откройте крышку фильтра насоса.
P.25P.24
Maintenance Maintenance
Clean detergent box and grooves
Clean detergent drawer and grooves
1.Press down the arrow location on softener cover
inside the drawer.
2.Lift the clip up and take out softener cover and wash
all grooves with water.
3.Restore the softener cover and push the drawer into
position.
Clean inlet filter
Inlet filter shall must be cleaned if there is not any or
insufficient water in when the tap is opened.
Clean the tap filter:
1.Close the tap.
2.Select any procedure except “Wash” or “Drain”
procedure.
3.Press the button “Start/Pause” and keep the
procedure running for about 40 seconds.
4.Remove the inlet pipe from the tap.
5.Use water to wash the filter.
6.Reconnect the inlet pipe.
Washing the filter in washing machine:
1.Screw off the inlet pipe from the backside of the
machine.
2.Pull out the filter with long nose pliers and reinstall
it back after being washed.
3.Reconnect the inlet pipe.
4.Open the tap and make sure there is no water leakage.
5.Close the tap.
Notes: Generally, the tap filter is washed first and then the filter in washing machine will be washed.
If only the filter in washing machine is washed, then the steps 1~3 in cleaning the tap filter shall be
repeated.
Pull out the power plug to avoid electrical shock before washing.
After using the washing machine, pull out the power cord and close the door tightly to avoid
pinching the kids.
Remove foreign matters
Drain Pump Filter:
Drain pump filter can filter the yarns and small foreign matters from the washings.
Clean the filter periodically to ensure the normal operation of washing machine.
According to the soil level within the cycles and the frequency of the cycles, you have to inspect
and clean the filter regularly.
The pump should be inspected if the machine does not empty and/or spin;
The machine makes an unusual noise during draining due to objects such as safety pins, coins
etc. blocking the pump.
The Service_panel proceed as follows:
When the appliance is in use and depending on the programme selected there can be hot water
in the
pump. Never remove the pump cover during a wash cycle, always wait until the appliance has finished
the cycle, and is empty. When replacing the cover, ensure it is securely retight end so.
Warning!
2.Turn the filter down as
shown with the figure and
take out sundries matters.
1.After the power is dis-
connected, use hand to
open the filter cover.
3.Reinstall each part back
after sundries matters are
removed.
- Выкрутите фильтр.
- Выньте фильтр.
- Очистите фильтр.
Установка фильтра осуществляется в обратном порядке.
ОЧИСТКА ФИЛЬТРА ПОДАЧИ ВОДЫ
- Отсоедините наливной шланг.
- Возьмитесь плоскогубцами за стержень ситечка фильтра.
- Выньте и очистите фильтр (при помощи кисточки).
Установка фильтра осуществляется в обратном порядке
ОЧИСТКА ЛОТКА ДЛЯ ДЕТЕРГЕНТОВ (МОЮЩИХ СРЕДСТВ)
Рекомендуется очищать, по крайней мере, один раз в месяц.
- Откройте отсек, вытягивая его за ручку (нажимая одновременно на ограничитель).
- Промойте под проточной водой (при помощи щетки или тряпочки).
- Вставьте отсек на место.

20 21
СТИРАЛЬНАЯ МАШИНА АВТОМАТ
AUTOMATIC WASHING MACHINE
СТИРАЛЬНАЯ МАШИНА АВТОМАТ
AUTOMATIC WASHING MACHINE
ИНСТРУКЦИЯ ПО ЭКСПЛУАТАЦИИ • USEr GUIdE ИНСТРУКЦИЯ ПО ЭКСПЛУАТАЦИИ • USEr GUIdE
Т
ехнические характеристики и комплектация
Модель KF-SH60101MWL
Цвет Белый
Напряжение питания/частота тока, В/Гц 220-240/50
Максимальная загрузка сухого белья, кг 6
Номинальная потребляемая мощность, Вт 2000
Максимальное число оборотов при отжиме,об/мин 1000
Дисплей / Цвет индикации LED / Оранжевый
Длина шнура электропитания, м 1,5
Длина шланга для залива воды, м 1
Длина шланга для слива воды, м 1,6
Класс энергопотребления A+++
Класс стирки / Класс отжима A / С
Остаточная влажность белья, % 62
Годовое энергопотребление, кВт*ч/год 153
Годовой расход воды, л/год 9240
Максимальный расход воды за цикл стирки, л/цикл 48
Уровень шума при стирке/отжиме, дБ 59/74
Объем барабана, не менее, л 38
Диаметр загрузочного отверстия / Внешний диаметр люка, мм 310 / 480
Габаритные размеры машины (ШхГхВ), мм 595 x 450 x 850
Габариты в упаковке (ШхГхВ), мм 650 x 555 x 885
Масса нетто/брутто, кг 53/56
Основные программы стирки
Число программ 16
Хлопок ECO да
Ручная стирка да
Спортивная одежда да
Экспресс-стирка да
Деликатная стирка да
Шерсть да
Полоскание и отжим да
Отжим да
Слив да
Цветное бельё да
Смешанное бельё да
Джинсы да
Детские вещи да
Синтетика да
Хлопок да
Моя программа да
Опции
Отложенный старт да (до 24ч)
Дополнительное полоскание / Предварительная стирка да / да
Регулировка оборотов при отжиме 0/400/600/800/1000
Выбор температуры стирки Холодная /20/30/40/60/90°С
Пауза в работе (для дозагрузки белья) да
Особенности
Возможность отключения звукового сигнала да
Режим «Быстрая стирка» да
Сотовый барабан Crystal Care да
Электронный блок с функцией памяти / Защита от детей да / да
Автобаланс / Антипена да / да
Контроль перегрева / Контроль перелива да / да
Комплектация
Стиральная машина автомат 1 шт.
Инструкция по эксплуатации с гарантийным талоном 1 шт.
Упаковка 1 шт.
Свидетельство о приемке и продаже
Стиральная машина автомат KRAFT модель _______________________
Заводской № ________________________________________________________
Дата выпуска «______» ______________________ _____________г.
Штамп ОТК
Продана ____________________________________________________________
наименование и номер магазина
____________________________________________________________________
Дата продажи «______» ______________________ _____________г.
Штамп магазина __________________________________________________
подпись продавца
Адрес сервисной службы ___________________________________________________
заполняется организацией, продавшей стиральную машину
____________________________________________________________________
Претензий к внешнему виду, комплектации и работе стиральной машины
не имею. С гарантийными условиями ознакомлен.
____________________________________________________________________
Ф.И.О., подпись покупателя
*Производитель оставляет за собой право вносить изменения в технические
характеристики и дизайн изделий.

22 23
СТИРАЛЬНАЯ МАШИНА АВТОМАТ
AUTOMATIC WASHING MACHINE
СТИРАЛЬНАЯ МАШИНА АВТОМАТ
AUTOMATIC WASHING MACHINE
ИНСТРУКЦИЯ ПО ЭКСПЛУАТАЦИИ • USEr GUIdE ИНСТРУКЦИЯ ПО ЭКСПЛУАТАЦИИ • USEr GUIdE
ГАРАНТИЙНЫЙ ТАЛОН
Дата продажи
«____» ____________________ 20___ г.
Штамп магазина
Продавец обязан при продаже
заполнить гарантийные талоны
Дата изготовления товара нахо-
дится на упаковке и на задней
стенке товара.
УСЛОВИЯ ГАРАНТИИ
Настоящая гарантия действительна при следующих условиях:
Все поля в гарантийном талоне заполнены правильно (имеются дата продажи,
печать и подпись продавца, подпись покупателя).
Гарантийное обслуживание осуществляется только при предоставлении неоспо-
римых доказательств, подтверждающих, что гарантийный срок не истек.
1. Срок гарантии составляет 24 месяца.
2. Гарантия включает в себя выполнение ремонтных работ и замену неисправных
частей.
3. Ремонт производится в стационарной мастерской Сервисного Центра при
предъявлении полностью и правильно заполненного гарантийного талона.
4. Гарантия не включает в себя установку, периодическое техническое обслужи-
вание (чистку, удаление пыли и т.п.).
5. Замену Изделия или возврат денег Сервисный Центр не производит.
6. Не подлежат гарантийному ремонту Изделия с дефектами, возникшими вслед-
ствие:
• механических, тепловых и иных повреждений, возникших по причине непра-
вильной эксплуатации, небрежного обращения или несчастного случая;
• неправильной установки или транспортировки;
• действия третьих лиц или непреодолимой силы;
• попадания внутрь посторонних предметов, жидкостей, насекомых;
• повреждений животными;
• ремонта или внесений конструктивных изменений, как самостоятельно, так
и неуполномоченными лицами;
• отклонений от Государственных технических стандартов питающих элек-
трических и кабельных сетей;
• подачи на мощности большей, чем предусмотрено изготовителем;
• использования изделия в промышленных или коммерческих целях.
7. Продавец оставляет за собой право проведения технической экспертизы каче-
ства изделия в установленные законодательством сроки.
Продавец гарантирует бесплатное устранение технических неисправностей това-
ра в течение гарантийного срока эксплуатации в случае соблюдения Покупа-
телем вышеперечисленных правил и условий гарантийного обслуживания.
Тел. сервисного центра: 8 (863) 258-73-02
КОРЕШОК ТАЛОНА №1 на гарантийный ремонт автоматической
стиральной машины KrAFT модели________________
Изъят «___________» _______________________________ 20___________г.
Исполнитель _______________________________ _____________________
Ф.И.О. подпись
Вид и содержание выполненных работ _________________________
___________________________________________________________________
Наименование сервисной службы_____________________________
Линия отреза
ТАЛОН №1 на гарантийный ремонт
автоматической стиральной машины
KrAFT модели ___________________
Продан _________________________________________
(наименование и адрес торгового предприятия)
_________________________________________________
_________________________________________________
_________________________________________________
__________________________тел: ___________________
Дата продажи «____» ____________________ _______г.
Штамп магазина __________________________________
(личная подпись продавца)
Наименование и адрес сервисной службы*
_________________________________________________
(* заполняется торговым предприятием)
_________________________________________________
_________________________________________________
КОРЕШОК ТАЛОНА №2 на гарантийный ремонт автоматической
стиральной машины KrAFT модели________________
Изъят «___________» _______________________________ 20___________г.
Исполнитель _______________________________ _____________________
Ф.И.О. подпись
Вид и содержание выполненных работ _________________________
___________________________________________________________________
Наименование сервисной службы_____________________________
Линия отреза
ТАЛОН №2 на гарантийный ремонт
автоматической стиральной машины
KrAFT модели ___________________
Продан _________________________________________
(наименование и адрес торгового предприятия)
_________________________________________________
_________________________________________________
_________________________________________________
__________________________тел: ___________________
Дата продажи «____» ____________________ _______г.
Штамп магазина __________________________________
(личная подпись продавца)
Наименование и адрес сервисной службы*
_________________________________________________
(* заполняется торговым предприятием)
_________________________________________________
_________________________________________________

24 25
СТИРАЛЬНАЯ МАШИНА АВТОМАТ
AUTOMATIC WASHING MACHINE
СТИРАЛЬНАЯ МАШИНА АВТОМАТ
AUTOMATIC WASHING MACHINE
ИНСТРУКЦИЯ ПО ЭКСПЛУАТАЦИИ • USEr GUIdE ИНСТРУКЦИЯ ПО ЭКСПЛУАТАЦИИ • USEr GUIdE
КОРЕШОК ТАЛОНА №3 на гарантийный ремонт автоматической
стиральной машины KrAFT модели________________
Изъят «___________» _______________________________ 20___________г.
Исполнитель _______________________________ _____________________
Ф.И.О. подпись
Вид и содержание выполненных работ _________________________
___________________________________________________________________
Наименование сервисной службы_____________________________
Линия отреза
ТАЛОН №3 на гарантийный ремонт
автоматической стиральной машины
KrAFT модели ___________________
Продан _________________________________________
(наименование и адрес торгового предприятия)
_________________________________________________
_________________________________________________
_________________________________________________
__________________________тел: ___________________
Дата продажи «____» ____________________ _______г.
Штамп магазина __________________________________
(личная подпись продавца)
Наименование и адрес сервисной службы*
_________________________________________________
(* заполняется торговым предприятием)
_________________________________________________
_________________________________________________
КОРЕШОК ТАЛОНА №4 на гарантийный ремонт автоматической
стиральной машины KrAFT модели________________
Изъят «___________» _______________________________ 20___________г.
Исполнитель _______________________________ _____________________
Ф.И.О. подпись
Вид и содержание выполненных работ _________________________
___________________________________________________________________
Наименование сервисной службы_____________________________
Линия отреза
ТАЛОН №4 на гарантийный ремонт
автоматической стиральной машины
KrAFT модели ___________________
Продан _________________________________________
(наименование и адрес торгового предприятия)
_________________________________________________
_________________________________________________
_________________________________________________
__________________________тел: ___________________
Дата продажи «____» ____________________ _______г.
Штамп магазина __________________________________
(личная подпись продавца)
Наименование и адрес сервисной службы*
_________________________________________________
(* заполняется торговым предприятием)
_________________________________________________
_________________________________________________
Автоматическая стиральная машина KrAFT
модель ______________________________________________
Владелец, его адрес ________________________________
_______________________________________________________
_______________________________________________________
подпись
Телефон владельца ______________________________
Причина отказа (неисправность) __________________
Владелец: ___________________________________________
_______________________________________________________
_______________________________________________________
подпись
Механик: _________________________________________
Ф.И.О.
Выполнены работы: ________________________________
__________________________________________________
__________________________________________________
Дата «______» ___________________________ ___________г.
Механик: _______________ Владелец: _________________
подпись подпись
Утверждаю ___________________________________________
наименование сервисного предприятия и адрес
__________________________________________________
____________________________________ ____________
должность руководителя предприятия, МП подпись
выполнившего обслуживание

26 27
СТИРАЛЬНАЯ МАШИНА АВТОМАТ
AUTOMATIC WASHING MACHINE
СТИРАЛЬНАЯ МАШИНА АВТОМАТ
AUTOMATIC WASHING MACHINE
ИНСТРУКЦИЯ ПО ЭКСПЛУАТАЦИИ • USEr GUIdE ИНСТРУКЦИЯ ПО ЭКСПЛУАТАЦИИ • USEr GUIdE
Автоматическая стиральная машина KrAFT
модель ______________________________________________
Владелец, его адрес ________________________________
_______________________________________________________
_______________________________________________________
подпись
Телефон владельца ______________________________
Причина отказа (неисправность) __________________
Владелец: ___________________________________________
_______________________________________________________
_______________________________________________________
подпись
Механик: _________________________________________
Ф.И.О.
Выполнены работы: ________________________________
__________________________________________________
__________________________________________________
Дата «______» ___________________________ ___________г.
Механик: _______________ Владелец: _________________
подпись подпись
Утверждаю ___________________________________________
наименование сервисного предприятия и адрес
__________________________________________________
____________________________________ ____________
должность руководителя предприятия, МП подпись
выполнившего обслуживание
Таблица обозначений на ярлыках одежды

28 29
СТИРАЛЬНАЯ МАШИНА АВТОМАТ
AUTOMATIC WASHING MACHINE
СТИРАЛЬНАЯ МАШИНА АВТОМАТ
AUTOMATIC WASHING MACHINE
ИНСТРУКЦИЯ ПО ЭКСПЛУАТАЦИИ • USEr GUIdE ИНСТРУКЦИЯ ПО ЭКСПЛУАТАЦИИ • USEr GUIdE
Safety Precautions
- If the supply cord is damaged,it must be replaced by the manufacturer,its service agent
or similarly qualified persons in order to avoid a hazard.
- The new hose-sets supplied with the appliance are to be used and that old hose-sets
should not be reused.
- This washing machine is for indoor use only.
- The openings must not be obstructed by a carpet.
- (This warning is only for EUROPEAN market ) This appliance can be used by children
aged from 8 years and above and persons with reduced physical,sensory or mental
capabilities or lack of experience and knowledge if they have been given supervision or
instruction concerning use of the appliance in a safeway and underst and the hazards
involved. Children shall not play with the appliance. Cleaning and user maintenance
shall not be made by children without supervision.
- (This warning is not for EUROPEAN market)This appliance is not intended for use
by persons (including children) with reduced physical, sensory or mental capabilities,
or lack of experience and knowledge, unless they have been given supervision or
instruction concerning use of the appliance by a person responsible for their safety.
Children should be supervised to ensure that they do not play with the appliance.
- Pull out its plug from the power socket before cleaning or maintenance.
- Make sure that all pockets are emptied.
- Sharp and rigid items such as coin,brooch,nail,screw or stone etc.may cause serious
damages to this machine.
- Pull out its plug and cut off water supply after the operation.
- Please check whether the water inside the drum has been drained before opening its
door.Please do not open the door if there is any water visible.
- Pets and kids may climb into the machine. Check the machine before every operation.
- Glass door may be very hot during the operation. Keep kids and pets far away from
the machine during the operation.
- Take care that power voltage and frequency shall be identical to those of washing
machine.
- Do not use any socket with rated current less than that of washing machine.Never pull
out power plug with wet hand.
- To ensure your safety,power cord plug must be inserted into an earthed three-pole
socket. Check carefully and make surethat your socket is properly and reliably earthed.
- Children of less than 3 years should be kept away unless continously supervised.
- Kids should be supervised to ensure that they do not play with the machine.
- Packing materials may be dangerous to the kids. Please keep all packing
materials(plastic bags,foams etc) far away from the kids.
- Be careful of burning when washing machine drains hot washing water.
- Washing machine shall not be installed in bath room or very wet rooms as well as in
the rooms with explos -ive or caustic gases.
- Make sure that the water and electrical devices must be connected by a qualified
technician in accordance with the manufacturer’s instructions and local safety
regulations.
Dear Buyer!
We congratulate you on having bought the device under trade name ТМ KRAFT.
We are sure that our devices will become faithful and reliable assistance in your
housekeeping.
Avoid extreme temperature changes. Rapid temperature
change (e.g. when the unit is moved from freezing temperature to a warm room) may
cause condensation inside the unit and a malfunction when it is switched on. In this case
leave the unit at room temperature for at least 8 hours before switching it on.
Contents
SAFETY PRECAUTIONS ......................................................................................... 28
OVERVIEW OF WASHING MACHINE ..................................................................... 30
INSTALL OF WASHING MACHINE .......................................................................... 31
OPERATE WASHING MACHINE .............................................................................. 34
VIEW OF CONTROL PANEL ................................................................................... 39
TABLE OF WASHING PROCEDURES .................................................................... 44
MAINTENANCE ........................................................................................................ 45
PRODUCT SPECIFICATION .................................................................................... 47
TROUBLESHOOTING.............................................................................................. 48
APPENDIX ................................................................................................................ 49
PRODUCT FICHE .................................................................................................... 50
REMOVE THE PROBLEMS ..................................................................................... 51

30 31
СТИРАЛЬНАЯ МАШИНА АВТОМАТ
AUTOMATIC WASHING MACHINE
СТИРАЛЬНАЯ МАШИНА АВТОМАТ
AUTOMATIC WASHING MACHINE
ИНСТРУКЦИЯ ПО ЭКСПЛУАТАЦИИ • USEr GUIdE ИНСТРУКЦИЯ ПО ЭКСПЛУАТАЦИИ • USEr GUIdE
Overview of Washing Machine
- Before operating this machine,all packages and transport bolts must be removed.
Otherwise,the washing machine may be seriously damaged while washing the clothes.
- Before washing the clothes at first time, the washing machine shall be operated in one
round of the whole procedures without the clothes inside.
- The washing machine with single inlet valve only can be connected to the cold water
supply. The washing machine with double inlet valves can be connected to the hot
water and cold water supply.
- Your washing machine is only for home use and is only designed for the textiles
suitable for machine washing.
- Flammable and explosive or toxic solvents are forbidden.Gasoline and alcohol etc.
Shall not be used as detergents.Please only select the detergents suitable for machine
washing, especially for drum.
- It is forbidden to wash carpets.
- Never refill the water by hand during washing.
- After the program is completed, Please wait for two minutes to open the door.
- Please remember to disconnect water and power supply immediately after the clothes
are washed.
- Do not climb up and sit on top cover of the machine.
- Do not lean against machine door.
- Please do not close the door with excessive forces.If it is found difficult to close the
door,please check if the excessive clothes are put in or distributed well.
- The household washing machine isn’t intended to be built-in.
- Cautions during Handling Machine
1.Transport bolts shall be reinstalled to the machine by a specialized person.
2.The accumulated water shall be drained out of the machine.
3. Handle the machine carefully. Never hold each protruded part on the machine while
lifting.Machine door can not be used as the handle during the conveyance.
- Notes on disposal:
This marking indicates that this product should not be disposed with other household
wastes throughout the EU. To prevent possible harm to the environment or human health
from uncontrolled waste disposal,recycle it responsibly to promote the sustainable reuse
of material resources.To return your used device,please use the collection systems or
contact the retailer where the product was purchased. They return and can take this
product for environmental safe recycling.

32 33
СТИРАЛЬНАЯ МАШИНА АВТОМАТ
AUTOMATIC WASHING MACHINE
СТИРАЛЬНАЯ МАШИНА АВТОМАТ
AUTOMATIC WASHING MACHINE
ИНСТРУКЦИЯ ПО ЭКСПЛУАТАЦИИ • USEr GUIdE ИНСТРУКЦИЯ ПО ЭКСПЛУАТАЦИИ • USEr GUIdE
P.08 P.09
Install Washing Machine Install Washing Machine
Unpacking the washing machine
Unpack your washing machine and check if there is any damage during the transportation.
Also make sure that all the items in the attached bag are received.
If there is any damage to the washing machine during the transportation, or any item is
missing, please contact the local dealer immediately.
Dispose the packing materials
The packing materials of this machine may be dangerous to kids. Please dispose them
properly and avoid easy touch by kids. Please dispose the related packing materials
according to the relevant local regulations. Please do no throw the packing materials
away together with the other daily living rubbishes.
Remove transport bolts
Before using this washing machine, transport bolts
must be removed from the backside of
this machine. Please take the following steps to
remove the bolts:
1.Loosen all bolts with spanner and then remove them.
2.Stop the holes with transport hole plugs.
3.Keep the transport bolts properly for future use.
Select the location
Before installing the washing machine, the location characterized as follows shall be
selected:
- Rigid, dry, and level surface (if not level, please make it level with reference to the
following figure “Adjust Leg”)
- Avoid direct sunlight
- Sufficient ventilation
- Room temperature is above 0 C
- Keep far away from the heat resources such as coal or gas.
Make sure that the washing machine will not stand on power cord.
Do not install the washing machine on the carpet floor.
Adjust Leg
1.When positioning the washing machine, please
first check if the legs are closely attached to the
cabinet. If not, please turn them to their original
positions with hand or spanner and tighten the
nuts with spanner.
2.After positioning the washing machine, press
four corners on top cover of washing machine
in sequence. If the washing machine is not
stable when being pressed, this leg shall be
adjusted.
3.Ensure the positioning status of washing machine. Loosen the lock nut with spanner
and turn the leg with hand until it closely contacts with the floor. Press the leg with one
hand and fasten the nut closely to the cabinet with the other hand.
4.After being locked properly, press four corners again to make sure that they has been
adjusted properly. If it is still unstable, it has to repeat Steps 2 and 3.
Connect inlet pipe
Connect the inlet pipe as indicated in the figure.
For the model which has hot valve , please connect
the hot vale to hot water tap. Energy will decrease
automatically for some program.
Install inlet pipe
1.Connect the elbow to tap and fasten it
clockwise.
2.Connect the other end of inlet pipe to the inlet
valve at the backside of washing machine and
fasten the pipe tightly clockwise.
Notes: after connection, if there is any leakage
with hose, then repeat the steps to connect inlet
pipe. The most common type of tap shall be
used to supply water. If tap is square or too big,
then standard tap shall be changed.
There are two ways to place the end of outlet hose:
1.Put it beside the water trough.
Hole plug
This Hole plug is used to jam the hole on the back
cabinet.
Place outlet hose
5.Put a solid cylinder (e.g. pop cans) oppositely on the top cover of the washing machine from in
the left, right, front and back directions. If the cylinder keeps stable, the washing machine is
positioned level. If it rolls, the washing machine is positioned unlevel. The rolling direction is the
direction of lower ground surface. Then, the two legs in this direction shall be raised at the same time
until the washing machine is level. Steps 1~3 are repeated to make the bottom legs closely against
the ground and the nuts shall be locked tightly.
P.08 P.09
Install Washing Machine Install Washing Machine
3.Ensure the positioning status of washing machine. Loosen the lock nut with spanner
and turn the leg with hand until it closely contacts with the floor. Press the leg with one
hand and fasten the nut closely to the cabinet with the other hand.
4.After being locked properly, press four corners again to make sure that they has been
adjusted properly. If it is still unstable, it has to repeat Steps 2 and 3.
Connect inlet pipe
Connect the inlet pipe as indicated in the figure.
For the model which has hot valve , please connect
the hot vale to hot water tap. Energy will decrease
automatically for some program.
Install inlet pipe
1.Connect the elbow to tap and fasten it
clockwise.
2.Connect the other end of inlet pipe to the inlet
valve at the backside of washing machine and
fasten the pipe tightly clockwise.
Notes: after connection, if there is any leakage
with hose, then repeat the steps to connect inlet
pipe. The most common type of tap shall be
used to supply water. If tap is square or too big,
then standard tap shall be changed.
Place outlet hose
There are two ways to place the end of outlet hose:
1.Put it beside the water trough.
Unpacking the washing machine
Unpack your washing machine and check if there is any damage during the transportation.
Also make sure that all the items (as shown in Page 5) in the attached bag are received.
If there is any damage to the washing machine during the transportation, or any item is
missing, please contact the local dealer immediately.
Dispose the packing materials
The packing materials of this machine may be dangerous to kids. Please dispose them
properly and avoid easy touch by kids. Please dispose the related packing materials
according to the relevant local regulations. Please do no throw the packing materials
away together with the other daily living rubbishes.
Remove transport bolts
Before using this washing machine, transport bolts
must be removed from the backside of
this machine. Please take the following steps to
remove the bolts:
1.Loosen all bolts with spanner and then remove them.
2.Stop the holes with transport hole plugs.
3.Keep the transport bolts properly for future use.
Select the location
Before installing the washing machine, the location characterized as follows shall be
selected:
- Rigid, dry, and level surface (if not level, please make it level with reference to the
following figure “Adjust Leg”)
- Avoid direct sunlight
- Sufficient ventilation
- Room temperature is above 0 C
- Keep far away from the heat resources such as coal or gas.
Make sure that the washing machine will not stand on power cord.
Do not install the washing machine on the carpet floor.
Adjust Leg
1.When positioning the washing machine, please
first check if the legs are closely attached to the
cabinet. If not, please turn them to their original
positions with hand or spanner and tighten the
nuts with spanner.
2.After positioning the washing machine, press
four corners on top cover of washing machine
in sequence. If the washing machine is not
stable when being pressed, this leg shall be
adjusted.
5.Put a solid cylinder (e.g. pop cans) oppositely on the top cover of the washing machine from in
the left, right, front and back directions. If the cylinder keeps stable, the washing machine is
positioned level. If it rolls, the washing machineis positioned unlevel. The rolling direction is the
direction of lower ground surface.Then, the two legs in this direction shall be raised at the same time
until the washing machine is level. Steps 1~3 are repeated to make the bottom legs closely against
the ground and the nuts shall be locked tightly.
Install of Washing Machine

34 35
СТИРАЛЬНАЯ МАШИНА АВТОМАТ
AUTOMATIC WASHING MACHINE
СТИРАЛЬНАЯ МАШИНА АВТОМАТ
AUTOMATIC WASHING MACHINE
ИНСТРУКЦИЯ ПО ЭКСПЛУАТАЦИИ • USEr GUIdE ИНСТРУКЦИЯ ПО ЭКСПЛУАТАЦИИ • USEr GUIdE
P.10 P.11
Install Washing Machine Install Washing Machine
2.Connect it to the branch drain pipe of the trough.
Electrical Connection
- As the maximum current through the unit is 10A when you are using its heating function,
please make sure the power supply system (current, power voltage and wire) at your
home can meet the normal loading requirements of the electrical appliances.
- Please connect the power to a socket which is correctly installed and properly earthed.
- Make sure the power voltage at your place is same to that in the machine's rating label.
- Power plug must match the socket and cabinet must be properly and effectively earthed.
- Do not use multi-purpose plug or socket as extension cord.
- Do not connect and pull out plug with wet hand.
- When connecting and pulling out the plug, hold the plug tightly and then pull it out. Do
not pull power cord forcibly.
- If power cord is damaged or has any sign of being broken, special power cord must be
selected or purchased from its manufacturer or service center for replacement.
1.This machine must be earthed properly. If there is any short circuit, earthing can reduce
the danger of electrical shock.
This machine is equipped with power cord, which includes plug, earthing wire at earthing
terminal.
2.Washing machine shall be operated in a circuit separate from other electrical appliances.
Otherwise, power protector may be tripped or fuse may be burned out.
O
perate Washing Machine
Checklist and Preparation before Washing Clothes
Please read this operation method carefully to avoid the troubles of washing machine and
damages of clothes.
Check if the first-washed clothes will bed decolorized.
After a white towel touched with liquid detergent is used to wash the invisible corners of the
clothes, check if the white towel is stained with
clothes' original color.
As for the scarves and those clothes that easily
get decolorized among imported clothes, please
wash them separately before washing.
As for the stains on sleeves, collars and pockets,
use the liquid detergent and wash it with brush
gently. Finally put them into the washing machine
to achieve more ideal washing effects.
As for temperature-sensitive clothes, they shall
be washed as required in the labels. Otherwise,
it may cause color change or distortion.
Keep in Mind:
Never put the clothes to be washed in washing machine for a long period of time.
Otherwise it may get moldy and cause spots. Therefore, please wash the clothes in time.
The clothes also may get color changed or distorted if they are not washed according to
the stated washing temperature.
Clothes that can not be washed by washing machine
The clothes that may get distorted if being immersed in water:
Ties, waistcoats, western-style clothes, outer garments etc. may have obvious shrinkage
if being immersed in water; the decolorized clothes such as blended spinning clothes of
artificial fiber etc.
!
WARNING
Max.100cm
Min.60cm
Min.60cm
Max.100cm
Position outlet hose properly so that the floor will not be damaged by water leakage.
- When installing outlet hose, fix it
properly with a rope.
- Position outlet hose properly so that
the floor will not be damaged by water
leakage.
Trough
Hose Retainer
Bind
Max.100cm
Min.60cm
Min.60cm
Max.100cm
- If outlet hose is too long, do not force
it into washing machine as it will cause
abnormal noises.
Notes:
If the machine has outlet hose support, please install it like the following pictures.
Operate Washing Machine
P.10 P.11
Install Washing Machine Install Washing Machine
2.Connect it to the branch drain pipe of the trough.
Electrical Connection
- As the maximum current through the unit is 10A when you are using its heating function,
please make sure the power supply system (current, power voltage and wire) at your
home can meet the normal loading requirements of the electrical appliances.
- Please connect the power to a socket which is correctly installed and properly earthed.
- Make sure the power voltage at your place is same to that in the machine's rating label.
- Power plug must match the socket and cabinet must be properly and effectively earthed.
- Do not use multi-purpose plug or socket as extension cord.
- Do not connect and pull out plug with wet hand.
- When connecting and pulling out the plug, hold the plug tightly and then pull it out. Do
not pull power cord forcibly.
- If power cord is damaged or has any sign of being broken, special power cord must be
selected or purchased from its manufacturer or service center for replacement.
1.This machine must be earthed properly. If there is any short circuit, earthing can reduce
the danger of electrical shock.
This machine is equipped with power cord, which includes plug, earthing wire at earthing
terminal.
2.Washing machine shall be operated in a circuit separate from other electrical appliances.
Otherwise, power protector may be tripped or fuse may be burned out.
Operate Washing Machine
Checklist and Preparation before Washing Clothes
Please read this operation method carefully to avoid the troubles of washing machine and
damages of clothes.
Check if the first-washed clothes will bed decolorized.
After a white towel touched with liquid detergent is used to wash the invisible corners of the
clothes, check if the white towel is stained with
clothes' original color.
As for the scarves and those clothes that easily
get decolorized among imported clothes, please
wash them separately before washing.
As for the stains on sleeves, collars and pockets,
use the liquid detergent and wash it with brush
gently. Finally put them into the washing machine
to achieve more ideal washing effects.
As for temperature-sensitive clothes, they shall
be washed as required in the labels. Otherwise,
it may cause color change or distortion.
Keep in Mind:
Never put the clothes to be washed in washing machine for a long period of time.
Otherwise it may get moldy and cause spots. Therefore, please wash the clothes in time.
The clothes also may get color changed or distorted if they are not washed according to
the stated washing temperature.
Clothes that can not be washed by washing machine
The clothes that may get distorted if being immersed in water:
Ties, waistcoats, western-style clothes, outer garments etc. may have obvious shrinkage
if being immersed in water; the decolorized clothes such as blended spinning clothes of
artificial fiber etc.
!
WARNING
Max.100cm
Min.60cm
Min.60cm
Max.100cm
Position outlet hose properly so that the floor will not be damaged by water leakage.
- When installing outlet hose, fix it
properly with a rope.
- Position outlet hose properly so that
the floor will not be damaged by water
leakage.
Trough
Hose Retainer
Bind
Max.100cm
Min.60cm
Min.60cm
Max.100cm
- If outlet hose is too long, do not force
it into washing machine as it will cause
abnormal noises.
Notes:
If the machine has outlet hose support, please install it like the following pictures.

36 37
СТИРАЛЬНАЯ МАШИНА АВТОМАТ
AUTOMATIC WASHING MACHINE
СТИРАЛЬНАЯ МАШИНА АВТОМАТ
AUTOMATIC WASHING MACHINE
ИНСТРУКЦИЯ ПО ЭКСПЛУАТАЦИИ • USEr GUIdE ИНСТРУКЦИЯ ПО ЭКСПЛУАТАЦИИ • USEr GUIdE
P.12 P.13
Operate Washing Machine Operate Washing Machine
Wrinkle-style clothes, embossed clothes, resin clothes etc. may get distorted when being
immersed in water. Among cotton and wool materials, the clothes that get easily distorted
are wrinkle-style silk, fur products and fur decorations;
Clothes with decoration, long dress and traditional clothes etc are the products to get
decolorized easily.
Please do not wash the clothes without material labels and washing requirements.
Never wash the clothes stained with the chemicals such as gasoline, petroleum, benzene,
paint thinner and alcohol.
Please pay attention with regard to detergents
“Low bubble” detergent or washing powder or washing powder special for drum washing
machine shall be selected according to fiber types (cotton, synthetic fiber, soft products and
wool products), colors, washing temperatures, dirty degrees and types. Otherwise,
excessive bubbles may be generated and overflowed out of the drawer so that accidents
may take place.
Bleacher belongs to alkali type and can damage clothes, so it is suggested to use as little
as possible.
Powder detergents can easily leave the residues in the clothes so as to generate the bad
smell, so they shall be sufficiently rinsed.
Detergent can not easily get dissolved completely if there is too much detergent or water
temperature is rather low. It can remain in clothes, pipes and washing machines to
pollute the clothes.
Washing shall follow the weight of clothes, dirty degrees, local water hardness as well as
the recommendations from the detergent manufacturers. Please consult the water
company if you are not clear of water hardness.
Notes:
Keep detergents and additives in safe and dry places out of touch by kids.
Checklist and Preparation before Washing Clothes
Please take out the items out of the pockets.
Please check the pockets of the clothes to be
washed, empty the rigid items such as
decorations and coins, otherwise washing
machine may be damaged or have abnormal
troubles.
For the clothes to be washed, they are classified
according to the following characteristics:
The symbol types of care labels: the clothes to be
washed are classified into cotton, blended fiber, synthetic fiber, silk, wool and artificial fiber.
Color: white and colorful colors shall be identified. All new colorful articles shall be washed
in a separate way.
Size: the articles of different sizes are washed together to increase the washing effects.
Sensitivity: soft articles shall be washed separately. As for new pure wool textiles, curtains
and silks, the soft washing procedure shall be selected. Check the labels in all washing
articles.
The clothes shall be sorted before being put into washing machine. As for the curtains with
hooks, the hooks shall be removed before being washed.
The decorations on the clothes may damage the washing machine. As for the clothes with
buttons or embroideries, they shall be turned over before being washed.
Clean up fasteners:
Zips shall be zipped close and buttons or hooks shall be fixed. The loose band or ribbon
shall be bound together.
It is suggested to put bras into the pillow slip
with zip or buttons sealed to prevent the steel
wire from popping out of bras into the drum and
damaging the machine.
Especially delicate textiles such as laced curtains,
straight jackets, small articles (tight socks,
handkerchiefs, ties etc.) shall be put into string
bag for washing.
When washing a single big and heavy dress such
as Turkish towels, jeans, wadded jackets etc.,
it may easily cause great eccentricity and give
alarm due to great unbalance. Therefore it is
suggested to add one or two more clothes to be
washed together so that draining can be done
smoothly.
Clean away dusts, stains and pet hairs from the clothes.
The clothes may be damaged and disturb washing effects during the friction between
dusts, stains and clothes.
To protect baby skin
Baby articles (baby clothes and towels) including napkins shall be washed separately.
If they are washed together with the adults' clothes, they may be infected. Rinsing times
shall be increased to ensure the thorough rinsing and cleaning without the detergent
residues.
It is suggested that the parts that are easily stained such as white sockets, collars
and sleeves etc. shall be hand washed before being put into washing machine to
achieve more ideal washing effects.
Please use powder or liquid detergents. The residues of the soap could remain in the
gaps of the clothes if soap is used.
!

38 39
СТИРАЛЬНАЯ МАШИНА АВТОМАТ
AUTOMATIC WASHING MACHINE
СТИРАЛЬНАЯ МАШИНА АВТОМАТ
AUTOMATIC WASHING MACHINE
ИНСТРУКЦИЯ ПО ЭКСПЛУАТАЦИИ • USEr GUIdE ИНСТРУКЦИЯ ПО ЭКСПЛУАТАЦИИ • USEr GUIdE
View of Control Panel
P.16 P.17
Operate Washing Machine Operate Washing Machine
Washing Clothes at first time
Before washing clothes at first time, the washing machine shall be operated in
one round of the whole procedures without clothes in as follows:
1.Connect power source and water.
2.Put a little detergent into the box and close it.
3.Press the button “On/Off”.
4.Press the button “Start/Pause”.
The drawer is separated as follows:
I: Pre-detergent or washing powder.
II: Main detergent
: Washing additive,such as fabric softener or tackifier.
Put detergent into washing machine.
1.Pull out the drawer.
2.Fill pre-detergent into Case I (when necessary).
3.Fill detergent into Case II.
4.Fill softener into Case (when necessary).
Notes:
- As for the agglomerated or ropy detergent or additive, before they are poured into the detergent box,
it is suggested to use some water for dilution to prevent the inlet of detergent box from being blocked
and overflowing while filling water.
-
option1: detergent (powder) . option2(liquid)
Please choose suitable type of detergent for the various washing temperature to get the best washing
effect with less water and energy consumption.
Select the procedure
The proper washing procedures shall be selected according to the types, quantities, and
dirtiness of the clothes to be washed in combination with the following washing
temperature table.
Start up washing machine
Connect the power. Check if water pipes are connected properly. Open the tap completely.
Put in the clothes to be washed and fill in the detergent and tackifier. Then press the button
“On/Off”,Select the proper procedures and functions and press the button “Start/Pause”.
90 ℃
60 ℃
Seriously besmirched, pure white cotton or flax (for example: coffee
table cloths, canteen table cloths, towels, bed sheets)
Moderately besmirched, colorful flax, cotton and synthetic articles
with certain decolorizing degree (for example: shirts, night pajamas;
Slightly besmirched, pure white flax
Normally besmirched articles ( synthetic and wool)for example:
40 ℃,30 ℃,
Cold water20 ℃,
Ⅰ
Ⅱ
Option1 Option2
View of Control Panel
Programme
For the convenience of users to washing
clothes with the different programme.
Start/Pause
Press the button to start or
pause the wash cycle
On/Off
Press once to turn the washing
machine on, press again to turn
the washing machine off.
Notes:
1.The Control panel line chart is for reference only,Please refer to real product as standard.
2.The Control panel could be changed without written notice. Please visit the website of Washing Machine or call up the service line for
consultation.
3.When the lights of Speed (600,800,1000,1200,1400) are off means the speed is 0.
Function setting
Press the button repeatedly to set the water temp.
washing time,rinse number,spin speed and so on.
Speed
1000: 400-600-800-1000
1200: 400-600-800-1000-1200
1400: 600-800-1000-1200-1400
Display
Speed
Child Lock
Reload
Extra
Rinse
Prewash
Remain Delay
No buzzer
My Cycle
Temp.
Speed
Wash
Rinse
Wash
Spin
8
P.14 P.15
Operate Washing Machine Operate Washing Machine
Confirm the washing capacity:
Do not put excessive washings; otherwise it may affect the washing effects. Please confirm
the maximum affordable washing quantity according to the following table.
The clothes which easily get fuzzed shall be turned over for washing
The clothes which easily get fuzzed shall be washed separately; otherwise the other
articles can be stained with dust and thrum etc. Preferably, black clothes and cotton
clothes shall be washed separately because they can easily get stained with the thrums
of other colors when being washed together.
Please check before washing.
Washing machine shall not wash water-proof materials (ski suits, outside napkin
pads, curtains).
As for the fiber products that water can not get soaked easily into such as water-proof
cushions, and clothes, it is better not to wash. Otherwise there will be water bursting out
or abnormal vibration to cause danger while rinsing and draining so that the clothes also
may be damaged. (Such as outside napkin pads, raincoats, umbrella, ski suits, car covers,
sleeping sacks etc.)
Cautions during Draining
Draining of normal clothes:
Moistures of washings are drained through drain hole.
Draining of water-proof clothes and fiber products:
In the normal washing and draining status, moistures of water-proof clothes and fiber
products can not be drained while washing water is gathered in one direction so that the
eccentricity of washing machine is too great and vibration or moving is caused.
Quick start
1.After washing, the washing machine will make the sound
2.Close the water tap;
3.Press the On/Off and pull out the power plug.
;
After washing notes:
1 Install the washing machine
7 Plug the power supply
6 Turn on the water tap
9 Select the desired programme
5 Put down (hang up) the drain pipe
4 Close the door
10 Press the [start/pause]
3 Measure out the detergent
2 Open the door and
Load the laundry
8 Press the On/Off
Delicate
8.0kg
8.0kg
4.0kg
2.0kg
2.5kg
Cotton
Synthetic
Wool
7.0kg
7.0kg
3.5kg
2.0kg
2.5kg
6.0kg
6.0kg
3.0kg
2.0kg
2.5kg
9.0kg
9.0kg
4.5kg
2.0kg
2.5kg
Table of contents
Languages:
Other KRAFT Washer manuals

KRAFT
KRAFT KF-ASL50801MWB User manual

KRAFT
KRAFT KF-SL60802MWB User manual

KRAFT
KRAFT KF-TWE5101W User manual

KRAFT
KRAFT KF-TWM6105DW User manual

KRAFT
KRAFT KF-TWE6103W User manual

KRAFT
KRAFT KF-ENC6105W User manual

KRAFT
KRAFT KF-EN5101W User manual

KRAFT
KRAFT KF-EN5104W User manual

KRAFT
KRAFT KF-MDS10146W User manual

KRAFT
KRAFT TCH-HD8529SDB User manual

KRAFT
KRAFT KF-AKM65103LW User manual

KRAFT
KRAFT KF-MDS6106W User manual

KRAFT
KRAFT KF-LX7101BW User manual

KRAFT
KRAFT KF-TWL50101CB User manual

KRAFT
KRAFT KF-HD8142WE User manual

KRAFT
KRAFT TCH-UME7201W User manual

KRAFT
KRAFT KF-SM60102MWL User manual

KRAFT
KRAFT KF-ENC6105W User manual

KRAFT
KRAFT KF-ED6206W User manual

KRAFT
KRAFT TCH-HDD8587SW User manual