KRS KRS118B User manual

Installation and Operation Manual
Do not operate this water heater without reading the Manual.
If the power cord is damaged, it must be replaced by a qualified person in order to avoid danger.
Air Source Heat Pump Water Heater

1
Table of Contents
1. Safety instructions
2. Product description
2.1 Product features
2.2 Working mode
2.3 Product appearance
3. Storage, handling, transportation and installation
3.1 Storage and transportation
3.2 Handling
4. Installation
4.1 Placement space requirements
4.1.1 Installation location and space requirements
4.1.2 Electrical requirements
4.2 Installation method
4.2.1 Equipment fixation
4.2.2 Water pipe connection
4.2.3 Condensate drain pipe
4.2.4 P/T valve installation
4.2.5 Thermal expansion tank (not provided)
4.2.6 Temperature limiting device (not provided)
4.2.7 Pressure limiting valve (not provided)
4.2.8 Remote wire controller installation
4.3 Installation check points
4.3.1 Water tank position
4.3.2 Pipeline connection
4.3.3 Condensate drain hose
4.3.4 P/T valve and drain line must comply with local regulations
4.3.5 Electrical connection
4.3.6 Check the wire controller
4.3.7 Confirm whether there is a problem with the machine settings
4.4 Heat pump start-up

2
5. Operating instructions
5.1 Precautions for use
5.2 Safety warning
5.3 Operating instructions
5.3.1 Start-up & Shutdown operation
5.3.2 Temperature setting
5.3.3 Working mode setting
5.3.4 Time setting
5.3.5 Timing setting
5.3.6 Manual forced defrosting
5.3.7 Manual start of auxiliary electric heater
5.3.8 Manual forced start of circulating pump
5.3.9 Child lock function
5.3.10 Screen protection function
6. Inspection and maintenance
6.1 Inspection and maintenance precautions
6.2 Inspection items
6.2.1 P/T valve
6.2.2 Water tank flushing
6.2.3 Water tank emptying
6.3 Holiday and long-time shutdown
6.4 Cleaning of condensate drain pipe
6.5 Refrigerating circuit
6.6 Magnesium anode rod maintenance
6.7 Check/Replacement of magnesium anode rod
7. Fault code display
8. Environmental protection

3
1. Safety instructions
The warnings in the manual are marked with a triangular warning sign.
Failure to comply with these warnings may result in serious consequences or even death.
Warnings
This water heater is not suitable for water heating in swimming pools.
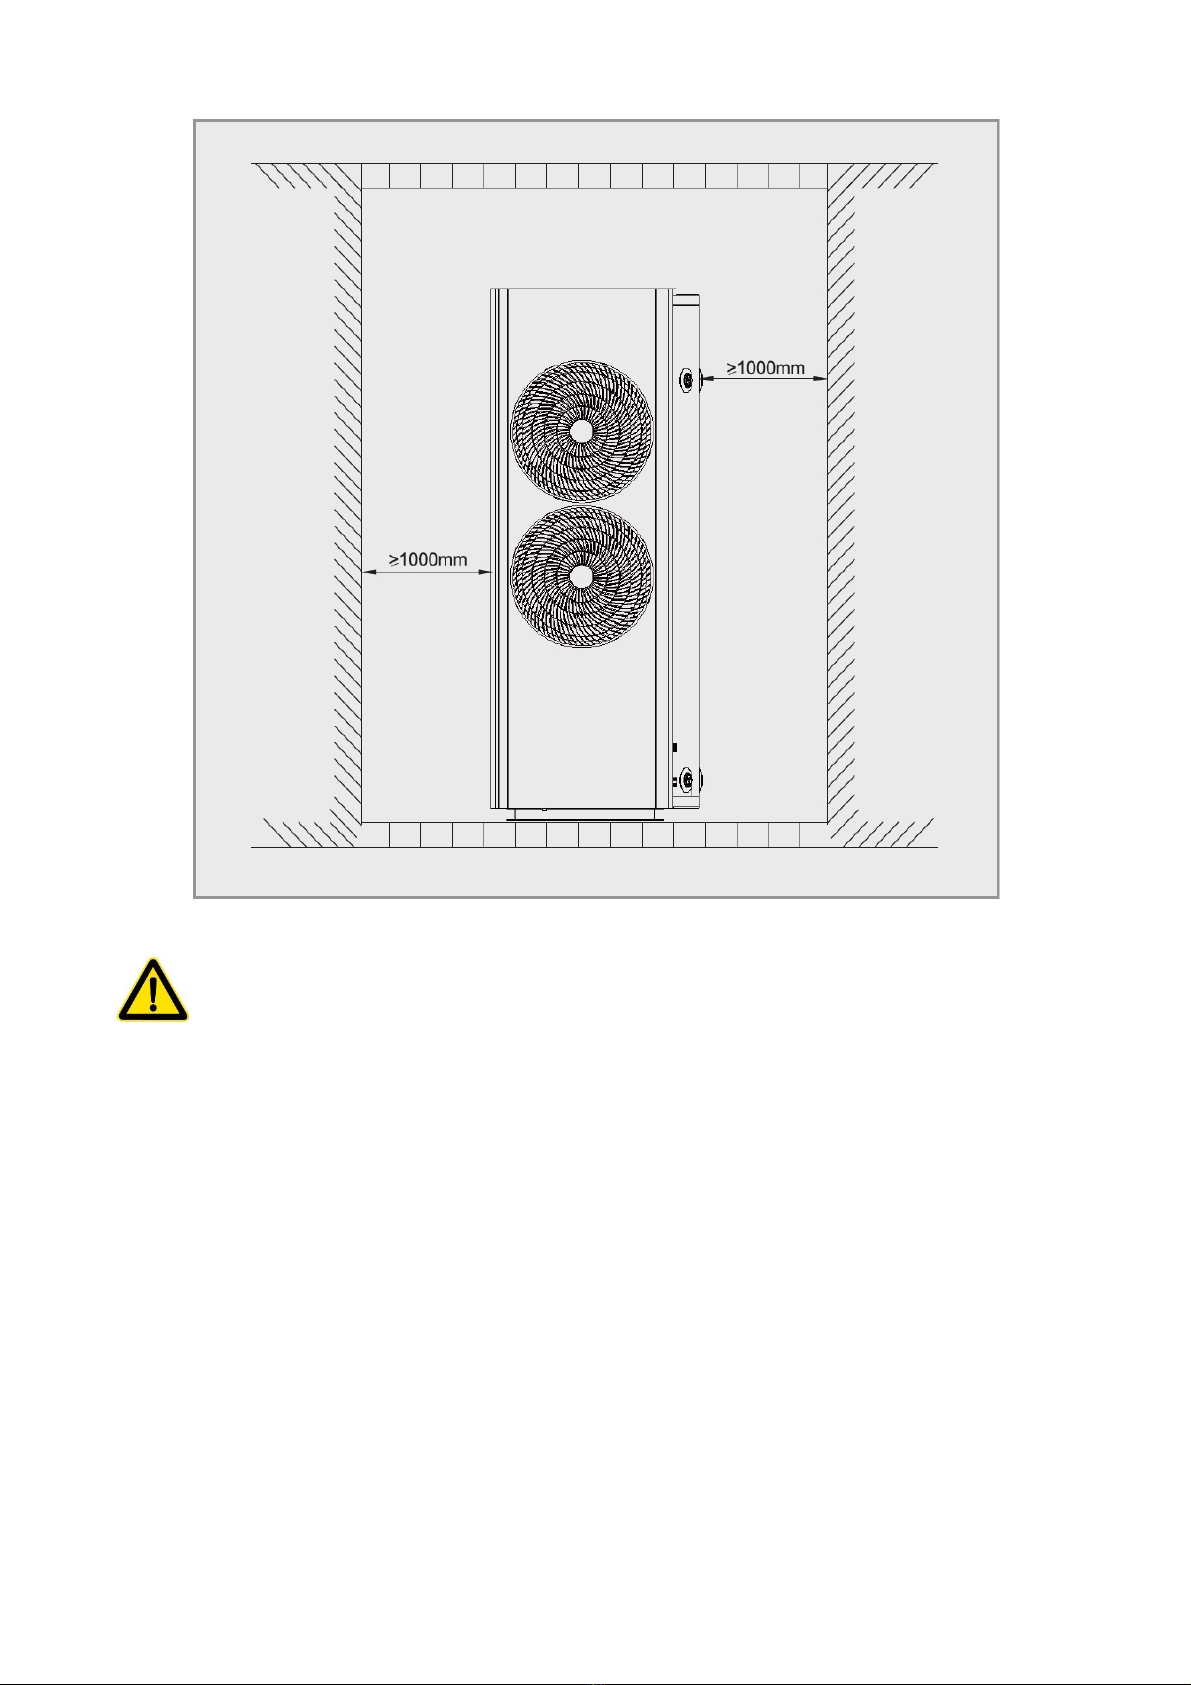
The water heater should be placed where it won’t damage the adjacent area or underlying
structure of the heat pump water heater even if there is leak at the water heater or the joint. When
these installation locations cannot be avoided, it is recommended to install a suitable water drain
pan in the lower part of the water heater for adequate drainage of water.
If the water heater is installed in a closed water supply system, measures should be taken to
prevent hot water from flowing back; for example, a check valve is installed on the cold water
supply pipeline to prevent hot water from flowing back due to thermal expansion.
Before manually operating the temperature and pressure safety valve (hereinafter referred to as
P/T valve), preventive measures must be taken to avoid the risk of scalds by the hot water flowing
out from the P/T valve.
The thermal expansion of the closed water supply system may cause the P/T valve to periodically
relieve pressure. Contact the water heater supplier for how to correct this situation. DO NOT
BLOCK THE P/T VALVE.
The P/T valve should be inspected every 6 months for its performance or replaced at an interval
of not more than 2 years. The P/T valve should be replaced more frequently in the high-occurrence
areas of water subsidence.
When using and reusing the refrigerant, please comply with relevant environmental regulations.
The refrigerant is not allowed to be discharged into the environment. R134a refrigerant is used
for this equipment, which is non-flammable and does not have a devastating effect on the ozone
layer.
When processing or operating components related to the refrigerant circuit, the refrigerant should
be discharged to ensure safe operation.
The high pressure insulation test of the water heater can only be carried out between the live wire
and the ground wire as well as the null line and the ground wire. The test between the live wire
and the null line will damage the electronic equipment.
All electrical installation and wiring must be performed by qualified professionals and subject to
wiring rules and the requirements of the local authority.

4
Risk of electric shock: Please turn off the power before performing equipment repairs. Failure to
do so may result in serious personal injury or death.
When the circuit board, controller or display is repaired, all wires shall be first labeled and then
disconnected. Wiring errors can result in incorrect and dangerous operation. The wiring must be
reconfirmed after repair.
The water tank may be frost-cracked due to low temperatures. Do not turn off the power to the
equipment. If it needs to turn off the power or there is a power outage, and there may be frost-
crack because of low temperatures, the water should be discharged from the water tank.
Do not store or use gasoline or other flammable, explosive or corrosive gases and liquids near
this equipment.
The water heaters must be installed, commissioned and repaired by authorized personnel in
accordance with local laws and regulations.
It should ensure that the surrounding area of installed equipment is clean and free of flammable
and corrosive materials such as gasoline and other flammable, explosive and corrosive gases
and liquids, etc.
The power supply of the water heater can only be turned on after the water tank has been filled
with water.
Water temperatures above 50 °C can immediately lead to severe burn or scald and death.
Please feel the water temperature before bathing or showering.

5
Prevent the risk of scald by high-temperature water:
In order to prevent scalds caused by excessively high water temperature, we recommend
installing a temperature limiter at the junction of the hot water pipe and the sanitary water outlet
(i.e the toilet and bathroom). This will keep the water temperature at the outlet below 50 °C, which
can reduce the risk of scalds.
Water temperatures above 50 °C can cause severe scalds, and the local regulations and
requirements regarding temperature limits primarily for personal sanitary hot water must be
considered.
The water heaters must be installed by authorized personnel and the installation must comply
with the local laws and regulations and the requirements of the supervision organization.
Faulty operation can result in death or serious injury.
This manual has clearly stated the possible risks. We will not be liable for any consequences
resulting from failure to apply the equipment in accordance with the requirements of this manual.
2. Product description
2.1 Product features
Easy to operate
The equipment adopts the user-friendly control panel, which is easy for users to operate.
Energy saving and environmental protection
The equipment heats water by absorbing energy from the surrounding air and releasing it into the water
stored in the tank, so it is very energy efficient. If the ambient temperature is low, the heating capacity of
the heat pump will decrease, and then the auxiliary electric heater can be used as a backup.
Overheating protection
The water tank is equipped with a thermostat protection device located above the electric heater and it is
in contact with the inner tank surface. If the water temperature reaches preset temperature or there is no
water in the tank due to any cause, the thermostat will automatically cut off the power circuit of the electric
heater.
When the water temperature is higher than 90 °C, the manual protection device of thermostat will cut off
the power supply. If the temperature returns to the normal level later, the thermostat needs to be turned
on by manual reset.
Manual reset of the thermostat should be performed by a qualified service personnel.

6
Warnings
The cause of abnormal high water temperature must be investigated by a qualified service
technician and corrective measures must be taken before the water heater is restarted.
Automatic defrosting
In the operating state of heat pump, the equipment will automatically defrost to ensure thermal efficiency.
Water temperature or pressure protection
For your safety, the equipment is equipped with a P/T valve. If the tank pressure reaches 800 kPa or the
temperature reaches 90°C, the valve will automatically open to allow the pressure or temperature to drop
to a safe value.
Water supply pressure
The water heater is designed to be directly connected to the water system. When the water supply
pressure exceeds 800 kPa, a pressure limiting valve must be installed. The minimum water supply
pressure of 200 kPa is required to ensure the normal water supply of the water heater.
If the P/T valve or other safety devices has been tampered or not been installed in accordance with the
instructions in this manual, the company will not be responsible for the consequences.
2.2 Working mode
• AUTO mode:
Water temperature setting: 35~75°C;
The heat pump can be heated up to 65°C at maximum, and it will shut down when the water temperature
is heated to 65°C.
• Eco mode (Energy saving mode)
It is a timing mode.
The heat pump will automatically start and shut down when the startup & shutdown time is pre-set. It can
be heated up to 65°C at maximum, and it will shut down when the water temperature is heated to 65°C.
Note: The default hot water outlet temperature is 55°C.

7
2.3 Product appearance
[1] Air inlet
[2] Air outlet
[3] Water tank
[4] Foot
3. Storage, handling, transportation and installation
3.1 Storage and transportation
As a rule, the equipment should be packed erectly and the water tank be stored or transported as an
empty water tank. For short-distance transport, care should be taken to allow a tilt angle of 30° at
maximum. Whether transported or stored, the ambient temperature should be in the range of -20 °C~
+60°C.
3.2 Handling
When handled and transported by a forklift, the equipment must be fixed to the pallet at all times. The
lifting rate should be kept at the lowest limit. Due to the top-heavy weight, anti-overturn measures must
be taken. To prevent any damage, the equipment must be placed on a level surface!

8
For handling, it must be noted that the maximum allowable tilt angle cannot exceed 15°. If tilting cannot
be avoided during handling and transportation, the equipment can only be operated one hour after
being moved to the final vertical position.
Warnings
Damage during transportation!
Avoid tilting the device over 15°.
Be careful when handling equipment.
To avoid dropping the equipment and damaging internal components, do not turn the
equipment.
To avoid equipment damage, the protective packaging shall be removed after the equipment
has been transported to the installation site.
Use straps to prevent the equipment from being scratched.
Use the appropriate means of transportation to transport the equipment to the installation
site (special vehicle, pallet truck, etc.)
4. Installation
The manufacturer's warranty does not cover any damage caused by improper installation, connection or
use of any type of accessory (except as listed in this user manual) of this water heater.
The use of unauthorized devices may shorten the life of the water heater and may result in death and
property damage. The manufacturer is not responsible for any loss or damage caused by the use of such
unauthorized devices.
4.1 Placement space requirements
Installation space requirements: to avoid affecting airflow, please ensure the equipment space
requirements as shown.

9
Warning
P/T valve coming with the equipment must be installed and the valve outlet must not be blocked,
as this may be dangerous.
4.1.1 Installation location and space requirements
The water heater shall be installed in a clean place that is as close as possible to the area with the
maximum hot water demand. The long non-insulated hot water pipes will waste energy and water.
When the water heater is placed, the space that is used for proper maintenance must be reserved, that
is, the space required for removing the top cover, accessing to the P/T valve, and removing & installing
the anode rod.
The entire water heater may be disassembled for future maintenance, so the water heater and water
pipelines should be protected to prevent damage caused by severe cold and corrosive environments.
In the place where the water heater is installed, there must be sufficient drainage facilities, such as floor
drains, to drain the water in the tank when the tank is repaired or cleaned.

10
Warning
The water heater should not be installed in areas with corrosive atmospheres (such as the areas
for storing chemicals and flammable liquids, or releasing aerosols). When using this water heater,
these corrosive, flammable vapors may be brought out from the storage area due to convection
of air in the room or other confined space. Any arc that may be generated at the electrically
controlled live part of the water heater may ignite these vapors, thus causing an explosion or fire
that could result in severe burns or even death and property damage.
Suggestions
Even if the water heater is running at a low level of noise, it is best to install it away from the bedroom or
other resting place.
Condensate discharge
The condensate produced by the water heater needs to be discharged, so there must be a drainage
device close to the water heater.
4.1.2 Electrical requirements
Power requirements
The power cord parameters are: 3 X 1. 5m2 or above.
This water heater must be directly connected to the main power supply of ~220-240V / 50Hz.
Warning
All electrical installation and wiring must be performed by qualified personnel in accordance with
the wiring rules required by local authorities.
The water heater needs to be connected to the user's power supply line through the earth leakage
protective device. It must be noted that the user's power supply line must have a grounding wire.
The earth leakage protective device is not waterproof, and it should pay attention to preventing
water flowing in when used.
Correct grounding connection is essential. The presence of water in pipes and water heater can
not provide sufficient grounding conductivity. Non-metallic pipes, dielectrics, flexible
connections, etc. may cause the water heater to be electrically isolated.
The electrical components and insulation tests in the water heater must be performed between
the live wire and ground wire, as well as the null line and the ground wire. The test between the
live wire and the null line will destroy the electronic components.

11
4.2 Installation method
4.2.1 Equipment fixation
Remove the package and external protective packaging
Pick up the water heater from the base
Align the water heater with the mounting position correctly
Note: In order to ensure trouble-free operation, the equipment must be installed vertically and the
installation tilt angle should not exceed 1°.
4.2.2 Water pipe connection
Warning
All piping work must be performed by qualified personnel in accordance with the requirements of
local laws and regulations.
Care must be taken not to touch the pipelines as the temperature may be very high.
The supplied P/T valve must be installed, otherwise damage to the equipment or other property
loss may be caused.
Installation of the inlet and outlet water pipelines: the inlet and outlet water threads are G3/4 (female
thread). Pipelines must be high temperature-resistant, durable and weathering-resistant (outdoor
installation).
Installation of P/T valve pipeline: The thread specification of the valve is G3/4 (male thread).
All pipelines should be insulated with suitable thermal insulation materials (if exposed, they must be
weathering and UV-resistant) to optimize energy efficiency.
The typical installation drawing is as shown below.

12
Water injection into water tank
Warning
Damage to the water heater
First inject cold water into the tank before the commissioning of the equipment.
Open the water outlet connection and one or more hot water taps.
Open the cold water inlet of the storage tank, start injecting water into the water tank.
Turn off the hot water tap when there are no air bubbles in the water stream.
Connect the equipment to the power supply via the power cord.
Water quality requirements
Poor water quality will lead to a shortened product life. The magnesium rod shall be checked more
frequently and replace it if necessary.

13
4.2.3 Condensate drain pipe
This water heater has an integrated condensate water pan. The water collected in the water pan is
drained from the drain hole at the back of the water heater and its connected hose.
Connect one end of the condensate drain pipe to the drain hole on the back of the water heater.
The other end is directly connected to the floor drain.
4.2.4 P/T valve installation
The P/T valve must be installed at the connection port marked “P/T valve” on the water heater. No other
valve body or any other type of part should be installed between the P/T valve and the water tank. Please
install the P/T valve correctly according to this valve's instruction manual.
Warning
The pressure rating of the P/T valve must not exceed 800 kPa.
The pressure relief device of the P/T valve shall be operated at least ONCE EVERY SIX MONTHS.
When the operating lever is running, if the water cannot be discharged smoothly, the authorized
relevant technician shall inspect the P/T valve or replace the P/T valve if necessary.
The P/T valve and its drain pipe must not be sealed or blocked. When heating the water, a small
amount of water is allowed to leak from the P/T valve.
Once the P/T valve is installed on the water heater, its function is to discharge high temperature
hot water under certain conditions. Therefore, it is highly recommended that the pipeline that
connects the P/T valve can withstand temperatures higher than 99 °C. Failure to follow this advice
can lead to dangerous situations.

14
Never block or seal the P/T valve or its drain outlet for any reason. If the P/T valve is changed
arbitrarily or not installed in accordance with the instruction manual, the warranty will be invalid.
It is recommended to connect a hose from the P/T valve outlet to the floor drain or a suitable drain
device so that the drained water will not touch any electrical part, person or animal, thus
eliminating any other possible risks.
In order to reduce the risk of excessive pressure or temperature in the water tank of the water
heater, a P/T valve is required to be installed as the protection device as per the local laws and
regulations.
4.2.5 Thermal expansion tank (not provided)
Thermal expansion is a natural process in which the volume of water is increased after it is heated. When
the volume increase of the water stored in the water tank is limited, it will cause an increase in pressure.
Increased pressure can lead to dangerous situations. If the safety settings on the P/T valve are already
in place, the valve will act during the heating cycle. Generally, if the pressure in the tank reaches the
nominal value of the valve, the excessive expansion may cause the valve to malfunction prematurely and
accelerate the actuating force of the valve.
Therefore, it is recommended to install an expansion water tank to alleviate this kind of excessive
pressure and avoid repetitive P/T valve action.
For more information on this issue, please consult the relevant professional or water heater supplier.
4.2.6 Temperature limiting device (not provided)
Warning
The water heater can heat the water to a temperature that may lead to scalds.
It is recommended to install a temperature limiting device at the water heater and hot water outlet in the
bathroom or similar location to reduce the risk of scalds.
4.2.7 Pressure limiting valve (not provided)
If the tap water supply pressure exceeds the product's pressure rating 800kPa, a pressure limiting valve
is required to be installed at the water inlet pipeline.
If the tap water supply pressure is lower than the product’s pressure rating 200kPa, a pressure increasing
valve is required to be installed at the water inlet pipeline to provide the necessary pressure or reduce
the generation of bubbles in the water system.
4.2.8 Remote wire controller installation
Disassemble the back cover of the power cord, pull out the communication cable connector, and plug it
into the communication cable connector of the wire controller.

15
4.3 Installation check points
4.3.1 Water tank position
The installation space must be at least 3mx3m x 2.5m (22.5m3). If it can not be satisfied, window-
blinds or similar ventilation devices are required.
The air inlet and outlet of the water heater shall be 1000mm away from the wall at least.
The front and back of the water heater should be unobstructed and clean.
The bottom of the water heater must be flat, otherwise spacers need to be added.
4.3.2 Pipeline connection
Inject tap water into the water tank after the water pipes are connected and check if there is water leak
at each joint.
4.3.3 Condensate drain hose
The condensate drain hose should be connected to the drain hole of the water pan and the floor drain,
drain device or drain pump.
4.3.4 P/T valve and drain line must comply with local regulations
4.3.5 Electrical connection
Electrical connections shall not obstruct the removal of the inlet and outlet air grids.
All electrical connections require insulating treatment.
4.3.6 Check the wire controller
Verify whether each operation button of the wire controller is flexible and displays normally.
Check whether the mode, temperature, time and other function settings are correct. The default
temperature is set to be 65 °C.
4.3.7 Confirm whether there is a problem with the machine settings
Start up the water heater after confirming that there is no problem with the settings. Please pay attention
to protecting the control panel.
Warning
The power supply cannot be activated before the water tank is filled with water.
4.4 Heat pump start-up
After the water heater is installed and all electrical and water connections are also determined and
checked, it should be filled with water (the water tank is ensured to be filled with water by opening the hot
water tap at somewhere in the home for drawing off water). Once the tank is filled with water and powered,
the user must press the power button on the wire control to start the equipment. The startup process is
as follows.

16
Time Heat Pump Notes
0---110 seconds The water heater is with no action
Prevent compressor from damage.
110---170 seconds Solenoid valve opens
170---180 seconds Fan starts
180 seconds later Compressor starts High-efficient heat pump heating.
The ambient temperature range for heat pump operation is -5 °C ~ 43 °C. If the ambient temperature is
outside this range, the heat pump will not operate and the auxiliary electric heating will start to heat the
water instead of the heat pump. It will return to the heat pump mode when the ambient temperature
restores to the operating temperature range of the heat pump.
5. Operating instructions
5.1 Precautions for use
If any insulation material or covering is applied on the outside of the water heater, the following points
need to be noted:
Do not cover the P/T valve.
Do not cover the lid of the auxiliary electric heater.
Do not cover the operation, warnings and other marks on the water heater.
Do not cover the air inlet and outlet.
Do not cover the control unit of water heater.
5.2 Safety warning
Warning
Do not turn on the water heater if the cold water supply switch is off.
Turn off the power if the water heater is overheated or subject to fire, flood or other physical
damage.
The installation, commissioning, maintenance and cleaning of the water heater must be
completed by professional technicians or maintenance personnel.
5.3 Operating instructions
Control panel

17
5.3.1 Start-up & Shutdown operation
When the controller is powered on for the first time, it defaults to be shutdown.
Start-up: Press the “ON/OFF” button to start it up when it is at the state of shutdown.
Shutdown: Press the “ON/ OFF” button to shut it down when it is at the state of start-up.
5.3.2 Temperature setting
Press the “Up” or “Down” button to enter the temperature setting state and “set the temperature”
displays; the big “88” flashes and displays the set temperature, press the “Up” or “Down” button
to adjust the set temperature, and the temperature will be quickly adjusted when pressing and
holding the “Up” or “Down” button. When the set temperature rises to the maximum or declines
to the minimum value, a new counting cycle from the minimum or maximum will start.
Press the “OK” button during the setting process, and the setting will take effect and exit.
The setting will take effect and exit if it is not operated for 5s.
Press the “ON/OFF” button, and the setting will become invalid and exit.
5.3.3 Working mode setting
Press the “Mode” button and release it to switch between “AUTO” and “ECO”. In the "ECO", it
will operate according to the set working time period.
AUTO mode: In the state of start-up, if the water tank temperature reaches the set temperature,
the system will stand by; if the water tank temperature is lower than (F11 set temperature-F12
return difference temperature), the system will start up.

18
ECO mode: When it is in the timing period, press the automatic mode to control the operation;
when it is not in the timing period, the system will stand by.
5.3.4 Time setting
Press the “Timing” button to enter the time setting and the “hour” flashes.
Continue to press the “Timing” button, and the time is adjusted as follows: hour → minute →
exit setting.
Press the “Up” or “Down” buttons to adjust the corresponding time value.
It will automatically exit if the button is not pressed for 30s.
Press the “ON/OFF” button to exit during the setting process.
5.3.5 Timing setting
Press and hold the “Timing” button for 3s to enter the timing setting.
Timing 1: At this time, “Timer On” is displayed, 1 is displayed on the big “88” and the “Hour”
flashes. Press the “Up” or “Down” buttons to adjust the hour; after the hour is adjusted, press the
“Timing” button again and “Timer On” is displayed, 1 is displayed on the big “88” and the “Minute”
flashes; press “Up” or “Down” buttons to adjust the minute; press “Timing” button again to enter
the setting of “Timer off 1” and the setting mode is the same as “Timer on 1”.
It will automatically exit if the button is not pressed for 30s.
Press the “ON/OFF” button to exit during the setting process.
Note: When the start time and end time of the timing period are set to be the same, it means that the
timing period is invalid. If the end time of a certain time period is earlier than the start time, the end time
is considered to be that on the next day. For example, if a time period is set to be "22:00~03:30", it is
considered to be from 22:00 to 3:30am of the next day.
5.3.6 Manual forced defrosting
Press and hold the “Pump” and “OK” buttons for 3s, the forced defrosting will start. When the coil (pipe)
temperature is greater than the defrosting exit temperature, defrosting will not start.
5.3.7 Manual start of auxiliary electric heater
Press and hold the “Heating” button for 3s to force the electric heater to start.
The “ ” flashes when it is started and it is always-on when it is successfully started.
5.3.8 Manual forced start of circulating pump
Press the “Pump” button to manually start the circulating pump.
The circulating pump icon flashes when it is started and it is always-on when it is successfully
started.

19
5.3.9 Child lock function
Press and hold the “ON/OFF” button for 3s to enter the lock state, and then press and hold the “ON/OFF”
button for 3s to release the lock.
5.3.10 Screen protection function
It will enter the screen protection state if it is not operated for F63 seconds, the big “88” displays the
temperature of the water tank, the “ON/OFF” button icon is illumed and the brightness is reduced. During
the period of 21:00-6:00am of the next day, the lights “ ”, “ ”, “ ” and “ERR” shall be illumed
according to the actual working conditions after it is not operated for F63 seconds by the user, and the
rest will not be displayed; when the button or relay action is detected in the screen protection state, the
screen protection will exit, and if no operation is performed 3 minutes after the screen protection exits, it
will enter the state of screen protection again.
6. Inspection and maintenance
Warning
The water heater should be repaired and maintained by professionals in accordance with local
plumbing standards.
Before manually operating the P/T valve, make sure that no one will be exposed to danger because
of contacting the hot water released by the valve. The water may not heat up to the level of scald,
however it is still necessary to use a suitable drain pipe to release the water to avoid possible
injury or property damage.
Periodic release of the P/T valve is part of normal operation. This is because there is thermal
expansion in a closed water system that causes an increase in pressure. If such release becomes
excessively frequent and continuous, please contact the after-sales service provider and don’t
block the outlet of the valve.
Note: Proper maintenance of the water heater will provide a longer, reliable, trouble-free and economical
operating life.
It is recommended to establish a regular preventive maintenance program for the users to follow up.
6.1 Inspection and maintenance precautions
It is recommended that periodic inspections of the controller, heating elements, and wiring should be
performed by qualified electrical service personnel.
It is recommended that the evaporator and refrigeration circuit be inspected and cleaned every 5 years
for dust and residue. In dusty environments, they should be inspected and cleaned more frequently.
Table of contents
Popular Water Heater manuals by other brands

State Water Heaters
State Water Heaters SBN85390NE/A Installation operation & maintenance

TriangleTube
TriangleTube 30 Installation & maintenance manual

Regulus
Regulus R0BC Series Installation and operation instructions

Quantum
Quantum 150-08ACW-134 owner's manual

OSO HOTWATER
OSO HOTWATER Accu-A60 manual

Heat Transfer
Heat Transfer Phoenix Evolution Installation & operation manual