Kruger&Matz KM0197 User manual

PL EN DERO
Action camera
KM0197
BEDIENUNGSANLEITUNG
OWNER’S MANUAL
INSTRUKCJA OBSŁUGI
MANUAL DE UTILIZARE

DE EN PL RO
1. Auslöser/
Auswahltaste
Shutter / select
button
Przycisk wyboru/
spust migawki
Buton declansare /
selectare
2. LED Betriebsanzeige LED control light Kontrolka LED Control lumina
LED
3. Mikrofon Microphone Mikrofon Microfon
4. Mikro SD
Kartensteckplatz
MicroSD slot Slot microSD Slot MicroSD
5. Taste Ein/Aus/
Modus
Power / mode
button
Przycisk
zasilania/zmiany
trybu
Buton pornire /
mod
6. Mikro USB
Steckplatz
microUSB port Port microUSB Port microUSB
7. Linsen Lens Obiektyw Lentile
8. Mikro HDMI
Steckplatz
microHDMI port Port micro HDMI Port microHDMI
9. Taste Aufwärts/
Wiedergabe
Up/playback
button
Przycisk w górę/
odtwarzanie
Buton Sus/redare
10. Bildschirm Screen Wyświetlacz Ecran
11. Lautsprecher Speaker Głośnik Difuzor
12. Taste Abwärts/
Wi-Fi
Down/Wi-Fi
button
Przycisk w dół/
Wi-Fi
Buton delare in
sus/ Wi-Fi button
13. Batteriefach-
Verschluss
Battery door lock Zamek pokrywy
baterii
Usa de blocare a
bateriei
14. Batteriefach Battery door Pokrywa baterii Capac
compartiment
baterie
15. Auslöser/
Auswahltaste
Select/shutter
button
Przycisk wyboru/
Spust migawki
Buton declansare /
selectare
16. Verrieglung Lock Zatrzask budowy
wodoodpornej
Inchizator
17. Taste Ein/Aus/
Modus
Power/mode
button
Przycisk zasilania
/zmiany trybu
Buton pornire /mod
2
PRODUKTBESCHREIBUNG / PRODUCT DESCRIPTION /
OPIS PRODUKTU / DESCRIERE PRODUS

①
②
③
④
⑤
⑦
⑧
⑥
⑬
⑭
⑮
⑯
⑰
⑩
⑫
⑪
⑨
3
MONTAGE / MOUNTING / MONTAŻ / INSTRUCTIUNI
DE MONTARE

4

5

6
Bedienungsanleitung
DE
SICHERHEITSANWEISUNGEN
1. Lesen Sie die Bedienungsanleitung vor dem ersten Gebrauch und heben
diese auf für späteres nachschlagen.
2. Setzen Sie das Gerät nicht extremen Temperaturen oder direkter
Sonneneinstrahlung aus.
3. Bewahren Sie das Gerät an einem kühlen, trockenen und staubdichten Ort.
4. Schalten Sie das Gerät aus, vor dem Entfernen der Speicherkarte. Die Karte
und die Daten können beschädigt werden, wenn die Speicherkarte eingesetzt
oder entfernt wird, während das Gerät noch eingeschaltet ist.
5. Verändern bzw. demontieren Sie das Gerät nicht selbst. Reparaturen können
ausschließlich in einer autorisierten Servicestelle durchgeführt werden.
ERSTE SCHRITTE
Einschalten:
Drücken der Taste Ein/Aus/Modus.
Ausschalten:
Drücken und halten der Taste Ein/Aus/Modus.
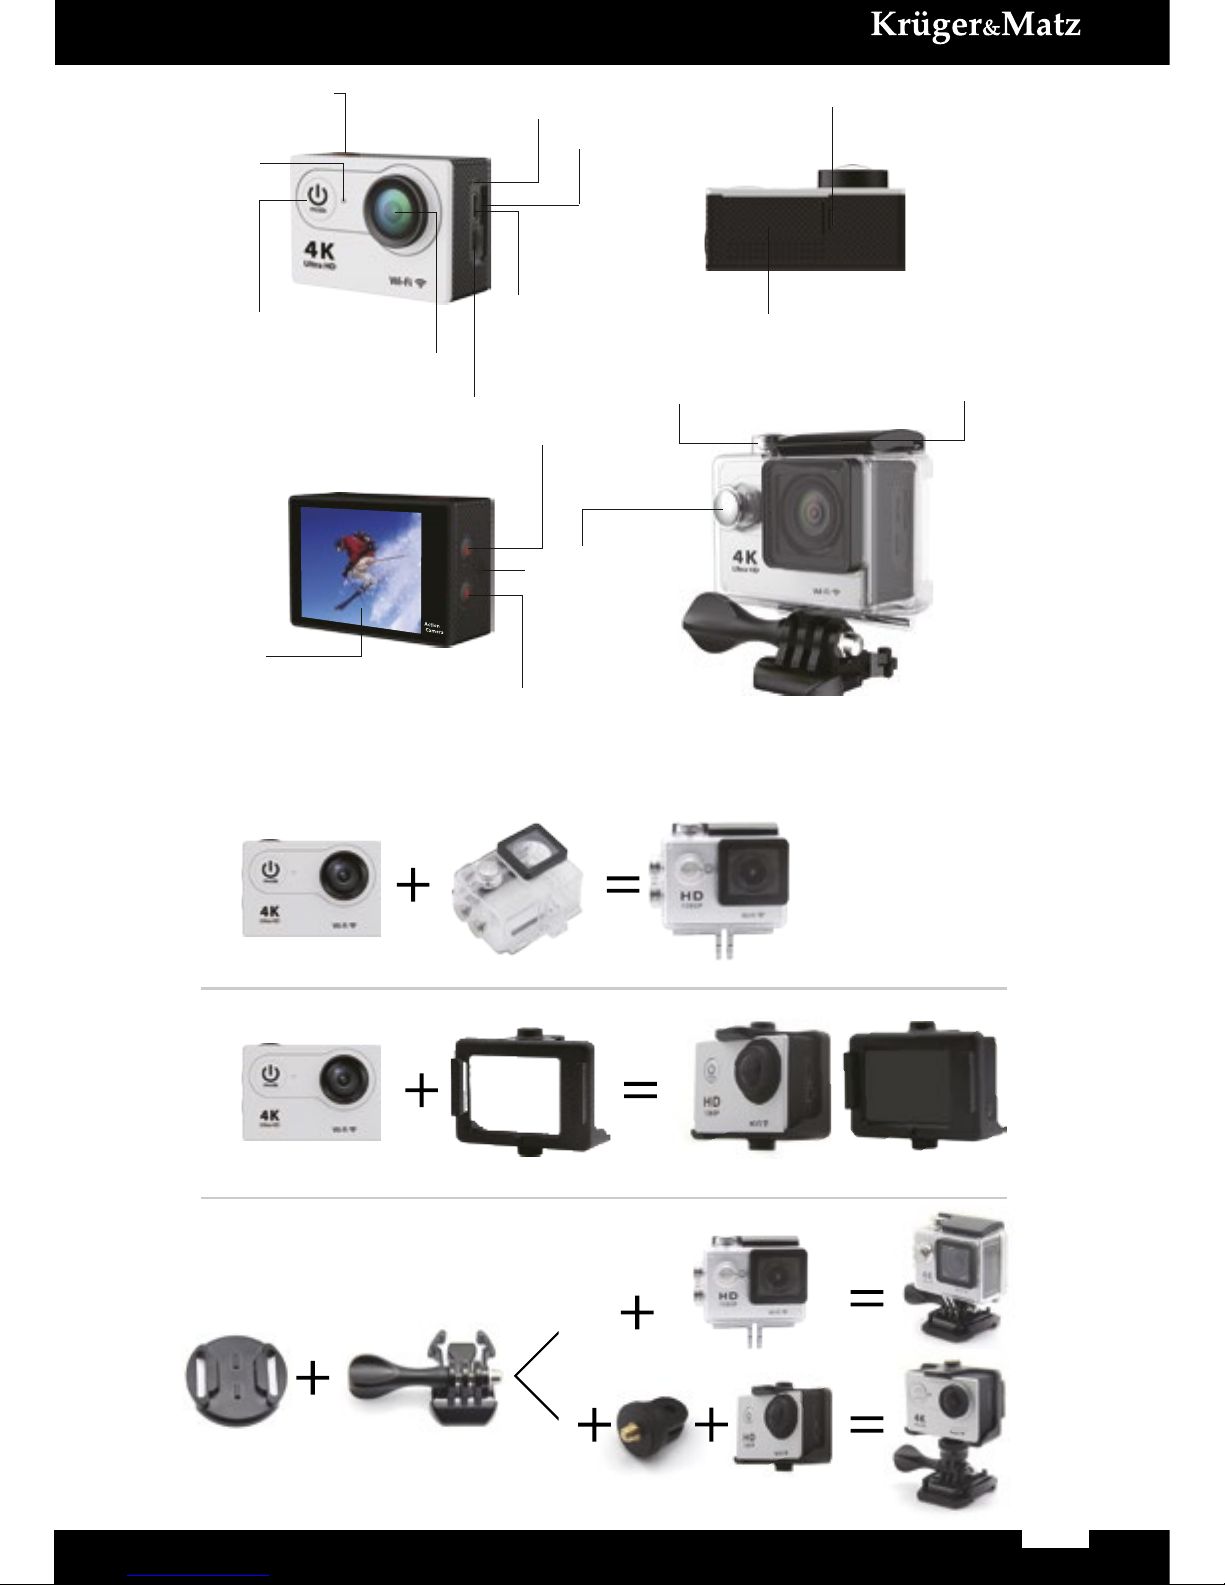
ÜBERSICHT
Schalten Sie die Kamera ein und drücken Sie wiederholt die Taste Ein/Aus/Modus, um
durch die Kamerafunktionen und Einstellungen zu blättern. Die Betriebsarten werden in
folgender Reihenfolge angezeigt: Video (Videoaufnahme) > Foto (erstellen eines einzelnen
Bildes) > Schnappschuss (Sofortbild-Serie) > Zeitraer (eine Reihe von Bilder in festgelegten
Zeitintervallen schießen) > Video Wiedergabe / Bildwiedergabe / Einstellungen.
EINSTELLUNGEN
Drücken Sie den Auslöser/Auswahltaste um das Einstellungsmenü aufzurufen.
Drücken Sie wiederholt die Taste Ein/Aus/Modus, um durch die Optionen zu blättern
und drücken den Auslöser/Auswahltaste um die gewünschte Option auszuwählen.
Oder benutzen Sie die Taste Aufwärts/Wiedergabe oder Abwärts/Wi-Fi um durch
die verschiedenen Optionen zu blättern.
Video Auösung: 4K25/2.7K30/1080p60/1080p30
Mikro SD Karte 4K25/2.7k30 1080p60 1080p30
32 GB 60 Minuten 120 Minuten 240 Minuten
16 GB 30 Minuten 60 Minuten 120 Minuten
Videoschleife: Ein/Aus (4K und 2.7K nicht unterstützt); Zeitstempel: Aus/Datum/Datum
& Uhrzeit; Belichtung: ±2,0/±1,7/±1,3/±1,0/±0,7/±0,3/0; Bildauösung: 12 M/8 M/5 M/4 M;
Schnappschuss: 3 Bilder; Zeitraer: 2 S/3 S/5 S/10 S/20 S/30 S/60 S; Ununterbrochener
Zeitraer: Aus/Ein; Sprache: Mehrsprachiges OSD; Datum & Uhrzeit: MM/TT/JJ, TT/MM/

7
Bedienungsanleitung
DE
JJ oder JJ/MM/TT; Tonanzeige: Auslöser Ein/Aus, Einschalten 1/2/3/Kein, Piep-Ton Ein/
Aus, Lautstärke 0/1/2/3; Kopfüber: Ein/Aus; Bildschirmschoner: Aus/l Min/3 Min/5 Min;
Energiesparen: Aus/l Min/3 Min/5 Min; Format; Zurücksetzen; Version
VIDEOMODUS
Drücken Sie wiederholt die Taste Ein/Aus/Modus, um in den Videomodus zu
gelangen. Das Videosymbol erscheint am LCD Bildschirm.
Aufnahme beginnen:
Drücken Sie den Auslöser/Auswahltaste. Es ertönt ein Piep-Ton und die LED
Betriebsanzeige blinkt während der Aufnahme.
Aufnahme beenden:
Drücken Sie den Auslöser/Auswahltaste. Es ertönt ein Piep-Ton, als Anzeichen dass
die Aufnahme beendet ist und die LED Betriebsanzeige hört auf zu blinken.
Diese Kamera beendet den Aufnahmevorgang automatisch wenn die Batterie
erschöpft ist. Ihre Videoaufnahme wird gespeichert bevor sich die Kamera ausschaltet.
BILDMODUS
Drücken Sie wiederholt die Taste Ein/Aus/Modus, um in den Bildmodus zu gelangen.
Das Bildsymbol erscheint am LCD Bildschirm.
Um ein Bild zu machen:
Drücken Sie den Auslöser/Auswahltaste. Es ertönt ein Kamera Verschluss-Ton als
Anzeichen dass ein Bild gemacht wurde.
SCHNAPPSCHUSS-MODUS
Drücken Sie wiederholt die Taste Ein/Aus/Modus, um in den Schnappschuss-
Modus zu gelangen. Das Schnappschuss-Symbol erscheint am LCD Bildschirm. Im
Schnappschuss-Modus, kann Ihre Kamera 3 Bilder in 1,5 Sekunden aufnehmen.
Um eine Schnappschuss-Bildserie zu machen:
Drücken Sie den Auslöser/Auswahltaste. Es ertönen Kamera Verschluss-Töne als
Anzeichen dass eine Bildserie gemacht wurde.
ZEITRAFFER-MODUS
Drücken Sie wiederholt die Taste Ein/Aus/Modus, um in den Zeitraer-Modus zu
gelangen. Das Zeitraer-Symbol erscheint am LCD Bildschirm. Im Zeitraer-Modus,
kann Ihre Kamera eine Serie von Bildern im Zeitraum von 2,3,5,10,20,30 oder 60
Sekunden aufnehmen.
Um eine Zeitraer-Bildserie zu machen:
Drücken Sie den Auslöser/Auswahltaste. Es ertönt ein Kamera Verschluss-Ton bei jedem Bild.

8
Bedienungsanleitung
DE
WIEDERGABE
Um in das Wiedergabe-Menü zu gelangen:
1. Stelen Sie sicher dass die Kamera sich im Kameramodus bendet.
2. Drücken Sie die Taste Aufwärts/Wiedergabe um in das Wiedergabe-Menü zu
gelangen.
3. Drücken Sie wiederholt die Taste Ein/Aus/Modus, um durch Bilder und Videos
zu blättern.
4. Drücken Sie den Auslöser/Auswahltaste um die gewünschte Option
auszuwählen.
5. Benutzen Sie die Taste Aufwärts/Wiedergabe oder Abwärts/Wi-Fi um durch
die verschiedenen Optionen zu blättern.
6. Drücken Sie den Auslöser/Auswahltaste.
7. Drücken Sie die Taste Ein/Aus/Modus, um zum Wiedergabemenü
zurückzukehren.
8. Um das Menü zu verlassen, drücken und halten Sie die Taste Aufwärts/
Wiedergabe gedrückt für 2 Sekunden.
SPEICHER/MIKRO SD KARTEN
Diese Kamera ist kompatibel mit den 16 GB und 32 GB Mikro SD Speicherkarten
(Klasse 10 Wertung). Hersteller empehlt für maximale Zuverlässigkeit und
Datensicherheit Markennamen-Speicherkarten zu verwenden.
BATTERIE
Batterie auaden
1. Verbinden Sie die Kamera mit einem Computer oder USB Stromversorgung.
2. Die LED Betriebsanzeige leuchtet ständig während des Ladevorgangs.
3. Wenn die Batterie voll aufgeladen ist, erlischt die LED Betriebsanzeige.
KAMERA APP
Verbinden mit der EZ iCam (4K & 2.7K nicht unterstützt)
Die EZ iCam Anwendung, ermöglicht die Fernsteuerung Ihrer Kamera mit Hilfe
eines Smartphones oder Tablett. Die Merkmale sind volle Kamerakontrolle,
Echtzeitvorschau, Bildwiedergabe und gemeinsame Nutzung von ausgesuchtem
Inhalt und anderes.
1. Scannen Sie den QR-Code auf der rechten Seite
um EZ iCam auf Ihrem Smartphone oder Tablett
von Google Play / Apple Store herunterzuladen.
2. Drücken Taste Ein/Aus/Modus, um die Kamera
einzuschalten.
3. Stellen Sie sicher, dass sich die Kamera im
Kamera-Modus bendet.
4. Drücken Sie die Taste Abwärts/Wi-Fi um Wi-Fi*
einzuschalten.
5. Schalten Sie die Wi-Fi Funktion auf dem
Smartphone / Tablett ein und stellen eine

9
Bedienungsanleitung
DE
Verbindung mit dem Gerätenetzwerk (ICAM-H9 (R)) her.
6. Geben Sie das Passwort “1234567890” ein.
7. Önen Sie die heruntergeladene App auf Ihrem Smartphone oder Tablett, um
die Kamera zu steuern.
* Drücken und halten der Taste Abwärts/Wi-Fi für 3 Sekunden um Wi-Fi auszuschalten.
Hinweis:
• Bitte beachten Sie, dass die App zur Bedienung des Gerätes nicht mit jedem
Smartphone und Tablett kompatibel sein kann.
• Kompatibilität variiert je nach Gerät. Die Wiedergabe des Inhalts, die gemeinsame
Nutzung und den Zugri auf die Speicherkarte der Kamera kann bei einigen
Geräten nicht zur Verfügung stehen.
TECHNISCHE DATEN
Bildsensor OV4689
Display 2” Full HD LCD (320x240 Px)
Maximale Bildauösung 12 Mpix (4608x2592 Px)
Bildformat JPEG
Maximale Videoauösung 4K / 25 fps (3840x2160 Px)
Videoformat MOV / H.264
Linsen 170º Weitwinkellinsen
Bildaufnahmemodus Einzelbild/Schnappschuss/Zeitraer
Aufnahmezeit (4K) Bis zu 50 Min.
Speicher Mikro SD Karte 16-32 GB (Klasse 10)
Anschlüsse Mikro USB, Mikro HDMI, Wi-Fi
Wasserdicht Bis zu 30 Meter
Batterie 1050 mAh
Betriebstemperatur 0 ~70°C

10
Bedienungsanleitung
DE
Deutsch
Korrekte Entsorgung dieses Produkts
(Elektromüll)
(Anzuwenden in den Ländern der Europäischen Union und anderen europäischen
Ländern mit einem separaten Sammelsystem)
Die Kennzeichnung auf dem Produkt bzw. auf der dazugehörigen Literatur
gibt an, dass es nach seiner Lebensdauer nicht zusammen mit dam normalen
Haushaltsmüll entsorgt werden darf. Entsorgen Sie dieses Gerät bitte getrennt
von anderen Abfällen, um der Umwelt bzw. der menschilchen Gesundheit nicht
durch unkontrollierte Müllbeseitigung zu schaden. Recyceln Sie das Gerät,
um die nachhaltige Wiederverwertung von stoichen Ressourcen zu fördern.
Private Nutzer sollten den Händler, bei dem das Produkt gekauft wurde, oder die
zuständigen Behörden kontaktieren, um in Erfahrung zu bringen, wie sie das Gerät
auf umweltfreundliche Weise recyceln können. Gewerbliche Nutzer sollten sich an
Ihren Lieferanten wenden und die Bedingungen des Verkaufsvertrags konsultieren.
Dieses Produkt darf nicht zusammen mit anderem Gewerbemüll entsorgt werden.
Vertrieben durch LECHPOL Electronics BV, Nijverheidsweg 15 4311RT Bruinisse,
Niederlande.
Die Spezikationen können ohne Ankündigung geändert werden.
“Hiermit erklär die Firma Lechpol dass sich das Gerät KM0197 im Einklang mit den
grundlegenden Anforderungen und anderen relevanten. Bestimmungen der Richtlinie
1999/5/EG bendet. Konformitätserklärung zum Download auf www.lechpol.eu”

Owner’s manual
EN
11
SAFETY INSTRUCTIONS
1. Read this manual before rst use and keep it for future reference.
2. Do not expose the product to extreme temperatures or direct sunlight.
3. Keep the device in cool, dry and dust-proof place.
4. Turn o the device before removing the memory card. The card and the data may
be damaged if the memory card is inserted or removed while the device is still on.
5. Do not alter or dismantle the device yourself. Any repairs can be carried out in
an authorized service point exclusively.
GETTING STARTED
To power ON:
Press the Power/Mode button.
To power OFF:
Press and hold the Power/Mode button.
OVERVIEW
Turn camera ON and repeatedly press the Power/Mode button to cycle through camera
modes and settings. The modes will appear in following order: Video (video recording) >
Photo (capture a single photo) > Burst photo (capture photo bursts) > Time lapse (shoot a
series of photos at set time intervals) > Video Playback / Photo playback / Settings.
SETTINGS
Press the Shutter/Select button to enter the settings menu. Repeatedly press the
Power/Mode button to cycle through options and press the Shutter/Select button
to select desired option. Or use the Up/Playback or Down/Wi-Fi Button to cycle
through the various options.
Video Resolution: 4K25/2.7K30/1080p60/1080p30
MicroSD card 4K25/2.7k30 1080p60 1080p30
32 GB 60 mins 120 mins 240 mins
16 GB 30 mins 60 mins 120 mins
Looping Video: O/On (4K and 2.7K not supported); Time Stamp: O/Date/Date
& Time; Exposure: +-2.0/+-1.7/+-1.3/+-1.0/+-0.7/+-0.3/0; Photo Resolution: 12 M/8
M/5 M/4 M; Burst Photo: 3 Photos; Time Lapse: 2 s/3 s/5 s/10 s/20 s/30 s/60 s;
Continuous Lapse: O/On; Language: multilanguage OSD; Date & Time: MM/DD/
YY, DD/MM/YY or YY/MM/DD; Sound Indicator: Shutter On/O, Start Up 1/2/3/
None, Beep On/O, Volume 0/1/2/3; Upside Down: On/O; Screen Saver: O/l
min/3 min/5 min; Power Saver: O/l min/3 min/5 min; Format; Reset; Version

Owner’s manual
12
EN
VIDEO MODE
Repeatedly press the Power/Mode button to enter video mode. The video icon will
be displayed on the LCD screen.
To start recording:
Press the Shutter/Select button. The camera will emit one beep and the LED
control light will ash while recording.
To stop recording:
Press the Shutter/Select button. The LED control light stops ashing and the
camera emits one beep to indicate recording has stopped.
This camera automatically stops recording when the battery is out of power. Your video
recordings will be saved before the camera powers OFF.
PHOTO MODE
Repeatedly press the Power/Mode button to enter photo mode. The photo icon will
be displayed on the LCD screen.
To take a photo:
Press the Shutter/Select button. The camera will emit the shutter sound to indicate
the photo has been taken.
BURST PHOTO MODE
Repeatedly press the Power/Mode button to enter Burst photo mode. The Burst
photo icon will be displayed on the LCD screen. In Burst Photo mode, your camera
takes 3 photos in 1.5 seconds.
To take a Burst Photo series:
Press the Shutter/Select Button. The camera will emit camera shutter sounds to
indicate the photo series has been taken.
TIME LAPSE MODE
Repeatedly press the Power/Mode button to enter Burst photo mode. The Time
Lapse icon will be displayed on the LCD screen. In Time Lapse mode, your camera
captures a series of photos at 2,3,5,10,20,30 or 60 second intervals.
To take Time Lapse:
Press the Shutter/Select button. The camera initiates countdown and emits the
camera shutter sound each time a Photo is taken.
PLAYBACK
To enter the Playback menu:
1. Make sure the camera is in Camera modes.

Owner’s manual
EN
13
2. Press the Up/Playback button to enter the Playback menu.
3. Repeatedly press the Power/Mode button to cycle through Videos and Photos.
4. Press the Shutter/Select button to select desired option.
5. Use Up/playback button or Down/Wi-Fi button to cycle through the various
options.
6. Press the Shutter/Select button.
7. To return to the Playback menu, press the Power/Mode button.
8. To exit, press and hold down the Up/Playback button for two seconds.
STORAGE/MICROSD CARDS
This camera is compatible with 16 GB and 32 GB microSD memory cards (class 10
rating). Producer recommends using brand name memory cards for maximum
reliability and data security.
BATTERY
Charging the battery
1. Connect the camera to a computer or USB power supply.
2. The LED control light will remain ON while charging.
3. The LED control light will turn OFF when the battery is fully charged.
CAMERA APP
Connecting to the EZ iCam (4K & 2.7K not supported)
The EZ iCam app lets you control your camera remotely using a smartphone
or tablet. Features include full camera control, live preview, photo playback and
sharing of select content and more.
1. Scan the QR code on the right to download the EZ iCam on your smartphone
or tablet from Google Play/Apple Store.
2. Press the Power/Mode button to power camera ON.
3. Make sure the camera is in Camera modes.
4. Press the Down/Wi-Fi button to turn on Wi-Fi*.
5. Turn the Wi-Fi function ON on your
smartphone/tablet, and connect to the device
network (ICAM-H9(R)).
6. Enter the password “1234567890”.
7. Open the downloaded app on your
smartphone or tablet to operate the camera.
* Press and hold the Down/Wi-Fi button for three
seconds to turn OFF Wi-Fi.
Note:
• Please note, the app to operate the device may not be compatible with every
smartphone and tablet.
• Compatibility varies by device. Content playback, sharing and access to the
camera's memory card might be not available on some devices.

Owner’s manual
14
EN
SPECIFICATION
Image sensor OV4689
Display 2” Full HD LCD (320x240 px)
Maximum image resolution 12 Mpix (4608x2592 px)
Image format JPEG
Maximum video resolution 4K / 25 fps (3840x2160 px)
Video format MOV / H.264
Lens 170º wide angle lens
Shooting mode Single shot / burst photo / time lapse
Recording time (4K) up to 50 min.
Memory MicroSD card 16-32 GB (class 10)
Connection Micro USB, HDMI, Wi-Fi
Water resistant up to 30 meters
Battery 1050 mAh
Working temperature 0~70°C
English
Correct Disposal of This Product
(Waste Electrical & Electronic Equipment)
(Applicable in the European Union and other European countries with separate
collection systems) This marking shown on the product or Its literature, indicates
that It should not be disposed with other household wastes at the end of its
working life. To prevent possible harm lo the environment or human health from
uncontrolled waste disposal, please separate this from other types of wastes and
recycle it responsibly to promote the sustainable reuse of material resources.
Household users should contact either the retailer where they purchased this
product, or their local government oce, for details of where and how they can take
this item for environmentally safe recycling. Business users should contact their
supplier and check the terms and conditions of the purchase contract This product
should not be mixed with other commercial wastes for disposal.
Made in China for LECHPOL, Miętne, 1 Garwolińska Street, 08-400 Garwolin.
Specications are subject to change without prior notice.
“The Lechpol company declares that product KM0197 is consistent with the
essential requirements and other relevant provisions of directive 1999/5/EC. The
proper declaration for download from www.lechpol.eu”

PL
Instrukcja obsługi
15
KWESTIE BEZPIECZEŃSTWA
1. Przed użyciem należy dokładnie zapoznać się z treścią instrukcji obsługi oraz
zachować ją w celu późniejszego wykorzystania.
2. Urządzenie należy chronić przed źródłami ciepła oraz bezpośrednim nasłonecznieniem.
3. Urządzenie należy przechowywać w suchym, chłodnym i pyłoszczelnym miejscu.
4. Przed wyjęciem karty pamięci należy wyłączyć urządzenie. W przeciwnym
wypadku, dane zapisane na karcie mogą zostać uszkodzone/usunięte.
5. Zabrania się własnoręcznej naprawy sprzętu. W wypadku uszkodzenia, należy oddać
urządzenie do autoryzowanego punktu serwisowego w celu sprawdzenia/naprawy.
PIERWSZE KROKI
Włączanie:
Aby włączyć urządzenie, należy nacisnąć przycisk zasilania/zmiany trybu.
Wyłączanie:
Aby wyłączyć urządzenie, należy nacisnąć i przytrzymać przycisk zasilania/zmiany trybu.
OPIS
Aby wyświetlić tryby i ustawienia, należy włączyć urządzenie, a następnie kilkukrotnie
nacisnąć przycisk zasilania/zmiany trybu. Dostępne tryby w kolejności: Video
(nagrywanie video) > Photo (zrób zdjęcie) > Burst photo (seria zdjęć) > Time lapse (seria
zdjęć w określonych odstępach czasowych) > Settings (dostosuj ustawienia urządzenia).
Ustawienia
Aby przejść w Ustawienia, należy nacisnąć przycisk wyboru/spustu migawki.
Następnie kilkukrotnie nacisnąć przycisk zasilania/zmiany trybu, aby wyświetlić
kolejne opcje, oraz nacisnąć przycisk wyboru/spustu migawki, aby przejść w wybrane
ustawienia. Lub wyświetlać kolejne opcje za pomocą przycisków w górę / w dół.
Rozdzielczość video: 4K25/2.7K30/1080p60/1080p30
Karta microSD 4K25/2.7k30 1080p60 1080p30
32 GB 60 mins 120 mins 240 mins
16 GB 30 mins 60 mins 120 mins
Nagrywanie zapętlone: Wył./Wł. (nie obsługiwane w 4K i 2.7K); Stempel daty: Wył./
Data/Data i czas; Ekspozycja: +-2.0/+-1.7/+-1.3/+-1.0/+-0.7/+-0.3/0; Rozdzielczość
zdjęć: 12 M/8M/5M/4M; Seria zdjęć: 3 zdjęcia; Sekwencja zdjęć w odstępach czasu:
2s/3s/5s/10s/20s/30s/60s; Ciągła sekwencja w odstępach czasu: Wył./Wł; Język:
wielojęzykowe menu; Data i czas: MM/DD/YY, DD/MM/YY lub YY/MM/DD; Dźwięk:
Migawka wł./wył.; Dźwięk startowy 1/2/3/Brak; Beep wł./wył.; Głośność 0/1/2/3;

Instrukcja obsługi
16
PL
Obrót ekranu: wł./wył.; Wygaszacz ekranu: wył./1 min/2min/3min; Oszczędzanie
energii: wył./1min/3min/5min; Format; Ustawienia fabryczne; Wersja
TRYB VIDEO
Aby przejść w tryb video, należy kilkukrotnie naciskać przycisk zasilania/zmiany
trybu. Na ekranie wyświetli się ikona kamery.
Aby rozpocząć nagrywanie:
Należy nacisnąć przycisk wyboru/spustu migawki. Urządzenie wyda sygnał
dźwiękowy, a kontrolka LED będzie migać podczas nagrywania.
Aby zakończyć nagrywanie:
Należy nacisnąć przycisk wyboru/spustu migawki. Kontrolka LED przestanie migać,
a urządzenie wyda sygnał dźwiękowy sygnalizujący zakończenie nagrywania.
Urządzenie automatycznie przerywa nagrywanie, jeśli bateria jest wyczerpana.
Nagrania zostaną zapisane przed wyłączeniem kamery.
TRYB ZDJĘĆ
Aby przejść w tryb zdjęć, należy kilkukrotnie naciskać przycisk zasilania/zmiany
trybu. Na ekranie wyświetli się ikona aparatu.
Aby wykonać zdjęcie:
Należy nacisnąć przycisk wyboru/spustu migawki. Urządzenie wyda dźwięk
migawki sygnalizujący wykonanie zdjęcia.
TRYB SERII
Aby przejść w tryb serii zdjęć, należy kilkukrotnie naciskać przycisk zasilania/zmiany
trybu. Na ekranie wyświetli się ikona serii zdjęć. W tym trybie, urządzenie wykonuje
3 zdjęcia w ciągu 1,5 sekundy.
Aby wykonać serię zdjęć:
Należy nacisnąć przycisk wyboru/spustu migawki. Urządzenie wyda dźwięk migawki
sygnalizujący wykonanie serii zdjęć.
TRYB SERII ZDJĘĆ W ODSTĘPACH CZASU
Aby przejść w tryb serii zdjęć, należy kilkukrotnie naciskać przycisk zasilania/
zmiany trybu. Na ekranie wyświetli się ikona aparatu i zegara. W tym trybie,
urządzenie wykonuje serię zdjęć w odstępach 2,3,5,10,20,30 lub 60 sekund.
Aby wykonać serię zdjęć w odstępach czasu:
Należy nacisnąć przycisk wyboru/spustu migawki. Urządzenie rozpocznie
odliczanie oraz wyda dźwięk migawki za każdym razem, kiedy wykona zdjęcie.

PL
Instrukcja obsługi
17
ODTWARZANIE
Aby przejść w menu odtwarzania:
1. Należy upewnić się, że urządzenie jest w trybie kamery.
2. Aby przejść w menu odtwarzania, należy nacisnąć przycisk w górę/odtwarzanie.
3. Kilkukrotnie nacisnąć przycisk zasilania/wyboru trybu, aby wyświetlić nagrania i zdjęcia.
4. Nacisnąć przycisk wyboru/spustu migawki, aby wybrać żądaną opcję.
5. Za pomocą przycisków w górę / w dół można wyświetlić opcje.
6. Należy nacisnąć przycisk wyboru/spustu migawki.
7. Aby powrócić do menu Odtwarzania, należy nacisnąć przycisk zasilania/zmiany trybu.
8. Aby opuścić tę funkcję, należy nacisnąć i przytrzymać przez 2 sekundy
przycisk w górę/Odtwarzanie.
PRZECHOWYWANIE PLIKÓW/KARTA MICROSD
Urządzenie jest kompatybilne z kartami pamięci o pojemności 16 i 32 GB (klasa
10). Producent zaleca używanie autoryzowanych kart pamięci, w celu zwiększenia
bezpieczeństwa danych zawartych na karcie.
Bateria
Ładowanie
1. Należy podłączyć urządzenie do komputera lub ładowarki USB.
2. Kontrolka LED będzie się świecić podczas ładowania.
3. Po zakończonym ładowaniu, kontrolka LED zgaśnie.
APLIKACJA
Łączenie z EZ iCam (nie obsługiwane formaty 4K i 2.7K)
Aplikacja EZ iCam pozwala na zdalne sterowanie urządzeniem z poziomu smartfona lub
tabletu. Z poziomu aplikacji, użytkownik ma możliwość całkowitego sterowania kamerą,
podglądu na żywo, odtwarzania plików, udostępniania wybranej zawartości itd.
1. Zeskanuj kod QR po prawej, aby pobrać
aplikację EZ iCam na smartfona lub tablet ze
sklepu Google Play/Apple Store.
2. Następnie, naciśnij przycisk zasilania/zmiany
trybu, aby włączyć kamerę.
3. Należy upewnić się, że urządzenie jest w trybie kamery.
4. Naciśnij przycisk w dół/Wi-Fi, aby włączyć
łączność Wi-Fi*.
5. Włącz funkcję Wi-Fi na smartfonie/tablecie i
połącz z kamerą (ICAM-H9(R)).
6. Wpisz hasło: “1234567890”.
7. Uruchom pobraną aplikację na smartfonie lub
tablecie, aby sterować kamerą.
* Aby wyłączyć funkcję Wi-Fi, należy nacisnąć i przytrzymać przez 3 sekundy przycisk w dół/Wi-Fi.
Uwaga:
• Aplikacja może nie być kompatybilna ze wszystkimi smartfonami/tabletami.
• Kompatybilność aplikacji uzależniona jest od parametrów urządzenia. Funkcja odtwarzania,
udostępniania oraz wgląd w kartę microSD może nie być dostępny na niektórych urządzeniach.

Instrukcja obsługi
18
PL
SPECYFIKACJA
Sensor OV4689
Wyświetlacz 2” Full HD LCD (320x240 px)
Maksymalna rozdzielczość zdjęć 12 Mpix (4608x2592 px)
Format zdjęć JPEG
Maksymalna rozdzielczość video 4K / 25 fps (3840x2160 px)
Format video MOV / H.264
Obiektyw 170º szerokokątny
Tryb zdjęć pojedyncze zdjęcie/seria/seria w odstępach czasu
Czas nagrywania (4K) do 50 min
Pamięć karta microSD 16-32 GB (klasa 10)
Interfejs Micro USB, microHDMI, Wi-Fi
Wodoszczelność do 30 metrów
Bateria 1050 mAh
Temperatura pracy 0~70°C
Specykacja produktu może ulec zmianie bez powiadomienia.
„Niniejszym rma Lechpol oświadcza, że urządzenie KM0197 jest zgodne z
zasadniczymi wymaganiami oraz innymi stosownymi postanowieniami dyrektywy
1999/5/WE. Właściwa deklaracja do pobrania na stronie www.lechpol.eu”
Poland
Prawidłowe usuwanie produktu
(zużyty sprzęt elektryczny i elektroniczny)
Oznaczenie umieszczone na produkcie lub w odnoszących się do niego tekstach
wskazuje, że po upływie okresu użytkowania nie należy usuwać z innymi odpadami
pochodzącymi z gospodarstw domowych. Aby uniknąć szkodliwego wpływu na
środowisko naturalne i zdrowie ludzi wskutek niekontrolowanego usuwania odpadów,
prosimy o oddzielenie produktu od innego typu odpadów oraz odpowiedzialny
recykling w celu promowania ponownego użycia zasobów materialnych jako stałej
praktyki. W celu uzyskania informacji na temat miejsca i sposobu bezpiecznego dla
środowiska recyklingu tego produktu użytkownicy w gospodarstwach domowych
powinni skontaktować się z punktem sprzedaży detalicznej, w którym dokonali
zakupu produkt, lub z organem władz lokalnych Użytkownicy w rmach powinni
skontaktować się ze swoim dostawcą i sprawdzić warunki umowy zakupu. Produkt
nie należy usuwać razem z innymi odpadami komercyjnymi.
Wyprodukowano w CHRL dla LECHPOL Zbigniew Leszek, Miętne ul. Garwolińska 1,
08-400 Garwolin.

Manual de utilizare
RO
19
INSTRUCTIUNI PRIVIND SIGURANTA
1. Cititi manualul cu atentie inainte de a folosi aparatul si pastrati-l pentru referinte ulterioare.
2. Nu expuneti aparatul la lumina directa a razelor solare sau la temperaturi ridicate.
3. Păstrați aparatul intr-un loc răcoros si uscat.
4. Opriți dispozitivul înainte de a scoate cardul de memorie. Cardul și datele se pot
deteriora dacă este introdus sau scos în timp ce dispozitivul este in functionare,
cu cardul de memorie in uz.
5. In cazul în care aparatul prezinta o funcționare defectuoasă sau prezinta anomalii
in functionare, opriti aparatul si contactati imediat un centru de service autorizat.
UTILIZARE
Pentru pornire
Apasati butonul Pornire/Mod.
Pentru oprire
Apasati si tineti apasat butonul Pornire/Mod.
PREZENTARE
Porniți aparatul foto și apăsați în mod repetat butonul Power/Mode pentru a parcurge
modurile și setările camerei foto. Modurile vor apărea în următoarea ordine: Video
(inregistrare video) > Photo (fotograe) > Burst photo (poze in rafala) > Time lapse
(efectuare fotograe dupa un interval de timp setat) > Setari (reglare setari de camera).
SETARI
Apăsați butonul Shutter/Select pentru a intra în meniul de setări. Apasati in mod
repetat butonul Power / Mode pentru a parcurge opțiunile și apăsați butonul
declanșator pentru a selecta opțiunea dorită, sau utilizati butonul Sus/Redare sau
Jos/Wi-Fi pentru a selecta optiunea dorita.
Rezolutie video: 4K25/2.7K30/1080p60/1080p30
MicroSD card 4K25/2.7k30 1080p60 1080p30
32 GB 60 min 120 min 240 min
16 GB 30 min 60 min 120 min
Inregistrare video in mod repetat: Oprire/Pornire (4K si 2.7K nu sunt suportate);
Time Stamp (marcare data si ora pe inregistrare): Oprire/Data/Data si Timp Exposure
(expunere): +-2.0/+-1.7/+-1.3/+-1.0/+-0.7/+-0.3/0 Rezolutie poza: 12 M/8 M/5 M/4 M;
Burst Photo (poze in rafala): 3 poze Time Lapse: 2 s/3 s/5 s/10 s/20 s/30 s/60 s Continuous
Lapse: Oprire/Pornire Limba: multilingual OSD Data & Timp: LL/ZZ/AA, ZZ/LL/AA sau
AA/LL/ZZ Indicator Sunet: Shutter Pornire/Oprire, Start Up 1/2/3/None, Beep Pornire/

Manual de utilizare
20
RO
Oprire, Volum 0/1/2/3 Upside Down: Pornire/Oprire Screen Saver: Oprire/l min/3 min/5
min Power Saver: Oprire/l min/3 min/5 min Format Resetare Versiune
INREGISTRARE VIDEO
Pentru a înregistra video, apăsați în mod repetat butonul Power / Mod pentru a
intra în modul video. Pictograma video va așată pe ecranul LCD.
Pentru a incepe inregistrarea:
Apasati butonul Shutter/Select. Camera foto va emite un semnal sonor, iar lumina
de control cu LED-uri va clipi în timpul înregistrării.
Pentru a opri inregistrarea:
Apasati butonul Shutter/Select. Lumina de control cu LED-uri nu mai clipește și
aparatul foto emite un semnal sonor pentru a indica faptul ca înregistrarea s-a oprit.
Acest aparat foto se oprește automat înregistrarea atunci când bateria este descarcata.
Înregistrările video vor salvate înainte ca aparatul foto sa se opreasca.
FOTOGRAFIERE
Pentru fotograere, apăsați în mod repetat butonul Power / Mod pentru a intra în
modul foto. Pictograma foto va așată pe ecranul LCD.
Pentru a face o fotograe:
Apasati butonul Shutter/Select. Camera va emite un sunet pentru a indica fotograa
a fost efectuata.
MOD FOTOGRAFIERE CONTINUA
Pentru fotograere continua, apăsați în mod repetat butonul Power / Mod pentru
a intra în modul fotograere continua. Pictograma FOTO BURST va așată pe
ecranul LCD. In modul Foto Burst Photo, camera face 3 fotograi in 1,5 secunde.
Pentru a face fotograi successive:
Apasati butonul Shutter/Select. Camera va emite un sunet pentru a indica faptul ca
fotograa a fost efectuata.
MOD TIME LAPSE
Pentru a captura o serie de fotograi in modul time lapse, apăsați în mod repetat
butonul Pornire / Mod pentru a intra în modul fotograe Burst. Pictograma Time
Lapse va așată pe ecranul LCD. In modul foto Time Lapse, camera face o serie de
fotograi la interval de la 2, 3, 5,10,20,30 sau 60 de secunde.
PLAYBACK (REDARE)
Pentru a intra in meniul Playback:
1. Asigurați-vă că aparatul este în modul Camera.
2. Apasati butonul Sus/Playback pentru a intra in meniul Playback.
3. Apasati in mod repetat butonul Pornire/Mod pentru a dela intre clipuri
Table of contents
Languages:
Other Kruger&Matz Action Camera manuals