KSIX BXBULB6011 User manual

SMARTLED
LED SMART BULB
User manual
BXBULB6011
Technical information
Base: E27
Type: A60
Power: 9W
Equivalent: 60W
Luminous flux: 806 lm
Colour: RGB + CCT (Warm White + Cool White)
Temperature: 3000K–6500K
Lifespan: 15,000h
Beam angle: 220º
CRI: RA≥80
Voltage: 220-240V/50-60hz
Connection: Bluetooth + WiFi
Voice Assistant: Amazon Echo and Google Home
App: TuyaSmart and Smart Life
Box contents
1 x Bulb
1 x User manual
1. Download the app
• To download the app, scan the QR code.
• You can also search the app in the App Store or Google Play.
2. Register
1. If you don't have an account in the App, sign up and then sign in with the verification
code.
2. Enter your email and click on “Get verification code”. Enter the verification code you will
receive in your email.
3. Set the password and press “Finished” to complete registration.

3. Add your device
1. First, turn on the Bluetooth and WiFi of your phone.
2. Open the app and tap “Add Device” or “+” in the top right corner.
3. Select your smart device from the list of devices or use automatic scanning to find it
directly.
4. Turn on the device and wait until it flashes, this way you are confirming and selecting
the type of flashing.
* If the device does not flash, restart it by following the steps detailed in the App: with the
device turned o, switch on, then switch o, switch on, switch o and switch on again
and the light will flash. In order for this process to be work, it should be done in less than
10 seconds. Confirm and select the type of flashing.
5. Next, select the 2.4 GHz WiFi network, enter the router password and wait while the app
finds the device. Once it has been added, tap “Finished”.
Note
1. To ensure a correct synchronization with your mobile, it is necessary to accept all the
accesses requested by the app.
2. To connect for the first time, it is necessary to be connected to a Wifi network. Make sure
that the light flashes quickly and that the WiFi password you entered is correct. (The
connection process may take several minutes, please be patient).
3. After the first connection, you can use a new WiFi or mobile data network to control the
device at any time and from any location.

4. Only compatible with 2.4 GHZ WLAN, Android 4.1 and above and IOS 8.1 and above. Do
not use 5G WiFi.
5. The first connection should be made close to the router to ensure a faster connection.
6. When connecting multiple devices to the WiFi network, do not put them too close
together as this may cause signal interference.
4. Control your device
After successful configuration, the device will be displayed on the "Devices" page. Tap on
the device icon to control its operation.
Selection of whites
• Go to the first tab on the main screen and tap on “White”. From here, you can select the
CCT white light you are looking for. Simply move your finger around the colour circle.
• You can also adjust the brightness from 1 to 100% using the bar at the bottom of the
screen.
• From the bottom of the App you can set the operating time slots, turn the lights on and
o and many more options.
• You will also be able to configure the synchronisation with your circadian rhythm.
• Circadian rhythms are all the physical and mental changes that respond to the light and
darkness present during the course of a day. Synchronising your lighting with your
biorhythms can help improve your quality of life, reduce stress and increase productivity.
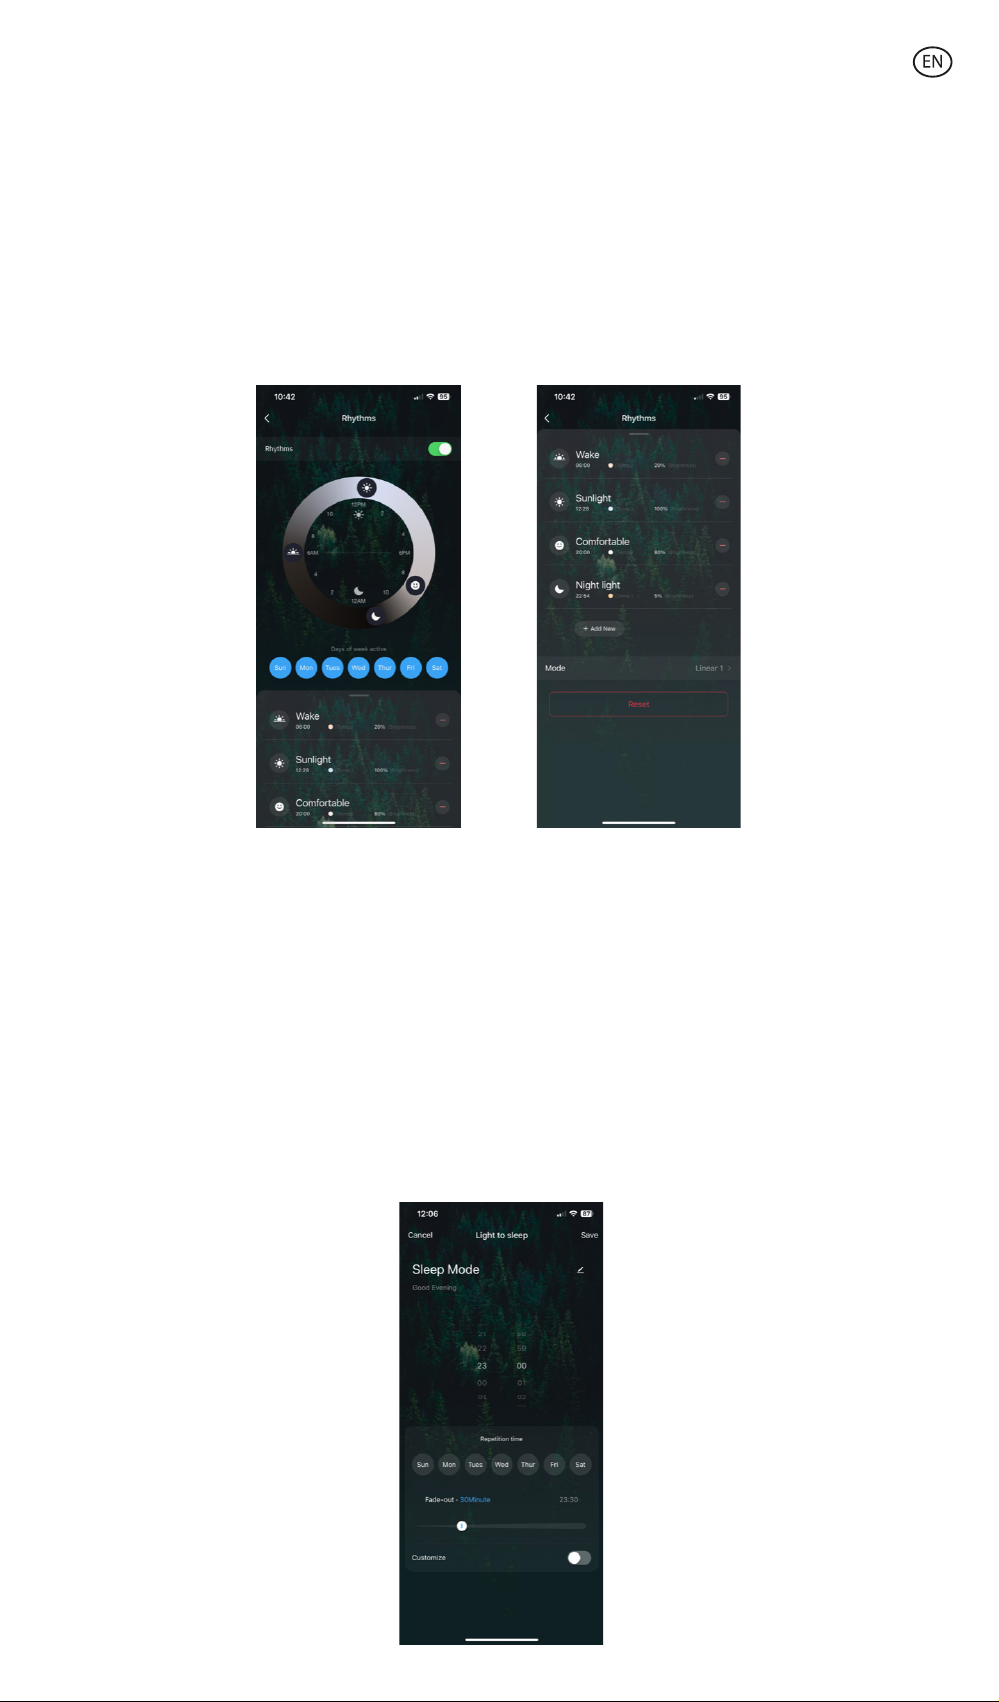
Rhythms
• To configure them, go to the bottom of the screen where the power button is located.
Then click on the button to the right.
• Then click on "Rythms" to access the settings screen.
• By activating the "Rythms" option, you can manually adjust the lighting for each time of
the day. Slide your finger across the circle to modify the time set for each moment of the
day. To adjust the brightness and temperature, slide up the bottom tab and click on each
of the icons representing them.
5. Planner
Sleep
• Go to the "Plan" screen and click on the "Add to" button. Click on "Sleep plan" to access
the settings screen. From there, you can set the time to turn o the light and the days of
the week on which this action will be repeated.
• Slide your finger across the bar to change the duration of the light switch-o. The
intensity of the light will decrease until it switches o completely at the desired time.
• By activating the "Customize" option you can choose the type of light and customise the
colour, saturation and brightness.
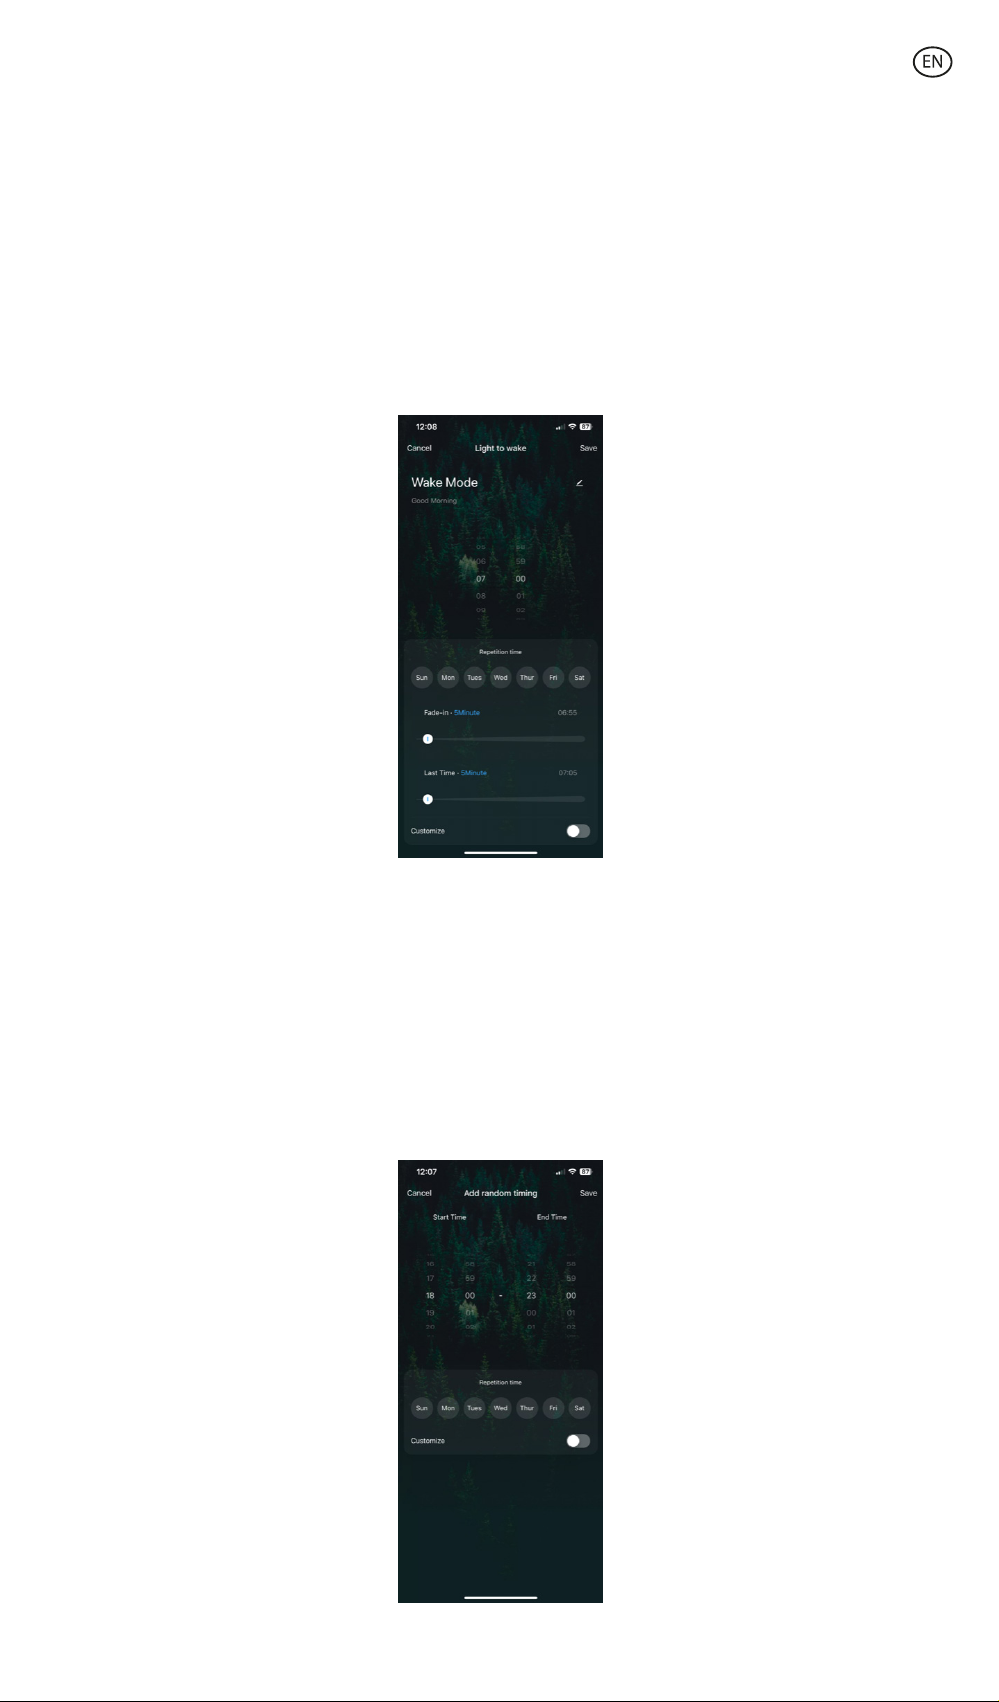
Wake up
• From the same menu you can adjust the switch-on time by clicking on "Wake up plan".
By sliding your finger on the "Fade-in" bar, you can change the duration of the light
switch-on time, which will help you to wake up in a natural way by gradually increasing
the intensity of the light.
• From the "Last Time" bar, you can set the time when the light bulb switches o.
• By activating the "Customize" option you can choose the type of light and customise the
colour, saturation and brightness.
Holidays ("Random timing")
• From the same menu you can access the "Random timing" function that allows you to
program the switch-on and switch-o time of the bulb simulating your presence.
• By activating the "Customize" option, you can choose the type of light and customise the
colour, saturation and brightness.
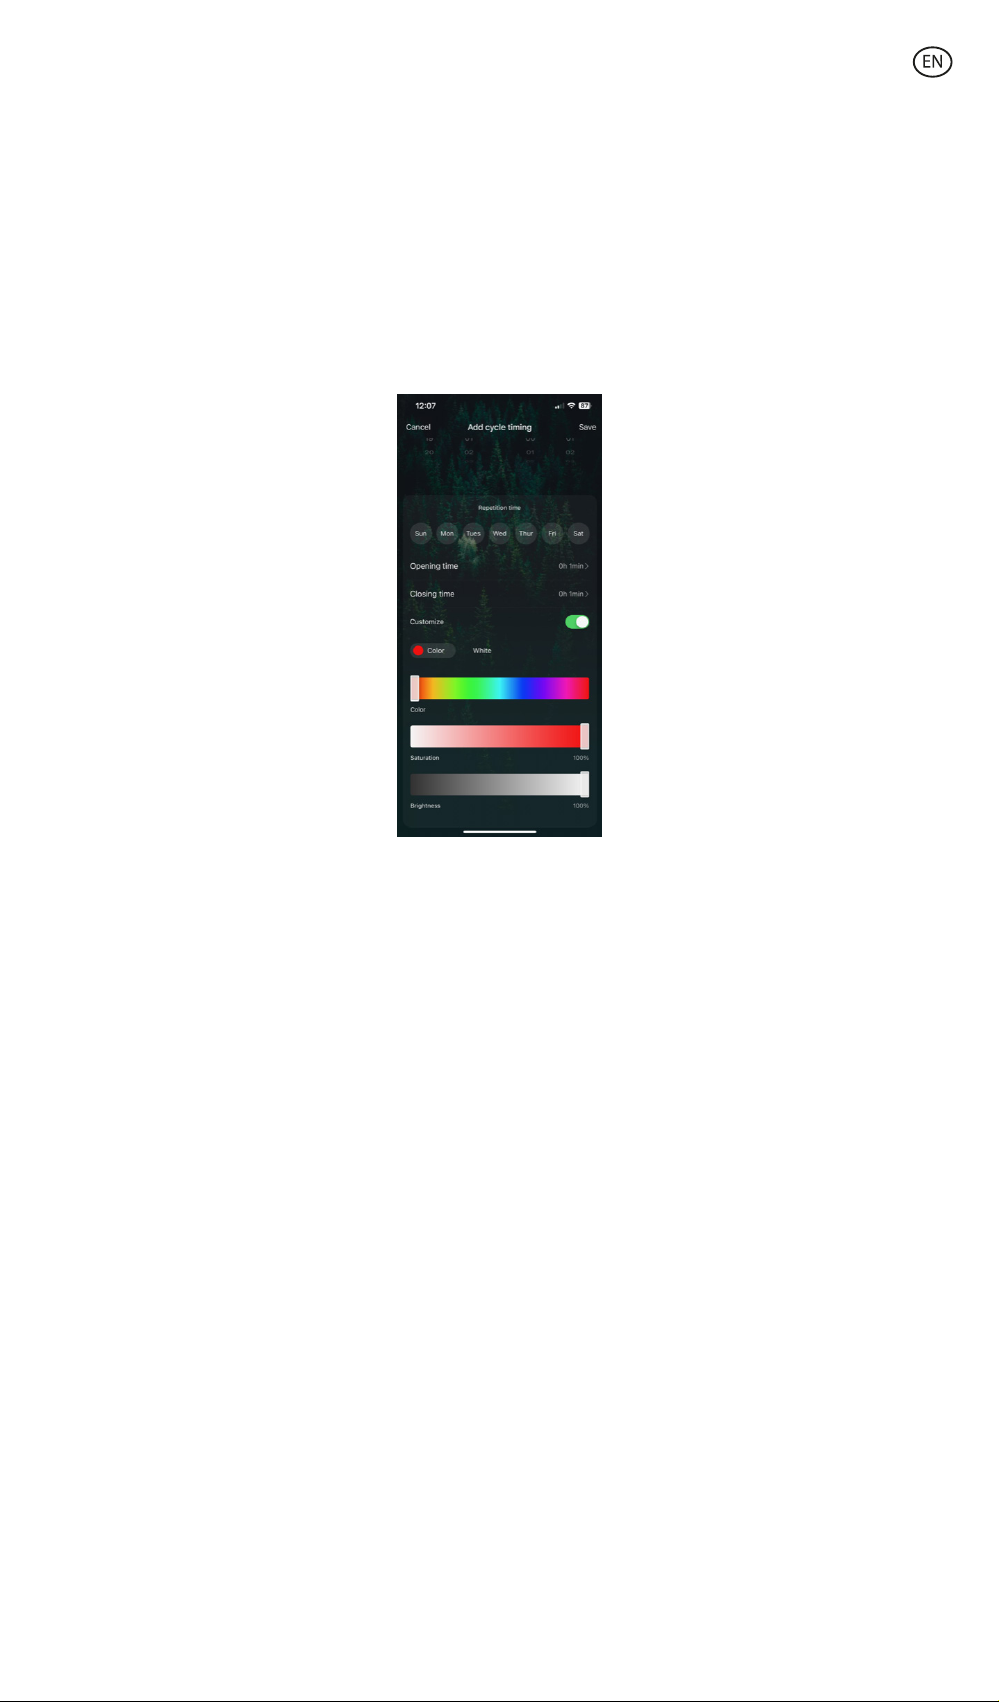
Cycle Timing
• You can also set operating time ranges for the bulb to switch-on or switch-o
automatically from the "Cyle timing" option. You can set the switch-on and switch-o
duration from the "Opening time" and "Closing time" option.
• By activating the "Customize" option you can choose the type of light and customise the
colour, saturation and brightness.
Colour selection
• Click on the "Colour" tab to choose from millions of options oered by the App. Simply
drag your finger to find the colour you are looking for.
• You can adjust the intensity and brightness using the two bars located below the colour
circle.
Scene modes
• To activate scene modes, you will need to tap on the “Scene” tab on the home screen,
located at the top of the screen.
• From here, you can choose between the dierent static and dynamic scene modes
provided by the App or create your own by tapping on the "Edit" tab in the upper right
corner.
• You can also program scene modes and set a plan by tapping on the dierent buttons at
the bottom.
Synchronization with music
• To get the light to follow the rhythm of the music in the room, you will need to tap on the
"Music Sync" section.
• Accept all the accesses requested by the App to allow the light to follow the rhythm of
the music by combining dierent lights, colours and eects.

6. Voice Assistants
• To set up your voice assistants through the app, you will need to tap on the top right
corner and then tap on the “Edit” icon.
• From here you can permit access to third parties to control the bulb, such as Alexa and
Google Home.
• You can adjust the brightness, change the colour, or simply turn the light on and o with
just a few words.
7. Device settings
• The App also allows you to configure other features of the bulb.
• To manage these other features, you will need to access the upper right corner and tap
on the "Edit" icon.

8. More about the App
You can adjust the dierent functions from the menu button at the top right corner of the
App.
1. The device name can be changed as desired.
2. Device information.
3. Tap-to-Run and Automation allows you to check the Intelligent Automation to which
your device is linked.
4. Supported third-party control provides information on how to connect your device with
Amazon Alexa, Google Assistant.
5. Disconnection notice: allows you to alert yourself when your device is oine.
6. Create “Group” to control another smart device at the same time.
7. FAQ & Feedback allows users to report issues and obtain assistance.
8. Add to Home Screen allows you to add the smart device to your smartphone's home
screen.
9. Check the network of the device to check the status of the network connection.
10. Firmware information allows you to check the software or install updates on the device.
11. Restore factory settings: Allows you to reset the factory settings of the smart device.

Maintenance recommendations
• Regularly clean the product with a dry cloth.
• The product must be disconnected or switched o when cleaned.
• Keep the connectors and/ or ports free from dust, lint, etc. to prevent improper
connections.
• Avoid breaking the device. Do not put objects over it or bend it too strong.
• If the product includes a cable do not bend it too strong and do not pull from it to
unplug the product.
• Do not wet the product.
• Keep it always in a dry place, away from humidity.
• When not using the product, store it in a place free from dust, dirt, lint, liquids, etc.
• If water enters the product interior, unplug it immediately from any attached power
source or device it is connected to.
• Avoid dropping or hitting the product. That might damage it.
• Do not use the product for anything other than its intended use.
• Please recycle the product in accordance with local environmental laws and regulations.
Safety information
Please read the following instructions before using the device for the first time:
• When you use device keep it away from heat sources (fire) and from humidity sources
(water and other liquids).
• Do not use the product if it is wet or damaged.
• Do not use the product with wet hands.
• Do not leave the product in contact with flammable materials.
• Do not expose the product to high temperatures (for example: inside a car during hot
weather).
• Do not throw the product into fire.
• Keep the product away from children.
• Disconnect or switch o the product if you are not going to use it for a long period of
time.
• Do not use the product if you perceive any visible defects.
• Do not attempt to open or puncture the product. You might damage it.
• Do not use the product with incompatible devices.
• Do not disassemble or modify the product. These actions will invalidate the Warranty.
Legal Note
Hereby, Atlantis Internacional S.L. declares that this product is in compliance with the
essential requirements and other relevant provisions of Directive 2014/53/EC. The features
and functions described in this manual are based on tests made by Atlantis Internacional
S.L. It is the user’s responsibility to examine and verify the product after its purchase.
Atlantis Internacional S.L. is not responsible and will never be liable for any personal loss or
injury, economical loss, material loss or any damage due to misuse, abuse or improper
installation of the product. Atlantis Internacional S.L. is not responsible and will never be
liable for any function, communication and connection failure between the product and
Bluetooth enabled devices.

Electronic and electrical devices disposal
This symbol indicates that electrical and electronic equipment is to be collected separately.
• This product is designated for separate collection at an appropriate collection point. Do
not dispose of as household waste.
• If the equipment uses batteries, they must be removed from the equipment and disposed
in an appropriate collection center. If the batteries cannot be removed, do not attempt to
do it yourself since it must be done by a qualified professional.
• Separate collection and recycling helps conserve natural resources and prevent negative
consequences for human health and the environment that might result from incorrect
disposal.
• The final price of this product includes the cost necessary for the correct environmental
management of the generated waste.
• For more information, contact the retailer or the local authorities in charge of waste
management.
Warranty: The 3-year warranty does not apply to products with consumable parts or parts
subject to wear, except for defects in materials or manufacturing.
Table of contents
Languages:
Other KSIX Home Lighting manuals


