Kuberg Challenger User manual

A word about this
safety manual
DEAR KUBERG CUSTOMER
Congratulations on your purchase of a KUBERG Challenger. You now own a state of the
art electric motorcycle that will give you endless thrills if you maintain it properly. We
welcome you to the community of KUBERG riders.
Your KUBERG Challenger is a performance motorcycle that should be treated with
caution and used in safe environments. The Challenger is highly adjustable and can be
set up specifically for the rider. Please do not allow the motorcycle to be used or adjusted
by other operators.
Your KUBERG Challenger is driven by a powerful electric motor, which requires experience
and careful handling. The speed and torque settings MUST be set to suit the abilities
of the rider. Please remember that even when the torque setting is set to a slow setting,
the torque on these motors is virtually instant. This means that opening the throttle
will propel the motorcycle to a rapid speed almost instantly. For developing good riding
skills this is a wonderful feature, as it will teach riders throttle control gradually with lower
power. If the maximum power and torque is set too aggressively, the rider may accelerate
to a speed he/she is not comfortable with. Your Challenger has great capabilities and
can grow with the skills of the rider to very high levels of performance, but it is important
to start slow and speed up as you improve.
KUBERG motorcycles (except the KUBERG Freerider Street) are designed for o road use
only and must not be used on public roads or sidewalks. Please check and obey all local
and state laws. KUBERG motorcycles should only be ridden in safe areas where all laws
are being followed and all required permissions are given.
KUBERG motorcycles are amazingly capable and can be used from the earliest stages
of learning to ride all the way through to veteran riders. The secret of learning to ride
well is to be able to ride a lot, and KUBERG motorcycles make this learning process very
gratifying for teenagers and adults alike. Thanks again for purchasing a KUBERG
motorcycle, and we hope you enjoy the ride!
Michal Kubanek
President, KUBERG s.r.o.
KUBERG s.r.o.
Zengrova 630/83
703 00 Ostrava – Vitkovice
Czech Republic
www.kuberg.com
2 CHALLENGER - OWNER‘S MANUAL 3

A word about this safety manual 3
Important symbols and terms 6
Safety advice 7
Electric drivetrain 7
Safe riding practices 8
Motorcycle overview 10
Specifications – 2021 KUBERG Challenger 11
Before first ride 12
Unpacking and assembly 12
First setup 13
Break-in period 13
Motorcycle controls 14
Setting up your KUBERG Challenger for riding 15
Setting power & torque modes 15
Drive train 18
Adjusting chain tension 17
Motor performance 17
Weather eects on performance 17
Maintenance 18
Before each ride 19
Cleaning 19
Front wheel removal and installation 20
Rear wheel removal and installation 21
Front and rear brake adjustment 21
Brake squeal 22
Adjusting the suspension 22
Battery use, care and maintenance 24
Charging instructions 25
Battery removal and installation 26
Short term and long term storage 27
Battery disposal 27
Riding instructions & safety tips (beginner riders) 28
First ride (novice riders) 28
Learning to stand up 28
Correct riding technique 29
Protective equipment 30
Helmets 30
Clothing 30
Accessories 31
Limited warranty 32
Table of contents

Introduction
PLEASE READ THIS SAFETY INSTRUCTION MANUAL PRIOR TO OPERATION!
To ensure optimum performance from your new KUBERG motorcycle and to ensure safe
operation, it is important to fully understand the features of the motorcycle. This manual
contains IMPORTANT INFORMATION that every owner must fully understand. Please read
this manual carefully and completely before operating your KUBERG motorcycle. Do not
attempt to operate the motorcycle until you have attained adequate knowledge of its
controls and operating properties and until you have received training in proper and safe
riding techniques.
Motorcycles generally, as well as KUBERG electric motorcycles, are single–track vehicles.
The safe use and operation of such single–track vehicles depend on proper riding
techniques and the experience of their riders (operators).
Please read, understand and follow all Warning, Caution and Note notices on your
KUBERG electric motorcycle and those included in this Manual. If you do not understand
any of this important information, please contact your selling dealer/distributor or the
KUBERG Customer Service Department (Email: kuberg@kuberg.com, phone:
+420 608 757 353)
Prop 65 WARNING
CALIFORNIA PROPOSITION 65 WARNING: accessories contain lead and lead
compounds, chemicals known to the State of California to cause cancer and
reproductive harm. Batteries also contain chemicals known to the State of California
to cause cancer. Wash hands after handling.
Important symbols and terms
This Owner’s Manual uses the following symbols and terms to call your attention to
Warnings, Cautions and Notes:
WARNING!
A Warning indicates a potentially hazardous situation, which if not avoided, could
result in bodily injury or death, in addition to the damage of the property. Read the text
accompanying the warning to be aware of the specific hazard.
CAUTION!
A Caution indicates a potentially hazardous situation, which if not avoided, may result in
damage to equipment or an inadvertent system failure. Read the text accompanying the
Caution to be aware of the specific hazard and to avoid damage or system failure.
NOTE:
The text accompanying a Note provides helpful or other important related information.
Safety advice
WARNING!
Failure to obey all of the warnings & instructions contained in this manual may result in
serious injury or death and/or permanent damage to your KUBERG motorcycle.
Speed & torque settings
Your KUBERG Challenger features a power and torque control button that must be set
for the abilities of the rider. This must be set by the responsible supervising adult before
each and every ride. Instructing and practicing in a controlled situation will allow the rider
to learn how to operate the motorcycle safely. Go to page 16 to find detailed instructions
on how to set up the dierent torque modes.
WARNING! ADULT SUPERVISION REQUIRED
This vehicle must be used in the presence of adult supervision to ensure that safe riding
practices are established and followed. Even though teenagers are of the recommended
age to use this vehicle, not all teenagers have the strength, skills or judgment needed
to operate this vehicle safely. Parents should permit continued use of this vehicle only if
they determine that their child or teenager has the ability and judgment to operate the
vehicle safely.
WARNING! OFFROAD USE ONLY
KUBERG motorcycles are designed primarily for OFF-ROAD use. Please check your local,
state and national regulations as to whether single–track, motorized electric vehicles are
legal for road use in your area. KUBERG Challenger is not homologated for road use in
the European Union.
WARNING! This motorcycle is for personal use only and is not intended for
commercial purposes. The use of this motorcycle for commercial purposes, such as
rentals, will void all warranties.
Electric drivetrain
The fully electric drivetrain of this motorcycle is dierent from any gasoline motorcycle,
in that:
1There is very little engine braking and no engine noise.
2When going into corners or coming to a stop the rider will be fully dependent
on the motorcycle brakes.
3Passers-by may not hear you approach – so extra caution should be taken.
Make yourself conspicuous in order to reduce the chance of other vehicle users
or pedestrians being unaware of you approaching.
4Be aware that your motorcycle is still ON when stopped and while at an “idle”.
Accidentally twisting the throttle can cause serious harm.
WARNING! Accidentally twisting the throttle can cause serious harm.
6 CHALLENGER - OWNER‘S MANUAL 7

Safe riding practices
1SINGLE OPERATOR ONLY! No passengers!
2Long hair, loose clothing or items worn by the rider must be covered to prevent
entanglement in moving parts of the vehicle or the surroundings whilst riding
3Do not exceed the weight limit. Heavier riders may significantly reduce performance
and/or render the vehicle unstable and/or over-tax the brakes and other control
devices. Heavier riders may cause structural damage not covered by the warranty.
4Do not touch any moving or hot parts.
5DO NOT RIDE AT NIGHT OR UNDER LOW VISIBILITY CONDITIONS. The KUBERG
Challenger is not equipped with lights.
6Do not immerse this vehicle in water.
7Do not ride on steep or uneven surfaces. Steep or uneven surfaces greatly increase
the likelihood of loss-of-control.
8Do not ride faster than the conditions permit for safe operation. Excess speed
greatly increases the likelihood of loss-of-control.
9The rider should have one leg on the foot peg ready to ride before turning the power
switch on.
Ride where other motorists, pedestrians and cyclists can see you. Avoid riding in another
motorist’s blind spot. Know your skills and limits. Stay within your limits in order to avoid
an accident.
NOTE:
Many motorcycle accidents are caused by rider error. A typical error made by motorcycle
riders is veering wide on a turn due to EXCESSIVE SPEED or under cornering due to
insucient lean angle for the given speed.
WARNING!
Maintain a proper posture while riding. The posture of the rider is important for proper
control of the motorcycle. The rider should keep both hands on the handlebars and both
feet on the foot pegs during operation in order to maintain control of the motorcycle.
Never ride under the influence of alcohol or other drugs. Go to page 27 to find detailed
instructions concerning proper riding technique.
One rider only
Your motorcycle was engineered to carry one rider and no (0) passengers. Carrying
a passenger would overload the motorcycle and alter the handling. Do not allow this
to happen.
Do not overload the motorcycle
Exceeding the weight limitations will adversely aect the handling of the motorcycle,
and potentially cause damage.
Obey all laws
Obey all laws. KUBERG bikes are for OFF-ROAD USE ONLY (except the KUBERG Freerider
Street). KUBERG motorcycles cannot be used on public roads or sidewalks.
The purchaser, owner, and/or riders of this motorcycle are directly responsible for
ensuring that they obey all local, state, federal and national laws regarding the riding
and use of this motorcycle.
Weather & riding conditions
Do not ride in the rain or snow. Please be aware that distance required to stop under wet
conditions may be double or even triple the usual distance required under dry conditions.
If riding in adverse weather conditions, ride more slowly and anticipate your stops by
applying the brakes MUCH earlier. Do not allow young riders to ride on slopes that are too
steep for their ability.
Night time
Do not ride after dark or in low light conditions.
Batteries
We have equipped your KUBERG Challenger with highly advanced lithium-ion batteries.
Go to page 23 to learn about these batteries and the correct charging procedure.
Be aware of the motorcycle’s chain
Under no circumstances should hands or other body parts be close to a moving
motorcycle chain. Riders should wear motorcycle boots without laces, and should not
wear any loose clothing that could be caught by the chain.
8 CHALLENGER - OWNER‘S MANUAL 9

1Throttle
2Handlebar
3Steering column
4Front brake
5Rear brake
6ON/OFF switch
7Front fender
8Tire
9Front fork
10 Speed & torque control button
11 Foot pegs
12 Motor
13 Rear shock absorber
14 Chain tensioner
15 Charge port
16 Controller
17 Side panel/Battery cover
18 Chain guide
19 Frame protection cover
Motorcycle overview
2021 Kuberg Challenger
For teens and adults looking for serious acceleration, the powerful Challenger opens the
door to a whole new riding experience.
1
9
7
2
3
15
6
16
17
19
10
5
8
8
13
11
14
18
12
4
Specifications
Kuberg Challenger 24” | 20”
Weight 48 kg (105.7 lbs) | 42 kg (92.6 lbs)
Power 12 or 8 kW, 48 V motor
Batteries 16,8 Ah / 24 Ah extended, 48 V Lithium-Ion with BMS
Controller KUBERG BLDC PRO
Input standard 110 V or 230 V
Transmission Clutchless one speed
Final drive 70T/10T | 55T/10T, chain 219H
Frame Aluminium Hydroformed Cradle frame
Wheelbase 125 cm (49.2”) | 120 cm (47.2”)
Seat height -
Handlebar height 106 cm (41.7”) | 100 cm (39.4”)
Front and rear brakes Hydraulic Disc Brake System Tektro Orion 4P
Brake discs front / rear Hardened brake discs SBT 35 HRC
203/180 mm | 203/160
Brake pads Sintered brake pads
Front fork RST KILLAH 200 mm
Rear shock absorber DNM Burner RCP-3 200 lbs
Tires front / rear 19”×2.75” M / 16”x3.5” M | 20”x2.5“ B / 14”x3.0” M
M - motorcycle tire, B - bicycle tire
Carrying capacity Maximum 220 lbs (100 kg), 1 person only
Colors Black w/ yellow
WARNING!
The KUBERG Challenger is designed to operate at 48 volts only. Use of any battery
voltage other than 48 volts will result in motor failure. KUBERG Inc. considers
modifications and/or changes to its electrical components to be a material alteration of
its products, thereby voiding any warranties and/or guarantees in their entirety. KUBERG
Inc. will not be responsible for any injuries, and/or death and/or other damage(s) caused
by such modifications.
10 CHALLENGER - OWNER‘S MANUAL 11

14 Using the Allen wrench #3 loosen and remove 4 bolts on side panels (2 on each side)
and slide these panels up to remove them.
15 Connect two main battery connectors (red to red and black to black) and the BMS
(battery management system) cable (yellow).
16 Slide the side panels back and tighten all bolts (2 - 3 Nm).
WARNING!
Incorrect connecting of the battery wires to the motorcycle terminals may cause
irreparable damage to motorcycle electrical components.
First setup
1Check the tire pressure of both tires and confirm that they are properly inflated.
The optimal tire pressure for the KUBERG Challenger is 35 – 50 PSI (2.4 – 3.4 bar) for
general use and should never exceed 50 PSI (3.4 bar).
2Unpack the charger from its box and charge the batteries, being sure to follow the
correct charging procedure. Go to page 26 to find detailed charging instructions.
3Compress each brake lever. The lever should not compress completely to the
handlebar. Each individual brake should hold the motorcycle securely when you
push the motorcycle against the brake. If your brake needs adjustment, follow the
instructions on page 21. All riders should be aware which lever operates which brake.
4Check the chain for tightness and lubrication and if needed, follow the section
Adjusting chain tension on page 17.
5Set the power and torque settings to an adequate level for the rider’s experience and
riding skills. Go to page 15 to find detailed instructions concerning how to set speed
limits and dierent riding modes.
WARNING!
There are no user serviceable elements incorporated into the motor, motor controller,
batteries, battery charger, throttle, or wiring harness of your KUBERG electric motorcycle.
DO NOT ATTEMPT TO DISASSEMBLE OR ADJUST ANY OF THESE COMPONENTS. Doing
so may cause extensive damage to these components, will void your warranty, and may
result in danger to persons and/or property. If you cannot resolve any problem using this
owner’s manual, contact your KUBERG authorized dealer, or call the KUBERG Customer
Service for assistance.
Break-in period
To assure future reliability and top-notch performance of your KUBERG Ranger, please
pay extra attention during your first 150 km/93 miles or three full-charge cycles (whichever
comes first). During this period please obey the following:
Avoid full-throttle starts and accelerate gradually.
Avoid full speed riding and use the Beginner and the Sport mode only. Do not use the
Race mode.
Avoid hard braking. New brakes need some time to break in with moderate use.
Before first ride
NOTE:
If you purchased your KUBERG motorcycle at a local dealer, your motorcycle might already
be fully adjusted and ready to ride. If you purchased your KUBERG motorcycle still in the
original packaging, please carefully follow the instructions below and any supplemental
instructions in order to complete the assembly and adjustment of your KUBERG motorcycle.
Unpacking and assembly
WARNING!
Failure to properly assemble and adjust your motorcycle prior to use may result in
an accident, resulting in death, serious injury and/or damage to property. If you are
uncertain about any aspect of the assembly and adjustment of your motorcycle, seek
help from a qualified mechanic or KUBERG Customer Service.
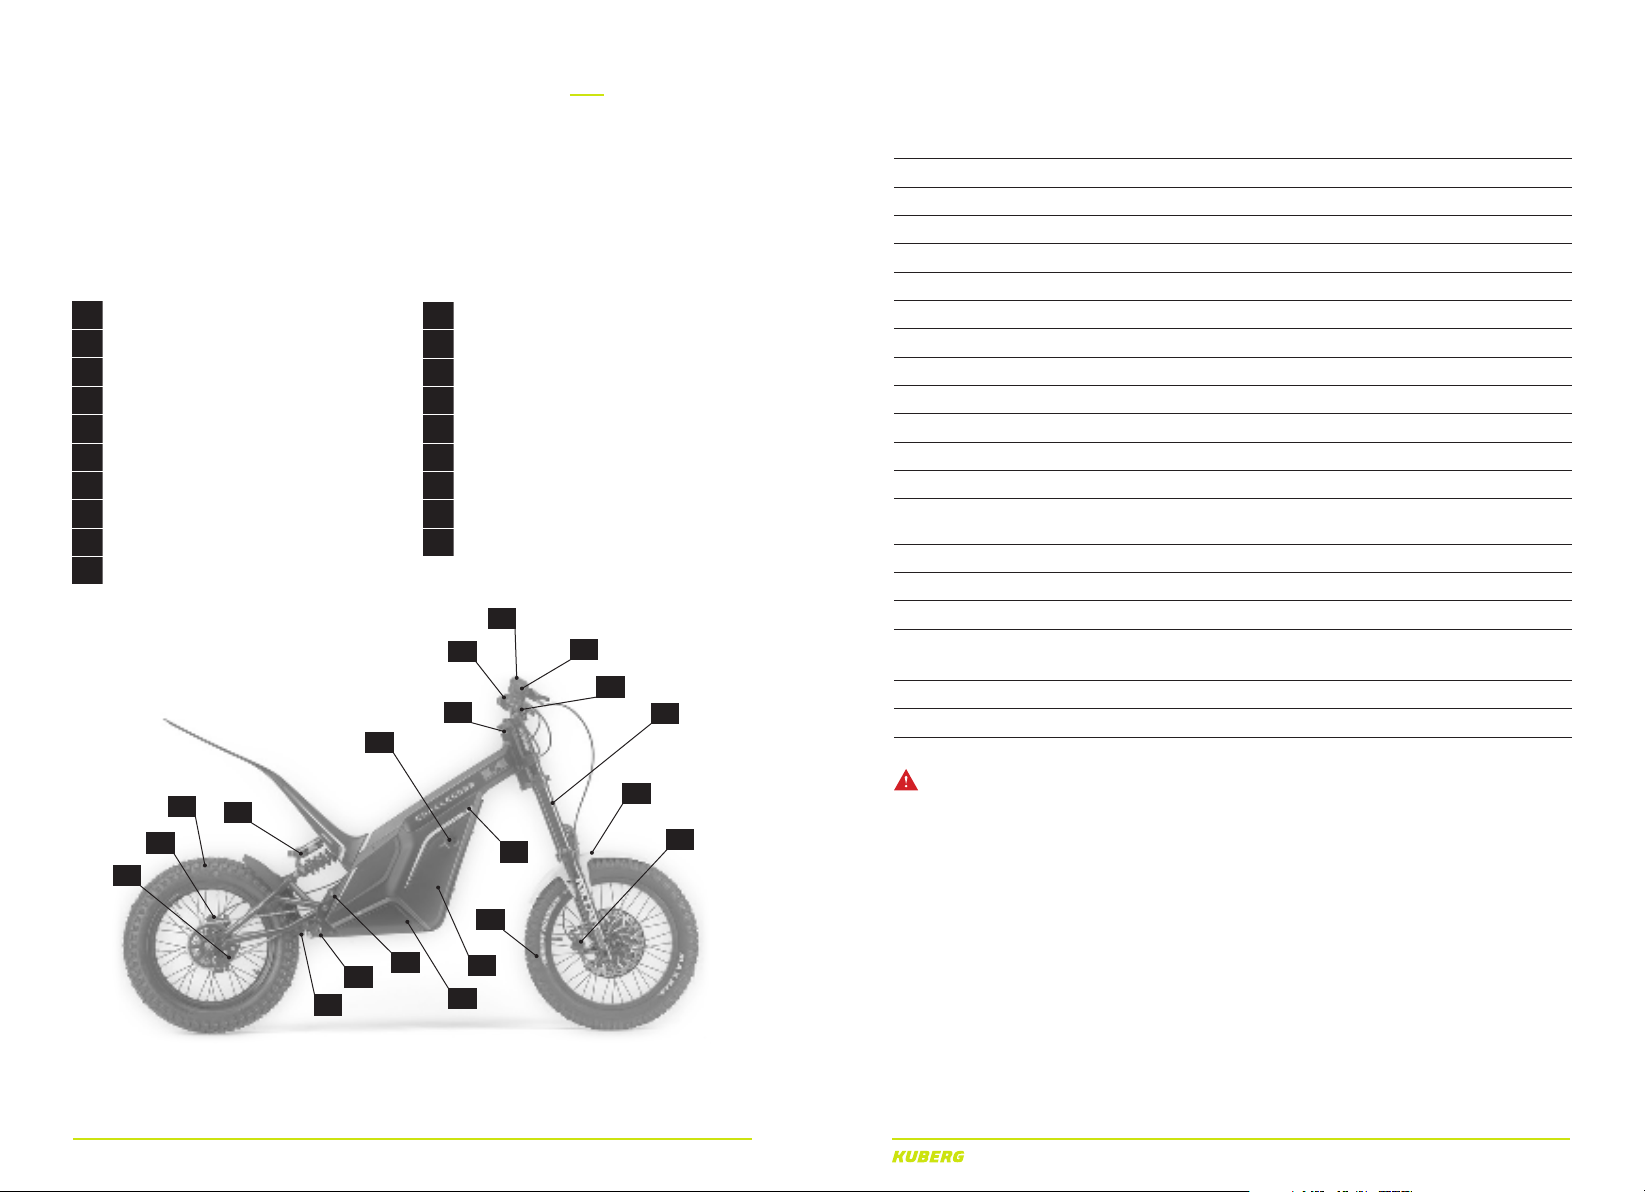
1With the help of another person, carefully remove your KUBERG Challenger
from the box.
2Place the motorcycle on a solid and level surface onto a block or stand so that the
rear wheel is o the ground.
3Remove all the packing materials.
4Using the Allen wrench #5 remove the front side of the stem, install the handlebars
onto the stem and tighten all bolts crosswise (6 - 7 Nm).
5Using the Allen wrench #8 loosen (clockwise) and remove front axle locking bolt (right
hand side of the motorcycle).
6Using the same wrench, loosen and slowly remove the axle from the disc side and
spacers. Note the position and orientation of both spacers and that one spacer acts
also as a disc guard.
7Remove the transport insert from the front brake caliper. From this point, do not push
the front brake lever until the assembly is done completely.
8Check that the front hub spacer is coaxial with both bearings and insert the front
wheel and both spacers carefully into the front fork. The brake disc must slide easily
and gently between brake pads. Then slowly slide the axle into the front hub from the
disc side and tighten it (first by hand clockwise, then to 12-15 Nm).
9Re-insert and tighten the axle locking bolt anticlockwise (12 - 15 Nm).
10 Ensure the wheel is aligned correctly and the axle bolt is tight.
11 Spin the front wheel to ensure it is centered and spins freely. If not,
follow the front brake adjustment on page 21.
12 Using the Allen wrench #4 adjust the brake lever positions to suit the
rider (5 - 7 Nm).
13 Make sure the ON/OFF switch is in OFF position.
12 CHALLENGER - OWNER‘S MANUAL 13

Motorcycle controls
Magnetic Kill Switch
The magnetic kill switch is located on the left hand side of the handlebars. Always switch
the motorcycle into the OFF position when stopped or parked.
WARNING!
If the power is turned ON and the throttle is open, the motorcycle will accelerate
immediately. This is potentially very dangerous. The rider’s right hand should be used to
switch the power on, with no hands on the throttle.
Speed & torque control button
The speed & torque control button allows a responsible adult to set motorcycle
maximum power and torque. There are three distinct power & torque modes.
Go to page 15 to read detailed instructions concerning how to set the various power &
torque modes. Do not attempt to guess or assume these settings. Always check them
before allowing the rider back on the motorcycle.
Charging port
When it’s time to recharge the motorcycle, the battery charger connector attaches to
this port. Before attaching, ensure that the power is switched to the OFF position. Please
refer to the battery and charging section (page 25) of this manual for more information.
WARNING!
The power on the motorcycle must be switched OFF before attaching and plugging in
the charger.
Charge indicator
The LED battery charge indicator is located on the right side of the fork upper plate.
The LED illuminates green when the motorcycle is fully charged, yellow when the charge
reaches 65% and red when the battery charge reaches 30%. The red light will start
blinking when the battery charge is very low. From this point. the motorcycle will start
losing power and will be able to travel roughly 2 - 3 km (1 - 2 miles) before the motorcycle
shuts down completely.
Setting up your Kuberg
Challenger for riding
WARNING!
Improper set-up is dangerous! It is your responsibility to set the motorcycle to the
ability of the rider. Failure to do so, may result in injury or death, and/or damage to your
motorcycle.
NOTE:
A responsible adult must ensure that the KUBERG Challenger and its rider are prepared
for every ride. The motorcycle must be set to the abilities of the rider, and the rider and
the motorcycle must be supervised when ridden by a teenager. Novice riders can lose
concentration quickly, and be easily distracted. If the power is set too high, an accident
could occur. RIDE SAFE!
Setting power & torque modes
Follow these steps to limit the maximum power and torque on your KUBERG Challenger:
1Turn OFF your motorcycle.
2Press and hold the map button. The map button is located on the right side of the
handlebars.
3Turn ON your motorcycle.
4The motorcycle will beep one, two or three times to indicate the desired power mode
1 beep - Beginner Mode (low-power)
2 beeps - Sport Mode (medium-power)
3 beeps - Race Mode (maximum-power)
14 CHALLENGER - OWNER‘S MANUAL 15

For example, if you want the medium power mode, hold the control button for two
beeps and release. The motorcycle will confirm your selection with a double beep.
5The power mode is now set. If you want to set a dierent power mode level, repeat
the process from step 1.
CAUTION!
Sport and Race modes should only be used by experienced riders!
Drivetrain
Your KUBERG Challenger features a traditional chain and sprockets. It has a direct drive
with no gears. The chain does not need to be adjusted on a regular basis, especially
when the motorcycle is new.
However, it is important to check the chain before every ride and adjust it when
necessary. There should be only a very little slack in the chain.
Adjusting chain tension
Follow these steps to adjust the chain tension:
1Ensure the power is turned OFF.
2Lift the motorcycle onto a block or stand so that both wheels are o the ground.
3Using the Allen wrench #10 and the open wrench #24 loosen the rear axle nut.
4Turn the adjustment eccentres evenly on both sides. Very small movements make a
big dierence. Do not tighten the chain too much so that there is no slack at all. It
should be ‘taught’, not ‘tight’.
5Tighten the rear axle nut (78 - 80 Nm), check the sprocket and chain tensioner for
tightness and ensure all bolts are tight.
6When turning the rear wheel by hand, lubricate the chain with the o-road
motorcycle chain lube spray.
7Spin the rear wheel by hand at least 10 times more around and wait a few minutes for
a spray to dry o.
8Remove the excess lubricant using a cloth. If the wheel does not spin freely, go to
page 21 and follow the brake adjustment instructions.
9Check once more the rear wheel for alignment and the chain for tension.
WARNING!
Failure to maintain and adjust the chain and align the wheel correctly could result in
the chain jumping o the sprockets, causing a potentially dangerous and damaging
situation.
Motor performance
The KUBERG Challenger has multiple sensors and control software to prevent the
batteries, the motor and the controller from overheating. Once the temperature of
batteries, motor or controller reaches a high temperature, the motorcycle power will be
16 CHALLENGER - OWNER‘S MANUAL 17

Maintenance
KUBERG motorcycles generally require significantly less maintenance compared to
traditional gas motorcycles due to having very few moving parts, no gas engine and no
exhaust. Our authorized dealers have extensive experience and know KUBERG vehicles
inside and out, so they can provide high-quality service for your KUBERG motorcycle.
However, service at a dealer is not required to maintain your warranty.
WARNING! PROPER MAINTENANCE OF THIS VEHICLE IS REQUIRED
Failure to maintain this vehicle in proper operating condition may lead to an accident
resulting in death or serious injury, and/or damage to property. If you have any questions
about the proper care and maintenance of this vehicle, consult your selling dealer/
distributor or contact KUBERG Customer Service (kuberg@kuberg.com,
+420 608 757 353.
limited to 70% until the components are able to cool down. If the motorcycle continues to
overheat, the controller will shut o the motorcycle until the components have cooled. This
takes approximately 15 to 30 minutes.
Thermal shutdown of the motor can occur when riding in situations that stress the motor
for a long period of time, such as long up-hills or continuous full throttle operation with no
rest period for the motor or dirt on the motor cooling ribs. For the best riding experience
keep your motorcycle clean.
Weather eects on performance
Very cold weather (-10°C / 14°F and lower) is hard on the motorcycle’s batteries and, as a
result, the battery charge will not last as long as at temperatures around 20°C / 68°F. This
is normal and does not require maintenance or servicing.
18 CHALLENGER - OWNER‘S MANUAL 19
Before each ride
1Make sure that all bolts and nuts are fastened securely and that the tires
are properly inflated.
2Check that the throttle and brake controls are operating freely.
3Check the chain and if needed, go to page 17 and follow these steps to adjust its
tension.
4Lubricate the chain with the dry motorcycle chain lube spray, spin the rear wheel by
hand at least 10 times around and remove the excess lubricant using a cloth. If the
wheel does not spin freely, go to page 21 and follow the brake adjustment instructions.
This vehicle should be returned for periodic maintenance to your selling dealer AT
LEAST once per year, but more frequently if used under severe or heavy use conditions.
The service log is located at the end of this manual and required when servicing the
motorcycle.
Keep your KUBERG Challenger clean and dry. Regularly check all components for tightness
and adjustment, including handlebars, levers, axles, chain and brakes. Check the settings
for torque and maximum speed. Check the tires for damage and for proper inflation.
Cleaning
Cleaning and maintaining your Challenger
correctly will provide more enjoyable ownership
and riding experience. By hand cleaning the
motorcycle, you can simultaneously inspect
all of the components. While the motorcycle
components are waterproof, be careful when
washing the motorcycle around the electrical
components, especially the charge port,
controller, battery, motor and a throttle. Do
not disassemble the motorcycle in any way before washing. You are free to wash your
Challenger with a low pressure water hose with clean water.
After cleaning:
1Lubricate the front fork gliders with an appropriate amount of specialized fork
lubricant spray and remove the excess lubricant using a cloth.
2Lubricate the chain with the o road motorcycle chain lube spray, spin the rear wheel
by hand at least 10 times around and wait a few minutes for a spray to dry o.
3Remove the excess lubricant from both chains using a cloth.
WARNING!
Do not disassemble the motorcycle in any way before washing. Using a power wash is NOT
ALLOWED! Do not use cleaners with added salt as it often consists of a lot of phosphates
that can harm the paint and the electronics. Do not use engine cleaners or solvents.

Rear wheel removal and installation
1Make sure the power is switched OFF.
2Lift the motorcycle onto a block or stand so that both wheels are o the ground.
3Using the Allen wrench #5 loosen and remove 2 upper bolts from the chain guide and
remove it from the rear swing arm.
4Using the Allen wrench #10 and the open wrench #24 loosen and remove the rear
axle nut. Don’t remove the rear axle yet.
5Move the rear axle and both chain eccentres a few millimeters aside to the point
where the wheel can be pushed forward and the chain can slip o to the outer side
of the sprocket.
6While holding the wheel, slowly remove the rear axle and spacers on both sides.
7Pull the wheel carefully back to remove it.
8To re-install the wheel, reverse the above procedure and ensure the wheel is aligned
correctly and the axle nut is tightened properly. (78 - 80 Nm).
9Spin the rear wheel to ensure it is centered and spins freely. If not, go to the bottom
of this page and follow the brake adjustment instructions.
Front and rear brake adjustment
1Check whether the brake disk and the brake pads are not worn-out and don’t need
a replacement.
2Using the Allen wrench #5, loosen the two brake caliper bolts.
3Pull and hold the corresponding brake lever firmly for the caliper to get centered with
the brake disc and re-tighten the caliper fixing bolts (9,5 - 10,5 Nm), then release the
brake lever.
4Test the brake by pulling hard on the lever a number of times.
5If the wheel does not spin freely with the brake lever released, the caliper position
itself needs to be fine adjusted again repeating the steps 1 to 3. Remember that the
new brake pads are thicker and need to break-in first.
WARNING!
Do not operate your KUBERG Challenger if any damage is apparent. Immediately contact
your local retailer/distributor or KUBERG Customer Service.
WARNING!
There are no user serviceable elements incorporated into the motor, motor controller,
batteries, battery charger, throttle or wiring harness of your KUBERG electric motorcycle.
DO NOT ATTEMPT TO DISASSEMBLE OR ADJUST ANY OF THESE COMPONENTS.
Doing so may cause extensive damage to these components, will void your warranty,
and may result in danger to persons and/or property. If you cannot resolve any problem
using this owner’s manual, contact your KUBERG authorized dealer, or call the KUBERG
Customer Service for assistance.
Front wheel removal and installation
1Make sure the power is switched OFF.
2Lift the motorcycle onto a block or stand so that both wheels are o the ground.
3Using the Allen wrench #8 loosen (clockwise) and remove front axle locking bolt (right
hand side of the motorcycle).
4Using the same wrench loosen and while holding the wheel, slowly remove the axle
from the dics side and spacers. Note the position and orientation of both spacers
and that one spacer acts also as a disc guard.
5Lower the wheel carefully away from the front fork.
6To reinstall the wheel, check that the front hub spacer is coaxial with both bearings
and insert the front wheel and both spacers carefully into the front fork. The brake
disc must slide easily and gently between brake pads. Then slowly slide the axle into
the front hub from the disc side and tighten it (first by hand clockwise, then to 12-15
Nm).
7Reinsert and tighten the axle locking bolt anticlockwise (12 - 15 Nm).
8Ensure the wheel is aligned correctly and the axle bolt is tight.
9Spin the front wheel to ensure it is centered and spins freely. If not, follow the front
brake adjustment on page 21.
20 CHALLENGER - OWNER‘S MANUAL 21

Brake squeal
Dirt and humidity can cause noisy or squealing brakes. These are normally temporary and
should gradually disappear with regular use. Repair is not required. If you hear a metallic
“screeching” sound, you might need to replace the brake pads. Visit your KUBERG dealer to
replace the brake pads.
Adjusting the suspension
The KUBERG Challenger features both front and rear suspension.
Front suspension
The front suspension on your KUBERG Challenger is adjustable, the RST KILLAH front
fork has settings for damping.
RST KILLAH quick set-up guide
1Rotate the blue adjuster, located on the fork upper plate, to change the amount
of compression damping to the lockout.
2Rotate the red rebound adjuster, located on the bottom of the right fork, as
indicated on the sticker, to adjust the rebound to faster or slower.
Rear suspension
Your KUBERG Challenger is equipped with a single coil spring and a DNM Burner RCP-3
shock. For a harder/stier ride at the rear, tighten the adjustment ring in a clockwise
direction. For a softer ride, loosen the adjuster by turning anti-clockwise.
22 CHALLENGER - OWNER‘S MANUAL 23

Battery use, care
and maintenance
For the proper use, maintenance and storage of the battery, it is critically important that
you follow and understand the instructions in this manual.
If you have any questions about the battery or its usage, please do not hesitate to
contact the KUBERG Customer Service Department.
WARNING!
Failure to properly use, charge and store this battery will void the warranty and may
cause danger or damage. DO NOT use this battery with any other vehicle or appliance.
Use of this battery with any other product will void the warranty and may create
a hazardous situation that may cause a fire resulting in severe injury or death, and/or
damage to property.
NOTE: The battery has an advanced battery management system (BMS) watching
over cell-voltages, currents, temperatures etc. If any error on the battery module occurs,
the BMS will keep the motorcycle safe. However, you must always park your KUBERG
Challenger away from any flammable objects
CAUTION!
Minimum distance between the parked vehicle and any flammable object must be at
least 3 meters (10ft.)
WARNING! NEVER SHORT CIRCUIT THE DISCHARGE TERMINALS OF THE BATTERY.
A short circuit will damage the battery and may cause a fire resulting in severe injury or
death, and/or damage to property.
WARNING!
Never mechanically manipulate the battery, never open the battery pack and do not
puncture the battery cover or the battery itself.
CAUTION!
Keep the battery away from excessive heat and/or open flames. Avoid long term
exposure to direct rays from the sun.
CAUTION!
Protect the battery from water or other moisture. If the battery becomes wet from rain
during use, dry as soon as possible. Remove the battery from the motorcycle before
washing.
CAUTION!
To avoid damage to the battery, never expose it to intense physical shock or severe
vibration.
Charging instructions - Kuberg Challenger
Always follow these steps when charging your KUBERG Challenger:
1Make sure your KUBERG Challenger is turned OFF.
2Connect your charger to an electrical outlet (AC) 110 V or 230 V.
3Turn on the power switch on the charger.
4Wait for 30 seconds.
5Connect the charger cable to the battery connector on your motorcycle.
CAUTION!
If the charger is plugged into the motorcycle with the charger switched OFF, a potential
in-rush of electrical current from the motorcycle battery to the charger may damage the
charger.
The recommended charging time for a fully discharged battery is 1.5 hours, respectively
3 hours for the bigger 24 Ah battery pack.
After 1.25 hours of charging, respectively 2.5 hours of charging the battery should be
charged to about 80 %
24 CHALLENGER - OWNER‘S MANUAL 25

WARNING!
Only use the supplied battery charger. Using any other battery charger will void the
warranty and may damage the battery.
The LED light on the charger will illuminate RED while charging.
The LED light on the charger will illuminate GREEN when the battery is fully charged.
CAUTION!
The battery charger supplied with your KUBERG Challenger is for INDOOR use only.
Important notes about battery charging
WARNING!
Do not cover the charger or its fan while charging, this can cause the charger to
overheat and may damage the charger and/or the motorcycle electrical components.
Avoid any contact with water or other fluids while charging the battery. If the battery,
charger or any connections become wet, immediately unplug the charger and
thoroughly dry all components.
Only charge under the constant supervision of an adult. Children must not operate
the charger.
Keep the charger and the motorcycle at least 3 m (10 ft) away from flammable items and
direct sunlight during charging.
Never dismantle or disassemble the supplied charger. Never use the supplied charger
for any purpose other than charging a KUBERG Challenger motorcycle.
Battery removal and installation
During normal use, KUBERG does not recommend removing the batteries from the
KUBERG Challenger. If you need to replace the battery or remove it, KUBERG highly
recommends taking the motorcycle to a certified technician or a KUBERG dealer.
If you choose to remove or replace the battery yourself, please follow the following
instructions carefully:
1Ensure the power switch is in OFF position.
2Stabilize the motorcycle using an additional stand on the rear wheel (sold separately).
3Using the Allen wrench #3 loosen and remove 2 bolts on the right side panel and
gently slide this panel up to remove it.
4Unplug the battery connectors, one at a time. Note the direction and position of the
battery and the terminal for each wire. When it comes time to reconnect, each wire
must be connected to the correct terminal.
5With the Allen wrench #5 loosen and remove 1 remaining bolt holding the battery in
the frame.
6Push the remaining positive and negative wires to the front and sides of the
motorcycle, so the battery pack can be carefully pulled out.
7With the help of other person gently remove the battery out from the frame. Be extra
careful to the wires and connectors.
8To install the battery, reverse the procedure above and ensure all connectors are
secured and all bolts are tightened properly. Tightening torque for the battery bolt
(removed during step 6) is 9,5 - 10,5 Nm, for side panel bolts use 2 - 3 Nm.
WARNING!
Incorrect connecting the battery wires to motorcycle terminals may cause irreparable
damage to motorcycle electrical components.
Short term and long term storage
If you do not plan to use your Challenger for an extended period of time (2 weeks or more),
disconnect the battery from the controller, also disconnect it from the charger and keep
your battery pack at 50 - 60% of its capacity (48,3 - 49,6 Volts). Store the motorcycle in
a dry and cool place at temperatures between 5 - 15°C (41 - 59°F). The battery MUST
be stored in a place that is NOT warm. It is not advised to place the battery in a freezer,
since the battery voltage would sag badly. If you decide to remove the battery and store
it in a cooling box, please wait until the battery warms to room temperature prior to the
reinstallation of the battery back into the motorcycle.
WARNING!
Our motorcycles can be stored indoors only if the battery is physically disconnected.
Keep the motorcycle and the battery away from excessive heat and/or open flames.
Avoid long term exposure to direct rays from the sun.
Keep the charger, the battery and the motorcycle at least 3 m (10 ft) away from
flammable items and direct sunlight during charging and/or storage.
If you have any questions about the batteries or their usage, please do not hesitate to
contact the KUBERG Customer Service (kuberg@kuberg.com).
Battery disposal
We are confident that you will enjoy many kilometers or miles of thrilling riding with your
KUBERG motorcycle. But, batteries can eventually wear out. When this happens, we urge
you to properly dispose of your used batteries. For guidance regarding proper disposal
of your batteries, please contact the KUBERG Customer Service (kuberg@kuberg.com).
Also, you can find useful information regarding used battery drop-o sites from the
Rechargeable Battery Recycling Corporation (RBRC) at www.rbrc.org.
26 CHALLENGER - OWNER‘S MANUAL 27

Riding instructions & safety
tips (novice riders)
With the motorcycle set up correctly, your KUBERG Challenger is ready to ride! For novice
riders, please follow these tips and instructions. The riders will get the most enjoyment if
they feel safe and in control. Do not be tempted to start the rides too quickly. Make sure
the speed and power settings are set slow to begin with. For the first time riders, this
should be near the walking pace.
First ride (novice riders)
Stand astride the motorcycle and locate the controls while the motorcycle is switched OFF.
After you understand the controls and are comfortable with them, it’s time for the first ride.
For this, make sure you are dressed correctly in suitable safety gear. Boots, gloves, helmet
and eye protection are necessary. The area for riding must be flat, open and safe, with no
obstacles of any kind. The motorcycle must be set up correctly, with the speed and torque
tuned to a slow setting.
1Ensure the power is turned OFF.
2Stand astride the motorcycle, keep your feet on the ground and move the motorcycle
from side to side, forward and back, to get comfortable with the handlebar position
and weight distribution.
3Switch the motorcycle ON by switching the power switch to the ON position (magnetic
kill switch).
4Before twisting the throttle, you should have one foot on the ground and the other one
on the corresponding foot peg.
5Twist the throttle smoothly and slowly and set o.
6Once comfortable, lift both your feet onto the foot pegs as you ride.
7Once stopped, set the power switch to the OFF position by unplugging the magnetic
kill switch.
Learning to stand up
Once the basics are mastered, the speed and torque settings can be switched to faster
and more powerful settings, step by step, to match the improving skills of the rider. Before
you get going too quickly, it’s a good idea to learn to ride the motorcycle ‘correctly’. This
means changing the riding position and in control. Learning to change the riding position
is dicult if a rider does not have good throttle control. While the speed setting is set to
low, the rider must learn to rotate his/her wrist ‘around’ the throttle so that when he/she
moves forward or backwards, the wrist is in the correct position. As the power and torque
settings get higher, the ‘dead-zone’ in the throttle diminishes, so it becomes easier to
stand up and work the throttle.
Correct riding technique
Learning the correct riding techniques will prepare the rider for all forms of riding that
come later. The rider needs to learn to control the motorcycle at slow speeds and use the
correct technique to execute tight turns. The natural approach of many riders is to turn the
handlebars but this is not a correct riding technique. The correct technique is to lean and
use so-called counter-steering.
Counter-steering is turning the handlebars in the opposite direction as the rear wheel
intends to travel outwards of the corner (over-steering). This will cause the motorcycle to
lean and turn in the desired direction. Counter-steering needs to be taught slowly and
smoothly, sudden movements of the handlebars may cause an accident. If tight turns are
mastered correctly, many other skills will follow naturally.
28 CHALLENGER - OWNER‘S MANUAL 29

Protective equipment
Always follow these instructions for protective equipment for every ride in order to limit
the risk of injury in case of an accident. The KUBERG Challenger is intended for OFF
ROAD use and therefore there is a high likelihood of dirt and other debris being thrown
into the air, which presents a risk of injury. Also, there is a high possibility of an accident
or a fall.
The rider should use and wear:
1A high quality helmet approved by your country’s governing body
2A helmet face-shield or goggles
3Protective clothing that covers rider’s legs, ankles, torso and arms
4Wrist, knee and elbow protection
5Solid motorcycle boots
6Gloves made from tear resistant materials (leather or kevlar)
7Motorcycle jacket made from tear resistant materials (leather or kevlar)
8Clothing that is brightly colored so other vehicle users and pedestrians can see you
WARNING!
THE RIDER MUST WEAR PROTECTIVE EQUIPMENT, ESPECIALLY HELMET, BOOTS AND
EYE PROTECTION.
Helmets
There is no single factor that works best for reducing the severity of injuries sustained in
accidents more than a quality helmet. Don’t ever allow your KUBERG motorcycle to be
ridden without a helmet.
Clothing
Motorcycle leathers and padded protection for knees, back and arms can prevent
abrasion injuries in the event of a fall. Failure to use appropriate safety equipment greatly
increases the likelihood of death or serious injury in the event of an accident.
Never wear loose-fitting clothes as these may catch on wheels, chains, control levers or
footrests.
Do not wear shoes or boots with laces as these can get caught in motorcycle’s chain or
wheels and result in serious injury.
Accessories
Adding accessories or cargo to your KUBERG motorcycle can negatively aect its
stability and handling. To avoid the risk of an accident, use extreme caution when
adding accessories or cargo to your KUBERG motorcycle. Use additional care when
riding with added accessories or cargo.
CAUTION!
The total weight of the rider, accessories and cargo must not exceed the maximum load
limit 100 kg (220 lbs).
WARNING!
Never attach any large or heavy items to the handlebar, front fork, or front fender.
Genuine KUBERG accessories have been specifically designed for use on this
motorcycle. Since KUBERG cannot test all other accessories that may be available, you
are personally responsible for the proper selection, installation and use of non-KUBERG
accessories. Use extreme caution when selecting and installing any accessories.
30 CHALLENGER - OWNER‘S MANUAL 31

Limited warranty
Kuberg motorcycles are warranted to the original retail purchaser to be free from defects in materials and
workmanship in the frame and components except for batteries, tires, and inner tubes for a period of thirty (30)
days from the date of purchase. An upgrade to a three (3) month Limited Warranty is available to the original retail
purchaser who registers his/her motorcycle via the registration form on www.kuberg.com/bike-registration within thirty
(30) days from the date of purchase. A further optional Extended Warranty is available for a fee.
Warranty is valid for 3 months from the purchase date of the motorcycle via a Kuberg dealership. Warranty is non-
transferable. All warranties are voided upon secondhand resales.
Batteries are warranted to the original retail purchaser to be free from defects in materials and workmanship for
the first 300 charging cycles where they have to keep more than 80% of their initial capacity, provided charging,
maintenance and storage instructions are properly followed.
Tires and tubes are warranted to be free of manufacturing and material defects for thirty (30) days. Such tire and
tube warranty shall not include flat tires, tire cuts, skid through, over-inflation blowouts, or other such misuse or normal
hazards.
Warranties are limited to repair and/or replacement of motorcycle and/or parts found by Kuberg to be defective, at
the sole discretion of Kuberg. Kuberg Limited/Extended Warranty does not cover or apply to the following:
- normal wear and tear
- damage, failure and/or loss caused by accident, shipping, misuse, or neglect
- damage due to improper transportation
- exceeding the weight limit of the vehicle
- use by the operator not specified in the age range vehicle was designed for
- abuse and/or failure to follow instructions or warnings as stated in the applicable owner’s manual or other printed
materials provided with the product
- damage, failure and/or loss caused by the use of the product for stunt riding, ramp jumping, speed competition,
inappropriate o-road use, acrobatics, trick riding or other similar activities, or in any other manner for which such
products were not specifically designed
This warranty does not apply to any products or components, mechanical and/or electrical, which have in any way
been altered from their original configuration by any person. Kuberg will not be liable and/or responsible for any
damage, failure or loss caused by any unauthorized service or use of unauthorized parts. Warranties do not cover
or apply to any Kuberg product used for rental or commercial purposes unless the specific product is designated,
labeled, or marketed by Kuberg as acceptable for rental or commercial use.
All warranty claims must be made directly to the original selling retailer. The selling retailer is the primary provider of
warranty support and customer service. Kuberg may choose to perform warranty service at the sole discretion of
Kuberg. The original owner of the product must provide proof of purchase prior to the approval of any warranty claim.
Under no circumstances do our warranties include any costs associated with the shipment and/or transportation to or
from retailer, distributor or Kuberg. Kuberg, at its sole discretion, has the option of replacing with a new part, a factory
recertified part, or repairing any defective product and/or component thereof, or to pay to the owner of such product
an amount equal to the original purchase price of such product.
The original owner shall pay for all costs of labor associated with any warranty claims. This warranty supersedes all
previous warranties. The warranties stated herein are in lieu of and expressly exclude all other warranties not expressly
set forth herein, whether expressed or implied by law or otherwise, including, but not limited to, any warranties for
merchantability and/or fitness for any particular purpose. Kuberg shall in no event be liable or responsible for incidental
or consequential losses, damages or expenses in connection with their electric dirt motorcycle products. The liability of
Kuberg hereunder is expressly limited to the replacement of goods complying with this warranty or at the sole election
of Kuberg to the repayment of an amount equivalent to the purchase price of the product in question. CAUTION!
Some states may not permit the exclusion or limitation of consequential damages and therefore, such limitations may
not apply to the consumer in which such impermissible exclusions are involved.
The Customer’s Responsibility under the warranty shall be to:
- Operate and maintain the motorcycle as specified in the appropriate Owner’s Manual
- Give notice to an authorized Kuberg dealer of any and all apparent defects within ten (10) days after discovery, and
make the machine available at the time for inspection and repairs at the dealer’s place of business.
Contact information on the back of this manual.
32 CHALLENGER - OWNER‘S MANUAL 33
Kuberg Motorcycle Service Log
Kuberg motorcycles are designed for extreme riding conditions which can cause a lot of stress
to the bike’s components. Because of this, Kuberg warranties require scheduled maintenance
at 3, 6, and 12 months in order to maintain optimal performance.
Please keep this service log in your records to present to your dealer at each service visit.
3RD MONTH
DATE DEALER
NOTES (DESCRIPTION OF SERVICES PERFORMED AND PARTS REPLACED) SIGNATURE
6TH MONTH
DATE DEALER
NOTES (DESCRIPTION OF SERVICES PERFORMED AND PARTS REPLACED) SIGNATURE
12TH MONTH
DATE DEALER
NOTES (DESCRIPTION OF SERVICES PERFORMED AND PARTS REPLACED) SIGNATURE
Recommended services

DATE DEALER
NOTES (DESCRIPTION OF SERVICES PERFORMED AND PARTS REPLACED) SIGNATURE
DATE DEALER
NOTES (DESCRIPTION OF SERVICES PERFORMED AND PARTS REPLACED) SIGNATURE
DATE DEALER
NOTES (DESCRIPTION OF SERVICES PERFORMED AND PARTS REPLACED) SIGNATURE
DATE DEALER
NOTES (DESCRIPTION OF SERVICES PERFORMED AND PARTS REPLACED) SIGNATURE
DATE DEALER
NOTES (DESCRIPTION OF SERVICES PERFORMED AND PARTS REPLACED) SIGNATURE
DATE DEALER
NOTES (DESCRIPTION OF SERVICES PERFORMED AND PARTS REPLACED) SIGNATURE
DATE DEALER
NOTES (DESCRIPTION OF SERVICES PERFORMED AND PARTS REPLACED) SIGNATURE
DATE DEALER
NOTES (DESCRIPTION OF SERVICES PERFORMED AND PARTS REPLACED) SIGNATURE
DATE DEALER
NOTES (DESCRIPTION OF SERVICES PERFORMED AND PARTS REPLACED) SIGNATURE
DATE DEALER
NOTES (DESCRIPTION OF SERVICES PERFORMED AND PARTS REPLACED) SIGNATURE
DATE DEALER
NOTES (DESCRIPTION OF SERVICES PERFORMED AND PARTS REPLACED) SIGNATURE
DATE DEALER
NOTES (DESCRIPTION OF SERVICES PERFORMED AND PARTS REPLACED) SIGNATURE
Other services needed
34 CHALLENGER - OWNER‘S MANUAL 35

KUBERG s.r.o.
Zengrova 630/83
Ostrava - Vítkovice, 703 00
Czech Republic
email: kuberg@kuberg.com
www.kuberg.com
#
{
Table of contents
Other Kuberg Motorcycle manuals