Kunft KDW4752N User manual

instructions manual
manual de instrucciones
manual de instruções
dishwasher
KDW4752N

2 3
KDW4752N
EN
dishwasher
Dear client,
Thank you for purchasing this product.
The quality of this appliance has been certied by several
laboratory tests. This instructions manual is provided
to simplify the use of the appliance as well as to guarantee
a safe use.
Please read carefully the instructions and safety measures
described in this manual.
We sincerely hope you will be satised when using
your new appliance.
INDEX
1. SAFETY INSTRUCTIONS...................................... 4
1.1. Power Supply ................................................. 5
1.2. Power Cord and Other Cables........................ 6
1.3. Humidity and Water ........................................ 6
1.4. Cleaning.......................................................... 6
1.5. General Precautions ....................................... 6
2. OPERATING INSTRUCTIONS............................. 12
2.1. Product Description....................................... 12
2.2. Product usage............................................... 13
2.4. Troubleshooting ............................................ 32
3. TECHNICAL SPECIFICATIONS........................... 36
4. POST-SALE SERVICE......................................... 37
5. ENVIRONMENTAL PROTECTION ...................... 37

4 5
KDW4752N
EN
dishwasher
1. SAFETY INSTRUCTIONS
WARNING
Risk of Electric Shock
Do Not Open
Warning: to avoid the risk of electric
shock, do not remove the cover.
The interior does not contain any parts
that can be repaired by the user.
Ask for assistance from the Customer
Support Service.
Important Warnings
Before using your appliance read these ins-
tructions manual carefully and keep it in a
safe place as you may need to consult it in
the future.
Before turning on your appliance, and to
ensure a safe and correct operation, do not
use if:
- It has fallen to the ground;
- You notice any evidence of damage;
- Any anomaly occurs during its operation.
To avoid hazards or deterioration of your ap-
pliance through incorrect use it is advisable
to read these instructions thoroughly.
Your appliance should not be used for other
purposes than the ones intended and sole-
ly for household use. Any damage resulting
from using the appliance outside this scope,
any incorrect use, as well as any manual
modications to the product will not be co-
vered and automatically voids the warranty.
Assistance
In case of malfunction, take your appliance
to the Customer Support Service for assis-
tance.
This appliance can be used by
children from the age of 8 and by
peoplewith reducedphysical, sen-
sorial or mental capabilities and/
or lack of experience and know-
ledge if they have been given ins-
tructions on using the appliance
safely and if they understand the
hazards involved. Children may
not play with the appliance. Cle-
aning and maintenance must not
be carried out by children without
supervision.
These instructions are also available at
www.suporteworten.pt
1.1. Power Supply
Make sure the main voltage is compatible
with the appliance’s. If this is not the case,
please consult the Customer Support Ser-
vice.

6 7
KDW4752N
EN
dishwasher
1.2. Power Cord and Other Cables
Do not tangle the cord or pull it to discon-
nect the appliance. Also, keep the cord
away from warm surfaces.
Never use the appliance if it has a damaged
cable or socket.
Take it to the Customer Support Service for
replacement.
1.3. Humidity and Water
Do not use your appliance in humid places.
Do not allow the appliance to become wet
under any circumstances as this may be
dangerous. To avoid re hazard or electric
shock do not expose your appliance to hu-
midity or water. Furthermore, do not place
your appliance under water (e.g. for clea-
ning).
1.4. Cleaning
Before cleaning, be sure to switch off the ap-
pliance and remove the plug from the main
power supply. Always allow the unit to cool
down before cleaning.
To clean the exterior of the product, use a
dry soft cloth only.
1.5. General Precautions
• Please follow the instructions in the user
manual which will help you to properly ins-
tall and operate this product and enjoy its
advanced features. Please keep the ins-
tructions for future reference.
• Read all instructions before using the pro-
duct.
• Maintenance and service operations are
only to be carried out by authorized pro-
fessionals.
• Any damage caused by manual modica-
tions to the product is not covered by the
warranty.
• If this product is used for other purposes
than the ones originally intended, or if it is
not correctly connected, the product may
become damaged and the warranty will be
voided.
• Please read this user manual carefully and
keep it for future reference. Pass it on to
any future owner of the appliance.
• This manual contains sections of Safety
Instructions, Operating Instructions, Ins-
tallation Instructions and Troubleshooting
Tips, etc. Read it carefully before using
the dishwasher, as it will help you use and
maintain the dishwasher properly.
• Review the section on Troubleshooting
before calling for assistance, as it will
help you solve some common problems
by yourself without professional techni-
cians.

8 9
KDW4752N
EN
dishwasher
NOTE:
The manufacturer, following a policy of
constant product development and up-da-
ting, may make modications without giving
prior notice.
WARNING!
When using your dishwasher, take basic
precautions, namely:
WARNING! HYDROGEN GAS
IS EXPLOSIVE
• Under certain conditions, hydrogen gas
may be produced in a hot water system
that has not been used for two weeks or
more.
• HYDROGEN GAS IS EXPLOSIVE. If the
hot water system has not been used du-
ring such a period, open all hot water fau-
cets before using the dishwasher and let
the water run for several minutes. This will
release some accumulated hydrogen gas.
As the gas is ammable, do not smoke or
use an open ame.
WARNING! PROPER USE
• Do not apply pressure to, sit on or stand on
the dishwasher’s door or rack.
• Do not touch the heating element during
or immediately after using the dishwasher.
• Do not operate your dishwasher unless
all enclosure panels are properly in place.
Open the door very carefully if the dishwa-
sher is operating, as there is a risk of water
squirting out.
• Do not place any heavy objects on or stand
on the door when it is open, as the applian-
ce could tip forward.
• When loading items to be washed:
• No not load sharp items near the door as
they might damage the door seal;
• Load sharp knives with the handles up in
order to reduce the risk of cuts;
• Warning: knives and other utensils with
sharp points must be loaded in the rack
with their points down or placed horizon-
tally.
• When using your dishwasher, prevent
plastic items from being in contact with he-
ating elements.
• Check to make sure the soap dispenser is
empty after a washing programme.
• Do not wash plastic items unless they are
marked as dishwasher safe or equivalent.
For plastic items without this marking, che-
ck the manufacturer’s recommendations.
• Use only detergent and rinse additives de-
signed for an automatic dishwasher. Never
use soap, laundry detergent or hand wa-
shing detergent in your dishwasher.
• Other means to disconnect the dishwasher
from the power supply must be incorpora-

10 11
KDW4752N
EN
dishwasher
ted in the xed wiring with a minimum 3
mm contact separation in all poles.
• Keep children away from dishwasher de-
tergent and rinse aid and the dishwasher’s
open door, as there could still be some de-
tergent left inside.
• To protect against the risk of electrical sho-
ck, do not immerse the unit, cord or plug in
water or other liquid.
• Dishwasher detergents are very alkaline.
They can be extremely dangerous if swallo-
wed. Avoid contact with skin and eyes and
keep children away from the dishwasher
when the door is open.
• The door should not be left open since this
could present a tripping hazard.
• If the supply cord is damaged, it must be
replaced by the manufacturer or its service
agent or a similarly qualied person in or-
der to avoid a hazard.
• Dispose of packing materials properly.
• During installation, the power supply must
not be excessively or dangerously bent or
attened.
• Do not tamper with the dishwasher’s con-
trols.
• The appliance is to be connected to the
water mains using new hose sets and the
old hose-sets should not be reused.
• Make sure that carpet does not obstruct
the dishwasher’s openings at the bottom
base.
• Use the dishwasher only for its intended
function.
• The dishwasher is intended for indoor use
only.
• The dishwasher is not designed for com-
mercial use. It is intended for use in do-
mestic households and in similar working
and residential environments.

12 13
KDW4752N
EN
dishwasher
2. OPERATING INSTRUCTIONS
2.1. Product Description
Control Panel
Dishwasher Features
Front View
1. Upper Basket
2. Spray Arms
3. Lower Basket
4. Water Softener
5. Cutlery Basket
6. Detergent Dispenser
7. Rinse Aid Dispenser
2.2. Product usage
Installation
Keep this instruction manual in a safe place for future reference.
If the appliance is sold, given away or moved, please make sure the
manual is kept with the machine, so that the new owner may benet
from the advice contained within it.
Please read this instruction manual carefully: if contains impor-
tant information regarding the safe installation, use and maintenan-
ce of the appliance.
If the appliance must be moved at any time, keep it in an upright
position; if absolutely necessary, it may be tilted onto its back.
Positioning and levelling
1. Remove all appliance packaging and check that it has not been
damaged during transportation. If it has been damaged, contact
the retailer and do not proceed with the installation process.
2. Check the dishwasher by placing it so that its sides or back panel
are in contact with the adjacent cabinets or even with the wall. This
appliance can also be recessed under a single worktop.
3. Position the dishwasher on a levelled, sturdy oor. If the oor is
uneven, the front feet of the appliance may be adjusted until it
reaches a horizontal position (the angle of inclination must not
exceed 2 degrees). If the appliance is levelled correctly, it will be
more stable and much less likely to move or cause vibrations and
noise while it is operation.

14 15
KDW4752N
EN
dishwasher
Connecting the water and electricity supplies
Connection to the water and electricity supplies should only be
performed by a qualied technician.
The dishwasher should not stand on top of the water hoses or
the electricity supply cable.
The appliance is to be connected to the water mains using new
hose sets and the old hose-sets should not be reused.
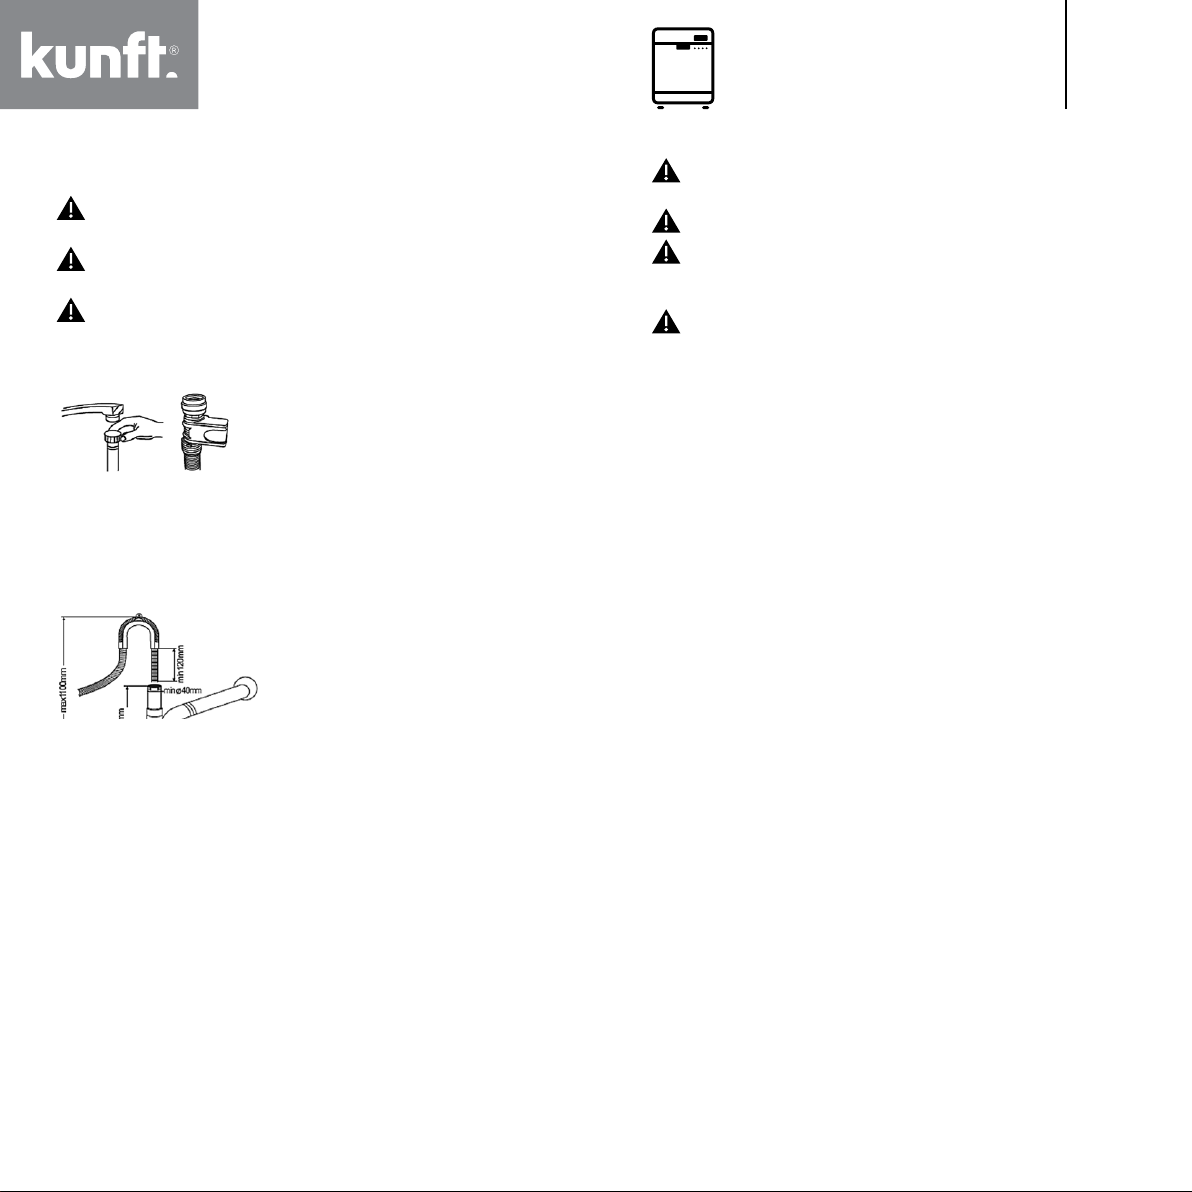
Connecting the water inlet hose
Connect the cold water supply hose to a
threaded ¾ (inch) connector and make
sure that it is fastened tightly in place.
If the water pipes are new or have not
been used for an extended period of
time, let the water run to make sure that
the water is clear and free of impurities.
If this precaution is not taken, there is a
risk that the water inlet can get blocked
and the appliance could be damaged.
Connecting the water outlet hose
Fit your dishwasher’s drainage hose to
the drainage pipe without bending it.
Remember that the length of the hose
should not exceed 4 meters even with
an extension.
If the drainage hose is longer the
4 m, the dishes will not be cleaned
properly. Secure your hose rmly to
the drainage pipe to avoid it coming off
during the washing process.
Electrical connection
Before inserting the plug into the electrical socket, make sure:
• the socket is earthed and complies with current regulations;
• the socket can withstand the maximum load of the appliance, which
is indicated on the data plate located on the inside of the door (see
description of the appliance);
• the power supply voltage falls within the values indicated on the
data plate on the inside of the door;
• the socket is compatible with the plug of the appliance. If this is not
the case, ask an authorized technician to replace the plug (contact
the Customer Support Service); do not use extension cables or
multiple sockets.
Once the appliance has been installed, the power supply cable
and the electrical socket should be easily accessible.
The cable should not be bent or compressed.
If the power supply cable is damaged, it must be replaced by the
manufacturer or its Customer Support Service in order to prevent all
potential hazards.
The company shall not be held responsible for any incidents that
occur if these regulations are not observed.
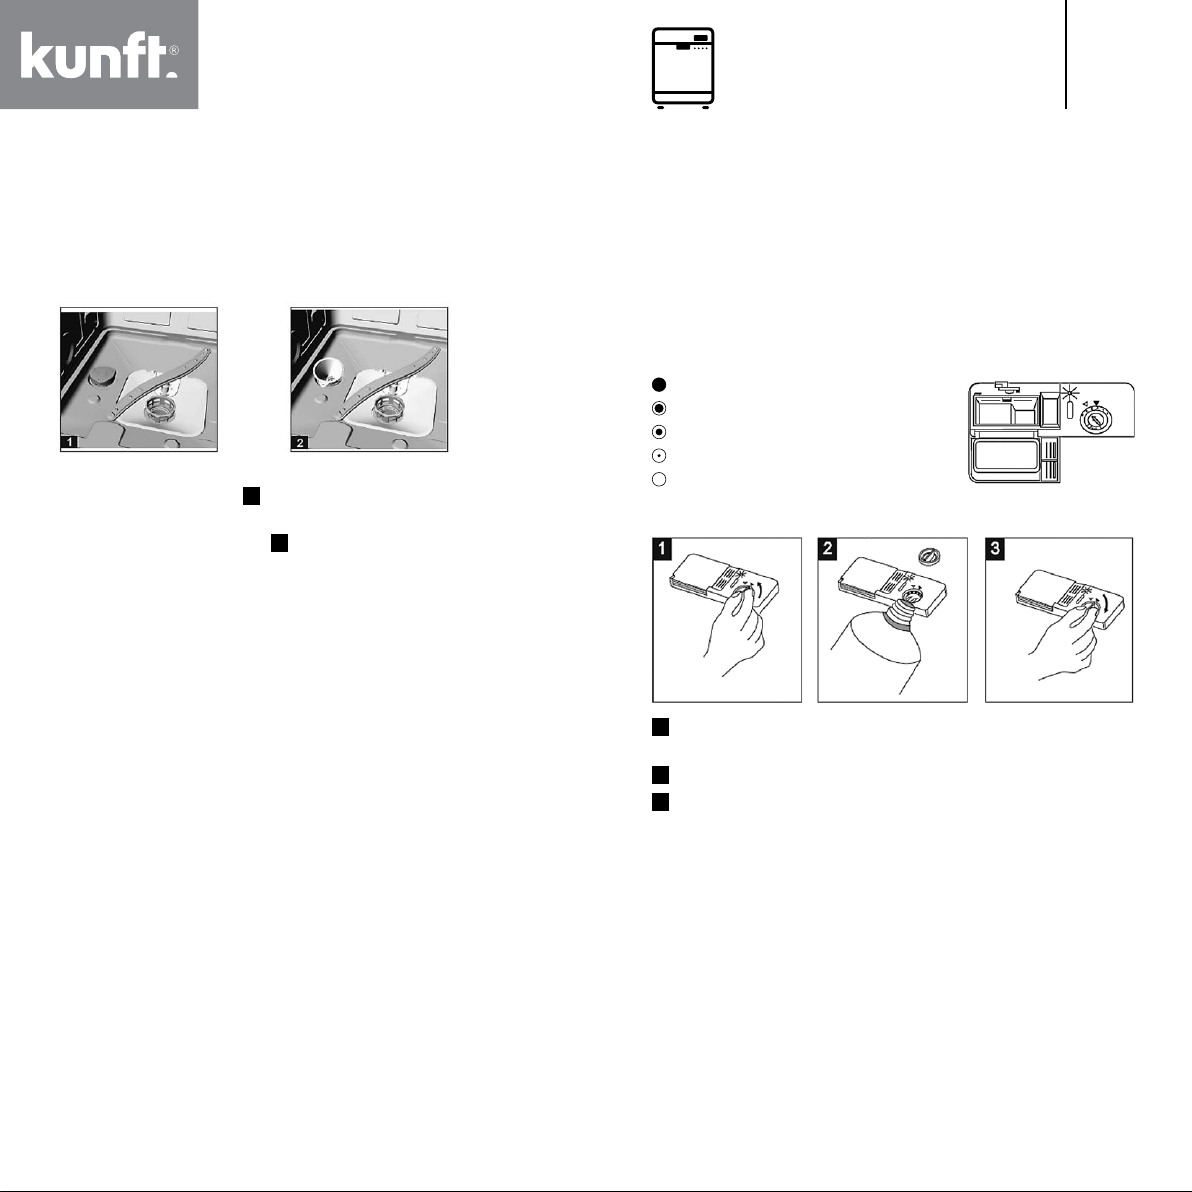
Advice regarding the rst washing programme
After the appliance has been installed, immediately before running
the rst washing programme, completely ll the salt dispenser and
add approximately 2 Kg of salt (refer to section “Salt, Detergent
and Rinse Aid”). The water may overow: this is normal and is not a
cause for concern. It is also normal that the LOW SALT indicator light
continues to ash for a few cycles after the salt has been loaded.
Positioning the Appliance
Position the appliance in the desired location. The back should rest
against the wall behind it, and the sides, along the adjacent cabinets
or wall. The dishwasher is equipped with water supply and drain
hoses that can be positioned to the right or the left to facilitate proper
installation.
Levelling the Appliance
Once the appliance is positioned, adjust the feet (screwing them in
or out) to adjust the height of the dishwasher, making it level. In any
case, the appliance should not be inclined more than 2°.
NOTE: the maximum adjustment height of the feet is 20 mm.
How to drain excess water from hoses
If the sink is 1000 mm higher from the oor, the excess water in the
hoses cannot be drained directly into the sink. It will be necessary to
drain the excess water from the hoses into a bowl or into a suitable
container that is held outside and lower than the sink.
Water outlet
Connect the water drain hose. The drain hose must be correctly tted
to avoid water leaks. Ensure that the water inlet hose is not kinked
or squashed.
Extension hose
If you need a drain hose extension, try to use a similar drain hose, no
longer than 4 metres; otherwise the cleaning effect of the dishwasher
could be reduced.

16 17
KDW4752N
EN
dishwasher
Syphon connection
The waste connection must be at a height of between 50 cm
(minimum) and 100 cm (maximum) from the bottom of the dish. The
water drain hose should be xed by a hose clip.
Before starting the dishwasher
The followings should be observed before starting the dishwasher:
1. Whether the dishwasher is levelled and xed;
2. Whether the inlet valve is opened;
3. Whether there is a leakage at the connections of the conducts;
4. Whether the wires are tightly connected;
5. Whether the power is switched on;
6. Whether the inlet and drain hoses are knotted;
7. All packing materials and printings should be taken out from the
dishwasher.
Attention
After installation, please put this manual into the bags of printings, as
its content is very helpful to the users.
Prior Using for the First Time
Before using your dishwasher for the rst time, refer to the
following items:
A. Set the water softener
B. Fill the salt container
C. Fill the rinse aid dispenser
D. Detergent
A. Set the water softener
The water softener is designed to remove minerals and salts from
the water, which would have a detrimental or adverse effect on the
dishwasher’s operation. The higher the content of these minerals
and salts, the harder the water is. The softener should be adjusted
according to your area’s water hardness. Your local Water Authority
can advise you on the water hardness in your area.
Setting
The amount of salt dispensed can be set from H0 to H7.
Salt is not required at the set value H0.
1. Find out about the water hardness in your area. Your water utility
company will help you with this.
2. Set value can be found in the water hardness table.
3. Close the door.
4. Switch on “Power” switch.
5. Hold down “ Delay” button and then press “Programme” button for
5 seconds.
The buzzer rings one time and “H...” ashes on the digital display
(factory setting is H4).
To change the setting:
1. Press the “Delay” button.
Each time the button is pressed, the set value increases by one
level; when the value of H7 has been reached, the display jumps
back to H0 (off).
2. Press the “Programme” button. The chosen setting has now been
stored.
Contact your local water board for information on the hardness of
your water supply.
Water hardness table
Water hardness Mmol/l Set value on
the machine
°Clark Range
0 - 8 soft 0 - 1.1 H0
9 - 10 soft 1.2 - 1.4 H1
11 - 12 medium 1.5 - 1.8 H2
13 - 15 medium 1.9 - 2.1 H3
16 - 20 medium 2.2 - 2.9 H4
21 - 26 hard 3.0 - 3.7 H5
27 - 38 hard 3.8 - 5.4 H6
39 - 62 hard 5.5 - 8.9 H7
WATER SOFTENER
The hardness of the water varies from place to place. If hard water is
used in the dishwasher, deposits will form on the dishes and utensils.
The appliance is equipped with a special softener that uses salts
specically designed to eliminate lime and minerals from the water.
B. Fill the salt container
The salt container is located beneath the lower basket and should
be lled as follows:
Attention!
Only use salt specically designed for use in dishwashers! All other
types of salt not specically designed for use in a dishwasher,
especially table salt, will damage the water softener. In case of
damages caused by the use of unsuitable salt the manufacturer does
not give any warranty nor is liable for any caused damages.

18 19
KDW4752N
EN
dishwasher
Only ll with salt just before starting one of the complete washing
programmes.
This will prevent any grains of salt or salty water, which may have
been split, remaining on the bottom of the machine for any period of
time, which may cause corrosion.
After the rst washing programme the control panel light expires.
A. Remove the lower basket and then unscrew and remove the cap
from the salt container. 1
B. If you are lling the container for the rst time, ll 2/3 of its volume
with water (around 500ml). 2
C. Place the end of the funnel (supplied) into the hole and introduce
about 2kg of salt. It is normal for a small amount of water to come
out of the salt container.
D. Carefully screw the cap back on.
E. Usually, the salt warning light will be off in 2-6 days after the salt
container is lled with salt.
NOTE:
1. The salt container must be relled when the salt warning light in
the control panel comes on. Though the salt container may be
full, the light indicator may not be off until the salt fully dissolves.
If there is no salt warning light in the control panel, use your best
judgement as to when load the salt into the softener dispenser
given the number of cycles the dishwasher has run.
2. If the salt overspills, a programme can be run to eliminate them.
C. Fill the rinse aid dispenser
Rinse Aid feature
The rinse aid is automatically added during the last rinse, ensuring a
thorough rinsing, spot and streak free drying.
Attention!
Only use branded rinse aid for dishwasher. Never ll the rinse aid
dispenser with any other substances (e.g. dishwasher cleaning
agent, liquid detergent), as this would damage the appliance.
When to Rell the Rinse Aid Dispenser
If there is no rinse aid warning light on the control panel, you can
estimate the amount of rinse aid to be added by the colour of the
optical level indicator “D” located next to the cap. When the rinse aid
container is full, the whole indicator will be dark . As the rinse aid is
lower, the size of the dark dot decreases. You should never let the
rinse aid get below ¼ full.
As the rinse aid diminishes, the size of the black dot on the rinse aid
level indicator changes, as illustrated below.
Full
¾ full
½ full
¼ full - Should rell to eliminate spotting
Empty
RINSE AID DISPENSER
1 To open the dispenser, turn the cap to the “open” (left) arrow and
lift it out.
2 Pour the rinse aid into the dispenser, being careful not to overll it.
3 Replace the cap by inserting it aligned with the “open” arrow and
turning it to the “closed” (right) arrow.
The rinse aid is released during the nal rinse to prevent water from
forming droplets on your dishes that can leave spots and streaks. It
also improves drying by allowing water to sheet off the dishes.
Your dishwashers are designed to use liquid rinse aids. The rinse aid
dispenser is located inside the door next to the detergent dispenser.
To ll the dispenser, open the cap and pour the rinse aid into the
dispenser until the level indicator turns completely black. The volume
of the rinse aid container is about 140 ml. Be careful not to overll
the dispenser, as it could cause excess suds. Wipe away any spills
with a damp cloth. Don’t forget to replace the cap before you close
the dishwasher door.

20 21
KDW4752N
EN
dishwasher
Attention!
Clean up any rinse aid split during lling with an absorbent cloth to
avoid excess suds during the next wash.
Adjusting Rinse Aid Dispenser
The rinse aid dispenser has four or six settings.
Always start with the dispenser set on “4” If spots
and poor drying are problems, increase the
amount of rinse aid dispensed by removing the
dispenser lid and rotating the dial to “5”. If the
dishes still are not drying properly or are spotted,
adjust the dial to the next higher number until
your dishes are spot-free. The dose is factory set
in the position 5.
NOTE: set the rinse aid dispenser to a higher dosage if there are
drops of water or lime spots on the dishes after washing. Reduce
it if there are sticky whitish streaks on the dishes or a bluish lm on
glassware or knife blades.
D. Detergent
Detergents with its chemical ingredients are necessary to remove
dirt, crush dirt and transport it out of the dishwasher. Most commercial
quality detergents are suitable for this purpose.
Concentrated Detergent
Based on their chemical composition, dishwasher can be split in two
basic types:
• conventional, alkaline detergents with caustic components
• low alkaline concentrated detergents with natural enzymes
The use of “Eco” washing programmes together with concentrated
detergents reduces pollution and is good for your dishes; these
washing programmes are specially matched to the dirt-dissolving
properties of the enzymes of the concentrated detergent. For this
reason, the “Eco” washing programme in which concentrated
detergents are used can achieve the same results that could
otherwise only be achieved using an “intensive” washing programme.
Detergent Tablets (3 in1)
Detergent tablets of different brands dissolve at different speeds.
For this reason, some detergents cannot dissolve and develop their
full cleaning power during short programmes. Therefore, use long
programmes when using detergent tablets, to ensure the complete
removal of detergent residuals.
Detergent Dispenser
The dispenser must be relled before the start of each washing
programme following the instructions provided in the Washing
programme Table. Generally, only one tablespoon of detergent
is needed for a normal wash load. Also, more heavily soiled items
need more detergent. Always add the detergent just before starting
a washing programme, otherwise it could get damp and will not
dissolve properly.
Amount of Detergent to Use
NOTE:
1 If the lid is closed: press release button. The lid springs open.
2 Always add the detergent just before starting each washing
programme. Only use branded detergent aid for dishwasher.
WARNING!
Dishwasher detergent is corrosive! Take care to keep it out of reach
of children
Use only detergent specically made for use in dishwashers. Keep
your detergent fresh and dry.
Don’t put powder detergent into the dispenser until you’re ready to
wash dishes.
Fill in the detergent
Fill the detergent dispenser with detergent.
The marking indicates the dosing levels, as
illustrated on the right:
1 Where to place the main washing pro-
gramme detergent. MIN means approxi-
mately 20 g of detergent.
2 Where to place the pre-washing programme detergent, approxi-
mately 5 g of detergent.
Please observe the manufacturer’s dosing and storage recommen-
dations as stated on the detergent packaging.
Close the lid and press it until it locks in place.
If the dishes are heavily soiled, place an additional detergent dose in
the pre-wash detergent chamber. This detergent will be used during
the pre-wash phase.

22 23
KDW4752N
EN
dishwasher
Detergents
There are 3 sorts of detergents
1. With phosphate and with chlorine
2. With phosphate and without chlorine
3. Without phosphate and without chloride
Normally, powder detergents does not have phosphate. The water
softener feature of phosphate is not given. In this case we recommend
lling the salt dispenser even when the water hardness level is only
6 dH. If detergents without phosphate are used, together with a high
water hardness level, white spots can appear on dishes and glasses.
Should this occur, add more detergent to achieve better results.
Detergents without chlorine only bleach a little. Strong and coloured
spots will not be removed completely. Should this occur, choose a
programme with a higher temperature.
Half Load
1.1 Half load is an additional function and can be used during the
Intensive, Eco, 90min and 30min program and cannot be used in
the pre-rinse program.
1.2 By activating the half load function, the machine will adjust the
program reducing water and energy consumption as well as the
program duration.
1.3 For best washing results, it is suggested that the use of this
function be limited to a maximum load of half of the total load.
Loading the Upper Baskets
For best performance of the dishwasher, follow loading guidelines.
Features and appearance of baskets and silverware baskets may
vary from your model.
Attention before or after Loading the Dishwasher
Baskets
Scrape off any large amounts of leftover food. It is not necessary to
rinse the dishes under running water. Place objects in the dishwasher
in the following way:
1. Items such as cups, glasses, pots/pans, etc. are stood upside
down.
2. Curve items, or those with recesses, should be at a slant so that
water can run off.
3. They are stacked securely and cannot tip over.
4. They do not prevent the spray arms from rotating while washing
takes place.
Very small items should not be washed in the dishwasher as they
could easily fall out of the baskets.
Removing the Dishes
To prevent water dripping from the upper basket into the lower
basket, we recommend that you empty the lower basket rst and
then the upper basket.
Loading the Upper Basket
The upper basket is designed to hold more delicate and lighter
dishware such as glasses, coffee and tea cup and saucers, as well
as plates, small bowls and shallow pans (as long as they are not too
dirty). Position the dishes and cookware so that they do not move
around with the water spray.
Upper basket
Type Item
ACup
BGlass
CSaucer
DMug
EDessert bowl
FSmall pot
GOven pot
Adjusting the upper Basket
If required, the height of the upper basket can be adjusted in order
to create more space for large utensils either in the upper basket or
lower basket. The upper basket can be adjusted for height by putting
wheels of different height into the rails. Long items, serving cutlery,
salad servers or knives should be placed on the shelf so that they do
not obstruct the rotation of the spray arms. The shelf can be folded
back or removed when not be required for use.
Loading the lower Basket
We recommend that you place large items which are most difcult
to clean in to the lower basket: pots, pans, lids, serving dishes and
bowls, as shown in the gure below.

24 25
KDW4752N
EN
dishwasher
It is preferable to place serving dishes and lids on the side of the
baskets in order to avoid blocking the rotation of the top spray arm.
Pots, serving bowls, etc. must always be placed top down.
Deep pots should be slanted to allow water to ow out.
The bottom rack features fold down tine rows so that larger or more
pots and pans can be loaded.
Lower Basket
Type Item
EDessert bowl
HSoup plate
IDinner plate
JDessert plate
KOval plate
LGlass bowl
MDessert bowl
NBowl
Folding racks
Folding racks consisting of two parts
that are located on the lower basket
of your machine are designed in or-
der to let you more easily place big
items, such as pots, pans, etc.
If necessary, each part can be folded
separately, or all of them can be fol-
ded and a larger space can be obtai-
ned. You can use folding racks by rai-
sing then upwards, or by folding them.
Cutlery basket
Cutlery should be placed in the cutlery basket with the handles down:
if the basket has side baskets, spoons should be loaded individually
into the appropriate slots and long utensils should be placed
horizontally at the front of the upper basket.
Type Item
1Tea spoons
2Dessert spoons
3Soup spoons
4Gravy ladle
5Serving fork
6Forks
7Knives
Cutlery basket
Door side
For washing in the dishwasher the following cutlery/dishes:
Are not suitable: Are of limited
suitability:
Cutlery with wooden, horn china
or mother-of-pearl handles;
Plastic items that are not heat resistant;
Older cutlery with glued parts that are not
temperature resistant;
Bonded cutlery items or dishes;
Pewter or cooper items;
Lead crystal glass;
Steel items subject to rusting;
Wooden platters;
Items made from synthetic bre
WARNING!
Do not let any item extend through bottom
Some types of glasses
can become dull
after a large number
of washes;
Silver and aluminium
parts have a tendency
to discolour during
washing;
Glazed patterns
may fade if
machine-washed
frequently.
NOTE: do not place items dirty with cigarette ash, candle wax,
lacquer or paint. If you buy new dishes please make sure that they
are dishwasher safe.
NOTE: please do not overload your dishwasher. There is only space
for 12 standard dishes. Do not use dishes that are not dishwasher
safe. This is important to obtain good results and for a reasonable
energy consumption.
Loading cutlery and dishes
Before loading the dishes, you should:
- Remove large left-over
- Soften remnants of burnt food in pans

26 27
KDW4752N
EN
dishwasher
When loading the dishes and cutlery, please note
the following:
Dishes and cutlery must not impede the rotation of the spray arms.
Load hollow items such as cups, glasses, pans etc. with the opening
downwards so that water cannot collect in the container or a deep
base.
Dishes and items of cutlery must not lie inside one another, or cover
each other
• To avoid damage to glasses, they must not touch
• Load large items which are most difcult to clean into the lower rack
• The upper basket is designed to hold more delicate and lighter
dishware such as glasses, coffee and tea cups
Attention!
Long bladed knives stored in an upright position are a potential
hazard!
Long and/or sharp items of cutlery such as carving knives must be
positioned horizontally in the upper basket.
Damage to glassware and other dishes
Possible causes:
• Type of glass or manufacturing process. Detergent’s chemical
composition.
• Water temperature and duration of the dishwasher programme.
Suggested solution:
• Use glassware or porcelain dishes that have been marked
dishwasher-safe by the manufacturer.
• Use a mild detergent that is described as delicate on dishes. If
necessary, seek further information from detergent manufacturers.
• Select a low temperature programme.
• To prevent damage, take glasses and cutlery out of the dishwasher
as soon as possible after the programme nishes.
At the End of the Wash
When the working cycle has nished, the digital display “---”, then
stop. Turn off the appliance using the Power button, shut off the water
supply and open the door of the dishwasher. Wait a few minutes
before unloading the dishwasher to avoid handling the dishes and
utensils while they are still hot and more susceptible to breakage.
They will also dry better.
Starting a washing programme
Washing programme table
Programme Cycle Selection
Information Description of
Cycle Detergent
Pre/main Running
Time
(min)
Energy
(kWh) Water
(L)
Intensive
For the heaviest soiled
loads, such as pots,
pans, casserole dishes
and dishes that have
been sitting with dried
food on them for a while.
Pre-wash
Main wash (60ºC)
Rinse1
Rinse2
Hot rinse Drying
4/16 g
(or 3in1) 180 1.300 16
Eco
(*EN50242)
(Standard
Programme)
For normally soiled
loads, such as pots,
plates, glasses and
lightly soiled pans.
standard daily cycle.
Pre-wash
Main wash (44º C)
Hot rinse
Drying
4/16 g
(or 3 in 1) 237 0.922 11
For lightly and normally
soiled plates and pans
for every day. Run cycle
immediately after use)
Pre-wash
Main wash (50º C)
Rinse
Hot rinse Drying
3/15 g 90 0.890 14
A shorter wash for lightly
soiled loads that do not
need drying.
Main wash (40º C)
Hot rinse
15 g 30 0.500 7
Pre-Rinse
To rinse dishes that
you plan to wash later
that day
Pre-wash / 11 0.010 4
Turning on the appliance
Starting a washing programme...
Pull out the lower and upper basket, load them with dishes and
proceed accordingly:
1. Push them back. It is recommended to load the lower basket rst,
then the upper one (refer to section “Loading the Dishwasher”).
Pour in the detergent.
2. Insert the plug into the socket. The power supply is 220-240 V
AC 50 Hz, the specication of the socket is 12 A 250 VAC, 50 Hz.
Make sure the water supply is turned on to full pressure. Close the
door, press the ON/OFF button, press the “programme” button to
select a desired “Washing programme” (refer to section “Washing
programme Table”).
The Eco program is suitable to clean normally soiled tableware, it is
the most efcient program in terms of its combined energy and water

28 29
KDW4752N
EN
dishwasher
consumption. It is used to assess compliance with the EU ecodesign
legislation.
Manual pre-rinsing of tableware items leads to increased water and
energy consumption and it’s not recommended.
Apply a little force to ensure the door is properly closed.
NOTE: a click will be heard when the door is properly closed.
When the washing is over, you can switch off the appliance by
pressing the ON/OFF button.
Switching on
1. Open the tap, if it is closed.
2. Close the door.
3. Make sure the spray arms are not obstructed.
4. Switch the dishwasher on using the “ Start/Pause “ button.
Cancel/Change the program
Note: a cycle that is underway can only be modied if it has only
been running for a short time. Otherwise, the detergent may have
already been released, and the appliance may have already drained
the wash water. Should this be the case, the detergent dispenser
must be relled (refer to section “Fill in the Detergent”).
Open the door and press the power button for more than 3 seconds
to turn off the machine and cancel the program. When you restart the
machine, you can change the program to the desired cycle setting
(refer to section “Starting a washing programme”).
NOTE: if you open the door during a washing programme, the
machine pauses, a warning alarm will ring and the display will show
E1. When you close the door, the dishwasher will resume working.
Forget to add a dish
Dishes can be added any time before the detergent container opens.
1. Slightly open the door to stop the washing programme.
2. After the spray arms stop working, open the door completely.
3. Add the dishes.
4. Close the door. The dishwasher will resume work after 10 seconds.
WARNING!
It is dangerous to open the door when washing, as hot water may
scald you.
Switch Off the Dishwasher
The digital display shows “--”, only in this case the programme has
ended.
1. Switch off the dishwasher by pressing the ON/OFF button.
2. Turn off the water tap!
2.3. Maintenance
Filtering System
The lter is used to avoid large residues
and other sundries from getting inside the
pump, as they can obstruct the lter.
The lter system consists of a coarse
lter, a at (main lter) and a micro lter
(ne lter).
1. Flat lter
Food and debris will be trapped by a
special jet on the lower spray arm.
2. Coarse lter
Larger debris, such as bone and glass that could clog the drain, will
be trapped in the coarse lter.
To remove an item caught in this lter, gently squeeze the taps on
the top of this lter and lift it out.
3. Micro lter
This lter holds soil and food residue in the sump area and
prevents it from being redeposited on the dishes during a washing
programme.
- Inspect the lters for obstructions after each use of the
dishwasher.
- By unscrewing the coarse lter, you can remove the lter system.
Remove any food remnants and clean the lters under running
water.
Step 1. Rotate the coarse
lter counter-clockwise
and lift it up.
Step 2: Lift the at lter.
NOTE: If operate from step 1 to step 2, the lter system will be
removed; while operate from step 2 to step 1, the lter system will
be installed.
Filter assembly
For best performance and results, the lter assembly must be
cleaned. The lter efciently removes food particles from the wash
water, allowing it to be recirculated during the cycle. For this reason,
it is a good idea to remove the larger food particles trapped in the

30 31
KDW4752N
EN
dishwasher
lter after each washing programme by rinsing the semi-circular lter
and cup under running water. To remove the lter assembly, pull the
cup handle upwards. The entire lter assembly should be cleaned
once a week. To clean the coarse lter and the micro lter, use a
cleaning brush. Then, reassemble the lter parts as shown in the
gures above and reinsert the entire assembly in the dishwasher,
positioning them in place and pressing downward. The dishwasher
must never be used without the lters. Improper replacement of the
lter may reduce the performance level of the appliance and damage
dishes and utensils.
WARNING!
Never run the dishwasher without the lters in place. When cleaning
the lters, don’t hit them. Otherwise, the lters could be contorted
and the performance of dishwasher could be debased.
Cleaning the Spray Arms
It is necessary to clean the spray arms
regularly as hard water chemicals will clog
the spray arm jets and bearings.
To remove the spray arms, screw off the nut
clockwise to take out the washer on top of
the spray arm and remove the arm. Wash
the arms in soapy and warm water and
use a soft brush to clean the jets. Replace
them after rinsing them thoroughly.
Caring for the dishwasher
To clean the control panel, use a lightly dampened cloth then dry it
thoroughly.
To clean the exterior, use a good appliance polish wax.
Never use sharp objects, scouring pads or harsh cleaners on any
part of the dishwasher.
Protect Against Freezing
If your dishwasher is left in an unheated location during the winter,
ask a service technical to:
1. Cut off electrical power to the dishwasher.
2. Turn off the water supply and disconnect the water inlet pipe from
the water valve.
3. Drain the water from the inlet pipe and water valve (you can use a
pan to catch the water).
4. Reconnect the water inlet pipe to the water valve.
5. Remove the lter in the tub and the bottom and use a sponge to
collect water in the sump.
Cleaning the Door
To clean the edge around the door, you should only use a soft, warm,
damp cloth. To prevent water penetration into the door lock and
electrical components, do not use a spray cleaner of any kind.
Never use abrasive cleaners or scouring pads on the outer surfaces
as they will scratch the nish. Some paper towels can also scratch or
leave marks on the surface.
WARNING!
Never use a spray cleaner to clean the door panel as it could damage
the door lock and electrical components. Do not use an abrasive
agent or paper towels as you risk scratching or leaving spots on the
stainless steel surface.
How to Keep Your Dishwasher in Shape
After every wash
After every wash, turn off the water supply to the appliance and leave
the door slightly ajar so that moisture and odours are not trapped
inside.
Remove the plug
Before cleaning or performing maintenance, always remove the plug
from the socket. Do not take any unnecessary risks.
No solvents or abrasive cleaning
To clean the exterior and rubber parts of the dishwasher, do not
use solvents or abrasive cleaning products. Use only a cloth and
warm, soapy water. To remove spots or stains from the surface of the
interior, use a cloth dampened with water and a little white vinegar or
a cleaning product made specically for dishwashers.
When you go on holiday
When you go on holiday, it is recommended that you run a washing
programme with the dishwasher empty and then remove the plug
from the socket, turn off the water supply and leave the door of the
appliance slightly ajar. This will help the seals last longer and prevent
odours from forming in the appliance.
Moving the appliance
If the appliance must be moved, try to keep it in the vertical position.
If absolutely necessary, it can be positioned on its back.
Seals
One of the cause for dishwasher odours is food that remains trapped
in the seals. Periodic cleaning with a damp sponge will prevent this.

32 33
KDW4752N
EN
dishwasher
Attention:
The installation of the pipes and
electrical equipment should be done by
professionals.
Warning
Electrical Shock
Hazard!
Disconnect the electrical power before installing dishwasher. Failure
to do so can result in death or electrical shock.
WARNING!
The packaging material could be dangerous for children!
Dispose of package and of the appliance at a recycling centre. Cut off
the power supply cable and make the door closing device unusable.
2.4. Troubleshooting
ERROR CODES
In the event of a malfunctions, the appliance will display the following
error codes:
Codes Meanings Possible Causes
E1 Door open The door is open when the
dishwasher is working
E2 Water inlet Water inlet malfunction
E3 Water drainage Water drainage malfunction
E4 Temperature sensor Temperature sensor malfunction
E5 Overow / leakage Overow / Water leakage occurs
E6 Water leakage Water leakage occurs
E7 Heating element Abnormal heating
WARNING!
In case of overow, turn off the main water supply before calling the
Customer Support Service. If there is water in the base pan due to an
overll or a small leak, the water should be removed before restarting
the dishwasher.
Before calling the Customer Support Service
Refer to the following charts before calling the Customer Support
Service, as many issues can be solved without recourse to external
services.
Problem Possible causes How to proceed
Dishwasher
doesn’t work
Fuse blown or the
circuit breaker acted
Replace the fuse or reset the
circuit breaker. Remove any other
appliances sharing the same
circuit with the dishwasher.
Power supply is not
turned on
Make sure the dishwasher is
turned on and the door is properly
closed. Make sure the power cord
is properly plugged into the wall
socket.
Water pressure is low Check that the water supply is
properly connected and the water
is turned on.
Drain pump
doesn’t stop
Overow The system is designed to detect
an overow. When it does, it shuts
off the circulation pump and turns
on the drain pump.
Noise Some audible sounds
are normal
Sound from detergent container
opening.
Utensils are not
secure in the racks or
something small has
dropped into the rack
Ensure everything is secured in
the dishwasher.
Motor is humming The dishwasher has not been
used regularly. If you do not use it
often, remember to set it to ll and
pump out every week, which will
help keep the seal moist.
Suds in
the tub
Improper detergent Use only a special dishwasher
detergent to avoid suds. Should
this occur, open the dishwasher
and let suds evaporate. Add 1
gallon of cold water to the tub.
Close and latch the dishwasher,
then start the “pre-rinse” washing
programme to drain out the water.
Repeat if necessary.
Spilled rinse agent Always wipe up rinse agent spills
immediately.

34 35
KDW4752N
EN
dishwasher
Problem Possible causes How to proceed
Stained tub
interior
Detergent with
colorant was used
Make sure the detergent does not
contain colorant.
Dishes and
atware are
not clean
Improper programme
Improper rack loading
Select a stronger programme.
Make sure the action of the
detergent dispenser and spray
arms are not blocked by large
dishware.
Spots and
lming on
glasses
and atware
1. Extremely hard
water
2. Low inlet
temperature
3. Overloading
the dishwasher
4. Improper loading
5. Old or damp powder
detergent
6. Empty rinse agent
dispenser
7. Incorrect dosage of
detergent
To remove spots from glassware:
1. Take out all metal utensils from
the dishwasher.
2. Do not add detergent.
3. Choose the longest cycle.
4. Start the dishwasher and allow
it to run for about 18 to 22
minutes, until it reaches the
main washing cycle.
5. Open the door to pour 2 cups of
white vinegar into the bottom of
the dishwasher.
6. Close the door and let the
dishwasher complete the cycle.
If the vinegar does not work,
repeat as described above, but
use ¼ cup (60 ml) of citric acid
crystals instead of vinegar.
Cloudiness
on glassware
Combination of soft
water and too much
detergent
Use less detergent if you have soft
water and select a shortest cycle
to wash the glassware and to get
them clean.
Yellow or
brown lm
on interior
surfaces
Tea or coffee stains Use a solution of ½ cup of bleach
and 3 cups of warm water to
remove the stains by hand.
WARNING: you have to wait 20
minutes after a cycle is nished
to let the heating elements cool
down before cleaning the interior;
otherwise, burns will happen.
Iron deposits in the
water can originate
a lm
You have to call a water softener
company and request a special
lter.
Problem Possible causes How to proceed
White lm
on interior
surface
Hard water minerals To clean the interior, use a damp
sponge with dishwasher detergent
and wear rubber gloves. Never
use any other cleaner than
dishwasher detergent for the risk
of foaming or suds.
The
Detergent
dispenser lid
doesn’t close
properly
Clogged detergent
residue is blocking
the lock
Remove the detergent from
the lock.
Detergent left
in dispenser
cups
Dishes block the
detergent cups
Reload the dishes properly.
Steam Normal phenomenon There is some steam coming
through the vent by the door latch
during drying and water draining.
Black or grey
marks on
dishes
Aluminium utensils
have rubbed against
dishes
Use a mild abrasive cleaner
to eliminate those marks.
Water
standing on
the bottom of
the tub
This is normal A small amount of clean water
around the outlet on the tub
bottom keeps the water seal
lubricated.
Dishwasher
leaks
Overll dispenser
or rinse aid spills
Be careful not to overll the rinse
aid dispenser.
Spilled rinse aid could cause
oversudsing and lead to
overowing. Wipe away any spills
with a damp cloth.
Dishwasher isn’t
levelled
Make sure the dishwasher
is levelled.

36 37
KDW4752N
EN
dishwasher
3. TECHNICAL SPECIFICATIONS
Technical datasheet for household dishwasher according to EU Di-
rective 2019/2017:
Model KDW4752N
Standard place settings 12
Energy efciency class1E
Eco programme energy consumption 0.922 kWh/cycle
Standard programme energy consumption 1.650 kWh/cycle
Energy Efciency Index 55.9
Eco programme water consumption 11.0 L/cycle
Cleaning performance index 1.13
Drying performance index 1.09
Duration of the eco programme 3h 57min
Power consumption in off-mode 0.49 W
Power consumption in stand-by mode 0.60 W
Does stand-by mode include the display
of information?
No
Power consumption in delay start 1.00
Noise level 49 dB
Mounting Freestanding
Possibility for built-in Yes
Height 84.5 cm
Width 60.0 cm
Depth (with connectors) 60.0 cm
Power consumption 1850 W
Rated voltage / frequency AC 220-240V / 50 Hz
Water pressure (ow pressure) 0.4-10bar=0.04-1.0MPa
NOTE:
1. From A (highest efciency) to G (lowest efciency).
The device meets the European standards and the directives in the
current version at delivery.
- LVD 2014/35/EU
- EMC 2014/30/EU
- EUP 2019/2022
NOTE: the values above have been measured in accordance with
standards under specied operating conditions. Results may vary
greatly according to quantity and pollution of the dishes, water
hardness, amount of detergent, etc.
The manual is based on the European Union’s standards and rules.
4. POSTSALE SERVICE
KUNFT has designed this appliance in order to guarantee maximum
reliability. However, if a problem occurs do not attempt to open the
appliance - there is a risk of electrical shock. If you are not able to
solve the problem, please contact the Customer Support Service
of any Worten, Modelo or Continente store in order to be assisted.
Worten Equipamentos para o Lar provides a 2-year warranty for
manufacturing defects from the date of purchase of the appliance.
WARNING: any attempt to repair the appliance without contacting
the manufacturer or seller will void the warranty.
All users must be familiar with these instructions. Knowing what
could go wrong can help prevent problems from occurring.
Availability of Spare Parts
Dependant upon the spare part, these are available for a minimum
period of seven years for professional repairers or a minimum of ten
years for professional repairers and end users after placing the last
unit of the model on the market.
5. ENVIRONMENTAL
PROTECTION
In order to protect the environment, we strive to reduce the volume of
packaging used, limiting it to three easily sorted materials: cardboard,
paper and plastic.
The appliance is manufactured using recyclable materials
after disassembled by a specialized company. Please
comply with local regulations concerning the recycling of
all materials.

38 39
KDW4752N
ES
lavavajillas
Estimado cliente:
Gracias por adquirir este producto.
Este aparato ha sido sometido a diversas pruebas
que avalan su calidad. Este manual de instrucciones
está destinado a facilitar el uso del aparato y garantizar
un uso seguro.
Lea atentamente las instrucciones, así como las medidas
de seguridad descritas en este manual.
Esperamos sinceramente que esté satisfecho
con su nuevo aparato.
ÍNDICE
1. INSTRUCCIONES DE SEGURIDAD ................... 40
1.1. Fuente de alimentación ................................ 41
1.2. Cable de alimentación y otros cables ........... 42
1.3. Humedad y agua........................................... 42
1.4. Limpieza........................................................ 42
1.5. Advertencias de seguridad............................ 43
2. MANUAL DE INSTRUCCIONES.......................... 48
2.1. Descripción del producto .............................. 48
2.2. Utilización del producto................................. 49
2.3. Mantenimiento .............................................. 66
2.4. Resolución de problemas ............................. 69
3. ESPECIFICACIONES TÉCNICAS ....................... 73
4. SERVICIO POSVENTA ........................................ 74
5. PROTECCIÓN MEDIOAMBIENTAL..................... 74
Table of contents
Languages:
Other Kunft Dishwasher manuals