Kunft KDW5137 WH User manual

instructions manual
manual de instrucciones
manual de instruções
dishwasher
KDW5137 WH
KDW5137 SL

2 3
KDW5137 WH
KDW5137 SL
EN
dishwasher
Dear client,
Thank you for purchasing this product.
The quality of this appliance has been certied by several
laboratory tests. This instructions manual is provided
to simplify the use of the appliance as well as to guarantee
a safe use.
Please read carefully the instructions and safety measures
described in this manual.
We sincerely hope you will be satised when using
your new appliance.
INDEX
1. SAFETY INSTRUCTIONS...................................... 4
1.1. Power Supply ................................................. 5
1.2. Power Cord and Other Cables........................ 6
1.3. Humidity and Water ........................................ 6
1.4. Cleaning.......................................................... 6
1.5. General Precautions ....................................... 6
2. OPERATING INSTRUCTIONS............................... 8
2.1. Product Description......................................... 8
2.2. Product usage............................................... 10
2.3. Troubleshooting ............................................ 19
3. TECHNICAL SPECIFICATIONS........................... 20
4. POST-SALE SERVICE......................................... 21
5. ENVIRONMENTAL PROTECTION ...................... 21

4 5
KDW5137 WH
KDW5137 SL
EN
dishwasher
1. SAFETY INSTRUCTIONS
WARNING
Risk of Electric Shock
Do Not Open
Warning: to avoid the risk of electric
shock, do not remove the cover.
The interior does not contain any parts
that can be repaired by the user.
Ask for assistance from the Customer
Support Service.
Important Warnings
Before using your appliance read these ins-
tructions manual carefully and keep it in a
safe place as you may need to consult it in
the future.
Before turning on your appliance, and to
ensure a safe and correct operation, do not
use if:
- It has fallen to the ground;
- You notice any evidence of damage;
- Any anomaly occurs during its operation.
To avoid hazards or deterioration of your ap-
pliance through incorrect use it is advisable
to read these instructions thoroughly.
Your appliance should not be used for other
purposes than the ones intended and sole-
ly for household use. Any damage resulting
from using the appliance outside this scope,
any incorrect use, as well as any manual
modications to the product will not be co-
vered and automatically voids the warranty.
Assistance
In case of malfunction, take your appliance
to the Customer Support Service for assis-
tance.
This appliance can be used by
children from the age of 8 and by
people with reduced physical, sen-
sorial or mental capabilities and /
or lack of experience and know-
ledge if they have been given ins-
tructions on using the appliance
safely and if they understand the
hazards involved. Children may
not play with the appliance. Cle-
aning and maintenance must not
be carried out by children without
supervision.
These instructions are also available
at www.suporteworten.pt
1.1. Power Supply
Make sure the main voltage is compatible
with the appliance. If this is not the case,
please consult the Customer Support Ser-
vice.

6 7
KDW5137 WH
KDW5137 SL
EN
dishwasher
1.2. Power Cord and Other Cables
Do not tangle the cord or pull it to discon-
nect the appliance. Also, keep the cord
away from warm surfaces.
Never use the appliance if it has a damaged
cable or socket.
Take it to the Customer Support Service for
replacement.
1.3. Humidity and Water
Do not use your appliance in humid places.
Do not allow the appliance to become wet
under any circumstances as this may be
dangerous. To avoid re hazard or electric
shock do not expose your appliance to hu-
midity or water. Furthermore, do not place
your appliance under water (e.g. for clea-
ning).
1.4. Cleaning
Before cleaning, be sure to switch off the ap-
pliance and remove the plug from the main
power supply. Always allow the unit to cool
down before cleaning.
To clean the exterior of the product, use a
dry soft cloth only.
1.5. General Precautions
• Please follow the instructions in the user
manual which will help you to properly ins-
tall and operate this product and enjoy its
advanced features. Please keep the ins-
tructions for future reference.
• Read all instructions before using the pro-
duct.
• Maintenance and service operations are
only to be carried out by authorized pro-
fessionals.
• Any damage caused by manual modica-
tions to the product is not covered by the
warranty.
• If this product is used for other purposes
than the ones originally intended, or if it is
not correctly connected, the product may
become damaged and the warranty will be
voided.
• If you cannot solve the problems by your-
self, please contact the Customer Support
Service.

8 9
KDW5137 WH
KDW5137 SL
EN
dishwasher
2. OPERATING INSTRUCTIONS
2.1. Product Description
Height (H) 845 mm
Width (W) 448 mm
Depth (D1) 610 mm (with the door closed)
Depth (D2) 1175 mm (with the door open at 90°)
Control Panel
3h 6h 9h 12h
3h 6h 9h 12h
90’
ECO
1 2 3 4
5 6
Operation (Button)
1 Power Press this button to turn on your dishwasher; the
indicator lights up.
2 Delay Press this button to set the delay time.
3 Programme Rotate the knob to select the appropriate
washing programme, and the corresponding
indicator will light up.
ECO
This is the standard programme. It is suitable to
clean normally soiled tableware and it is the most
efcient programme in terms of its combined
energy and water consumption for that type of
tableware.
Universal
For universally soiled loads, such as pots, plates,
glasses and lightly soiled pans.
Intensive
For heavy soiled crockery, and normally soiled
pots, pans, dishes, etc. with dried-on food.
90 min
For normally soiled loads that need a quick wash.
Rapid
A shorter wash for lightly soiled loads that do not
need drying.
Glass
For lightly soiled crockery and glass.
4 Start / Pause Press this button to start the selected washing
programme or pause the working programme.
Display
5 Delay time This function shows the delay time
(3 h / 6 h / 9 h / 12 h)
Rinse Aid
6 Warning
indicator If the “ ” indicator is turned on, it means the
dishwasher is low on dishwasher rinse aid and
needs to be relled.
Salt
If the “ ” indicator is turned on, it means the
dishwasher is low on dishwasher salt and needs
to be relled.

10 11
KDW5137 WH
KDW5137 SL
EN
dishwasher
2.2. Product usage
Please read the corresponding content on the instruction’s manual
for a detailed operating method.
1. Install the dishwasher
Inside Inside
2. Remove the larger residue
on the cutlery
3. Load the baskets
4. Add the detergent 5. Select a programme and
running the dishwasher
Water Softener
The water softener must be set manually, using the water hardness
dial.
The water softener is designed to remove minerals and salts from
the water, which would have a detrimental or adverse effect on the
appliance’s operation.
The more minerals there are, the harder your water is.
The softener should be adjusted according to the water hardness in
your area. Contact your local Water Authority for advice on the water
hardness in your area.
Adjusting the Salt Consumption
This dishwasher is designed to allow for adjusting the amount of salt
consumed based on the hardness of the water used. This is intended
to optimise and customise the salt consumption level.
Please follow below steps to adjust salt consumption.
1. Switch on the appliance.
2. Press the Start / Pause button for more than 5 seconds to start the
water softener setup mode within 60 seconds after the appliance
was switched on.
3. Rotate the Programme knob to select the proper setting according
to your local environment. Settings will change in the following
sequence: H1->H2->H3->H4->H5->H6.
4. Press the On / Off button to end the setup mode.
WATER HARDNESS Water softener
level
Salt
consumption
(grams /
cycle)
German
º dH
French
º fH
British
º Clarke
Mmol / l
0 - 5 0 - 9 0 - 6 0 - 0.94 H1-> Rapid
indicator light
0
6 - 11 10 - 20 7 - 14 1.0 - 2.0 H2-> 90 min
indicator light
9
12 - 17 21 - 30 15 - 21 2.1 - 3.0 H3-> 90 min Rapid
indicators light
12
18 - 22 31 - 40 22 - 28 3.1 - 4.0 H4-> Glass
indicator light
20
23 - 34 41 - 60 29 - 42 4.1 - 6.0 H5-> Glass Rapid
indicator light
30
35 - 55 61 - 98 43 - 69 6.1 - 9.8 H6-> Glass 90 min
indicator light
60
1° dH = 1.25° Clarke=1.78° fH = 0.178 mmol/l. The manufactory
setting is: H3.
Contact your local water authority for information on the hardness of
water supplied.
Please check section 3 “Loading the Salt Into the Softener” of PART I:
Generic Version, if your dishwasher lacks salt.
NOTE:
If your model does not have any water softener, you may skip this
section.
Water Softener
Water hardness varies from place to place. If hard water is used
in the dishwasher, deposits will form on the dishes and utensils.
This appliance is equipped with a special softener that uses a salt
container specically designed to eliminate lime and minerals from
the water.

12 13
KDW5137 WH
KDW5137 SL
EN
dishwasher
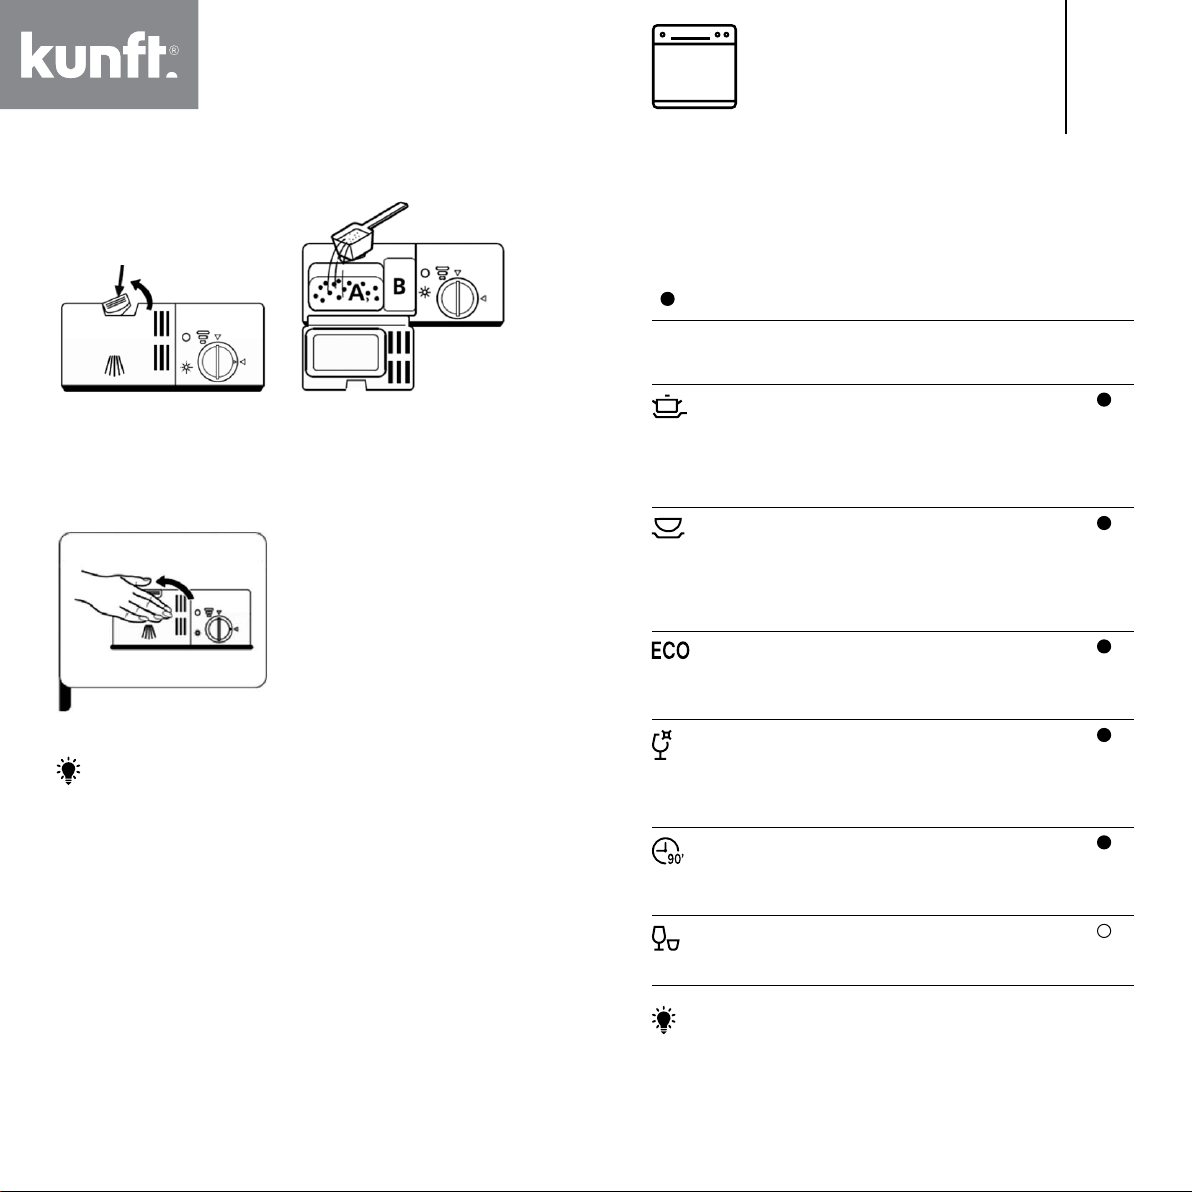
Preparing and Loading Dishes
• Consider buying utensils which are identied as dishwasher-safe.
• For particular items, select a programme with the lowest possible
temperature.
• To prevent damage, do not take glass and cutlery out of the
dishwasher immediately after the programme has ended.
The following cutlery / dishes are not suitable
for washing in the dishwasher:
• Plastic items that are not heat resistant
• Cutlery with wooden, horn china or mother-of-pearl handles
• Older cutlery with glued parts that is not temperature resistant
• Bonded cutlery items or dishes
• Pewter or cooper items
• Crystal glass
• Steel items subject to rusting
• Wooden platters
• Items made from synthetic bres
The following are of limited suitability:
• Some types of glasses can become dull after a large number of
washes
• Silver and aluminium parts have a tendency to discolour during
washing
• Glazed patterns may fade if the machine washes the items
frequently
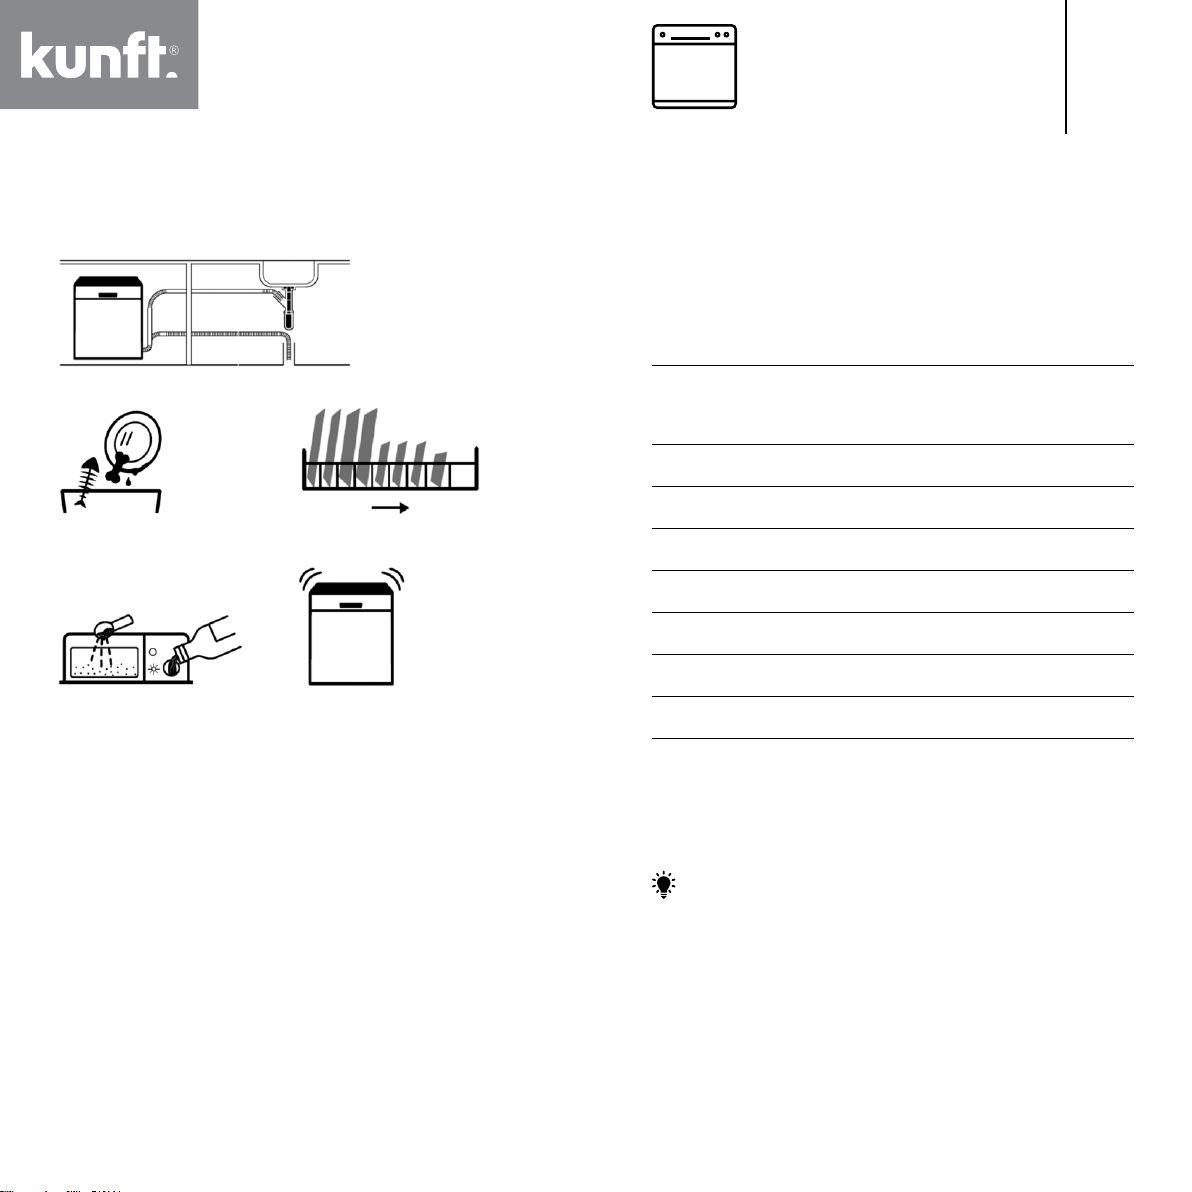
Recommendations for loading
the dishwasher
Scrape off any large amounts of leftover food. Soften remnants of
burnt food in pans. It is not necessary to rinse the dishes under
running water.
For a best performance of your dishwasher, please follow these
loading guidelines.
(Baskets and silverware baskets’ features and appearance may
vary from your model.)
Place objects in the dishwasher as follows:
• Items such as cups, glasses, pots / pans, etc. should be placed
upside down.
• Curved items, or those with recesses, should be loaded aslant so
that water can run off.
• Ensure all utensils are stacked securely and cannot tip over.
• Ensure all utensils are placed in a way that allows the spray arms to
rotate freely while washing.
• Load hollow items such as cups, glasses, pans, etc. with the opening
facing downwards so that water cannot collect in the container or
a deep base.
• Dishes and cutlery items must not lie inside one another or cover
each other.
• To avoid any damage, glasses should not touch one another.
• The upper basket is designed to hold more delicate and lighter
dishware such as glasses, coffee and teacups.
• Long bladed knives stored in an upright position are a potential
hazard!
• Long and / or sharp items of cutlery such as carving knives must be
positioned horizontally in the upper basket.
• Please do not overload your dishwasher. This is important for good
results and for reasonable energy consumption.
NOTE:
Very small items should not be washed in the dishwasher as they
could easily fall out of the basket.
Removing the Dishes
To prevent water dripping from the upper basket into the lower
basket, we recommend that you empty the lower basket rst, and
them the upper basket.
WARNING
Items will be hot! To prevent damage, do not take glass
and cutlery out of the dishwasher for around 15 minutes
after the programme has ended.
Loading the upper basket
The upper basket is designed to hold more de-
licate and lighter dishware such as glasses, co-
ffee and teacups and saucers, as well as plates,
small bowls and shallow pans (as long as they
are not too dirty).
Position the dishes and cookware so that they do not move due to
the spray of water.
Loading the lower basket
We suggest that you place large items and the
most difcult to clean into the lower basket,
such as pots, pans, lids, serving dishes and
bowls, as shown in the gure beside.
It is preferable to place serving dishes and lids on the side of the
racks in order to avoid blocking the top spray arm’s rotation.

14 15
KDW5137 WH
KDW5137 SL
EN
dishwasher
The maximum diameter advised for plates in front of the detergent
dispenser is 19 cm. Like this, dishes will not hamper opening the
dispenser.
Loading the cutlery basket
Cutlery should be placed in the cutlery rack separately from each
other in the appropriate positions. Also, please make sure the
utensils do not nest together, as this may cause a bad performance.
WARNING
Do not let any item extend through the bottom.
Always load sharp utensils with the sharp point down!
For the best washing effect, please load the baskets according to
standard loading options on the last section of PART I: Generic
Version.
Rinse Aid and Detergent
The rinse aid is released during the nal rinse to prevent water from
forming droplets on your dishes, which can leave spots and streaks.
It also improves drying by allowing water to roll off the dishes. This
dishwasher is designed to use liquid rinse aids.
WARNING
Only use branded rinse aid for dishwashers. Never ll the rinse aid
dispenser with any other substances (e.g. dishwasher cleaning
agent, liquid detergent), as this would damage the appliance.
When to rell the rinse aid dispenser
Unless the rinse aid warning light ( ) on the control panel is on, you
can always estimate the amount from the colour of the optical level
indicator located next to the cap. When the rinse aid container is full,
the indicator will be turned off. As the rinse aid diminishes, the light
indicator will progressively light up. It is recommended that the rinse
aid never reaches below 1/4 full.
As the rinse aid decreases, the size of the light on the rinse aid level
indicator changes, as illustrated below.
Full ¾ full ½ full ½ full Empty
Detergent
The chemical ingredients that compose the detergent are necessary
to remove dirt, crush dirt and dispense it out of the dishwasher.
Therefore, most commercial quality detergents are suitable for this
purpose.
WARNING
• Proper Use of Detergent
Use only detergent specically made for dishwasher use and keep
your detergent fresh and dry.
Do not add powder detergent into the dispenser until you are ready
to wash dishes.
Dishwasher detergent is corrosive! Please keep
it out of the reach of children.
Filling the Rinse Aid Reservoir
1. Remove the rinse aid
reservoir cap by rotating it
counterclockwise
2. Carefully pour in the rinse
aid into its dispenser, whilst
avoiding it to overow.
NOTE:
Clean up any spilled rinse aid with an absorbent cloth to avoid
excessive foaming during the next wash.
3. Close the rinse aid reservoir cap by rotating it clockwise.
Adjusting the Rinse Aid Reservoir
Turn the rinse aid indicator dial to a number between
1 and 6. The higher the number, the more rinse
aid the dishwasher uses. If dishes are not drying
properly or have spots, adjust the dial to the next
higher number until they are spot-free. Reduce it if
there are sticky whitish streaks on the dishes or a
bluish lm on glassware or knife blades.

16 17
KDW5137 WH
KDW5137 SL
EN
dishwasher
Filling the Detergent Dispenser
1. Press the release latch
on the detergent dispenser
to open the cover.
2. Add detergent into the larger
compartment (A) for the main
washing cycle . For more
heavily soiled wash loads, also
add some detergent into the
smaller compartment (B) for
the pre-washing cycle .
3. Close the cover and press on it until it locks into place.
NOTE:
• Be aware that depending on the soiling level of the water, settings
may be different.
• Please observe the manufacturer's recommendations on the
detergent packaging.
PROGRAMMING THE DISHWASHER
Washing Cycle Table for EN60436
The table below shows which programmes are best for the levels of
food residues on them and how much detergent is needed. It also
shows various information about the programmes.
() Means: need to rell the Rinse Aid Dispenser with rinse.
Programme Cycle
Description Pre-wash /
main wash
Detergent
Running
Time (min) Energy
(kWh) Water (L) Rinse
Aid
Intensive
Prewash
(50º C)
Wash (65º C)
Rinse
Rinse (65º C)
Drying
4/13 g
(1 or 2 pieces)
205 1 378 15.3
Universal
Pre-wash
(45º C)
Wash (55º C)
Rinse
Rinse (65º C)
Drying
4/13 g
(1 or 2 pieces)
175 1 278 13.1
(* EN 60436)
Wash (45º C)
Rinse
Rinse (55º C)
Drying
17 g
(1 or 2 pieces)
235 0.704 9.0
Glass
Pre-wash
Wash (50º C)
Rinse
Rinse (65º C)
Drying
4/13 g
(1 pieces)
120 0.934 13.1
90 min
Wash (60 ºC)
Rinse
Rinse (65 ºC)
Drying
17 g
(1 pieces)
90 1 234 10.2
Rapid
Wash (50º C)
Rinse
Rinse (45 ºC)
12 g 30 0.611 10.0
NOTE:
ECO (EN 60436): This programme is the test cycle. The information
for comparability test is in accordance with EN60436.

18 19
KDW5137 WH
KDW5137 SL
EN
dishwasher
Starting a Washing Cycle
1. Draw out the lower and upper baskets, load the dishes and then
push them back. It is recommended to load the lower basket rst,
then the upper one.
2. Pour in the detergent.
3. Insert the plug into the socket. Please refer to the last page
“Product Data Sheet” for information on the power supply.
4. Make sure that the water supply is turned on to full pressure.
5. Close the door and press the POWER button to switch on the
machine.
6. Choose a programme, and the response light will turn on. Then
press the Start / Pause button and the dishwasher will start its
cycle.
Changing the Programme Mid-cycle
A cycle that is underway can only be modied if it still in the
beginning. Otherwise, the detergent may have already been
released and the dishwasher may have already drained the wash
water. If this is the case, the dishwasher needs to be reset and
the detergent dispenser must be relled. To reset the dishwasher,
follow the instructions below:
1. Press the Start / Pause button for more than 3 seconds and the
machine will pause.
2. Rotate the knob to select the desired programme.
3. Press the Start / Pause button; after 10 seconds, the dishwasher
will start.
If you Forget to Add a Dish
A forgotten dish can be added any time before the detergent
dispenser opens. If this is the case, follow the instructions below:
1. Press the Start / Pause button to pause the washing.
2. Wait 5 seconds and then open the door.
3. Add the forgotten dishes.
4. Close the door.
5. Press the Start / Pause button; after 10 seconds the dishwasher
will start.
After 5 sec
WARNING
It is dangerous to open the door mid-cycle, as hot steam
may scald you.
2.3. Troubleshooting
ERROR CODES
If there is a malfunction, the dishwasher will display error codes to
identify these:
Codes Meanings Possible Causes
Rapid indicator
ashes frequently
Longer inlet time. Faucets are not open, or the
water intake is restricted, or
the water pressure is too low.
90 min and
Rapid indicators
ash frequently
Not reaching
required
temperature.
Malfunction of the heating
element .
Glass indicator
ashes frequently
Overow. Some dishwasher element
is leaking.
WARNING
• If an overow occurs, turn off the main water supply before calling
the Customer Support Service.
• If there is water in the base pan due to an overll or small leak, the
water should be removed before restarting the dishwasher.

20 21
KDW5137 WH
KDW5137 SL
EN
dishwasher
3. TECHNICAL SPECIFICATIONS
Technical Data Sheet for this household dishwasher according to EU
Directive 2019/2017:
Product Data Sheet (EN60436)
Model identier: KDW 5137 WH / KDW 5137 IX
General product parameters:
Parameter Value Parameter Value
Rated capacity (a)
(ps)
9 Dimensions in cm Height 84.5
Width 44.8
Depth 61.0
EEI (a) 55.9 Energy efciency
class (a) (¹)
E
Cleaning performance
index (a)
1.13 Drying performance
index (a)
1.07
Energy consumption
in kWh [per cycle]
based on the eco
programme using cold
water ll. The actual
energy consumption
will depend on how
the appliance is used.
0.704 Water consumption
in litres [per cycle]
based on the eco
program. The actual
water consumption
will depend on how
the appliance is used
and on the water
hardness.
9.0
Programme duration (a)
(h:min)
3:55 Type Free standing
Airborne acoustical
noise emissions (a)
(dB(A) re 1 pW)
49 Airborne acoustical
noise emission class
(a)
C
Off-mode (W) 0.49 Standby mode (W) N/A
Delay start (W)
(if applicable)
1.00 Networked standby
(W) (if applicable)
N/A
(a) for the eco program.
NOTE 1: From A (highest efciency) to G (lowest efciency).
The device meets the European standards and the directives in the
current version at delivery.
- LVD 2014/35/EU
- EMC 2014/30/EU
- EUP 2019/2022
NOTE: The above values have been measured in accordance with
standards under specied operating conditions. Results may vary
greatly according to quantity and pollution of dishes, water hardness,
amount of detergent, etc.
This manual is based on the European Union's standards and rules.
4. POSTSALE SERVICE
KUNFT has designed this appliance in order to guarantee maximum
reliability. However, if a problem occurs do not attempt to open the
appliance - there is a risk of electrical shock. If you are not able to
solve the problem, please contact the Customer Support Service
of any Worten, Modelo or Continente store in order to be assisted.
Worten Equipamentos para o Lar provides a 2-year warranty for
manufacturing defects from the date of purchase of the appliance.
WARNING: any attempt to repair the appliance without contacting
the manufacturer or seller will void the warranty.
All users must be familiar with these instructions. Knowing what
could go wrong can help prevent problems from occurring.
5. ENVIRONMENTAL
PROTECTION
In order to protect the environment, we strive to reduce the volume of
packaging used, limiting it to three easily sorted materials: cardboard,
paper and plastic.
The appliance is manufactured using recyclable materials
after disassembled by a specialized company. Please
comply with local regulations concerning the recycling of
all materials.

22 23
KDW5137 WH
KDW5137 SL
ES
lavavajillas
Estimado cliente:
Gracias por adquirir este producto.
Este aparato ha sido sometido a diversas pruebas
que avalan su calidad. Este manual de instrucciones
está destinado a facilitar el uso del aparato y garantizar
un uso seguro.
Lea atentamente las instrucciones, así como las medidas
de seguridad descritas en este manual.
Esperamos sinceramente que esté satisfecho
con su nuevo aparato.
ÍNDICE
1. INSTRUÇÕES DE SEGURANÇA ........................ 45
1.1. Fonte de alimentação .................................. 46
1.2. Cabo de alimentação e outros cabos ........... 47
1.3. Humidade e água.......................................... 47
1.4. Limpeza ........................................................ 47
1.5. Precauções gerais ........................................ 48
2. INSTRUÇÕES DE FUNCIONAMENTO ............... 49
2.1. Descrição do produto.................................... 49
2.2. Utilização do produto .................................... 51
2.3. Resolução de problemas .............................. 61
3. ESPECIFICAÇÕES TÉCNICAS........................... 62
4. SERVIÇO PÓS-VENDA ....................................... 63
5. PROTEÇÃO AMBIENTAL..................................... 63

24 25
KDW5137 WH
KDW5137 SL
ES
lavavajillas
1.INSTRUCCIONESDE SEGURIDAD
ATENCIÓN
Peligro de electrocución
No Abrir
Atención: para evitar el riesgo de
electrocución, no abra esta unidad.
Su interior no contiene elementos que
puedan ser reparados por el usuario.
Acuda al Servicio de Atención al Cliente.
Avisos importantes
Antes de usar el aparato, lea atentamente
este manual de instrucciones y guárdelo en
un lugar seguro, pues puede tener que con-
sultarlo en el futuro.
Antes de encender el aparato, y a n de ga-
rantizar su utilización de forma correcta y
segura, no lo utilice si:
- Se ha caído al suelo;
- Nota alguna señal de daño;
- Se produce alguna anomalía durante
su funcionamiento.
Para evitar posibles peligros y el deterioro
del aparato debido a un uso incorrecto, se
recomienda que lea atentamente las ins-
trucciones.
Este aparato no deberá ser utilizado para
otros nes que no sean los previstos en el
manual y únicamente para uso doméstico.
Cualquier daño derivado del uso del aparato
fuera de este ámbito de aplicación, cualquier
uso incorrecto, así como cualquier modica-
ción manual del producto, no estará cubierto
y anulará automáticamente la garantía.
Asistencia
En caso de avería, acuda al Servicio de
Atención al Cliente.
Este aparato podrá ser utilizado
por niños de ocho años o más y
por personas con discapacidad fí-
sica, sensorial o mental, o perso-
nas con falta de experiencia o co-
nocimientos, siempre que cuen-
ten con supervisión o se les haya
proporcionado instrucciones para
usar este aparato de un modo se-
guro, y entiendan los riesgos que
conlleva. Los niños no deben ju-
gar con el aparato. La limpieza y
mantenimiento no deben ser rea-
lizados por niños sin supervisión.
Estas instrucciones también están disponi-
bles en www.suporteworten.pt
1.1. Alimentación
Compruebe que la tensión de la red eléctri-
ca es compatible con la indicada en el apa-

26 27
KDW5137 WH
KDW5137 SL
ES
lavavajillas
1.5. Advertencias de seguridad
• Siga las instrucciones de este manual,
que le ayudarán a instalar y poner correc-
tamente en funcionamiento este producto
y disfrutar de sus características avanza-
das. Guarde las instrucciones para refe-
rencia futura.
• Lea todas las instrucciones antes de usar
el aparato.
• Las operaciones de reparación o manteni-
miento deben ser realizadas únicamente
por profesionales autorizados.
• Cualquier daño provocado por modica-
ciones manuales al producto no estará
cubierto por la garantía.
• Si usa el producto para otros nes que no
sean para los que ha sido originalmente
diseñado, o si no está correctamente co-
nectado, el producto podrá sufrir daños y
la garantía quedará anulada.
• Si el problema persiste, póngase en con-
tacto con el Servicio de Atención al Cliente.
rato. En caso de que no sea compatible,
consulte al Servicio de Atención al Cliente.
1.2. Cable de alimentación y otros
cables
No enrolle el cable de alimentación ni tire de
él para desenchufar el aparato. Asimismo,
manténgalo alejado de supercies calien-
tes.
Nunca utilice este aparato si el cable o el
enchufe están dañados.
En su lugar, llévelo a un Servicio de Aten-
ción al Cliente para que proceda a su sus-
titución.
1.3. Humedad y agua
No utilice el aparato en lugares húmedos.
No deje que el aparato se moje en ningu-
na circunstancia, pues puede ser peligroso.
Para evitar el peligro de incendio o descarga
eléctrica, no exponga el aparato al agua o la
humedad. Asimismo, no sumerja el aparato
(por ejemplo, para limpiarlo).
1.4. Limpieza
Antes de proceder a la limpieza del aparato,
apáguelo y desconecte el cable de la cor-
riente. Deje siempre que el aparato se en-
fríe antes de efectuar cualquier operación
de limpieza.
Para limpiar el exterior del producto, utilice
únicamente un paño suave y seco.

28 29
KDW5137 WH
KDW5137 SL
ES
lavavajillas
2. MANUAL DE INSTRUCCIONES
2.1. Descripción del producto
Altura (Alt.) 845 mm
Anchura (Anch.) 448 mm
Profundidad (P1) 610 mm (con la puerta cerrada)
Profundidad (P2) 1175 mm (con la puerta abierta a 90°)
Panel de control
3h 6h 9h 12h
3h 6h 9h 12h
90’
ECO
1 2 3 4
5 6
Funcionamiento (Botón)
1 Alimentación Presione este botón para encender
su lavavajillas; el indicador se iluminará.
2 Inicio
programado Presione este botón para ajustar el tiempo
de inicio programado.
3 Programa Gire el mando para seleccionar el programa
de lavado adecuado, y el indicador
correspondiente se iluminará.
ECO
Este es el programa estándar. Es adecuado
para limpiar la vajilla normalmente sucia
y es el programa más eciente en términos
de su consumo combinado de energía y agua
para ese tipo de vajillas.
Universal
Para cargas habitualmente sucias, como ollas,
platos, vasos y cacerolas ligeramente sucias.
Intensive (intensivo)
Para vajilla sucia pesada y ollas, sartenes,
platos, etc., en los que normalmente hay comida
pegada.
90 min
Para cargas normalmente sucias que necesitan
un lavado rápido.
Rapid [Rápido]
Un lavado más corto para cargas con poca
suciedad que no necesitan secado.
Glass [Cristal]
Para vajillas ligeramente sucias y cristal.
4 Inicio / Pausa Pulse este botón para iniciar el programa
de lavado seleccionado o pausar el programa
en funcionamiento.
Pantalla
5 Tiempo
de retardo Esta función muestra el tiempo de inicio
programado (3 h / 6 h / 9 h / 12 h)
Abrillantador
6 Indicador de
advertencia Si el indicador « » está encendido, signica
que hay poco abrillantador en el lavavajillas
y necesita que lo rellenen.
Sal
Si el indicador « » está encendido, signica
que queda poca sal en el lavavajillas y necesita
que la rellenen.

30 31
KDW5137 WH
KDW5137 SL
ES
lavavajillas
2.2. Utilización del producto
Lea el contenido correspondiente en el manual de instrucciones para
conocer un método de funcionamiento detallado.
1. Instale el lavavajillas
Inside Inside
2. Elimine los residuos más
grandes en los cubiertos
3. Cargar las cestas
4. Añada el detergente 5. Seleccione un programa y
ponga en marcha el lavavajillas
Descalcificador de agua
El descalcicador de agua debe ajustarse manualmente, usando el
dial de dureza del agua.
El descalcicador está diseñado para eliminar los minerales y las
sales del agua, que tendrían un efecto perjudicial o adverso en el
funcionamiento del aparato.
Cuantos más minerales haya, más dura será el agua.
El descalcicador debe ajustarse de acuerdo con la dureza del agua
en su área. Póngase en contacto con la autoridad local del agua
para que le asesoren sobre la dureza del agua en su zona.
Ajuste del consumo de sal
Este lavavajillas está diseñado para permitir ajustar la cantidad de
sal consumida en función de la dureza del agua utilizada. Esto tiene
por objeto optimizar y personalizar el nivel de consumo de sal.
Siga los pasos a continuación para ajustar el consumo de sal.
1. Encienda el aparato.
2. Presione el botón «Start / Pause» [Inicio / Pausa] durante más de 5
segundos para iniciar el modo de conguración del descalcicador
de agua en los 60 segundos posteriores al encendido del aparato.
3. Gire el mando de «Programme» [Programa] para seleccionar
el ajuste adecuado de acuerdo con su ambiente local. La
conguración cambiará en la siguiente secuencia: H1->H2->H3-
>H4->H5->H6.
4. Pulse el botón de encendido / apagado para nalizar el modo de
conguración.
DUREZA DEL AGUA
Nivel de
descalcicador
de agua
Consumo de
sal (gramos /
ciclo)
Alemán
º dH
Francés
º fH
Británico
º Clarke
Mmol / l
0 - 5 0 - 9 0 - 6 0 - 0,94 H1-> Luz indicadora
de “Rapid” [Rápido]
0
6 - 11 10 - 20 7 - 14 1,0 - 2,0 H2-> Luz indicadora
de 90 min
9
12 - 17 21 - 30 15 - 21 2,1 - 3,0 H3-> Luz indicadora
de “90 min Rapid”
[Rápido 90 min]
12
18 - 22 31 - 40 22 - 28 3,1 - 4,0 H4-> Luz indicadora
de “Glass” [Cristal]
20
23 - 34 41 - 60 29 - 42 4,1 - 6,0 H5-> Luz indicadora
de “Glass Rapid”
[Rápido Cristal]
30
35 - 55 61 - 98 43 - 69 6,1 - 9,8 H6-> Luz indicadora
de “Glass 90 min”
[Cristal 90 min]
60
1° dH = 1,25° Clarke=1,78° fH = 0,178 mmol/l. El ajuste de fábrica
es: H3.
Póngase en contacto con las autoridades locales de agua para
obtener información sobre la dureza del agua suministrada.
Consulte la sección 3 «Carga de la sal en el descalcicador» de la
PARTE I: Versión genérica, si su lavavajillas no tiene sal.
NOTA:
Si su modelo no tiene descalcicador, puede omitir esta sección.
Descalcificador de agua
La dureza del agua varía de un lugar a otro. Si se usa agua dura en
el lavavajillas, se formarán depósitos en los platos y utensilios. El

32 33
KDW5137 WH
KDW5137 SL
ES
lavavajillas
aparato está equipado con un descalcicador especial que utiliza un
depósito de sal preparado especialmente para eliminar la cal y los
minerales del agua.
Preparación y carga de los platos
• Contemple la posibilidad de adquirir utensilios etiquetados como
aptos para lavavajillas.
• Para determinados elementos, seleccione un programa con la
temperatura más baja posible.
• Para evitar daños, no retire los vasos y cubiertos del lavavajillas
inmediatamente después de nalizar el programa.
Los siguientes cubiertos / platos no son aptos
para lavarse en el lavavajillas:
• Artículos de plástico no resistentes al calor
• Cubertería con mangos de madera, porcelana o nácar
• Cubertería antigua con piezas adheridas no resistentes a la
temperatura
• Objetos de cubertería o vajilla unidos
• Artículos de estaño o cobre
• Vasos de cristal
• Objetos de acero sujetos a oxidación
• Tablas de madera
• Objetos hechos de bras sintéticas
Los siguientes son de idoneidad limitada:
• Algunos tipos de cristal pueden volverse opacos después de un
gran número de lavados
• Las piezas de plata y aluminio tienen tendencia a la decoloración
durante el lavado
• Los patrones de esmalte pueden desvanecerse si la máquina lava
los artículos con frecuencia
Recomendaciones para cargar el lavavajillas
Raspe las grandes cantidades de restos de comida que hayan
quedado. Ablande los restos de alimentos quemados en sartenes.
No es necesario enjuagar los platos con agua corriente.
Para obtener el mejor rendimiento de su lavavajillas, siga estas
pautas de carga
(las características y el aspecto de las cestas y cestas de
cubiertos pueden variar con respecto a su modelo).
Coloque los objetos en el lavavajillas de la siguiente manera:
• Artículos tales como tazas, vasos, ollas / sartenes, etc., deben
colocarse boca abajo.
• Los elementos curvos o con rebordes, deben cargarse de manera
inclinada para que el agua pueda escurrirse.
• Asegúrese de que todos los utensilios estén apilados de forma
segura y no se puedan volcar.
• Asegúrese de que todos los utensilios estén colocados de manera
que permitan que los brazos rociadores giren libremente durante
el lavado.
• Cargue los artículos huecos, como tazas, vasos, sartenes, etc.,
con la abertura hacia abajo para que el agua no se acumule en el
recipiente o en una base profunda.
• Los platos y cubiertos no deben estar uno dentro del otro, ni
cubrirse entre sí.
• Para evitar cualquier daño, los vasos no deben tocarse entre sí.
• La cesta superior está diseñada para sostener vajilla delicada y
más ligera, tales como vasos y tazas de café y té.
• ¡Los cuchillos de hoja almacenados en posición vertical son un
peligro potencial!
• Coloque los cubiertos largos o alados, como cuchillos para tallar,
de manera horizontal y en la cesta superior.
• No sobrecargue el lavavajillas. Esto es importante para obtener
buenos resultados y un consumo de energía razonable.
NOTA:
Los artículos muy pequeños no se deben lavar en el lavavajillas ya
que podrían caerse fácilmente de la cesta.
Extracción de los platos
Para evitar que el agua gotee de la cesta superior a la cesta inferior,
recomendamos que vacíe primero la cesta inferior y luego la superior.
ATENCIÓN
¡Los artículos estarán calientes! Para evitar daños, no
retire los vasos y cubiertos del lavavajillas hasta unos 15
minutos después de nalizar el programa.
Carga de la cesta superior
La cesta superior está diseñada para contener
vajilla más delicada y ligera, como vasos,
tazas de café y té y platillos, así como platos
pequeños, tazones pequeños y sartenes poco
profundas (siempre que no estén demasiado
sucias).
Coloque los platos y los utensilios de cocina de manera que no se
muevan al rociarse el agua.

34 35
KDW5137 WH
KDW5137 SL
ES
lavavajillas
Carga de la cesta inferior
Le recomendamos que coloque los artículos
grandes y los más difíciles de limpiar en la
cesta inferior, como ollas, sartenes, tapas,
platos y tazones, como se muestra en la gura
siguiente.
Es preferible colocar las fuentes y las tapas en el lateral de las cestas
para evitar que bloqueen la rotación del brazo rociador.
El diámetro máximo aconsejado para los platos delante del dispen-
sador de detergente es de 19 cm. Así, los platos no obstaculizarán la
apertura del dispensador.
Carga de la cesta de cubiertos
Los cubiertos deben colocarse en la rejilla para cubiertos por
separado en las posiciones adecuadas. Además, asegúrese de que
los utensilios no se queden juntos, ya que podría causar un mal
funcionamiento.
ATENCIÓN
No deje que ningún artículo se extienda por la parte
inferior.
¡Cargue siempre los utensilios alados con la punta
alada hacia abajo!
Para obtener el mejor efecto de lavado, cargue las cestas de
acuerdo con las opciones de carga estándar en la última sección de
la PARTE I: Versión genérica.
Abrillantador y detergente
El abrillantador se libera durante el enjuague nal para evitar que el
agua forme gotas en sus platos, lo que puede dejar manchas y rayas.
También mejora el secado al permitir que el agua se escurra de los
platos. Este lavavajillas está concebido para utilizar abrillantadores
líquidos.
ATENCIÓN
Utilice únicamente un abrillantador de marca para lavavajillas.
Nunca llene el dosicador de abrillantador con otras sustancias (por
ejemplo, detergente para lavavajillas o detergente líquido), dado que
podría dañar el aparato.
Cuando rellenar el dispensador de abrillantador
A menos que la luz de advertencia de abrillantador ( ) situada en el
panel de control esté encendida, siempre puede estimar la cantidad
a partir del color del indicador de nivel óptico situado junto a la
tapa. Cuando el recipiente de abrillantador esté lleno, el indicador
se apagará. A medida que disminuye el abrillantador, el indicador
luminoso se iluminará progresivamente. Recomendamos que el
abrillantador nunca llegue a menos de 1/4 de su capacidad.
A medida que disminuye el abrillantador, el tamaño de la luz
del indicador de nivel de abrillantador cambia, como se ilustra a
continuación.
Lleno ¾ lleno ½ lleno ½ lleno Vacío
Detergente
Los ingredientes químicos que componen el detergente son
necesarios para eliminar la suciedad, triturarla y dispensarla del
lavavajillas. Por lo tanto, la mayoría de los detergentes comerciales
resultan adecuados para este n.
ATENCIÓN
• Uso adecuado del detergente
Utilice únicamente detergente especícamente diseñado para
lavavajillas y consérvelo en un lugar fresco y seco.
No añada detergente en polvo en el dispensador hasta que vaya a
lavar los platos.
¡El detergente para lavavajillas es corrosivo!
Manténgalo fuera del alcance de los niños.
Llenado del depósito de abrillantador
1. Quite la tapa del depósito
de abrillantador girándola
en sentido contrario a las
agujas del reloj
2. Vierta cuidadosamente
el abrillantador en su
dispensador, evitando
que se desborde.
NOTA:
Limpie cualquier resto de abrillantador derramado con un paño
absorbente para evitar la formación excesiva de espuma durante el
siguiente lavado.

36 37
KDW5137 WH
KDW5137 SL
ES
lavavajillas
3. Cierre la tapa del depósito de abrillantador girándola en el sentido
de las agujas del reloj.
Ajuste del depósito de abrillantador
Gire el dial del indicador de abrillantador a un número
entre 1 y 6. Cuanto mayor sea el número, más
abrillantador utilizará el lavavajillas. Si los platos no
se secan correctamente o tienen manchas, ajuste el
dial al siguiente número más alto hasta que queden
sin manchas. Redúzcalo si observa rayas de color
blanquecino en los platos o una película azulada en
la cristalería o las hojas de los cuchillos.
Llenado del dosicador de detergente
1. Presione el pestillo de
liberación del dispensador
de detergente para abrir
la tapa.
2. Agregue detergente en el
compartimento más grande (A)
para el ciclo de lavado principal.
Para cargas de lavado más
sucias, agregue también un poco
detergente en el compartimiento
más pequeño (B) para el ciclo
de prelavado.
3. Cierre la tapa y presiónela hasta
que encaje en su lugar.
NOTA:
• Tenga en cuenta que, dependiendo del nivel de suciedad del agua,
los ajustes pueden ser diferentes.
• Siga las recomendaciones del fabricante que se indican en el
envase de detergente.
PROGRAMACIÓN DEL LAVAVAJILLAS
Tabla de ciclo de lavado para EN60436
La siguiente tabla muestra qué programas son los mejores para
los niveles de residuos de alimentos en ellos y cuánto detergente
necesita. También muestra información diversa sobre los programas.
() Signica: necesidad de rellenar el dispensador de abrillantador
con abrillantador.
Programa Descripción
del ciclo Detergente
de prelavado
/ lavado
principal
Tiempo de
ejecución
(mín.)
Energía
(kWh) Agua (L) Abrillan-
tador
Intensive
[Intensivo]
Prewash
[Prelavado] (50º C)
Wash
[Lavado] (65º C)
Enjuague
Enjuague
Rinse
[Enjuague] (65º C)
Secado
4/13 g
(1 o 2 piezas)
205 1378 15,3
Universal
Pre-wash
[Prelavado] (45º C)
Wash
[Lavado] (55º C)
Enjuague
Rinse
[Enjuague] (65º C)
Secado
4/13 g
(1 o 2 piezas)
175 1278 13,1
(* EN
60436)
Wash
[Lavado] (45 ºC)
Enjuague
Rinse
[Enjuague] (55 ºC)
Secado
17 g
(1 o 2 piezas)
235 0,704 9,0

38 39
KDW5137 WH
KDW5137 SL
ES
lavavajillas
Programa Descripción
del ciclo Detergente
de prelavado
/ lavado
principal
Tiempo de
ejecución
(mín.)
Energía
(kWh) Agua (L) Abrillan-
tador
Glass
[Cristal]
Prelavado
Wash
[Lavado] (50 ºC)
Enjuague
Rinse
[Enjuague] (65 ºC)
Secado
4/13 g
(1 pieza)
120 0,934 13,1
90 min
Wash
[Lavado] (60 ºC)
Enjuague
Rinse
[Enjuague] (65 ºC)
Secado
17 g
(1 pieza)
90 1234 10,2
Rapid
[Rápido]
Wash
[Lavado] (50 ºC)
Enjuague
Rinse
[Enjuague] (45 ºC)
12 g 30 0,611 10,0
NOTA:
ECO (EN 60436): este programa es el ciclo de prueba. La información
para la prueba de comparabilidad corresponde a la norma EN60436.
Inicio de un ciclo de lavado
1. Saque las cestas inferiores y superiores, cargue los platos y
luego vuelva a colocarlas. Se recomienda cargar primero la cesta
inferior y luego la superior.
2. Llene de detergente.
3. Conecte el enchufe en la toma. Consulte la última página «Ficha
de datos del producto» para obtener información sobre la fuente
de alimentación.
4. Asegúrese de que el suministro de agua esté abierto a presión
total.
5. Cierre la puerta y pulse el botón «POWER» [ENCENDIDO] para
encender la máquina.
6. Elija un programa, y la luz de respuesta se encenderá. Luego
presione el botón «Start / Pause» [Inicio / Pausa] y el lavavajillas
comenzará su ciclo.
Cambio de programa a mitad de ciclo
Un ciclo que está en marcha solo se puede modicar si aún está en
su inicio. De lo contrario, es posible que el detergente ya se haya
dispersado y el lavavajillas ya haya vaciado el agua de lavado. Si
este es el caso, es necesario reiniciar el lavavajillas y rellenar el
dispensador de detergente. Para reiniciar el lavavajillas, siga las
instrucciones a continuación:
1. Presione el botón «Start / Pause» [Inicio / Pausa] durante más de
3 segundos y la máquina se detendrá.
2. Gire el mando para seleccionar el programa deseado.
3. Pulse el botón «Start / Pause» [Inicio / Pausa]; después de 10 se-
gundos se pondrá en marcha el lavavajillas.
Si olvida añadir un plato
Si ha olvidado añadir un plato, puede hacerlo en cualquier momento
antes de que se abra el dispensador de detergente. Si este es el
caso, siga las instrucciones a continuación:
1. Pulse el botón «Start / Pause» [Inicio / Pausa] para pausar el lavado.
2. Espere 5 segundos y luego abra la puerta.
3. Añada los platos que hayan quedado olvidados.
4. Cierre la puerta.
5. Pulse el botón «Start / Pause» [Inicio / Pausa]; después de 10 se-
gundos el lavavajillas se pondrá en marcha.
Después de 5 segundos
CALENTAMIENTO
Es peligroso abrir la puerta a mitad de ciclo, ya que el
vapor caliente puede quemar.
This manual suits for next models
1
Table of contents
Languages:
Other Kunft Dishwasher manuals